Let’s talk about knocking out a few walls and framing a few new ones, shall we?
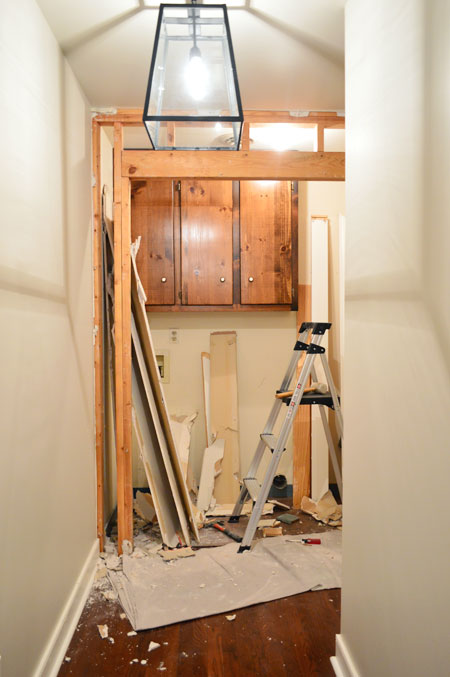
For two weeks we had virtually no progress in our laundry area, except for rethinking our approach and considering contractor bids. So by comparison, things happened so swiftly over the last few days that it nearly put our heads on spin cycle. What started out looking like this…
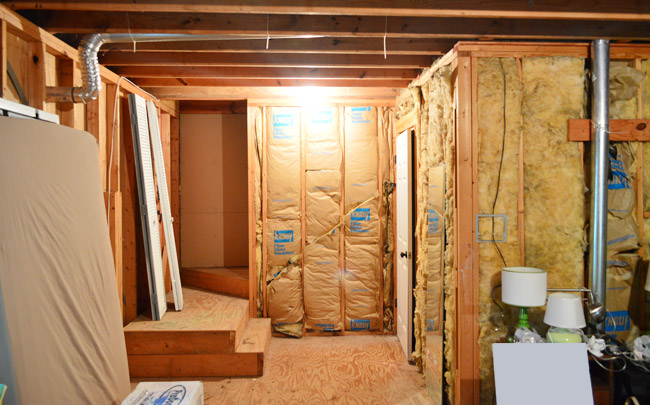
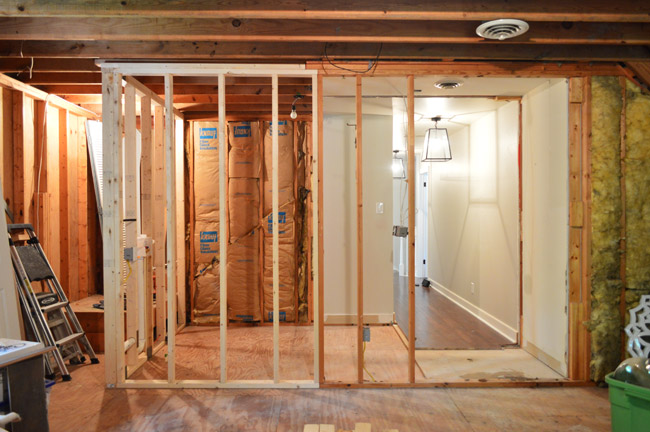
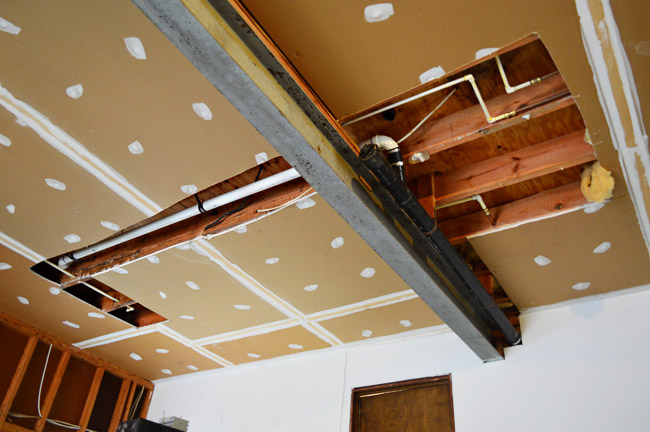
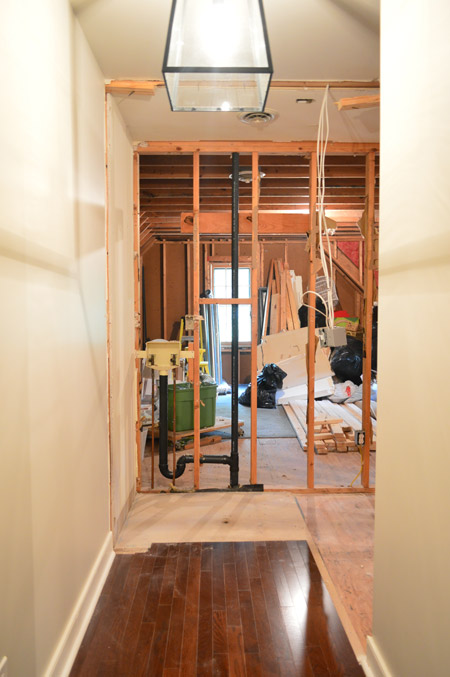
…is now looking a bit more like this. Yowza.
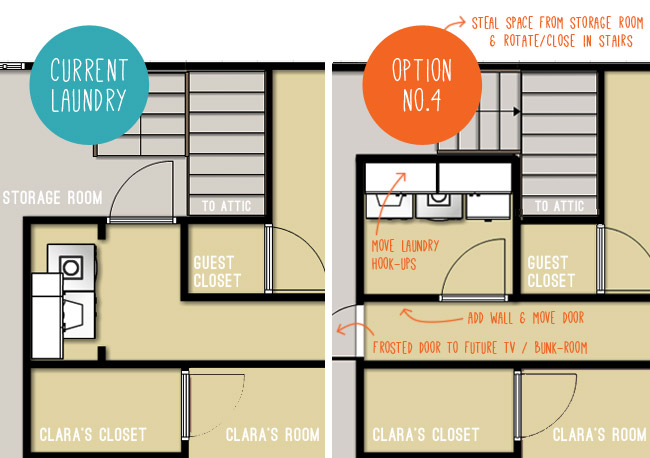
Let’s rewind to early last week, when it clicked that maybe we could do more ourselves and sub-contract certain jobs out instead of relying entirely on one contractor and his team. As you may recall from this post, Option 4 is our goal:
We put together a to-do list for all of the tasks ahead of us and decided to take this approach: do what we’re capable of and when we get to a line item that’s outside our comfort zone, call in a pro. Here’s what that list looked like (I added an asterisk to the items we’ve hired out or are considering hiring out):
- Move washer & dryer and remove cabinetry
- Demo cased opening, side wall, back wall, part of the floor and the attic step
- Frame new walls & doorways*
- Move laundry plumbing hook-ups & drains*
- Move laundry electrical (plus other lights, switches, and outlets)*
- Move dryer vent
- Hang drywall
- Add insulation
- Mud, tape, and sand all the drywall seams in the new room*
- Rehang laundry door
- Add new frosted door to attic
- Prime & paint laundry room and hallway walls
- Tile & grout new laundry floor
- Add baseboard and door casings
- Add upper cabinetry and shelving
- Tile & grout laundry room backsplash
- Reinstall washer & dryer
- Add lower cabinet
- Add ceiling light fixture
- Hang art, ironing board, and bring in other laundry room items
- Finishing touches and repairs (drywall in garage, step in attic, etc)
You already saw that we moved the appliances, so let’s talk demo – which started on Tuesday, with a careful prying off of all of the baseboards and trim so that we can hopefully reuse some of it.
Next came drywall demo, which only involved the cased opening at this point (we were trying to leave the walls to the storage room intact as long as possible to keep the A/C in). As for the actual demo-tools I used, I knocked things out with a rubber mallet and pried things off with a crowbar.
As for clean-up, I have been sweeping small stuff into garbage bags and collecting a pile of the big stuff in the attic. At some point I’ll get either a small dumpster or another Bagster (I very much look forward to hurling things out the storage room window into the trash bin below – although we can reuse some items, like some studs and trim).
Next on the demo list was removing the old cased opening framing.
This probably required the most brute force of anything – lots of hammering at 2x4s and prying nails apart. Slowly but surely things came down.
Once that was all out of the way, we removed the upper cabinet so the space was officially empty.
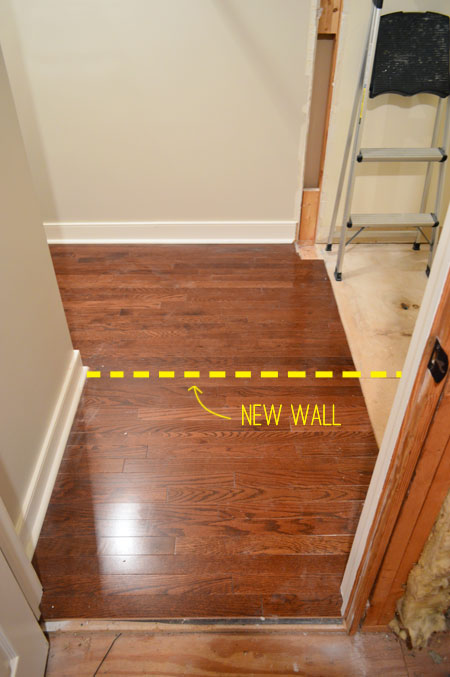
Demo was not just limited to walls, though. I also had to remove some of the hardwood flooring since the framing for our new laundry room wall needed to be attached directly to the subfloor. It was a little weird to be tearing out floors that we had laid just last year, but whatchagonnado?
Since we used Elastilon to lay our floors (basically a big adhesive sheet) it wasn’t the same process as prying out nailed planks. I managed to pry off the first few pieces with a flat-head-screwdriver-turned-chisel (that Elastilon is ridiculously sticky) and then it started to lift up in sheets.
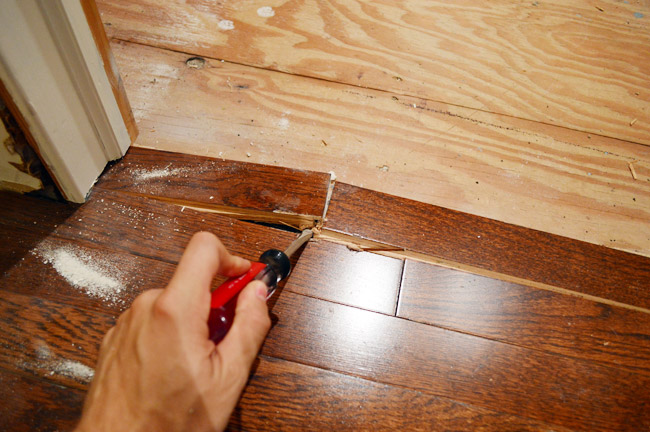
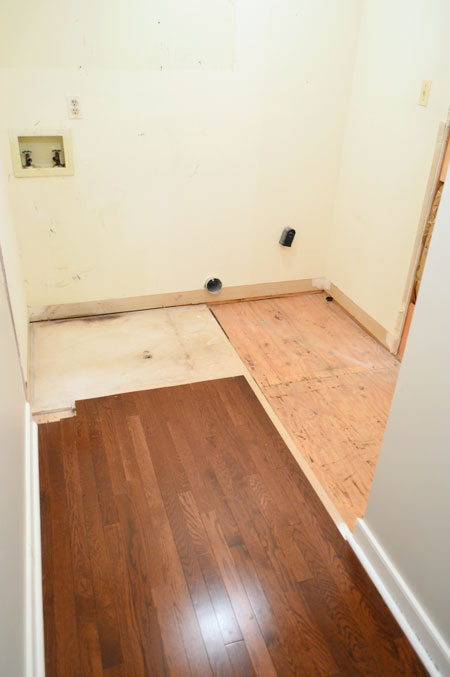
At that point I was able to separate it enough to get my knife in and slice through the Elastilon layer underneath, and eventually I could remove the exact section I needed. I also removed the particle board subfloor so that the plywood was ready for framing. Looks awesome, no?
The process of removing the floor confirmed one change to our plan that we had been contemplating for a few days: bumping the frosted door to the storage room (aka: future bunk/TV room) forward a bit. So rather than it sitting in the existing back wall, it will be framed to go right where the hardwood floors end. Not only does this save us from having to extend the hardwoods (we’re thinking we’ll do carpet in the TV room) but it also shortens the already-quite-long hallway a smidge. Thirdly, it will create a small vestibule at the entryway of the TV room for the door to swing into (rather than into the middle of the room), which may make furniture placement in the room easier down-the-line.
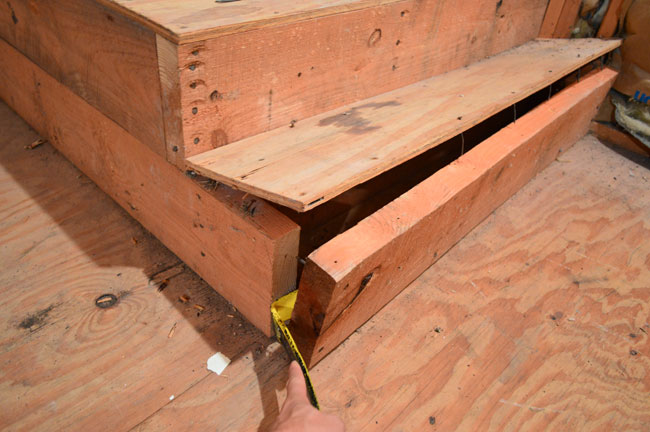
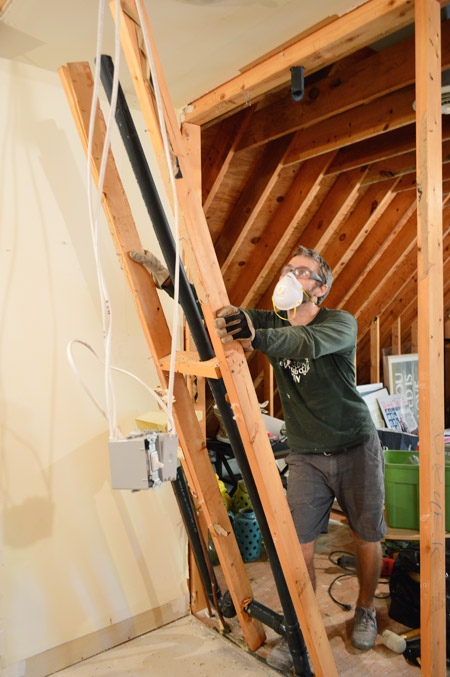
My last demo step before framing began was prying (and cutting) out the single attic step that was in the way. I’ll rebuild it on the other side of the platform later.
That was as much demo as our framing guy recommended doing before he arrived (we used David of Chicas Construction, who helped us raise our sunroom ceiling last year). Obviously there are still more walls that need to come down, but we all agreed it would be best to leave them up for as long as we could (again, to keep the hot storage room from overworking our AC). The last half of the framing couldn’t be completed until the plumbing and electrical was moved anyway (which couldn’t be moved until the first part of the framing had been completed) so we always knew framing would be tackled in two parts. So it just made sense to do demo in two parts to go along with that.
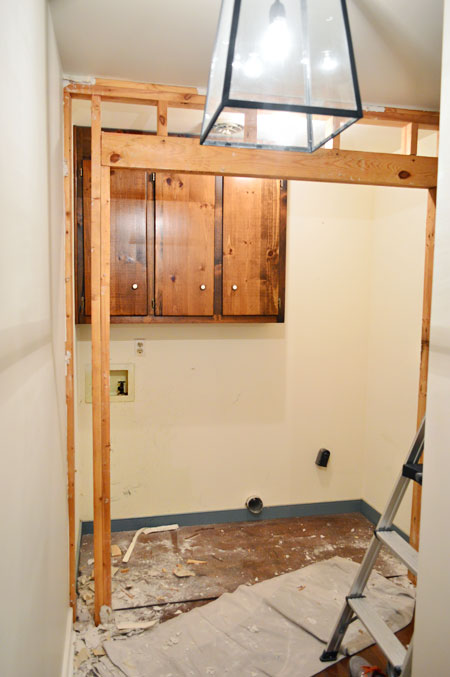
On Wednesday morning it looked like this…
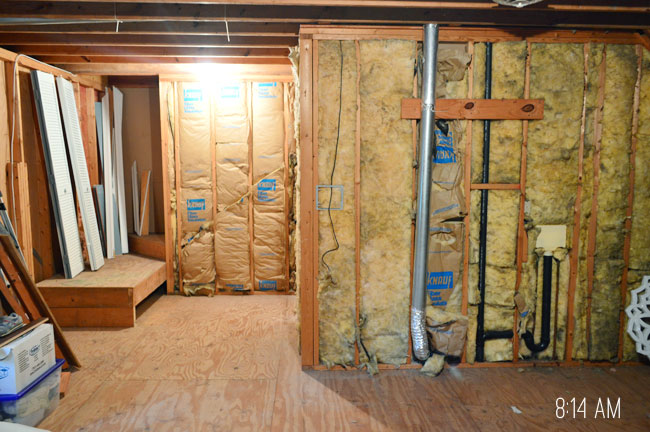
…and less than three hours later we had two new walls thanks to David.
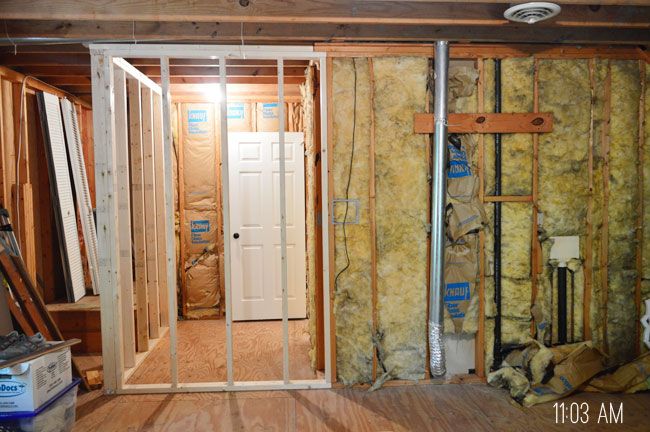
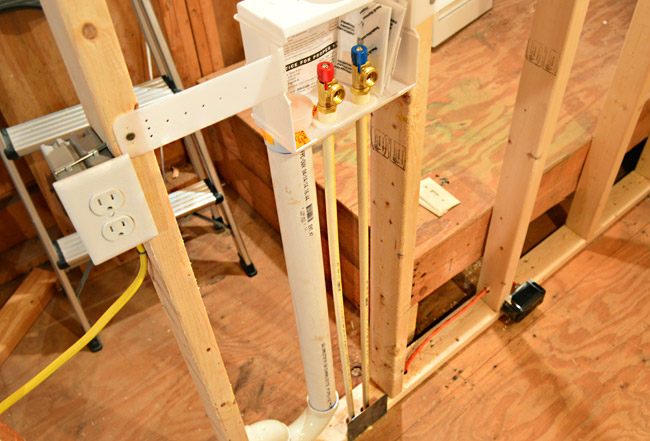
After observing him work his magic, I’m pretty sure it’s a task I could’ve managed, but it definitely would’ve taken me MUCH longer. And since he was so speedy, we were able to have the plumbers (Scott & Mike’s Plumbing Services) out just hours later to disconnect the old hook-ups and add new ones.
It only took them about 3 hours to make the change, especially since all of this sits above our garage – giving them easy access to everything without making a big mess inside the house. Of course, they still had to cut out a big section of our garage ceiling, so we do have that repair on our to-do list. But we have been talking about drywalling the whole garage (two big side walls are unfinished anyway) so we might try to get it all done at once.
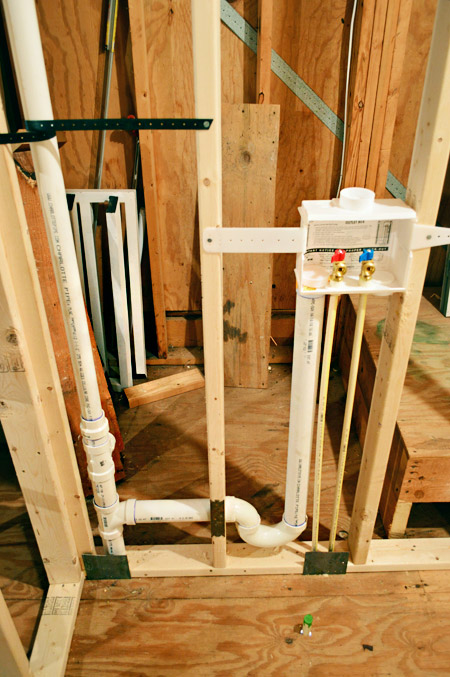
Having that area cut open actually made life easier for the electricians (S J Ryan Electric), who arrived the next morning. They were able to move the laundry outlets in a flash, but there was still lots to be done in terms of moving light fixtures, switches, and outlets.
For instance, putting a ceiling light in the laundry room (with a switch at the future laundry doorway) and moving some of the storage room lighting & switches. Sherry and I brainstormed where we wanted everything to be moved ahead of time (time is money when people work by the hour) and were able to come up with a nice solid plan for relocating everything so it makes sense. For example, now we have a light above the attic stairs, an outlet in the future laundry room to plug in our iron, and a fixture box in the laundry room that will be centered in the room after we add upper cabinets (if we hadn’t been thinking we would have just centered it in the room but after the upper cabinets were hung it would have felt off-center since it would be closer to them than the other walls).
That was all done by Thursday afternoon, so we called our framer to come back out to finish framing on Friday buuuuuuut… he had food poisoning. He’s like the nicest guy ever so he was saying he would come out on Saturday or Sunday if he was feeling better, but we told him not to worry. We wanted him to focus on feeling better and, well, we had other messes to make over the weekend. The good news is he’s here this morning (feeling much better) to finish everything up so we can hopefully start hanging drywall soon!
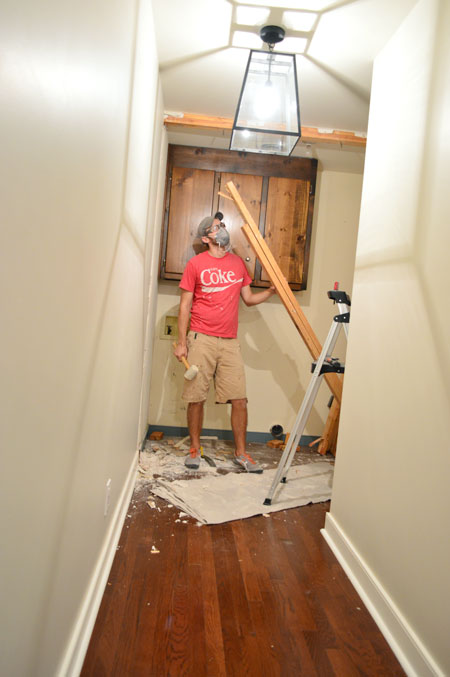
With the plumbing and electrical stuff relocated, it was time to proceed with the second phase of demo, so I had some fun with that over the weekend.
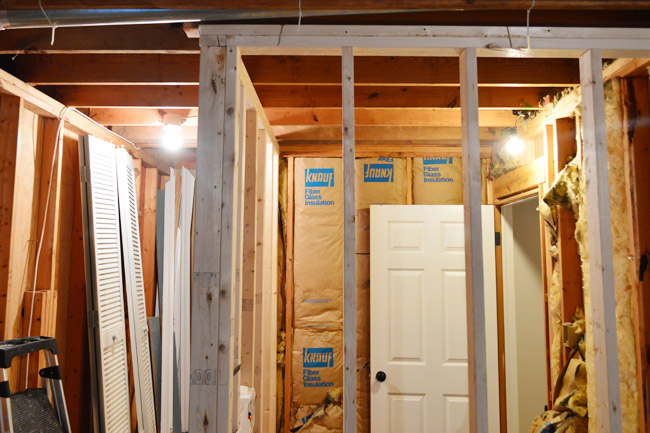
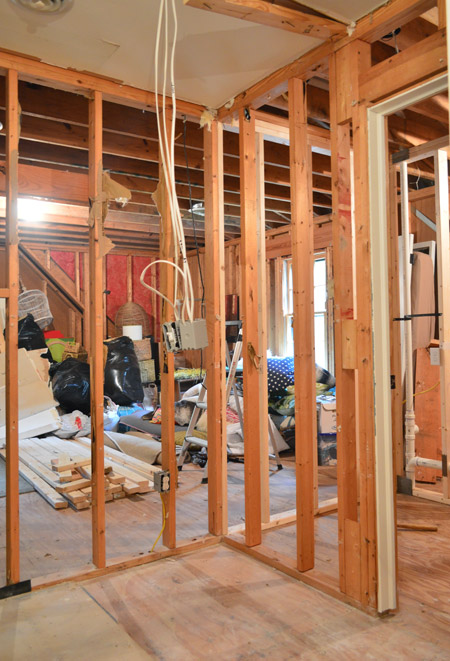
First I bashed down some drywall, which fortunately came down in pretty big sheets for the most part (hence my growing pile of trash/reuse items that you can see near the window). Speaking of the window, here’s our first peek at the daylight we’ll be getting into the hallway now.
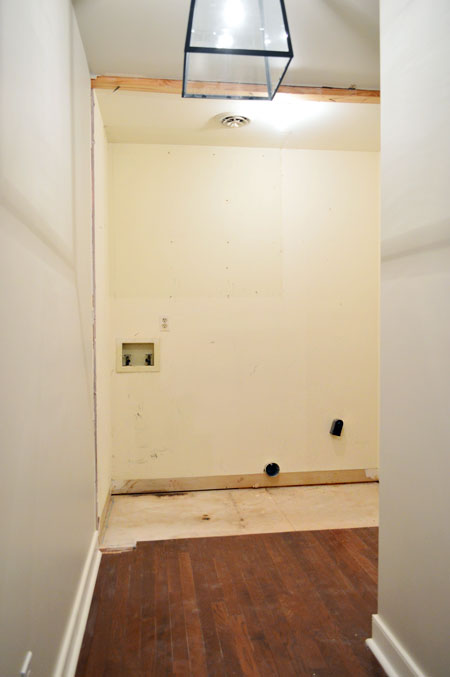
I could also take down a bit more of the framing too – namely the old wall with the storage room door in it, which would give us our first real feel for what the new laundry room will be like. Don’t mind the dangling outlet boxes. The electricians added them in a way that makes them easy to be set right into the freshly framed wall that David is working on right now for us.
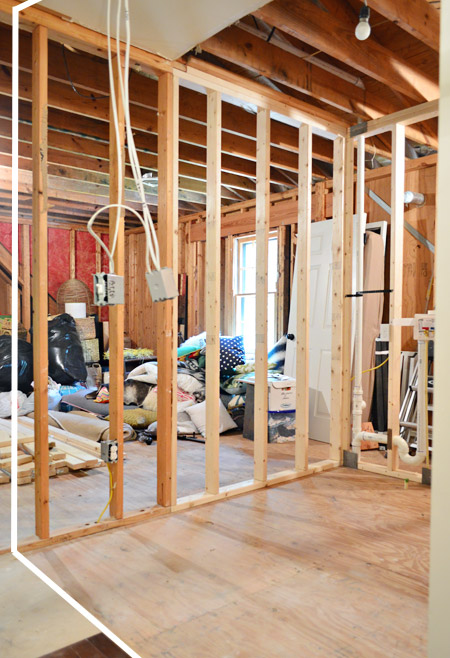
Here’s the same area with the framing down (and white lines added to remind you where the last wall will be framed in). It’s feeling ever-so-slightly like a room.
I could also take out part of the other wall, since the area with the old washer hook-ups will now just open into the storage room. The plumbing was all disconnected already, but the plumbers left the old pipes in the wall for me to remove during demo. All it took was some cutting with my reciprocating saw and it all came down…
And that, my friends, is how we got to the picture that you saw at the beginning of the post.
The next step construction-wise is going on right now, which is getting those remaining two walls framed – both the one to close off the laundry room, and the one for the frosted door into the storage room. I whipped up a little GIF to help show what I mean (David does it almost this fast):
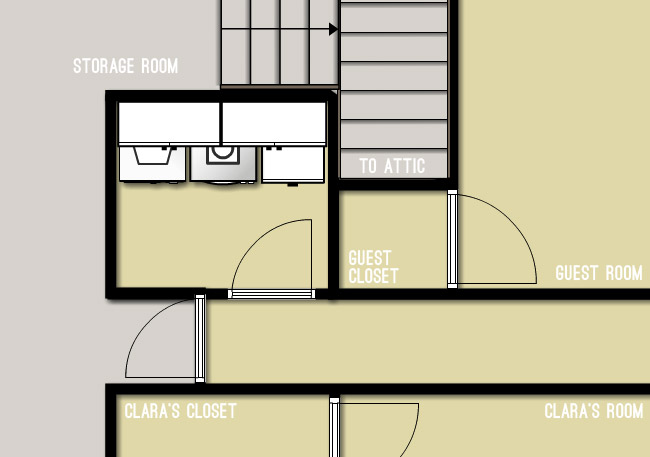
I realize that’s still not crystal clear, so I’ll make one last attempt by showing you an updated version of the floor plan. I can’t tell you how satisfying it was to change the “Current Laundry” label to “Former Laundry.”

Once framing is complete, we’d love to hop right into drywalling (which we’re going to give a go ourselves – although our mudding skills could use some practice) but we need to cross of some other little items first, like rerouting the dryer vent.
Move washer & dryer and remove cabinetryDemo cased opening, side wall, back wall, part of the floor and the attic stepFrame new walls & doorways*Move laundry plumbing hook-ups & drains*Move laundry electrical (plus other lights, switches, and outlets)*- Move dryer vent
- Hang drywall
- Add insulation
- Mud, tape, and sand all the drywall seams in the new room*
- Rehang laundry door
- Add new frosted door to attic
- Prime & paint laundry room and hallway walls
- Tile & grout new laundry floor
- Add baseboard and door casings
- Bring washer & dryer back in and hook them up (and party like it’s 1999)
- Add upper cabinetry and shelving
- Tile & grout laundry room backsplash
- Reinstall washer & dryer
- Add lower cabinet
- Add ceiling light fixture
- Hang art, ironing board, and bring in other laundry room items
- Finishing touches and repairs (drywall in garage, step in attic, etc)
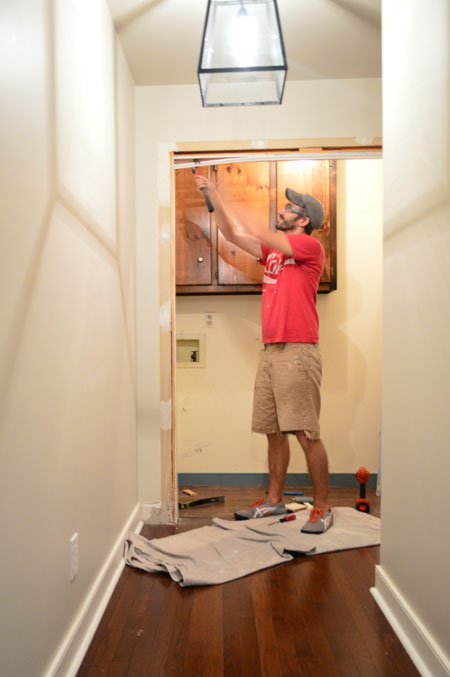
I’ll leave you with the last shot I took before taping up a few big drop cloths to keep the hot attic air at bay. It’s some glorious, glorious natural light that’s finally shining on that end of the hallway.

Oh, and we owe you a cost update too. Maybe in our next post once we have the final bill from the framer? So far his estimate, plus the totals for the plumbing and the electrical help are looking great compared to the line items in our two contractor estimates.
What did you guys do this weekend? Did anyone else wield a rubber mallet and tell some drywall who’s boss?

Alix says
Umm…John, are you sure you don’t have any regrets using up that title for this post? What the heck are you going to do when you guys install an escalator??
YoungHouseLove says
Bahahahahaha! How about “Well that escalated quickly. Literally.”
xo
s
Rachel G. says
Maybe someone already asked this, but will the new laundry room have HVAC run into it?
I’m so excited you all are doing this. That laundry room is going to be huge! Mine right now is so narrow (it makes Katie Bowers look like the Taj Mahal, ha!) and I get giddy just thinking about yours. Good for you all. I can’t wait to see how it comes together.
YoungHouseLove says
Thanks Rachel! We are planning to reroute the HVAC vent you see in the vestibule area to be in the laundry room so it stays heated/cooled (there are other hallway ones, so that reconfiguration should hopefully be pretty straightforward).
xo
s
Angela says
This is awesome! It’s going super fast (for me, haha.) You’re going to have this all together in no time and be itching to make progress on the bunk room.
Grace says
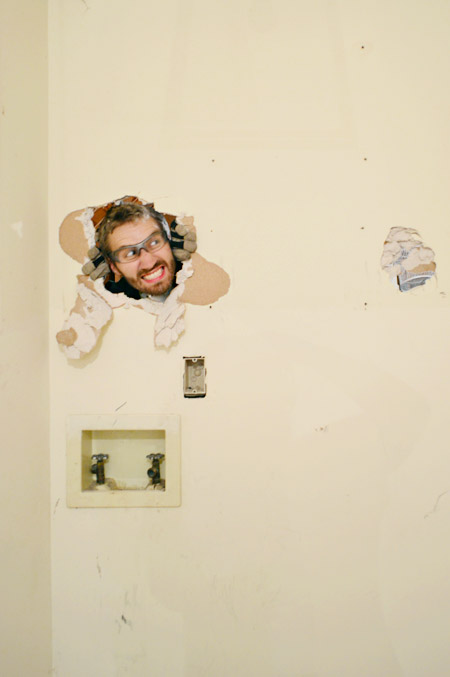
That picture of John is awesome. (I love Emily’s idea for the book cover. I’m sure it would make the Bestseller list again:)
Jess says
Love this project! You have made such smart decision and the upgraded space is going to be fantastic. Once you have that frosted door in, it’s going to be hard to resist starting on that bunk room! :) Can’t wait to see the finished product.
YoungHouseLove says
I know! I keep telling John that the bunk-room is trying to jump the line! Haha!
xo
s
Meredith says
YAY!! I’m SO HAPPY you guys decided to go all-in on changing the layout and creating this laundry room :-) It’s really such a better use of the space. In the comments of your first post, I shared a little mock up in Imgur so I feel like I helped a little bit in the planning stages! Hehe ;-) I’m glad you guys figured out you could do a vestibule-like area from the hallway into the bunk room so the frosted door wouldn’t swing into the room as far, so smart!! I do have one question, have you guys thought about reducing the length of the 2nd step/platform into the attic? Then you could have a vestibule-like area at the bottom of the attic stairs, and that landing/stair wouldn’t encroach so much on the door you’re planning to put there. I’m sure you don’t want things to add to your to-do list, but it could probably be done later :-) Just a thought! Can’t wait to see how it all comes together :-)
YoungHouseLove says
Really smart! The way we have to reroute the dryer vent seems to need that under-step area to avoid having too many turns (more turns = less efficient and more prone to fires and build-up) so I think we’ll need to keep that step but still will hopefully have a little landing area in front of the steps as well I hope (we want that door to the attic to line up with the back of the laundry room).
xo
s
Tristan says
Love your blog! I’m redoing my laundry area too and since you guys are I was wondering if you had any suggestions as to where to find an over washer/dryer cupboard?! Much appreciated!
YoungHouseLove says
I would check out places like Home Depot and Lowe’s (they sell stock cabinetry) as well as Ikea or other places with cabinets (Kraft Made, etc). They seem to vary across a ton of price points, so depending what you’re looking for, hopefully you can find it. Oh and the Habitat ReStore often has cabinets that are in pretty good shape for sale (secondhand, so the price is awesome!).
xo
s
Pamela says
Noticed a lot of comments about putting a sink in the laundry room, and your reply about the tight space. When you get around to redoing the garage, that’s where you should put a utility sink for cleaning those paintbrushes. You can also use it for soaking all those muddy little boy clothes in Oxyclean, before they even make it into the house. Here, I speak from experience.
YoungHouseLove says
LOVE that idea!
xo
s
Nat says
Fantastic guys!! I just love all that building. And yes we did some framing and drywalling on the weekend. Like you we had a spot in the house that severely lacked light. Our kitchen. So we added a skylight. We are also going to get the professionals to do the mudding up (we call it stopping up) of our plaster.
See here if you want: http://landhousereno.blogspot.com.au/2014/07/let-there-be-light.html
YoungHouseLove says
Amazing!! So cool. And I love that you guys call it “stopping up”!
xo
s
Gale says
One of the comments above was concerning a wall mounted ironing board. My daughter had an ironing board that folded up into a small “closet” in the wall. Took up absolutely no floor space and was super handy to use and hide away. My ironing piles up because I hate to take the board down, set it up, plug in the iron and then put it all away. She also had a little metal wire rack mounted on the wall that the iron fit into when she was done.
YoungHouseLove says
Smart!
xo
s
Karin says
We started ripping out drywall in the upstairs master bedroom yesterday, and John, we look like twins! I would take a pic, but I think it would be used against me! I look like I’m about to meet aliens on the front lawn with a Tyvek suit coverall (with a hood!), full on organic mask and goggles. Scaaaaary!
My son is psyched for what it’s going to look like when he get’s back from camp – not so much my husband. LOL! He is doing all of the electrical work. Hopefully we will have new insulation, electric and new drywall up on the ceiling before he returns. :D
YoungHouseLove says
Sounds like fun! Good luck Karin!
xo
s
Heather says
I think the bunk room is trying to bump up the ole listy mclisterson! The older kids get the more on the go you are. I have a friend who planned on finishing her basement for when her kids are teens. Now that they are teens there is no time and it is so costly to hire completely out:( It’s so much easier to do projects like that when your kids are little and you try to stay home and close to home for little ones naps and such.
YoungHouseLove says
Oh yes, we feel it pushing to cut the line too! Would love to have it done in the not-so-distant future!
xo
s
Sandy says
I’m looking into my crystal ball and seeing a larger window installed in the attic area somewhere down the line! The addiction to sunlight somehow makes putting bigger holes in the house ok :-)
YoungHouseLove says
Agreed!
xo
s
Kim Allison says
Looking great! I’m wondering how you manage to do renovations while still managing to get your kidlets to have day sleeps? I have a nine month old and we often find it challenging to get things done while also trying to work around nap times.
YoungHouseLove says
We usually try to do work downstairs while they nap when we can (ex: cutting something in the garage, holding off on hammering while they sleep and sizing photos and writing posts instead, doing book stuff, etc). Thankfully there are a lot of morning hours to bang around, so we have been trying to seize those when we can!
xo
s
Anna, Sydney says
Sensational update to the laundry!
Paula says
Agree, that is definitely a “Here’s Johnny” moment! Great pic for your 2014 family book ;) I see lots of cool, fun design ahead when the playroom moves to the top of the list. In fact, you two could write the book on kids rooms and spaces … your 3rd book!
Dawn says
So excited for you guys! This will be amazing and when it is done, you will wondered how you ever got along without an actual laundry room. (Think multiple swimsuits, towels, soccer or baseball/softball gear along with the ever present sheets, blankets and pillowcases.) You will smile whenever you do laundry! My laundry room was the first room I ever “finished” at my house and I have never regretted it.
And the light at the end of the tunnel, I mean hallway is so cheerful and hopeful even.
~As for my weekend, it was spent dog-sitting. My goal was to prevent demo, not complete it. :-)
YoungHouseLove says
Haha, so cute!
xo
s
Jessica Holmes says
Ohmigosh!! This is going to be fab!!
I have to say this (might sound bragish) but I tried to leave a comment on the original laundry post about if you had considered this exact scenario!! But my comment wouldn’t work! I however, had no idea about the window which is an absolute bonus!
This is my favourite project in the new house :) Can’t wait to see those marble tiles in all their glory- but loving the laundry journey too!
Sarah @ Sarah's Daybook says
Woohoo!
Emily says
This is absolutely incredible!!! You will never ever regret spending the money to do this project! Having a dedicated laundry ROOM with a door you can close is so awesome especially as your kids get bigger & so do all their clothes. I also love how much brighter your hallway is. The whole plan is perfect. Love it :-)
Kelly says
Wow! That did escalate quickly! Loving the progress. Can not wait to see it all finished. No doubt it’ll be fabulous. Keep trucking!! :-)
Heidi says
Ahhh! There is something weirdly fun and exciting about demo and finally getting started on projects isn’t there? Seeing the beginnings of something great when a wall is knocked down is amazing. I love your idea of putting a glass door on the TV room to get some natural light in the hallway… Not sure I would ever have thought of that one.
Oh, and throwing stuff out the window into a dumpster? That sounds like way to much fun!
Susan (Between Naps on the Porch) says
Looking great, Sherry and John! Seeing how logical this is, it makes you wonder why they didn’t design it this way originally, doesn’t it? You’re going to love this space when it’s finished! :)
Sally G says
So. Much. Progress! Laundry rooms are probably the fastest renos of all time due to their criticality (is that a word?) ! I feel like you’ll look back on this move as one of your best decisions of all time. The jewel at the end of the hall was going to be good, but this is gonna be awesome!!!
Irene says
Looking good!
I do not understand how you guys are able to do “loud” projects like this one with two kiddos in the house. The only time we’re able to get any substantial projects done is when my toddler is sleeping – but then we can’t do anything loud! What were Clara and Teddy doing while you were knocking down walls and making a big ruckus??
YoungHouseLove says
One of us is usually watching both kids (ex: I have them both downstairs in the living room while John demos) or they’re asleep for the night (naps can be interrupted by bangs, but maybe because we have DIY kids, their night sleep is really solid – we have hung frames right outside Clara’s room at night without her waking up!).
xo
s
angie says
You guys! I was shocked to see that mudding, taping, and sanding the drywall was something you were seriously considering hiring out. My husband and i hung drywall and did those steps last year when we finished my daughters bedroom and it was not hard at all. We are NOT EVEN CLOSE to being the DIY-ers you two are. It was our first attempt at doing it and i just googled the steps. And it turned out great! Dont pay for that! You can do it in your sleep! PS: i love the new layout:)
YoungHouseLove says
Thanks so much for the vote of confidence Angie! It’s such an art form we’d hate to end up with sub-par results, so we might try a seam or two and see how it works out (we did it for our first bathroom gut job and John was never happy with the result- but we’ve come a long way from then, so maybe it’ll be great! Will keep you posted!
xo
s
Bethany says
Didn’t you do the drywall in your second house’s dining room too? The little half wall for the peninsula? That was just a little wall though so I have no idea if it’s different… and I might be remembering wrong. It does seem like an art form and I’d be afraid to screw it up too!
YoungHouseLove says
Yes, that was pretty small (not a large sheet) so we’re more intimidated by those big seams.
xo
s
Megan says
Just a thought to ask for an estimate on hanging the drywall too. My brother in law spent weeks dry walling his huge basement with the plan to hire out the taping and mudding. When the guys came to mud, they mentioned that it would of been $200 for them to hang the drywall and done much faster. Since it was such a big project, it would of been worth it for him. Your space is much smaller and I think you have experience with the hanging so it might be fun for you . The new layout is already looking great!
YoungHouseLove says
Thanks Megan!
xo
s
Lindsey says
I can’t wait to see the finished product!! (Oh, and btw, when I clicked over to your page, my popup blocker went nuts blocking 6 different things. Just so you know!)
YoungHouseLove says
GRRRR. Thanks Lindsey.
xo
s
G says
Hey there! Have you considered putting a window in the laundry room in order to get some natural light in there too?
YoungHouseLove says
Something to think about!
xo
s
Haley says
Have you considered installing a pocket door to the laundry room? It would give you another small wall in the laundry for hooks, shelves, etc.
YoungHouseLove says
Those came up a ton in reader suggestions so we heavily considered both of them, but we settled on a regular door for the laundry and a frosted one for the storage room. The drawing isn’t to scale, but there’s a ton of room for it to swing open without interfering (we’ll share a picture of the door propped up against that wall for scale for you guys in our next post).
xo
s
Kristine says
I remember some readers suggested you just shift the W/D down the wall to possibly keep the labor costs down. Did you consider that option? What made you decide to go ahead and turn the W/D 90 degrees anyway? Just curious, and thanks!
YoungHouseLove says
Ended up being the same estimate from both the electrician and the plumber either way – apparently moving the pipes and rerouting them, whether over or over and across, didn’t make much of a time difference (just a longer wire/pipe which they both said was negligible).
xo
s
kimi says
WOW!!! Amazing so far! I cant wait to see it all come together! Great job!
Angela says
I cannot believe how great this project is! I am SO envious of the convenience of your laundry being on the same floor as your bedrooms… so handy! In my ever so creeptastic way, I was daydreaming about your renovations yesterday, and was wondering if you guys have considered a pocket door for the laundry room? I always run into our swinging doors in the tight spaces in our home, and would love to have more sliding door action for our smaller rooms. It might make ironing (hopefully you don’t have to do it too much!) less cramped. Anyways… just a thought. Thanks so much for always sharing such amazing and smart updates!
YoungHouseLove says
Those came up a ton in reader suggestions so we heavily considered both of them, but we settled on a regular door for the laundry and a frosted one for the storage room. The drawing isn’t to scale, but there’s a ton of room for it to swing open without interfering (we’ll share a picture of the door propped up against that wall for scale for you guys in our next post).
xo
s
Sassafras says
WOW WOW WOW – i lurv it!!!!! That light!!! Wooooohoooo!!!!
Spoiler Question – I see what looks like an air conditioning vent in what looks to be the new-to-be TV/bunk room…is there one going to be moved to the laundy? already there? not on the list???
YoungHouseLove says
Yes, we have to reroute that- forgot to add that to the list, but it’s on the agenda for today (before drywalling can begin).
xo
s
kali says
You guys are living the life! So fun! A question–do you need to take out the old insulation and reinsulate the new walls? Id hate to see frozen pipes. Insulatikn is tricky stuff.
YoungHouseLove says
Yes, definitely have to re-insulate!
xo
s
JoDi says
Wow guys! This is a great project! I’m so glad you decided to go all out and make this area REALLY functional and tackle parts of it yourself. John, you are totally right, framing is a piece of cake. You should definitely try tackling it on your next project! You’ll never pay for a framer again once you see how easy it is. Much easier than drywall finishing IME!
SO excited to see how this turns out. We are currently remodeling our whole house so various parts of it look like a demo zone at all times. We’ve completed a guest room and my craft room/office so far. Next up is combining our bedroom with another bedroom, expanding our bathroom, and creating a new walk-in closet. It’s going to take a while since we really only have time on the weekends, but we’re really looking forward to getting it all done! I think I’m most excited about the closet after visiting Ikea recently and drooling over all their amazing closet organizing systems!
Christina L says
How does Clara do with all the construction. I’m sure she’s way used to constant changes by now, and she seems like a very careful child. This post just got me thinking how you keep the little one out of harms way (or getting out of bed at night to explore)since all the action is right by her room! I am really enjoying this update. Way to go all in on this one :)
YoungHouseLove says
She’s pretty good with that stuff! In this case I was watching her and Teddy downstairs while John demoed for the most part (popped up to take pics when I knew they were ok downstairs) and then we taped it all off with dropcloths to conserve the heat, so it has been nicely sectioned off – but she’s usually pretty good with the “that’s the messy part of the house, let’s stay away from it” thing.
xo
s
Rosie S says
Wow, what a great start! This will be wonderful and the light at the end of the hallway is such a bonus. Good decisions here, all around! Cannot wait to see the finished product.
Melanie says
I may be in the very small minority…but I agree with going for the standard door. Growing up our house had a pocket door for the laundry room, and we never shut it. Also,for some reason, I don’t know if it was just an illusion or what, my mom always felt that it didn’t absorb the sound very well. So I like the standard door idea :) Will it swing in or out?
YoungHouseLove says
Thanks for the tips Melanie! It will swing in (all the hall doors swing into the rooms that way).
xo
s
Felicia says
Would you consider putting a high long skinny horizontal window/frosted glass on the laundry wall near the attic room to let some of the natural light into the laundry so it won’t feel like a small closed in room?
YoungHouseLove says
That could be really fun!
xo
s
Vicky says
As someone who commented on your original post and questioned the functionality of your original plan, I wanted to comment here and say thanks for taking a risk and going for a bolder, more involved upgrade/transformation. I think you will be happy with your laundry room, bonus room (when finished), and those of us who truly can’t afford to even replace our rusted out, crappity crap dishwasher can look forward to living vicariously through your blog.
Thank you. Can’t wait to see how everything unfolds!
YoungHouseLove says
Thanks Vicky!
xo
s
Niki @VillageCapeCod says
Don’t forget a place to store clothing prior to washing! Like a big bin. I wish I would have thought of that. Right now all of the clothes end up on my laundry room floor!
YoungHouseLove says
Thanks Niki!
xo
s
Haley says
Maybe y’all mentioned this–but did you pull a permit for this? We’re about to do something similar and keep getting different advice!
YoungHouseLove says
Oh yes, permits are necessary for this type of work! Thankfully when you use subs you can negotiate who pulls them, so we had our licensed and insured electricians, framers, and plumbers pull the permits they needed. Some sub-contractors are more likely to make you do all the permit work (which really isn’t too bad, we did them ourselves when John built the deck).
xo
s
aurelie says
guys – This is amazing! I am loving watching your house evolve and am totally in awe of how much you are able to get done with 2 litte ones around. In your replies about getting things done while they sleep, it made me wonder how little T is doing on the night sleeping front. We are still in the throws of serious sleep-deprivation here with our 10 month old (I know, terrible. Darn that whole constant teething process! How does that make any sense evolutionariy?!), but hoping you guys are faring better :-)
YoungHouseLove says
Aw thanks Aurelie! Some nights he is amazing (8pm to 8am!!!) and other nights I’m up every few hours with him (last night). He had a little cough that seemed to be waking him up so I’m hoping once that passes we might get more consistency. I do love to snuggle the little guy, though…
xo
s
Maren says
What are the approx. dimensions of your new laundry room? We are looking at stealing space from the office adjoining our Master for laundry and converting our existing main floor laundry into a mudroom/entry instead.
P.S. I’ve been a reader since before Clara was born but think this is my first official comment/question! I look forward to each and every post!
YoungHouseLove says
Aw thanks Maren! The finished space is going to be around 8′ deep x 7′ wide. Hope it helps!
xo
s
Meredith says
I keep thinking that the frosted door to the bunk room should be a wood or black door instead of white! Something like the double doors below, but only one door obviously.
http://2.bp.blogspot.com/-JusVASxL4ac/Uz4NKCbKtLI/AAAAAAAAg34/zxUkTEAR4FE/s1600/IMG_4229+copy.jpg
YoungHouseLove says
Ooh that’s fun!
xo
s
Suzanne Melton says
Tip on the drywall behind the new washer location:
When Dave re-rocked our laundry room, he cut out a piece of drywall a little wider than the width of the hot/cold water pipes and from under the laundry box to the floor.
That piece of sheetrock can be textured and painted but not taped and spackled. The washer sits in front of the piece so it doesn’t show.
If we ever have a water issue, he won’t have to cut into his nice textured wall. He’ll just move the washer, remove the small piece of sheetrock, and figure out how to fix the problem.
YoungHouseLove says
Smart!
xo
s
tami says
I didn’t read all the comments so maybe this was mentioned… when you get furniture for the tv room, measure carefully! The narrow doorway with no immediate wiggle room may be tricky. Everything will have to be carried in in a straight line, with no ability to tilt and lean… if that makes sense…
YoungHouseLove says
Thanks Tami!
xo
s
Sassafras says
Not that you’re asking, but I vote if you hire out drywalling??? That you go ahead and bump that bunkroom to the head of the Listy McListerson. Might as well while someone is there. Well, as least I know I would! ;D Looking fabo!!!
YoungHouseLove says
Oh how we wish we could get that bunkroom done in a flash! We got one drywalling estimate for our little laundry room and it was $1500 so that SKEEERED us for an estimate for such a large space (the bunkroom is 500 square feet while the laundry is just 56!). The good news is that we’ve just started drywalling the laundry room ourselves, and while it’s not easy, we’re slowly but surely getting there (she says crossing all appendages).
xo
s
Marilyn says
Just wondering how you go about deciding what to work on first. I guess I would rather have spent the money on creating my master bath than working on a laundry room.
No disrespect intended.
YoungHouseLove says
Our master bathroom reno will involve removing a wall and absorbing some sink nook space, so we’re still debating whether we want a tub and a shower, a shower/tub combo, or just a standing shower. So because we’re still undecided about what we even want to do in there, it’s not at the top of the list yet. Meanwhile we found tile we loved for the laundry room, were able to consider a ton of approaches, researched some stuff, and got a bunch of estimates, so we felt much more sure about pulling the trigger.
xo
s