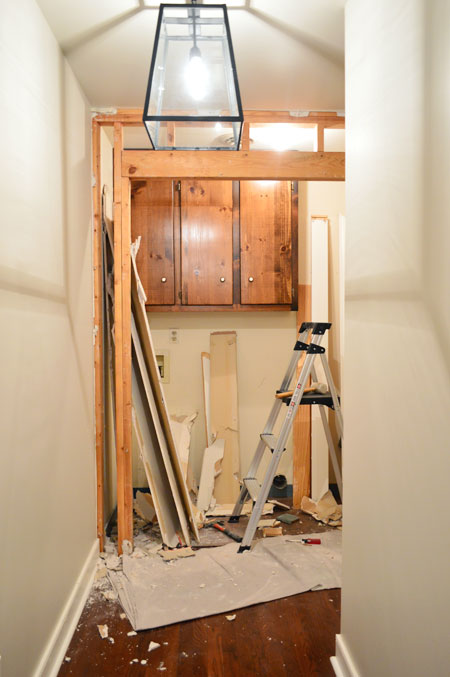
Let’s talk about knocking out a few walls and framing a few new ones, shall we?
For two weeks we had virtually no progress in our laundry area, except for rethinking our approach and considering contractor bids. So by comparison, things happened so swiftly over the last few days that it nearly put our heads on spin cycle. What started out looking like this…
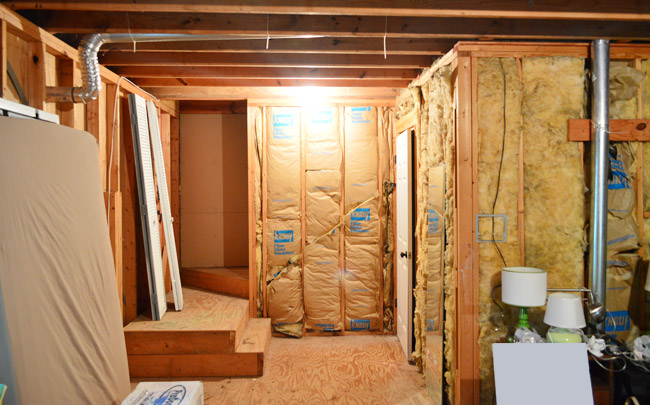
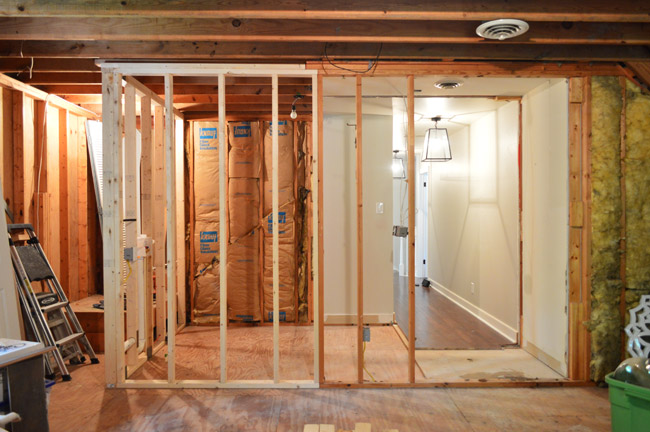
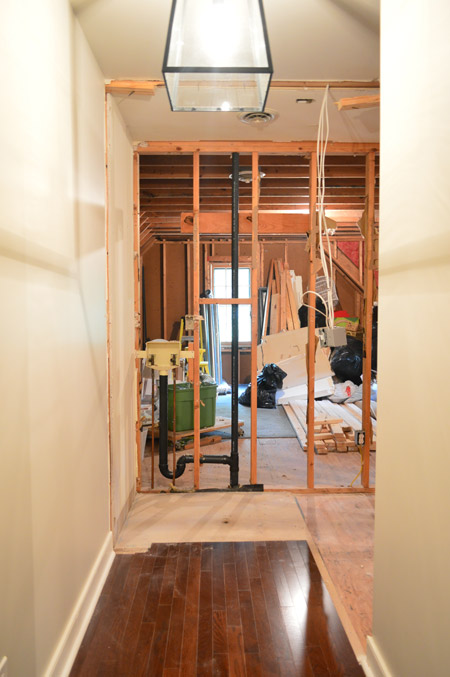
…is now looking a bit more like this. Yowza.
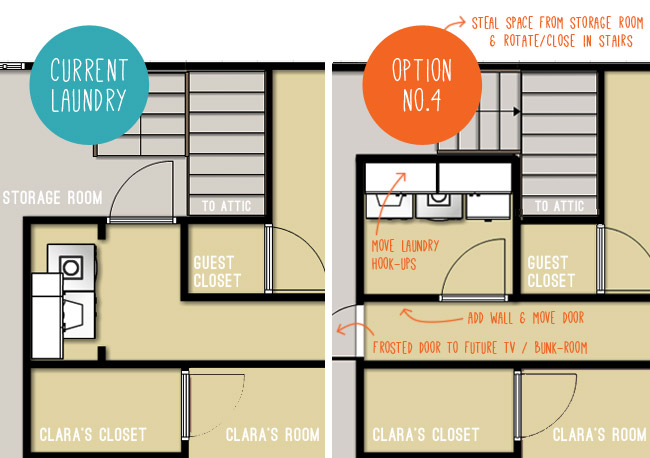
Let’s rewind to early last week, when it clicked that maybe we could do more ourselves and sub-contract certain jobs out instead of relying entirely on one contractor and his team. As you may recall from this post, Option 4 is our goal:
We put together a to-do list for all of the tasks ahead of us and decided to take this approach: do what we’re capable of and when we get to a line item that’s outside our comfort zone, call in a pro. Here’s what that list looked like (I added an asterisk to the items we’ve hired out or are considering hiring out):
- Move washer & dryer and remove cabinetry
- Demo cased opening, side wall, back wall, part of the floor and the attic step
- Frame new walls & doorways*
- Move laundry plumbing hook-ups & drains*
- Move laundry electrical (plus other lights, switches, and outlets)*
- Move dryer vent
- Hang drywall
- Add insulation
- Mud, tape, and sand all the drywall seams in the new room*
- Rehang laundry door
- Add new frosted door to attic
- Prime & paint laundry room and hallway walls
- Tile & grout new laundry floor
- Add baseboard and door casings
- Add upper cabinetry and shelving
- Tile & grout laundry room backsplash
- Reinstall washer & dryer
- Add lower cabinet
- Add ceiling light fixture
- Hang art, ironing board, and bring in other laundry room items
- Finishing touches and repairs (drywall in garage, step in attic, etc)
You already saw that we moved the appliances, so let’s talk demo – which started on Tuesday, with a careful prying off of all of the baseboards and trim so that we can hopefully reuse some of it.
Next came drywall demo, which only involved the cased opening at this point (we were trying to leave the walls to the storage room intact as long as possible to keep the A/C in). As for the actual demo-tools I used, I knocked things out with a rubber mallet and pried things off with a crowbar.
As for clean-up, I have been sweeping small stuff into garbage bags and collecting a pile of the big stuff in the attic. At some point I’ll get either a small dumpster or another Bagster (I very much look forward to hurling things out the storage room window into the trash bin below – although we can reuse some items, like some studs and trim).
Next on the demo list was removing the old cased opening framing.
This probably required the most brute force of anything – lots of hammering at 2x4s and prying nails apart. Slowly but surely things came down.
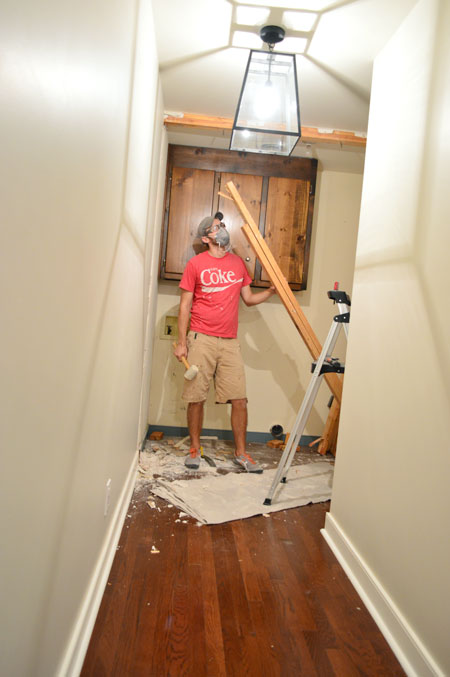
Once that was all out of the way, we removed the upper cabinet so the space was officially empty.
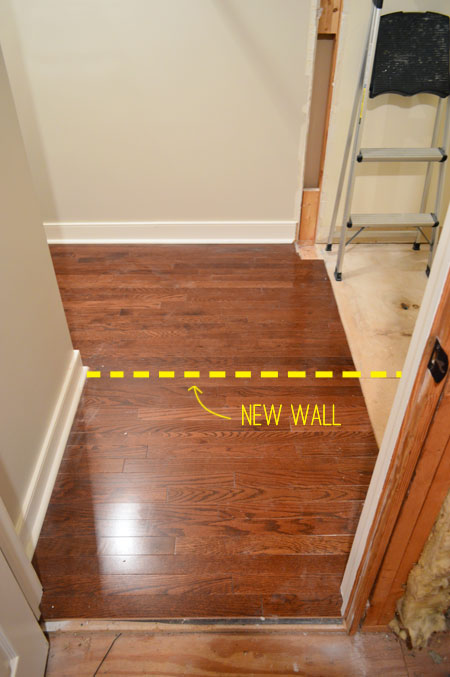
Demo was not just limited to walls, though. I also had to remove some of the hardwood flooring since the framing for our new laundry room wall needed to be attached directly to the subfloor. It was a little weird to be tearing out floors that we had laid just last year, but whatchagonnado?
Since we used Elastilon to lay our floors (basically a big adhesive sheet) it wasn’t the same process as prying out nailed planks. I managed to pry off the first few pieces with a flat-head-screwdriver-turned-chisel (that Elastilon is ridiculously sticky) and then it started to lift up in sheets.
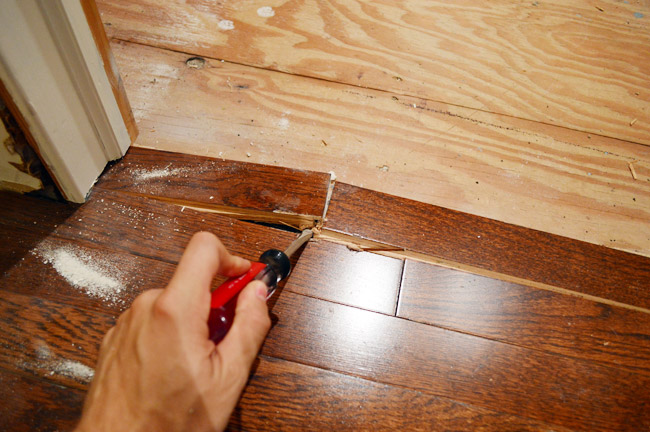
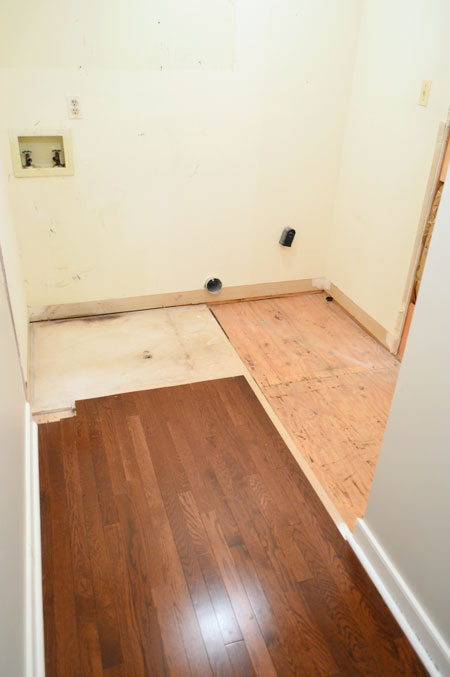
At that point I was able to separate it enough to get my knife in and slice through the Elastilon layer underneath, and eventually I could remove the exact section I needed. I also removed the particle board subfloor so that the plywood was ready for framing. Looks awesome, no?
The process of removing the floor confirmed one change to our plan that we had been contemplating for a few days: bumping the frosted door to the storage room (aka: future bunk/TV room) forward a bit. So rather than it sitting in the existing back wall, it will be framed to go right where the hardwood floors end. Not only does this save us from having to extend the hardwoods (we’re thinking we’ll do carpet in the TV room) but it also shortens the already-quite-long hallway a smidge. Thirdly, it will create a small vestibule at the entryway of the TV room for the door to swing into (rather than into the middle of the room), which may make furniture placement in the room easier down-the-line.
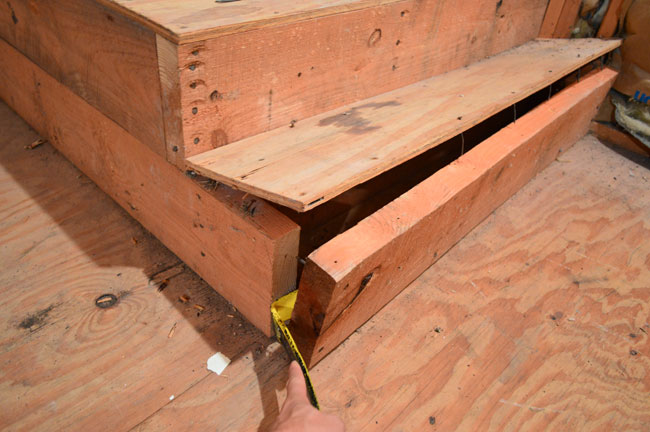
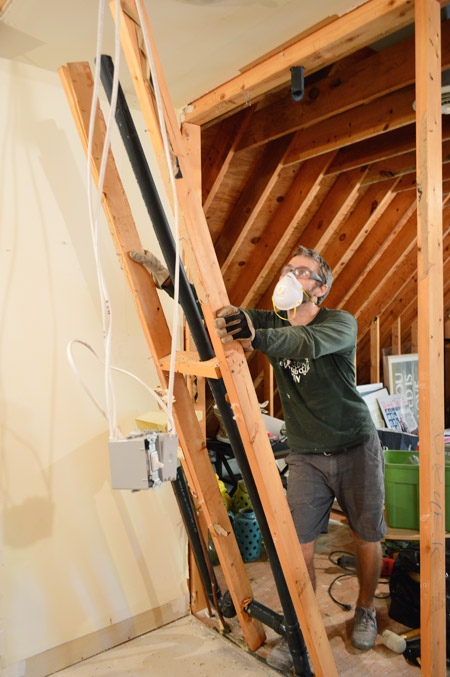
My last demo step before framing began was prying (and cutting) out the single attic step that was in the way. I’ll rebuild it on the other side of the platform later.
That was as much demo as our framing guy recommended doing before he arrived (we used David of Chicas Construction, who helped us raise our sunroom ceiling last year). Obviously there are still more walls that need to come down, but we all agreed it would be best to leave them up for as long as we could (again, to keep the hot storage room from overworking our AC). The last half of the framing couldn’t be completed until the plumbing and electrical was moved anyway (which couldn’t be moved until the first part of the framing had been completed) so we always knew framing would be tackled in two parts. So it just made sense to do demo in two parts to go along with that.
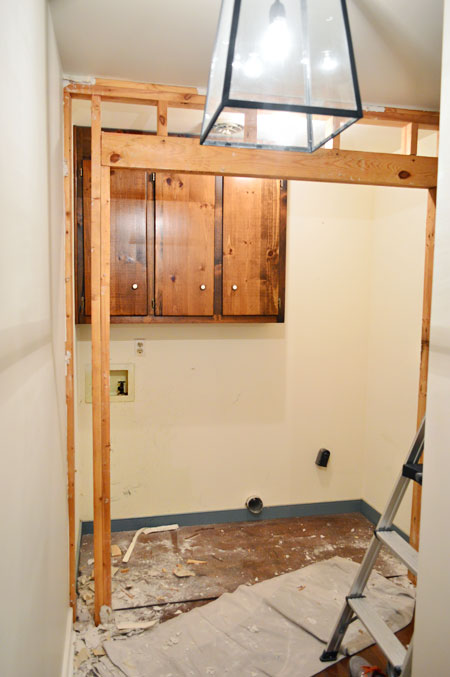
On Wednesday morning it looked like this…
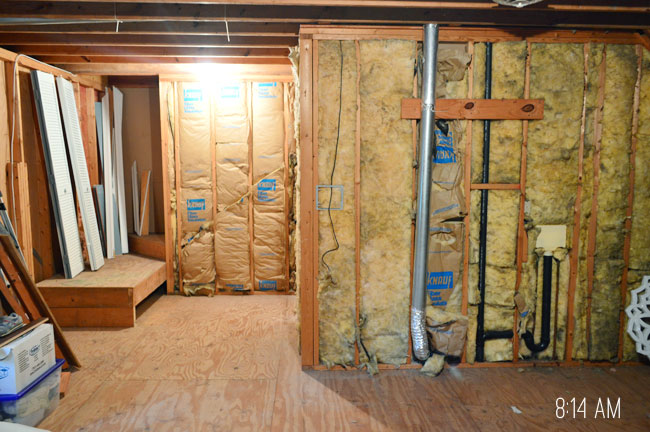
…and less than three hours later we had two new walls thanks to David.
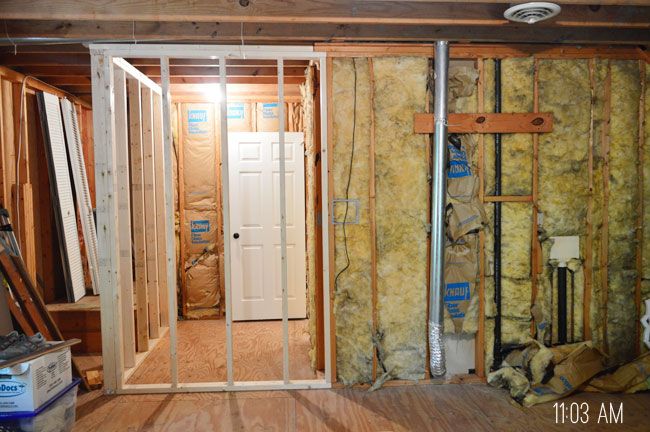
After observing him work his magic, I’m pretty sure it’s a task I could’ve managed, but it definitely would’ve taken me MUCH longer. And since he was so speedy, we were able to have the plumbers (Scott & Mike’s Plumbing Services) out just hours later to disconnect the old hook-ups and add new ones.
It only took them about 3 hours to make the change, especially since all of this sits above our garage – giving them easy access to everything without making a big mess inside the house. Of course, they still had to cut out a big section of our garage ceiling, so we do have that repair on our to-do list. But we have been talking about drywalling the whole garage (two big side walls are unfinished anyway) so we might try to get it all done at once.
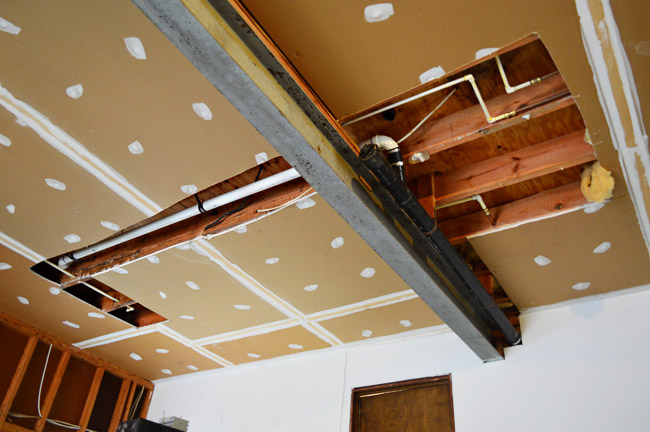
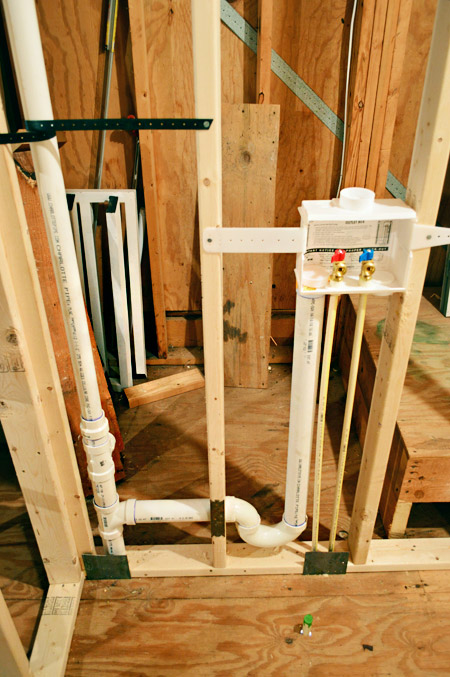
Having that area cut open actually made life easier for the electricians (S J Ryan Electric), who arrived the next morning. They were able to move the laundry outlets in a flash, but there was still lots to be done in terms of moving light fixtures, switches, and outlets.
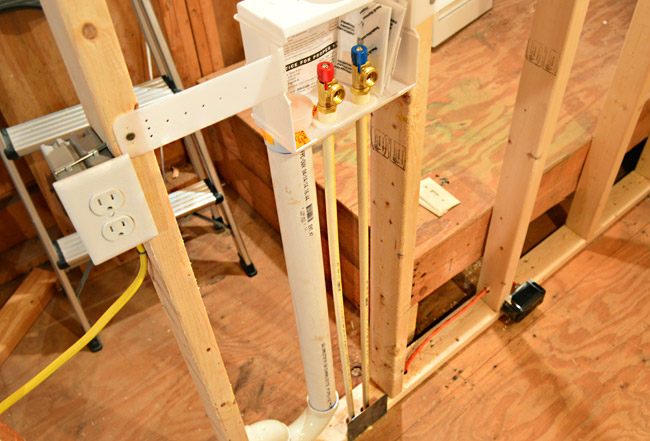
For instance, putting a ceiling light in the laundry room (with a switch at the future laundry doorway) and moving some of the storage room lighting & switches. Sherry and I brainstormed where we wanted everything to be moved ahead of time (time is money when people work by the hour) and were able to come up with a nice solid plan for relocating everything so it makes sense. For example, now we have a light above the attic stairs, an outlet in the future laundry room to plug in our iron, and a fixture box in the laundry room that will be centered in the room after we add upper cabinets (if we hadn’t been thinking we would have just centered it in the room but after the upper cabinets were hung it would have felt off-center since it would be closer to them than the other walls).
That was all done by Thursday afternoon, so we called our framer to come back out to finish framing on Friday buuuuuuut… he had food poisoning. He’s like the nicest guy ever so he was saying he would come out on Saturday or Sunday if he was feeling better, but we told him not to worry. We wanted him to focus on feeling better and, well, we had other messes to make over the weekend. The good news is he’s here this morning (feeling much better) to finish everything up so we can hopefully start hanging drywall soon!
With the plumbing and electrical stuff relocated, it was time to proceed with the second phase of demo, so I had some fun with that over the weekend.
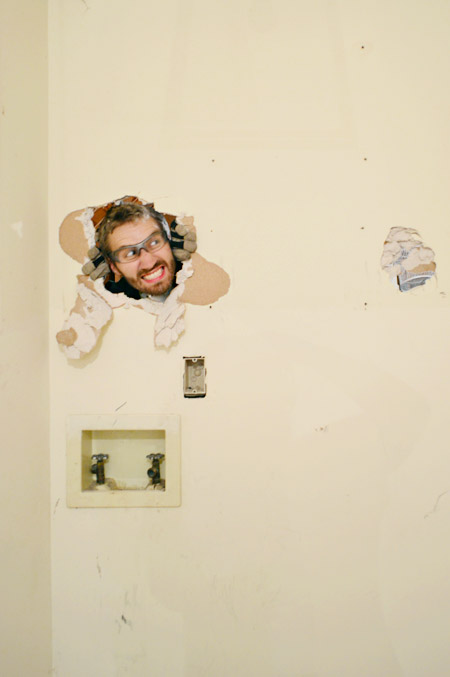
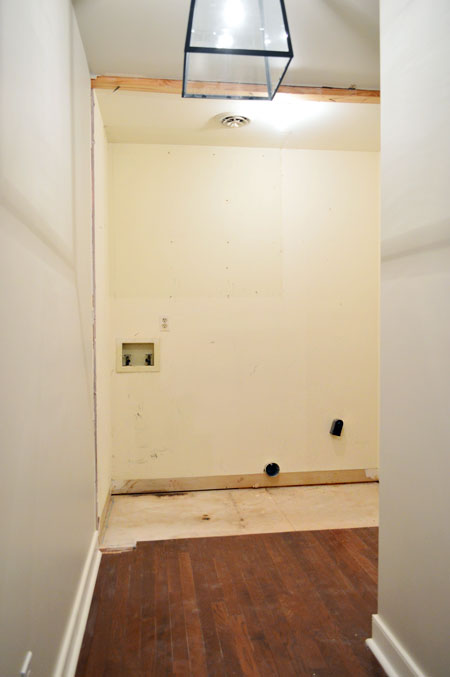
First I bashed down some drywall, which fortunately came down in pretty big sheets for the most part (hence my growing pile of trash/reuse items that you can see near the window). Speaking of the window, here’s our first peek at the daylight we’ll be getting into the hallway now.
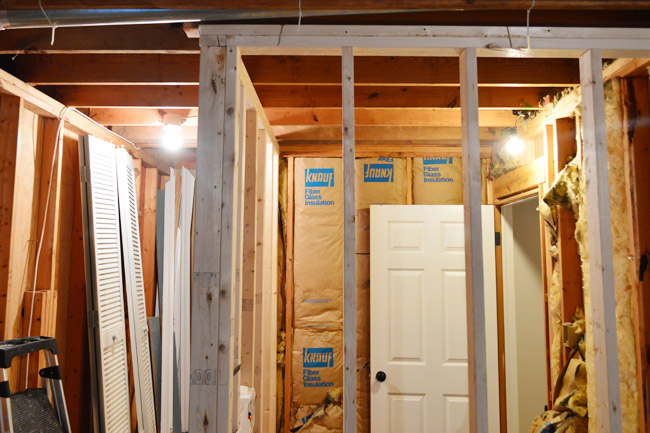
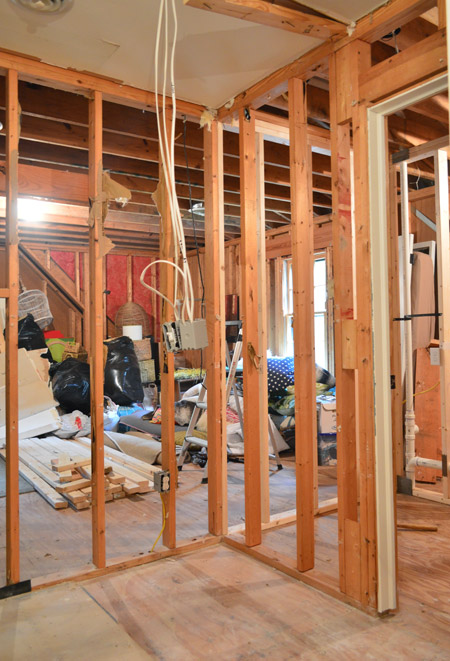
I could also take down a bit more of the framing too – namely the old wall with the storage room door in it, which would give us our first real feel for what the new laundry room will be like. Don’t mind the dangling outlet boxes. The electricians added them in a way that makes them easy to be set right into the freshly framed wall that David is working on right now for us.
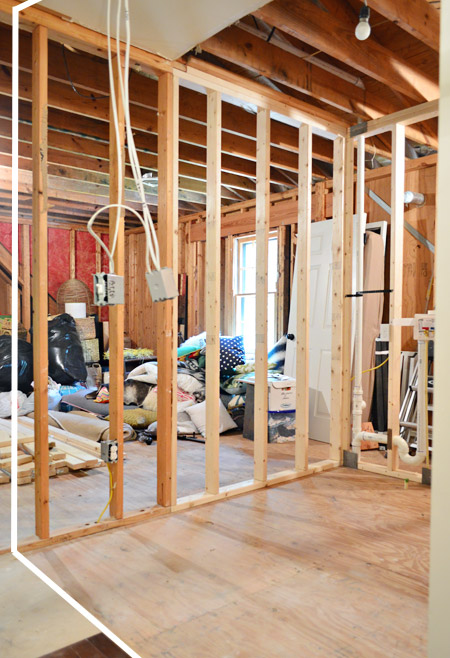
Here’s the same area with the framing down (and white lines added to remind you where the last wall will be framed in). It’s feeling ever-so-slightly like a room.
I could also take out part of the other wall, since the area with the old washer hook-ups will now just open into the storage room. The plumbing was all disconnected already, but the plumbers left the old pipes in the wall for me to remove during demo. All it took was some cutting with my reciprocating saw and it all came down…
And that, my friends, is how we got to the picture that you saw at the beginning of the post.
The next step construction-wise is going on right now, which is getting those remaining two walls framed – both the one to close off the laundry room, and the one for the frosted door into the storage room. I whipped up a little GIF to help show what I mean (David does it almost this fast):
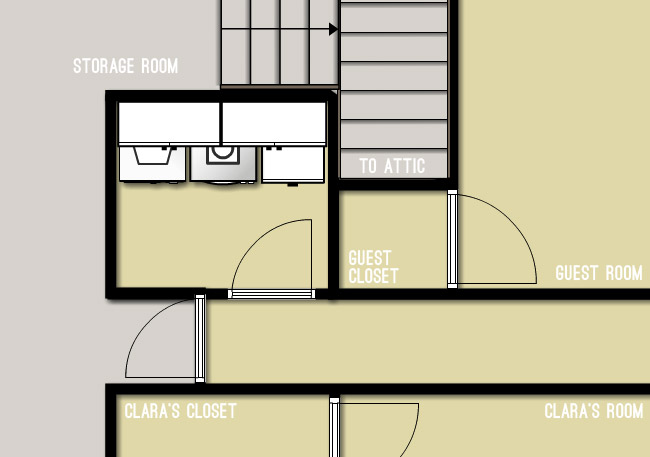
I realize that’s still not crystal clear, so I’ll make one last attempt by showing you an updated version of the floor plan. I can’t tell you how satisfying it was to change the “Current Laundry” label to “Former Laundry.”

Once framing is complete, we’d love to hop right into drywalling (which we’re going to give a go ourselves – although our mudding skills could use some practice) but we need to cross of some other little items first, like rerouting the dryer vent.
Move washer & dryer and remove cabinetryDemo cased opening, side wall, back wall, part of the floor and the attic stepFrame new walls & doorways*Move laundry plumbing hook-ups & drains*Move laundry electrical (plus other lights, switches, and outlets)*- Move dryer vent
- Hang drywall
- Add insulation
- Mud, tape, and sand all the drywall seams in the new room*
- Rehang laundry door
- Add new frosted door to attic
- Prime & paint laundry room and hallway walls
- Tile & grout new laundry floor
- Add baseboard and door casings
- Bring washer & dryer back in and hook them up (and party like it’s 1999)
- Add upper cabinetry and shelving
- Tile & grout laundry room backsplash
- Reinstall washer & dryer
- Add lower cabinet
- Add ceiling light fixture
- Hang art, ironing board, and bring in other laundry room items
- Finishing touches and repairs (drywall in garage, step in attic, etc)
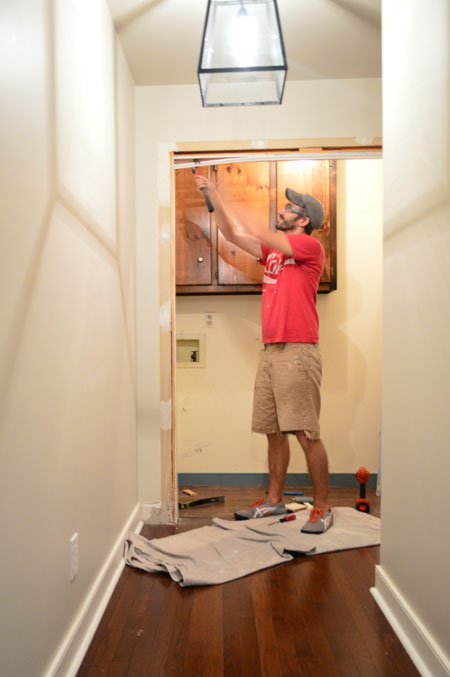
I’ll leave you with the last shot I took before taping up a few big drop cloths to keep the hot attic air at bay. It’s some glorious, glorious natural light that’s finally shining on that end of the hallway.

Oh, and we owe you a cost update too. Maybe in our next post once we have the final bill from the framer? So far his estimate, plus the totals for the plumbing and the electrical help are looking great compared to the line items in our two contractor estimates.
What did you guys do this weekend? Did anyone else wield a rubber mallet and tell some drywall who’s boss?

Aimee says
I love this project. It’s so exciting to see you guys take on a big meaty project with demo and contractors! I can’t wait to see the finished result. I’m also excited for your kitchen renovation down the road. Our house is only a few years old and in great shape so we don’t have a lot of projects to do besides maybe upgrading the flooring and repainting theiving room for the 3rd time. Haha
Emily @ Life on Food says
That last photo is so cool with the light. The speed of all of this work seems so fast. Were you spending all day every day doing some part of it? We have a bathroom and two closet redo. I was thinking it would be pretty time consuming to make the framing changes but this gives me hope.
YoungHouseLove says
We’re definitely trying to truck it to get things sealed up so we’re not losing cold air (and of course we want the washer & dryer back in there and running!) so we’re doing as much as we can each day (admittedly, with two kids and book stuff and other blog stuff going on it’s not all day everyday, but maybe around 15 hours a week?).
xo
s
Bailey says
Look at you guys gooooo! How fast you’ve gone from having this idea to putting it into motion. Good for you :) I do have some concerns about John’s left arm in that first photo of him prying off the framing! It seems to be disappearing!!
YoungHouseLove says
Ha! He’s speedy, that one ;)
xo
s
Stacey W. says
This space is looking amazing! I can’t wait to see the cost breakdown, which leads me to ask….do you think this project will influence how you do future mini-reno projects, like the master bathroom?
YoungHouseLove says
We have actually used this method when we gutted our first bathroom (hired out plumbing stuff but did the rest ourselves) so I definitely think we’re fans! For some reason the super long list of all the dominoes that had to be lined up in just the right order (along with a baby and book stuff to juggle) had us intimidated this time, but we’re so glad we came around to GCing it!
xo
s
Anna Sundman says
What program do you guys use to make your blueprints? Construction looks great! I just redid our laundry room, but it was minor compared to yours–can’t wait to see the end result.
YoungHouseLove says
We like floorplanner (we put the labels on in photoshop).
xo
s
Susan Z. F. says
Fabulous post. You are sure to love this dedicated laundry ROOM.
This blog is built on mutual admiration & respect between you and your readers. You post ideas, you receive ideas and you carefully consider ideas that are thoughtfully posted by truly interested, intelligent readers. That’s why I’m a loyal reader.
YoungHouseLove says
Amen! Never could have gotten here without you guys! It’s amazing how much better a bunch of heads are than one!
xo
s
Sheralyn says
THIS IS SO EXCITING!!
LOVELOVELOVE the new floor plan, it makes so much sense! This is kind of what we dream of doing over our garage so until we do, I am living vicariously through you :)
Can’t WAIT to watch it progress!
Audrey says
I have the exact same setup, an unfinished room at the end of a long (dark) hallway. You’ve given me the FANTASTIC idea of switching out our existing door to a frosted one. Ingenious and why didn’t I think of that? However, I do have one quickie question…since the room is currently unfinished, thus unheated and uncooled, will there be any temp loss due to changing out the door? Will the glass door work as well as the existing door? Thanks guys!!!
YoungHouseLove says
We hope a double paned glass door will be the same as all of the glass windows in the house, but that’s a good thing to think about! Now that we’re into the whole reno thing, we’re tempted to finish the storage room sooner, so that might be a good motivator!
xo
s
Lil says
That is going to look amazing. Can’t wait to see your source for the frosted glass door. I saw a designer show house several years ago where ALL of the interior doors were frosted. It was fabulous.
YoungHouseLove says
OOOOOH!
xo
s
Rachel @ Blonde with a Chanse says
Yay! I’m excited to see the finished look!
jeannette says
so inspiring to see you all take on the contracting yourselves, and to see 3-D rooms rise up out of flat 2-D sticks of wood, and even flatter 1-D plans on paper. inpsiring you planned out electrical outlets/boxes mindfully before hand, so electrician isn’t tearing his hair out while the meter runs and you decide. also tremendously inspiring is the elegant solution you found in your commentariat. the light at the end of the tunnel really makes all this work worthwhile. thank you for all the plans, changes, and pix from all angles. and that final money shot. wow. wow. wow. this may top the deck saga at your former house.
jeannette says
p.s. i’m about to start reading this, and i bet you all have this even if you never heard of it.
http://en.wikipedia.org/wiki/The_Poetics_of_Space
YoungHouseLove says
So interesting!
xo
s
Bethany says
That book sounds super interesting, thanks for sharing! I love the quote they shared!
Beth Sasser says
Oh my WOW! I am blown away at how much extra space you guys had in the unfinished room. For some reason I was thinking it was more closet size (large closet size). I am so jealous right now!
The window at the end of the hall is amazing…
Just an idea but why not go ahead and finish in some of the dry wall while you are already working on it? I know that moving the laundry room is costly, but is it something that would be better in the long run if you went ahead and did the dry wall at once?
I know that when we had to replace three rooms in our house with dry wall it was cheaper to buy it in bulk and just go ahead and fix two more rooms that were on our list to update. Our homes previous owners had an obsession with nails…we removed HUNDREDS of them. We couldn’t even repair the sheet rock..it had to be replaced.
YoungHouseLove says
Oh my gosh that sounds terrible! I think since we’re trying to get the washer and dryer hooked up as soon as possible and still have to do flooring and stuff, we’re happy to leave storage room drywall for another time, although buying drywall in bulk is really smart!
xo
s
The Vintique Object says
Apologies if anyone else has already suggested this, but I’m wondering if you’d want to put an interior window (maybe even near the ceiling?) so that you get natural light in there too. Might be helpful for seeing stains before things go into the wash.
Felicia says
I was thinking a narrow long window up higher would look great. It would let in lots of light and be helpful for ironing.
YoungHouseLove says
That’s a sweet idea too!
xo
s
The Vintique Object says
Something like this could be cool, though I realize that’s WAY more money. Easy to suggest. Not as easy to accomplish.
http://www.pinterest.com/pin/53761789271789798/
YoungHouseLove says
So cool!
xo
s
Lauren says
Wow, laundry room looks much bigger than expected! Looks like you’ll have a good amount of space in there.
You mention closing off the attic… It looks like all you needed to do is extend the wall 3 more feet over to the left in front of the stairs – wouldn’t it have been most cost and time effective to have the framer put that in straight away as he’s doing the nearby walls/rest of that wall? Why would you skip that tiny section when you intend to close it off?
YoungHouseLove says
We thought about that but wondered if we’d try to tackle that ourselves down the line. Since heating and cooling (and time without a washer & dryer) will be a lot less dire, it might be worth it for us to try it instead of relying on a pro to get it done quicker like we did in this case!
xo
s
Lauren says
Yeah, that’s what I don’t understand… How is that cost and time effective? It would have hardly taken the framer any extra time to build in that doorway and the cost would not be much more. If anything, it probably would have been easier for him to frame the portion on the right side, had he been able to just go all the way across… Plus you’ve mentioned multiples time here about concerns about the cooling in that space since the attic is open, so you’ve basically forsaken all of the positive aspects just to take a stab at framing something?
YoungHouseLove says
I hear you loud & clear, Lauren! We certainly could have had him do it while he was here, and it sounds like you definitely would have gone that route. We didn’t because we liked the idea of trying it down the line when the stakes aren’t high at all. We’ll need to tackle more framing stuff when we redo the kitchen and the master bathroom, so an out-of-the-way spot like an attic door seemed like as good a spot as any to learn.
xo
s
Jackie says
I think you should get some of those tubs/bins with lids from Lowes or HomeDepot that you can put all of your extra throw pillows in. Perhaps a second bin for the other decorating items you have thrown in that room.
They are all going to get dusty and dirty or wrecked with the construction that’s happening.
Michele from IL says
LOVE the progress! One question….I see the outlet for the iron, but where is the outlet for the washer & dryer?
YoungHouseLove says
You can see them best in this pic (the washer outlet is next to the water lines and the dryer plug is down near the floor to the right of those: http://images.younghouselove.com.s3.amazonaws.com/2014/07/Demo-Electrical-Plugs-In.jpg
xo
s
austin says
Hi! Just wondering if you guys considered making the laundry room door a pocket door instead? I love those for small spaces! Though of course you miss the opportunity for hanging anything on the back of the door –
YoungHouseLove says
Thanks Austin! We heavily debated that option, but decided we’d prefer the same classic six panel doors that we have in the rest of the hallway (with a frosted door on the end of the hallway as the star). Thakfully there’s more than enough clearance for it to swing open (the drawing isn’t really to scale, but in person the room is really deep!). Will have to share a photo of the door leaning on that framed wall so you guys can see :)
xo
s
Karin says
It always amazes me how much work you guys get done so quickly! How do you manage with 2 little ones’ naps? I see Clara’s room is right next door to this laundry room project, do you have to plan demo and construction around nap time?
YoungHouseLove says
Oh yes, there’s not too much banging during nap time for the most part.
xo
s
Shellie says
OMG. I read your reply without reading the original comment while skimming and laughed out loud at the dirty direction my mind took it!
YoungHouseLove says
Shellie, that made me blush! Haha!
xo
s
Julianne says
Looks amazing! Definitely made the right choice….3 cheers for the astute reader who recognized that there was a window behind the space that could be accessed for natural light. Fantastic YHL fans!! :O)
YoungHouseLove says
Amen!
xo
s
Mary says
Awesome! In your list of what is left, do you basically have reinstall the washer and dryer twice?
YoungHouseLove says
Oops, yeah. Can you tell we’re looking forward to that part?!
xo
s
Rebecca says
Are permits not needed when you’re moving walls/plumbing/electrical, etc…? I can’t wait to see how it turns out!
YoungHouseLove says
Thankfully when you use subs you can negotiate who pulls the permits, so we had our licensed and insured electricians, framers, and plumbers pull the permits they needed. Some sub-contractors are more likely to make you do all the permit work (which really isn’t too bad, we did them ourselves when John built the deck).
xo
s
Kat says
Ha! I cracked up when I saw John’s Jack Nicholson ala The Shining! “Heeeere’s Johnny!” You guys are so funny AND amazingly productive. I love how this small change makes an epic change to your home. :)
kimb says
Only thing I would suggest is make sure the door to the laundry and back room are 36″ for easy to move machines and couches etc
Kelli says
It’s looking great! Natural light is just awesome, no? Speaking of, do you know about those little tubular skylights? My parents have installed a few in their house, as have my brother and my sister, and they are especially great in small spaces like laundry rooms and walk-in closets. I know you’ve already carefully placed your overhead light fixture in the laundry room and might not want to reconfigure your ceiling plans, but in case you’re dreaming of natural light in there too, this is a good option!
YoungHouseLove says
Thanks Kelli!
xo
s
Ashley says
Wow, it’s looking good guys! Have you considered anything like a stained glass window in the wall the laundry room and future bunk room share to bring natural light into the laundry as well?
YoungHouseLove says
That would be fun!
xo
s
Sara says
Please post a before/after progress pic of the dark hallway that is now going to get some light? Thanks!
YoungHouseLove says
We’ll have to add one to our next post! The difference is INSANE in person!
xo
s
Robyn T. says
John…The lightbulb really went off for me reading the beginning of your post this morning! My husband too loves tossing the remnants of a remodel out the window to the awaiting dumpster below. I guess if I want the first floor of my home to look as good as the second, I need to haul all the debris upstairs so he can have the “joy of the hurl”!
YoungHouseLove says
Bahaha!
xo
s
John says
Make sure the garage ceiling has a one hour rating using 5/8″ type-X gypsum board per the Residential Building Code as you plan to use the space above for living.
YoungHouseLove says
Thanks John!
xo
s
Dana says
Are you going to put a door in front of the new entryway to your attic stairs? If you do, I totally vote for a fake bookshelf/secret door.
YoungHouseLove says
Ooh that’s a fun idea too!
xo
s
Shellie says
BEST IDEA EVER!
Cindy says
I’m cracking up at the “Well, that escalated quickly” title. Because that’s exactly what projects do at our house: escalate.
Example:
This row of hooks is too low. Don’t you think?
Yes, plus they need to be spread out.
I agree. But there’s no room in the current space, so what would you think about moving them to the other side of the doorway?
Oooo, good idea. But you know what is even better than hooks? Lockers.
Yes! Lockers! I could build them!
We’d have to move this current shelving unit though, don’t you think?
You’re right. We could move it into the other room, but where would we put the books?
You know what we need? Built-in shelves.
Yes! Shelves! I’ll build those, too!
(That’s an actual conversation. I wish I were exaggerating.)
YoungHouseLove says
Haha! If you give a mouse a cookie…
xo
s
Brenda says
It’s ridiculous how giddy this post made me on your behalf. New walls! More light! Progress! I’m mentally hugging that new framing.
Jessica says
I can’t help thinking the door would be awesome along the same line as the door to Clara’s closet & the back of the spare room closet. It would give you so much more space in the laundry room. Am I nuts?
YoungHouseLove says
We could have put the door there, but we wouldn’t have a passage to the storage room without walking through the laundry room, so we opted to go with this floor plan so we weren’t walking through one room to get to another one :)
xo
s
DKL says
I bet the storage space becomes a family room within the next year. This layout is so much more user friendly all the way around.
YoungHouseLove says
Oh man, that would be awesome!
xo
s
Kate says
Might have missed it in the comments, but….did you guys consider a pocket door for your laundry room instead of a regular hanging door? Might make the little room feel that much mightier!
YoungHouseLove says
We heavily debated that option, but decided we’d prefer the same classic six panel doors that we have in the rest of the hallway (with a frosted door on the end of the hallway as the star). Thakfully there’s more than enough clearance for it to swing open (the drawing isn’t really to scale, but in person the room is really deep!). Will have to share a photo of the door leaning on that framed wall so you guys can see :)
xo
s
marie says
It looks really promising, and I am really impressed with the new floor plan.
Have you considered installing a window in the laundry room to get some natural light there, too? Like a long and narrow one near the ceiling?
YoungHouseLove says
That has come up a few times along with a solartube or something like that. Definitely something to think about!
xo
s
Erin says
I love this — it’s going to look so great when it’s done!
I’m also loving these process posts!
Heather H. says
It’s amazing how fast experienced people are even though the task looks simple. We are adding a guest room in our basement which only requires constructing one wall. We are having my uncle (a contractor) do the job because even though it’s not that difficult he is way faster!
Joseph@littlehouseblue says
If you want to stick with the Knauf insulation I know a place you can get it *wink* (I work for an insulation distributor in Ashland). It’s honestly about the same price as Owens Corning and they don’t use any dye anymore so it’s brown now instead of yellow, but apparently they use a long strand fiberglass that’s less itchy. Just, you know, in case you care about the color of something you’ll never see again.
YoungHouseLove says
Haha, thanks Joseph!
xo
s
Lee Ann says
This is looking amazing! Can’t wait for the finished photo. As for the weekend, I did absolutely nothing productive (unless you count canning 14-day sweet pickles). Instead, my dad and I went kayaking on the New River! Yay, family time!
Lisa says
So thrilled to see this project coming together. We are finishing up our new laundry closet. We took an unorganized closet on the first floor, added the plumbing and electrical and will be moving our stacked washer and dryer up from the basement. So excited!
Can’t wait to see how you organize everything in the new space.
Ellie says
Do you have to worry about the permits & code since you are acting as the GC?
YoungHouseLove says
Thankfully when you use subs you can negotiate who pulls the permits, so we had our licensed and insured electricians, framers, and plumbers pull the permits they needed. Some sub-contractors are more likely to make you do all the permit work (which really isn’t too bad, we did them ourselves when John built the deck).
xo
s
Oriah says
Since ya’ll are still having the framing done, i would like to suggest putting a pocket door into the laundry room. Otherwise, you’ll end up with dead space near the door swing. I just had my basement finished and there’s one place where i wish i’d used one because it would’ve made just a smidge more usable space.
…And now’s the time to do it….while it’s being framed.
YoungHouseLove says
Thanks Oriah! We heavily debated that option, but decided we’d prefer the same classic six panel doors that we have in the rest of the hallway (with a frosted door on the end of the hallway as the star). Thakfully there’s more than enough clearance for it to swing open (the drawing isn’t really to scale, but in person the room is really deep!). Will have to share a photo of the door leaning on that framed wall so you guys can see :)
xo
s
Sarah says
What an exciting project! This is fun to read along with your progress.
I assume you didn’t need any building permits? I’m always interested in where different jurisdictions draw the line for requiring permits. I’m pretty sure my city would require permits for moving the laundry hook-ups and maybe even the framing!
YoungHouseLove says
Oh yes, permits are necessary for this type of work! Thankfully when you use subs you can negotiate who pulls them, so we had our licensed and insured electricians, framers, and plumbers pull the permits they needed. Some sub-contractors are more likely to make you do all the permit work (which really isn’t too bad, we did them ourselves when John built the deck).
xo
s
Maura says
I must confess, the title of this post gave me butterflies! Whee! I know this was more than you originally planned, but I agree it is the exact right thing to do. Plus, we are planning on relocating laundry room and bathroom walls in the near future, so I am selfishly enjoying your posts and pics as research. So excited for your process and end product!
Rubbish Removalist from Melbourne says
Great job so far, it looks like an ambitious project and I am sure you will be delighted with the end result once the hard work is over.
On a different note, looking at what you’ve done so far, it seems there will be plenty of work for the after builder cleaners or are you planning to do it by yourself? (sorry, couldn’t help, but ask, since I do this for living).
Can’t wait to see the pictures once everything is finished.
Regards,
Ryan
YoungHouseLove says
That’s all us, baby! John can’t wait to throw stuff out the attic window!
xo
s
Big Mike says
Any thought to plumbing for a future bar sink area on the back wall since everything is opened up. Maybe a fridge/sink/counter (in between the attic stairs and frosted door)for the future entertainment room?
YoungHouseLove says
Ooh that would be swanky!
xo
s
JoAnne says
I only mention this since all your plumbing is still exposed…did you consider installing a small sink in your laundry room? I have often wished that I had one in mine.
YoungHouseLove says
We would have loved a sink, but we mapped it all out and measured and remeasured and think it’ll be too tight, so we’re going without. It’ll be nice to have a little countertop area to set things down on though!
xo
s
Kari says
Have you thought about using a pocket door / barn door style for the laundry room so you could use every inch of space in the there?
I’m slightly obsessed with pocket doors!
YoungHouseLove says
Thanks Kari, I am too! We heavily debated that option, but decided we’d prefer the same classic six panel doors that we have in the rest of the hallway (with a frosted door on the end of the hallway as the star). Thankfully there’s more than enough clearance for it to swing open (the drawing isn’t really to scale, but in person the room is really deep!). Will have to share a photo of the door leaning on that framed wall so you guys can see :)
xo
s
Betty says
Shelly, I know you heavily debated the pocket door option, but I know you can get the same classic six panel door like you have in the rest of the hallway. Because we have the same classic six panel pocket door on our master bathroom door.
Great for using every inch of space, but not as a bathroom door with a two year old. :) It doesn’t have a lock on it.
YoungHouseLove says
Sounds awesome!
xo
s