Okay, let’s get some open shelves up in this mother.
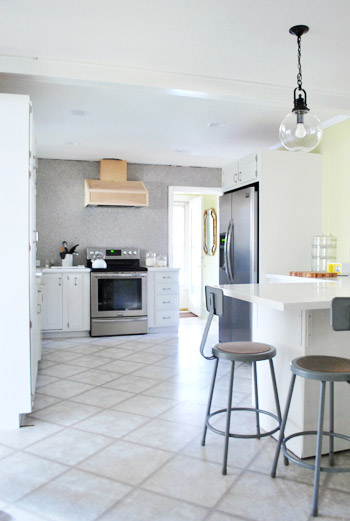
With the hood cover now built, we could finally put the shelves in around it. We were originally going to build true floating shelves (maybe even breaking out Ana White’s instructions) but after looking at some of our inspiration pics again, we decided to open ourselves to the idea of using brackets instead. Note: For anyone wondering how the whole dust/grease situation is with open shelves, check out this post (we’re crazy so we did our research). Apparently the consensus is that if you have a great range hood (check!) and put dishes you use often up there (soon-to-be-checked!) it’s all good. Rarely used items stored inside of cabinets get dusty too, so the key seems to be to have a good hood and to rotate things and use them a lot when they’re out in the open. We’ll definitely tell you how it goes for us.
Besides just liking the look of them, brackets would also make us less concerned about things ripping out of our wall o’ tile (and you already know that stresses us out). Plus, we had heard that Home Depot had some pretty good and affordable options for brackets. Here are the ones I found – actually this is the photo I texted to Sherry to ask which one she liked best since she was at home with Clara and the photoshoot crew.
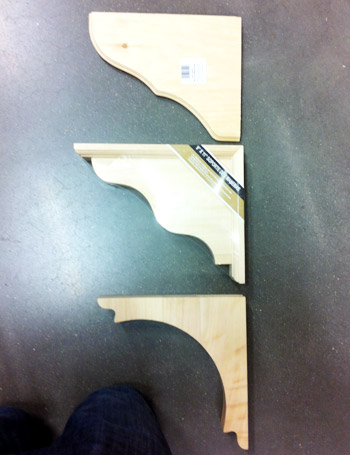
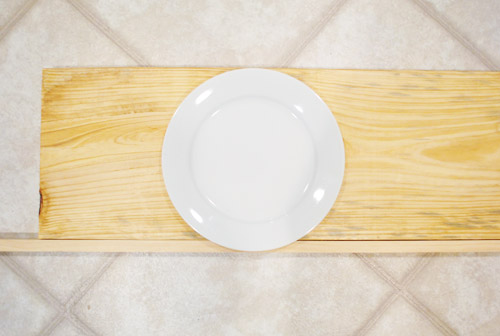
We both agreed the last one was BY FAR our favorite, so I picked up 12 of ’em along with some 12″ framing lumber to act as our shelves. A few of you had said this 12″ framing lumber + brackets system worked well in your kitchens (and we had good luck with them making our office desk) so why not, right?

Well, one “why not” would be that they’re not wide enough for our plates. We have 12″ dinner plates and since 12″ in lumber terms is really closer to 11.25″, we realized we’d have some plate overhang-age. Which is never a good look:

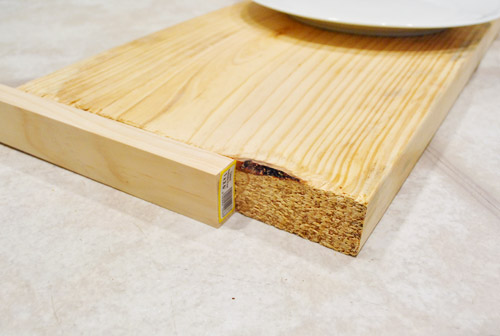
After briefly contemplating getting smaller plates, we devised this solution instead: adding some 1 x 2″ trim around the end (just like we did to finish the top of our homemade console table in the living room).
Not only would it solve our shelf depth issue, but it’d also mean I could cover up the rough end of each board with a nice smooth piece of wood. A win-win, dontcha think?
With all of our materials purchased our total came to about $116 (for brackets) + $15 (for the shelf boards) + $10 (for the smaller boards to frame out the larger shelves) = $141. Which isn’t exactly cheap, but we knew we’d essentially get four shelves worth of storage (two big and two smaller ones) which is about the equivalent of three upper cabinets (which usually go for around $300+ total). And thanks to saving money with things like reusing our original cabinets, building our fridge cabinet, our self-installed wall of tile, and our craigslist range hood we were ok with a semi-splurge in the shelving category (plus we already have the paint and primer we’ll be using).
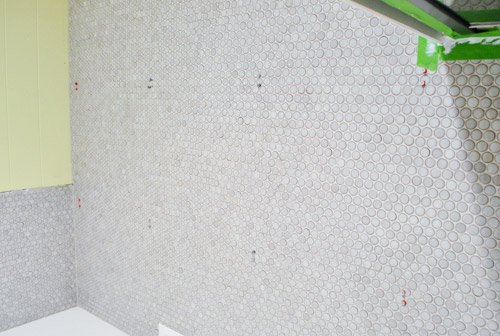
Next we began marking and measuring everything. We used the same weighted-thread-hanging-from-marks-on-ceiling method for indicating where my studs were (which we used here to hang our range hood). Ends up they’re pretty awesomely placed to get even looking brackets – except for the two on the end of the long side (that stud is being used by the hood, remember?). But we figured we’d just use heavy duty anchors on the other two (sunk into tile we knew they’d be nice and strong).

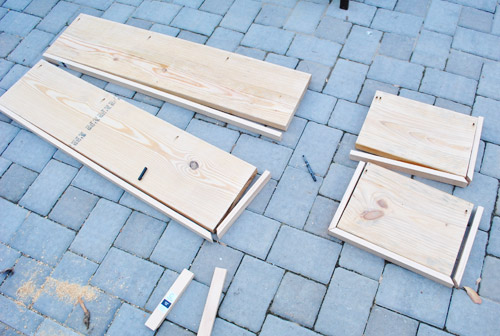
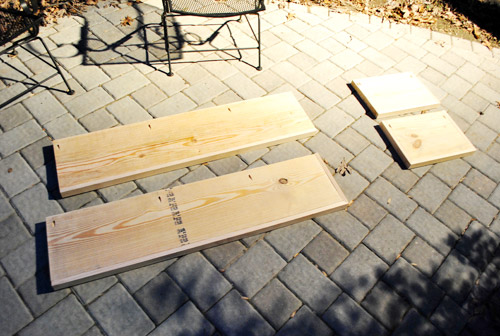
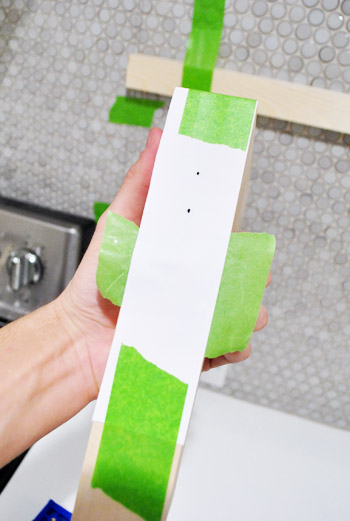
We also used this moment to measure and cut our shelves too. I know it may look short on that one end, but remember we’re gonna trim it with a 1 x 2″ board, so that’s intentional. Oh and see those subtle gray lines in the photo above and below? Those are our hanging pieces of thread to mark the studs. Just didn’t want anyone to wonder if we drew on the tile or anything.

We decided to just trim the exposed sides so each shelf had a slightly different configuration. The long shelf on top would have the wall and hood on both ends, so it only needed trim on the front. But the short shelf on the bottom would be exposed everywhere but the back side (the one on the top right would run into the hood and the one on the bottom left would run into the wall). I know it might seem strange not to just trim them all out in the same way, but we knew from building our console table that once it was all put together and painted it would look great this way. And of course we cut the framing lumber to different sizes to account for the trim, so they’ll all be the same finished length and depth.
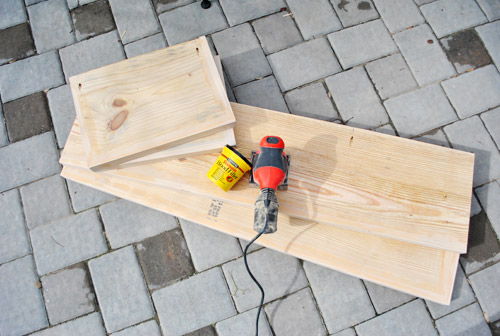
We attached the trim with some wood glue and finish nails. You’ll notice we also have some pre-drilled pocket holes on the top. I was thinking it might be nice to screw the shelves directly into the wall (in addition to screwing them to the brackets).
That night I also broke out the wood filler to make the thin seam between the trim and 12″ board completely disappear. It was a small detail, but we thought once primed and painted it would really help make it feel like one solid board. See how even in the photo below (without primer and paint) you can’t tell that some are trimmed out on one side while others are trimmed out on two? We’re actually glad our plates didn’t fit on the boards alone since the trimmed out result is so much more finished looking.
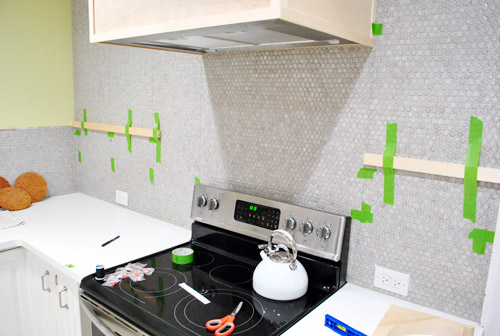
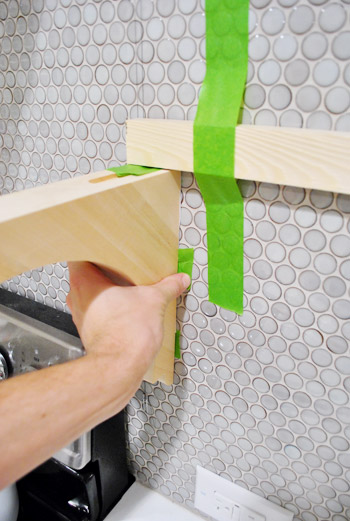
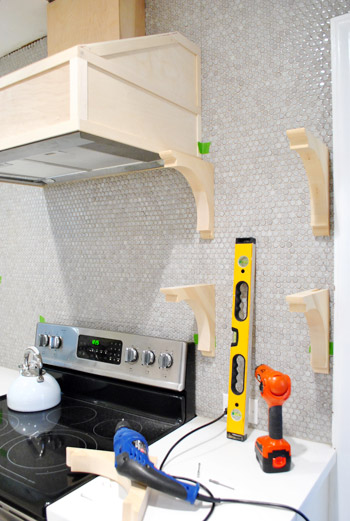
While all that was happening, we also started getting ready to attach the brackets to the wall. We leveled and taped up some 1 x 2″ scraps to act as our placeholder shelves so that we’d know exactly where the top of the bracket needed to sit.
The brackets came with two metal hooks on the back, so I used my favorite paper template method to help figure out where I needed to drill corresponding holes on the wall. The strip of paper is taped to the bracket on the top and bottom, but the tape on the sides is facing out to stick to the wall. And the two holes are punctured right where the notches are.
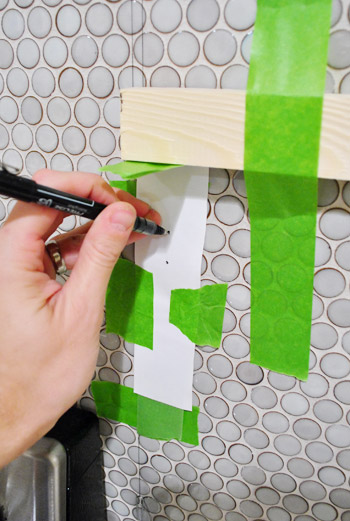
Then I put it in place on the wall, pressed the side pieces of tape against the tile, and carefully peeled the bracket away…
…leaving my paper template in place so that I could mark through the holes.
See? Easy right? Now just pretend it wasn’t super tedious to do it 11 more times.
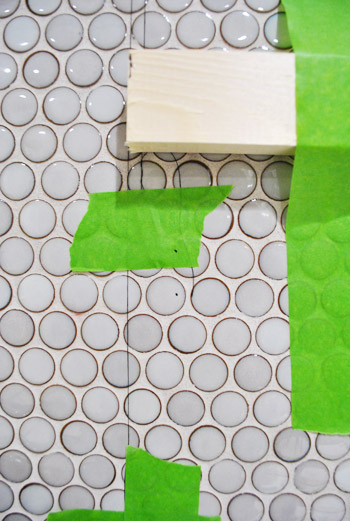
And since I still cringe at the sight of our tile getting drilled into (especially 24 times!) I couldn’t bear to photograph it again, let alone share it here. But here’s some of the final product – a dozen pairs of screws waiting for brackets to be hung on them. That my friends, as subtle as it may look, is the look of progress.
Here’s a sense of how everything will hang. We did a test run of hanging one side to make sure the screws weren’t in or out too far, and to make sure they felt secure. They did! Phew. True to form, Sherry can’t wait to load them up with dishes and plates galore.
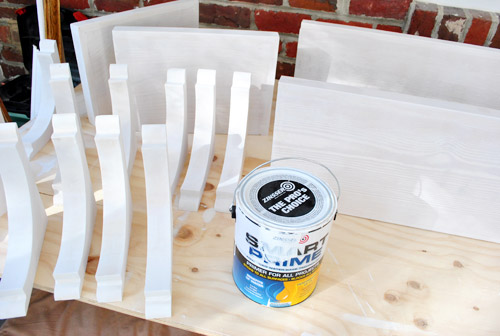
But as excited as we were to just get the darn stuff hung, we knew it would behoove us to do all of our priming/painting beforehand – (that way we wouldn’t have to worry about taping off the wall or getting paint on our grout). So this is where our shelf-hanging tale ends for now. Waiiiiiting for our primer to dry so we can apply two coats of paint (the same color that we used for our cabinets) and then hang it all up once it’s nice and cured. Oh yes, and we’re priming and painting the hood too, so that should look nice and crisp the next time you see it.
Once dried, it should be pretty quick to get everything hung so we should should have “after” pics for you by Wednesday, barring any unforeseen craziness (who are we kidding, it’s week two of three for our in-home book shoots and we live in Crazyville, but it would take a pack of wild boars running through the house for us to slow down on our shelves). What did you guys do this weekend? Any lumber stuff? Priming? Drilling through tile? Prepping 35 more secret projects to shoot for your book while your daughter ran amok and your chihuahua ate various crumbs leftover from the past week of visitors?

Heather says
Do you ever just sit around like slugs and do nothing? You guys are like SUPER HUMAN!!
YoungHouseLove says
Haha- after these photoshoots… that’s the plan!
xo,
s
Bethany says
you guys are truly amazing. i wanted to do this in our kitchen but thought we may have to pull a contractor in. im thinking, now, that my handy hubby may be able to do the open shelves. i just love what you did. and those brackets would be my choice too. you get so much done in a weekend :)
Bethany
http://www.powellbrower.com/2012/02/holy-trinity.html
The Mrs @ Success Along the Weigh says
That is going to look so amazing to you know, match the rest of your amazing home! ;)
We spent the weekend painting trim, painting decorative windows, nightstand and something else but my brain cells disappeared with the fumes so I’ll have to hunt around the house to see what ended up black. Oh yeah! The file cabinet! Yeesh!
YoungHouseLove says
Haha, congrats on all that painting! Wow. Must feel awesome.
xo,
s
Jamie says
I’m not sure I can wait until Wed!!!! With every update I fall more and more in love with your kitchen!
houseofearnest says
This is the kitchen project I’m MOST excited about. I love open shelving in kitchens so much and am very eager to see how this turns out!
I think I’m too much of a closet slob like Monica from Friends to really pull this off, so I’m glad someone else is :)
Camille says
I love them already. I LOVE THEM ALREADY. You guys are kickin’ A and takin’ names on this kitchen remodel. I can’t believe how much you’ve done so quickly, woot woot!
heather says
Nice!
I actually did spend my weekend working on some shelving for above our laundry area, nothing fancy, just some pieces of pine biscuited together, painted and then put up and secured on brackets. I just need to get my final photos to put it up!
I also had to redo the plumbing under our sink. Pretty basic but still a wtf moment when you’re standing in water.
Haha. Yikes.
YoungHouseLove says
Holy cow you were busy!
xo,
s
lyn says
I love the idea of floating shelves, any thoughts on putting up floating shelves when you live in an earthquake prone area– um like California? For instance the thought that comes to mind is.. dishes rattling their way to edges and falling off…. =D
YoungHouseLove says
Anyone in california have tips for Lyn? Maybe open shelves with a front and side lip to better contain things would help? Or maybe they’re just not recommended in that region?
xo,
s
Whitney says
Looks good! Did you consider putting a small notch toward the wall side of the shelf so that you can stand decorative plates or platters up using the notch so that they won’t slide? (Like a china cabinet shelf?) Just wondering.
YoungHouseLove says
Such a sweet idea! I’m planning to lean a few frames up and have always had luck using that poster putty for leaning plates (we did that in our first house’s dining room but a notched ledge thing is another great solution!
xo,
s
Mel says
I love it! Good choice on placement. I can only imagine how crazy it was measuring out drill holes for hanging the brackets on tile. Its not as easy on a wall, right? I’d be super nervous the entire time !! It is really looking awesome.
Angela M says
Yay! Cant wait for Wednesday to see how the shelves looked all “accessorized”!
..And since you asked what we all did this weekend, I started tackling my own dastardly rocking chair yesterday using Sherry’s tutorial. Once I removed all the tacks and staples and got the cushion and wood slat removed, it looked like some of the frame was chewed on. Any cheap diy suggestions on fixing that? I found something online that said to use auto-body filler but that stuff aint cheap. I didnt know if leaving it like it was would compromise the stability of it. Maybe nailing some trim to the back of the chewed areas for more security?
YoungHouseLove says
Oh yeah nailing trim sounds like a good idea! Good luck!
xo,
s
Maggie says
Let me proffer another shelving suggestion. I used pine stair treads from Home Depot for some heavy-duty shelves. they are virtually knot-free, have a finished bullnose edge, finished other edges, and are 48 inches long, 11-1/2 inches deep, and 1 inch thick. You still might need a bit more width for plates, but they are good looking. HD also has oak treads, but they are way expensive. I only used them for shelves when my plan to replace stair treads got sidelined, and I hated to have these beautiful boards go to waste.
YoungHouseLove says
Love that idea too! Great for anyone looking for a rounded bullnose edge!
xo,
s
Christina says
How is $herdog going to reach the taller shelf? They look high up from the photos (could just be perspective).
YoungHouseLove says
I should be able to reach them thankfully! Will have to post photographic evidence when they go up!
xo,
s
Amanda @ The Scacchi House says
I love the shelves! I keep trying to talk my husband into moving our kitchen cabinets up and adding a row of open shelving under them. No luck so far. The kitchen is coming along great. I can’t wait to see it when it’s finished!
Caity says
I immediately got giddy when I read the first line of this post.
You never cease to amaze me…getting projects like this done even when your house is invaded! *claps*
Lisa says
You may have already covered this topic, but did you all consider one of those slide in ranges- the kind that does not have the piece that runs along the top with all the controls and timer on it?
Just wondering- I tend to like the way it looks with open shelving in particular.
Lisa
YoungHouseLove says
We did but it wasn’t in the budget! But we love those too!
xo,
s
Heather says
I am SO SO SO SO SO beyond excited to see the painted shelves and hood! I think your kitchen is going to look AMAZING once they are up. I know there is flooring to get done blah blah blah but the shelves are going to be the icing on the cake. (Oh who am I kidding? The peninsula, the cabinet moving and painting, the counters… it’s all so fantastic.) Rest assured that your kitchen is definitely going in my “Kitchen Inspiration” file. LOVE IT.
YoungHouseLove says
Aw thanks so much Heather!
xo,
s
Seriously Sassy Mama says
As much as I like the shelves. So jealous… I am super, nerdy excited about seeing the floor.
Amy says
This is so appropriate because I had a vision to do the same thing this weekend, and of course, decided to go to Lowe’s and spend $180, but I’m so excited to finish. Reading this post inspired me more (to go buy different brackets for sure!), and also to measure my plates (which I didn’t do before) and now realize that my square dinner plates are 11″ and my shelves are 10″. Do you think I can add trim to the back side of the shelf, as I’ve already put decorative trim on the front?
YoungHouseLove says
Oh yes, you can definitely add trim to the back! Good luck!
xo,
s
amy says
Love the brackets #3 also! I picked them in my head before I read what you picked. :)
Then I promptly scrolled to the bottom to see the “after” pics. :(
Boo- I hate waiting!
Sincerely,
Girl who sits in a tidy house with a beautiful, functioning kitchen but secretly dreams of open shelving and can’t wait to see yours
Kitty says
I recently put up open shelving in my kitchen with those exact same brackets! I love them! Also, I have not had any problems with stuff getting dirty on the shelves. My shelves are right over my dishwasher and my dishes are constantly being rotated through. Once a week I give the shelves a quick wipe and all is good. Enjoy!
YoungHouseLove says
Wahoo! So glad to hear it!
xo,
s
MichelleG says
ok, so i have a million primer questions!
(1) what kind of primer (pictured in the post) are you using to paint your wood materials? i know you guys have often recommended Kilz no-voc, oil based primer for dark surfaces like your kitchen (or old den) paneling, but it looks like you’re using something different for the wood?
(2) is the primer you pictured in this post a new find or an old fave when it comes to priming wood surfaces/furniture/etc? and what do you like about it?
thanks for satisfying my DIY curiosity (neurosis?)! :o)
YoungHouseLove says
Oh yes, for the cabinet painting (and everything since then) we talked to some pros about what they use and two of them used the same stuff! It’s Zinsser Smart Prime (it’s low-VOC) and Benjamin Moore advance paint! Such a great pairing. From now on it’ll be all that we use for furniture and trim and cabinets I think! Just because no-VOC is nice, but it didn’t work nearly as well as this stuff, which is still low-VOC. Hope it helps!
xo,
s
Katie says
The first sentence of this post made me laugh out loud :) Can’t wait to see the finished product all gussied up with plates and fun accessories!
Marie says
Your kitchen is really looking fabulous! We are doing a mini-makeover on our kitchen and I would like a new stove. I looked at the same model you have from Lowe’s. Are you happy with it? Is it easy to keep clean? Does it preheat quickly? Any help you can give me would be appreciated!
YoungHouseLove says
Oh yes, we’ like it! The knobs are pretty and it cooks well! We had pretty much the same one in our first house’s kitchen (minus the convection feature) and we’re used to it so it’s great to us! We’re not used to anything with gas heat or something amazing though, so I’d say it’s a nice stove but not a super fancy upgraded one or anything. Hope it helps!
xo,
s
Kelley says
I really have my eye on this project. The hubs and I were thisclose to pulling down a few sections of our cabinets this past summer and putting up open shelves, but our lack of knowledge on HOW TO DO IT kept us from attacking. So this project of your has great timing! :) Like you, we just want a few, to break up the boring cabinets we have and to give more opportunity to display the pretty things we have. Good luck, guys!
Georgia says
These are looking awesome. I can’t believe how much you can get done with everything else going on around you! And john, your paper template tip is THE BEST. I don’t know how many times i’ve measured to hang things….like marked it up all over tape measure and then when i go to hang things the screws are in the wrong place! I will be using this handy dandy tip ALL the time…and every time I will think of you and say a little “thankyou” under my breath for not having to patch all the holes in my walls.
Georgia says
Oh, can i also say that i love the concept of open shelves…having EVERYthing at your fingertips. We’ve always kept all our plates and bowls etc in the bottom cabinets while the kids have been growing up to encourage them to be able to make their own breakfasts, set the table and unstack the dishwasher. But seeing as my oldest is 6’1″ now, the day is fast approaching to move everything UP (my youngest is still only 4’7″).
Jenna says
I can’t wait to see those shelves up!! I love open shelves in a kitchen. And I love brackets – so I’m excited that you went that way. Yay for shelving!
Heidi P. says
Wow. You amaze me with your stick-to-it-iveness. I had questions while I was reading, but every time I’d think of one, you’d cover it!
Good luck good luck!
{tuvalu} says
We can’t wait for Wednesday either! So impressed with the soothing design of the kitchen and your multi-tasking on writing/shooting for you book… all while raising Clara. Im-pressive! Good luck these next few weeks! We’re rooting for you!
Jenna at Homeslice says
I love the progress! We hung shelves in our home two this weekend… ours were just on a wall, so not quite as tricky, but it’s all about the little bits of progress!
Carole says
If “put a bird on it” is the motto of Portlandia’s DIY and crafts scene, I think “put some trim on it” could be yours :)
YoungHouseLove says
Haha- nice. Or “Put A Ceramic Animal On It.”
xo,
s
Kim S says
OH EM GEE you are so close! The anticipation of painting must be killing you. I swear, even though it’s not my kitchen, I get a little anxious when you talk about drilling into the tile or hanging heavy things. Can’t WAIT for Wednesday’s post!!!!
Laura says
Ahhh! What a cliffhanger! Can’t wait to see the shelves and hood all painted and finished!
This weekend, I started a YHL inspired project… painting a fireplace! It’s a 100+ year old fireplace so it took a long time to scrub out. Then I painted the interior with the special fireplace paint that can withstand high heat. This week sometime I will paint the face and mantel! Thanks for giving me the courage!! :)
YoungHouseLove says
Wahoo! Good luck Laura!
xo
s
Ginny @ Goofy Monkeys says
I love your bracket choice! I can’t wait to see how things look when they’re up and done and the hood is all painted and pretty.
Just curious – did you guys consider painting or at least priming the hood cover before putting it up? We have started prepainting more on our projects and it often saves time (easier to prime/paint when stuff is laid out rather than installed). Usually there’s just a little touch-up when we’re done.
YoungHouseLove says
I think we were anxious about building it since we’ve never tackled it before so John just wanted to build it in place (I’m not sure he could have worked out all his cuts ahead of time, he sort of built on one layer with another and cut things as he went). But it’s a great solution for things like shelves and cabinets and trim and stuff!
xo,
s
Elizabeth @ The Little Black Door says
I’m so excited they are going up! Can’t wait to see them!! It’s probably too late to mention this now, but we ran into the same issue (plate overhang) when handing our open shelves and we ended up using stair treads. They were the perfect size and with the beveled front they saved us the trouble of having to sand them down. http://thelittleblackdoor.blogspot.com/p/kitchen.html
YoungHouseLove says
So smart!
xo,
s
Libby says
Great bracket choice! Is there any coat that goes above 2 coats of paint? I’ve never had open shelving and I’d be worried about chipping. Excited for final project!
YoungHouseLove says
Do you mean is there sealer or something? You can always add that, but we consulted with two pro cabinet painters and they both use the same method we used on our cabinets (which we’ll us on our shelves too) which is good primer followed by great paint (Ben Moore Advance was is highly recommended by everyone, and is used inside of cabinets a lot). Of course we’ll let you know how it weathers!
xo,
s
Kelly says
I just have to say I found your blog on Thursday last week and I sat down and read ALL 400 and something pages, just finished up yesterday! My husband and I (and 2 boys) live in the land down under in Bunbury WA and we are big DIYers as well I just LOVE LOVE LOVE seeing all your pics! Your kitchen is looking fabulous – our kitchen reno was my favourite DIY to date.
YoungHouseLove says
Wow- that’s amazing! You’re a speedy reader indeed! Wish we could churn out projects and posts that fast! Haha.
xo,
s
Heather S. says
Those are the brackets I’ve been checking out for a shelf in my kitchen as well! Can’t wait to see the completed shelves!
GreenInOC says
Two things:
1. It’s amazing how great the tile “fill-in” looks, you can’t even tell you had to go back and add some where part of the vent came out. IMPRESSIVE!
2. If you ever do a flower giveaway you might want to consider https://californiaorganicflowers.com; they are a small family owned company, organic and Fair Trade!
YoungHouseLove says
Aw, thanks on both accounts!
xo,
s
terresa says
It looks like you got the same brackets as the dining room in The Old Painted Cottage. Have you seen that site? I have been admiring her open shelves for a year. They are so lovely:)
YoungHouseLove says
Oh yes, I love that site!
xo,
s
Roeshel says
Ugh! What a teaser! I scrolled as I read, anticipating a finished project. lol. I can’t wait to see the result. The inspiration is gorgeous. I do love open shelving!
Maggie says
I seriously can’t wait for you to get the floors finished.
Fiona McKay says
I am so inlove with how your kitchen is coming together! You are doing such an amazing job!
debbie c says
Looking good, can’t wait to see them all dressed up!! Hey I saw some cool looking light bulbs at West Elm I thought you might want to check out for your lights over your island, they are chrome light bulbs…check em out!
YoungHouseLove says
Love it!
xo,
s
Kristin says
The kitchen is looking great!! Nice detailed instruction’s on hanging the brackets and shelving. :)
Jillian@TheHumbleGourmet says
Can’t wait to see the finished result!
Joy says
Oh goodness… you guys are so awesome.. I love how your house is coming along. I envy you.. I wish you lived near me I have no idea what to do with my kitchen.
nat says
Love your ideas.
They have some ‘Edison’ lightbulbs at Lowes.
Would look great in your light fixture above the island :)
YoungHouseLove says
Thanks nat! We tried them and they were too warm (made the counter look dirty/yellow) but we’re still on the lookout for the perfect lights. Will keep you guys posted!
xo,
s
melissa*320 sycamore says
Those are the ones we chose for our kitchen too, except…ours were purely decorative for under our cabinets so I, ahem, hot glued them to the subway tile. They’ve held up great for almost a year now! :)
YoungHouseLove says
Haha- nice!
xo,
s