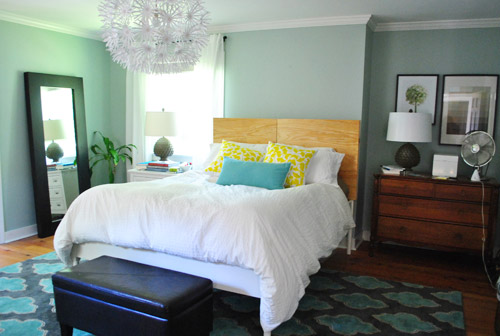
We owe you a huge post about all things Haven/ATL, but we’re actually driving home today (after crashing a bunch of awesome houses, doing a thrift store tour with Katie B, hosting an informal backyard wedding for Clara and Will, etc) so we’ll share what we snuck in before we left for Atlanta: the beginnings of a headboard for the freshly rearranged masted bedroom. With Ed the Bed officially minus posts, we quickly turned our attention to making him plus headboard – as you saw Sherry mock up in Photoshop last week – along with darker floors and a darker dresser:
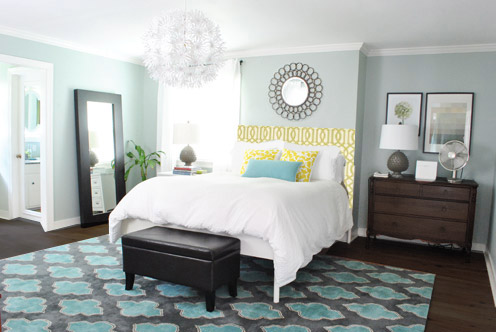
We wanted something upholstered over something wood/tin/woven/stenciled/painted since we wanted something cushy to lean back on (we’ve been doing a decent amount of reading in bed lately, and with the new arrangement the room feels cozier but not as “soft” as it could – especially since our first house’s bedroom had two curtained nooks on either side of the bed, so maybe we’re just fabric-starved individuals).
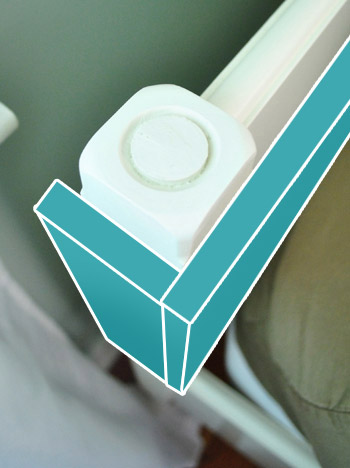
For this headboard we decided to forgo our usual stretched canvas technique since we’re working around Ed’s existing headboard. We devised a quick plan to use plywood and some 1 x 3″ boards to create a headboard that would wrap around what’s left of the existing posts and essentially hide them from view. Just pretend those Photoshopped blue blocks below are wood:
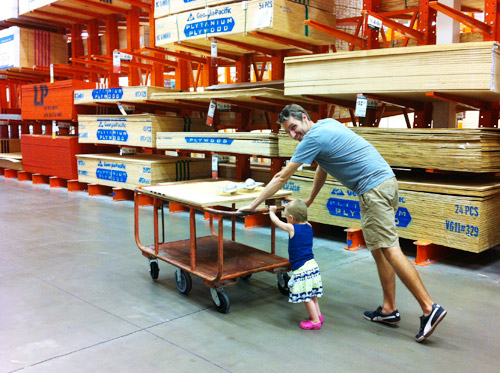
Clara was being quite the little helper at Home Depot (when she wasn’t simultaneously mesmerized / terrified of the big saw they used to cut our piece of plywood down to size). We bought a piece of 5/8″ plywood cut to 65″ x 36″, though I actually had them slice it down the middle so the darn thing would fit in our little Altima’s trunk. It also made it easier for Clara to help push us towards check out (where our total was $22 for the plywood plus two 1 x 3″ whitewood boards).
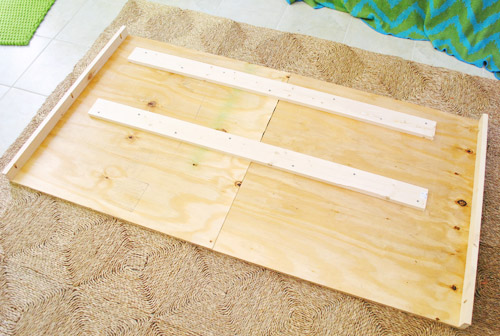
Here are all of my pieces laid out back at home so you can see how we planned to assembled it. The two brace pieces across the middle would make up for the fact that we had to cut our plywood in half. The two on the sides are what will wrap around to hide the posts.
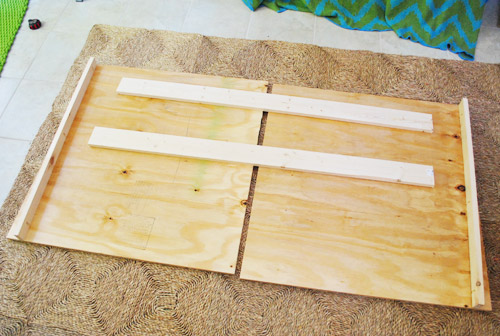
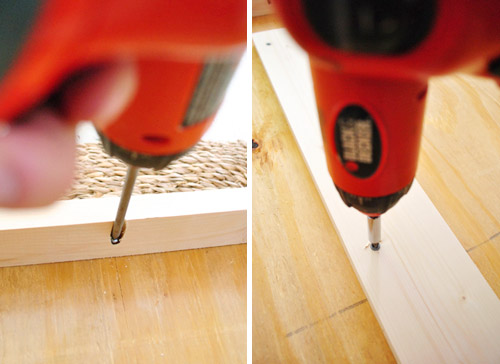
I attached my side pieces using my Kreg Jig and for my brace pieces I just drove a few spare screws right into them.
So here’s the headboard all assembled. If it wasn’t already obvious, this is the backside that will face the wall.
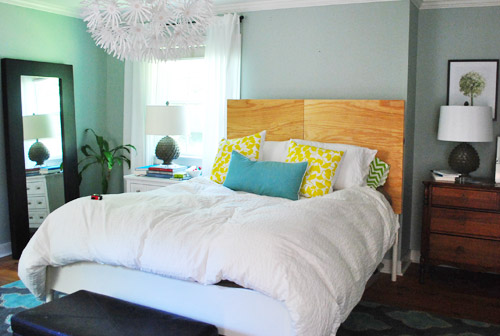
I had considered my work done and declared Ed’s headboad (Ed’s head? The Ed-board?) ready for upholstery. But Sherry, in all of her wisdom, suggested we bring it in the room to make sure it fit before covering it with batting and fabric. Smart cookie.
It did fit. At least, it did side to side – but we realized it was looking a bit taller than we wanted. In person it just sort of felt too top-heavy if that makes sense, so we thought a bit of a lower rise would work better with the proportion of the bed.
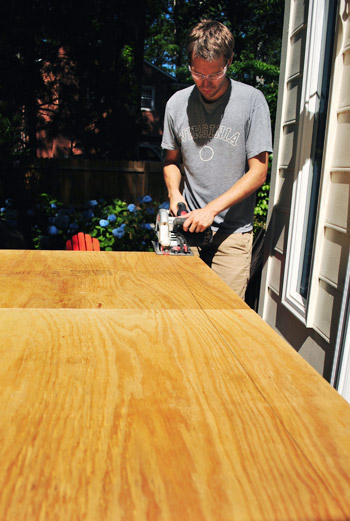
So after a bit of debate (and actually holding up paper while standing across the room to block off different lengths of the top) we decided to lop off about 5″ (poor guy, first his posts get chopped off – now this) using a circular saw so that I didn’t have to disassemble and cut the pieces separately on my table saw.
So here’s the headboard back in place, looking much better. It’s a modern bed with nice clean lines, so anything taller just felt off in person (a little too traditional/ high-flying) and we want to leave room above it to hang something there to break things up and add more “layered bedroom ambiance” as the lady-wife calls it.
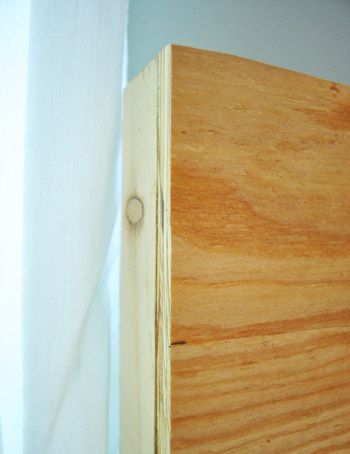
And in case that Photoshopped headboard-building-plan picture at the beginning of the post still confuses the heck out of you, maybe this close up of the side will help clear things up. That piece of 1 x 3″ just curls around the side enough to hide the post – that way once it’s upholstered it’ll be a seamless, even fatter looking headboard (rather than a headboard with a random white post behind it).
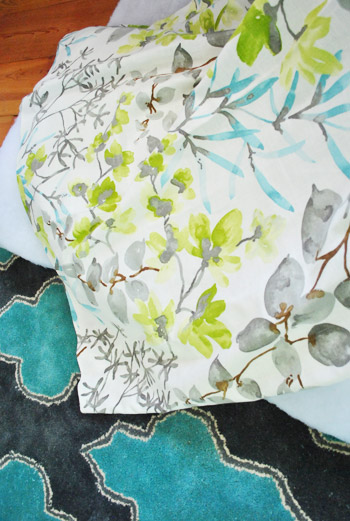
Sherry will cover the actual upholstery process tomorrow (we took way too many pics that we still have to upload so Sherry can write up those details) but I promised her I’d give you all a preview of the fabric that we picked out. We opted for a more free-form botanical print that picks up the turquoise in the rug, but doesn’t compete with it by being another perfectly symmetrical geometric. It’s a nice mix of light-and-airy-meets-mathy-and-shape-riddled. It looks a little crazy with them touching in the picture below, but in reality the headboard will be on a different plane than the rug (floor vs. wall) so they won’t be all up in each other’s area.
Now that I’m at the end of this post I’m not so sure it qualifies as an “adventure” but don’t tell Clara that. She thinks surviving the loud “scary scary saw” and getting to push the cart at Home Depot is about as exciting as it gets (although 8.5 hours in the car with her today might add up to something “exciting”). I think it would have been more of an adventure (slash nightmare) if we had upholstered it before checking how the initial height looked on the bed, so that would be my Tip Numero Uno. Before shooting a few hundred staples into something, hold it up wherever it’s going to go and see if the proportions look right (being sure to put all of the bed pillows in place if it’s a headboard, since those can block a bunch of the headboard so they make a difference). What did you guys do this weekend? Any road tripping with a dog and a toddler? Or fellow headboard adventurers?

Lauren Johnson says
Hey! So I’m totally dumb about this sort of thing and I feel awkward even asking…but I have to. I’m looking to paint my kid’s playroom a light gray and I love the color you chose for your hallway and living room in an old post I just came across {“Our Paint Colors”}. It was the Moonshine by Benjamin Moore. I’m just a little confused though because you said you “color matched it” to the Olympic No-VOC paint. Does this mean you took the paint sample from Benjamin Moore to another store {ie Lowe’s} and had them match that color in the Olympic Paint? And if so, can I ask why? Sorry I have no idea but I’m really curious as I love this color you chose!
YoungHouseLove says
Don’t feel dumb at all! It’s a good question. Basically you can pay for paint from a premium brand like Benjamin Moore and it’s a little more but has great coverage and durability. If you want to save money and just like the paint color but don’t mind lesser coverage (you might have to apply another coat) you can go to a place like Lowe’s or Home Depot and use their paint (which is less expensive) with the BM formula (they can usually look it up on the computer or scan your swatch to match it). Hope it helps!
xo,
s
Sara@LiteraryLima says
You guys make this look so easy! I’ve always wanted an upholstered headboard but it seemed so intimidating, especially for a non-sewer like myself! On a scale of 1 to 10, how do-able would this be for a newbie?
YoungHouseLove says
I’d say it’s a three. Just get the store to cut the wood for you, use a drill to build it like we did (took about twenty minutes) and upholster it with a simple staple gun. More details tomorrow, but you can totally do it!
xo,
s
Jennie says
where did you get your tall mirror?
YoungHouseLove says
That was a wedding gift from John from West Rlm but Ikea has something similar now (and cheaper!).
xo,
s
Angela says
Hi John & Sherry
Your keynote address at Haven was fabulous-funny and full of information at the same time! Can’t wait to see your headboard-I recently made one in an olive colored duck cloth with nailhead trim and am in love with it…love that i’s the last thing I see at night before bed!
Angela (friends with Lisa G.-I will tell her she’s my claim to fame! ) :)
YoungHouseLove says
Hahah, that’s so funny! It was so great to meet you! We had so much fun there.
xo,
s
Ellen says
I took my 6 month old on his first plane trip! I had to go to a conference for work, so took the still nursing baby and my mother in law with me to California. He was a champ on the plane, stayed on Texas time the whole weekend, then had a poopsplosion on the plane coming back. Darn those disposables for travel – the cloth he normally wears would have contained it!
YoungHouseLove says
Oh man I feel for ya! Glad you made it!
xo,
s
Judith says
Wondering where you got and what the fabric is that is the green and turquoise zigzags? Those are my colors throughout our house. Great job so far on the headboard. I made my own a couple of years back with plywood, 2x4s, thick foam, batting, and discount Joanns fabric, with a staple gun. We have loved ours for reading and breakfasts in bed, hope you enjoy yours’.
YoungHouseLove says
Aw thanks! That’s actually a blanket we used to cover a secret book project in our sunroom. It’s from jossandmain.com a few months back. Hope it helps!
xo,
s
Wendy says
The fabric looks great!
No road tripping with a toddler and dog, but we did drive from NoVa to TX in 4 days, compete at a half Ironman (hub…I volunteered), and then started the process of driving back to NoVa in 3 days only to move to UT in under 60 hours later (we arrive on Weds. and leave on Sat.).
Yes, I’d say this is an adventure enough with a tired triathlete and preg wife who worked harmoniously for 99% of the trip so far.
Jenn Leigh says
Can’t wait to hear about Haven!
I’m getting ready to marry a self proclaimed “bull in a china shop” – do you have any tips on not dinging up walls during these kind of projects…other than just being careful? He woke up the other morning and decided it was time to swing elbows in our bathroom…I now get to fix a frame and wall…alcohol wasn’t even involved!
YoungHouseLove says
Oh man, John’s the same way! He has butterfingers (dropped a frame on my ceramic dog, shattered a hallway light cover, drops countless dishes). I wish I had a secret but it’s really just reminding him to be careful when I can. Haha.
xo,
s
Chrissie says
That is going to look so pretty when it’s all done! I love all of the softness you’re adding to your bedroom, it makes it so cosy and welcoming. Mind if I just curl up for a second? I’m just resting my eyes, I promise…. *snore*
We weren’t home much over the weekend, but last night Matt ended up demoing part of our kitchen. I came home from Zumba to find our island bench in the living room. Now part of a wall is missing too! That part was fun :-)
I have to take photos once the sun comes up this morning so we can share it!
YoungHouseLove says
Ooh can’t wait to see pics!
xo,
s
Abbie says
Wow! That fabric is gorgeous! This room just keeps getting prettier and prettier! Love the colors and everything!
Christine Witt (Brush Dance) says
I thought it looked before you cut it down – and then I thought it looked even better after it was cut down – good decision.
We have a Pottery Barn headboard that has a linen cover and is made to have the fabric replaced. I’ve been looking all over for a nice fabric – but love that if we don’t like our first choice, we can replace inexpensively and easily!
Amy @Five Kinds of Happy says
Love that fabric you picked out – I think going for the organic freeform look is an amazing choice! Can’t wait to see how it looks.
Kelley says
I got that same fabric at u fab a few weeks ago :) off the reminants rack! Love that place!
Mary says
Thanks for your great bedroom updates. Wish our room was big enough to rearrange. A couple of years ago my husband built a headboard to for me to cover. He did a great job and we love the look. Ours is approx. 52″ tall and just as wide as the metal frame for our queen size bed. I covered the board with a couple layers of quilt batting, then an old sheet, stapling each layer to the wood. Then I stapled the gripper side of Velcro to the headboard all along the backside edge. I purchased a quilted coverlet at TJ Maxx, sewed the soft side of the Velcro to the edges of the coverlet and voila! I have a removable, read washable cover. Then hubs made a headboard for a friend and she covered hers with a fabric shower curtain. She stapled hers directly to the headboard ’cause she figured a shower curtain on sale would be an easy way to update the room in a year or two. We love ours. Its comfy, looks smart and gave the room just the right amount of sophistication we were looking for.
YoungHouseLove says
That sounds awesome!
xo,
s
Genevieve says
Looks good – you guys are so productive!
What’s the blue and grey chevron fabric peeking at the top of the photo where the headboard is mid construction and lying on your rug? Is that a hint of something to come or a fabric choice that got dismissed?
YoungHouseLove says
Oh, that’s actually just a throw blanket from our living room. It’s in there because I threw it over a secret book project so I didn’t accidentally photograph it!
-John
how2home says
head board is looking good! Love the fabric you got! Congratulations on your feature in style me pretty :) When I saw it, I was shocked!! The items you chose was awesome! Congrats again !!
YoungHouseLove says
Aw thanks! Love Abby and the whole team over there – it was so much fun!
xo,
s
Home Furniture says
The headboard ended up looking pretty good!
sarah says
i LOVE the new headboard fabric! you guys find the best colors/prints. every time i go to fabric stores all i find is lame-o. blah. your room is gonna look awesome!
Meghan says
I have this fabric! I found it initially at the Tonic Living link above, but I ordered mine through Mary Jo’s (http://maryjos.com/fabrics/gazebo-cloud-braemore). It’s about $6/yd cheaper and their customer service was great!
YoungHouseLove says
We love Mary Jo’s!
xo,
s
Tirsa says
What gorgeous fabric! I can’t wait to see the finished product.
I am sooo sore from painting and working in my son’s bedroom for days now. (I’m a tortoise when painting.) I’m very tired, but very happy with how it turned out. DS loves it too. :-) I used this room as inspiration (but with white stripes instead of peach): http://www.houzz.com/photos/77631/Erika-Ward—Erika-Ward-Interiors-modern-kids-atlanta
YoungHouseLove says
Such a cool inspiration photo! I’m sure it looks amazing!
xo,
s
Clare says
What great fabric! Not an obvious choice, so I’m really looking forward to the end product.
I hope you all got through yesterday’s bad storms without any damage – the Post online showed some videos of the crazy wind that blew through Richmond.
YoungHouseLove says
Yeah it was crazy! Our poor neighbor ended up with a tree on her house! We were nervous about what we’d find when we arrived home, but thankfully our house was unscathed and we even had power!
xo,
s
Meredith says
We leave this week for a road trip with toddler twins! But we are leaving our dog behind!!!
Essie says
How many yards of fabric would you say you need for a headboard of this size?
YoungHouseLove says
Our bed is a queen and we needed two yards. Hope it helps!
xo,
s
cara says
I was making an upholstered headboard once and had an “adventure” with my dog. I had a box of wood screws sitting next too me and I knocked them over. My dog grabbed a huge mouth full! I had to reach into his mouth/throat and pull them out. He was a Rottweiler so his mouth actually accommodated my entire fist pretty easily. I managed to get them all out but he started throwing up everytime he ate after that. The vet said he had scratched his throat up so he got to eat cottage cheese, ice cream and soft food for the next week. I never would have thought he would try to eat screws!
YoungHouseLove says
Oh no! So glad you got them out!
xo,
s
Sheila says
I LOVE that fabric! In fact, I love it so much that I just used it in our own master bedroom/bathroom redo – made curtains and a matching throw pillow for our bed (my first sewing project since Grade 8 Family studies). Will be posting after photos on the blog soon.
Can’t wait to see how the headboard turns out!
YoungHouseLove says
Can’t wait to see the pics! Sounds gorgeous!
xo,
s
Jocelyn says
Beautiful fabric!
karin says
Darker IS better – on floors, drawers and walls! I vote with the dude.
Erin says
I know you’ve probably shared this, but where did you find the yellow gingko pillows? They are gorgeous, probably never-to-be-found-again-bargain finds, and my new favorite lust item. I’d love to know where you got them!
YoungHouseLove says
I wish we remembered the name! It was a shop in Northern Virginia (in Old Towne). Anyone know of another source or that shop’s name?
xo,
s
Rachael says
We finished our headboard made from free wood from Craigslist, I believe a fence and parts of a pallet. Also reused our windows when we got them replaced, just painted them green.
I’m also soloing a road trip (just 5 hours) tomorrow with my 5 month old and our dog Gear.
all photos under this link.
http://share.shutterfly.com/action/welcome?sid=0AZs3Lhq4cs2TrY
YoungHouseLove says
Love it!
xo,
s
Essie says
Well, I’m pretty excited because this inspired my hubby and I to make one for our bedroom. I think it will really make it cozier for us. That fabric is exactly what I’ve been looking for – I wanted something with yellow, green & blue for a change to our white duvet but never liked anything I’ve seen. Adding a headboard instead sounds better! Also, our furniture is black (which I regret) but I think it will go really nicely because of the gray. So I’m very excited!! Already purchased 2 yards from Mary Jo’s (thanks for the tip – they sold it cheaper there than the other place mentioned.)
On to my questions – I know that the center boards were to make up for cutting the plywood down the center to fit into your car. So we wouldn’t need to do that since we can put it in my husband’s truck bed. But do we need those thin pieces on the ends?
Also, how would you recommend or go about hanging it on the wall(since we just have a bed frame)?
Thanks so much and awesome job & fabric choice!
YoungHouseLove says
I think you’d need those thin pieces on the ends if you want it to wrap around your existing headboard (ex: if it has a low headboard with posts like our bed has). If it doesn’t you could build legs instead so it’s freestanding or hang it on the wall (which might be more complicated, so legs might be easier). Hope it helps!
xo,
s
Jenny says
Nice! I designed a tufted headboard in InDesign and printed it tiled to scale, cut it out of MDF, and upholstered in thick foam and white faux suede… all on my due date in 2012! Love an upholstered headboard. And we road trip with our almost 2 year old all the time, 7 hours in the car Monday and another 7 further away this coming Saturday! What do you guys do to entertain Clara? For Logan he has a bin full of books and toys, and if he gets antsy I put a musical show (like Backyardigans) on through the cars speakers so he’s listening rather than watching. Just curious! xo
YoungHouseLove says
For Clara it’s mostly books, music and food in the car – though we also pass back some toys and a little Magna-doodle type thing to color on. Our toughest challenge is that when she’s done with something she tends to just toss it over the side of her seat where we can’t reach it!
-John
Allison says
Amazing job with the headboard!! Where did you get those table lamps? I’m obsessed.
YoungHouseLove says
Those were HomeGoods. Hope it helps!
xo,
s
David Judd says
Where did you get the lamps in your bedroom, the pineapple ones with the light round shades
YoungHouseLove says
Those are from HomeGoods.
xo,
s
Kylie says
I love this–it’s exactly what I’ve been looking for to give our platform bed some personality! One question: it looks like when you installed it, you sunk it all the way down to the bed rails. Was it a tight fit against the mattress? I’d like to do a cushy tufted headboard but not if it’s going to make sheet-changing a nightmare.
YoungHouseLove says
Thankfully that gave it the most stability (to have it go down against the rails) and it doesn’t effect how changing sheets is (most beds aren’t so snug around the mattress that there isn’t room for a headboard to be added- so in our case it was a mattress in a box that was a little loose and is now less loose but still works). Maybe test it out by sticking something about an inch or two wide in there just to see how changing sheets works?
xo,
s
maeve says
I was perusing blogs for a tutorial on upholstering a sleigh bed. I’ve landed on and admired your blog many times before, so kudos, keep it up! I love your whole bedroom! It’s beautiful, and even have that same hanging lamp with the flowers. Our tastes are very similar, such that I must know where you got that rug that’s under the bed. Thanks again.
YoungHouseLove says
Aw thanks Maeve! It’s from a local outlet (on clearance since it had a hole that we hid) but I think you can grab it at shadesoflight.com. Hope it helps!
xo,
s
Madeleine says
I know I’m backtracking a bit here, but reading about your decision not to use plywood for Clara’s train board, I was wondering if you were worried about off gassing plywood in this case? Is there a plywood that you think is safer, or some other technique to minimize potential health threats?
YoungHouseLove says
Yes, that was a reason we shied away from it, although we have heard there are some eco companies out there (I think one line carried at Home Depot) so maybe try looking into that as a solution or try going with the solid untreated whitewood like we used in this case. Good luck!
xo,
s
Madeleine says
Sorry, I probably should have clarified that my plywood inquiry was in regard to your headboard, since now I realize you probably can’t tell what post I meant to comment on! I was dreaming up headboards this weekend, but thought sleeping next to something that might be hazardous was not the route I wanted to go…and since you guys seem very in tune with those sorts if concerns, I was interested in how you decided to go with plywood for your headboard.
YoungHouseLove says
Oh yes! Sorry, I thought this was about the train board. Oh yes, I would try to check out Home Depot and Lowe’s for something not-treated and as pure as possible. Ours was just regular plywood that we made sure wasn’t pressure treated or anything (I’ve heard MDF has higher off-gassing issues than plywood) but if we were doing it in a kids room we probably wouldn’t have used anything other than the “green” stuff they sell or solid wood like whitewood. Hope it helps!
xo
s
Berenice says
I love this fabric! I just happened to find a duvet cover in the same fabric over at http://www.horchow.com and I can’t believe what they are charging for it…$735!
YoungHouseLove says
Wow!!
xo,
s
katiekayekate says
Do love all and will be looking at estate sales for a headboard to work with. My question tho is about your light fixture. Did you make it or was it purchased?
YoungHouseLove says
That was actually from Ikea!
xo
s
Melody says
Looking for fabric for curtains … Found your headboard fabric, I think.
http://www.tonicliving.com/productsDetails.asp?categoryid=26&productid=2268¤tpage=1&onsale=0
YoungHouseLove says
Yup, that’s it!
xo
s
Julia says
HI there! I used your inspiration for this headboard this weekend, but haven’t yet hung it on the wall. I am going to use the 2x4s as you suggest to hang them, but am at a loss about what hardware I should use to hang the headboard. Do you have suggestions? or does yours just sit around/on the existing headboard?
Thanks so much!!!
YoungHouseLove says
If you google for “french cleat” that image/description will hopefully help. You can essentially use a piece of wood on the wall and one on the back of the headboard so that they rest on each other and it’s supported!
xo
s
Julia says
THANK YOU SO MUCH!!! I am so excited about this project, and your step by step progression, was insanely helpful!!
XO
Julia
YoungHouseLove says
Good luck Julia!
xo
s
Rach says
Hey guys, I have a sleigh bed, should I upholster the existing wood or build a frame like you did? What would you suggest?
http://www.rachelsewcute.blogspot.com
~Rachel
YoungHouseLove says
I would upholster the existing wood part if you can!
xo
s
Kristy says
Hi,
You’re a blessing. I was just wondering if I should or could make a headboard to sell with a wardrobe I’m rehabbing from a primary child’s look to a cool, industrial tween boy’s taste. I’d like to make it look like faux metal or something, my problem is I don’t have fancy “kregs” or other tools. Is there another way to make it without that? Also what kind of paint would you use on plastic styrene that would be safe and last long? I’m painting embossed styrene that looks like diamond plate. Thank you, you rock!
YoungHouseLove says
Sounds cool! As for the right paint for plastic styrene, they come out with new better formulas all the time so I’d ask at the paint desk (at a place lik Benjamin Moore) what they recommend. And as for making the headboard, I would check out ana-white.com (she has so many great building plans, and if you look for a beginner one you hopefully won’t even need a Kreg jig or anything). Good luck!
xo
s