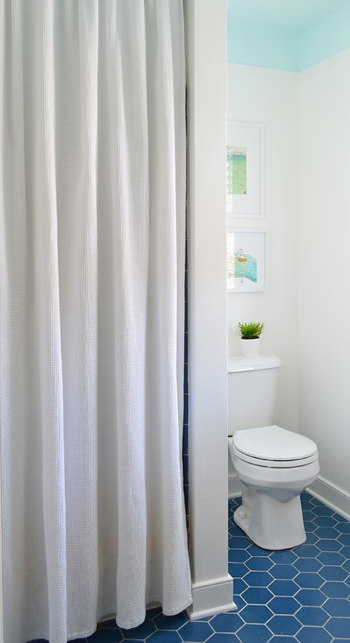
Happy Martin Luther King Jr. Day, guys. We’re back with a fully finished bathroom paint & trim project (we mentioned our plan here last week, and you saw a sneak half-done peek of it in the house tour video on Friday). So here’s what it’s looking like now:
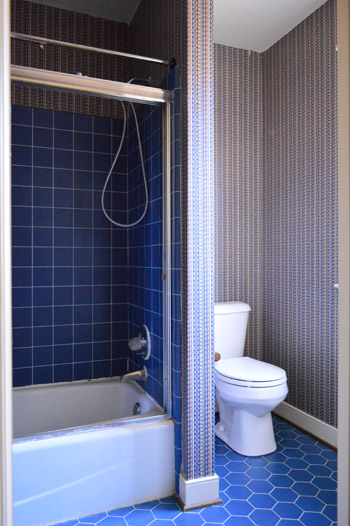
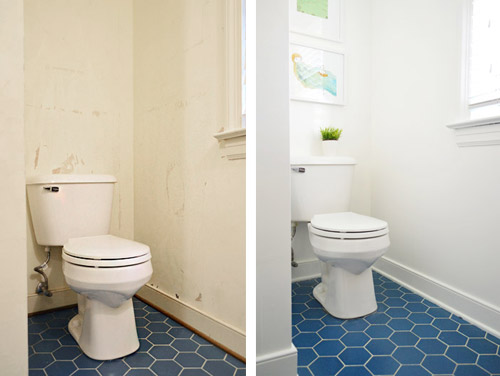
Which is a pretty stark contrast to what we started with. You might remember that we removed the glass shower doors pretty early on, but then we didn’t touch the room again until recently waging war on the wallpaper.
It’s a tough room to photograph due to all the doorways and nooks – especially when trying to get the ceiling and the floor in one shot. So forgive all of the super vertical crops and choppy shots. We hope they at least give you a sense of what the room looks like now.
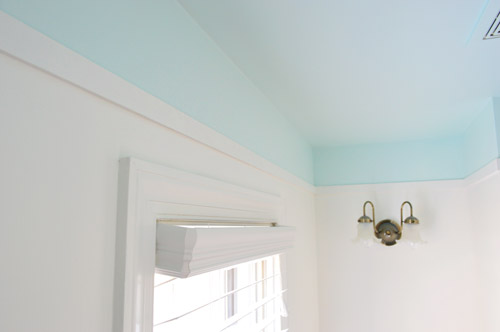
As we mentioned in last week’s post, the thought behind the blue ceiling was to balance the floor. We’re actually charmed by the blue hex flooring, but we thought some up-high interest would be a nice counterpart. Heather’s bathroom (and this similarly blue-floored inspiration image) helped to guide our vision – especially the part about adding some simple architecture to create a transition between the colors.
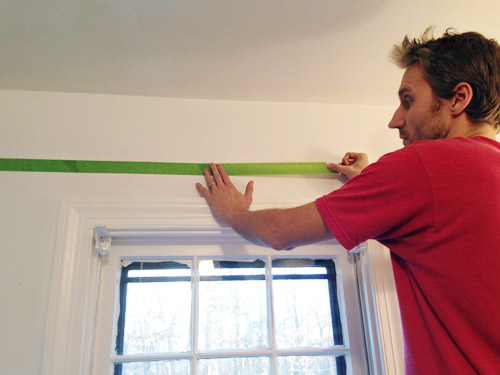
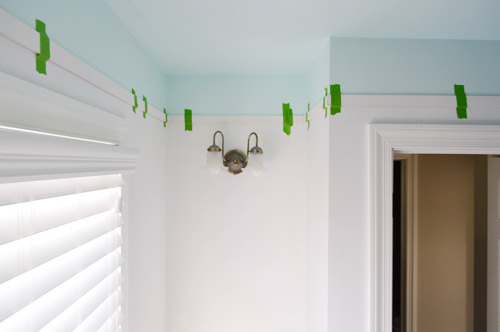
The first step was taping a horizontal border around the room where we wanted our blue color to start. We landed on about 8″ down from the ceiling, since it meant the border wouldn’t be interrupted by door or window trim but would still be substantial enough to look purposeful. I just held up my level and drew a pencil line along the wall… which then acted as my guide to apply painters tape. I wasn’t super meticulous at keeping my tape lines perfectly level since ultimately the paint edge would be hidden under the trim (so as long as it wasn’t majorly crooked, the trim would hide any small wavers or dips).
The next challenge was picking a paint color. We started off by doing some test swatches of colors we had on hand, like Nelson Blue (from our kitchen), Sylvan Mist (leftover from book projects), and Spirit In The Sky (a losing test pot from when we picked a front door color). Normally we’d go for subdued blues with a good amount of gray in them for the walls (like the two on the left) – kinda like a haint blue. But with the low bathroom lighting and the primary blue tiles on the floor, the grayed-out tones actually looked more gray than blue in here. Spirit In The Sky was exciting in a small swatch because it was bold and very obviously blue, but we worried that once it went around the whole room – and covered the entire ceiling – it would be too intense for us (paint tends to magnify itself from a small test swatch and looks a lot bolder when it’s all over the walls or ceiling). So you see how Sherry’s holding up another swatch?
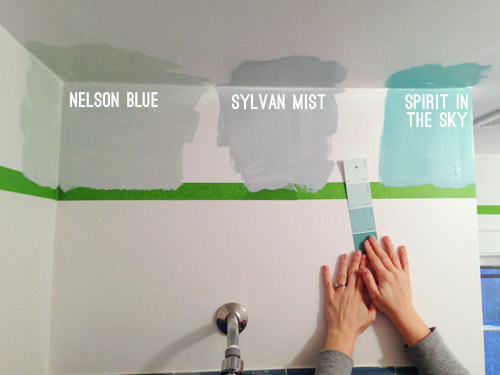
That’s Spring Mint (in an eggshell finish). Since nothing we had on hand was working, we decided to spring for a quart of a new color that was further from the blue-gray category, and more in the “pure blue” arena. Something like Spirit In The Sky, but a bit lighter and more subdued in intensity.
It took us two coats, but by that evening we had the blue border and ceiling that we were going for. As we peeled off the tape, we both wondered if we should leave it as is (i.e. forget adding molding). We decided it was definitely an option (especially if you’re someone who doesn’t have the time/money/tools to add it) but we wanted to take ours a step further. Mostly because we’re a little too in love with our nail-gun, and lattice strips are nice and inexpensive.
Speaking of lattice, we used the same pre-primed strips that we used for our last hallway’s board & batten. They’re super thin, light weight, and just 77¢ per foot from Home Depot. Sherry measured and cut the strips using our miter saw, and we taped them into place as she brought them up, just to keep track of how it looked and what walls were still incomplete. Despite all of the nooks and crannies in this bathroom, it took us under an hour to get everything cut and taped up… though it did involve about two dozen trips up and down the stairs between the two of us. Go quads!
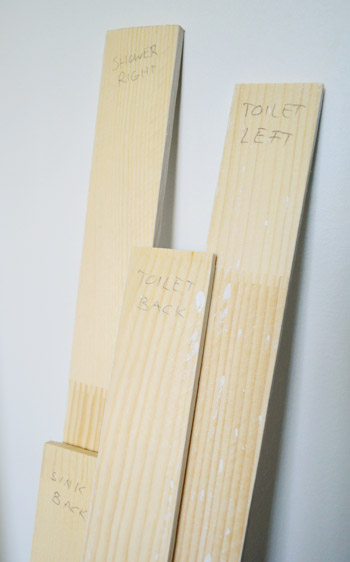
As we took them down to paint them, we labeled each one on the back so we knew exactly where they went when it was time to nail them into place. Many of the walls are similar in size, so we figured it would save us the frustration of putting the puzzle back together by trial-and-error.
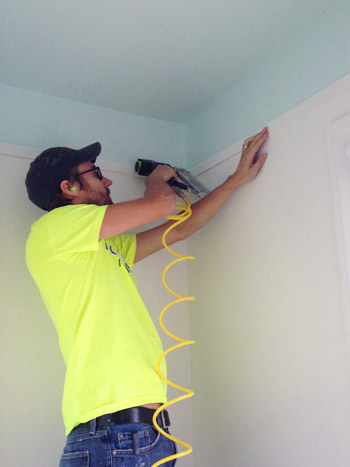
In addition to putting a coat of white (Simply White by Benjamin Moore) on the pre-primed slats, we also painted the walls the same color. Once that dried, we could finally attach the trim. This is one of those easier-with-two-people projects, so Sherry was with me holding things (the nail gun, the other end of the lattice strip, the level, etc) which made it go faster. We started with me nailing one end of our first strip with the nail gun (it was loaded with 1.25″ brad nails). Note the ear plugs, since in such a small space the sound of the gun was crazy loud.
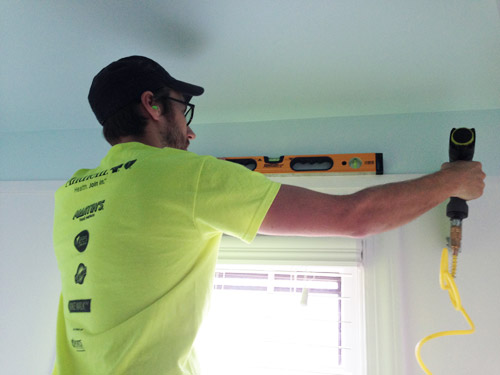
Then I held my level across it to make sure it was straight before handing the nail gun to Sherry so she could nail in the other end. This is a rigged photo since Sherry had to hop down to take this picture, but in real life it was a lot easier for her to hold the other end of the lattice up, and I’d check things with the level, say “good!”, and she’d fire a nail into her end. Then we could just continue around the room, making sure each piece lined up with the one before it.
Once we had all of the lattice hung, I went around the whole bottom edge with a bit of caulk, since our walls weren’t flat enough for them to looks seamless. I also used caulk to fill the tiny nail holes that we fired into the lattice on each end as we hung it. When the caulk dried, Sherry went over the trim with one more coat of paint – just on the front and under the bottom edge – to make sure it looked as crisp as the freshly painted wall.
There are still lots of little tweaks that we’d like to do to this room for Phase 1 (see that light fixture above?) but so far we’re really happy with this slice of personality that we brought back into the space (you know, after ridding it of its wild wallpapered persona).

And I don’t want to ignore the power of the white paint in all of this too. Here’s the difference between our post-wallpaper-removal “gas station bathroom” look, and the post-paint after that we have going on now.
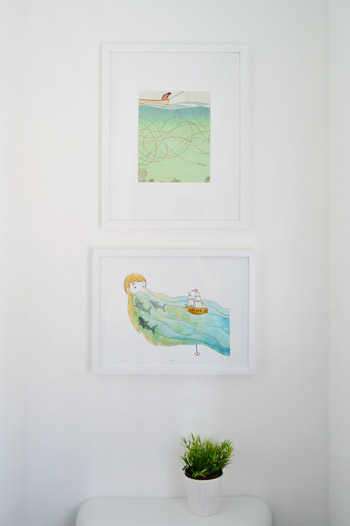
We also hung some art on the wall behind the toilet. These are prints we had from our last house (the top one is a page ripped from Real Simple magazine that hung in our guest bathroom, and the bottom one is a print by Sally at sadlyharmless.com that was given to us during one of our book tour stops last year and used to hang in our sunroom).
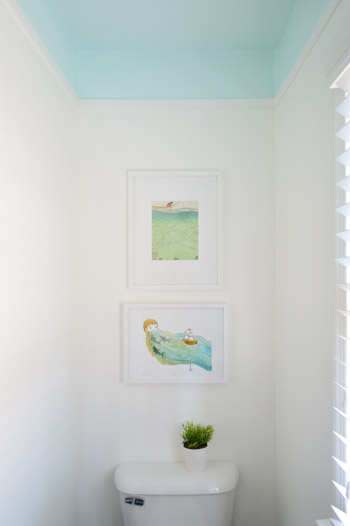
When we held them up together we initially worried they were a little too similar to be so close to each other, but decided just to work with what we have for now. The gradient of blues (the top print is a little lighter) actually seem to connect the lighter blue ceiling to the deeper blue floor in a nice subtle way.
At the end of the day, our entire bathroom update so far clocks in at a little over 50 bucks. Here’s the breakdown:
- Removing the glass shower doors (more on that here): $0
- Peeling the wallpaper (more on that here): $0
- Lattice trim from Home Depot: $25
- A quart of blue paint for the ceiling in “Spring Mint”: $30
- Shower curtain, white paint for the walls & trim, and art: $0 (we already had them)
- TOTAL: $55*
* If you don’t have a shower curtain, wall & trim paint, and art on hand, you might spend around $100 grabbing those.
We still have a few more inexpensive updates in mind for this room, but it’s already a lot nicer to walk into than the dark blue wallpapered space that we started with. What did you guys do this weekend? Any bathroom or trim projects in the works?
Psst- Last week we woke up to some surprise snow, and Clara really got into it.

Andrea says
—((standing ovation))—
SO good. Love.
YoungHouseLove says
Thanks so much Andrea!
xo
s
Stacey @ Likes to Smile says
WOW! I love the blue at the top! And it makes me love the blue on the floor! I never could have dreamed that up. So impressive!
Now to think of how I can convince my rental landlord to let me try it…
Mia says
All old carpet removed–check. All wallpaper removed–check. So with all that you have scheduled (and things we may not yet know about) during the next few months, does it still look hopeful that all blue trim will be banished by barnacle day?
YoungHouseLove says
Oh man, it’s going to be tight! There are so many window panes in the office and those big built-ins in the office, but I’m hopeful we can at least make a nice big dent. And it would be awesome if we could get it done!
xo
s
Maryanne says
It looks amazing! And I’m impressed with all you’re getting done when you might just feel like putting your feet up and having John bring you stuff at this point. :)
Carla says
Gray is over done in people’s homes. It can be very cold. The blue you chose doesn’t have any hints of gray and is just lovely. I love the blue tile and how fresh and cheery everything looks.
Jedi Mama says
I love the comment above mine, where the gal shouts out, “Holy Crap!” And really, I’d like to holler that as well, but I feel like I should be a touch more ladylike (even though… you know… my heart WANTS TO YELL THAT OUT). This bathroom is fantastic! I’ve had so much fun popping in here to see what y’all have accomplished, and now… well… I want a blue ceiling in my own bathroom. You grabbed the ball on this makeover and just ran it straight into the end zone for lots of points! (Which is my football comparison, seeing as how it was on ALL. DAY. YESTERDAY. Go, Broncos!) Well played.
YoungHouseLove says
Haha, thanks Jedi Mama!
xo
s
Sally says
Thanks so much for featuring my print! Someone told me that I was on your blog today and I had to come see what it was all about. Great work and lovely bathroom!
Sally
YoungHouseLove says
You’re welcome Sally! Love your work!
xo
s
Carrie Lea says
I’m just realizing you have a sink in the bathroom! I thought the set up was similar to your old house, where you just had the sink nook outside the shower/toilet room. I must have been asleep somewhere along the line. :)
My parents house has picture rails in a few rooms and I’m trying to get my mom on board with doing fun ceilings and bring the color down to the picture rail. I love ceilings that aren’t white!
YoungHouseLove says
Oh yes, it’s so hard to shoot, but we have a little wood vanity with a sea-shell-shaped sink in the bathroom too!
xo
s
Jess says
What kind of plant is that in there? It looks so happy and bright!
YoungHouseLove says
Thanks Jess! That’s a faker from Ikea! I grabbed it years ago and just put it in a simple ceramic pot. I love that I can’t kill it!
xo
s
Emily-Jane @ Not A House, But A Home says
Love the blue trim! It’s so fresh! It’s really brightens up the room and makes it feel larger and airier :)
Leah says
Your tile looks so much nicer now. Color me impressed!
Also, I love blue as a bathroom color. Our bathroom is tiled halfway up the wall with white tiles (that are cracking, but we don’t own, so we just deal with it). Then, we painted blue up top. We choose “bathe blue” by Sherwin Williams, and I think it’s close to what you chose. Subtle, lovely, but clearly blue without being “hello, I’m blue!”
YoungHouseLove says
Sounds so pretty!
xo
s
J Bagley says
Lovely! I love how light and bright the space looks now.
I didn’t see at toilet paper roll holder – is it just outside the shots, or do you still need to choose one?
YoungHouseLove says
We haven’t hung the new one yet, but it goes on that inside wall next to the toilet (where the shower is on the other side) so we don’t think it’ll show in most photos since it’s tucked back there.
xo
s
Mamaw says
Love, love, love the two blues and the white together! Y’all done good!
YoungHouseLove says
Thanks Mamaw!
xo
s
Ashley says
The bathroom looks much better, but you guys are confusing me! Lattice as trim?? You said that in this house you planned to spend more time making choices and more money making them happen, because it was your forever house, right? But these really cheap upgrades are along the lines of what you did in H2 before you announced that you were selling it. How are we supposed to believe this is your forever house when the upgrades point to a flip? Help me understand!
YoungHouseLove says
Sorry for the confusion! This update, along with the sink nook, are Phase 1 changes as we save our pennies for a big reno down the line, where we’ll knock down the wall between the sink nook and this room and make them into one big space instead of two choppy ones. Our apologies for not mentioning that in this post (we’ve chatted about it in previous posts as well as on our House Tour page). So this is just an in-the-meantime update for $55 to make us smile for a few years – you know, while we thank our lucky stars that the wallpaper’s gone! We’ve also done some more major forever-house upgrades here (like installing hardwood floors upstairs, tackling an almost-$3000 sunroom makeover project, choosing an updated slate-like new roof, and springing for premium doorknobs everywhere instead of spraying the old ones). We just can’t do a ton of those biggies all at once since we have to wait for funds to build back up :)
xo
s
caroline [the diy nurse] says
Not sure if it’s just a phase one thing or if you plan on keeping the tile but I was totally hoping you would. It’s fun and playful and I think really charming [especially if it’s in good shape and you can keep it around longer]. With all the other updates it becomes so sweet. And I love the whole painted ceiling detail. What a fun pop of color!
Samantha says
Wow! It looks SO much better! I love how much the blue in the tiles pop with the new paint.
Jamie says
That ceiling color! Love the progress you two (or three counting the bump?) have made in here. And I have to say I’m seriously drooling over your tile… By itself it was beautiful before but now that the wallpaper is gone and you’ve really spruced up the bathroom, I am swooning over it!
YoungHouseLove says
Aw thanks Jamie!
xo
s
Chris says
I love the way the new paint colour tames the bold tile. It’s crazy how pairing colours can suddenly change the way they appear! The bathroom reminds me the sea, bright, fresh and airy. Great job guys.
J Lardizabal says
You know, I actually bought a back issue of the September 2012 Real Simple magazine, hoping to find that fisherman print, but no luck. Would you be able to double-check the date? Thanks!
YoungHouseLove says
So sorry J! That’s really the best guess (I thought that was the date on the bottom of the page). Anyone else have any tops for J?
xo
s
Mia says
I also bought the 9/12 back issue for that print, and it definitely was in there. I no longer have that issue so can’t tell you the page number, sorry.
hayley says
Love the new bathroom! Easy touches make a huge different! dailydoseofdarling.com
Kristen | Popcorn on the Stove says
I love the color you chose and that you used it on the ceiling, too! The bathroom looks great now!
Cynthia St. Clair says
I think this is my favorite update EVER, and that’s saying a lot! I keep going back to the “after” photos and smiling — what a delightful bathroom you’ve had the vision to create!
YoungHouseLove says
Thanks so much Cynthia!
xo
s
Michelle @ A Healthy Mrs says
What a difference some fresh paint makes! Love the blue ceiling!
Aylin says
Wow, that bathroom came out beautiful! What a difference, you guys are so talented. I love checking out the before and after pictures, it gets me excited to do more at my house! I saw that a while back you had some blog posts about reader dilemmas and possible solutions to their design problems, are you still doing that?
YoungHouseLove says
I’d love to get back into those! We have been so busy with showhouse stuff lately, but we’d love to bring those back!
xo
s
AlisonG says
On my monitor the ceiling and the tile don’t go together. Between the bedroom the sink nook and closet you sure have a lot of color and styles going on. You liking it is all that matters. I bet you are getting tired of painting!
YoungHouseLove says
Aw thanks Alison! I think we’re ready to be DONE painting all that blue trim, but we still have a whole lot of it going on in the office and dining room (ack, all those window frames and built-ins). It’ll be tight to see if we can get ‘er done by the time this baby comes, but that’s the goal! Fingers crossed…
xo
s
AlisonG says
Wow, you have a lot on the agenda, good luck with it. Careful you will run out of before and afters to blog about! At that speed.
YoungHouseLove says
Haha, thanks Alison! Our list is a mile long, so we hope to have stuff to chat about for a nice long time! We also have thought about how much fun it would be to tackle a rental or a beach house after we’re done with our house – along with other people’s homes and other charity projects! Should be exciting to see where we end up…
xo
s
Jolene says
It’s SO happy!!! The tile now looks hip and modern, which is also happy. :) I love the art – it’s perfect. So’s the blue paint choice. Good work!
Ann says
This might be a strange question, but what kind of nails or wall hanging tool did you use to hang the art in the bathroom? I grew up with a mother that never wanted to put nails into the walls, so we didn’t have much art hanging up. I’m kind of a newbie to hanging art, but I have a lot of it but want to make sure I’m using the right tools. I love the color you used in the bathroom. Thanks!
YoungHouseLove says
We just buy a big ol’ plastic container of picture hanging nails from Home Depot (I think they’re around 1.5 inches long with a nice round head to grab a wire or a picture-hanger.
xo
s
Shavonda@AHomeFullOfColor says
My heavens this is fabulous! I looooove the color choice. It makes that awesome floor pop in a massive way. This is so good you guys!
Maggie S says
Wow! What a night and day difference! I can’t believe how much better the floors look with your new paint and trim colors! I’m always a sucker for salvaging retro finishes in homes full of character. That’s the fun part of buying an old house! It’s so great how you were able to not only love and use the original blue flooring but actually make it look great! I think the mostly white walls, with just a touch of the Spring Mint, is really what made it work! Making the floors the focal point and letting the rest of the colors simply support it really made the blue tiles the star of the show! So, essentially, I’m a big fan of this bathroom makeover!
YoungHouseLove says
Aw thanks Maggie!
xo
s
Molly says
Q: Is “spring mint” the top one on the strip Sherry is holding up? I assume so, but it looks SO pale there. This is a good example of what you were talking about a few weeks ago – – if you’re all “ooo, let’s paint the ceiling seaglass aqua!”, you should actually dial the color back a bunch to get the end result you’re looking for and not a scary rainbow-brite style neon glow. Looks great!
YoungHouseLove says
Yes, it’s the one on the end of the strip! Isn’t that funny?! Looks completely washed out, but on the wall (and especially on a ceiling) it seems to really amplify!
xo
s
Celina says
No projects this weekend, but I did post the before and after of my guest bathroom last night on my weekend update. This room was updated almost two years ago, but I still love it.
http://mycajuntrinity.com/2014/01/19/weekend-update-3/
YoungHouseLove says
So pretty! Such a soothing room!
xo
s
Nikki H says
We installed a new dining room fixture and a new living room fan with a light. And then the mr. installed a closet rod and shelf in the closet of the guest room, which is like a pass-through into the fame room. It’s a weird set up, but works better now.
YoungHouseLove says
Sounds smart!
xo
s
Janaya says
Where did you find the extra long shower curtain? I love the look!
YoungHouseLove says
Amazon.com a while back!
xo
s
Cher says
YOU GUYS HAVE ESP! I painted my bathroom ceiling pink a while back, but it wasn’t working like I wanted. This is the perfect solution. Did you run into any areas you had to work around, like doorframes, whatnot, or did you do it high enough to avoid those? I’ve got a tub-to-ceiling slate wall to deal with, and I’m not sure how to make it work.
YoungHouseLove says
We just did 8″ below the ceiling because that cleared the window frame and the door frame (originally we thought about meeting those right at the same height, but it looked better when we held the molding above it instead of intersecting those). As for your to-the-ceiling tile, you’re lucky! I’d just choose a measurement (ex: 8″ below the ceiling) and just run it right up to the side of the tile, for a hopefully clean and simple look.
xo
s
Jessi says
I’m trying to choose a white paint for my kids room (and planning on a blue ceiling, kind of similar to what you’ve got going on in Clara’s room, but blue like in this room). Any thoughts on Decorator White vs. Simply White? I noticed you used Decorator White in your last house but have been using Simply White in this one. Thanks!!
YoungHouseLove says
The light just seems to be different in every house, so in this one Dec White looked yellower and Simply White had more of a warm-but-pure-white tone. I’d bring both swatches home and just see which one you like better in your lighting situation.
xo
s
Jeff says
Looks great! I’m actually moving into a new place and I plan to do something similar in my bedroom. I have 2 questions. What are the dimensions of the lattice trim, or does lattice only come in one standard size? And you paint everything white in your house Simply White, do you use different sheens for the walls and ceiling vs the trim?
YoungHouseLove says
We seem to just favor Simply White here (it reads really nicely in this light, and it’s nice to keep it consistent for all the trim and doors in the house). The ceilings are usually flat paint, the walls are usually eggshell, and the trim and doors are always semi-gloss. As for the lattice, I believe Home Depot just sells it in one standard size (look for the one that’s 77 cents per foot and that’s the one).
xo
s
Jeff says
Thanks! I’ll be sure to update you on it.
Beth says
LOVE it!!!! I may try something similar in my bath soon.
Amy says
I usually like your color choices a little more. I personally don’t think that the blue you chose for the ceiling compliments the floors at all. The blue on the floor looks more purple-y and the ceiling has more green in it.
It seems like a blue with more grey in it would have looked better.
Unless the colors just aren’t photographing well???????
YoungHouseLove says
That could be! Two of the blues that we tried first (and had on hand) had gray undertones, so if we liked those better we definitely would have used them over running out and buying something else. In person we just preferred Spring Mint with the floor tile. They certainly don’t match, but it’s sort of like how the darker sea and the lighter sky look nice together in nature.
xo
s
Jessie G says
We are at the midpoint in gutting our guest bathroom…. Walls repaired, floor tile and glass tile wall put in this weekend… Grout tomorrow!
YoungHouseLove says
Exciting! Best of luck Jessie! Grout is a fun stage because it all comes together!
xo
s
Amy says
Oops, one more thing. As for the placement of the rail, I think if you used the same trim as the door frame and window it would have looked good to have it line up with the top of the window and door. You would remove the top pieces of the door frame, and window, cut the remaining side pieces to 90 degree angles, then used the new trim to go all the way around the room and across the door and window. Does that make sense?
YoungHouseLove says
Oh yes, I love that idea if we were doing this as a forever change! This is just phase 1, so spending $25 on inexpensive lattice instead of $100+ for thick window/door molding just made sense to us (since we’ll eventually be knocking down the wall between this room and the sink and combining them as one big bathroom). But for anyone doing this for the long haul that’s a great idea!
xo
s
Dana@chocolateandsunshine says
This was a really sweet little project. At first glance, the white wall looks like wood and once I read about the lattice board, I was wishing I had a nail gun. I like the white on white, too with the blue you selected. I love it when it just takes a bit of creativity and hard work to make a major difference — some thing you two do all the time. Great job.
YoungHouseLove says
Aw, thanks Dana!
xo
s
Chloe says
Call me crazy, but I actually like the blue tile! It looks great against the crisp white walls and is modernized by what you did to the ceiling. I kind of hope it stays!
Nicole says
LOVE!!!!!!
Laura says
Love it! I have the same print in the upper frame — I tore it out of Real Simple :) It looks great with the blue-green you chose!
YoungHouseLove says
So funny! Such a small world!
xo
s
Ortisse says
I like it a lot! Your bathroom looks like a lot to my parent’s. They had to manage with a similar dark blue floor, so they put white “stones” (not sure about this word, in french it is “carrelage”) on the walls and they painted the ceiling in light blue, and it ended up very nicely.
I love your blue a bit better because it brings more light in the room. And I’m in love with your arts choice, the colors are perfect for the room.
YoungHouseLove says
Thanks so much Ortisse!
xo
s
Nicole says
Thought I was going to dislike this, based on your mock-up the other day-boy was I wrong- really great vision!
YoungHouseLove says
Thanks so much Nicole!
xo
s
gina says
This is looking so great!
And I love your inspiration room and the prints that you chose so much! I like the bit of greenery (potted plant on the toilet!) you added as well to pop some of the greens in the prints and I’m wondering if you’ve considered adding a bit of natural wood tones (like your inspiration picture)? I think it could further balance out/tone down the blue tile.
Great work as always, can’t wait to see more!
YoungHouseLove says
Yes! We have a wood vanity just like the sink nook in here, so we’d love to stain that dark just like the one out there, and maybe hang a bamboo shade to bring more of those tones in?! Will keep you posted!
xo
s
Megan says
Yeah for spring mint. It is the color of my third kid’s nursery. We’ve got edge comb gray and revere pewter in this house too. Great minds think alike. Looking good. Do you ever have problems getting your shower to vent with the curtain so high? My husband doesn’t think it will vent well so despite buying the extra long curtain I still hang it about 4 inches from the ceiling.
YoungHouseLove says
Oddly enough we don’t have issues with that – we had the same setup in our first and second house’s bathroom too. Maybe just try it with a tension rod so you can lower it if you have issues?
xo,
s
ChristinaInAustralia says
This is really stunning. What a change! Must remember this… Warm (!) wishes from Australia!
Renee says
Love that blue tile! I would leave it for all phases, don’t kill all the old stuff forever in a house. I will also cry if you tear out the slate in your entryway :) Love, love, love your site!
Renee says
Love the blue hex tile, not what’s in the shower so much.
YoungHouseLove says
Haha, thanks Renee! Eventually when we knock down the wall between our weird sink nook and this small bathroom (we’d much rather make one big room) we’ll either need to find more of the same floor tile or retile everything to make it cohesive, but we think that’s a while down the road, so we’ll get to soak up this hex for a good year or two :)
xo
s