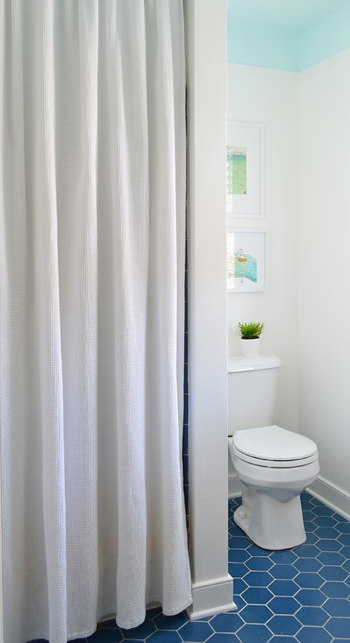
Happy Martin Luther King Jr. Day, guys. We’re back with a fully finished bathroom paint & trim project (we mentioned our plan here last week, and you saw a sneak half-done peek of it in the house tour video on Friday). So here’s what it’s looking like now:
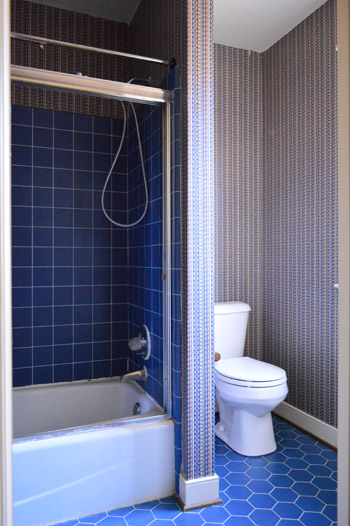
Which is a pretty stark contrast to what we started with. You might remember that we removed the glass shower doors pretty early on, but then we didn’t touch the room again until recently waging war on the wallpaper.
It’s a tough room to photograph due to all the doorways and nooks – especially when trying to get the ceiling and the floor in one shot. So forgive all of the super vertical crops and choppy shots. We hope they at least give you a sense of what the room looks like now.
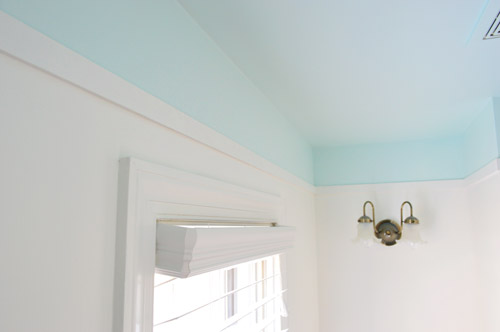
As we mentioned in last week’s post, the thought behind the blue ceiling was to balance the floor. We’re actually charmed by the blue hex flooring, but we thought some up-high interest would be a nice counterpart. Heather’s bathroom (and this similarly blue-floored inspiration image) helped to guide our vision – especially the part about adding some simple architecture to create a transition between the colors.
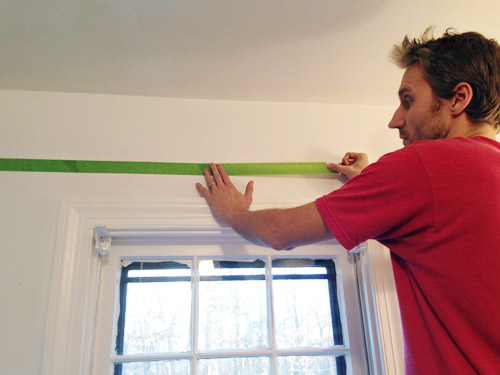
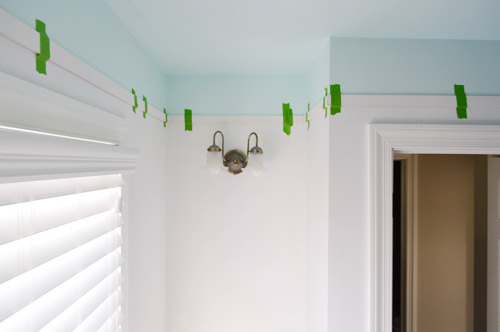
The first step was taping a horizontal border around the room where we wanted our blue color to start. We landed on about 8″ down from the ceiling, since it meant the border wouldn’t be interrupted by door or window trim but would still be substantial enough to look purposeful. I just held up my level and drew a pencil line along the wall… which then acted as my guide to apply painters tape. I wasn’t super meticulous at keeping my tape lines perfectly level since ultimately the paint edge would be hidden under the trim (so as long as it wasn’t majorly crooked, the trim would hide any small wavers or dips).
The next challenge was picking a paint color. We started off by doing some test swatches of colors we had on hand, like Nelson Blue (from our kitchen), Sylvan Mist (leftover from book projects), and Spirit In The Sky (a losing test pot from when we picked a front door color). Normally we’d go for subdued blues with a good amount of gray in them for the walls (like the two on the left) – kinda like a haint blue. But with the low bathroom lighting and the primary blue tiles on the floor, the grayed-out tones actually looked more gray than blue in here. Spirit In The Sky was exciting in a small swatch because it was bold and very obviously blue, but we worried that once it went around the whole room – and covered the entire ceiling – it would be too intense for us (paint tends to magnify itself from a small test swatch and looks a lot bolder when it’s all over the walls or ceiling). So you see how Sherry’s holding up another swatch?
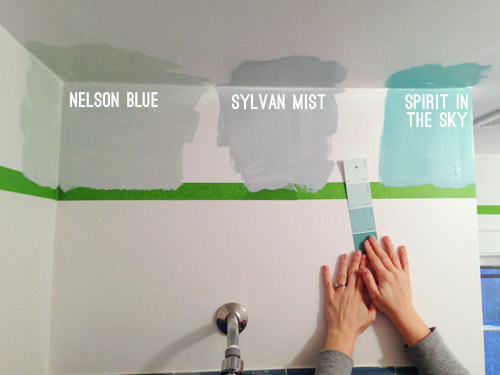
That’s Spring Mint (in an eggshell finish). Since nothing we had on hand was working, we decided to spring for a quart of a new color that was further from the blue-gray category, and more in the “pure blue” arena. Something like Spirit In The Sky, but a bit lighter and more subdued in intensity.
It took us two coats, but by that evening we had the blue border and ceiling that we were going for. As we peeled off the tape, we both wondered if we should leave it as is (i.e. forget adding molding). We decided it was definitely an option (especially if you’re someone who doesn’t have the time/money/tools to add it) but we wanted to take ours a step further. Mostly because we’re a little too in love with our nail-gun, and lattice strips are nice and inexpensive.
Speaking of lattice, we used the same pre-primed strips that we used for our last hallway’s board & batten. They’re super thin, light weight, and just 77¢ per foot from Home Depot. Sherry measured and cut the strips using our miter saw, and we taped them into place as she brought them up, just to keep track of how it looked and what walls were still incomplete. Despite all of the nooks and crannies in this bathroom, it took us under an hour to get everything cut and taped up… though it did involve about two dozen trips up and down the stairs between the two of us. Go quads!
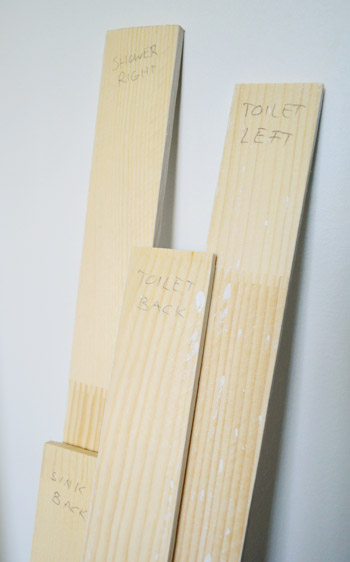
As we took them down to paint them, we labeled each one on the back so we knew exactly where they went when it was time to nail them into place. Many of the walls are similar in size, so we figured it would save us the frustration of putting the puzzle back together by trial-and-error.
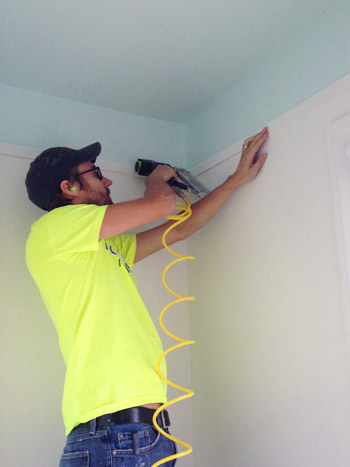
In addition to putting a coat of white (Simply White by Benjamin Moore) on the pre-primed slats, we also painted the walls the same color. Once that dried, we could finally attach the trim. This is one of those easier-with-two-people projects, so Sherry was with me holding things (the nail gun, the other end of the lattice strip, the level, etc) which made it go faster. We started with me nailing one end of our first strip with the nail gun (it was loaded with 1.25″ brad nails). Note the ear plugs, since in such a small space the sound of the gun was crazy loud.
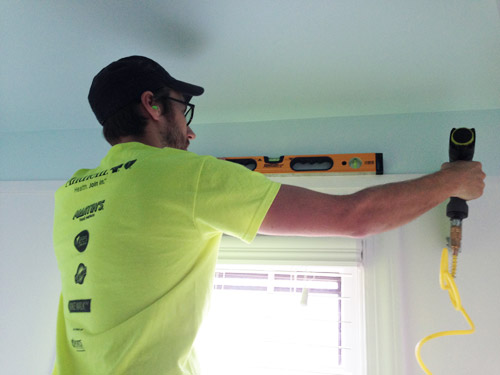
Then I held my level across it to make sure it was straight before handing the nail gun to Sherry so she could nail in the other end. This is a rigged photo since Sherry had to hop down to take this picture, but in real life it was a lot easier for her to hold the other end of the lattice up, and I’d check things with the level, say “good!”, and she’d fire a nail into her end. Then we could just continue around the room, making sure each piece lined up with the one before it.
Once we had all of the lattice hung, I went around the whole bottom edge with a bit of caulk, since our walls weren’t flat enough for them to looks seamless. I also used caulk to fill the tiny nail holes that we fired into the lattice on each end as we hung it. When the caulk dried, Sherry went over the trim with one more coat of paint – just on the front and under the bottom edge – to make sure it looked as crisp as the freshly painted wall.
There are still lots of little tweaks that we’d like to do to this room for Phase 1 (see that light fixture above?) but so far we’re really happy with this slice of personality that we brought back into the space (you know, after ridding it of its wild wallpapered persona).

And I don’t want to ignore the power of the white paint in all of this too. Here’s the difference between our post-wallpaper-removal “gas station bathroom” look, and the post-paint after that we have going on now.
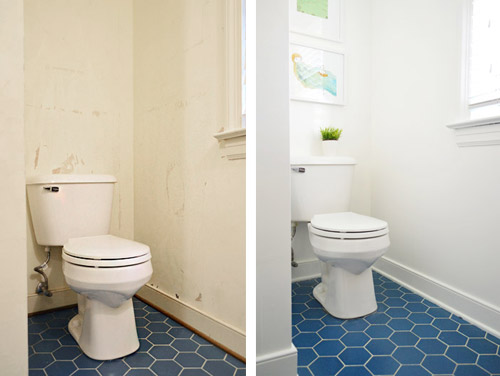
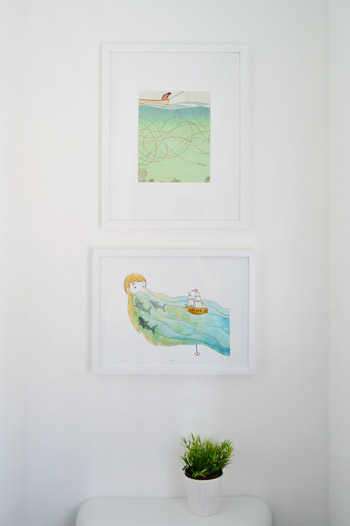
We also hung some art on the wall behind the toilet. These are prints we had from our last house (the top one is a page ripped from Real Simple magazine that hung in our guest bathroom, and the bottom one is a print by Sally at sadlyharmless.com that was given to us during one of our book tour stops last year and used to hang in our sunroom).
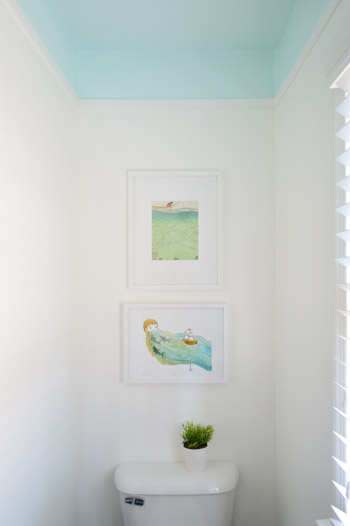
When we held them up together we initially worried they were a little too similar to be so close to each other, but decided just to work with what we have for now. The gradient of blues (the top print is a little lighter) actually seem to connect the lighter blue ceiling to the deeper blue floor in a nice subtle way.
At the end of the day, our entire bathroom update so far clocks in at a little over 50 bucks. Here’s the breakdown:
- Removing the glass shower doors (more on that here): $0
- Peeling the wallpaper (more on that here): $0
- Lattice trim from Home Depot: $25
- A quart of blue paint for the ceiling in “Spring Mint”: $30
- Shower curtain, white paint for the walls & trim, and art: $0 (we already had them)
- TOTAL: $55*
* If you don’t have a shower curtain, wall & trim paint, and art on hand, you might spend around $100 grabbing those.
We still have a few more inexpensive updates in mind for this room, but it’s already a lot nicer to walk into than the dark blue wallpapered space that we started with. What did you guys do this weekend? Any bathroom or trim projects in the works?
Psst- Last week we woke up to some surprise snow, and Clara really got into it.

Cindy says
I was totally painting my powder room a turquoise blue this weekend!
I was actually going to contact you about it to thank you — I haven’t painted a room for several years and I followed your recent advice about choosing a color that is a little muddier than the one I thought I wanted, which means I don’t have a neon bathroom. BIG HUGS, and I’ll share with you when it’s all done. xo
YoungHouseLove says
Aw congrats, Cindy! I’m so glad!
xo
s
Koen @ TownHouseHome says
Wow, that’s quite a difference, it looks a lot brighter now. It’s also an idea I’ll have to remember when redoing any of our rooms, to have the paint from the ceiling run through on the walls. If it works on 8′ ceilings it should work on 10′ ceilings as well :)
My weekend consisted of removing all old electricals like light switches and so from our kitchen-to-be, a real puzzle as I couldn’t break anything going into another room. Now the walls are ready to be plastered, another baby step towards our new kitchen.
YoungHouseLove says
Congrats on getting all that done Koen! And good luck with the new kitchen!
xo
s
Amanda says
Wow! What a transformation :) looks so bright and pretty! I’m
Loving seeing all of the updates you’re doing to the new digs xo
Stephanie says
Wow! What a huge difference! It amazes me how you work with what you have but make it look totally different!
Mary says
That blue is fantastic! I have to admit I love, love the blue hex tile. I think awhile ago you mentioned some pieces are pretty beat up and cracked so phase 2 might involve new flooring. If you end up going that route salvaging the good tiles and using them for project like a backsplash would be gorgeous and eye catching.
YoungHouseLove says
That would be fun! We’ll have to see how they come up! We hear some tiles pop right up and others break a ton during removal…
xo
s
Kim says
I love the extra long shower curtain! Did you make that or did you purchase it?
YoungHouseLove says
That was from amazon.com a while back! It’s just a 95″ waffle weave curtain. I believe the vendor on amazon.com was Target.
xo
s
seanna says
A long time reader – first time commenter. Love the site, how your personalities shine through and how you balance so many projects – it’s been inspiring for me!
i have a question about the paint colour you chose. just wondering why you didn’t choose something closer to the floor tile, as that would have been my instinct. is the ceiling colour in the same colour range as the tile?
YoungHouseLove says
I think that was our initial instinct too, but since the wallpaper was close to the floor tile and that looked sort of heavy and dark to us after living with it so long, we just sort of swung the balance over to a lighter sky like color. Sort of how the ocean can be a deep blue and the sky can be a light blue and they still look nice together.
xo
s
Karen B says
Wow! That looks amazing. What a fun way to add a pop of color to a small space. I’m stashing that idea in my back pocket!
Emily M says
Love the look you created and never suspected you had 8′ ceilings in there – it looks so much taller.
I finally wrapped up our phase 1 master bath update this weekend by priming & painting the trim a crisp white. It was a breeze after the nightmare of removing the 20 year old textured wallpaper and patching the mess it left behind.
YoungHouseLove says
Thanks Emily! And congrats on wallpaper removal success! That’s gotta feel good!
xo
s
Christine G says
The updates look amazing! With the shower curtain mounted so close to the ceiling, do you have any issues with light while in the shower?
YoungHouseLove says
Surprisingly we don’t, even with that dark tile! We had the same setup in our last two houses as well, and the best way to describe it is that if you’re in a room with the lights on and you hold some white fabric up, so much light passes through it, so the whole curtain glows as light comes in through it instead of above it, if that makes sense.
xo
s
patty says
sorry i don’t care for the turqoise wall and royal blue foor… i haven’t read comments above… and even though they’re far apart i think a grey or deeper blue grey would have complimented the floor better… maybe you’re planning to do the floor sooner rather than later.. i think it clashes.. but pretty by itself.
Kay says
I have to say I agree. The blue hex tile actually looks great now that the wallpaper is gone, but it’s just not working for me with the turquoise toned top half. Add in the completely different color scheme for the vanity room snd I am left feeling like in real life it probably looks way more disjointed than it is appearing in photos. Love the artwork and the lattice trim, however.
Susan says
Can I just say that all your ‘phase I’ updates are lovely enough for a final makeover in my book! This is such a stunning contrast to the before look, as is your whole house tour. I think you’ve increased the value of your home significantly with these improvements!!
Kudos to you both for your vision and elbow grease.
YoungHouseLove says
Thanks so much Susan!
xo
s
Evie says
I love seeing vision and elbow grease side by side, just as in meaningful life!
Stephanie says
IT IS SO BRIGHT AND LOVELY. Seriously, what a transformation. I’m in love.
Stephanie says
Wow, I love it! I’m in love with those blue hex tiles, now. The whole space looks fantastic.
Gwen, The Makerista says
What a difference! It’s nice that the hex tile is back in style…I love the tone on tone of the blues. One of my favorite trends on the rise! Looks beautiful.
Betsy says
Love the light & airy look! Question on painting windows– how do you paint them & make sure they still open with ease?? I’ve struggled with this on a few projects and have yet to perfect it. Any ideas?
YoungHouseLove says
I need to make a video or take step by step pics since so many folks have asked that! The bathroom is a little tight for that, but maybe when we do the windows in the office or dining room I’ll get it done for you guys. It’s basically just a series of movements I do to allow things to get painted and dry and then I do other parts so the whole window is done.
xo
s
Needle little Balance says
This bathroom looks so much better!!
Something I have wanted to ask for a long time because I am curious and English is not my first language:
when you say you caulk something on the wall or to fill in holes when you build something out of wood like on your veranda- do you use the same water repellend stuff that contains silicone that one would use e.g. to seal the bathtub? Or is your caulk some kind of chalk/ plaster?
I am asking because the carpenters used the silicone containing stuff to caulk the trims of the hard wood floors and I hate that those lines seem to be dust magnetes now. I wonder if there is something better.
YoungHouseLove says
Good question! It comes in a tube like the silicone stuff you’d use outside, but we use the non-silicone version for things like windows and doors inside (the brand we like is Dap and it’s white and paintable – whereas a lot of the silicone stuff for outside isn’t paintable).
xo
s
Tanja says
Sorry for butting in but I thought this might help. I think the stuff you were asking for is called “Acrylmasse” in German. The texture’s pretty much the same as “Silikon”, but you can paint over it and therefore it really blends in well with the wall as any gaps between a ledge and the wall are almost indiscernible.
Greetings from Austria!
YoungHouseLove says
Thanks so much for sharing the tip Tanja!
xo
s
Katie B says
Looks so great!
I have a question! Our basement ceilings are 9’6″ would doing this make them look even taller ?? Or what do you think! The room I’m thinking of doing something like this too is a bathroom 9×8. Thanks!
YoungHouseLove says
I think it might break up that long vertical in a nice way (sort of bringing the ceiling down a bit visually) although I think that would depend on the color you choose (some receded and some come forward a bit more).
xo
s
Sherry@The Impatient Remodelers says
I finally finished painting our stairwell/hallway. I painted our living room Edgecomb Gray back in the summer and the hallway never got finished. Paint at Lowes was buy one get one free this week!! Score!!
Your bathroom idea is great!! We have a super tiny master bathroom that needs to be totally gutted (picture a HUGE corner 80’s jet tub taking up 3/4 of a 6′ x 10′ bathroom).
YoungHouseLove says
Wahoo! Gotta love those paint sales! And good luck on your bathroom, Sherry!
xo
s
Danielle says
Soo pretty! It never ceases to amaze me what a difference paint can make in a space!
We also worked on our master bathroom this weekend. It has mint-y green tile on the floor and walls (those are staying)with an ugly flowery wallpaper border (that had to go). I managed to get all the wallpaper border removed with our handy-dandy steamer, but most of the glue is still there – for now. It appears that the previous homeowners went with a special bathroom/steam-resistant wallpaper glue – gee, thanks for that! ;) So we’re going to have to go the chemical route and scrub it off.
I’m trying not to think of all the other things that have to be addressed in that room (low water pressure, stained grout, ugly light fixture)and focus on how great it looks w/o that border!
YoungHouseLove says
Oh no, good luck with that pesky glue, Danielle!
xo
s
Harmony_G says
I’ve said it before and i’ll say it again, it is amazing how a little paint can make such a big difference!
Krista says
We are in the midst of a bathroom update too…pretty minor stuff – paint, new curtain, new toilet (isn’t it amazing what a new, shiny white toilet will do for the place!?).
We are thinking about painting the ceiling a color other than white (our walls will be white – Popcorn by Martha Stewert). We have a exhaust fan in the middle of the bathroom ceiling…so do we paint it the same as the ceiling color? Or a new coat of white?
YoungHouseLove says
We have one too and just painted it the ceiling color to blend it in. It had already been painted the same color as the ceiling by the previous owners so that made us feel less weird about it. Haha!
xo
s
Melissa@TheChicDream says
It looks so crisp and fresh! What a great way to work with your blue tile. I recently used lattice strips for the board and batten trim in my baby girl’s room(thanks to the tutorial from your last house). Thank you for all of the great ideas and tips for working with what you have.
YoungHouseLove says
That sounds really cool, Melissa!
xo
s
Miranda Rowe says
AAAHHH! I love this. These colors are making me itch for Spring. The whole rooms look so bright and clean!
-Miranda
http://www.mirandawritesblog.com
Elisa says
Woah, not only is the blue great, but the white makes it look *so* much cleaner. And who doesn’t want to think of the word “clean” when they walk into a bathroom?
Padilla Clan says
I love your instinct and how those decisions just completely transform the space…that being said you are my go to makeover gurus. Forgive my ignorance but I need some help. We are repainting our house. I decided to go with sherwin Williams Tobacco Road it’s a golden tan color that I have always gravitated too and the master bedroom and Bath will be Sea Salt by Sherwin Williams the kids rooms well they each reflect their likes at the moment so thank god for doors. All this includes redoing the trim as well. Of course I went with Benjamin Moore Advance after my gurus LOL. Here is the part I am stuck with and please forgive my ignorance. Why tint the paint for trim? (is it a personal preference?)Why not just use the white it is? (is it too much?) I know I want the trim a clean white for contrast/pop since we are also doing batten in the foyer and hallway. I gave in to my husband in going with the high gloss finish vs semi. But I am completely undecided as to tint or not (choices would be white dove/simply white (of course) or bright white)Just curious as to why most people tint the white for trim. I would love your insight. Again thanks for sharing your journey I look forward to seeing it for inspiration and ideas!!!
YoungHouseLove says
You’re so sweet Padilla! I think the issue is that sometimes a base color of white straight from an untinted can can be too stark or even blue looking – so things like Decorators White or Simply White or Dove White often just have one tiny drop of gray and one tiny drop of cream but they warm it up or make it slightly less stark if that makes sense.
xo
s
Marie says
How does it look in the shower nook? Where the tile comes up close to the blue ceiling and trim? Its a different color blue tile in there right? Either way, now you know it would look awesome if you’re ever in the mood to add white subway tile or something in there! Speaking of bathroom updates…how do you think re-finishing/glazing (whatever its called) the steel tub in your last home measured up?? on a “cost/benefit” scale? Would you do it again if you knew it wasn’t your “forever” home?
YoungHouseLove says
Oh yes, we’re going to address that in a future post! We have a few ideas/finishing touches we’d love to do for that space! As for reglazing, we did that in our first house’s bathroom and were really happy with it! I would do it again for sure if we needed it!
xo
s
Katy says
Crazy good for any budget! I like that you made the blue tiles work. They are not something you see every day.
Julia says
It looks fantastic! I love the two pieces of art over the toilet…they complement each other. Great job!
Teri says
Just wondered why you didn’t take the color down to the top of the windows and incorporate that trim ? Seams like quite a few horizontal lines going on? I obvi don’t know what I’m talking about, just a personal preference question.
YoungHouseLove says
That was our first instinct too, but holding the thinner lattice up to the thicker molding just didn’t look as good as floating it above it. It’s hard to explain, but it felt too light when it touched the thicker trim, and nicer when it was floating above it.
xo
s
Theresa says
I LOVE IT! I love love love love your bathroom now. I mean seriously, I would go out and choose that blue tile just to get my bathroom to look like that. Hahaha go figure because, like you, I don’t dig the rest of the blue-everywhere-in-the-house.
Your house is turning out so lovely!
YoungHouseLove says
Thanks so much!
xo
s
Andrea says
I really love the blue tile. I also did that paint border effect in my kids’ rooms but left off the trim. I do like the clean line of the trim though!
Tara says
LOVE IT!
Question: when you repaint in the bath, do you remove the toilet? How do you get behind it??
YoungHouseLove says
I use a little short handled brush to reach as far back as the eye can see.
xo
s
Carrie Lea says
The mini rollers work really well too. In my bathroom I am able to cover the entire wall by doing half of the space on one side and half on the other.
lyndsay says
so fresh and so clean clean!
you said there are still lots of little tweaks you’d like to do to this room for phase 1… does that include the random sink/ vanity too?
YoungHouseLove says
Yes, we still want to address that vanity along with lights and the shower tile I think!
xo
s
Olivia says
I’m glad you’re keeping the tile, it’s awesome! We have a 1950’s ranch and our 1/2 bath is all pastel pink, ha! I secretly like it :) We’re about to redo our main bath but I’d love to lay some retro tile to keep the feel of an older era house but definitely with an update! Good job guys!
http://www.thenealranch.blogspot.com
Meg says
So bright, airy, modern and crisp — I love it! The idea of adding height with the blue at top is genius. Looks so nice!
Aspen @ little green orchids says
Okay…the Spring Mint color is perfect!! It actually reminds me of sea glass, which I think is so gorgeous with crisp white in a bathroom. I just changed my bathroom color from dark red (it was bad) to Behr’s Burnished Metal (a grey-blue) but now I think I may have to re-do it again with Spring Mint…
Julia says
Nice, that’s almost exactly the color we chose to put on the ceiling of our bathroom! Except ours doesn’t extend down onto the wall and our walls are gray. But I’m definitely also on board with the blue bathroom ceiling trend! Looks great :)
Melissa says
Wow! Love that look! If I was going for more of a coastal cottage, I would have wanted that example before doing the bathroom we recently finished. We are leaning toward modern, coastal modern, in the work we’re currently doing. http://msgfun.blogspot.com/2014/01/another-bathroom-ready-for-business.html
Thanks for the inspiration! I have a few bathrooms left to do (we also moved into a blue-painted trim house last year), I might have to look into this lattice product!
YoungHouseLove says
So pretty! Thanks for sharing the link!
xo
s
Christine says
The ceilings looking soaringly higher than 8 feet. I’d keep that blue floor tile, long term!
Danielle says
I love the look! Trying to decide if this will work somewhere in my house. This weekend we worked at finishing up a vanity that we are constructing from on old antique table with a vessel sink on top. I was wondering where you got your floor length shower curtain?
YoungHouseLove says
That one’s from amazon.com (I just searched for an extra long 95″ curtain).
xo
s
Kelli says
I was so happy to get a chance to see Nelson Blue in less light than your kitchen because I’ve had it in mind for our basement. I think just like this instance it would be a little gray/muddy. We are looking for a nice light bright fresh color that isn’t neon or intense. We are just stumped!! This weekend I dug out old caulk am recaulked along all of the trim and primed our basement bathroom and you are right what an amazing difference the bright white makes!!!
Your bathroom is totes adorbs, as usual you guys have the Midas touch. Now can you please come over an help us pick a color for our basement??!!
YoungHouseLove says
Haha! Be right over!
xo
s
Carla says
Nelson Blue is a very gray, subdued blue. I haven’t seen any examples of it that doesn’t feel a bit drab and depressing. I am very sensitive to color and have had a hard time choosing paint colors for our new home because of this.
Danielle says
Oops! I meant your ceiling height shower curtain.
Stephanie @ Whole Health Dork says
What a huge transformation! I love that you two find an inspiration picture and just go for it! It looks fantastic! I would never think of doing that, but the results are amazing! Thanks for sharing.
Bonnie @ The Pin Junkie says
Beautiful job and a big improvement from what it looked like before! Blue and white are one of my favorite color combinations! Love your new bathroom!
Alycia says
WOW! What an amazing transformation. This gives me that final kick in the butt I need to redo our bathroom. We rent a four bedroom home but our landlord’s don’t care what we do to the paint, which is awesome. We have already “finished” (HA) our bedroom and living room – well basically done minus the glaringly bare walls. That bathroom though…with its hideous peeling wallpaper…it’s physically painful to look at it now haha. I laughed when I read about your shower peeling because I started doing that a month or so ago.
YoungHouseLove says
Wahooo! We need to start a Naked Wallpaper Peeling Anonymous club.
xo
s
Allison says
The bathroom is looking amazing! And as a Speech & Hearing Sciences major in college, I am thrilled to see the ear plugs. Yay ear protection! :)
YoungHouseLove says
Ha! Thanks Allison!
-John
M.C.@ ThousandStoryKitchen says
I love it, guys. That Spring Mint is really fun and I never would have guessed it would go with the blue floor so well! QUESTION: I’ve thought about hanging the shower curtain high like you guys do, but I worry that it will make taking a shower too dark! Do you find that annoying or anything? Like you’re blocking out all the light from the shower that way? Thanks :)
YoungHouseLove says
Oddly enough, even with the dark shower tile it has been just fine (we’ve had it up there for around 6 months since we moved in). The best way to describe it is that in a room with the lights on when you hold up a white fabric, the light shines right through the fabric (since there’s no blackout fabric or anything going on). So the light shines right through the whole shower curtain while we’re in there (it sort of glows white if that makes sense).
xo
s
Suzette says
It’s amazing how much better the floor looks now that you’ve done the other changes!
katrina says
Did this with similar paint colors in my dining room and 8 years later it’s still my favorite room in my house. Your bathroom looks great!