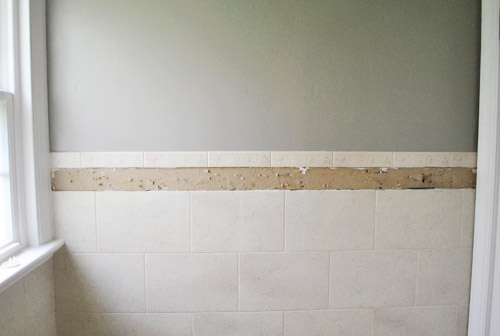
We no strangers to removing unsightly trees. In fact, taking care of the dead/dying/dangerous trees that we were warned might fall on our first house during our home inspection was a big part of the transformation of the front yard. But taking out these particular trees was a new challenge… because they were in the form of tile in our bathroom:
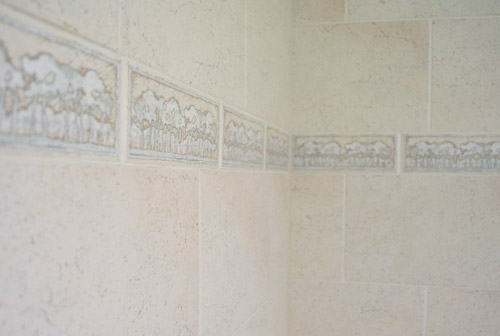
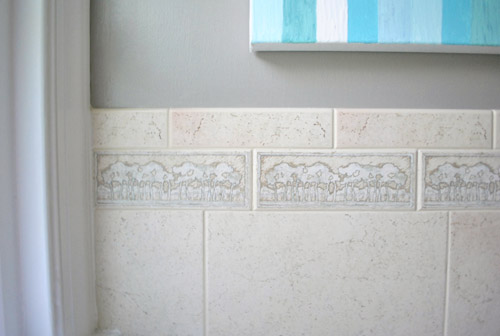
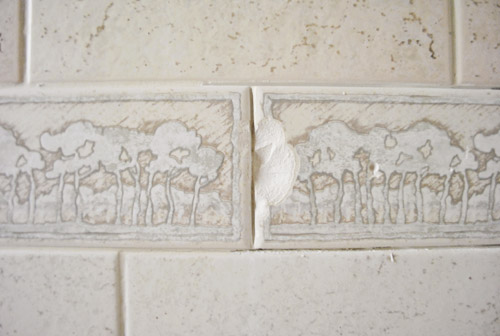
We’ve never been crazy about the beige-on-beige color scheme going on when it comes to the tile in that bathroom, but at least most of it is neutral enough to not call that much attention to itself. Except for that tree-tacular border. Every time we walk in the opening chant from The Lion King plays on repeat in our heads. Feel free to listen to it as you read this post (you can bet your buns we were singing it throughout this project).
It’s just not what we would have picked to encircle the entire bathroom (it’s on all four walls, the same tree sketch on each tile, over and over again). It’s like groundhog day without Bill Murray.
Thankfully, tile isn’t permanent. And we’ve seen people cut out offending tiles (whether they’re broken, ugly, or both) and replace them with something more their style. We even tackled a little bit of that in our kitchen when we did some bracket-reduction surgery here.
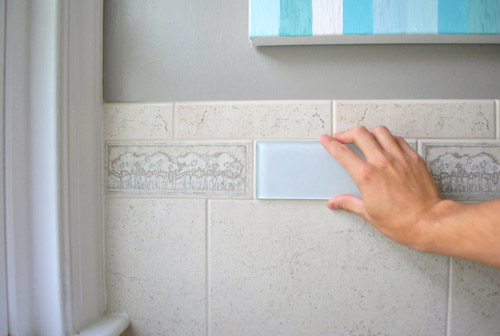
So we debated for a while about what we wanted to put in its place, and finally decided on some classic clear glass subway tiles (sort of like the glossy and reflective cousin of the classic white subway tile). They were the perfect size and we felt like they’d help update the room like some of the other beige-to-white changes that we’ve made (painting the of-white trim, swapping out the beige toilet, etc). See how holding just one of them up to the old border sort of modernizes and freshens the whole room and breaks up the monochromatic beige-on-beige tile action? They sort of look blue here (since they’re reflecting the blue painting) but they’re clear glass in person – which is really cool since they pick up colors in the room, whatever they are.
After checking out a couple of sources (local tile shops and big box stores like Home Depot), we found these guys at The Tile Shop, which is also where we got our kitchen penny tile. And with our 10% discount (the code is YHL10, which works for everyone) we only needed about $50 worth of tile to redo the entire border. So it actually was a pretty quick and easy shopping trip… except for having to repeatedly peel Clara away from all of the displays. For some reason she’s obsessed with crawling in and out of all of the fake showers. And laying down in them. We call that last shot “The Crime Scene.”

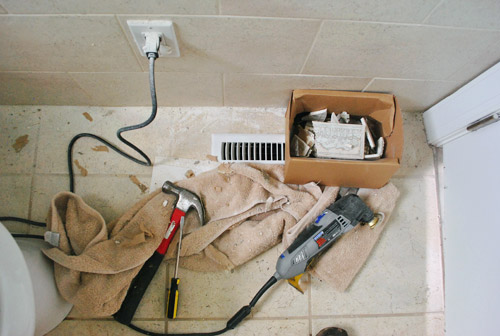
Even though the tile was pretty affordable, the project total quickly jumped with the purchase of the tool that we’d need to cut out the old tile: a Dremel MultiMax (here’s an affiliate link to the one we bought for ya). It – plus the special head for grout – ran us about $130. But I called it part of John’s Father’s Day gift (and a late Mother’s Day gift to myself, haha) since it was high time we “transplanted” those tree tiles. We figure it’s a tool that’ll come in handy a lot over the years (it has a bunch of different heads), so it’s not just a one-project-thing. We’ve actually used it on two other projects since, including the deck so it’s already paying off!

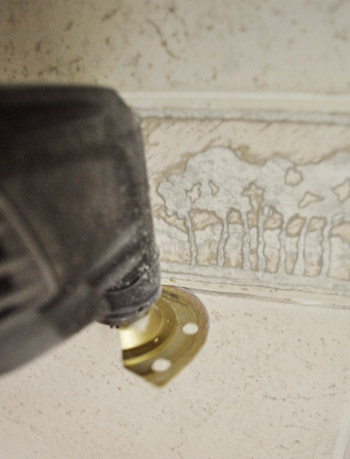
We were a bit hesitant to just have at it, but the Dremel felt like a pretty straightforward tool. We attached the special grout attachment, plugged it in, turned it on, and slowly pressed the oscillating head (it sort of just shakes back and forth quickly) into the grout line.
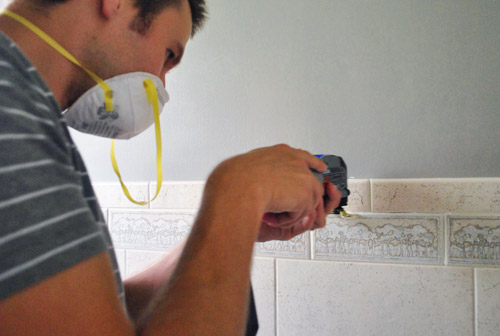
John got to take it for a spin first (new-tool-lover that he is) but I also got in on the fun. It wasn’t the fastest process in the world, but we liked that the attachment was strong enough to break up the grout – but not really strong enough to majorly scratch the tile. So if we slipped a little bit we didn’t have to worry about ruining the surrounding tiles (you probably could, but you’d have to lay into them with some force, and that wasn’t our game plan). Oh and once we got started, the groove between the tiles acted as a natural guide to keep our line straight – so that was nice.
Once we had removed the grout around one tile we half expected it to just pop off the wall with a light flick of the flat-head screwdriver. Nope. Instead it just chipped off a bit and came flying at us like a ceramic bullet.
In an unusual reversal of roles, I was just about ready to throw up my hands and declare this entire project too difficult (I’m usually the chipper we-can-do-it cheerleader while John voices his doubts). I think I was just riled up because that chipped piece of tile-shrapnel hit my neck and gave me a small cut. Thank goodness we were both wearing safety glasses so the eyeballs were protected. Since John’s neck remained unscathed (and he probably was enjoying this role reversal of being the one who soldiers on) he carefully tapped at it the edge a bit more with a screwdriver and hammer… and eventually was able to get under our first tile!
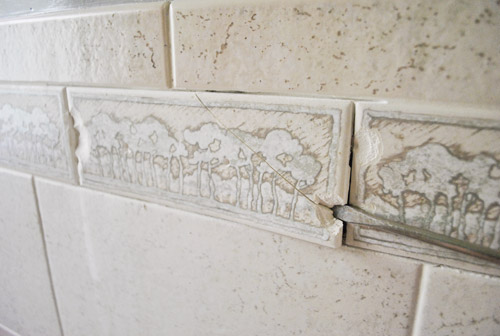
A bit more prying later and voila – we had one tile down, and about three dozen more to go.
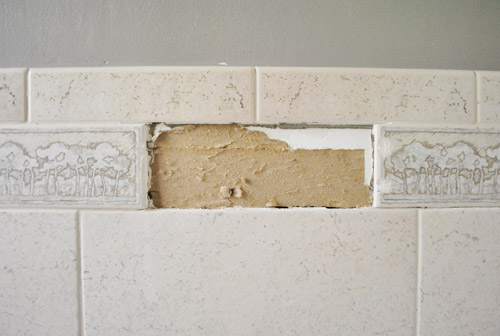
You can see in these shots that it looks like these tiles were applied to drywall, not cement board. It’s not ideal, but not problematic enough that we were going to tear the whole thing off and replace it with with the sturdier stuff (this is not the shower wall, it’s the wall next to the toilet).
Did I mention this process was kinda messy?
The other rows of tile came off easier actually (the difference between thinset on cement vs. thinset on drywall paper) so the process speed up a little bit (although cutting out all of that grout was still more time consuming that we expected).
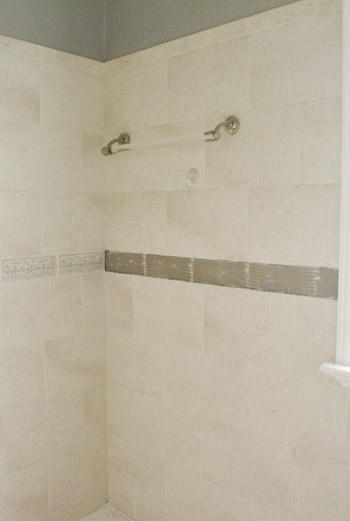
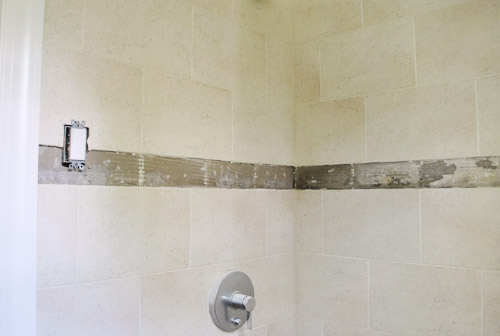
But by the end of Clara’s nap (about 2.5 hours this particular day) we had managed to get all of the tile off the wall successfully, without any more tile-inflicted wounds. High fives ensued. Update: A few folks have asked why there’s a light switch in the shower in the photo below this one, but it’s actually located outside of the shower curtain near the door to the bathroom, so it doesn’t get wet.
And we had continued to make quite a mess on the floor. More high fives were enjoyed.
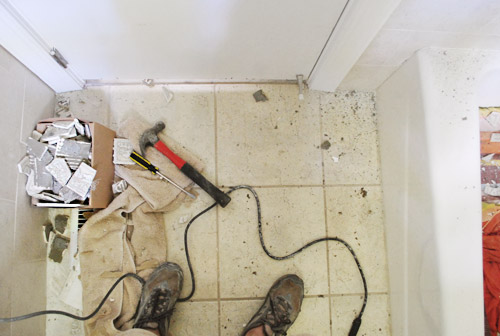
Accomplishing any project within the span on one nap always falls within the “victory” column for us. After taking another half hour to sweep up and wipe down the room (followed by showering in the hall bath), the room was ready for tiling. But we’ll cover that tomorrow since we still have a few things to finish and some photos to snap before we can share that whole shebang. Who else has rocked some tile removal? Anyone use a Dremel (or similar rotary tool) for the task? Any high fives going on, or are we the only ones trying to keep those alive?
Psst- To follow this bathroom sprucing project from the start, check out this planning post, this painting post, this light-swapping post, this art and trim-painting post, this toilet-updating post, this window frosting and shampoo wrangling post, and this toilet selling/buying and door-cutting-down post.

heather says
We may not have delicately cut tile out, but we did rip out carpet from my MIL’s “new” house. Thankfully most of it wasn’t tacked down which made it easier…except in the second video when my husband tells me to nut up and then I use the word “scrotum” twice.
I should be banned from videos.
http://www.likeacupoftea.com/it-runs-in-the-family/
YoungHouseLove says
Hahaha, that’s hilarious.
xo,
s
Veronique says
I just love your blog, your sense of humor, your descriptives (the tile, like GroundHog Day without Bill Murray),your use of music and videos (that entry segment to Lion King was so satisfying the day I first saw the movie that I would have been happy if that had been the entire thing), and your friendly, fun, often self-deprecating tone…
I found your blog a few years ago (when looking for garden weddings as we planned ours) and started reading daily a few months ago when I finally got curious about blogs. I look forward to my dose of YHL every day :-)
And one other thought – who knows – maybe Clara is working through her birth traumas by entering, crime-scening, and then easily exiting calm safe gorgeous shower stalls :-) with her parents safe near by :-)
YoungHouseLove says
Aw, you’re so sweet Veronique! Thanks for the kind words!
xo,
s
carrie @ brick city love says
I’ve got a Rockwell SoniCraft tool that’s very similar to the Dremel. Comes in handy for so many different, random projects. You’ll use it a ton!
Amy says
Just bought a Dremel at an estate sale for $3. :) Looking forward to using it!
YoungHouseLove says
Amazing score!
xo,
s
Alisa says
No tile to speak of, but I wanted to comment that I FINALLY know what you guys are talking about when you say you can get stuff done during naps. Our little lady is a cat napper but yesterday she took such a long nap, I was able to make an entire pair of pants. It was beyond life-changing! I’m hoping she keeps up this new trend so I can finally finish painting the kitchen next! :)
YoungHouseLove says
Isn’t it amazing?! Clara went through a phase where she only slept for 40 minutes and we were going crazy, but now she gives us one two-ish-hour nap a day, and we’re overjoyed! Of course we have friends who say their kids sleep for 3 hours, but we’ll take 2!
xo,
s
Alisa says
ahhhh you’ve given me hope!!!!!!! I’m crossing my fingers it’s just a stage :)
Regina says
My hubby gave me a dremel for xmas last year. I had asked for one for two years and he came throught last year and I love it. I too am removing ugly border tile in my bath the sad thing is I picked out that ugly border about 8 years ago, what was i thinking?
Laura @cookicrumbsandsawdust.blogspot.com says
Oh yea- we are tile removal masters over here. We put a band of clear glass penny rounds in our shower. The only bummer, which I wish I would have noticed before we installed it, would be noticing all the small inclusions and the color variations.
I’m don’t know how much variation is in the tile you selected, but I would recommend dry laying it out first to make sure you get the look you like.
Can’t wait to see it!
YoungHouseLove says
Oh that’s really smart! We’ll have to make sure all of our tile looks the same so there aren’t any color changes!
xo,
s
erin says
wow, your bathroom really is small! i mean i knew that it was small, but seeing the picture that shows the mess on the floor, really shows how there isn’t much space between the wall and the tub!
YoungHouseLove says
Oh yes, it’s tiny! Haha. So glad we are finally capturing that on film!
xo,
s
Krysta says
Question…were you able to get any of the tiles off without breaking? I was hoping to install an accent border in my bathroom and salvage some of the existing vintage tile to patch the holes from removing the built-in ceramic soap dish and towel bar. Am I just dreaming that I can get any of them off in one piece?
YoungHouseLove says
Sadly we weren’t. Not a one. They seemed to be really thinsetted in there, so maybe it depends on how much mortar your tiles were held in by?
xo,
s
Jessie says
oh and absolutly love the “part of John’s Father’s Day gift” and it being a late Mother’s Day gift to you!
Sounds like something I’ve done!
Kate says
This post is timed perfectly! We just decided to regrout our entire shower surround. What started as “just filling in a few worn spots” has turned into “OMG our grout is in bad shape. it. must. go.” And I’m realizing I should have invested in a Dremel! I’m using a hand-held grout saw and I suppose the plus to all of this is that the grout AND my arms will look awesome when I’m done! :)
YoungHouseLove says
Oh my gosh- that’s a ton of work! And you’re totally right, you’ll have Madonna arms by the end!
xo,
s
Angela says
I ordered a Bosch oscillating tool Amazon was offering as a Daily Deal last week to do just the same thing–remove some highly offensive (to me, anyway) accent tile in my bath. Good timing on your tutorial!
YoungHouseLove says
So glad! Good luck!
xo,
s
Kate says
What are you planning on doing with your old tiles? The reason I ask is that I recently fell in love with Motawi Tileworks (http://www.motawi.com/) from Ann Arbor, and the style is kind of similar to your old tree tiles. I think the old tiles are really pretty — but would definitely be more suitable in a less repetitive fashion :-)
YoungHouseLove says
So sorry, they all came apart when we got them out. See in the picture how they splintered and broke? They were so morter-ed in there, so to get them out they kept breaking.
xo,
s
heartartz says
We just had the dated 1987 border removed from our shower and replaced with a more monochromatic tile to go with the field tiles. A Definite update!!!
Not being DIY-ers we had our tile guy do it.
You’ll be happy to know you did it like a professional!
He used a Dremel just like you and found the same thing in shower easier on cement backer and on wall “glued” to drywall. He too only broke on tile ..the first.
He was able to fit in new tile monochromatic classic border.
He then removed all the shower grout (with Dremel) and regrouted and sealed entire shower.
It all looks brand new, a definite updated look!
YoungHouseLove says
That’s amazing! So interesting to hear how he did it!
xo,
s
Sarah says
I bought a Dremel Multimax after getting super sick of attempting to hand sand small spaces. I love it! The attachments make it so handy, and it practically cut my sanding time in half. It’s definitely one of my favorite tools. Glad you guys are enjoying yours!
Liz E. says
Looks great! The tree tile border is….interesting. Not something I would pick but at least it was neutral! LOVE the new tile by the way!
We may be doing something similar in our bathroom (removing some tile to upgrade to wainscoting while leaving the bathtub tile intact) or purging the tile all together. Just curious: would the Dremel cut through the tile itself? Depending on the route we take it would be necessary.
YoungHouseLove says
I think you might be able to get a head that’s meant for cutting tile (this one was meant for grout). Hope it helps!
xo,
s
Jessica says
I’m not sure…but I think you need a wet saw to cut tile, so that you keep a smooth edge. Maybe there’s a “wet saw” attachment?
YoungHouseLove says
Ooh that’s a good point. I think someone commented about using it to cut across their tile, so maybe just a diamond blade (and wetting the tile by hand before cutting it) helps?
xo,
s
Meagan {Green Motherhood} says
The tile is going to be awesome! Im so glad ya’ll weren’t complacent and just said, “oh well, we’ll live with it” and found a way to make it work for you. I don’t know if I would have been so brave!
On a personal note, we’re picking out all of the details for our house to be built and I want to paint the whole thing the gray you have in your bathroom (BM Rockport gray, right?) I want your totally honest opinion (you will NOT offend me, promise :) ) do you think it would work throughout the house? I just love it in your bathroom, and in the kitchen you crashed (which is where I first fell in love with it), but after getting the swatch, it’s a little dark? Would it be too much for the whole house? Is it a good “neutral”? Thanks!!
YoungHouseLove says
You will love it. It’s totally neutral. I would totally go for it!
xo,
s
Meagan {Green Motherhood} says
Thanks! I can’t believe I convinced the husband to let me do a grey. Your ok on it definitely swung him in favor of it!
YoungHouseLove says
Haha, yessss!
xo,
s
Shelley @ Green Eggs and Hamlet says
You guys are so impressively productive! It’s a good reminder that I can get a lot done in an hour or two and can break projects up into chunks rather than succumbing to the “I need all day to do this and I don’t want to” thoughts.
That new subway tile is going to look gorge!
Melissa says
I’m surprised and so glad you posted this as I’m heading out to shop for tile and a border tile! Love your taste; if you were to replace the rest of the tile, would you go with white. I’m leaning that way, but the commitment makes me nervous.
YoungHouseLove says
Yes, I think I’d go with white on the walls and maybe some hex tile or penny rounds on the floor?
xo,
s
Krissy says
I thoroughly enjoyed having music accompany my reading of this post! Also, the dremel has an attachment you can use to keep Burger’s nails trimmed. So you can consider it a Burger birthday gift too!
YoungHouseLove says
Haha, I love it.
xo,
s
Mehgan says
I bought a 3-in-1 pack of Dremels that was on sale awhile back, it was around $180 I think for the Multi-Max, Trio, and one other I can’t remember the name of. I use the Multi-Max all the time for sanding and cutting, the half-circle saw was incredibly handy for cutting door trim when we were replacing carpet with hard-wood. You’ll be surprised at the amount of things you can use the Dremel for! :)
Kerri says
Love the new tiles! Though I’m sad that they won’t inspire such a fun song association like the old ones haha. Or will they?
YoungHouseLove says
I think we’ll need to come up with a new tile song asap.
xo,
s
Laura says
Well, mine may be just a little more labor intensive, if it can be done! I want to remove just the floor of our master shower. It is small and when they tiled it 12 years ago the cut weird angles for the floor tiles. It drives me batty! I just need to see if it is doable. I would love to put down those pebble tiles, to massage my feet! I will have to do a little research. Love your glass tile. It will be the bomb!
YoungHouseLove says
Ooh that sounds like an awesome project! Keep us posted!
xo,
s
Amber says
I love the new accent tiles and I’m excited to see the finished product!
It makes me feel better to see you guys working on multiple projects at once. Now I can tell people it’s normal that I have three projects in progress at any given time :)
YoungHouseLove says
Haha, oh yeah, we just bounce around. We go wherever the DIY dust blows. Haha.
xo,
s
Carla says
i love it! what is the name of tile that you picked?
YoungHouseLove says
Good question, haha. It’s called “Glass Snow” on the receipt!
xo,
s
Amanda L says
I haven’t done any tile removal, but we are teaching our 1 year old to high five. Pass it on to a new generation!
YoungHouseLove says
Haha, keep the high five alive! I love it.
xo,
s
marti says
Love the Dremel ! We use it here at the vet college where I work. You can trim parrot’s beaks, and even dogs nails. Maybe Burger needs a manicure?
YoungHouseLove says
Haha, I love that tip.
xo,
s
Heidi P. says
Wow! Exciting! I can’t believe your doing two semi-big projects at once!
Anne says
Lol! Love the Lion King connection! Totally get it after watching video!
Rachel@hammeringourwayhome says
UMMMM, are you serious about the 10% tile discount? I had NO idea!!! And I’m about to buy mega tile for a bathroom build. HIGH FIVES ALL AROUND. Set to move into our house in about 10 days…bathroom currently non-existent. We are tile desperate. THANKS FOR THE HOOK UP!!!
YoungHouseLove says
Oh yes, hope it helps! We always list all of our discount codes on the sidebar for ya. Hope it helps!
xo,
s
Emily @ The Happy Home says
ahhhh! so excited for this tutorial. we’re juuuuust starting our house hunt and realizing that crappy accent tile was kind of a big thing in the outlying parts of LA. so. much. hideous. tile. i’m about to go nab one of those dremels right now, in preparation for my future DIY days.
Koliti says
I don’t know how John does it – but you know it was bound to happen…he’s made the ultimate sacrifice for the blog – he’s the owner of a Dremel Multi-Max!
Cool tools rule! (I saw a Dremel Multi-Max demo at Home Depot and I can understand the need, want, desire).
Thank you for all of your exceptional project pics, descriptions, and explanations. Even if I don’t have a project like this on the horizon, all of your DIY wisdom certainly translates to other projects.
YoungHouseLove says
Haha, thanks!
xo,
s
Abigayle says
glad you got rid of that tile…it was way to matronly for your home. can’t wait to see how it looks with the new tile in place.
also, my hubby and i high five all the time, so we’re holding down the fort on keeping it alive in northern va.
YoungHouseLove says
Niiice. So glad you guys are holding it down for high fives in Nova!
xo,
s
priscilla says
For Brittney, who has plaster and mesh on her kitchen:
We had that on a bathroom in a house, and the problem is that is really concrete. The only thing that would really work is a jackhammer. You can rent them at a rental place and then you need to wear masks and tape off the area with plastic as you would not believe the dust!! Anyway, it works, but the Dremel (small hand held tools) are just no match for concrete. Good luck!!
YoungHouseLove says
Oh yes, we had that in our bathroom at the first house and renting a demolition hammer did the trick.
xo,
s
Lynette says
I’m going to pretend that the Dremel tile attachment would not have worked when we removed ALL the grout in our shower. ;-) We had to after a major disaster struck when we chose a very poor grout product for our brand new subway tile. Let me tell you, scraping out grout with a utility knife is NO FUN!
YoungHouseLove says
Oh man, that’s intense!
xo,
s
Pamela says
That picture of Clara on the shower floor is hilarious!
Lisa C says
Our house was full of white tile and red grout so we used our Dremel to remove the grout – we figured maybe we could just regrout. Too bad things don’t always go as planned! The red grout had unfortunately stained our white tiles so we ended up tearing down the tiles and starting fresh. A bit more expensive than just regrouting but man, does it ever look good now!
Rave reviews for Dremel though!
YoungHouseLove says
Oh no! That stinks! I bet it looks amazing now!
xo,
s
Shelley says
Cutest Crime Scene ever! And I think I’m going to bypass the high-five, and bring back the high-ten!
Joanna says
You will not regret the investment in the Dremel! We just used to cut a few tiles actually.
Kristi says
We have a MultiMax tool and it has certainly been handy for so many things. Our recent basement update involed using ours:
http://kriskrafting.blogspot.com/2012/05/downstairs-board-and-batten.html
Unfortunatly, it died in the process :(. Not sure I can survive long with out replacing it!
Love what you’ve done. Can’t wait to see it all finished!
YoungHouseLove says
Oh no, so sorry it died! Hope it comes back to life or gets replaced soon! Someone else said they brought a dead one back to HD and they replaced it!
xo,
s
Erica says
If I ever remove tile in my bathroom, I’m breaking it out with a sledgehammer and throwing every bit of it away!
Seriously, though, I have the Dremel and the Dremel Trio. The Dremel has a grout removing thing as well. Glad to know it works. :-) Can’t wait to see what you’ve done with the new tile!
maureen says
I have a 2 year old and I am on my own (no dad in the family- 100% me, all the time, 24/7 with no other adult in the house) – when I really need time to deal with things (like packing for moving!) I pop in a DVD- would this ever work with Clara? I’ve noted that you always refer to nap time as the time you get things done – just curious if you let Clara watch videos/dvds/tv or not when you need to accomplish things?
Marueen
ps -been visiting my sister for a few weeks – who told me about your blog – so I just discovered it – LOVE it!
YoungHouseLove says
She loves watching little learning videos on YouTube and occasionally will watch about ten minutes of a DVD like Frosty The Snowman (her favorite) but the girl doesn’t sit still, so if we park her on the sofa with her favorite video, maybe ten minutes later she’ll be calling us to help her because she has climbed up into her high chair and can’t get down without our help. Haha. She’s a wiggly one!
xo,
s
Christina C says
Clara’s “crime scene” position is hilarious!
shannon says
Heads up on glass tiles. Last week, I installed super white glass tiles by mirage in my kitchen as a back splash. They looked very white when held up to the cabinets and they have a painted white backing so, any wall color won’t show through. I took the extra step of installing them over a white wall. Now that they are up, they have a blue tint. So upset! I have since learned via internet, that you need to get glass tiles with low iron or whats called starfire to ensure pure white color. Not sure if this pertains to clear tiles but wanted to inform you. I can see that you guys do your research, so, I may not be telling you something you don’t already know.
YoungHouseLove says
Oh yes, ours have an opaque paper backing instead of being painted, so nothing can show through. Sure enough we have them up and they’re thankfully clear as snow! So sorry about the issues you have had with yours! A slight blue tint sounds pretty though!
xo,
s
Tracy says
Your “crime scene” photo has me cracking up!!! My daughter is 20 months, and this is the kind of thing she’d do, too! :)
Eric says
It’s great seeing the oscillating Dremmel in action! I’ve been on the fence about purchasing one so its nice to see the uses.
I currently have the Dremmel rotary tool that I used to help cut a dryer vent here: http://www.firesidedreamers.com/bathroom-project-washer-and-dryer-move-pex/ but really missed the plunge cuts of yours.
Good luck with the rest of the project!
John@RemodelingBIBLE says
I thought they were strawberry patches at first. Looking forward to see how you finish this project. :)
Emily Stevenson says
THank you so much for providing such great ideas. I came across this blog earlier today. I also blog about crafting, cooking, and activities that can be done alongside kiddo’s at: http://forevertogetherfamily.blogspot.com/.
I really appreciate what you do and think your ideas are awesome!! Thanks for helping our homes look lovelier. :)
Take care,
Emily
RebeccaNYC says
saw the photo of Clara lying on the shower floor and read what you called it…my heart did a little THUNK. May you never ever ever ever see a crime scene photo of a child. Not of anyones child, and most certainly not of your dear one.
Renee says
The hubby and I are working on some small renovations to get our condo ready to put on the market – we actually spent last Friday, Saturday, and Sunday doing all kinds of projects, so we had three days of high fives going on!! Especially on Saturday when my Mom and I tackled refinishing our bathroom cabinets!! Maybe when all is said and done, I’ll send you some before and after pics :)