As John mentioned on Monday, our full bathroom is in need of the full monty. Sure it’s great from afar…
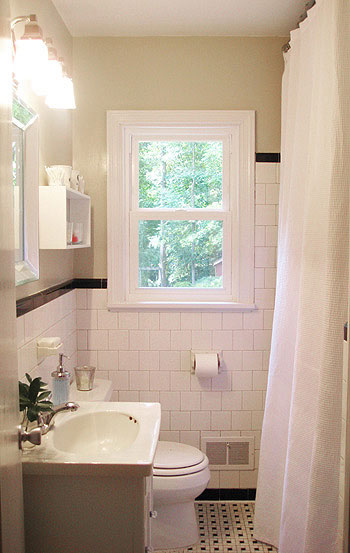
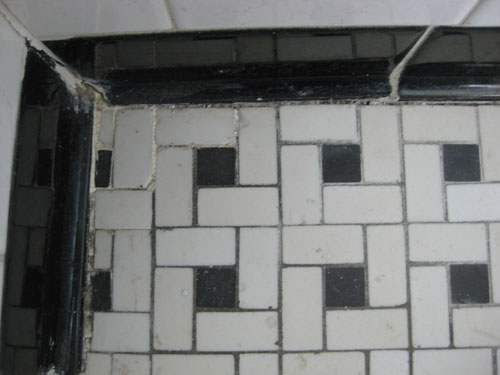
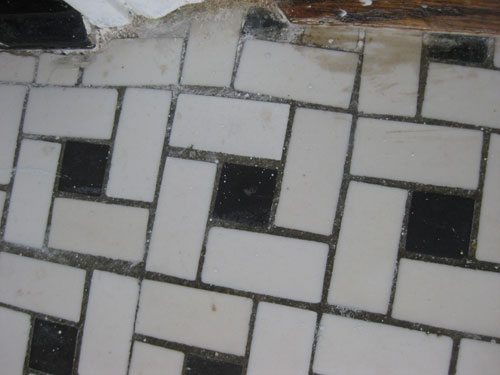
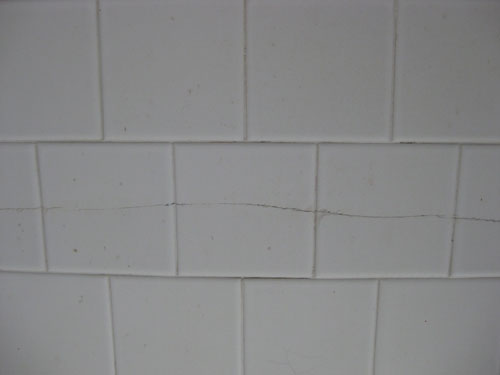
… but up close it’s a bit more, um, not great. Sadly, after over fifty years of use, the once wonderful black and white basketweave floor tiles are cracked, stained, and worn down beyond repair…
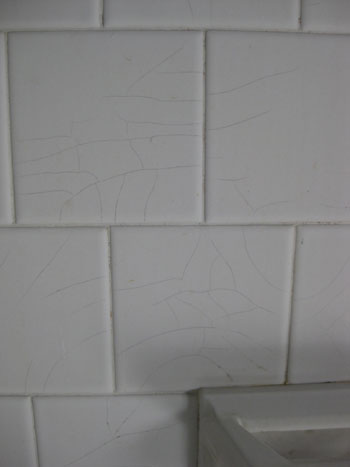
… and the white tiled walls are in pretty scary shape (shattered in some areas and dingy and worn almost everywhere else).
We’re all about saving what you can and working with whatcha got, but in this case we’re sorry to say that after a pretty serious cleaning and recaulking effort a few years back- which certainly tided us over for a while- the time has come to bring the bathroom up to speed. But of course that doesn’t mean that we’ll be bringing in materials and colors that feel all futuristic and out of place in our half-decade-old brick rancher. Our plan is to walk the line between classic and current while choosing tiles and accessories that should fit right in with our 50’s home without feeling “so 2009” in a decade or so (since we hope to enjoy this new bathroom for at least as long as the old one lasted, which happened to be half a century).
And since we know you guys love the play by play when it comes to our actual planning process, this post is all about the brainstorming and beginning legwork that we put into the bathroom waaay before we even picked up a hammer and got to the smash-em-up demo part. As many of you know, one of our favorite first steps to any makeover is to hunt for inspiration images in magazines and online. We get tons of emails each week from people who just don’t know where to start and we always suggest what works for us: look for rooms that you love and let them be your starting point.
And not just one. It helps to hunt down at least five or so. Sure they might all be a bit out of your price range, but you’ll notice patterns start to emerge as you add more images to your inspiration folder (ex: you’re drawn to white cabinets for example, or you seem to like mosaic tile) and you might even find the “jackpot room” that you can literally follow to the letter if you’d like (grabbing a paint color that matches, choosing similar tile, snagging nearly identical window treatments, etc). And of course you can duplicate the look for less thanks to lots of stores like Target, Z Gallerie, Ikea, TJ Maxx and HomeGoods which carry high-end-esque items that don’t break the bank.
So since we knew a bathroom makeover was in our future for the past six months or so, we slowly but surely built up a little folder of inspiration and recently sifted through it when the time came to settle on tile choices and a color scheme. Here’s the single most inspiring image from our hunt (found on Canadian House & Home’s eye-candy riddled site).
Now at first glance you may laugh because this luxe and spacious floor plan is nothing like our own, but the reason we were so drawn to this room were the mocha floors paired with lots of airy light colors everywhere else. Because our entire house has dark hardwoods (even our half bathroom, laundry nook and kitchen) we loved the idea of carrying the deep mocha tone into the bathroom for a more seamless feeling. No more stepping into a little box of light tile after roaming around a whole house full of mocha flooring. And the bathroom above showed us that you can mix light tile with dark floors for a stunning and open effect. Yes, part of the reason it looks open is because this bathroom is about as big as our entire house, but we’ve learned over the years that contrary to the “lighter’s always looks bigger” rumor, keeping flooring cohesive in a small house makes things flow more easily, breaks things up less, and- you guessed it- can actually make rooms appear more expansive and open because there’s not a hard and fast boundary when you step from one space to another. Plus dark floor tile means dark grout which is a dream to keep clean compared to the white stuff.
So it was settled: we were gung ho about a dark mocha floor. But we didn’t want hardwood in our home’s only full bathroom (tile is notoriously better when it comes to moisture & water- and because it’s the only shower/tub that we have, it definitely gets a lot of use). So we set out to Home Depot and Lowe’s to scope our floor tile options in the dark mocha family. Of course we had no intention of coming home with anything… we were just doing a bit of legwork before possibly checking things out online or hitting up a specialty tile shop. Home Depot had a few basic porcelain and ceramic options in brown-ish tones, but they all sort of mimicked the look of travertine (which is a bit more new-traditional than the classic meets modern effect that we’re leaning towards).
So off to Lowe’s we went. Which is where we literally struck gold. Ok, we did not literally come into a small fortune thanks to discovering gold bars in the tile aisle, but we did find gorgeous mocha tiles (marble ones to be exact!) that were normally over $10 per square foot marked down to $2.50 each in the clearance section. It was love at first sight. And we did save a fortune so we might as well have actually struck gold. Since our bathroom only calls for about 30 square feet of tile for the floor (there are some perks to a small bathroom!) the cost to retile the entire room came in at around $75 (of course we’ll have some other flooring materials to add to that price, but because we’re doing all the work ourselves – well, with the help of John’s dad- we’ll definitely make out like bandits).
But did we just buy 30 square feet of the clearance floor tile? Heck no. We actually employed an old trick from my house-renovation-loving mom and step dad and purchased twice as much tile as we needed. Home Depot and Lowe’s are great about taking back full boxes of tile that have been opened as long as they’re undamaged and not missing any tiles, so my mom her husband always purchase twice as much as necessary when it comes to tile with irregular patterns (like veiny inconsistent marble) because there are always tiles that you love mixed in with oddly spotted or colored ones that you’re less crazy about. And when you have twice as many tiles to choose from, you can hand select the ones you like best and return all the rest to the store unharmed in their original boxes for a full refund. Not a bad system, eh? And it’s totally above board! In fact we’ve heard of many a contractor who does the same thing (and even chats about their approach with store employees as they return half of the tile). As long as it’s undamaged and back in the original box it’s a great way to ensure a floor that you love instead of having to hide a few tiles that you’re less crazy about behind the toilet. Note: buying at least 10% more tile than you need is always a good bet because you might have breakages during installation and will also want to keep a few spare tiles on hand for replacement down the road.
But what about the rest of the room? Well from the beginning we’ve been sold on classic white subway tile for the shower surround (it’ll go all the way up to the ceiling for added height which makes a room feel taller and less broken up). The perks of subway tile are nearly endless. It’s affordable and timeless and perfectly appropriate in a 50’s ranch (in fact the white tile that we’ll be replacing is pretty similar except that it’s square instead of rectangular). And you can’t beat the price. It’s just 21 cents a tile at Home Depot (compared to a few cents more per tile at Lowe’s- yup every penny counts!). And when it comes to the tile you see around the rest of our bathroom (behind the toilet and the sink) we’ll be demoing that out and replacing it with drywall for a less broken up effect so we can paint those walls floor to ceiling in the same tone for a streamlined and open look that’s still totally workable in a bathroom (who needs tile behind a toilet anyway?). Using semi-gloss paint will keep it just as wipe-able as our half bathroom walls (the toilet and sink in there get tons of use and the semi-gloss wall paint is super durable and perfect for the job).
But onto the vanity. From pretty early on we decided that we wanted to make our own using a sturdy piece of furniture like a cabinet or an end table and retrofitting it with a sink and faucet (just like my mom did in her bathroom over ten years ago).
We love the classic lines of a dark wood cabinet paired with a crisp and current clean-lined sink. And after a full day of driving our bums all over town (we literally visited three thrift stores followed by TJ Maxx, Marshall’s, HomeGoods, World Market, two Pier 1 locations, West Elm, Pottery Barn and Crate & Barrel over the course of about five hours) we finally discovered the perfect base for our DIY bathroom vanity. So for anyone at home who wonders how we find what we do, there’s usually a bit of old fashioned legwork involved (and we like to do it all at once in one chunk of weekend time so all of our options are fresh in our minds and we don’t have to spend ten evenings in a row ducking out for a half-hour each night).
But back to the vanity we found after some pretty decent store hopping. We were looking for a very specific size (around 18″ deep , 23″ wide, and 30″ high) so it wasn’t all that easy to find. And of course it had to be sturdy enough to support the weight of a sink full of water and adaptable enough to accommodate the pipes that will need to be integrated into the base. So when we stumbled upon the perfectly sized night table at Crate & Barrel we were both thanking our lucky stars. Plus with a 15% off coupon that we happened to have in the car (tip: keep coupons in the car so they’re most likely always with you- and they don’t clutter up your purse) we snagged it for just $165! Not bad when you consider that many of the wood vanity bases sold at places like Home Depot and Lowe’s are around $500 (which don’t include the above counter sink and faucet, btw) like this one and this one. Heck even this tiny one is $199, so we’re feeling pretty good about our lucky Crate & Barrel find.
And once we add a discount sink that we tracked down (hundreds cheaper than this one from Home Depot) and an affordable ebay faucet, we’ll have a totally customized classic-meets-modern vanity for around $380. Which is cheaper than most of the vanity bases (not including the sink and faucet) sold at Home Depot and Lowe’s! And it’s even more of a deal when you compare it to similar pieces sold for around $1500 at stores like Pottery Barn and Restoration Hardware. Crazy, huh?
But enough jibber jabber. Here’s our little mood board of sorts for the bathroom so you can start to see how it’ll all (hopefully!) come together…

1. We plan to bring in soft gray-blues and light taupey-green tones in the accessories and the wall color while the floor is that delectable rich mocha tone and the shower/tub tile (along with the shower curtain) are crisp white for an open and airy feeling. Status: no specific paint colors or accessories have been selected as of yet- we plan to get the tile up before crossing that bridge.
2. Here are our tile choices together (the cheap 21 cent subway tile for the shower walls will hail from Home Depot and the clearance $2.50/square foot mocha marble from Lowe’s will go on the floor). Status: all the tile has been purchased- and our wallet hardly felt it!
3. We searched high and low to find a clean-lined white sink that’s hundreds cheaper than most of the others we hunted down, and when it’s paired with an affordable ebay faucet the savings will really start to add up (without sacrificing an ounce of style). Status: we already received the sink and LOVE IT, and as for the faucet we ended up snagging a similar but less bamboo-ish version right here.
4. Here’s the night table that we’ll be turning into a vanity sink base thanks to the perfect size and sturdy construction (and also thanks to a 15% off coupon that helped us snag it for $165 total). Status: it’s here in a box just waiting to be assembled.
5. We already have an extra long white floor-to-ceiling waffle curtain that we’ll stick with for the new bathroom remodel (you can read about how it came to be right here). And adding some softly patterned towels in taupey-green and gray-blue along with a few accessories, a bit of art, and other finishing touches will really tie everything together. Status: as mentioned we already have the curtain so we just have to grab towels along with accessories after the tiling is completed.
So that’s the plan for the big bathroom overhaul of 2009- and of course we’ll include a big budget breakdown when we actually take things from mood board to reality. We can’t wait to get started and share every detail with you guys along the way. And since we’re all about bathroom steals and deals, we’d love to know what cheap-o projects you’ve completed yourselves. Or what sorts of discounted items and accessories you’ve found that have resulted in a so-fresh upgrade without emptying your piggy bank. Do tell.

Renae says
Isn’t it fun to do a mood board for yourselves? This looks just gorgeous!! Can’t wait to see the end result.
Hilary says
We had a vanity turned sink combo in our one bathroom. Had is the key word.
Make sure to seal the wood really well. I might consider putting a polyurethane coating on the wood before you put the sink on it. I say this because we did not put any coating on our wood prior to attaching the sink. BIG MISTAKE. There are a lot of sealers, and I might consider using one. The unit we used was actually an antique, which I think contributed to its demise.
The wood weathered with wear to a point where the vanity actually started to rot. The vanity used by our contractor was actually a set of drawers- less ventilation in there and the mold just grew and grew. We had to rip the entire unit out and replace it with a stock unit from Lowe’s.
That’s just our experience with the homemade vanity sink.
YoungHouseLove says
Hey Hilary,
Thanks for the tip! We definitely plan to coat the side-table-turned-vanity with many thin coats of polyurethane to effectively “seal it” and create a waterproof shell to protect the wood! Stay tuned for those step by step details when we get to making the vanity in a few weeks…
xo,
s
Chris A. says
It’s going to be gorgeous! I was going to mention the tiles that look like wood, too (saw them on Devine Design); but I love that dark marble – awesome! Can’t wait to see the finished product (as I’m sure you can’t either)!
jodi says
We did a total bathroom overhaul about 2 years ago … http://www.flickr.com/photos/jodimichelle/sets/72157600763411969/ and we’re still working on the finer details (rugs, art for wall) but we outfitted an old buffet we found at an antique store with a sink and faucet … here’s my caution – we bought the sink and faucet off ebay and found that once we were ready to put them in, the fittings didn’t work together some how – I don’t remember exactly, but they were non returnable and we had only one option at the time from our local Lowes, we overspent to the tune of $300 just for the mistake. Boo.
Hopefully you guys don’t run into that!! And I’m loving the mood board break down … can’t wait to see it come together :)
Joshua says
I love your mood board and the plans you have set in place for your remod….We just finished a big kitchen overhall on our “new” house and we will be doing a bath remod as well, our biggest budget saver was our friend’s parents had extra marble from where the remodled their house and it was more than enough for our kitchen and one bathroom and to top it off they gave it to us for FREE….installing it ourselvs and doing 99% of it oursleves has def saved tons of money. I can’t wait to see your finished product, i’m sure it will be great and good luck!
Jenn says
Your bathroom plans look awesome! This is a very lazy question (I don’t want to sit down and do the math), but can you tell me about how much your subway tile cost in total to cover the walls around the tub? If it’s at all hard for you to figure out, feel free to just ignore my question :) Thanks!
YoungHouseLove says
Hey Jenn,
Off the top of our heads, we think we purchased six boxes of subway tile (which accounts for about 15% extra) for the entire tub/shower surround and we believe they were around $20 a box- so that’s around $120 total. We definitely plan to whip out all of our receipts and do a detailed budget breakdown when it’s all said and done (who knows what unexpected expenses will pop up along the way!) so stay tuned for that when we finish the big bathroom makeover…
xo,
s
Megan says
Looks great! Can’t wait for details on the nightstand-turned-sink transformation. Very cool idea.
Amanda says
Watching intently because I would like to replace the floors in my bathroom. The tub and tub walls are great, white and white ceramic squares. The floor is 12″ peel and stick vinyl tiles with a rose in the middle of each one. And there is icky 4 inch rubber base moulding all around.
Not sure what I want to do, but gathering ideas.
Danielle@Newlyweds Paradise says
I saw those towels on Westelms site! Too cute!
Looks like you got your work cut out for you. Are you having Christmas guests over?
YoungHouseLove says
Hey Danielle,
We’ll be having a few informal holiday gatherings at our house but luckily our family and friends are used to seeing things “in progress” when they come over. In fact when we’re not in the middle of some big project they almost look disappointed. Luckily that takes the pressure off finishing by the time we have company, but we still have a pretty good chance of being *almost* all done by Christmas. But only time will tell I guess. Fingers crossed!
xo,
s
Tiffany S. says
I’m absolutely in LOVE with your floor tile! If it’s missing one day it means we’ve run off to Tahiti together!
You could have also gone with floor tile that looks like wood planking but I think you got the less expensive/more luxurious option!
I vow to send you photos of our remodel this weekend. Our bathroom is 7′ by 10′. My bright move was using a smaller bar sink to leave me more counter space (on a remnant slab of granite that cost $50 but $600 to cut and install).
You have to work extra carefully in a small space. Our contractor dinged a few things because there just wasn’t a whole lot of room to maneuver. I know you two will be more careful.
I’m not so happy about our faucet (I think it was around $90) because the finish is coming off around the end of the spigot, but I have bigger day-to-day worries that keep me from ripping it out and starting over with that.
I know your bathroom will be GORGEOUS!
Stacy says
Looks like a great plan! I can’t wait to see how it turns out – for some reason, bathrooms are my favorite rooms to decorate. Weird, huh?
I’m particularly interested in the end-table-to-sink-counter conversion. Do you plan on posting a tutorial for that? Any tips on how to pick an appropriate piece of furniture for that type of project? I would love to do something similar in my two bathrooms.
Keep up the good work!
YoungHouseLove says
Hey Stacy,
Yup there will definitely be a tutorial when we whip up our DIY vanity so keep an eye out for those details in the coming weeks!
xo,
s
Audrey says
this looks great! are ya’ll contemplating any changes to the lighting/mirror combo you’re rocking now?
YoungHouseLove says
Hey Audrey,
Contemplating is the perfect description. We could probably go either way, so we’re thinking we’ll do a little whirlwind tour of TJ Maxx, HomeGoods, Target, and other budget-friendly destinations to see if we find any alternate mirrors or lighting solutions that tickle our fancy, but we’re big fans of taking things one step at a time to avoid getting overwhelmed and burned out. So until the bathroom is put back together and the tile is up we have bigger fish to fry!
xo,
s
Janice says
Love the plan! I was a little startled when I saw the inspiration photo, and thought to myself, “what on earth do they see in that bathroom?”, but I knew you’d make it right, and sure enough your plan is super fab. Can’t wait to see the steps along the way and the final reveal.
Just stumbled across this house tour, which includes several bathrooms, and thought you might enjoy a peak. It’s given me some serious house envy this afternoon.
http://219northcliffwood.com/
Amber V. says
Wow! I am so inspired by your mood board and your prep process.
“Bathroom” has become a dirty (pun intended) word around my house. Our 1950s rancher was flipped right before we bought it just over a year ago. In our case, the flipper did a lot of corner cutting and that is most evident in our bathroom. The biggest provlem is the plastic tub surround and the mold that constantly growns behind the clear caulking. I am hoping you post excellent DIY instructions when you put up the tiles so that I can finally muster the courage to take down that plastic tub surround and re-tile. There are only so many hours a person can be closed in a bathroom while scrubbing caulk with bleach…
Love the blog!!
Danielle@Newlyweds Paradise says
O I love showing off our work also, while it is in progress! Makes it more excited when they see it next.
My fingers are crossed!
SmilingJudy says
So this is a way down the road, but just FYI – carefully research what you use to clean that marble. Seemingly innocuous ingredients like vinegar and lemon will etch marble and your gorgeous shiny tile will become scratchy and cloudy-looking. Wouldn’t want that to happen!
Good luck with the project!
YoungHouseLove says
Hey SmilingJudy,
Yup, before we made the call to definitely go with the marble tiles we took home (as opposed to returning them all) we did a bunch of marble research and plan to keep only marble-safe cleaning products in the bathroom to avoid any mishaps! It’s actually pretty easy to take care of them once ya learn what to use and what to avoid- so thanks so much for the tip. It would definitely be a shame to ruin our tiles after a week or so of use!
xo,
s
karrie says
I’m really excited about your bathroom reno and looking forward to the tips you all are bound to have. We have a bathroom that desperately needs a reno but we have to wait a while before we start it. I’m really afraid of finding mold behind the tile in the shower–ugh, it makes me shudder just thinking about it.
I read in the comments about shopping around for towels that are similiar to your mood board–have ya’ll seen the new Amy Butler towels at BB&B? They’re cotton/organic blend (not really sure what that means) and super cute!http://www.bedbathandbeyond.com/product.asp?order_num=-1&SKU=120648&COL=440&RN=273.
YoungHouseLove says
Ooh we love Amy Butler! Thanks for the tip.
xo,
s
Ann says
This came in perfect timing. I am planning a demo in my bath as well. Can’t wait!!
Jennifer S. says
The mood board looks really good. I’m a big fan of the classic subway tile look.
Oh, I’ll tell you who needs tile behind the toilet…me. I have a few little boys in the house and their aim isn’t the best. It can get quite messy and I’m glad there is tile back there!
Caitlin @ That House On The Corner says
OMG! As if I wasn’t already joined at the hip to your blog! Those are the EXACT colors I want in our master bath! Our bath is BEGGING for a remodel since it still has commercial grade carpet flooring, a broken vanity with an ancient faucet, and a hole in the door (we call it our doggie door) from when the previous tenants used it for ventilation to grow their marijuana plants–and yes, I am serious! I had ideas of what I liked but our room has so much browns, blues, and creams, yet I loved the idea of gray in the bathroom, yet I still felt wary of mixing gray with browns, but part of me screamed “yes, just do it!” inside! Thank you so much for unknowingly giving me that little push to get together my ideas and hopefully get the ball rolling on our own bathroom remodel!
kay says
Beautiful!
I was wondering if you’ve ever found the dark woods in either the bathroom or the kitchen to be harder to keep looking clean? I have some dark furniture like that and it seems to show dust quickly and every little fingerprint. I was wondering if it would be the same in a kitchen or bath. Thanks! and good luck with the remodel.
YoungHouseLove says
Hey Kay,
Well, we have dark mocha hardwood floors throughout the house (including the kitchen) and although they don’t make dust and dirt invisible (the dark color does seem to help things blend in a bit) they’re pretty easy maintenance. Of course we still have to vacuum and sweep from time to time, but they don’t seem to be more work than lighter wood would be. We also have a bunch of dark wood furnishings throughout the house and they look great with a weekly dusting session (which seems to be pretty average maintenance). Hope it helps!
xo,
s
dinah says
:O THIS is TOTALLY my dream bathroom! can’t wait to see how it turns out. will you also babyproof things? babies/toddlers have a way of getting into places you don’t want them to be in.
YoungHouseLove says
Hey Dinah,
With a curious eight pound pooch we’re pros at dogproofing things- and we’re definitely going to babyproof the heck outta our entire house as well, once our little one is mobile of course.
xo,
s
Michelle says
It’s going to be absolutely beautiful! I’m worried about the floor tile though. Marble is notoriously smooth and we would die if you slipped and fell…what do you think? Will a rug take care of that? The color of the tile is delicious. I just can’t bare to read about any accidents :)
YoungHouseLove says
Hey Michelle,
We were waiting for that question! We definitely plan to put a rug down and since the bathroom is so cramped the good news is that we’ll never really have a running start or be able to fall without grabbing at least two of the nearby walls since it’s such a small space (unlike a large bustling foyer with kids and dogs running in and out, which would definitely not be a good choice for this tile). We did discover that if we lay them down and even with a rug we find ’em too slick, we can apply a special coating to etch them so they have a less-shiny and more honed finish that’s a lot less slippery when wet. Hope it helps!
xo,
s
Dana says
Thanks for sharing the bath mood board… I can already picture it in real life and it looks FAAAANTASTIC! The only cheap trick we’ve pulled in our builder baths so far was to get rid of those flat, lifeless mirrors they always hang. I got one from IKEA for our boys’ bathroom and found another oak oval mirror at an antiques store (which I painted white) for our powder room. Have yet to get to the master bath… we’re thinking of tiling a frame around the HUGE mirror in there. To find another mirror that big would be expensive so we’re gonna try to work with it. Just changing out those builder mirrors has made a great impact – and only for about $60 total!!
Cecily T says
You mentioned that the dark tile will be the way to go because of the dark grout. The tile grout in my house is the bane of my existence. We scrubbed and resealed the grout that goes throughout the tile on the first floor last year, and I’m dreading redoing it when the time comes. I suppose it’s nice tile (creamy off-white 12×12’s) with bisque grout, but man, I HATE to clean it.
I see that the tile in the tub and shower is all the rage over the acrylic liner type right now, but all I can think about is what a pain it would be to clean, especially with the shower getting twice-daily use! How are you planning to keep that clean?
YoungHouseLove says
Hey Cecily,
Good question! We’re planning to seal the heck out of our grout so it’s super easy maintenance. And actually for the past three years we’ve lived with similar white tiles and grout and they’re not too bad to keep clean since we have an overhead exhaust fan to help combat mildew and moisture. Hope it helps!
xo,
s
Caitlin says
I be this is going to look AMAZING when it’s done!
With you two, how could it not?
Kathy says
We’re about halfway through remodeling all 3 of our bathrooms (!!). We also used the subway tile in our basement bath shower and I love love LOVE it! It looks so stunning against the green-ish glass tile accent pieces. And at such a good price, we could afford to go with more expensive accents!
Also in the basement bath, we snagged a gorgeous vessel sink that almost perfectly matches the accent tile – on Craigslist. I know you guys love it and it’s our first stop for anything DIY (which is daily since our entire house is in remodel phase right now!). In the main upstairs bath we snagged a super duper cheap shower door on CL as well.
The hunt is still on for a vanity that will work in the upstairs bath, which has been tricky since it needs to be about 22″ or less in width. But I’m loving your night stand turned vanity idea and am going to have to change gears a bit on my search. I can’t believe the prices of vanities!!
The final bath that is currently sporting its studs is the master and I’m loving the idea of matching the floor color from the adjoining room. We’d also like to do an open feeling in there given it’s even smaller than your bathroom! We’re definitely leaning towards an all glass shower enclosure to open up the space more than it was previously. So I’ll be watching and reading very closely and can’t wait to see the finished, inspirational product! Aren’t bathrooms fun??
meryl rose says
I LOVE all the things you have chosen for your bathroom remodel, but I thought I’d give a little chirp about the sink…my dad just purchased a new house and one of the bathrooms has a similar sink and it looks FABULOUS, but because it’s so shallow it gets water EVERYWHERE when you wash your hands, wash your face, brush your teeth. If you don’t mind whipping up a bit more often than normal, there’s nothing to worry about though, I just thought I’d pass the info along!
YoungHouseLove says
Great tip Meryl Rose! We figure we’re in for our fair share of wiping down the area around the sink (but who am I kidding, I do that all the time with my normal sinks!). The good news is that the new sink we chose is super deep- five whole inches- which is substantially deeper than most above counter varieties. So we’re hoping it’ll cut down on the splash-factor (considering our pedestal sink in the half-bathroom is also 5″ deep we’re hoping it’s a pretty standard experience when it’s all said and done). Hope it helps!
xo,
s
Kerry says
I love that you are turning a piece of furniture into a vanity! I am working on the same project right now in my bathroom using this Z Gallerie nightstand: http://www.zgallerie.com/pc-6334-69-concerto-nightstand.aspx
I can’t wait to see the final reveal – good luck with everything!
Betsy says
My second floor bathroom is exactly like that (except with the original sink- charming, and original medicine cabinet- not so much.) And yeah, it’s really cute if you don’t look at it too closely.
Can’t wait to see the results!!
Meghan says
Our best bathroom find was a Craigslist concrete countertop with built-in sick that was the perfect size to go over our existing vanity. Insta-gorgeous. New faucet from Lowes, a fresh coat of light grey paint for the vanity and new drawer hardware and it looks like a million bucks! We have still to address the dingy old tub, but a fresh shower curtain helped!
Ellen says
I love the idea of subway tile for the shower. Are y’all going to do any pattern or accent tile with it, or just the subway tile all the way up?
YoungHouseLove says
Hey Ellen,
After much deliberation we’ve decided just to go all the way up with the crisp white subway tile and forgo any sort of border or accent tile. Since making the room feel tall and expansive is the name of the game, were afraid a border detail would visually cut things up and make things feel less open and seamless. Plus we’ll be saving money by going with solid subway tile and we feel like it’s a timeless choice that we’ll never tire of. Hope it helps!
xo,
s
Laure says
I just LOVE subway tile!!! When we were remodeling our bathrooms and kitchen, we purchased 18″ travertine from Floor Decor Outlets of America for under $2/sf!!! It was such a deal! We used it everywhere we could…and to save money my husband cut the large tiles down to the sizes we wanted for the shower walls, and even cut small 2″x2″ tiles for accent rows in the shower. The best part was being able to save sooooo much moola just by putting in a little elbow grease!!! Can’t wait to see the finished product…and the steps along the way!
Amy E. says
love the mood board for your bathroom. that floor tile looks amazing! and the subway tile is actually the inspiration for the way we’re laying the wall tile in our currently-under-reno shower. the tiles are a bit bigger in our case (8″ x 12″) but it still has a nice look to it. can’t wait to see more of yours!
Bridget B. says
love the plans so far. will you guys be changing out the toilet as well? there are so many cool, low flow varieties out there. we recently remodeled our bathrooms, but didn’t had an excuse to buy new toilets since our old ones still work fine.
YoungHouseLove says
Hey Bridget B,
We actually replaced the toilet about three years ago when we moved in, so we’ll be reinstalling the same one since it’s so new. Hope it helps!
xo,
s
angela says
Lowe’s says that tile is normally $105 per square foot? So you got it for over $100 off per tile? Am I understanding that right? Your post said it is normally over $10 – do you mean normally over $100?
I’m sorry, I”m just confused!
Thanks!
YoungHouseLove says
Hey Angela,
We think you’re looking at the “per box” price (and boxes usually include anywhere from 10-20 tiles). Hopefully that clears things up for you! We saved around $7.50 per tile, but $75 off per tile would have been pretty cool too!
xo,
s
Erica says
Your mood board is “the bees knees” as you would say, I love it!
And I just have to say…how the HECK do you respond to EVERY. SINGLE comment with a question?? Doesn’t that exhaust you? Don’t get me wrong, I don’t want you to stop, afterall you’ve answered a bunch of questions that have come from me! I just don’t understand how you do it (and with loads of information and sweetness to boot)!
YoungHouseLove says
Hey Erica,
Well, to answer your question honestly, it has been a pretty big challenge for us to keep up with all the comment questions that we receive these days. It basically means that we have to write all of our posts and do all of our DIY projects in the evenings so we can keep up with the never-ending flow of questions during the day. But we just love helping people and we want to be there to answer things for our lovely readers so the plan is to do our best to continue to answer every single one for as long as we can. And then to hopefully invent some sort of machine that creates more hours in the day when we can no longer manage!
xo,
s
kim says
hooray for subway! this bathroom is going to look great! so excited to see the finished results.
just a thought on sealing the vanity – a resin coating might work really well and add a bit more protection than poly, although it can be a bit of pain to apply. my dining room table (handmade by the hubs) is sealed with it (overtop a bamboo floor inlay), and all it takes is a little windex to clean. it’s essentially a solid surface.
thanks for the inspiration!
YoungHouseLove says
Hey Kim,
Great idea! We’ll definitely look into using a resin for the added protection. Thanks so much for the tip!
xo,
s
Jess says
I love the idea of the dark mocha floors. So clever!!!! I was looking at that exact subway tile for my kitchen a week ago. GREATNESS!
Lynn says
Sad to see the old bathroom go (it looked great from far away!) but the new one looks amazing as well. You didn’t mention lighting, but when we redid our basement bathroom (similar gray/mocha color scheme) we did sconces on the sides of our mirror instead of a lightbar over the top – and I highly recommend them! You can see pics of what I mean here: http://alittlechippy.blogspot.com/2009/08/after.html
Jenny says
I love all the ideas! When we remodel our master we are also going to use the white subway tiles in the shower because of the classic look and the price. I also have had the perfect sinks picked up for awhile now because you can’t beat the prices.
In our previous bathroom remodel we found clearance marble tile at Lowe’s too! Ours was a lighter color but it looked so glam in the tiny space. With a rug under the sink we never had any slippage issues.
Can’t wait to see your progress!
ronda w says
It is going to look great. I love your choices and am excited to see the finished product!
Laura says
Did you consider using a seamless glass surround on the tub to highlight that lovely tile? It can also make the space look larger. Just a thought. Love the mood board.
YoungHouseLove says
Hey Laura,
We did consider seamless glass instead of a shower curtain but ended up eliminating it due to budget and kid-friendly considerations (we thought a large pane of glass might be tempting fate if we plan to live here forever and raise lots of bambinos). Hope it helps!
xo,
s
Kara says
Amazing. How do you do it? :)
I love the subway tile, but since it seems to be so popular I assumed it was expensive, too! Thanks for setting me straight! I can’t wait to see your budget breakdown… I’m going to show it to my husband and convince him that we can afford our own bathroom make-over!
Oh and congratulations on the little one! :) Children are the biggest blessing!
Kelly Deen says
Beware of the Subway Tile – We loved the look and price of subway tile and used them for all our bathroom walls. Over the next three years we watched them chip and crack, and then grout started to fall out. We thought it was our DIY skills but the professional we brought in to replace the tiles indicated that this is a common problem with low-end subway tiles, not our installation. The glossy white coating is poorly ” “baked” onto the base tile and the tiles are “unstable” as a result. Tiny flaws in the tile from everyday use allowed moisture to get under the coating and eventually the tiles cracked and the grout failed. He told us for future projects to break one of the tiles to see how easily the coating separates from the base tile. Hope you have better luck than us! It cost over $5000 to replace the tile in a single bathroom!
YoungHouseLove says
Hey Kelly,
That’s definitely good to know! We want this bathroom makeover to last for decades so we’ll research the tile maker and even snap a tile or two just to check that they’re up to par. The good news is that big box stores like Home Depot and Lowe’s usually have very good quality control since they don’t want any trouble from their millions of consumers (brands that don’t perform get the boot and are replaced by other companies who provide better quality and durability) so unlike ordering discount tile online from a lesser known vendor we’re pretty confident about the brands that HD and Lowe’s let in the door. It’s always worth double checking before we get it on the wall, though! Thanks again for the tip.
xo,
s
Jamie says
Love it! Your sink is going to be gorgeous.
MaryB in Richmond says
“Leave your coupons in the car. LEAVE YOUR COUPONS IN THE CAR.”
OMG … this makes my day complete. Why on EARTH has nobody ever told me this before?!?!?!
Wow.
I love you guys even MORE now!
Donita says
Maybe I missed it *didn’t read all the comments* but just wondering, are you going to box in the vanity? It just seems like there would not be enough room in that drawer to hold all the pipes etc. Just curious. I LOVE ALL of the things on the mood board, and cannot wait to see it all put together. You guys have GREAT TASTE in decor!!! ;-)
YoungHouseLove says
Hey Donita,
Nope, we don’t plan to box in the vanity but you’ll have to wait and see how we retrofit it to create a working vanity! We have an entire post coming up about the impending DIY project, so as soon as we take it on we’ll share our progress with you guys!
xo,
s
Donita says
I am so excited to see. We rent, but the landlords allow us to do what we want. ;-) I would love to change the bathrooom vanity…our bathroom is small like yours. Anxiously awaiting the post on your vanity. I can’t wait to see your finished bathroom, bet you can’t either. ;-)
Renee Smith says
You guys rock my face off! Does John’s dad have a saw that cuts the subway tile, or are you renting it, or can you get that done at home depot? I ask because retiling my bath surround is sounding like an awesome idea after reading these posts!!! Did I mention that you guys are awesome?
I got so excited the other day when I read about this project that I totally forgot about the half bath you guys have and asked where you were going to be going potty with the toilet removed. I’m pumped for you guys!
YoungHouseLove says
Hey Renee,
You’ll have to stay tuned for more tiling details! Of course we’re planning to whip up an entire how-to post when it comes to our tiling process (and we’ll be borrowing John’s dad’s wet saw, which can also be rented at Home Depot, along with using tile scoring tools and tile nippers- two inexpensive tools that can actually get the job done if you don’t have access to a wet saw). Stick around for more details!
xo,
s