We’re back to share how we fared when it came to our big cabinet clean-out which we announced late last week and tackled this weekend (hopefully along with a bunch of you guys at home). Remember our pathetic starting point? Of course you do. Those two chaotic double cabinets (where we store every single edible item in our kitchen, except for the stuff in the fridge) were pretty hard to forget:
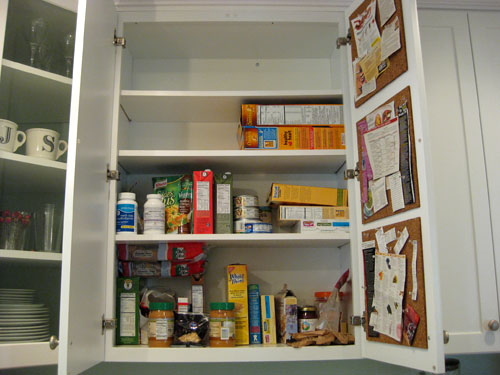
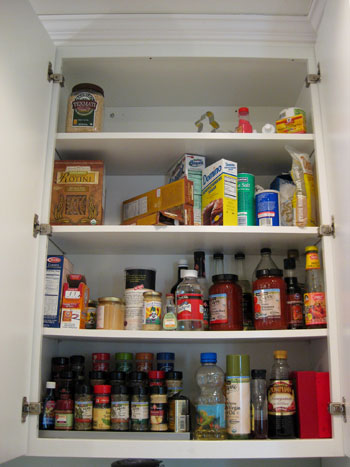
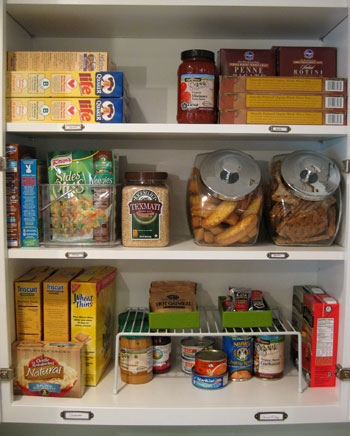
But now we’ll reveal what they look like after a few hours of weekend weeding out and reworking:
First we followed the 100% empty rule and cleared out both cabinets and placed everything on the counter so we could evaluate what we had, pair like with like, toss anything that was past its prime, and see what we were dealing with.
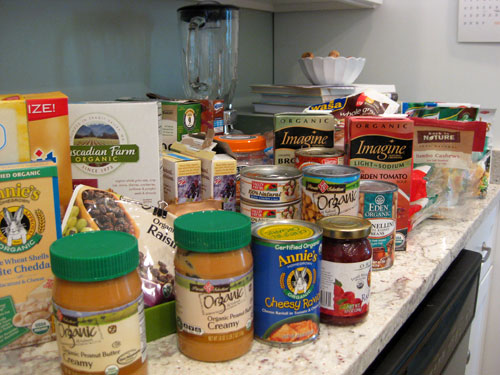
Once we looked at it all en masse it was easy to see that we had just a few popular categories that kept popping up again and again. So if we could keep things grouped by these reoccurring descriptions we would always know where to put specific things (which practically makes our organization efforts automatic). For the first double cabinet, those categories were: cereal, pasta, sides, snacks, crackers, and cans & soups.
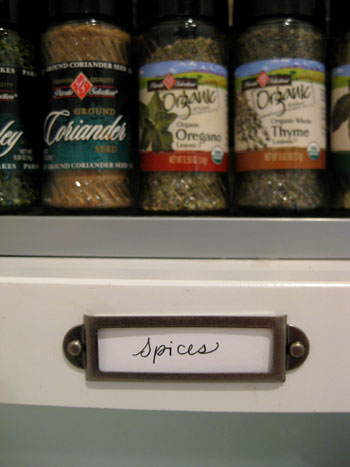
So we decided to hit up Michael’s for some cheap-o metal labels (found in the scrapbooking aisle by the way) that we could hang on each shelf to delineate each area. We especially love that unlike self adhering stickers (like those from a label maker), these metal frames look more polished, and they hold pieces of paper that can easily be switched out if we ever want to recategorize anything at a later date. And at a mere $2.19 for four labels, we came home with more than we needed for just six dollars and some change.
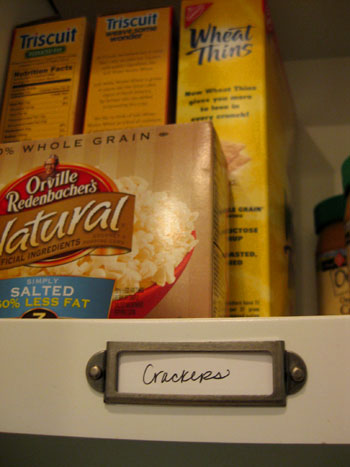
Oh and when it came to hanging them, first we measured to ensure they were all lined up, then we pre-drilled tiny little holes using the metal frame as a template for where the nails would go, and then we gently hammered those nails into the small pre-drilled holes we made. Worked like a charm. Note: for a less permanent hanging job, double stick tape or even velcro could have done the trick. We just knew we’d like having them around for the long haul.
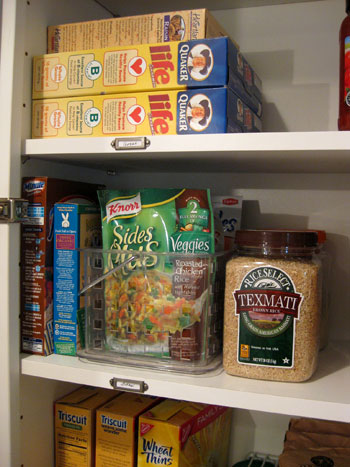
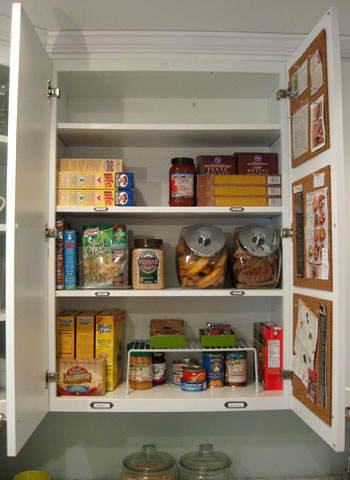
In the photo above you can see that when it came to our “sides” category we had a bunch of slippery envelopes that we used to attempt to stack (yeah, not possible) but eventually we just ended up shoving them between two heavier objects to try to keep them somewhat together. Now thanks to a clear plastic caddy that I already had laying around, they’re much more controlled and easy to store.
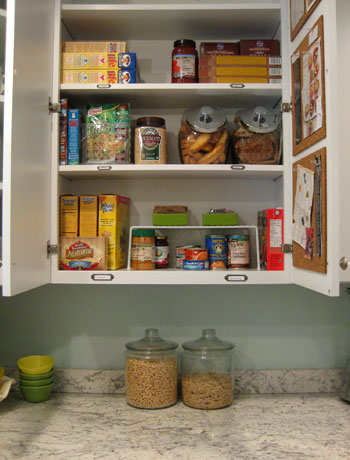
And grouping our pasta with our sauce seems like a no brainer, but that idea never occurred to us before since we just mindlessly jammed everything into the cabinets and called it a day. Now we feel oh so elegant for having a little section for that stuff, and of course we love that we were able to swank things up even more with two lidded glass containers (just $5.29 a pop at Target) for our always-purchased-in-bulk snacks (almond biscotti and Wasa crackers). Hey, whatever floats your boat right? Plus they stay a lot fresher since they both come in not-very-easily-resealed packaging. Double bonus.
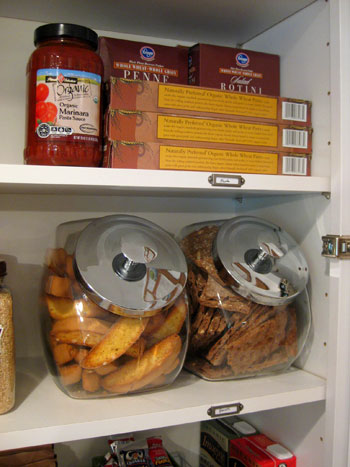
Oh and if you look on the bottom shelf you’ll see another added organizational item that we introduced: a little wire shelf (that we already had on hand). It really helps us gain more usable vertical space for smaller items that get all jumbled up and lost without some semblance of order. And I even had two green stationery boxes (leftover from a slew of Thank You notes that I sent off after my baby shower) which were perfectly sized for housing some random packets of oatmeal and a bunch of granola bars (sometimes finding a way to lose all that bulky packaging frees up way more space, plus it makes it even easier to grab something on the go).
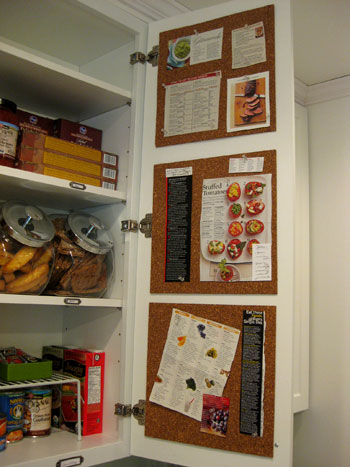
We even paused to sort through our DIY in-cabinet cork boards full of recipes and nutritional articles to pare things down and eliminate the unnecessary visual clutter (see the original post about those cork boards and how we hung them here).
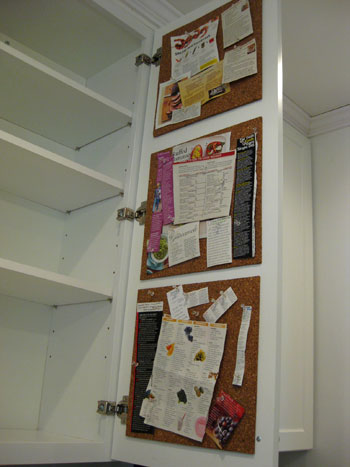
They cleaned up nice, right?
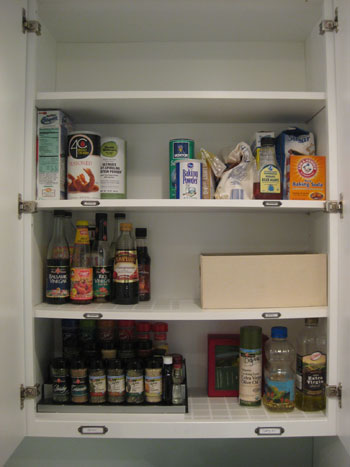
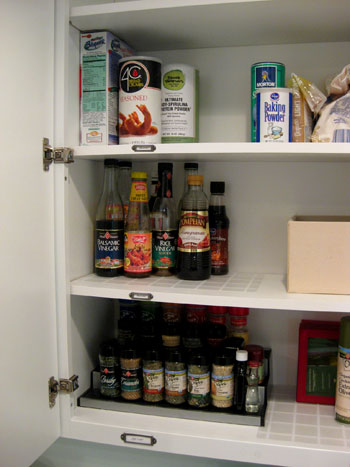
Now we’ll move over to the other cabinet, which used to house everything from spaghetti and sauce to baking goods, oils, and spices. We immediately realized that it made more sense to dedicate one cabinet to snacks, sides, pasta, crackers, soup, etc- while the other cabinet was devoted to spices, cooking oil, sauces, and baking ingredients. Again, this should have been more intuitive to us, but we’ve lived with our new kitchen for years without reaching this obvious realization. So we looked at all the items that would be going back into this cabinet and arrived at a few more overarching categories that we could use to create a spot for everything. We landed on: powdered mixes, baking ingredients, sauces, baking accessories, spices and cooking oils.
Again we loved how the labels instantly created a system to keep like items together (and that the categories could easily be changed if we wanted to move things around in the future).
But when it came to storing some greasier bottomed items (like cooking spray, canola oil, etc) we had another challenge inside this cabinet. Namely, gross rings left behind.
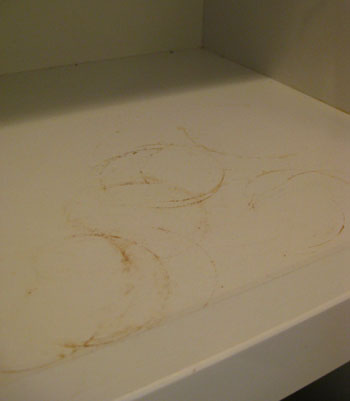
But it was nothing a few $1.99 placemats from Target couldn’t fix.
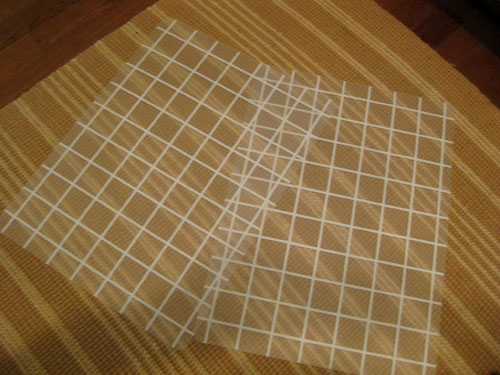
We were able to cut one in half and create two different 100% wipeable (and even dishwasher safe) protective mats for under the sticky sauces and the cooking oils that can now be stored without fear that they’ll nastify our shelves.
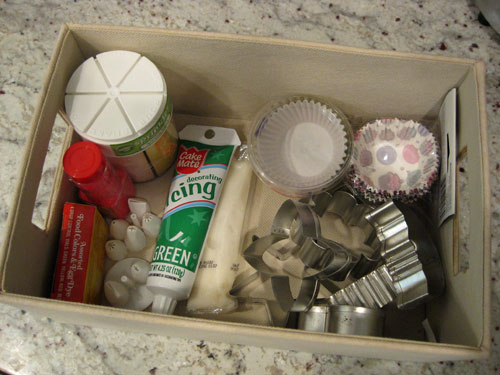
And you might be wondering what sort of “baking accessories” are stored in that box. Well, we already had it laying around, and it totally works for keeping all of our sprinkles, icing nozzles, cookie cutters and cupcake liners together. And it’s super convenient to just whip out the entire box when it comes time to bake something (instead of losing nozzles and cupcake liners in the back of the cabinets, it’s now much easier to see what we have and get to the business of decorating).
And not to be overachievers, but there was one more kitchen cabinet that was a bit, er, lackluster. We store many of our skillets and pans in the drawer under the stove, but we have a few pots and lids that spill over into the base cabinet on the right.
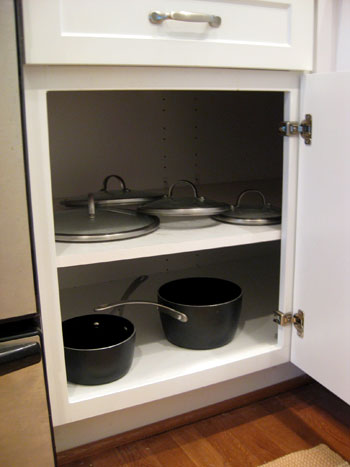
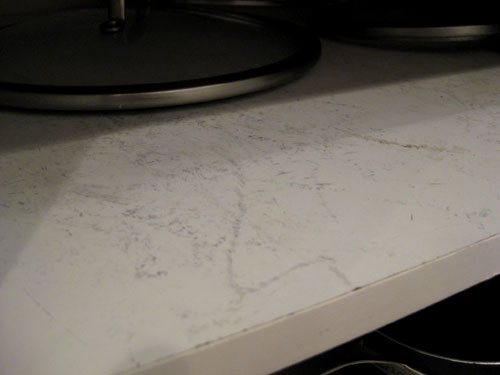
And it’s not that it looked cluttered or messy per se, it just didn’t feel organized. And if you looked closely you could see that the lids and the bases of the pots were leaving tiny marks on the shelves as they were slid in and out.
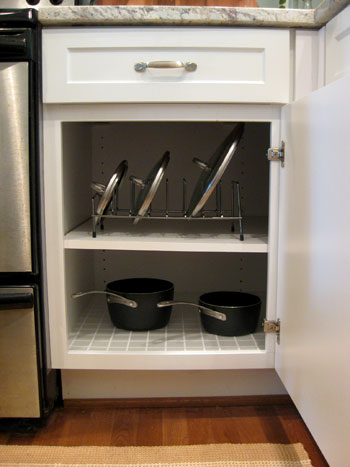
Luckily those marks were easily removed with a sponge, and then all we needed to do was pick up a lid rack ($9.39 at Target) and two more of those $1.99 placemats (which we taped together to create one large wipeable protective surface under the pots on the bottom shelf). No more scrape marks- and it looks a lot more organized too.
So that’s how it all went down this weekend when we finally decided to tackle our dreaded kitchen cabinets. And we’re pleased to report that the whole project ran us less than $30 for all of our storage-friendly additions (from those metal label holders and the placemats to the pot lid organizer and the glass jars for keeping snacks fresh).
But enough about us- how’d you guys do? Did any of you tackle your kitchen cabinets and live to tell the tale? Any tips or tricks you implemented to keep things under control? Did anyone attempt an organizational task outside of the kitchen (in the garden, the garage or the basement for example)? Do tell.
Psst- Wondering how we stash and store nearly everything else in our house? Click here for all the dirty deets.

Steph says
Looks great! Thanks for the inspiration, i’m blocking some time this weekend to tackle my own wayward cupboards!
Liz @ bon temps beignet says
Ahh, I’m in love. I can’t get enough of organization. I think I have a minor case of OCD.
Jennifer says
I have to confess I haven’t yet gotten to the kitchen cabinets, but I was able to finally take your advice and do a Serious closet clean out. I literally got rid of anything that didn’t make me feel good while I was wearing it and have it in the back of my car to take to a local shelter for abused women. Now if I could just get my husband to do the same thing! ;)
Samantha @ i heart mini. says
We didn’t really organize our cabinets from a before, we just installed brand new cabinets, so we were REALLY starting from scratch. Since I’m under 5 feet tall, we stacked our washer and dryer (that live in the kitchen) so I could have more short-person-friendly reaching power.
http://iheartminiblog.blogspot.com/2010/06/kitchen-renovation-get-low.html
Still need to organize the baking goods and the junk utensil drawer, but it feels so good to not need the step stool! Anything I don’t need to reach on a regular basis is now at the top of the upper cabinets, which I actually have to use a step stool AND climb on the counters to reach. But the idea to put plates and bowls in lower drawer cabinets was the best one I ever had :)
I actually used Target cloth napkins to make the curtains. Way to be resourceful with Target dining supplies!
Lanie says
What a simple project that looks great! Do you guys have any ideas for tupperware/plastic storage tidying?
YoungHouseLove says
Maybe get those stackable ones so you can just keep them in neat little nested piles?
xo,
s
Blair R says
Lovely! That wire rack will come in handy when Clara starts eating baby food, too. I love how you always make the updates to your home so adaptable for any situation. Great job, guys!
Dani S. says
Tackled a kitchen organization project the expensive way (Container Store) – but it was worth it.
We also tackled the frosted privacy windows in our basement – just like you guys did a few months back!
http://adventuresoncstreet.wordpress.com/
Dani
Liz @ bon temps beignet says
Hey I just noticed… this must have happened before you put your green and blue glasses in the corner cabinet. Sneaky sneaky
YoungHouseLove says
Hey Liz,
We did snap the before pics a while back (the cabinets were looking especially cluttered and being a nesting prego person I meant to take on this project a lot sooner). But life got in the way so we never got around to it before the Clara bean arrived, so the cabinets really were tackled this weekend!
xo,
s
Amanda B says
Someday I hope my house is as neat and beautiful as yours is!
Also, I have a suggestion for Lanie: My husband and I live in an apartment so there is VERY little kitchen cabinet space. We keep a basket in one cabinet to hold all our lids and then stack all our tupperware in size order next to it. It’s a lot less messy than having lids strewn about in the cabinets. Good luck!
mary=beth says
I still cannot express how happy it makes me to see messes at YHL. I mean that it in a completely loving and supportive way. :)
Beth says
UGH, my cabinets are HORRIBLE! You did inspire me to clean them but once I saw the disorder I fizzled out. I will get it done this weekend though!
I did organize some things in the garage though. I organized all my spray paint and project “stuff” like sanding blocks, painters tape, etc. It took up the entire junk hutch that is in the garage, but it’s so great knowing where everything is!
Emma says
i love organizing kitchen cabinets, haha. i think it was a comment on one of your posts that gave me a great idea – when we first moved in to our house a couple months ago, i put postit notes on the outsides of the cabinets so i knew where to unpack things.
a few other tips i’ve picked up/things i do… (including photos in case there are other people like me who pour over the comments looking for ideas!) One idea I particularly thought of you guys for, in regards to that unused top shelf. my boyfriend and I are both tall, but so are our cabinets… read on!
all of my dry goods (flour, sugar, rice, etc) are up in a cabinet, freeing up precious counter space. they are in the glass containers from IKEA, and labeled with just paper office-supply lables. photo:
http://hphotos-snc3.fbcdn.net/hs375.snc3/24054_723865815047_10606249_41401869_8083796_n.jpg
Our counters have an odd shape but i utilized every corner by wedging my spice rack next to the microwave
http://sphotos.ak.fbcdn.net/hphotos-ak-snc3/hs375.snc3/24054_723865710257_10606249_41401859_1589775_n.jpg
http://hphotos-snc3.fbcdn.net/hs375.snc3/24054_723865765147_10606249_41401864_3940340_n.jpg
we don’t have a pantry either, so extra items from costco and bar accessories went into our awkwardly shaped/sized cabinet next to, well, the bar!
http://hphotos-snc3.fbcdn.net/hs395.snc3/24054_723865790097_10606249_41401866_3807682_n.jpg
here’s the quasi-pantry… plastic bins for pasta etc, popcorn etc, then a metal basket on the bottom shelf for onions, potatoes, and garlic and loose bags of chips and oatmeal in there as well. i kind of like NOT being able to stock up on chips and snacky foods, haha. on the top shelf is extra brown sugar from a super-sale, unorganized, and then a basket of teabags – only the ones that are double wrapped in plastic, and since we buy our tea mostly from fresh&easy, they all are. baking ingredients and oils are on the left there, unhindered by a cabinet door, for frequent use.
http://sphotos.ak.fbcdn.net/hphotos-ak-snc3/hs395.snc3/24054_723865725227_10606249_41401860_5869744_n.jpg
barebones other “Pantry” cabinet. on the top shelf are all the extra boxes of tea, as witnessed of tea bags in the basket in the other cabinet. i don’t need to get up there very often, and i needed to make that a shorter shelf to accommodate cereal boxes and then jars, so it worked out great for us.
http://sphotos.ak.fbcdn.net/hphotos-ak-snc3/hs395.snc3/24054_723865750177_10606249_41401862_5266853_n.jpg
i have since added a bookshelf to a corner of our kitchen, tucked behind the laundry machines, for more canned good storage – sometimes those sales are too good to pass up for lack of cabinet space, and a garage in arizona with 115 degree temperatures doesn’t lend itself to food storage…
hope someone can glean something useful from my photos… i love YHL comment zones for picking brains! thanks for providing them :-)
Chris says
Looks great! Love the metal tag idea: so simple but it makes a big difference. I am going out to buy some of those place mats now for my cooking oil bottles!
Sophie says
The crazy organisation in your house puts mine to shame. You’re ‘everything has its place’ kind of people, whereas we’re a ‘I wish everything had a place but you just kind of have to hunt and shout at other people until you find what you need’ kind of family.
We really need to take a leaf out of your book (:
Jessica @ How Sweet says
Even with organization, mine turn into a disaster within weeks. I need some more discipline for myself (and the hubs).
Elaine K says
I put my oils and vinegars on a Rubbermaid lazy Susan in a cabinet near the stove and it made it so easy to find the right one.
candace says
Oh, it’s so pretty and organized! Great job! You inspired me to clean out/organized our fridge and scrub the stove. It was a nice little weekend project – and I think my kitchen cabinets are up next!
summer says
we started buying in bulk & it really helped restore order to our cabinets. it’s also been one of the easiest organizational systems to maintain.
http://domesticnest.com/blog/?p=1724
your inner-cabinet cork boards are genius! must try that.
Katherine @ Grass Stains says
OK, you are the only people I’ve ever “known” who eat Life cereal! Funny.
NancyV908 says
Great job! A couple of years ago I did this for my entire kitchen, & it made a huge difference. I’m itching to do a second run to refine my much-improved system.
I think your cooking oil section could be made even more useful if you put the bottles on a turntable. You could cut the placemat to size, or even just dispense with it altogether, since the turntable is removable for cleaning when necessary.
Re Tupperware etc, I second the solution of a separate container for lids. For the containers themselves, (after editing down my collection) I just tossed them in a bin, which I can lift out of the pantry. Much easier than stacking. However, since I try not to use plastic bags or Saran wrap or foil, I do have a lot of these containers in different sizes, so they remain a problem for me–I haven’t completely solved it. And it’s getting worse, as I’m trying to use more glass containers. The ones I have don’t stack.
waterlooheather says
Looks great. I completely forgot about this but must’ve been sub-consciously inspired. I tackled the dreaded bottom corner cabinet with hard to reach spaces. It’s crazy how good I felt looking at neatly stacked bakeware and mixing bowls.
I also have a suggestion for Lanie. We use the drawer beneath our oven for all our tupperware. We have our pots and pans on a pot rack so it frees up that space, but any drawer will do. It’s easiest to be able to look in and grab things without all the piles tumbling down.
Jennifer says
I should have warned you to leave a whole shelf for baby. Soon she will take up a crazy amout of space in babyfood and sippy cups. Funny how such little things come with so much stuff.
YoungHouseLove says
No to worry! We actually have a cabinet to the left of the sink where we already have her bottles (we hope it’ll do for baby food and all that good stuff as well).
xo,
s
Meredith says
I took your lead and worked on the cabinets this weekend. It was more an exercise of figuring out what we had so that I could go out and find the little gadgets we are going to need to get organized. Here is my biggest struggle… I feel like every time we try to use the cute looking storage containers there is a always a little bit that doesn’t fit. so the question is… What do you do with the little bit that doesn’t fit into the container?
YoungHouseLove says
Hey Meredith,
We actually use the amount of things that we have leftover to inform the size of the container we get. For example, we made sure an entire box of Wasa crackers and two boxes of biscotti would fit into our glass containers from Target before we gt them. Hope it helps!
xo,
s
AbraCat says
I just love the metal labels– you can’t argue with a label! And I don’t know why it never occurred to me to put cereal on its side– it fits so much better. Thanks for the inspiration– I may do some reorg of my own!
Elizabeth says
Everything looks so organized! I love the box for the decorating supplies, such a good idea!
We got a similar pot lid rack at Ikea for $3.99! They don’t have it online, but if you are lucky enough to live near a store (we aren’t) they have one there. The only difference is that it hangs on the wall or the inside of a cabinet. Pot lids are so tough to organize, I love that companies are making things that help!
Anne says
I’d love to help you guys out organizing your cabinets with Tupperware. Let me know if I can help. I think you would love the Modular Mates to store all your food in (and get rid of those card board boxes that attract all sorts of critters!)
My website is above. I’d love to send you an email with some great tips on saving money and how easy it is to re-do your cabinets.
Sorry if this sounds like too sales-pitchy (since in a way it is…) I love your blog and you’re constantly keeping me inspired for my house when it’s ready this fall! You have incredible cost saving tips! I love it!
YoungHouseLove says
Hey Anne,
We actually use glass containers to store things instead of plastic. Thanks so much for the generous offer though! You’re too kind!
xo,
s
Erika says
I did clean out my “pantry” – more like a little cabinet that I use to store dry goods! It’s amazing how many 1/2 empty containers of crackers, chips, etc. that I found.
I noticed you had a lot of organic products in your cabinets. Could you recommend any yummy snacks for someone whose trying to make better eating decisions? I’m trying to replace my Ruffles Cheddar & Sour Cream/Cheese Nips addiction with something a little better for me :)
YoungHouseLove says
Erika- Some of our favorite snacks are: Laughing Cow cheese on Wasa crackers, tuna fish on Wasa crackers, tomato soup with fresh basil from our garden, biscotti and milk, granola bars, oatmeal, etc. Hope it helps!
Katy- Good suggestion! I guess we didn’t want to store the top shelf somewhere else (since we might want it down the line) and we figure it still gives us room to add more food up there (for example, those cereal boxes could go on the top shelf if we needed more room for Clara food someday…).
Jennifer- Maybe you can find some thin wood from the hardware store to lay across it? Or even thick foam core board from the craft store?
xo,
s
Nicole says
I love, love, love this project! I am all about organizing everything so this is right up my alley. I also love the upgraded labels. So pretty and smart!!
Katy :) says
Just curious…why don’t you take out the empty top shelf to give you room to stand up your cereal boxes? I am sure you crafty kids have thought of it, but i was just wondering. This question (mind you) is coming from a gal with one mess of a pantry ;) Love your blog.
jennifer F says
I did not organize anything this weekend, but we did mow the lawn :-) I am fortunate I guess in that we have a decent sized pantry. I feel like because we have more space, we collect a lot more junk though. The one thing I hate about our pantry is that is has the wire shelves. So some items dont sit nicely or fall over. Anu suggestions for putting something on top that would make it one flat service? We have the same thing in our closets but it’s not as big of an issue. Thanks!
Karrie says
Looks good! Oh how I wish I had a couple of cabinets to put our food in. Sigh. We use a former broom closet that has narrow but deep shelves. I can’t tell you how many times I’ve organized that closet only to come home with a loaf of bread or extra cereal and it not fit with its like items. Frustrating, indeed! Dreaming of the day we renovate the kitchen and gain more storage.
Christy Q says
We just reorganized our pantry this weekend also – I cleaned it out and then thought to myself that it’d be nice if it was painted. Little did I know that my husband had the same thought and was on his way down to the basement to get the paint. 8 hours later, our pantry looked fab along with the back of the kitchen door as we were on a painting tear. LOL
I got some great ideas from your post so may be utilizing some of your ideas so my brand spanking clean pantry doesn’t get dirty. :) Thanks for the timely post!
Melissa says
Great job you guys! This inspired me to get my pantry under control. I know there are some stale pretzels hiding down behind everything in there. Your linen closet restoration inspired me to get my master bedroom linen closet in order which makes me so happy every time I have to go in there! http://houseography.blogspot.com/2010/06/linen-closet-mecca.html
Sassy says
My favorite cabinet clean-up and out ever had my sister and I using self stick floor tiles as cabinet liners — they wash, take abuse and aren’t contact paper (I can’t use that stuff without major problems). But if we’d thought about placemats we might well have gone that way. Looks good.
Diana says
Ok, you guys are nothing short of amazing. You tackled this with a new baby in the house? I think it took me about 2 months before I could even get in to a routine that I knew with confidence that I would get a shower that day when my first one came along. Congratulations! Also, we need more pictures of the little bean!
YoungHouseLove says
Diana- Just click that button on the sidebar with Clara’s photo to see tons of new baby pics (we add more nearly every day!).
Jennifer S- Liquid Nails would hold them til the end of time!
xo,
s
Jennifer S. says
A while ago I added those cork boards on the inside of my cabinets. I felt all organized and my fridge looked de-cluttered! Then they started falling off the cabinet every time I opened it. They would hit me in my head when I went for a glass or something. I tried using a tack to tack them to the cabinet, but that didn’t work either. So now I’ve given up!
Shanns says
Like Samantha above, we actually just finished replacing all our cabinets as well, so I had ALOT of organization to do this weekend! Nothing groundbreaking, but alot of common sense placement (like drinking glasses next to the fridge, items we use most on lower shelves, etc).
Awesome tip for the mats under the dripping sauces and oils! I had skipped that cabinet when I was doing my shelf liners, but I’ll have to throw another one in that cabinet tonight!
We haven’t gotten to our ‘pantry’ yet, as I’m waiting on the shelves that apparently didn’t come with it?! (Thanks for telling us Lowes….) I’ll be referencing this post when the shelves come in, that’s for sure! I love the glass jars from Target, I’ve been looking for a cookie jar solution for a looong time – do you know how deep they are? Or did you notice if they had smaller/different shaped ones? (Our ‘pantry’ cabinet is only 12 inches deep I think).
YoungHouseLove says
Hey Shanns,
They’re definitely not 12″ deep so they should totally work for you. Good luck!
xo,
s
Elle Sees says
I love the cork inside the cabinets!
And I know how to analyze handwriting, so it’s nice to know that you’re just as wonderful as you appear on the internet! You have very nice handwriting.
Sayward says
Your little metal lables are a fantastic idea! Also, Knorr Sides Plus Veggies are a staple of my diet, and I also have mine and the other misc. pouches corraled in a similar plastic container. I hated how they slid around too, but now when I cook it feels like flipping through a little filing cabinet.
marie says
Thanks for the reminder about ways white cabs can turn grungy: your choices are inspiration for preventative measures ;-)
Great organizing job btw
Any tips on keeping my mom from lugging a box of kitchen essentials every time she visits?
YoungHouseLove says
Hey Marie,
Hmm, good question? Maybe saying something sweet and joking the next time she does it like “I’m gonna need a bigger house if you keep bringing me all this kitchen stuff every time you visit!” will softly get the point across? It’s so hard when people are just trying to be nice! Anyone else have any ideas?
xo,
s
Becky says
I use a plastic bin to keep all of my backing stuff in too. It has been super helpful when I bake. I just grab the whole box and go. My daughter loves it too…she always knows where the sprinkles are for ice cream!
Mel says
Hi Sherry and John,
I love reading your blog. I have been having some health issues and your blog is a live saver. Your little Clara is beautiful! I love your organizational skills. Don’t know if you can help with this, but I have a request? Could you do a post or give some websites on what to eat while expecting? From preventing allergies to food that may do harm to a fetus. I have heard /read peanut butter is bad? Your help would be greatly appreciated. Bless you ALL! Mel
YoungHouseLove says
Hey Mel,
We don’t know of any specific websites with info like that, but we’re sure if you did a google search you’d find a lot of helpful articles (searching “what to eat when you’re expecting” or “what not to eat when you’re pregnant” should turn up a wealth of info). You also can check out books for free at the library on the subject! Hope it helps!
xo,
s
Misty says
We are actually in the midst of redoing our kitchen and this post came @ a perfect time. I spent this weekend lining our shelves and rearranging our cabinets. I cannot believe we lived with the chaotic mess we had before for 7 long years!! Thanks for sharing your clutter as well ;)
Pam @ diy Design Fanatic says
Ahhh, I enjoyed the organized after photos! You did a great job! A major reorganization of the kitchen is needed at least once a year because the way you live changes, especially as children grow. What worked last year won’t necessarily work for you this year. I try to tidy up the pantry at least once a week and then clear it out completely once a month. I have three others who cook in our kitchen, including 2 teenagers, who don’t always put things away in a neat & tidy manner. I used to grumble about the mess, but then an old Hoover commercial slapped me up side the head with their slogan which I now live by: “Life’s messy, clean it up”!
Great job on your re-organization!
Shunta says
you guys never cease to inspire me!! I’m going to buy that lid rack from Target this week!! (and for free b/c I have 2 $5.00 gift cards after buying some items this weekend from target and receiving the buy 2 get $5.00 gift card deals!) Our lids just lay there and while it’s “neat” it never looked as orderly as I’d like and that lid rack is exactly what I’ve been wanting!!
Tiffini S. says
Meant to do the cabinets this weekend, but I got sidelined by closets. I do want to share two closet clean-out techniques that always work for me, though.
1) I use mini curtain rods with clip style curtain rings to organize scarves, belts, and other small accesories. Just hang it on the door, or on a blank wall in the closet, if you’re blessed to have one large enough. Works in the bedroom, too, but can be a bit girly for a shared room.
2) I got overwhelmed with clothes a few years ago. Let’s just say I was holding on to some pre-baby items that my heart swore I could get back into, when my mind was saying, “As if…” So, in order to give myself a direction, I did this:
-Picked a date 6 months in the future and circled it in RED
-Piled ALL my clothes in one spot and did not move until I’d sorted through them all
-Even after the sorting, I had a large amount of clothes to keep, that I knew were likely never going to be worn again
-…So, I bought a big roll of duct tape (to the rescue again!) and put a large piece of tape in the crotch or armpit of every single piece of clothing, except what I was wearing. The idea was, on the BIG RED DATE, anything with duct tape still on it was GONE. So now, it was do or diet to fit back into clothes I loved.
-This actually motivated me to start in with the working out and dieting again, and I did lose a bit of weight
-I got down a few sizes, though not all, and was able to save clothing in a reasonable size. Not pre-baby, time to workout and meal plan size, but post-baby, making workouts and healthy eating a priority size. So I can keep up with it.
Got rid of (almost ashamed to say it) 5 LARGE plastic totes of clothes this way…eesh!
Lindsey says
First of all…how lucky you are that she sleeps like she does at night! I have an almost two-week-old and we are usually up feeding all night (she’s one of those babies that has her days and nights mixed up right now!).
Here are a few things that have made our first couple of weeks work for us:
1) Boppy. People told me that it wouldn’t work well for feeding, but it works really well for us and I can easily feed her in a couple of different positions. Plus, once she is done eating and has fallen asleep, I can set her down in it next to me on the couch and she doesn’t move!
2)Dwell Studio for Target swaddle blankets. I found a three-pack on clearance for $3 this winter and I’m so happy I bought them. We received so many homemade blankets for our shower, but for the first few weeks of swaddling these have been amazing!
3) Hospital Water Bottle. We normally use stainless steel canteens, but the water bottles I got at the hospital have been amazing! They hold over 32oz and have a handle & straw, which make them really easy for me to use while feeding. Plus, they are double insulated so they stay cold for a long time…even though I usually refill them at least five times a day.
4) Baby Nail File. My daughter has loooong finger nails, and since she isn’t old enough for me to cut her nails, I have to file them down every couple of days. If I don’t she scratches her poor little cheeks while she’s eating!
Lindsey says
Oops…wrong post :)
Brianne Buskey says
Great tips, and for some reason something is so fun about seeing what other people stock in their pantry. :)
I do something similar with lining my pantry and pots & pans shelves. I use a commercial vinyl tile, it’s strong, doesn’t move around when I put my heavy pots away and it wipes up really nicely! Here is a link to the tiles I’m talking about http://www.homedepot.com/Flooring-Vinyl-Resilient-Flooring-Vinyl-Tile/h_d1/N-5yc1vZ1xhcZaq27/R-100202790/h_d2/ProductDisplay?langId=-1&storeId=10051&catalogId=10053
Tia says
I love the placemat idea for the sticky stuff. Such a simple idea that I didn’t think of. Off to Target tonight! You guys implemented the label system just like I was talking about in the pre-cleaning post. I love it, and it really helps stay organized.
I know you mentioned why you put the cereal boxes on the side, but doesn’t the cereal go everywhere? Maybe you use clips on the opened bag. I don’t, so I’m afraid I’d have little flakes of Honey Bunches of Oats everywhere!
YoungHouseLove says
We just roll up the cereal bags and close the cardboard flap at the top- and we don’t have any issues with cereal spillage. Hope it helps!
xo,
s