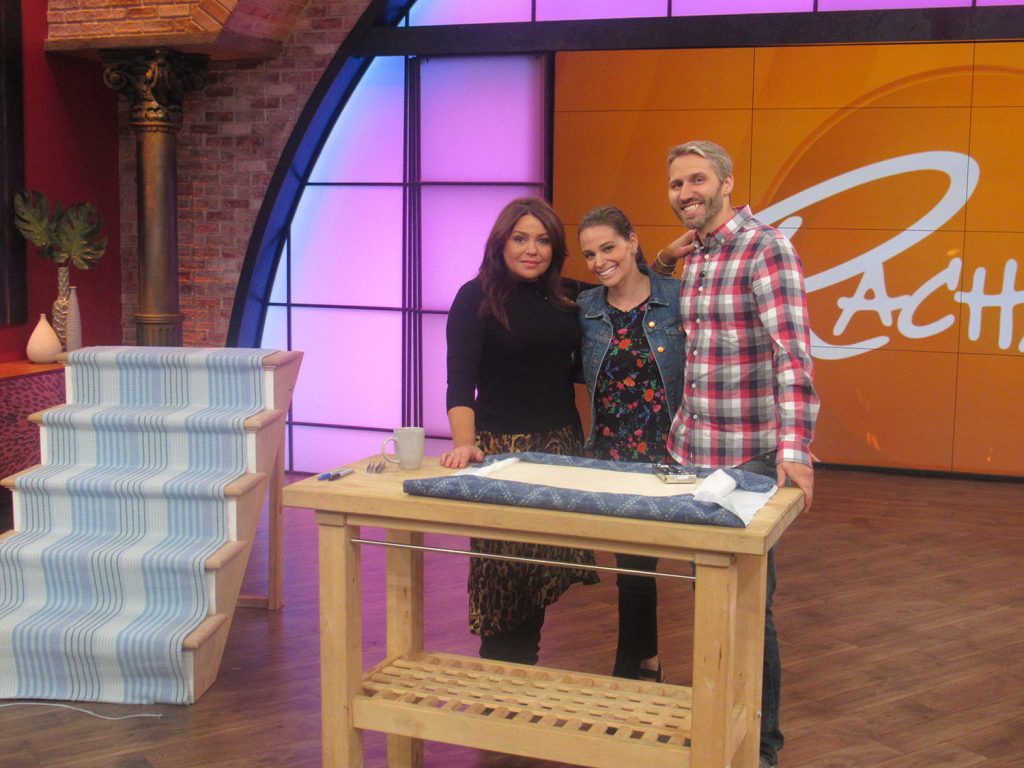
It may seem intimidating to install a stair runner yourself, but it’s so darn easy that we’ve done it twice! Thrice if you count demonstrating it on live TV (more on that later). Just follow the steps in our tutorial below, including our trick for making sure your rug is the perfect size for the project.
Adding a rug or runner to your stairs isn’t just a stylish decor choice that can add color, personality, or pattern. It’s also a safety feature! We find that adding a stair runner cuts down on slips, falls, and even makes it easier for our dog to traverse them. They also absorb sound, meaning your less likely to hear your kid clomping up and down the steps. So we highly recommend adding one if you’ve got young children, pets, or even just clumsy adults around.
DIY Stair Runner Before & Afters
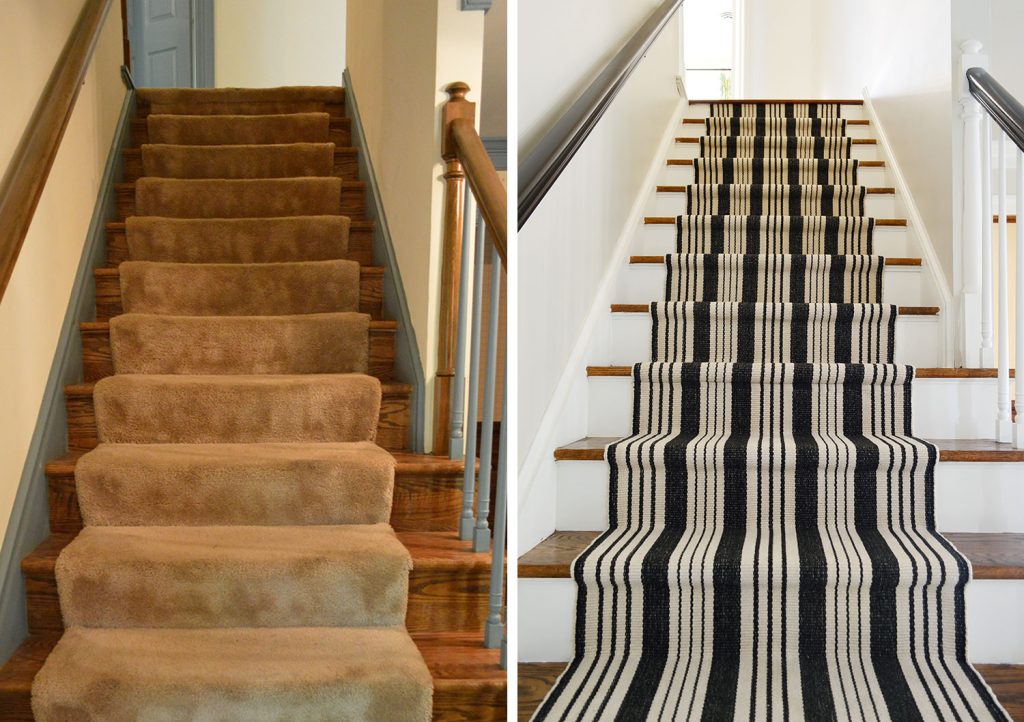
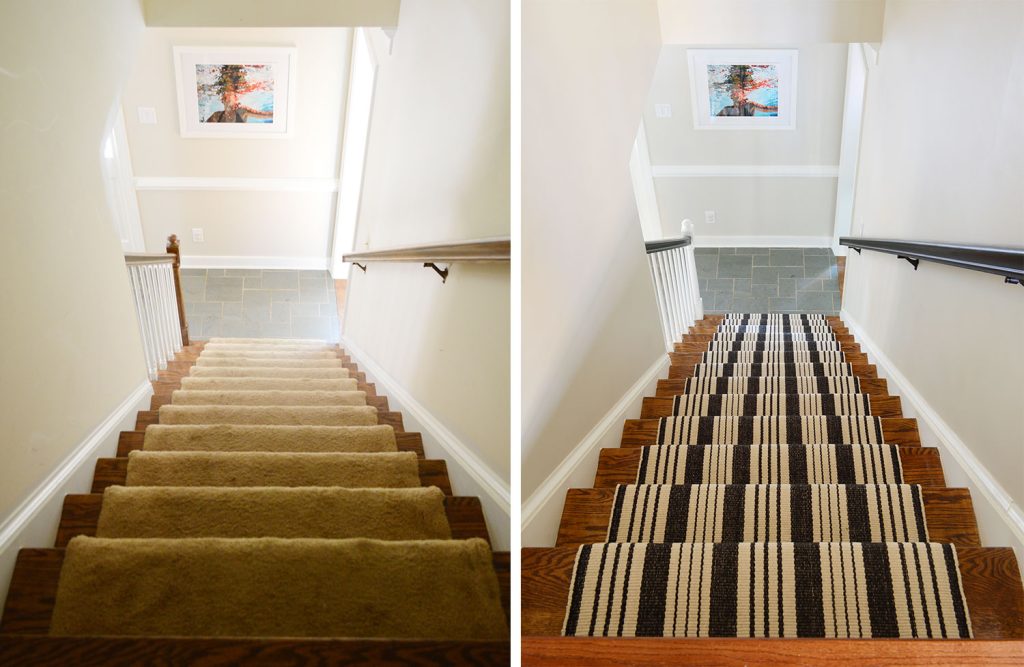
The first time we installed a stair runner, it was to replace a dingy carpet runner that came with the house. You can see in the photos below that we not only livened up the stairs with a bold striped rug, we also modernized the steps by painting the risers, trim, & balusters white and staining the wood handrails dark.
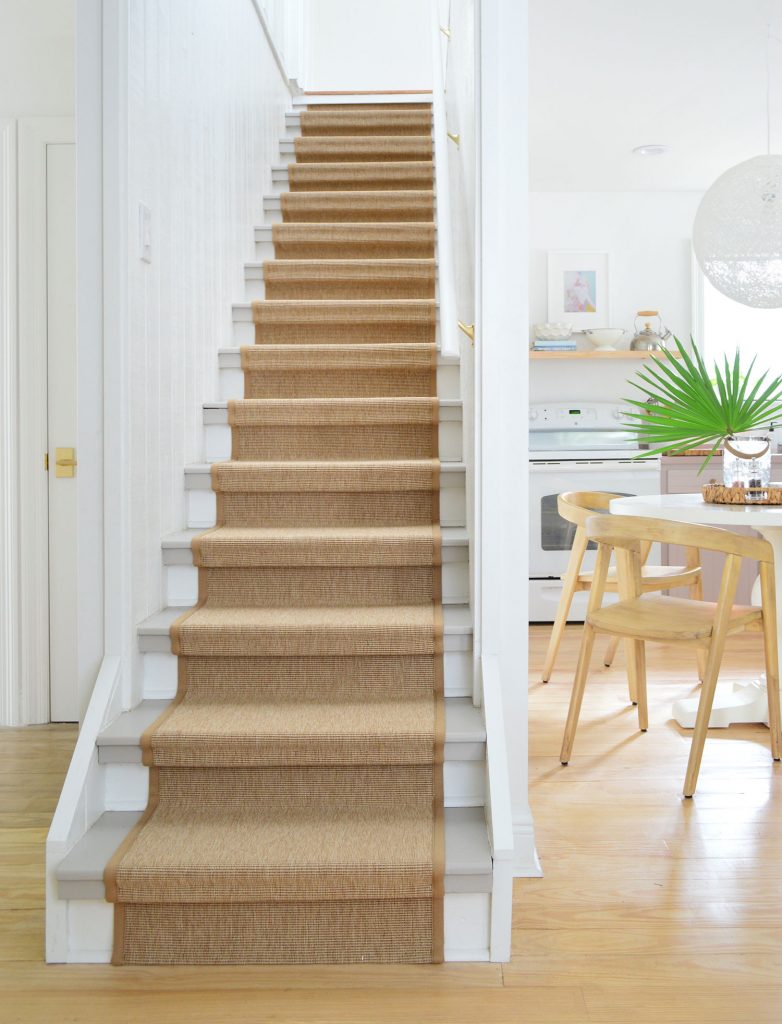
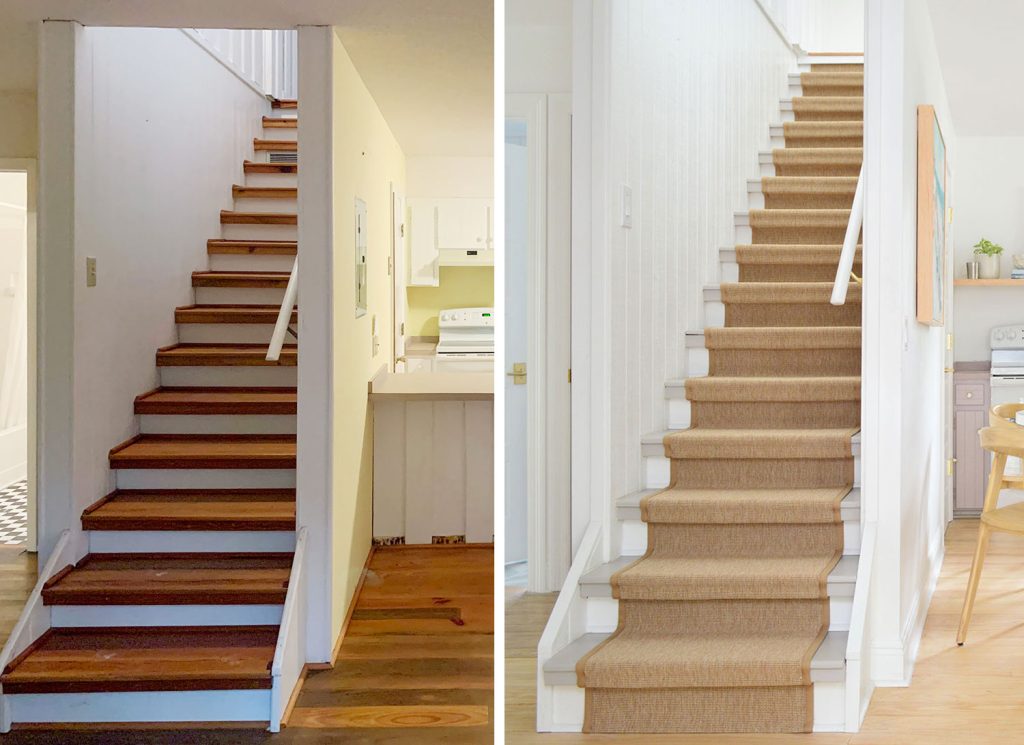
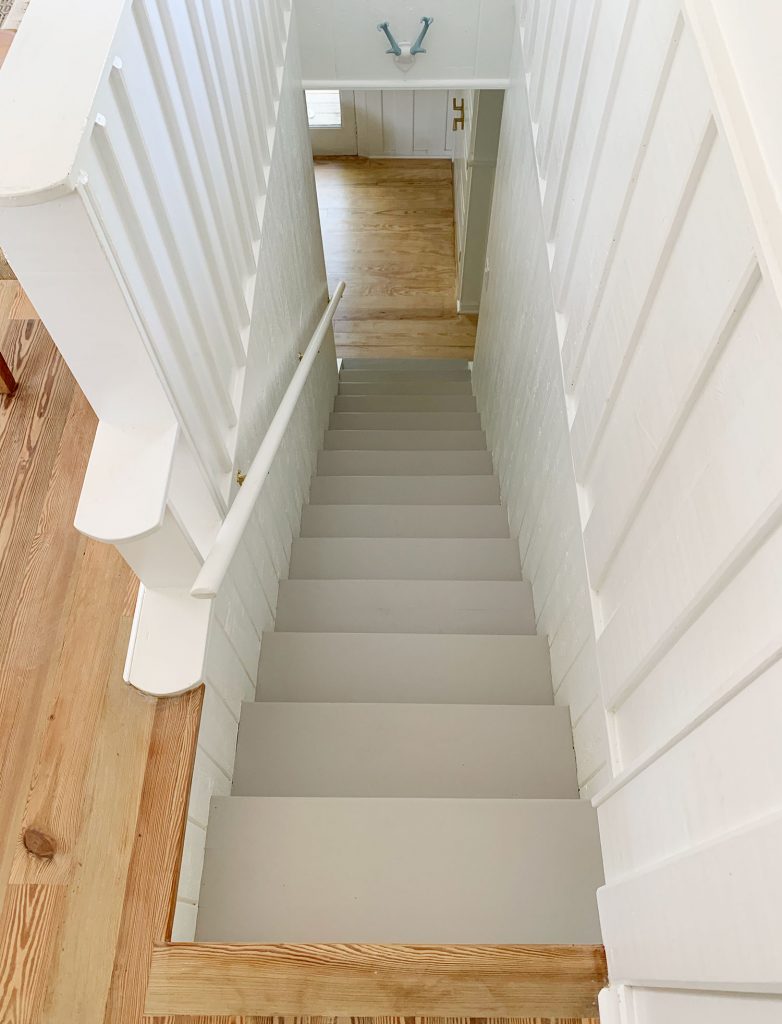
For our second install, here in our current home, we used a beachy sisal runner instead. We also painted the treads a wary gray to brighten them up.
The “third” stair runner we added was for a DIY segment we taped for The Rachael Ray Show. We only shot about 3 staples on camera, but we prepped the small fake staircase backstage. It’s too bad we didn’t get to do a whole staircase. That runner is cute!
Overall, you have lots of ways you can customize this project to suit your style and your stairs. So let’s dive into the tutorial!
Tools, Materials, & Cost
Here are the supplies and tools you should have handy to install your own stair runner:
- Stair runner
- Rug pad
- Tape Measure
- String
- Painter’s Tape
- Electric staple gun & staples
- Sharpie
- Scissors
- Needlenose pliers
This doesn’t have to be an expensive project either. Our first runner installation cost less than $300! It mostly depends on the runner you choose and how much you need.
Steps To Install A Stair Runner
Our project in total took us about 20 hours, but that also included removing the old runner and painting the risers and railings. The actual stair runner install only took about 4 hours, although may depend on the length of your stairs. We’ll go into each step in more detail, but here’s an overview of the process:
- Remove your old runner (if needed)
- Measure
- Select a runner
- Paint or stain your stairs (optional)
- Mark your placement
- Cut the rug pad
- Prepare your staples
- Start at the top
- Connect two runners (if needed)
- Finish the bottom edge
Step 1: Remove your old runner
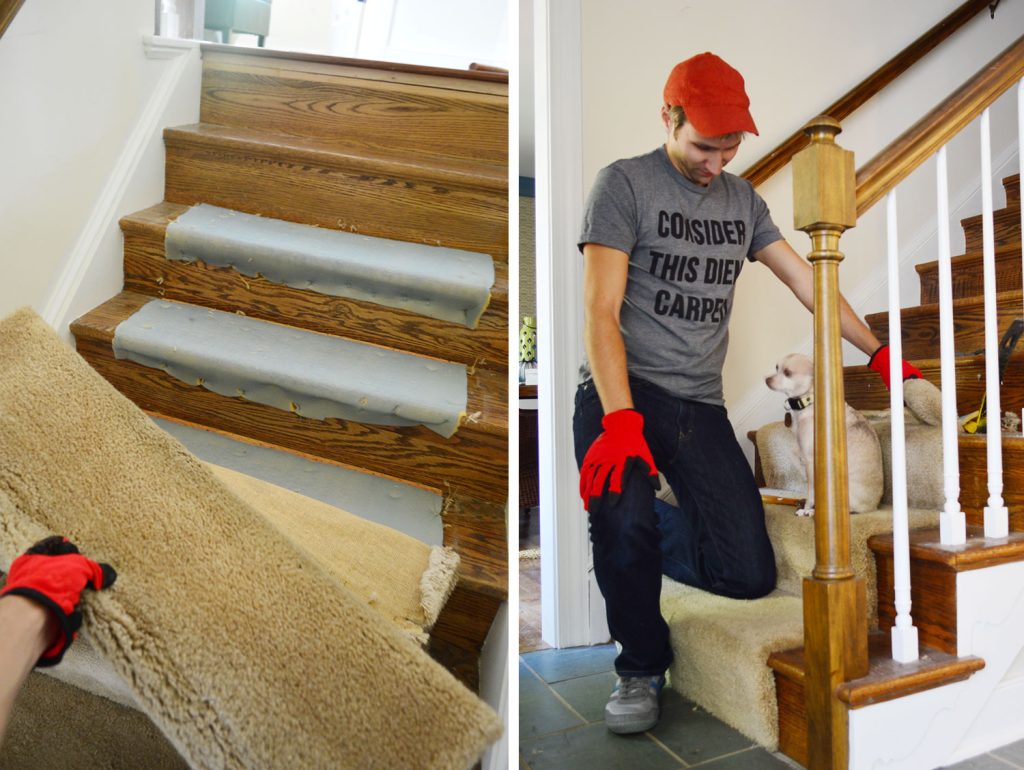
This step only applies if you have an existing rug, runner, or carpet on your stairs that needs to go. This process may take time – especially getting all of the old stapes up! We counted nearly 600 staples in our old carpet. We have a separate stair runner removal tutorial for this, including what tools you’ll want to help get that old carpeting off.
Step 2: Measure
Before buying your runner, you’ll need to measure how much you’ll need. As with any rug, the important measurements are length and width. Knowing this will also help you determine if you can purchase a stock size or need to order something custom.
Measuring runner length
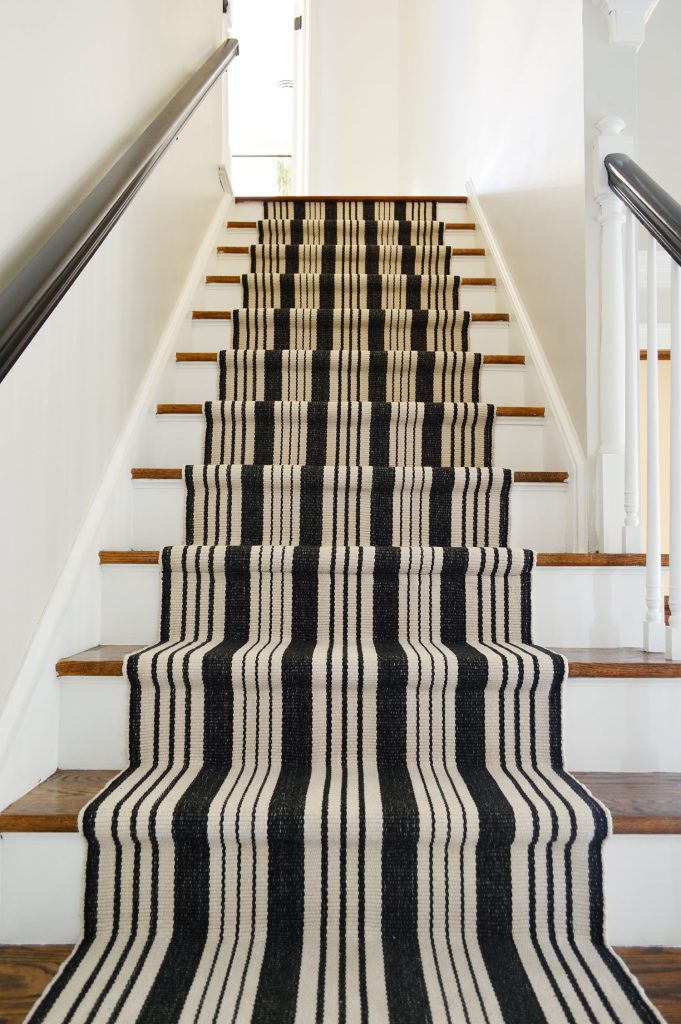
We suggest using a string or flexible measuring tape to determine the length of one step. This means riser + tread, including around the front bullnose edge. Multiply this measurement by the number of steps you have, and then add 10-15% extra. Having too much material is easier to deal with than not having enough!
Measuring runner width
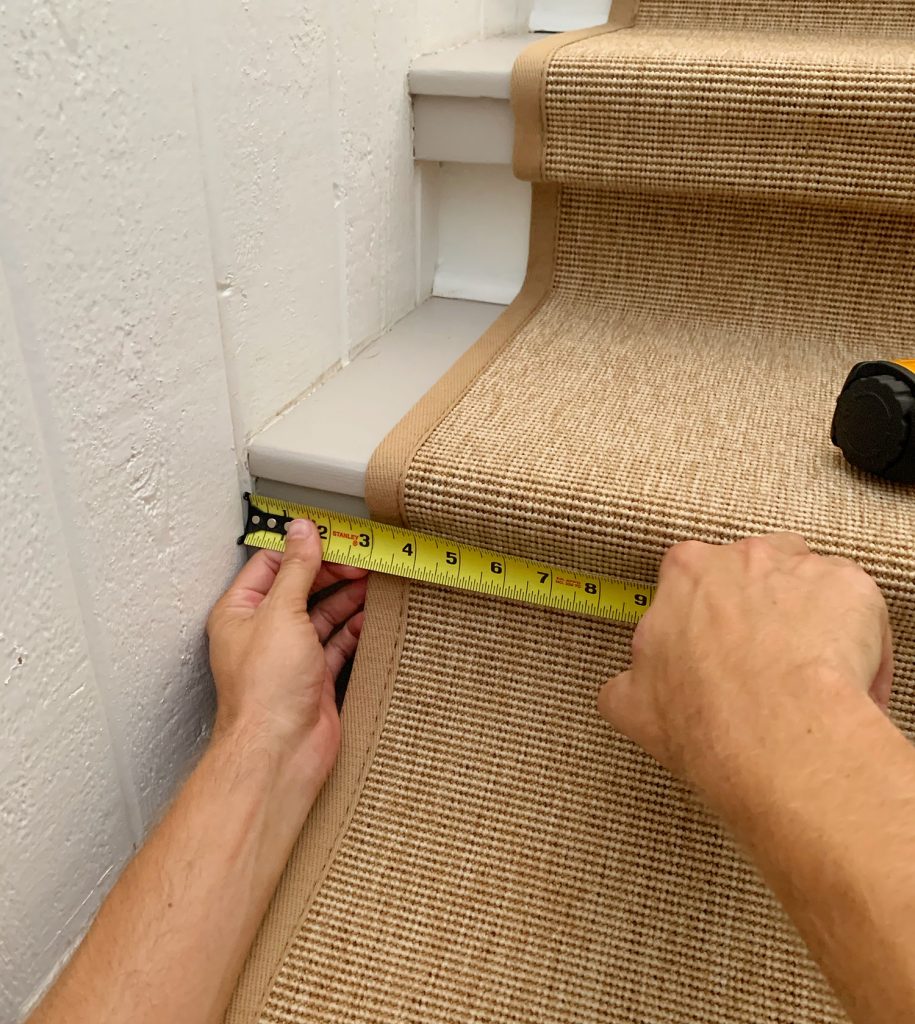
Most stair runners don’t go wall-to-wall. Instead, they leave about 2-3″ exposed on either side (see above). This number is personal preference, and it may be dictated by stock sizes. Measure the width of your narrowest stair, and subtract 4-6″ to get your runner width. Just be mindful that many staircases “flare” at the bottom, so make sure whatever width you choose will fit and look good from top to bottom.
Step 3: Select a runner
Virtually any carpet or rug can be turned into DIY stair runner. However, we suggest choosing something that will be durable and easy to clean, especially if your stairway gets lots of foot traffic. Indoor/outdoor rugs and natural fiber rugs like wool or cotton are great for these reasons. We also suggest something low pile, since they are easier to keep clean. We have used both stock and custom runners for our stairs.
Using a stock runner
For our striped runner, we used a rug from Annie Selke (formerly Dash & Albert) because they are known for their durability. They also have tons of patterns and colors, and most styles come in a variety of sizes. We used two 2.5′ x 8′ Birmingham runners, but they now also sell a 20-foot version and as a customizable size. After 7 years of use, we can vouch that it held up great (apart from some fading from sun) and felt quite soft underfoot!
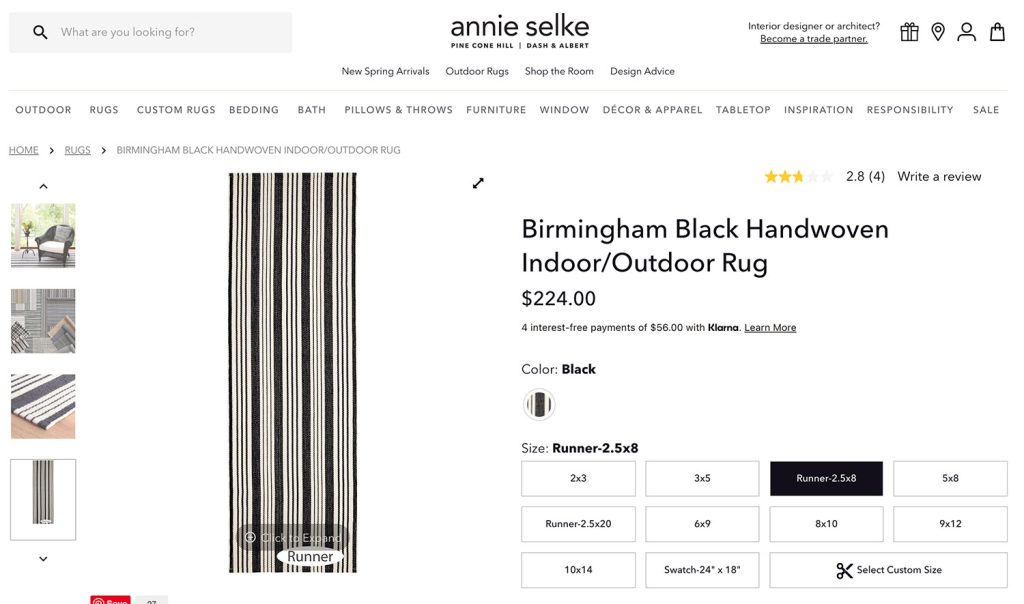
Stock runners are typically cheaper, but they may require more ingenuity to fit precisely to your space. Don’t worry – we’ll show you how!
Using a custom runner
For our sisal runner, we ordered a custom outdoor rug from Sisal Rugs. This gave us great control over the exact look – we picked the color, border material, border color, size, etc – and only cost us slightly about $100 more than 2 Annie Selke rugs would’ve at the time.
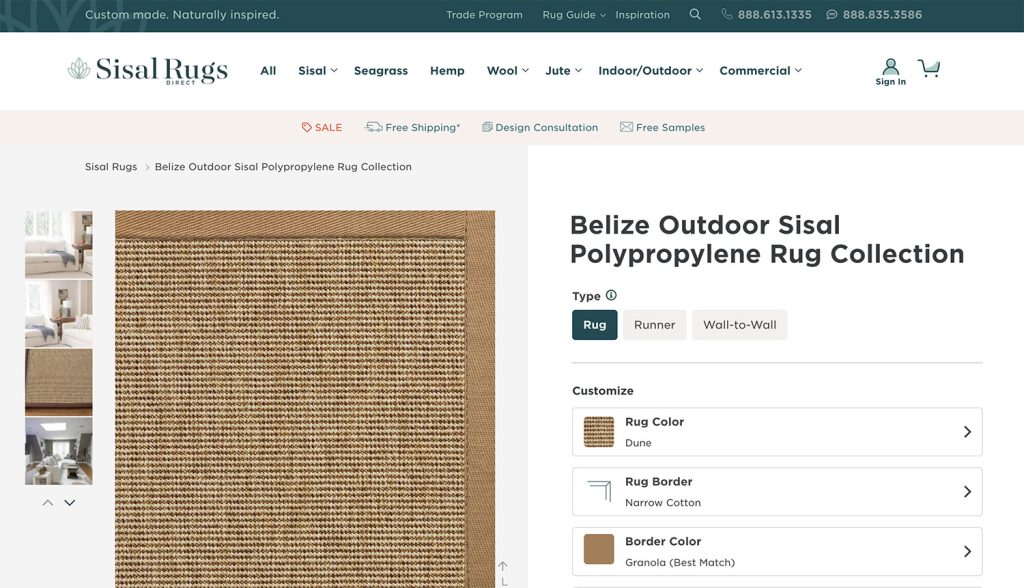
We have been equally happy with both types of rugs we’ve used – stock vs custom, cotton vs sisal, bold vs neutral – so you should feel good about choosing whatever is best for you.
Step 4: Paint or Stain Your Stairs
If your stair makeover plans include any painting, staining, or other potentially messy updates: do them now! You don’t want to have to worry about dripping a new rug later!
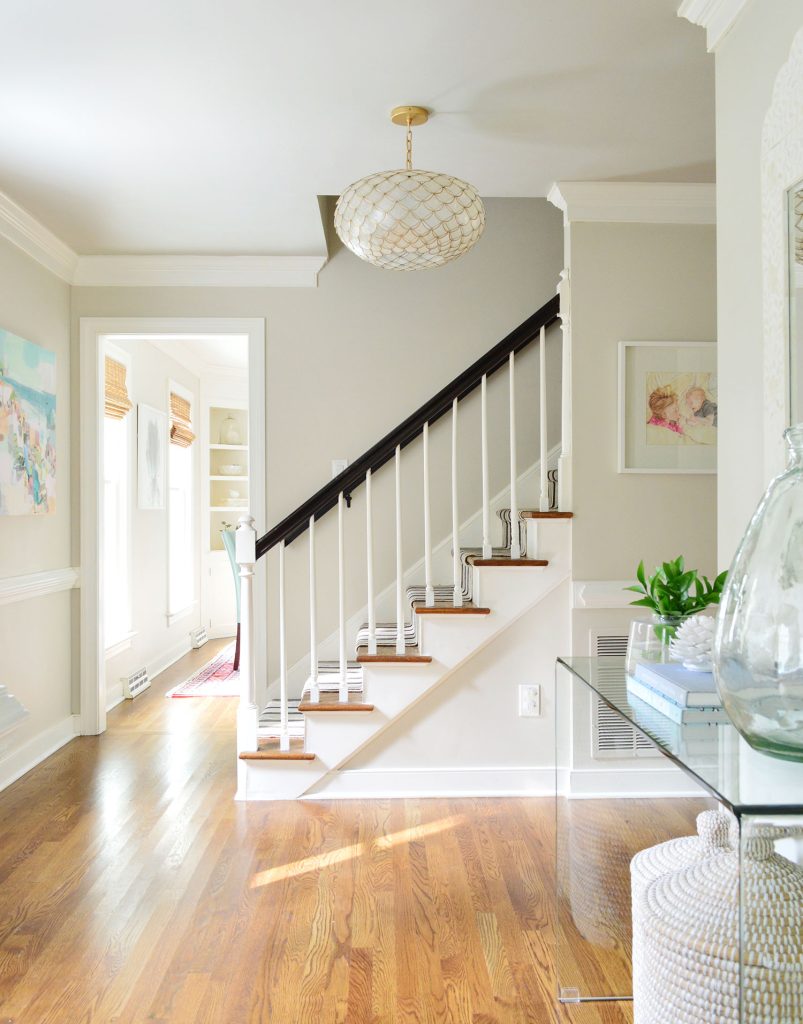
Before we added our striped runner, we stained the handrail a darker color and painted the balusters, trim, and risers white. These were somewhat time-consuming tasks, so they are great to tackle while you’re waiting for your rug order to arrive.
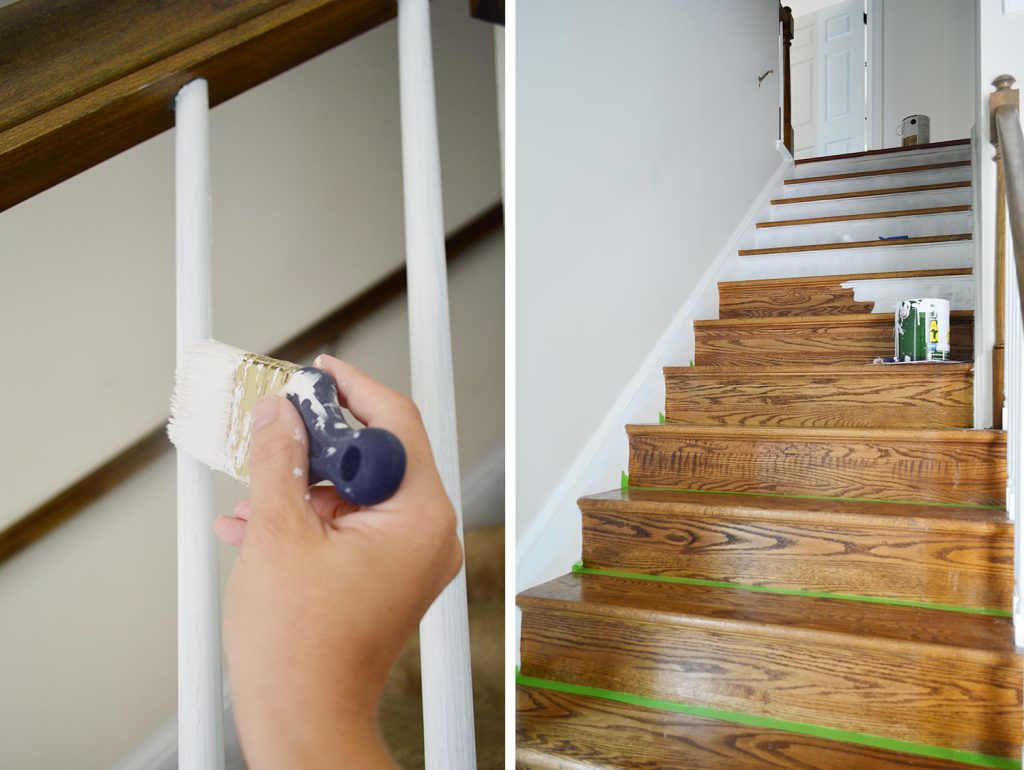
Before adding our sisal runner, we decided to paint the stair treads a warm gray to cover up some discoloration in the stain. We used this Porch & Floor Enamel in Requisite Gray by Sherwin-Williams. It didn’t require a primer and has held up great!
This also is a great time to do any other repairs to the stairs – like if you have a loose or squeaky tread, or need to fix any nearby molding.
Step 5: Mark Your Placement
Once you’re ready to install your runner, start by marking its placement on every step. This will help make sure it stays straight and doesn’t drift to the side as you install it. We used a measuring tape and painter’s tape to mark the edges along each tread, which you can see below.
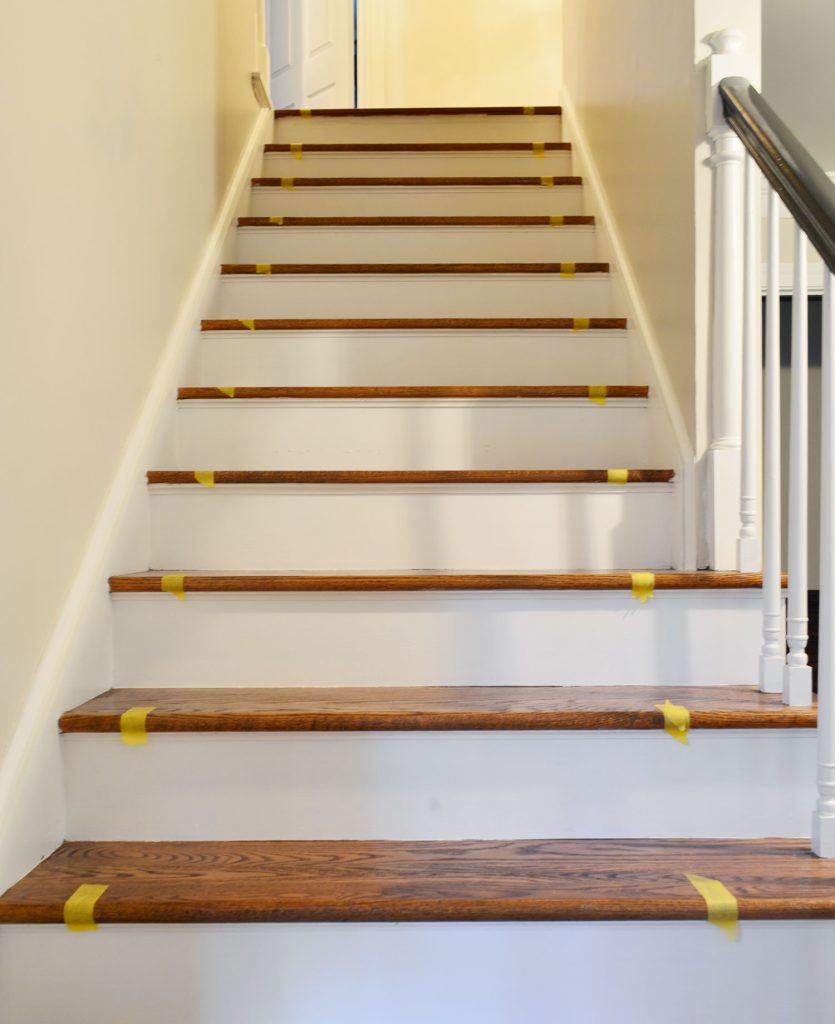
Alternatively, you can check your placement with a ruler or measuring tape as you go. We just found it faster to tape down guides at the start of the project.
Step 6: Cut The Rug Pad
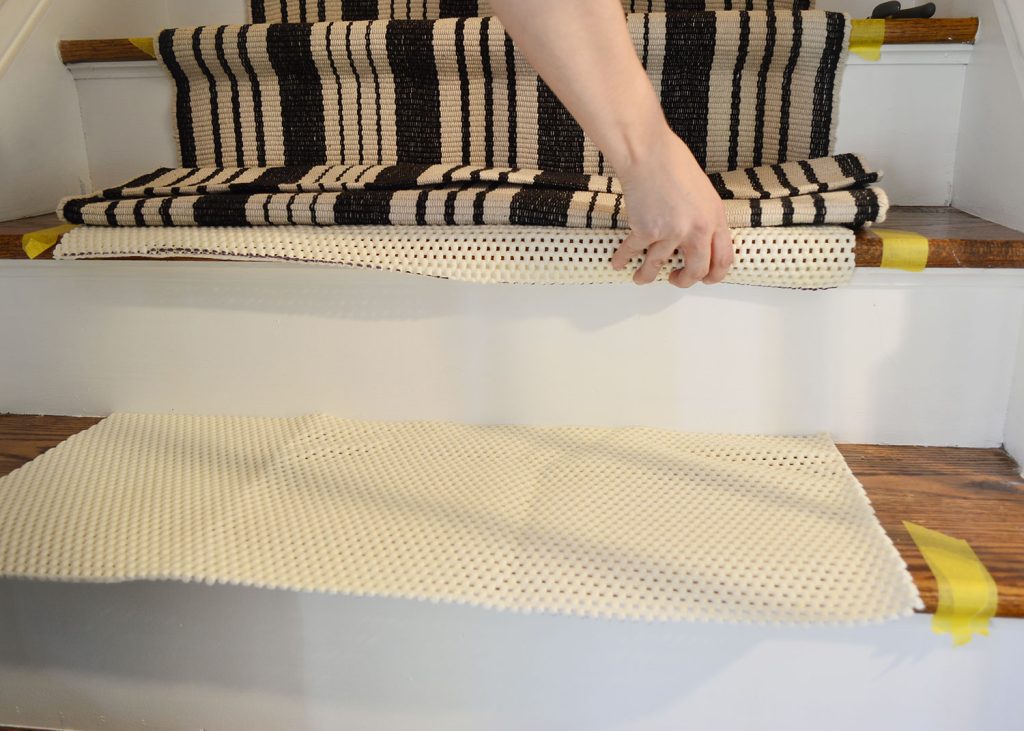
You’ll want a rug pad under your runner to (1) provide more cushion and (2) keep the runner in place. If you don’t want extra cushion, you can use carpet tape instead. We have used both a felt rug pad and a rubber rug pad with equal success. Just make sure whichever you choose has a non-slip design. Both are sold in multiple sizes, including runner lengths, and don’t need to be very thick (we use 1/8″ depth).

We prefer to use the rug pad ONLY on the tread surface (not the vertical riser). This saves money and also prevents unnecessary bulk against the riser. But it does require some time upfront to cut the rug pad into strips. Luckily they usually cut easily with household scissors. We leave it long enough to wrap around the front nose of the stair.
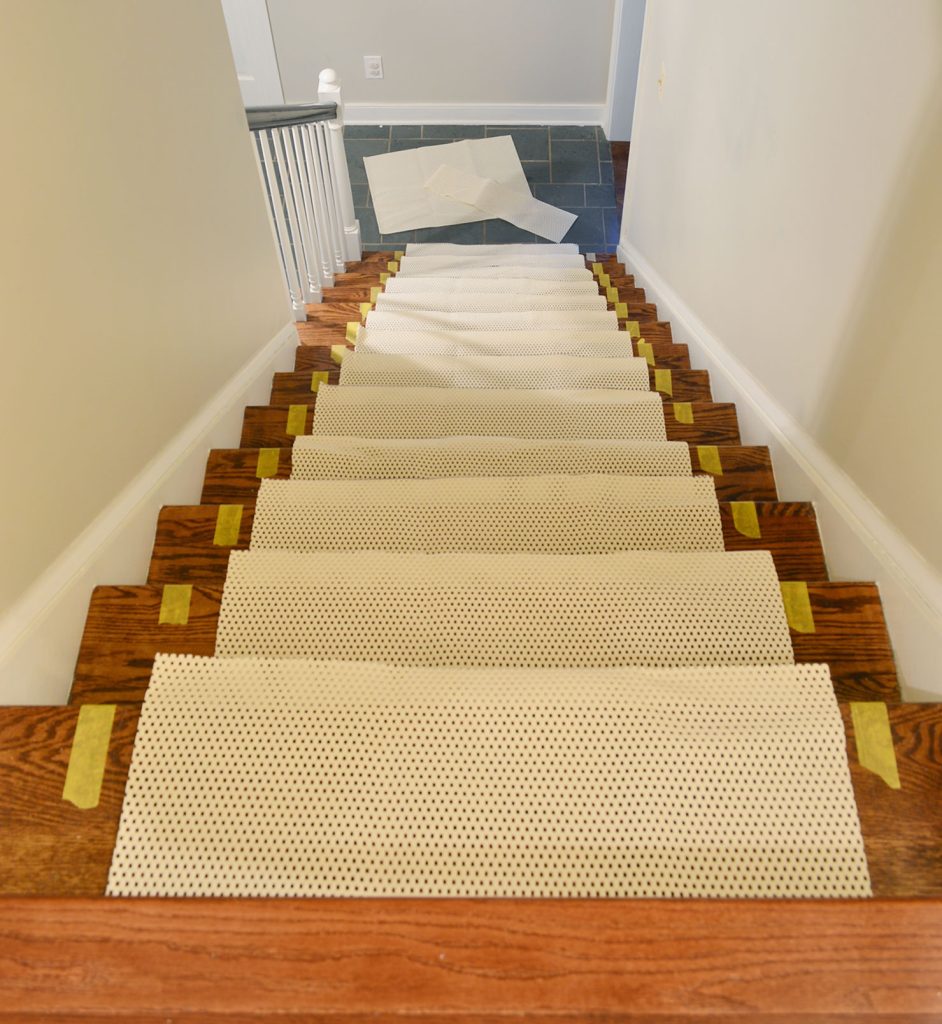
We leave enough overhang so the rug pad can wrap around the bullnose of each step, as you can tell above.
Step 7: Prepare Your Staples
Here comes the weird step, but we promise it’s worth it! After some trial and error, we found an electric staple gun designed for upholstery projects to be the most effective way to secure a stair runner. A hand-powered staple gun was too light-duty. We needed something with more oomph!
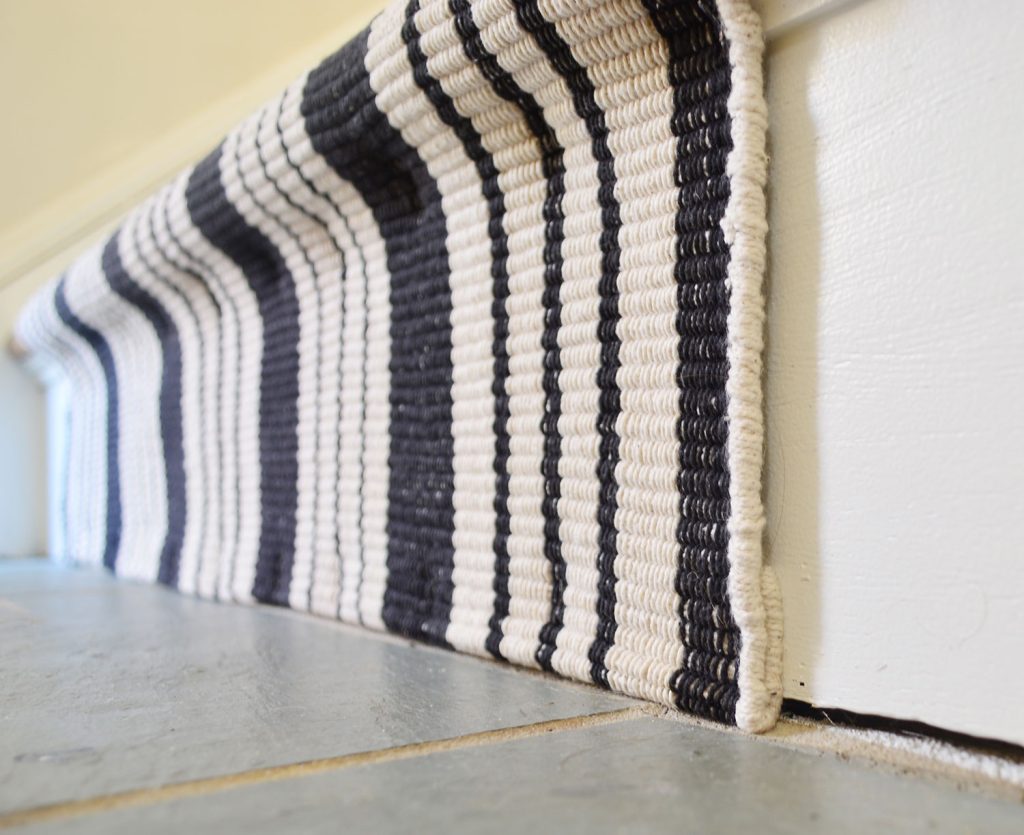
The drawback to this approach is that your staples may be visible UNLESS you take the time to color them first. I know it sounds weird, but trust us. It works!
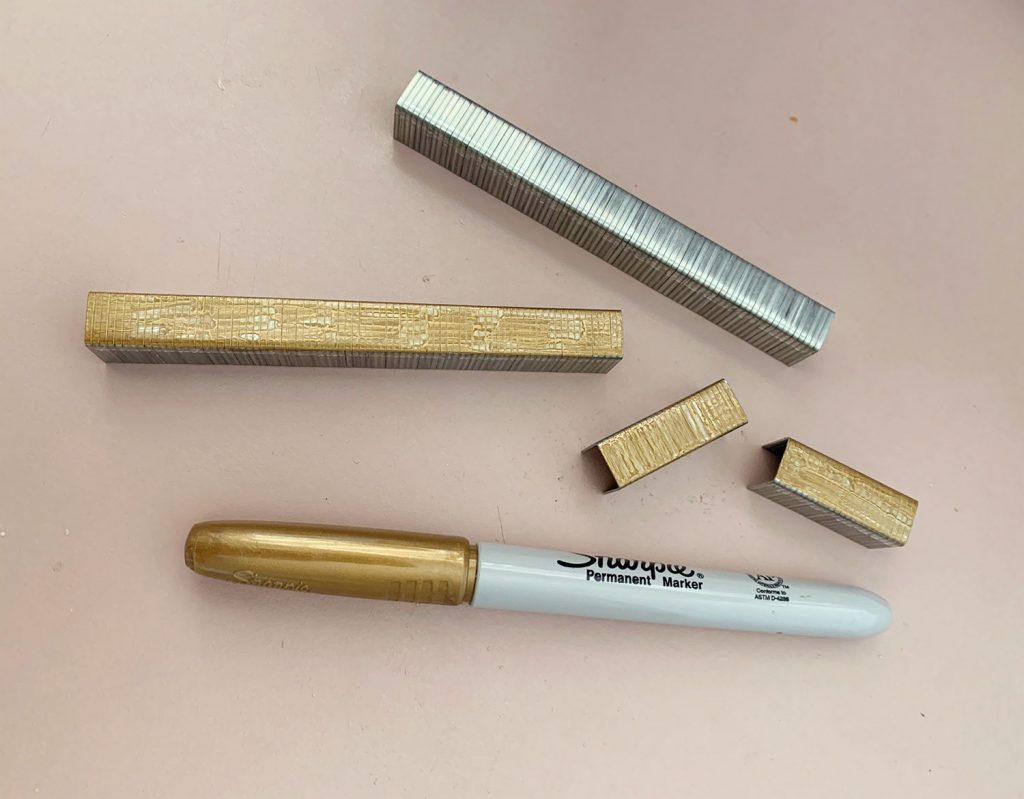
For our sisal runner, we used a gold Sharpie to roughly color a strip of staples before loading them into the stapler. For our black and white runner, we did the same thing with a black Sharpie.

Matching the exact color of your rug is not important because the main benefit of this approach is that it removes the SHINE of the staples. The staples were mostly visible when they catch the light, so the Sharpie ink dulls them enough that they camouflage into the pattern of the rug.
Coloring one big strip of staples before you put them in the stapler is much faster than doing it individually after they’re stuck into your rug. But you can test it on a few stapled staples first if you want to determine what color offers the best disguise.
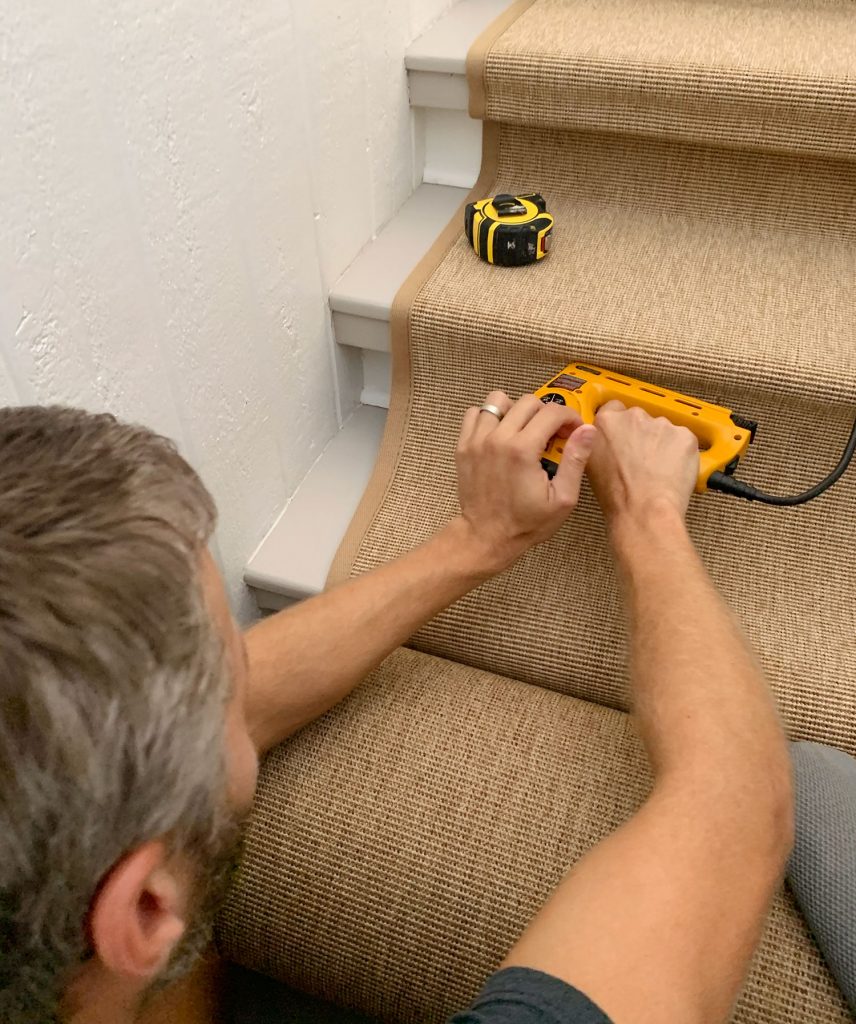
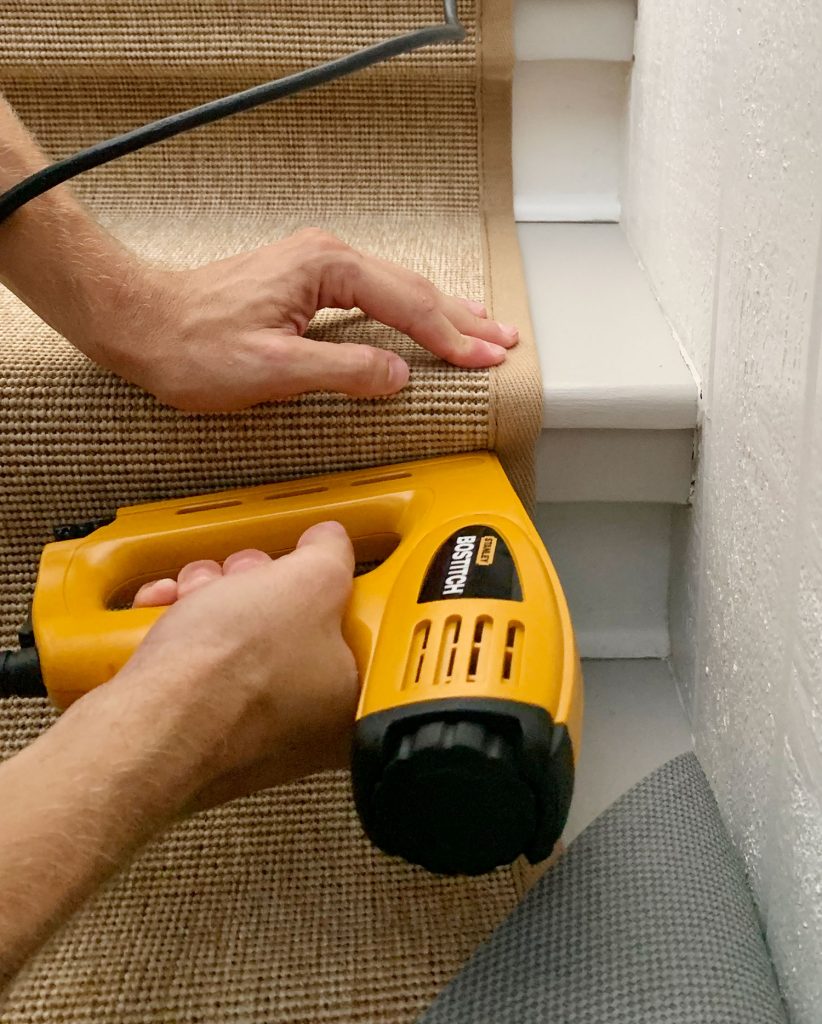
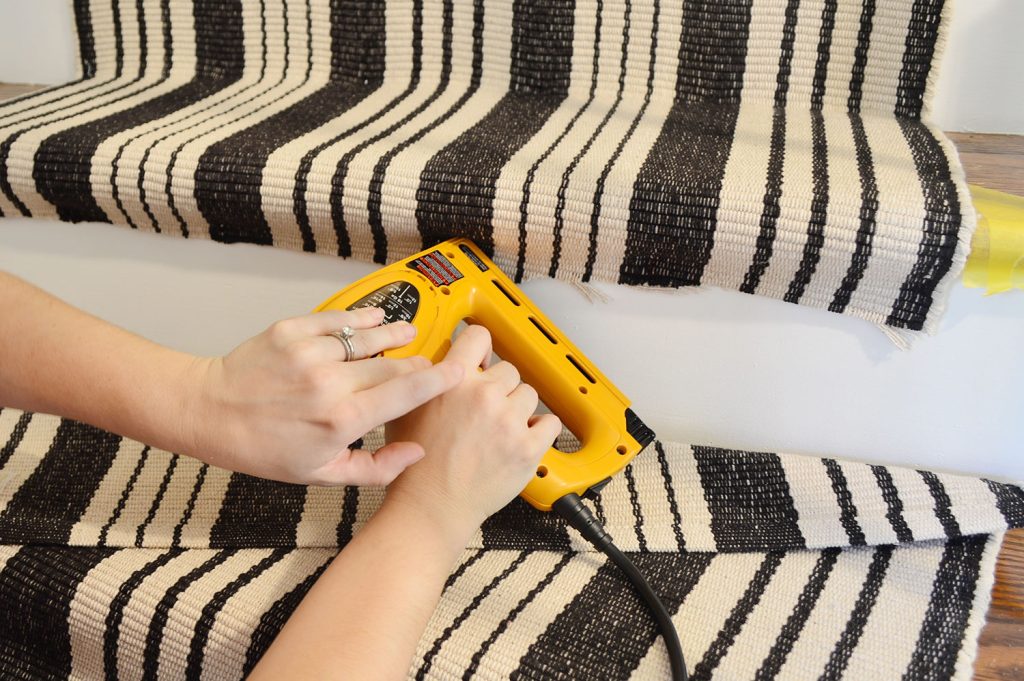
Step 8: Start At The Top
Begin stapling your runner under the lip at the top of your staircase. Take your time to position your runner precisely – keeping the top edge flush, and your edges aligned with your tape markings. Use the electric staple gun to secure it at each edge and about 4-5 places in the middle. Your rug’s pattern may determine where best to place your staples so they are as hidden as possible. You can also go back and add more staples later if it is sagging anywhere. The important part now is to just get it attached.
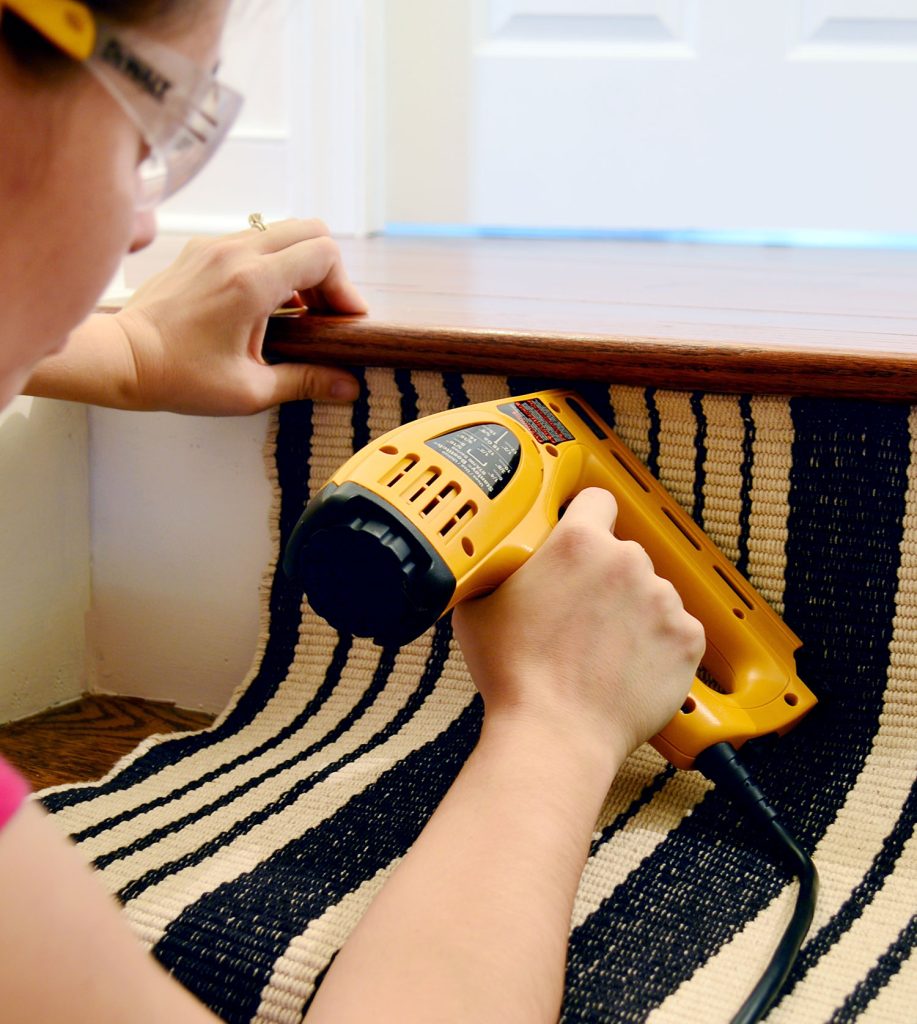
With the runner stapled along the top, pull it tight against the riser and staple along the bottom into the RISER, not the TREAD. At no point during this process will you need to nail into the treads. This way you don’t have to worry about bare feet ever feeling cold metal.

Next, pull the runner tight along the tread and repeat this process, starting with another row of staples under the lip of the next tread.
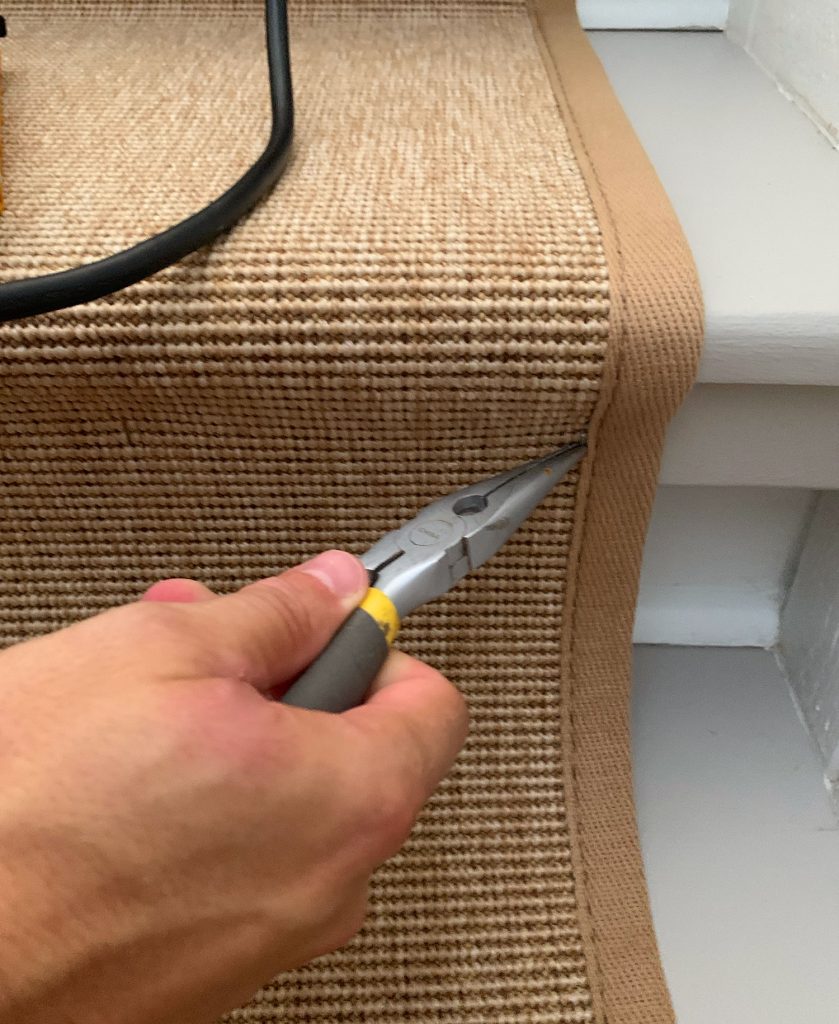
Use your judgment as to where & how many staples are needed to hold your runner tight to the stairs. With our sisal runner (above) we had two “lips” under each tread, so we had to do two rows of staples along the top of each step. Also, don’t fret if you need to remove a misfired staple now and again. Just keep some needlenose pliers handy.
Continue this process, working down your stairs towards the bottom. Just remember to keep pulling your runner tight and make sure it’s not drifting to one side as you go. Oh, and don’t forget to put down your rug pad strips as you go.
Also, we find the electric staple gun works best when you apply pressure to the back of it as you fire. This helps the staples sink deeper into the swood.
Step 9: Connect Two Runners
If one runner won’t reach the bottom of your stairs, it’s easy to seamlessly connect two separate runners. The best way to do this is to hide the transition under the lip of a tread. Use scissors to cut off any extra material from your first runner so that it terminates under the lip.
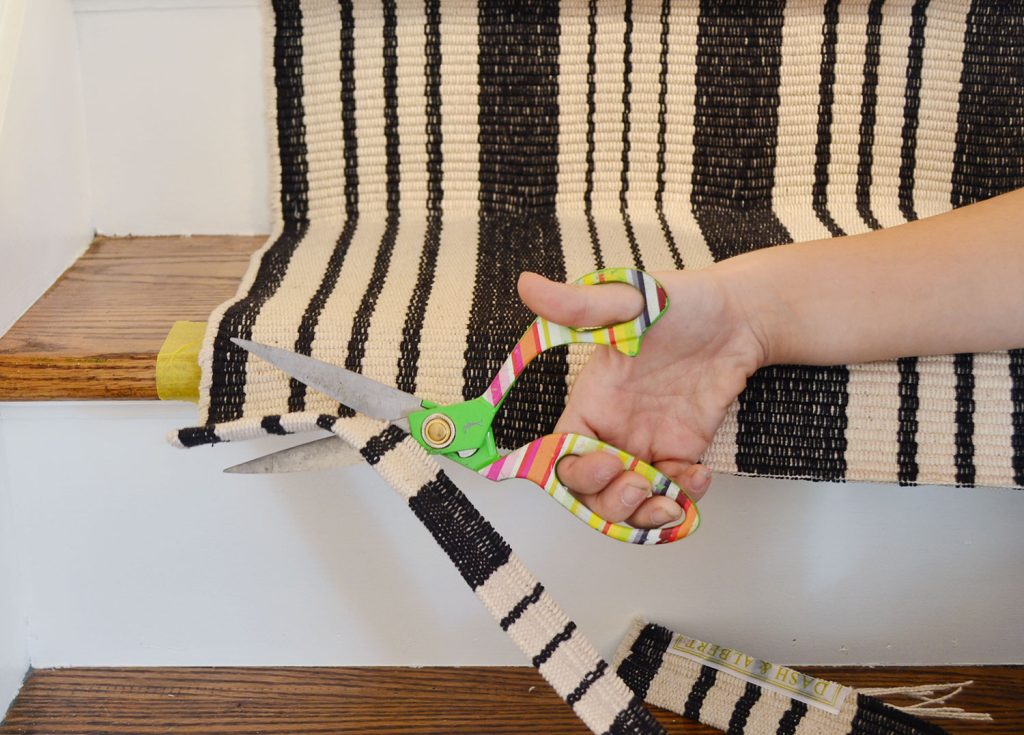
Staple that cut end right under the bullnose edge of the tread, just as you have been doing.
Then attach the second runner under the lip, just like you did with the first runner at the top of your stairs. From there, you can continue down your stairs with the second runner. Here is a finished picture of our stairs. Can you find the spot where one runner ends and the other begins?
You can kinda see it there about 3 steps up. The transition is not 100% undetectable, but it’s so subtle you only really notice it if you’re looking for it.
Step 9: Finish The Bottom Edge
Once you get to the bottom, use scissors to cut off any excess material – leaving about an extra inch of material. Fold this extra bit back under the runner and staple it into the bottom of the rise. This fold gives a cleaner, even edge on the bottom (since some runners will fray slightly when cut).
And just like that, you’ve finished your stair runner installation!
You can read more specifics about installing our sisal stair runner, and see more before & after pictures of that space.
Stair Runner FAQs
Here are answers to other questions we frequently get about installing a stair runner.
How well do stair runners hold up?
Our stair runners have held up very well, even with busy kids & pets in the house. Like any rug or carpet, they require regular vacuuming and the occasional stain removal. But as long as you choose a durable material like an indoor/outdoor polypropylene rug or a natural fiber rug, you should have little trouble. We lived with our striper runner for over 7 years before moving, and we only experienced light fading at the bottom (where it got lots of sunlight) and some small, but barely noticeable, fraying on the nose of a step or two.
Do stair runners damage the stairs?
When you install a stair runner, you will put small staple holes in your stair risers. A stair runner also may cause your paint or stain finish to fade unevenly, due to the steps being partially covered. However, both of these can be remedied with wood putty and a fresh coat of paint or stain.
What are the advantages of a stair runner?
In addition to improving the look of your stairs, you’re also making your steps safer and quieter when you install a stair runner. Rugs absorb sound and cut down on the noise of loud footsteps. They also are less slick than wood steps, which makes slips and falls less common.
How do stair runners stay in place?
Stair runners stay in place thanks to a combination of staples and rug pads. The staples hold the rug tight to each riser, helping it form to the shape of the staircase. Rug pads under the tread keep it from moving underfoot. Alternatively, you can use stair carpet rods to hold the rug tight to the riser.
What are alternatives to a stair runner?
In our historic beach home, we didn’t want to install a permanent stair runner. We used two alternate solutions to help our dog not slip on the stairs. On our front steps, we used non-slip sisal treads held in place with carpet tape. On our back stairs, we used clear non-slip treads for a nearly invisible look.
*This post contains affiliate links, so we may earn a small commission when you make a purchase through links on our site at no additional cost to you.

Jami says
Hey john and sherry! Love your blog and this project came out beautifully! My question for you would be whether you have any suggestions for staircases with landings and turns? I would love to do this to my steps but wouldn’t know whether to skip over the landing or try to miter a runner for the landing. Seems I could get away with lots less work and carpet it I skip the landing but not sure how that would look. Thanks for sharing your adventures with all of us eager readers!
Jami
YoungHouseLove says
My friend had one installed professionally and has a turn in her stairs and he basically mitered the corner of it (picture two triangles of the rug meeting to make a diagonal seam, so it looks like the stripes turn at a right angle to follow the steps). Hope it helps!
xo
s
Barbara Mulligan says
Holy cr@p. I didn’t expect the white on the front of the steps! Long time follower, first time commenter. Holy cr@p. It makes such a difference!!!
YoungHouseLove says
Haha thanks Barbara!
xo
s
Chris says
You did an amazing job with the connection of the two rugs, and the finishing off of the bottom stair. Beautiful work! I would have never tackled something like this, but you made it look doable!
Eve says
Does this sound crazy? I love the way the Minwax stain turned out on the handrail. I especially love the espresso color. So I’m wondering if I can use the Minwax on my guest bathroom vanity instead of painting it… Any thoughts?
YoungHouseLove says
Not crazy! Someone said they used it on furniture and it was great! I’d go for the satin finish and hopefully it’ll be great!
xo
s
Dave says
I love the order for stapling graphic.
YoungHouseLove says
Thanks Dave.
-John
Laurie says
Love it. It is amazing how much difference new paint, stain and a runner can make. It is lovely. As for me, I am decorating a guest bedroom. I have somehow found myself with a shabby chic scheme, which is not something I thought I would ever embrace but it is working in this room, which has leftover pink walls when my 10 year old lived in this room. I could paint but I don’t have the energy right now. I acquired a vintage baked porcelain daybed and am refurbishing old nightstands (finished those over the weekend) and an old pine armoire. The room is turning out great and now my daughter wants to move back in to it!
Hillary says
Beautiful! I installed a similar runner last fall and wish I’d known ahead of time to tape it off in order to keep it centered. Live and learn, right? Also, I’m impressed that your electric stapler could do the job! Mine would have wimped out on the places where I had to fold/tuck the runner, so I used my pneumatic one.
YoungHouseLove says
That looks so good! I love it!
xo
s
Ashley says
Looove it!!! Obsessed with the before and after, in fact. You guys are so inspirational to those of us hesitant about DIY!! Currently hanging a gallery wall in each of my kids’ rooms (with lots of white to brighten things up) because of you two. Thank you for the inspiration!! Enjoy your great new stairs with every up and down you take!
Ashley
Hayley says
Looks fantastic!!! almost makes me want stairs!! almost :)
dawn says
Beautiful. So well thought through, every item fits well together and how everything balances each other. Thanks for sharing this post. I also love the PolyShade. I have a railing that just doesn’t fit in with my house. But after reading your post I am going to try the PolyShade on my railing. Again, just beautiful.
Lesley says
It looks great. But I have to tell you that we have the same exact rug, same pattern/color, in our kitchen and it is a dirt/lint magnet. I hope it does better for you!
YoungHouseLove says
Oh no! We’ve heard from a few other D&A rug owners in the comments (even with multiple/big dogs) and they have said they’re awesomely durable so I’m crossing my fingers that we have the same luck. Do you guys wear shoes indoors? Is your rug cotton or an indoor/outdoor one?
xo
s
Lesley says
We never wear shoes inside. Ours is cotton. Maybe yours is indoor/outdoor and I didn’t catch that. Hoping for the best!
YoungHouseLove says
Ahh, thanks Lesley! Will keep you guys posted. I think we should do an update with photos 6 months in whether it’s good, bad, or ugly! Fingers crossed…
xo
s
Jessica says
This looks incredible!! It would look so great on our stairs too, but ours curve about half-way down. I’m thinking we’d need to get professionals in, because I have no clue how to pull that off. Great job!
Vanessa says
Looks CRAZY amazing! Just showed these photos to the boyfriend in hopes he’ll consent to doing something similar on our stairs! Awesome work, you guys!
Lee Ann says
I’m bookmarking this project! My stairs look awful, so they are on the long-term to-do list. Problem is that my stairs have always been carpeted, so my guess is I’ll have to install a bullnose edge before I do anything like this.
As for my weekend, my dad helped me replace the flooring in a guest bathroom. The floor looks great (just new vinyl tile, but it sure helped). But now I need to replace the guts in the toilet tank. Why is it(for me anyway?) you can have a toilet that’s worked perfectly for 10-15 years, but once you take it up to replace the flooring, the minute the toilet is back on the new wax ring, some part of it starts acting up? Geez!
YoungHouseLove says
Oh man, I know what you mean! Sounds like you got a bunch done though!
xo
s
Jessica says
This looks incredible… probably my favorite “makeover” in your new house so far!
I did want to add (though forgive me, I feel like a buzzkill doing so) that I was quite surprised you chose that type of rug pad. The waffle-weave rubber type is notorious for breaking down (sometimes into a powder almost) and is not recommended for wood floors, as over time it can leave an imprint of the pattern on your wood or worse, adhere to it, causing damage that can require refinishing. (I’ve read that the chemicals in the material can react with the floor finish.) Felt rug pads are recommended for wood floors, and are often made of recycled materials and with no chemicals or adhesives.
If and when you decide to return to bare stairs (though your result is so gorgeous, I can’t even imagine it!), you may find that you will have to contend with repairing the finish on the steps. But hopefully all will be fine!
~ Jessica
YoungHouseLove says
Wow never heard that, Jessica! Thanks for the tip! We use these pads on carpets that sit on our hardwoods all the time, but thankfully we haven’t had any breaking down or damage to the floors so far. Now I’m nervous though so I guess we’ll find out in a decade or so! Haha!
xo
s
Kathy says
I’m impressed! I love it! Took me a year and a half to convert my carpeted staircase. I love the idea of adding a runner :-)
Mine looks exactly like yours, right down to the finial post at the bottom! Must be a 1978 -ish era home like mine? Also…why did you do the rails dark and leave the treads the lighter wood? Looks great! Just wondering your thought process.
YoungHouseLove says
Thanks Kathy! We added an update to the post about that for you! Since the treads are the same color as all the hardwood floors upstairs (they meet right at the top of the stairs) we wanted to keep them consistent.
xo
s
Kimi says
IM IN LOVE!!!!!!!! <3 I'm in the middle of a stair makeover myself!!;) Great Great Job!!! You guys are amazing!!!
Jill says
This is really spectacular. I am especially coveting the runner, but got really excited when I saw the stain/poly blend. We remodeled our home about nine years ago and I painted and stained the interior. ALL OF IT. When the stairs were put in place, I had stained all the pieces and just needed to finish off the wood. Nine years of foot traffic later, they remain unfinished. At this point I’m afraid I need to sand it all down and start over. This means the railing and posts too, which makes me want to weep.
I’m wondering, can I somehow clean the stained wood and go over the whole thing with this blend? (And then get one of these fabulous runners!) What do you think? Or am I doomed to start over?
YoungHouseLove says
Hmm I’ve heard it works on furniture and vanities but I’m not sure about foot traffic spots like stairs. I would check out their site or read the can to see what they say. Hope it works!
xo
s
John says
Looks wonderful! What a difference! And in 20 hours too!
I have had the same experience with PolyShades. It seems to always take a few coats to make the difference. Sometimes it looks thicker and darker in spots. Kind of a tricky product sometimes. Painting the end posts was a great call. It looks terrific. And I never thought about coloring the staples in the gun before. I am going to put that into use someday. Did the gun rub off any of the black when it was shot into the stairs?
It’s funny, the view from the top makes the stairs look like piano keys. Ha! :)
YoungHouseLove says
Haha, thanks John! Thankfully the gun just shot our black staples in, but we didn’t have any issues with it rubbing the rug or anything.
xo
s
Sarah H. says
Your foyer is beautiful! The stairs are so fresh looking now. Good job!
Jodi says
Hi Sherry & John,
Sorry this is a random question, but just wondering if your sofa in the family room is the KARLSTAD from IKEA? If it is, wondering how you like it? Has it held up well? Comfortable? We are in the market for a sofa and value your opinion. Thanks!
Jodi
YoungHouseLove says
Yes, it’s the corner sofa and add-on chaise (both of the Karlstad line from Ikea) and we really love them! We painted the legs darker but otherwise have done nothing to maintain it and it looks great even years after buying it and getting beat on by a child and a dog (and two parents who flop down on it regularly). We hear some other covers aren’t as durable, but our dark sivik gray one has been awesome (and it’s machine washable!).
xo
s
Cate says
Don’t you love all the architectural terminology related to stairs? I believe it is actually “nosing”, rather than “nose”, but I love the image of a bunch of noses coming down the stairs. Also, I really like your newel post decision. I think it looks best white, but you can always change it if you change your mind.
YoungHouseLove says
Ha, thanks Cate! Nosing is too funny! That sounds like what Burger does when he wants a treat (rubs his nose on us).
xo
s
Catherine says
It looks really awesome! And now that you know how to do it, you can easily change it if you decide to go with a different pattern in a few years.
Meredith says
That looks really great! If you guys had decided to stain the treads along with painting the risers, which do you recommend doing first?
YoungHouseLove says
I think I would stain first and then paint!
xo
s
Shannon says
It looks amazing!
Jillian@TheHumbleGourmet says
I have never lived in a house with stairs (aside from the occasional step up and down, but no staircase) so I’ve always dreamed about what I would do with a staircase if I had one. This looks great! I love the stripes too…so mod.
Meredith says
I must ask, how do you manage to keep Clara and Burger away from these projects? Especially if the railing was curing for so long. Even as an adult I would have a hard time remembering to not grab the railing. Or to have them stay away from the wet risers.
YoungHouseLove says
Thankfully Burger’s really skittish so if we’re working somewhere he’s usually happy to stay clear (although he was oddly interested in sitting on the steps with us when we were pulling staples, perhaps because it was so slow-going and we were there for hours?). As for Clara, if we were actively painting the stairs in front of her she might want to be involved and it might feel like we’re constantly trying to distract her to not come touch things, which is why we typically switch off doing something with her when she’s not napping or asleep for the night if we tackle something (if John’s painting and she’s awake I might go play outside or color in the office with her). Once it’s done though, she’s pretty good about not touching something (for example, once she woke up from her nap to wet risers we just said “we’re going to carry you downstairs and we can’t come back upstairs for a few hours because the stairs are wet, so let’s bring everything you want downstairs so we have it to play with in the living room.” Then just watching her to be sure she’s not sneaking off to test how wet something is (kids do love that…) seems to work for us.
xo
s
Lesley says
WOW, and I worked my fingers off stripping the paint from my newell post, railing and I you could not pay me to paint the risers. Not after seeing the paint easily chip off the wood that runs up the stairs. HOW does that happen anyway?? So in your runner search, did you see any oriental style ones? That’s what I want and I have not begun my search. Thanks
YoungHouseLove says
I haven’t seen any runners of that style, but admittedly I was mostly googling Dash & Albert. Maybe try a site like overstock to see what they have?
xo
s
nancys says
Your runner looks great!
We ripped out a whole house of carpeting when we made our last move. I have painted the risers twice now in 4 years – boo. (Last was an epic failure, really just a waste of time. Did an ombre paint job, not realizing when I started that the way the light hit the stairway you can’t see the different shades of grey. Oh well, live and learn right!)
We are pretty much a no shoes household also, but just those few trips with shoes (we are more strict about that during the winter months)have left those dang scuff marks that are so annoying & unsightly. Can’t afford a runner at this time but I’m thinking some kind of “riser disguise” would make a nice winter time project.
YoungHouseLove says
You know what? A designer friend of mine was just saying she did an ombre on the steps for a client and because of the lighting you couldn’t even tell! I thought it might make you feel better! It seems to happen to the best of them!
xo
s
Crystal says
Sexiest. Staircase. Ever.
tess says
thank you for posting donation link to aid for Philippines, my heart breaks
tiffany says
Love these stripes!!!
XOXO,
http://outfitidentifier.com/
Celebrity fashion dictionary of who made it and where to get it
Lil says
Looks awesome.
Two things…
1. I bought the same nail gun as you (thank you)…doesn’t it take staples too?
2. “blue trim winking”…I read blue trim whining. lol.
YoungHouseLove says
We thought the same thing about the nail gun! But when we read the booklet we realized we needed to buy a separate attachment, and the staple gun we found for this project was well rated and inexpensive (cheaper than the attachment) so we thought it would be nice to have around for projects like this. And as for that blue trim, it’s making me whine! Haha!
xo
s
Shannon L. says
LOVE this! Seriously, I need to find a house with stairs so I can do the same thing. You guys are always such a great inspiration to us—thanks for writing and DIYing so faithfully! :)
YoungHouseLove says
Of course Shannon! We were so excited to share this with you guys!
xo
s
Amber says
Sorry if I missed this in the text (I admit sometimes if I have no need for the step-by-step I just skim the photos and some descriptions!)
I mean no disrespect by this as what you’ve done looks BEAUTIFUL! In my opinion, the runner would look even more dramatic and the stairs would visually tie together better if the steps had also been stained darker.
Did you guys consider staining the steps to match what you did to the railing? If so, what made you decide against it?
YoungHouseLove says
Thanks Amber! We did add an update to the post about that, but the gist is that we considered staining the stairs the same dark color as the railings, but since the entire upstairs of our house are hardwood floors that match the current tone of the stairs (which run right into them at the top) we didn’t want a big color change at that point :)
xo
s
jar of lights says
Please say the slate is on the chop block, because the wood, runner, slate, blue door combo is hideous.
YoungHouseLove says
Yeah, we’re not loving the slate (there are some damaged areas and some stains I just can’t seem to conquer) so perhaps when we redo the kitchen and add heated tile in there we can carry it over into the foyer and the half bathroom so there’s just hardwood and tile on the main level (right now there are three different flooring types that all meet at the corner of the kitchen/living room so it looks a little chaotic).
xo
s
Sacey C says
Wow! Love it. One of my most favorite updates that you have done so far! Love the contrast and the runner is beautiful!
Laura says
Wow- it looks awesome!
I ripped up the carpet on our stairs a few months ago (and we are STILL finding staples I missed), but unlike your stairs, our carpet was “wall-to-wall”.
Now that the carpet is up, there is a gap between the stair tread and the baseboards. In the hallway, we put quarter round to cover the gap- but I don’t see extra moulding in your pictures. What do you do for a gap like that on the stairs? Caulk?
YoungHouseLove says
Hmm, we didn’t have that gap, but quarter round or some sort of trim piece sounds like it could work, or caulk or wood filler could do the trick if you think you could get it to look seamless! Good luck!
xo
s
Kimberly H. says
I love your blog. Have been reading daily for several years. But I have to say that I’m pretty disappointed that you mentioned nothing about the fact that today our country is celebrating the men and women who make great sacrifices every day and join our military to protect our freedoms. Makes me sad…
YoungHouseLove says
I’m very sorry if we offended you in any way, Kimberly. John’s dad served in the army as well as my grandpa, and we certainly LOVE the brave men and women who defend this country with a capital L. There have been other commenters who recognized our nod to Veteran’s Day in this morning’s post title (Stairs and Stripes) like this one and we shouted out how much we appreciate our Veterans here. We’ve also added a thank you in this afternoon’s post here. Hope it helps!
xo,
s
Kimberly H. says
Thanks for your response! I still have lots of love for you guys. I know the posturing with running a blog must be tough.
YoungHouseLove says
Thanks Kimberly, love you right back! John actually realized that we have an old photo of his Grandpa Harry while he was serving 32 months in the South Pacific during WWII (away from his wife and newborn son) so we instagramed/facebooked that awesome picture. It’s amazing to hear other people’s stories (there are lots of other Grandpa Harrys who served too!).
xo
s
Erin says
I was not nearly as ambitious this weekend as you were but I’m proud to say I finally finished watching all the past seasons of Mad Men. I’ve fallen asleep with Donald Draper many a night as I caught up on Netflicks on my ipad under the covers. From a design perspective, I chuckled every time they showed Megan’s chevron printed coat or the quatrefoil lampshades in their bedroom. What’s old is new again!
YoungHouseLove says
Love it. A weekend well spent!
xo
s
esther says
Love the new looks of your staircase, it looks absolutely looks fabulous.
I really dig the look of wooden steps with a runner over it like you guys have, but sadly our new house doesn’t have a straight staircase :( So it looks we’ll have to carpet the full width of the stairs, both the treads as the risers, unless I somehow find a way to do this.. but so far I haven’t. Always open to suggestions in case someone has an good idea!:D
YoungHouseLove says
Ooh someone posted a link to a photo on pinterest of a turned staircase and the landings were uncarpeted and the stairs had runners and it looked awesome! Hope it helps!
xo
s
Kate Sanders says
We need a before and after photo!!
YoungHouseLove says
There’s one at the end looking down the steps, but I want to add some to the House Tour page too for ya :)
xo
s
Susanne Stowe says
We’ve heard great things about Rejuvenate and I was wondering how your floors are looking these days from when you used it back in July. Need to go get some for our floors… our two 75lb pups have done a number on them!
YoungHouseLove says
We’re still very happy with how the Rejuvenate has worked out after living with it for five months!
xo
s
qs777 says
Looks great! Thanks for making me wish I had stairs now.
I kind of can’t get my head around stain that doesn’t have you wipe off the excess, but I am intrigued since we just got a console that I had wanted to paint or stain, but can’t really sand down too much since it is a veneer. Do you think your stain would work?
YoungHouseLove says
Yes, others have commented to say they used it on furniture and really liked it (they also had luck with the satin finish, so maybe try that one)? Good luck!
xo
s
Cf Betcher says
Love it! My stair case has a turn in it, 3/4 of the way up– I’m not sure how I would do the landing, otherwise I would be doing this this weekend.
Would love to see a shot of your stairs from the toy closet (?)– that is, from an angle…
YoungHouseLove says
We’ll have to get more shots of the stairs/foyer as we go (we still have some other foyer updates to attend to) as well as for our Before & After page! As for your staircase with a turn, someone in the comments shared a link to a staircase that had a runner on the steps and a bare landing between them where the turn is and it looked great, so I hope that helps!
xo
s
Kristi says
I love this update!!! Looks all around gorgeous and very put together!
Anna, Sydney says
So glad you decided to go white on the newel posts. The stairs looks fantastic!
When I see your whole entrance though I realise I have no idea where your Craigslist green console went? I recall a post about ridding of furniture that doesn’t fit this house, but I don’t remember that being part of it, and now I can’t find the post, doh.
Great job as usual. Hope $herdog is feeling better.
YoungHouseLove says
Thanks so much Anna! The green buffet is actually in the dining room, but it’s on the wall across from the built-ins so it hasn’t made it into many photos yet. I think once I finally finish removing wallpaper in there and we paint we’ll have a lot more photos/angles to share!
xo
s
Anne Phillips says
I love this so much. Let’s pretend for a moment that you had banisters (railings/newel posts/spindles) on both sides of the stairs at the bottom and chose to stain the newel posts instead of paint them. Would you have also stained the half-posts (the ones that but up against the wall)? I am trying to make this decision.
Also, did you just put a double layer of padding under the treads or did you put one layer all the way down and a second layer on the treads?
YoungHouseLove says
We just did padding on the treads since you don’t walk on the risers, and we could get by with using just one 5 x 8 pad if we cut them for each step instead of wasting yardage on the risers too. As for the posts (if we had them on both sides), I’m torn. We have seen inspiration photos with two posts in a balanced placement like you describe and it seems that half of the people stain them and half of the people paint them (it’s such a 50/50 thing because some people just do all the posts white, whether they’re the end ones or not, and some people visually connect them to the rail on top by staining them). So I’d just look at photos (Pinterest has some good ones) and see what you like!
xo
s
April says
This looks amazing… you two should be proud! I’m also intrigued by the dark stain… does “roughing up” with steel wool produce a lot of dust? And do you need to do it in between each coat, or only initially?
YoungHouseLove says
You have to sand it initially (just to rough it up so it’s not super slick, but not to get down to the bare wood or anything). Then between coats you use the fine steel wool, which isn’t too dusty, but seems to smooth it out and get it grippy enough to hold onto the next coat firmly. Hope it helps!
xo
s
Sammy says
That’s quite a difference! It looks great =)