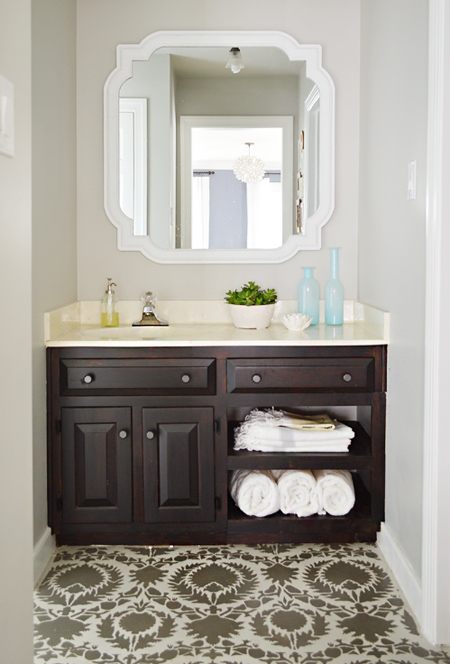
We were trapped inside for the last few days due to rain, so we made some progress by tackling the job of painting our recently de-carpeted bathroom & closet. Here’s a shot of what we eventually got the space to look like, complete with stenciled floor, and – what we’re talking about today – Benjamin Moore’s Revere Pewter on the walls.
But let’s rewind for a second. First up was painting the cream trim white (we went with Benjamin Moore Simply White in semi-gloss, just like the trim in the rest of the house).
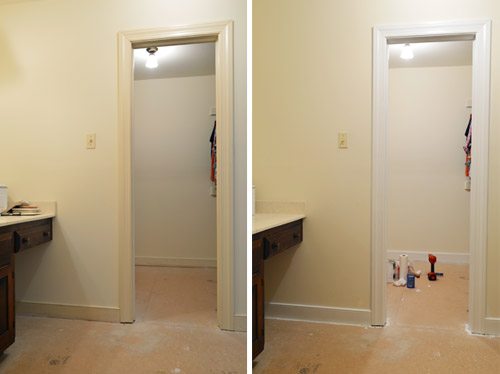
Part of me hates to downplay the time that task took by sharing one measly before & after picture to cover that step. It took one coat of primer and two coats of paint (all applied with a brush) and both Sherry and I got in on the action. I primed since that’s not VOC-free like the painting part, and then when that coat dried we both worked our way around the room’s copious doorways and little areas of baseboard with the paint. Then the cutting in part of the wall-painting process came along and made the trim-work look like child’s play. So. Many. Angles.
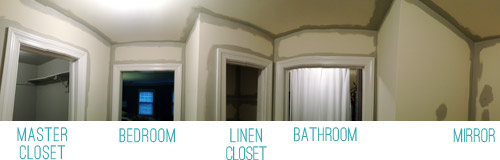
Please allow me to demonstrate with the panoramic function on my iPhone.
I’m not usually one to complain about painting (except for painting ceilings, in which case I will whine for days) but painting walls is usually “the fun part” for us. However (here comes the BUT!) I think whenever you go into any project thinking “this’ll be fast and easy” it’s a slippery slope. And after 6+ years of DIYing we should have know better, so it’s no ones fault but our own. But this was totally one of those tiny areas (seriously, the whole thing is probably around 80 square feet) that had us feeling cocky and saying “let’s just bang this out in an hour or two” and it ended up taking a few 2-hour installments over a couple of days. Womp-womp. But it’s done! Praise those sweet, unpredictable DIY Gods, it’s done.
The color we chose was Revere Pewter, which Sherry says pops up on Pinterest as a lot of people’s favorite light-to-mid-toned color. In fact, some consider it the best greige paint color out there. You can see more examples of Rever Pewter here. Her brain also refuses to read it as “Revere Pewter” so she can’t stop calling it “Reverie Pewter” – even when the guy at the paint desk is like “Oh, you mean Revere.”
You might remember that we tossed out this “Percolating In Progress” post with a few first thoughts on paint colors right after we moved in. For our bathroom and our walk in closet we wanted something somewhat light (there aren’t any windows in either of those spaces) but not too light that it washed out things like the white trim, white mirror, and the white shelving in the closet. At first we debated Pismo Dunes and Gray Owl (both below) but we ended up liking the Revere Pewter swatch better, which is sort of a combination of both of them. It’s almost like a darker tone of Edgecomb Gray (less brown than Pismo Dunes and a little richer and less gray than Gray Owl).
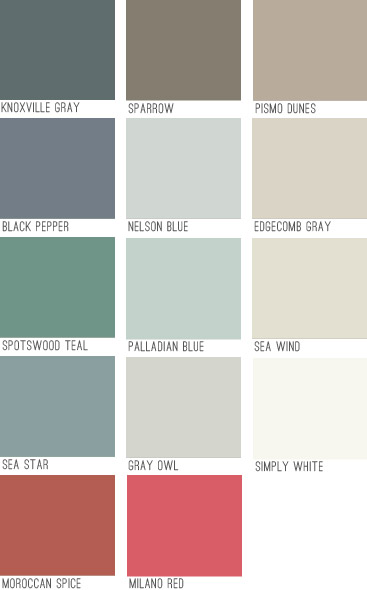
We really liked the way it dried. Taupe-y in some lights (like this shot). Gray-ish in others (like the one below this one). It changes throughout the day, and works really nicely with the deep faded blue-gray color (Black Pepper) in our bedroom. We have a devoted post all about our favorite slightly lighter grige color, if you want to see Edgecomb Gray in our house & read why we love it so much.
The rolling was pretty easy by comparison to the edging. Oh and we chose to paint the ceiling the same color as the walls in here. We’ve learned in small spaces it actually makes the room feel less cramped when the ceiling and the walls are the same tone (assuming it’s not too dark of a color) since it just makes an angular/choppy/cramped space feel less broken up and boxed in.
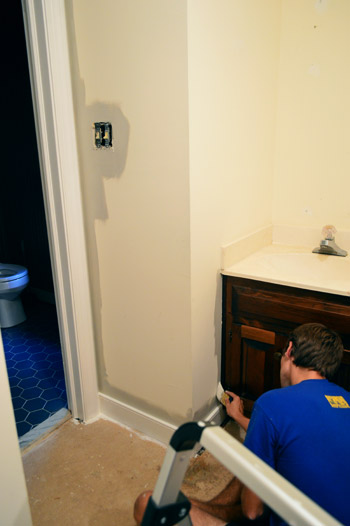
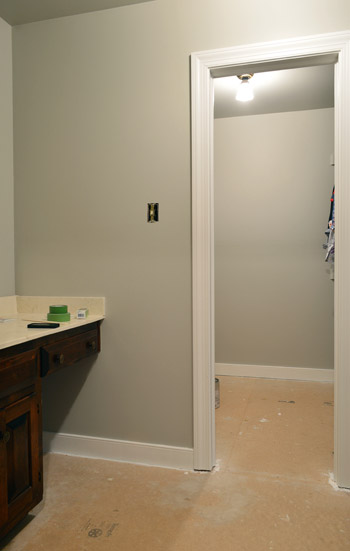
And just like the other rooms we’ve painted, after all the paint was dry, I used this as an opportunity to switch out all of the light switches and outlets from the old cream versions to clean white ones. This photo is a bit darker (hello black hole closet) because I had the power off, but it actually demonstrates how the wall color sort of chameleons itself in different lighting situations.

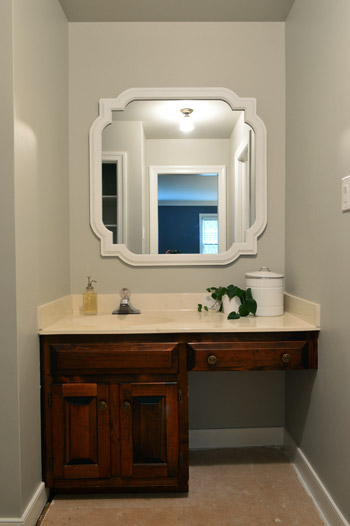
Even with the lights on, the darker color on the walls is a nice backdrop to help show off the mirror’s shape (and all of that trim that we painted pops nicely too).
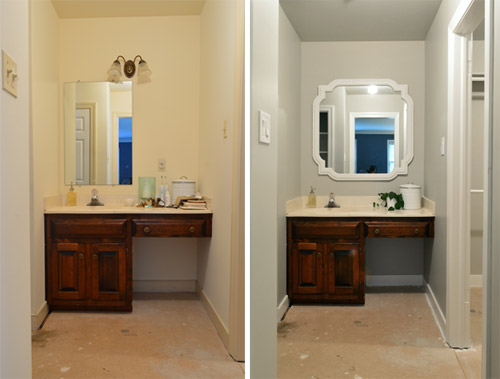
We still have a ton of other things to attend to in here, but here’s a little side-by-side comparison of where we started (well, once carpet was up) to where we are now.
With the walls painted, we can now get jiggy with the floor (I don’t think I’m using that right) which is the part we’re most excited for because, well, it’s the most unattractive at the moment. And since the sunroom grout situation is still looking a little bleak (throw us a bone, Mother Nature!) all signs are pointing towards this floor getting done before we can finish the tile-job outside.
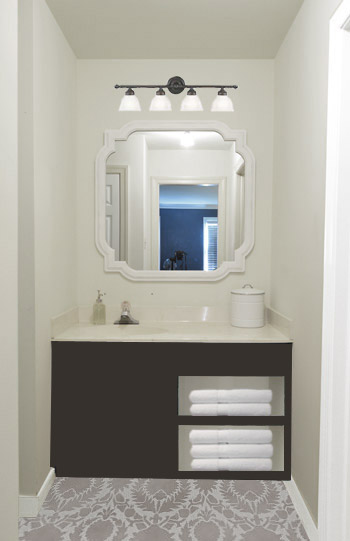
Oh, and just as we predicted in this post about our bathroom plans (where you can also read more about why we’re down with painting this floor, how we’d like to add shelves to the vanity to balance it out, etc) we changed our minds again. After some more percolating, we worried that staining the vanity a dark blue color might not work very well with our yellow-ish sinktop, and we also thought we could have a lot more fun with the floor than going all-one-color with it…
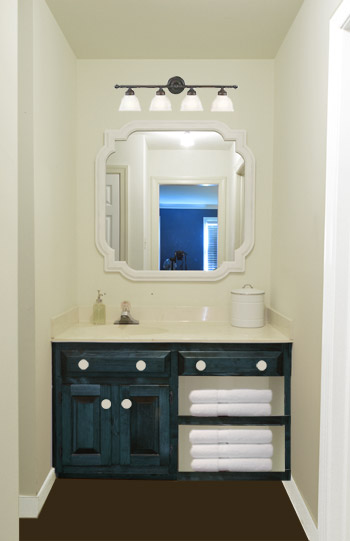
… so now we’re thinking that a two-toned stencil on the floor and a more subdued color on the vanity might play better with the sinktop tone without robbing the room of any excitement (instead of adding interest to the vanity we’ll just shift the attention to the floor). Sort of like how a darker tone on the vanity in our half bathroom downstairs neutralized the same yellow-toned sink – and then we can add art and accessories for more color, interest, and to balance things out so the room makes sense in real life (photoshopped renderings aren’t always the perfect real-life representation).
So that’s where we are in our bathroom. We’re around halfway done after getting to check off:
- carpet removal
- mirror painting & hanging (more on both of those steps here)
- painting the trim
- painting the walls
- replacing all of the outlets/light switches
So we just have the vanity and the floors (along with re-adding the light above the sink) to attend to before we can declare that this interim update is done-zo. It never fails to amaze us how much a few days of work and some paint (along with small updates like a new mirror, some shelves, and some carpet removal) can change a space so much. So here’s hoping we have some after photos in a few weeks. Sherry’s trying to convince me that adding some more shelves and cubbies to the walk-in closet could be nice while we’re at it. I guess you never really know where one update might lead. You know what they say, if you give a mouse a house a cookie…
Our Favorite Paint Colors
If you’re having trouble picking the right color to paint your room, check out these detailed deep-dive posts about our favorite paints:

Leave a Reply