We just flew back from Boston (and boy are our arms tired, har-har) but since we shared our freshly painted bathroom with you guys this morning and we didn’t want to leave you hanging with just one post, we got this Reader Redesign together in the airport for ya (throughout all this travel, we’re doing out best to keep blogging as usual). I know we typically share full room makeovers, but this furniture upgrade had such a creative twist that we had to pass it along. We loved that Beth and Nick rescued this old to-be-trashed buffet with the help of some wood stain applied in an unexpected way. Here’s what Beth had to say about the project:
Hi guys! I love drawing with charcoal, and I decided that I was going to try the same techniques, only using stain on wood, instead of charcoal on paper. It came out so well, we just had to share it with you!
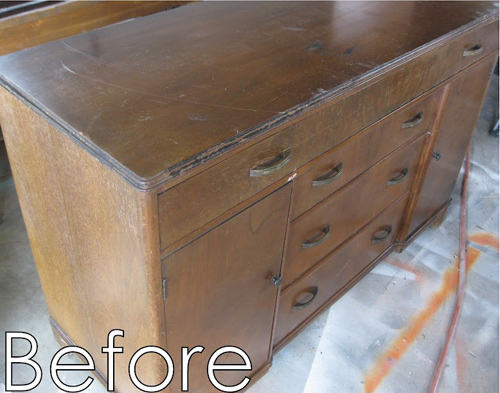
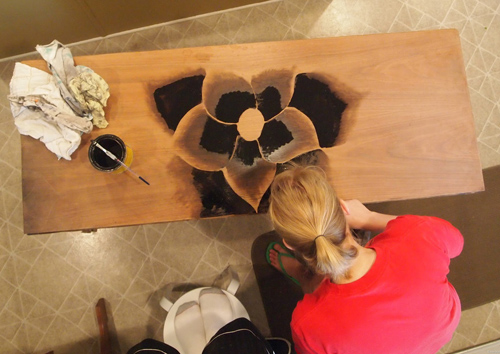
We pulled this buffet out of a burn pile, repaired the burn damage and fixed a structural problem, prepped, primed, and painted the body. Then I drew out some flower petals lightly with a pencil on the top surface of the buffet and began staining with Minwax Ebony. I started with the center petals and stained each petal, starting at the center and working my way out toward the tip of the petal.
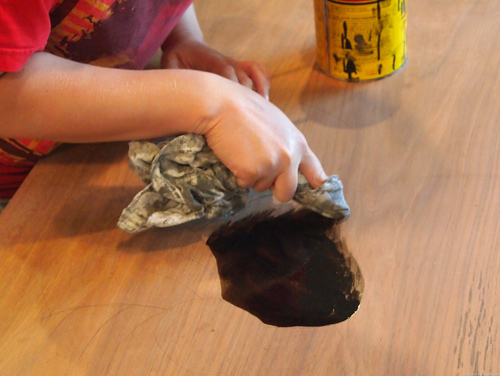
As you can see I didn’t stain all the way out to the edge of the petals, because I wanted that to be the lightest portion of my ‘shading.” Using a dry cloth and my finger, I wiped away from the stain to allow a smooth transition from the stained portion to the outer unstained portion of my petal. Rubbing it to create that shaded look. I continued to repeat this process on each petal as I worked my way away from the center of the flower.
I’m soooo super proud of myself. Hope you love it! – Beth & Nick
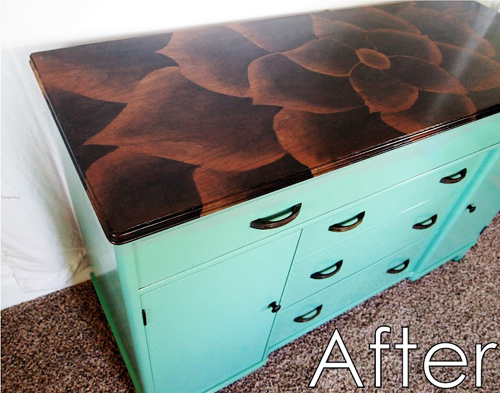
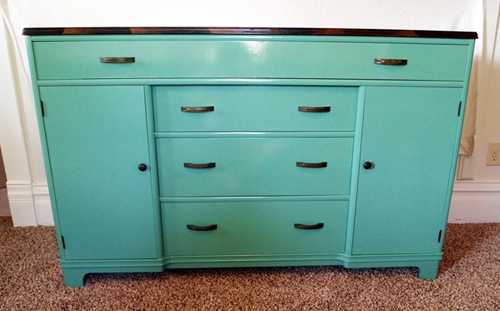
Isn’t that such a cool idea? For those who might shy away from the painted bottom, you could easily stain the front/sides of a piece and apply this treatment to the top as well. Makes me feel like such a staining novice. But now I’m kind of itching to think of a piece that we could try this on. And it makes me realize that if such an intricate design is possible, someone could attempt something like stripes or tiled triangles too (perhaps with the help of some painters tape?). So if you’re looking for more pics and details about the process, be sure to visit Beth and Nick’s blog, and if anyone else has tried something fun with stain we’d love to hear how it all went down.

marjo says
Just read Caroline’s blog and noticed she apologized for cables showing. Have also noticed you and John have a lamp cord showing behind/under your buffet. Have you considered doing a tutorial on some cord management techniques?
YoungHouseLove says
Oh yeah, you can just use cord wrangling things (they sell them at Bed Bath & Beyond and office supply stores) to tuck them up. We usually don’t see ours in real life (the tripod that we use to shoot is at a shorter height than a person’s head, so you see more in pics if that makes sense). Hope it helps!
xo
s
Melissa says
wow SO COOL. That has got to be one of the best up-cycled pieces I have ever seen! So inspired, desperately needing a buffet in my dining room so I will have to try this!
Tyler @ HomeSpot HQ says
That flower is absolutely amazing. This is probably one of the best reclamations of a piece of furniture I’ve ever seen.
Elizabeth@ Food Ramblings says
WOW!!! So impressive!
Whitney says
AHHHMAZING! Love it- she should be so proud!!! (And it was great to see you in Boston!)
Mamaw says
That is GORGEOUS!!!
Ann says
wow. That is amazing!
donna dorrane says
HOW GORGEOUS IS THAT??? I’ve never seen anything like this done before…especially with stain.
Patti says
oh.my.word. she’s an artist!
Kim Freestone says
I WANT! I LOVE! I’m totally going to try this! Thank you for the inspiration!!
Christy says
In. Love. Plain and simple. Now all I can think is, “Where can I do this in my house?” I bet staining a design on a headboard would look stunning and be a nice focal point in the room. Uh oh, the wheels are turning now!
Paula says
I have never seen anything like that, it’s gorgeous!!
Nikki Kelly says
Me! I did some stenciling with stain. First I made my own cabinet doors to fit Ikea kitchen cabinets in my studio, then I used a combination of wood glue and stain to finish them. Here is the link, maybe once I add a countertop I’ll email it all to you guys as a Reader Redesign submission.
Nikki Kelly @ the ambitious procrastinator
YoungHouseLove says
Cool!!
xo,
s
Jessica says
Saw this listing and thought of you two and any readers who loved your chair redo! http://washingtondc.craigslist.org/mld/fuo/3380496158.html
YoungHouseLove says
Fun!!
xo,
s
Misty @ 2brokebruces says
That is so neat! How awesome would that look on a big round dining table or a round end table?!? I am mentally filing this away for future use.
Jules says
That’s incredible. What a great artist!
Kim @ Yellow Brick Home says
Holy smokes. That is show stopper!
Jessica says
Holy smokes, that is beautiful!
I wish I was that talented!
Shanda Davidson says
PINNED! And, this will be copied. I have a small side table that I have been wondering what to do with the top. Woop, there it is!
Joanna says
So cool!!
Christina P (NS) says
Oh my goodness – that is GORGEOUS!!!!!!!
Job well done Beth, you should be super proud of yourself!!!!
Brenda says
This is absolutely fantastic, I think stripes or something would be great too for those of us that aren’t as artistic!
Arianne says
Just amazing. I am constantly astounded by the creativity of other people. Two thumbs (and two big toes) up!
Sarah Jessica Farber says
Amazeballs. I am blown away. Thanks for sharing, John & Sherry!
Natalie says
That is just amazing! I love the way it turned out and the blue color on the bottom is perfect! I don’t know I’ve got enough creative genes to even come up with something so cool much less do it and have it turn out “share worthy”! Totally impressed!
Leann says
I like this very much.Gorgeous!
Stacey says
Are YOU SERIOUS!?!?!?!?!?! THIS IS FREEGGGINN AMAZING I CAN’T EVEN BELIEVE THIS IS THE SAME BUFFET!!!!
The color choice: AWESOME!!!
The painted flower: AWESOME!!!!
The reveal: SO AWESOME…
WOOOOOWWW! I LOVE THIS!
pds says
Absolutely stunning. I wish I were that creative!
YES Spaces says
Love the artistic twist of this redesign! My wheels are turning about how I can reinterpret it for my next project!
danielle says
that is… AMAZING. i love it! what a creative mind!
Sarah R says
OMG That’s amazing!! LOVE IT!!!
Christine says
It is always so inspiring to see true creativity! And look at how many people you have in turn inspired. Well done – and thank you for sharing!
Sarah (@SarahsBigIdea) says
A-mazing! Not sure I have the courage to try shading with stain.
Connie says
OH-EM-GEE, This is a beautiful piece of furniture. Sooooo creativity!
Vera says
This is amazing! I’ve never imagined the possibilities of stain beyond just one whole application to a surface, this really has me inspired!!
Candice Brooker says
Amazingly beautiful!
Chez says
What kind of stain would you use to do this? I’m a staining rookie, but I’d love to give this project a try – if it ends up looking terrible I could always paint over it!!
YoungHouseLove says
I think if you click over to her blog she has that info for ya!
xo
s
Sarah says
AH! THAT LOOKS AMAZING!!! My husband and I just bought a house ONE WEEK AGO.. so naturally I am more obsessed with your blog then ever!
YoungHouseLove says
Aw, congrats Sarah!
xo
s
Adriana Maes says
Wow! That is a Fantastic piece of furniture!