We just flew back from Boston (and boy are our arms tired, har-har) but since we shared our freshly painted bathroom with you guys this morning and we didn’t want to leave you hanging with just one post, we got this Reader Redesign together in the airport for ya (throughout all this travel, we’re doing out best to keep blogging as usual). I know we typically share full room makeovers, but this furniture upgrade had such a creative twist that we had to pass it along. We loved that Beth and Nick rescued this old to-be-trashed buffet with the help of some wood stain applied in an unexpected way. Here’s what Beth had to say about the project:
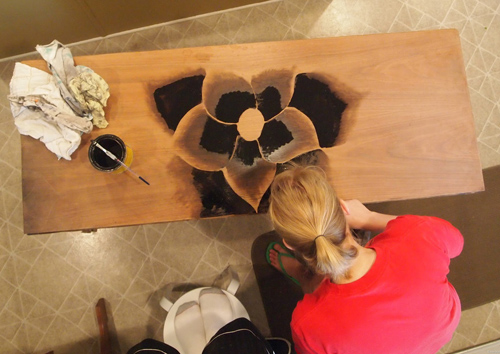
Hi guys! I love drawing with charcoal, and I decided that I was going to try the same techniques, only using stain on wood, instead of charcoal on paper. It came out so well, we just had to share it with you!
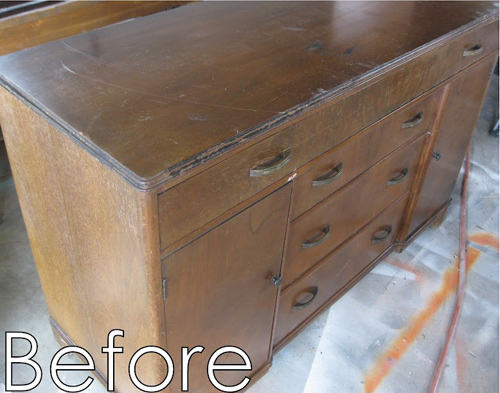
We pulled this buffet out of a burn pile, repaired the burn damage and fixed a structural problem, prepped, primed, and painted the body. Then I drew out some flower petals lightly with a pencil on the top surface of the buffet and began staining with Minwax Ebony. I started with the center petals and stained each petal, starting at the center and working my way out toward the tip of the petal.
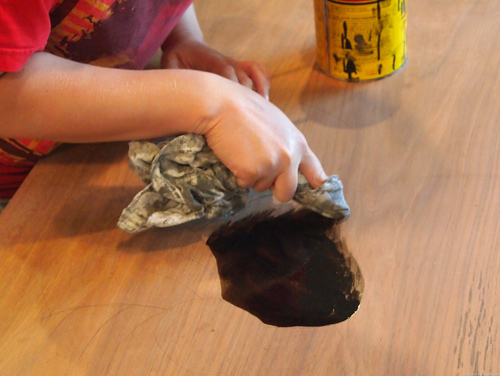
As you can see I didn’t stain all the way out to the edge of the petals, because I wanted that to be the lightest portion of my ‘shading.” Using a dry cloth and my finger, I wiped away from the stain to allow a smooth transition from the stained portion to the outer unstained portion of my petal. Rubbing it to create that shaded look. I continued to repeat this process on each petal as I worked my way away from the center of the flower.
I’m soooo super proud of myself. Hope you love it! – Beth & Nick
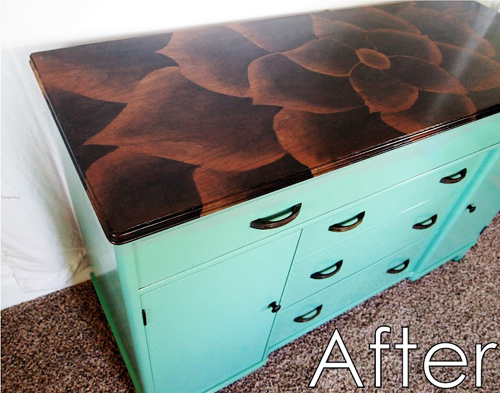
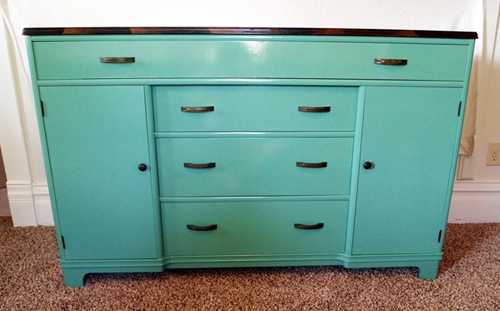
Isn’t that such a cool idea? For those who might shy away from the painted bottom, you could easily stain the front/sides of a piece and apply this treatment to the top as well. Makes me feel like such a staining novice. But now I’m kind of itching to think of a piece that we could try this on. And it makes me realize that if such an intricate design is possible, someone could attempt something like stripes or tiled triangles too (perhaps with the help of some painters tape?). So if you’re looking for more pics and details about the process, be sure to visit Beth and Nick’s blog, and if anyone else has tried something fun with stain we’d love to hear how it all went down.

Jenn says
WOW! This is one of the most beautiful pieces of furniture I’ve ever seen!!!!
pam in illinois says
I love Sawdust and Embryos! She just did an amazing stenciled wall.
Her twins are as cute as can be too!!
pam
Debbie @ Pink Texas Chick says
Absolutely gorgeous!!!!!
Jana H. says
Holy wow! That is gorgeous. :)
Jen E. says
Wow. Just wow. There are no words for how much I love that piece. Thanks for sharing!
jeannette says
this is one of the top 10 hottest redos i’ve ever seen. how beautiful, and inspiring. thank you so much.
ruben says
“boy are our arms tired, har-har”
I am glad you guys made it home safe. I am assuming you had a bumpy take off in Boston?
I am hoping things calm down because I am flying out on Sunday going down south Charlotte and August,Ga. 2 “big” cities in 3 days filled with work.
Just wanted to congratulate you guys on the effort of “keep blogging” during your travels. I think your followers really appreciate your efforts. I know i do.
thanks!
Safe travels
p.s. don’t forget to blog about the local eats that you guys “indulge” in :) that’s the best part of every town ( well after meeting all the fans) :)
YoungHouseLove says
The funny thing is that the flight in yesterday morning was crazy bumpy because of high winds (I guess they were in front of the snow, hah). But flying out this morning wasn’t bad! And as for the local eats, we’re definitely taking photos for our once-every-two-weeks tour posts! So stay tuned…
xo
s
Jamie says
Wow! What an amazing piece! She makes it sound so easy too.
Abby says
This is GORGEOUS!!! I’m drooling over here.
Mandi says
That. Is. Stunning. I was quite literally open mouthed! I am a bit drawing/design challenged, but I think I might be able to manage this anyway. Can’t wait to find something to try this upon!!
Kevin says
Well done!
Sorry we missed you in Wilton, CT. Blame it on Sandy.
YoungHouseLove says
Aw man, next time for sure!
xo
s
Cara says
That is amazing. I would love a coffee table stained like that. Will have to add it to the to do list!
Natalie @ A Turtle's Life for Me says
Ridiculously beautiful!! I would LOVE to have a piece like that! She should be patting herself on the back for a long time with this one!
liz @ btb says
Absolutely STUNNING!! Awesome job!
Janelle says
Beth and Nick,
I think you’ve found a new business idea. It looks brilliant!
Melanie P. says
Holy balls! This is amazing!
Elizabeth says
Beautiful!!
Michelle N says
WOW!! So creative and what a talent.
Gina says
Btw, is your tour date still on for Dec 1 at Living Social in DC? It is on the list I clicked on today in the post but not on the list if I go through the “our book” link on the right margin of the blog. Just checking due to the discrepency.
YoungHouseLove says
Yes, it’s still not ironed out but we’ll announce all the details as soon as they’re finalized!
xo
s
Gina says
Correction. It is not listed on the “tour time” post probably because it was not in the works when that post was written. Thanks for clearing it up.
YoungHouseLove says
Oh yes, sorry about that! That post is outdated, but on our Tour page we have a green button that leads to the most updated tour info!
xo
s
nancy@owensolivia says
fantastic job!
Libby says
Wow. Wow. Wow. This is amazing, and so innovative…can’t wait to try this technique on our own piece.
H. says
Wow. Just…wow. So beautiful.
Annie says
Mind. Blown.
Anika says
That is so impressive – crazy!
Also, thanks for keeping us in the loop even while travelling! But please make sure to give yourselves enough time to rest and recover from your tour; we’ll all still be here if you take a day off every now and then. :)
Theresa W says
Gorgeous! She’s an amazing artist!
I’d love to see more Reader Redesigns that showcase an up-cycled item instead of always seeing full room makeovers. I have the budget and attention span for one project and not a whole room :)
YoungHouseLove says
Sounds good to us too! Send them our way guys, we’d love to share them!
xo
s
Gaidig says
That’s so creative! What a great idea.
Eileen Catherine says
Absolutely beautiful!!! What a wonderful way to “think outside of the box.” Love it!
Dee says
I wish I was the first to say… that is the newest trend and soon to be repeated design.
They should be so pleased.
Dee
Alison says
I got my book! I got my book! I’m so excited. I might be up a little too late tonight…
YoungHouseLove says
Wahoo! Hope you love it!
xo
s
Jennie says
I have never seen anything like this before! Amazing job, Beth! Thanks for sharing this project.
Nic H says
That is simply incredible. BETH: you SHOULD be sooooo proud of yourself–that piece is just gorgeous. I can only imagine what that piece would cost in a store. BRAVO!
Taya says
This is SO COOL! I totally want to do this. I draw flowers just like this in notebooks all the time.
Maxime says
That is seriously FAB!!!!!!
Amber at Love, Laugh, Live Well says
WOW, this is awesome! I’d love to do something like that but not sure if I have the skills to do so. A job well done!
jessica@fourgenerationsoneroof says
Wow it came out awesome!!!!! Nicely done :) I’m bummed out I missed your signing here in Boston :( I”m sure you loved the snow :)
YoungHouseLove says
It was awesome! Clara was so excited to hear about it!
xo
s
Maria @ Redecorate Blog says
Wow, this turned out completely gorgeous! And I love how the detailing continues onto the rim of the top of the dresser. Very creative — what an artist! :-)
Anne says
I have never seen anything like that. Rad!!!
Rhapsody says
Pretty, but I think it’d look gorgeous with a stained bottom instead of painted. Still, great idea!
Autumn says
This is incredible! So unique!
Gwenalyn says
This is the most beautiful piece I have ever seen!
Sam says
I love that! It looks so awesome and I love the turquoise bottom!
Allie says
WOW!!! That is beautiful, great job!!
Kiki says
That is so surprising and amazing! Very unique. I was a little worried when I saw the in-progress photos because I couldn’t visualize (not that I wouldn’t trust you guys to post great stuff!) but then I got to the end and was totally impressed. Love it.
Annie says
That is beautiful! I’ll just add that to my list of cool things I need to try and re-create…along with at least 50 others. :)
Here’s one of my favorite stained wood projects we’ve done. It’s our “temporary” fix for flooring (sorry, I don’t know how to make the link clickable):
http://growanniegrow.blogspot.com/2012/10/day-22-faux-plank-flooring.html?m=0
YoungHouseLove says
So cool! It looks awesome!
xo
s
Ann Marie says
Wow! That took guts to attempt, but it came out gorgeous!!! Now I’m itching to stain something…
Elizabeth says
This is amazing, and she is very talented!!!
Kel says
Holy Batman! That is spectacular!! I love it.
Anna says
Ha! I’ve been following Beths blog for a long time and I actually tried to recreate this on my old battered coffee table. Unfortunately mine turned out so bad that the coffee table is now a plain dark brown on top! Beats having to throw it out. It looks much easier than it is really. Beth is blessed with some serious artistic talent!
Christy says
Stunning! I’m going to check out her other pieces!
I don’t think painter’s tape would work well because the wood will draw the stain under the edge of the tape. This hunch is based on a failed project involving me, stain, and painter’s tape…. :(
I wonder if you could paint melted wax on the wood and get a batik effect? Once it’s all dry, you would remelt the wax with a hair dryer and wipe excess away?
Anyway, thanks so much for sharing this — inspiring!
Parnuuna Kristiane Thornwood says
Wow, what a great idea! It looks very cool! I’ll keep this in mind, for when i move to somewhere spacy, and have room for more cabinets! This is so cool!