We just flew back from Boston (and boy are our arms tired, har-har) but since we shared our freshly painted bathroom with you guys this morning and we didn’t want to leave you hanging with just one post, we got this Reader Redesign together in the airport for ya (throughout all this travel, we’re doing out best to keep blogging as usual). I know we typically share full room makeovers, but this furniture upgrade had such a creative twist that we had to pass it along. We loved that Beth and Nick rescued this old to-be-trashed buffet with the help of some wood stain applied in an unexpected way. Here’s what Beth had to say about the project:
Hi guys! I love drawing with charcoal, and I decided that I was going to try the same techniques, only using stain on wood, instead of charcoal on paper. It came out so well, we just had to share it with you!
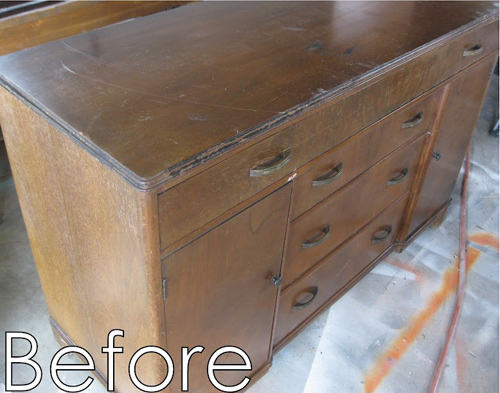
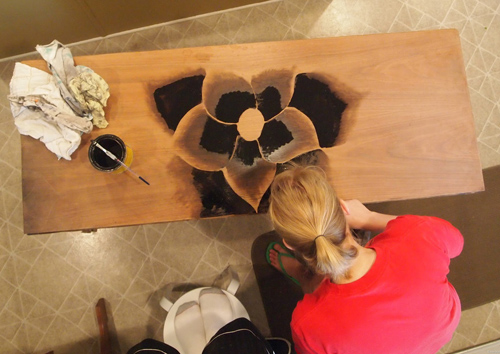
We pulled this buffet out of a burn pile, repaired the burn damage and fixed a structural problem, prepped, primed, and painted the body. Then I drew out some flower petals lightly with a pencil on the top surface of the buffet and began staining with Minwax Ebony. I started with the center petals and stained each petal, starting at the center and working my way out toward the tip of the petal.
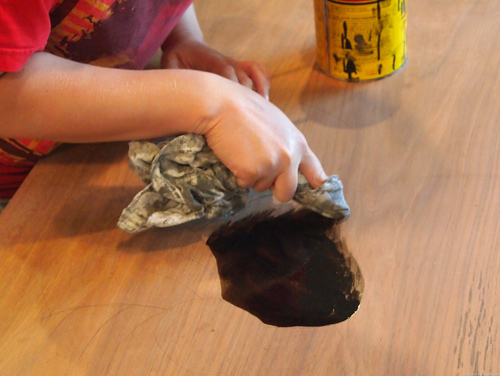
As you can see I didn’t stain all the way out to the edge of the petals, because I wanted that to be the lightest portion of my ‘shading.” Using a dry cloth and my finger, I wiped away from the stain to allow a smooth transition from the stained portion to the outer unstained portion of my petal. Rubbing it to create that shaded look. I continued to repeat this process on each petal as I worked my way away from the center of the flower.
I’m soooo super proud of myself. Hope you love it! – Beth & Nick
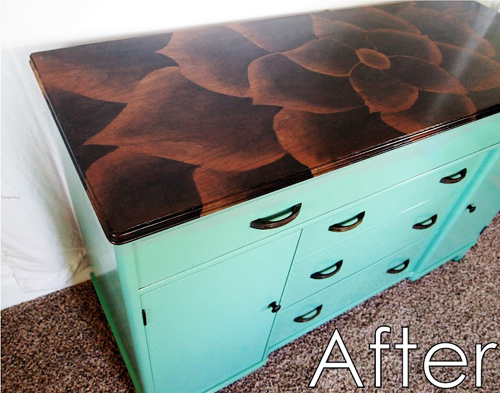
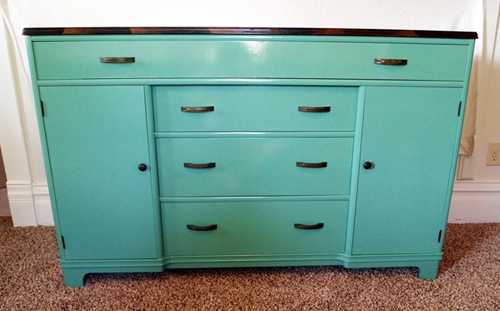
Isn’t that such a cool idea? For those who might shy away from the painted bottom, you could easily stain the front/sides of a piece and apply this treatment to the top as well. Makes me feel like such a staining novice. But now I’m kind of itching to think of a piece that we could try this on. And it makes me realize that if such an intricate design is possible, someone could attempt something like stripes or tiled triangles too (perhaps with the help of some painters tape?). So if you’re looking for more pics and details about the process, be sure to visit Beth and Nick’s blog, and if anyone else has tried something fun with stain we’d love to hear how it all went down.

alg says
#OVERTHEMOONFORTHIS
Beth — A grand tip of the upcycler’s hat to you — Coolest thing I’ve seen in a while!!!
Will check out your blog, for sure :)
Jess @ Little House. Big Heart. says
This is gorgeous. And they found it on a burn pile?
I was just thinking of doing something more with our bedroom dressers, but I don’t know that I’d ever get this adventurous.
Shay says
Wow, looks amazing! :D
Melissa says
What a wonderful realization of her/their artistic vision and talent!
Colleen says
Holy amazeballs!
Ashley@AttemptsAtDomestication says
Holy cow! That is crazy awesome!
Danny says
That’s awesome! I also like the painted backsplashes that they have on their website. Got to remember that for our own.
Eve says
Holy. Whoa. Totally love this! Totally outstanding job! Makes me want to try a henna-esque linear design on a sanded tabletop! (did I mention we have a dining table to fix up? haha…)
Megan says
Absolutely stunning! This is very impressive and gorgeous. As with most other commentors, I don’t think I have the talent to do something so beautiful!
Melanie says
Stupendously inspiring!!! So many ideas are running through my head. Thanks!!!!
Hannah says
It looks like a perfectly shaded tattoo! This is awesome! Totally one of a kind :)
Jen D. says
Super high-tens to Beth. That is seriously stunning.
Laura is Undeterrable says
That is absolutely amazing. Love it!
Jo says
Yep. THAT ROCKS. Wow, great idea and beautifully executed. I’m inspired.
Melody says
UGH!!!! That is AWESOME! I love it!
Reenie says
WOW……that’s absolutely beautiful.
Off to check out their blog :)
Stef says
Whoa. This is wildly impressive!
Junkin Revival says
I loved this so much that it was mtg inspiration on a few tables :) if you would like to see mine on Facebook it is under the page Junkin Revival ( and course kudos to Beth she has Amazing talent!)
Audrey says
Wow…. just WOW!!!
Beautiful!!!!
Samantha R. says
love love love love LOVE. That would never work out for me, so I am just in awe of the talent and precision.
Erin says
Coolest dresser EVER!
rachel l says
I don’t comment too often, but I have to say, Beth, that is amazingly beautiful!
Barb says
Stunning!
Claire says
This is, by far, my favorite Reader Redesign you’ve featured that wasn’t an entire room. Heck, it might even beat the entire room makeovers you post, too. What a gorgeous result!
Lindsay B says
WHAT! That’s freaking AMAZING! I can’t stop staring at it. I want it in my house.right.now.
Elaine says
I cant believe you have an Elmo live aswell.. He is a cute little guy
Shelley @ Green Eggs and Hamlet says
Wow, what a gorgeous piece! I think Nick and Beth have back-up careers as furniture restorers.
Annie says
I stained our dining room table using painters tape and three different stain colors. We love the results.
http://www.facebook.com/photo.php?fbid=10100832559386280&set=a.10100225216606080.2543015.16925644&type=3&theater
YoungHouseLove says
Holy amazingness, it’s gorgeous!
xo
s
Christina @ Homemade Ocean says
Holy oh my gawwhhh….she should totally sell those.
That is amazing! Beautiful, I want one!!!
Kitty says
Wow – stunning work. Great job and very nice website too.
Kay says
My mind, it is blown. That is so unbelievably cool!
Shannon Summers says
Gorgeous!!! I love seeing a newer technique like this!
Megan says
That is stunning! Never would have thought to play with wood stain in that way.
Nancy@Artsy Chicks Rule says
Oh my, that is completely AMAZING. I absolutely love it!! What wonderful talent!
Amanda J. says
WOW! Amazing…
Becky S. says
That’s so crazy! She is super talented:)
Dianne says
OMG how amaaaaaaaaaaaaaaaaazing!!!!!!! Congrats to Beth for “saving that piece”. Looks stunning.
Dianne
Jaime Whall says
Holy Crap! That has to be the best dresser rescue ever!!! Sooo talented!
Corie says
Wow, that’s incredibly beautiful! Amazing job, Beth! Thanks for sharing this, YHL!
Kelley says
This is amazingly cool.
Samantha E says
that is gorgeous! I cant wait to have a house and not a closet apartment in NYC (im sure you guys can relate) and not have all of my furniture exclusively from Ikea. (although i love ikea)
Sam says
Amazing!!! Seriously, no words to describe that! Wish I could do that!
xx
Stephanie says
OMG!! That is GORGEOUS!!!
Stefani says
That’s awesome! What a fantastic and original furniture make over!!
Just finished reading your book (while simultaneously cross-checking with your behind-the-scenes post) – took me a few days but I love your book and am looking forward to having it out on display, whipping it out for future inspiration, and sharing it with friends!!
I think it would be awesome if you could do a whole book filled with Reader Redesigns. I just love seeing all the amazing and creative and jaw dropping before and afters and having a whole book full of different ones would be so fun! Just an idea :)
YoungHouseLove says
Aw thanks Stefani! So glad you loved the book, and we love that idea for a future book :)
xo
s
Sara VT says
Wow- that’s amazing!
Lindsay M says
Oooooooohhhh!!! Brilliant!!! I’m refinishing dressers from 1916 for my nephew (and sister & bro in law) for his first Christmas! I’ll be staining the tops of them now with a geometric design!!! Thank you!!!!
PS- I’ll send you guys pictures once I’m done!
GreenInOC says
WOAH – that’s incredible!!!
michele says
holy monkeys that’s gorgeous!
Lauren@FilingJointly says
Ok wow. That is insanely gorgeous. I could never in a million years do something like that, she should be sooo super proud of herself.
I was a tiny little bit proud of myself when I rewrote Twas The Night Before Christmas for Thanksgiving yesterday. My husband was not as pleased.
http://www.filing-jointly.com/2012/11/an-offer-he-can-not-refuse-maybe-well.html
YoungHouseLove says
Haha, you had me at grouse.
xo
s
mary says
My jaw literally dropped. That is just beautiful. I think my second favorite part is they reused the hardware.