I’ve always thought that curtains are the unsung hero of room makeovers because everyone’s quick to talk about how paint can make such a huge difference (agreed, it totally can) but I’d argue that curtains can rival the whole “wow, paint totally changed that room” because they can:
- make a small window look twice as wide
- draw the eye up and make ceilings feel taller
- add a whole lot of color/pattern/interest (or not, if you just want something simple/breezy)
- make any room feel more cozy by adding softness
- add function (block light and drafts, provide privacy, absorb sound, etc)
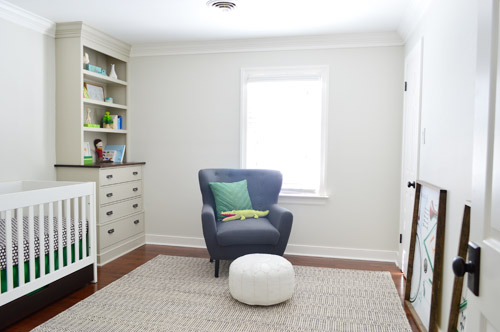
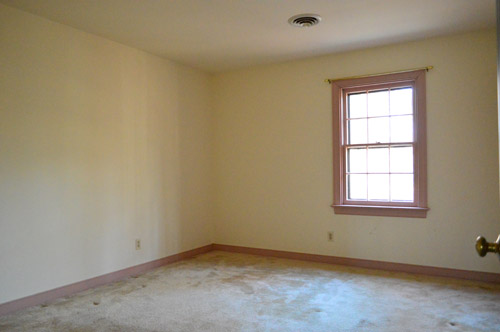
So there it is. My name is Sherry, and I’m a fan of curtains. Just look at the nursery wall without any:
And here it is now with some happy green-apple deliciousness going on:
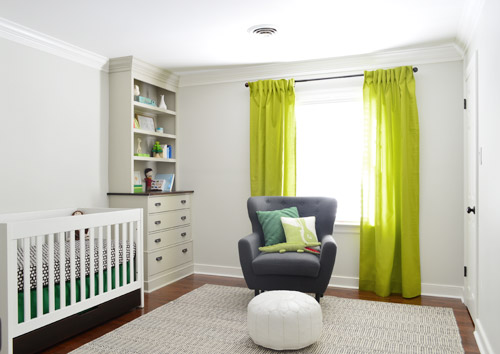
This room is still far from finished (we’re planning a colorful large-scale mobile for over the crib – maybe something like this – and the bare wall across from the crib still needs furniture and art). But back to the curtains. They make such a difference, right? I also tried a new pleated approach this time, along with an extra thick hem at the top and bottom to give them some added heft, and I’m a complete fan. It was really easy, so I’ll just stop yapping and dive into the details.
When it came to picking the fabric for the nursery, we knew we wanted something happy and colorful since the walls and built-ins are a neutral palette (Clara’s white-walled yet super colorful room has taught us that safer choices on those harder-to-change surfaces leave things wide open to layer in a lot more personality and color with other accents like textiles, art, and accessories). We considered everything from a bold pattern to a fun dip-dyed look or a band at the bottom, but thought one solid hue would be nice because we didn’t want anything that would look too busy next to our patterned rug and crib bedding.
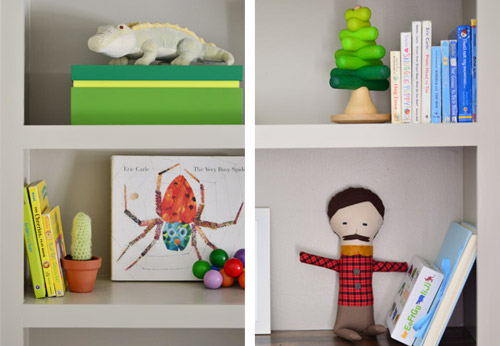
We were actually really inspired by the different tones of green in the Target box that we recently grabbed for the built-ins, along with our old stacking tree game, which both showed us how great a vibrant apple green color could look with a darker kelly tone in the mix.
We hit up a local place (U-Fab) as well as JoAnn fabrics, and ended up falling for a cheerful apple green color at JoAnn. We thought it would layer in nicely with the kelly green bedskirt, bike art, and chair pillow without being too matchy or flat. I bought five and a half yards of fabric, which was listed at $6.99 a yard (it’s 100% cotton, and the color is Solid Apple if that helps you track it down at JoAnn) but I used one of those 50% off coupons so my entire purchase was $19.22, which means each of my panels breaks down to being under ten bucks.
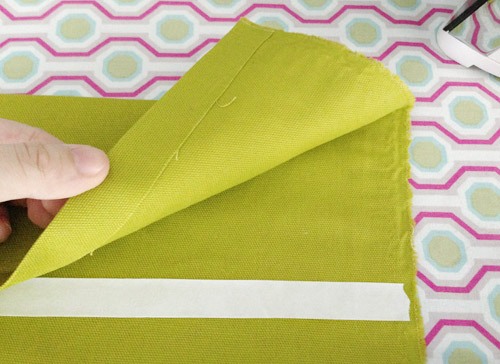
The first thing I did when I got it home was pre-wash it (this helps you avoid shrinkage on the back-end, which can result in highwater panels if you wash them later). Then I laid my fabric on the floor and folded it in half (length-wise, not width-wise) and cut along the fold so I was left with two equally sized 99″ panels. My desired finished length was 88″ so that meant I could have a nice weighty 5.5″ hem at the top and the bottom. First I hemmed the top and bottom of the panel just about an inch from the edge with hem tape, like so:
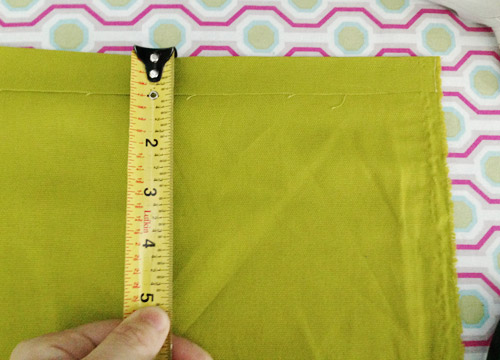
Heavy duty Heat N’ Bond is a favorite of mine, just because I’ve made a few curtain panels with my sewing machine and others with hem tape and find that hem tape is easier for me to get a nice straight seam instead of a slightly meandering one. I’ve also had luck with durability (and washability) in a nursery/kids room with it over the last 3.5 years (all of Clara’s curtains have been hemmed with the stuff) so that made it an easy choice.
After making that first 1″ hem on the top and bottom of the panel, I folded each one of them over again to make a 4.5″ cuff, so I was left with a nice finished looking edge on each end (that’s why I did that little 1″ hem first). Even though it’s the back of the panel, it doesn’t take much time to make that extra little fold, and it ends up looking nice and clean.
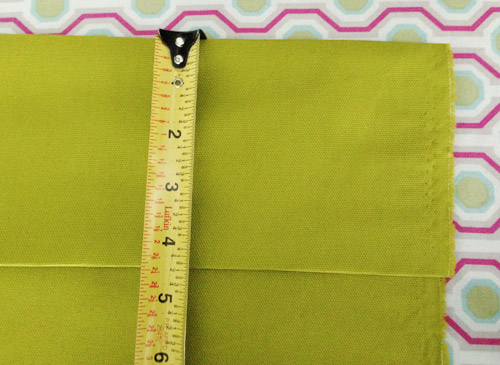
Again I used hem tape to secure that flap of fabric at that 4.5″ mark.
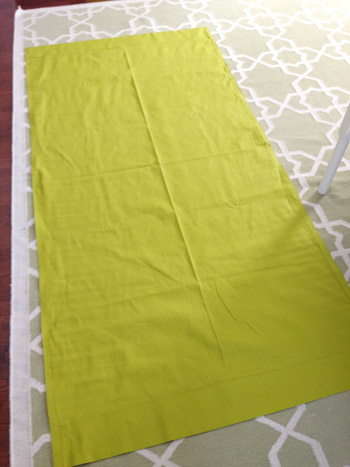
After securing each of those top and bottom hems, I hemmed the sides (just with simple 1″ one) to keep the panel as wide as possible, but give it a finished edge. Here’s what one panel looked like on the floor with the backside-up, wrinkles and all.
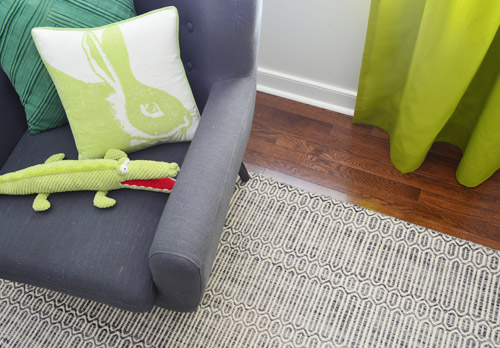
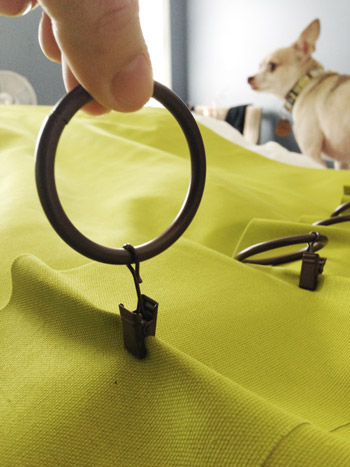
Next I ironed each panel to get a bunch of the wrinkles out (they honestly still could use a steam-session now that they’re hanging in place) and then it was time to give the whole “pinch-pleat effect” a try. Instead of my usual MO of clipping rings to the top edge of the fabric (so the curtains hang like this or like this), I pinched the fabric in ten equal increments and secured the clip to the back of the top hem, about 2.5″ from the top of the panel. Burger was intrigued.

Here’s a close up for you of that top hem along the back of the panel (again, I just used ten ring hooks and spaced them out by eye in as-equal-as-possible increments).
This is John holding up the rod after I strung one panel on so I could snap a picture of the back for you guys.
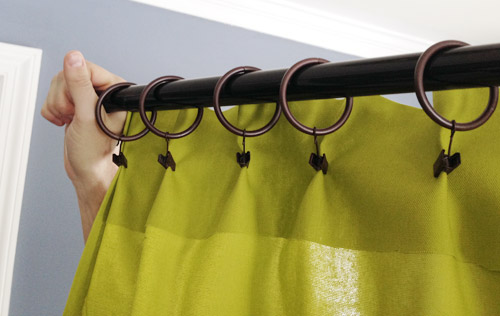
And here’s what they look like from the front after hanging them with the anchors and screws that came with the rod we picked up at Home Depot:
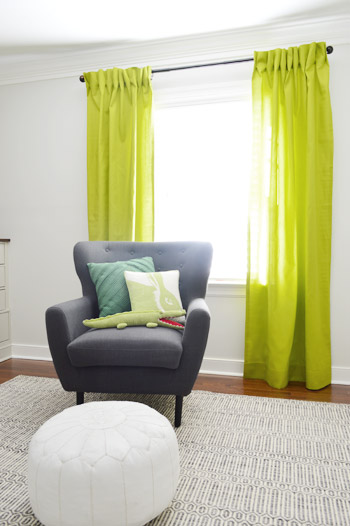
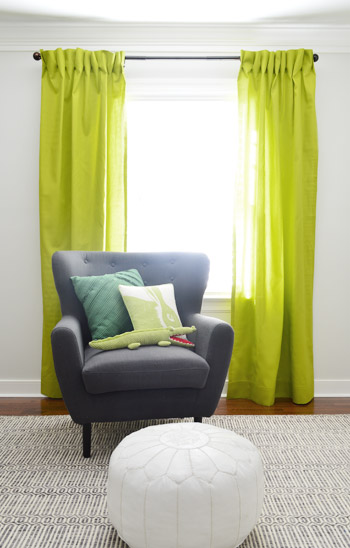
Don’t those pleats add a little something extra? I like that they’re not super perfect & uniform (it’s more of a casual pleat if that makes sense) but they still feel a bit more upgraded than the regular old ring-hook look that I’m used to. If you’re at home thinking “I’d make those, but I wish each pleat was identical and super uniform” – fear not. You could probably stand on a stepladder and tweak the clips in the back to even everything out. John and I just thought they looked sort of effortlessly cool this way. Either that or we’re too lazy to break out the step-ladder.
Update #1: We’re getting a bunch of questions about if we’re planning to use blackouts and/or if these curtains can close to block light. They can close (they’re each 56″ wide) but we have light-blocking faux wood blinds on all of the upstairs windows (more on those here) so we typically just close those instead of the curtains. Although I might add some blackout panels to the back of these panels like we did in Clara’s room if this guy ends up loving total darkness like her. Will keep you posted!
Update #2: Also getting questions about where the chair’s from. We bought that from Joss & Main a few years ago (it used to be in the corner of the kitchen across from the fireplace in our old house, and was in our office at this house until we realized it made more sense in the nursery). The white pouf is a sale find from J&M too.
It’s definitely feeling a bit more like home (and making this baby on-the-way thing feel a bit more real) to see how much this space has changed since we bought the house.
I’m telling you, curtains make the difference. Ok, and a new floor, some wall paint, a pair of built-ins, crown molding, and furniture help too.
So that’s what’s new in the nursery. And Operation Homemade Mobile is actually in progress, so I hope to share that with you guys soon – along with some updates to the completely blank wall across from the crib. Have any of you ever done pinch-pleats, either with the sewing method or the ring-clip method? Do they make you feel fancy? Was your dog super interested the entire time?
Psst- Wanna know where we got something in our house or what paint color we used? Just click on this button:


Michelle @ A Healthy Mrs says
What a great pop of color! Love them!
Tara @ Sock Monkey Smiles says
This room says “calm” and “soothing” to me. I bet your sweet little boy will sleep well in this room!
YoungHouseLove says
Oh gosh, I hope so Tara!
xo
s
Jenny K says
Hi! How would you treat a window that is wide and short in a bedroom? Would you have the curtain fall to the floor or at window length? Thank you.
YoungHouseLove says
I think I’d hang floor length curtains high and wide around the window and then put a piece of furniture like a dresser under the window (between the panels) to ground it and fill in that negative wall space :)
xo
s
Charleen says
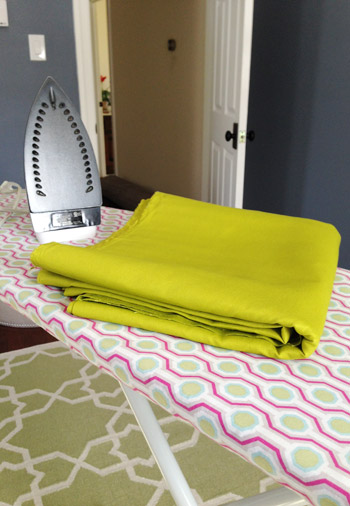
The room is looking great! I couldn’t help but notice your ironing board cover. Any ideas where it came from? BTW…love your style…
YoungHouseLove says
Thanks Charleen! That was from this charming little etsy shop: https://www.younghouselove.com/2011/07/oh-the-iron-y/
xo
s
Michelle says
Congratulations on your soon-to-be new addition to your family. So exciting!
YoungHouseLove says
Thanks so much Michelle!
xo
s
Rachel says
Wow! I do like your curtain panels, but I have to say that I LOVE the look of the room without the curtains! I’m apparently odd man out on this topic, though, since almost everyone else agrees about the curtains! :) I love the look of a clean, simple room and the curtainless room is more simple! Great job, though, on the curtains!!
Kristine says
That is the perfect pop of color without being too babyish.
Alice says
Those look great! I’m super-impressed with the pleat via clip method that you figured out. Clever lady!
Lori Keith says
How wide are each of your panels? How wide is the window? I want to do this for my daughter’s room but I am not sure they will be wide enough. Her window is 4 ft wide + 12 to 18 inches on either side. That is 6-7 feet total.
YoungHouseLove says
Our curtain panels are the width of the fabric bolt, which was 56″ (well, I guess 54″ since there are 1″ hems on each side). The window is about three feet across (a little less than that) so they easily can close. You also could do double width panels if you’re worried (they look nice and thick). Hope it helps!
xo
s
kristi says
That is not a pinch pleat… more like cartridge or goblet pleat.
YoungHouseLove says
Thanks for the tip Kristi!
xo
s
Mariah says
I had to look back at your first picture to see if the chair was in it, the curtains make it “Pop!” so much!
Cindy says
It never would have occurred to me to attach the clips in that manner. Clever!
Kara B. says
This made me think of you and your darling family … I have some items from this Etsy vendor and they are lovely! So thrilled for all of you and your upcoming arrival! :-)
https://www.etsy.com/listing/179899717/mobile-ornament-green-planet-with-a?ref=af_shop_listed_item
YoungHouseLove says
Thanks so much for the tip and the kind words Kara!
xo
s
lisa says
Genius curtain idea! I am redoing my 7 year old’s eoom and need curtains … FYI I scores the 5×8 rug you have at HD is Tysons today … I went for a bumch of rugs for our new upstairs wood floors amthis one was stealthily hiding rolled up on the floor … cheeky rug! They were a bit ppicked over but I finally found the giant Home Goods!!!!
YoungHouseLove says
That’s awesome!!
xo
s
Kim says
I can’t believe the timing of this post, I’m jumping out of my seat. This is literally the exact project that is next on the list and although I have the fabric and the hem tape and even the rings, I’ve just been eying the project with a fearful eye. But after reading this post – I feel ready to get going on it! Plus, people have raised their eyebrows when I explained that I plan to make curtains without a sewing machine – now I can show them what the end result can look like and that I can handle the project on my own! Thank you!!
YoungHouseLove says
Wahoo! Good luck Kim!
xo
s
Alicia says
Hi John and Sherry- this is totally random, but I just wanted to say thank you for showing off a cute crib that’s completely safe for a baby to sleep in. So many advertisements/things in stores show lots of cute but very fluffy bedding in crib (which I’m sure you know is unfortunately extremely dangerous). You guys show that a simple sheet with a dust ruffle is adorable! I love that expecting moms and dads can see such an awesome example on such an influential site! As a pediatric nurse practitioner who has seen the terribly sad side of SIDS, this makes me (and all of my coworkers) SO happy. You guys are a role model in more ways than one! Can’t wait to see what else you come up with :)
YoungHouseLove says
Aw thanks Alicia, you’re so sweet.
xo
s
Lynne Wesenberg says
When I saw this DIY mobile I thought of you and how I could see you making one of these for the barnacle’s room!
http://creaturecomfortsblog.com/home/2014/02/19/diy-circus-pals-mobile-room-decor.html
YoungHouseLove says
SO CUTE! Love it!
xo
s
Stacy Nelson says
What color did you end up painting the walls in the nursery? I searched the archives and wasn’t able to find a post about it. Are you guys planning to do another post on the paint colors you’ve used in each room? Thanks!
YoungHouseLove says
Yes, we need to do one of those posts for you! In the meantime, it’s Going To The Chapel on the walls of the nursery with Simply White on the ceiling/trim/doors and Senora Gray on the built-ins.
xo
s
Whitney says
Oh my goodness! Please do a tutorial post after you finish your mobile! That’s exactly what I have in mind for my daughter, due in July :)
Whitney
YoungHouseLove says
Will do!
xo
s
Jennifer says
I did the exact same faux pinch pleat on my dining room curtains! I just left the clips dangling and used the pocket rod to hang them though. I had planned on sewing them and watched youtube videos and all that, but I got frustrated and just pinched them with the clips. It works!
YoungHouseLove says
Really smart!
xo
s
B says
For items you get at Home Goods or Joss & Main, which are typically lucky sale finds that are hard to find again at those stores later on, would it be possible for you to share the manufacturer? (I’ve had some luck purchasing sold out Joss & Main products by searching online retailers for the manufacturer.) Thanks!
YoungHouseLove says
Sure! Whenever we know (ex: it’s on the tag at HomeGoods or the listing at Joss & Main) we share it – but sometimes for flash sale sites (or flash sale stores like TJ Maxx/HomeGoods/Marshall’s) they’re not even allowed to use brand names since they’re selling off surplus or “off” merchandise (like a rug with a slight irregularity), so they’re blacked out or removed. For example, the rug in the nursery is from HomeGoods but is made by Safaveih for Martha Stewart (you can read more on that here in the original post about it) but the chair and the ottoman were just listed with generic descriptions (ex: white pouf, charcoal armchair) and arrived without any tag or paperwork, so they’re a mystery unless another reader recognizes them and identifies them in the comments.
xo
s
B says
Thanks! I didn’t realize that the store don’t always share the manufacturers’ information. I would be so nervous to buy something “brand unknown” because there’s no way of gauging the reputation for quality before buying. And I suppose nobody to really contact if you have issues with parts down the line. Did your chair and ottoman at least come with care instructions?
YoungHouseLove says
They did, but those are just little printed tags with instructions for how to spot clean them or dab them dry so there’s sadly not any manufacturing info on those. I guess since we buy from thrift stores and craigslist, these other sources seem like a step up (the furnishings are new and never used) so it’s a gamble, but doesn’t seem as big if the price is right ;)
xo
s
B says
What a smart way of thinking about it! Going to have to remember that next time I find a brand-unknown score to get out of my “must research everything” mindset, haha. Thanks for the help!
YoungHouseLove says
Good luck B!
xo
s
Susie Wilson says
I’m curious how you get such good deals on fabric at JoAnn’s. Anytime I find a 50% off coupon it says that it’s only good for 1 yard of fabric. I would have ended up paying over $30 for the same fabric, but it sounds like you must have gotten 50% off all 5 yards. Is there something I’m missing?
YoungHouseLove says
I used to think that too! It actually says “50% off one item (any single cut of by the yard fabric = one item)” on the coupons I get (like this one). So as long as you’re not buying five one-yard cuts of five different fabrics, and just want to apply it to one 5.5 yard of fabric (which is a single cut), they honor it for the entire amount :)
xo
s
Mary Ann says
Not sure if anyone suggested this, but I always trim the selvage (the tightly woven lengthwise edge). If left on, over time the curtain can hang crooked, shorter on those edges.
YoungHouseLove says
Great tip! Never knew that!
xo
s
rachel laree says
For some reason, I thought you would do a black and white or navy and white curtain so you could do the kelly green door. It looks refreshing, I was just looking forward to the door. Im sure you’ll think of something. ;)
YoungHouseLove says
We’re definitely still planning to bring color into a lot of other nooks and crannies (including considering a bunch of door alternatives) – we just thought with the neutral walls and the charcoal chair it would be nice to see color on that back wall and not just see it hiding on the side wall door :)
xo
s
Kat@junktogem says
That’s very inventive how you used those clip rings! I’ve used them a few times for handmade curtains, but they always show. Your way makes them easy and practical while looking more elegant. Love that spring green color–so fresh!
http://www.junktogem.com
YoungHouseLove says
Thanks Kat!
xo
s
carrie says
amaze-balls
Page says
To be honest I am not a fan of this shade of green in this room. I think a cooler green would work with the wall color better but even just matching the curtains to the crib skirt would have looked great! Please reconsider.
Cathi says
Always a big fan of pinch pleated curtains on a black rod (ala Victoria Hagan), I’ve had great success converting Ikea panels. They usually have the pleat tape already on them so I simply sew a couple of panels together (for fullness) and create the necessary number of pleats, evenly spaced, to create the finished width needed. The pleats are “pinched” with a simple tacking stitch at the top and bottom of each pleat and a single curtain hook is pierced through the back of each pleat. I always use Ikea Syrlig rings ($4 for 10 in Canada) but since I’m using hooks on the back, I use the hook holders they supply as opposed to the clips. The finished result looks polished and professional and end up costing around $40/ panel. And Ikea panels are looooong so lots of room for the floor to ceiling look.
YoungHouseLove says
That sounds so high end and awesome for Ikea curtains! Thanks for sharing those details Cathi!
xo
s
Krystal says
Thank you! Thank you! Thank you! for such an amazing and EASY way to make curtains. You have given me the itch now :)
YoungHouseLove says
So glad Krystal!
xo
s
YoungHouseLove says
SO CUTE! I love him.
xo
s
April Brickhouse says
I never would have picked that color for the curtains but I LOVE IT! And the pinch pleats on the back are so clever. I think we need to start playing with more color in our house and your blog is such a great source of inspiration.
Oh! I just bought that back of the door organizer for our kitchen pantry…can’t wait to get it installed!
YoungHouseLove says
Thanks so much April! Best of luck with your pantry progress!
xo
s
Jackie says
These curtains match the House in Young House Love!
YoungHouseLove says
Haha!
xo
s
Becky says
Geniuses! I just made some panels for the new nursery here (due march 27th) and they ended up too long, and too much light is coming in above the existing curtain rod. I was going to try to move the rod up, but this looks so much nicer!!
Cameo says
It’s looking soo great, I love his room! Hey, question: I have the identical crib as you and my first little guy chewed it all up along the top rail. I was nervous about how/what to use to touch it up in case it got chewed on again by baby number two… have you ever touched up the white paint on yours, or what do you think would be a good non-toxic option?
YoungHouseLove says
I would get no-VOC paint (like Mythic or Olypic Premium or Natura by Ben Moore) and then use SafeCoat Acrylacq (you have to order that online) as the clear sealer (it’s non-toxic, so it’s great for kid stuff).
xo
s
Katie says
I love how the nursery is turning out, and I love the green curtains! They’re so bright and fun!
YoungHouseLove says
Thanks Katie!
xo
s
Katie B. says
Okay, I was not really on board with your original vision in the beginning, but now I get it! I love that you kept in neutral with the walls and furniture, but are using bold prints in the fabrics, toys, and decor. I just love the curtains! (I’m with you – curtains really add texture and depth to a room!)
Also… ironing board cover FTW.
YoungHouseLove says
Haha, thanks Katie!
xo
s
Stephanie Ayer says
Sherry, love the color and the pleat! I’m going to try the pleat in my youngest’s room. Question: will I be committing a decorating crime if I only take the curtains to a few inches below the window? I’m worried my 4yr old is going to pull the whole shebang down.
YoungHouseLove says
That would still look charming I think! Especially with the pleat. Maybe try to find some photos online (on Pinterest?) to see how you like the look before committing?
xo
s
Lidia says
Love your taste and what you’ve been doing! (I just bought fabric that I’m going to try this with – your timing is perfect!!) Quick question for you: I was going to use Mythic Paint to paint the nursery we’ve been working on and wondered what you thought of it in terms of coverage and also if you felt the need to vent the room when you painted with it while pregnant? (I’m prego and paranoid) :)
YoungHouseLove says
We used that for Clara’s first nursery and really liked it! We opened the windows just because we always like ventilation but it had virtually no odor and went on well. It’s not as thick coverage as Ben Moore or one of the other premium brands (like Sherwin Williams) but two coats got it done.
xo
s
Sarah says
I just wanted to say a big thank you for taking the time to respond to the comments and questions personally! What a huge task! I really do appreciate that you answered my question about the gorgeous rug in the baby’s room.
YoungHouseLove says
You’re so sweet Sarah, of course!
xo
s
Francesca says
Bellissima idea!
Diane says
You two have such a delightful sense of style it makes me swoon!
My Crappy House says
I really like the pinch pleat idea with the clip on rings. I might try this, but sew each pleat to keep it more tailored. I love that you can’t see the rings!
Kelly says
Wow, what a difference. Can you please come decorate my house? ;) where did you find the cute rug?
YoungHouseLove says
Thanks Kelly! It’s from HomeGoods about a month ago (made by Safaveih).
xo
s
EngineerMom says
This seems like a silly question, but do you do anything to the fabric before washing to keep it from fraying in the washing machine and dryer? Every time I wash fabric, it turns into a tangled mess of fibers on the edges, and I end up cutting a bunch of it off in the form of tangled threads before I can start sewing.
YoungHouseLove says
Oh yes, I have lots of spare threads on the ends that I end up trimming too (oddly enough some sides seem to do it more than others).
xo
s
Shanda says
I love your work and want to try this at home but I am confused on the measurements for the width of each finished panel. I thought the fabric was 56″ wide and 99″ long when you purchased it? If you folded and cut them length-wise like your instructions, isn’t each panel at least UNDER 28″ wide (half of 56″) when you account for the side hem?
In your responses about the curtains being closed you say EACH panel is 56″ wide. PLEASE advise. Thanks!
Shanda says
Oops! I need to read AND comprehend! You folded length-wise and cut along the fold. Duh! Sorry!
Brandyn | Southern Distinctions says
I have always had my curtains made for me, but it can get pricey. I have two windows in desperate need of new drapes and with this tutorial I think I might give it a try on my own. Thanks~
YoungHouseLove says
Good luck Brandyn!
xo
s
John says
The reason the different greens work together on the box on the shelf and the stacking toy is that all the greens are part ONE item. I don’t think the different greens on the crib skirt and curtains work together in the same way; they are literally too far apart in the room.
YoungHouseLove says
Yup, they’re definitely far apart now, but by the time we’re done with this room both colors will reoccur a lot more – so they should feel more like a “color family.” We’ve seen lovely rooms with apple & kelly layered together on separate surfaces (or aqua & navy or pink & red, etc). In Clara’s room we actually have red, blue, and pink, which sounds really random but the combo occurs on enough surfaces to make sense. This room is just about half as complete as that one. So I can totally see how you might look at this and scratch your head. It’s a half-baked cake at this point ;)
xo
s
Erin says
The nursery is looking good!
I had a semi-unrelated question. Now that you have a two story house with all the bedrooms upstairs, what kind of fire escape ladder do you have for the second floor? I saw a home improvement show that was installing a built in ladder in a box installed in the wall right under the window, so the homeowners would always know where it was. I was curious if you have something like that, or whether you have a portable one. The selection/installation process might make a good post topic too. Or if there’s anything you’re doing differently to prepare Clara (and baby #2 in the future) for an emergency now that you’re in a 2 story house.
YoungHouseLove says
Great question! Growing up we always had a rope ladder that hooked over the window and dropped down. My mom was hilarious about fire drills, but it’s so important! That house was set really high off the ground too, so it was a huge drop. Here we don’t have a ladder yet (we completely need to get one) since there are some ways to get out that wouldn’t be big drops (for security reasons we don’t really want to map out what ways we could hop out of a few rooms and drop to the ground, just because I’m paranoid) but a rope ladder will probably be the way I go just so we can exit any room in any scenario. Need to get on that!
xo
s
Jen says
Guys this is awesome! Its like a clean classic suit with an awesomely bright bow-tie! You mentioned black out curtains – can you just buy the ‘black out’ material and sew it to the backs of the panels or do you have to buy additional curtains? I have some curtains I love but they are not so great at keeping light out so Im looking to give them the black out feel some how.
YoungHouseLove says
You’re so sweet Jen. Love the bow-tie comment! As for liner, yes, in the past we have bought that and actually just clipped it to the back of the fabric by the same ring clips that hold the front panel. Sewing it would be nice and secure for a more finished result :)
xo
s