I’ve always thought that curtains are the unsung hero of room makeovers because everyone’s quick to talk about how paint can make such a huge difference (agreed, it totally can) but I’d argue that curtains can rival the whole “wow, paint totally changed that room” because they can:
- make a small window look twice as wide
- draw the eye up and make ceilings feel taller
- add a whole lot of color/pattern/interest (or not, if you just want something simple/breezy)
- make any room feel more cozy by adding softness
- add function (block light and drafts, provide privacy, absorb sound, etc)
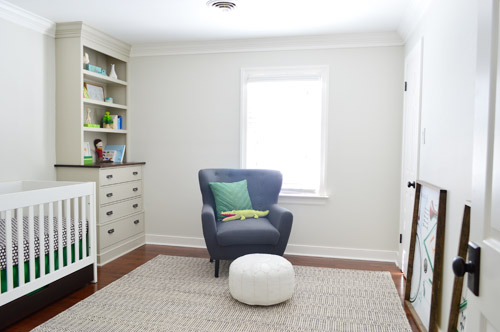
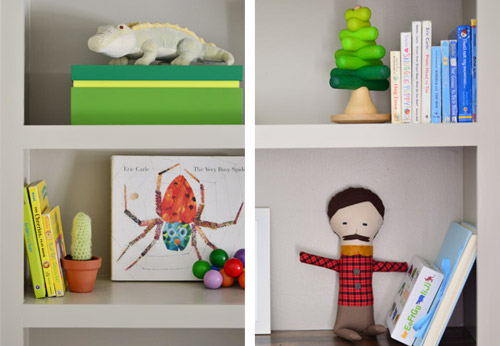
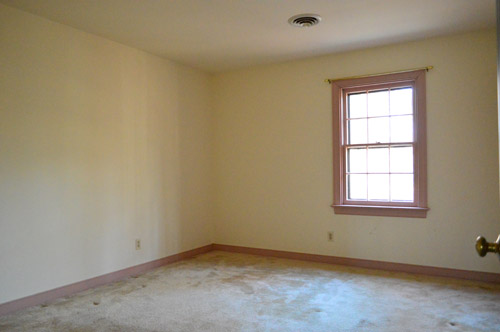
So there it is. My name is Sherry, and I’m a fan of curtains. Just look at the nursery wall without any:
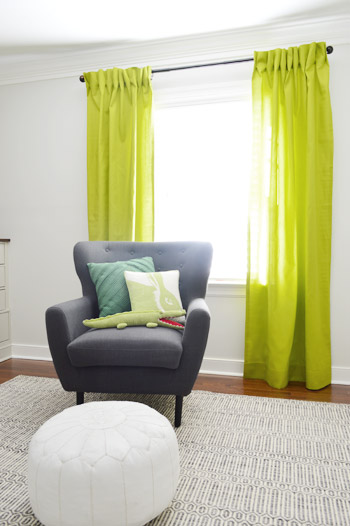
And here it is now with some happy green-apple deliciousness going on:
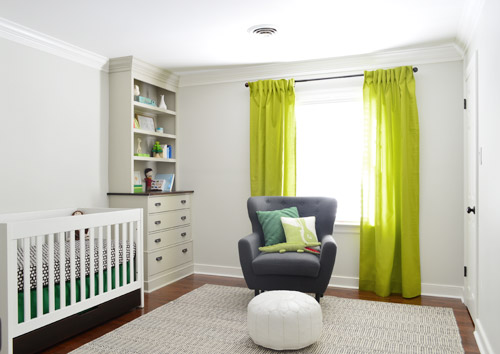
This room is still far from finished (we’re planning a colorful large-scale mobile for over the crib – maybe something like this – and the bare wall across from the crib still needs furniture and art). But back to the curtains. They make such a difference, right? I also tried a new pleated approach this time, along with an extra thick hem at the top and bottom to give them some added heft, and I’m a complete fan. It was really easy, so I’ll just stop yapping and dive into the details.
When it came to picking the fabric for the nursery, we knew we wanted something happy and colorful since the walls and built-ins are a neutral palette (Clara’s white-walled yet super colorful room has taught us that safer choices on those harder-to-change surfaces leave things wide open to layer in a lot more personality and color with other accents like textiles, art, and accessories). We considered everything from a bold pattern to a fun dip-dyed look or a band at the bottom, but thought one solid hue would be nice because we didn’t want anything that would look too busy next to our patterned rug and crib bedding.
We were actually really inspired by the different tones of green in the Target box that we recently grabbed for the built-ins, along with our old stacking tree game, which both showed us how great a vibrant apple green color could look with a darker kelly tone in the mix.
We hit up a local place (U-Fab) as well as JoAnn fabrics, and ended up falling for a cheerful apple green color at JoAnn. We thought it would layer in nicely with the kelly green bedskirt, bike art, and chair pillow without being too matchy or flat. I bought five and a half yards of fabric, which was listed at $6.99 a yard (it’s 100% cotton, and the color is Solid Apple if that helps you track it down at JoAnn) but I used one of those 50% off coupons so my entire purchase was $19.22, which means each of my panels breaks down to being under ten bucks.
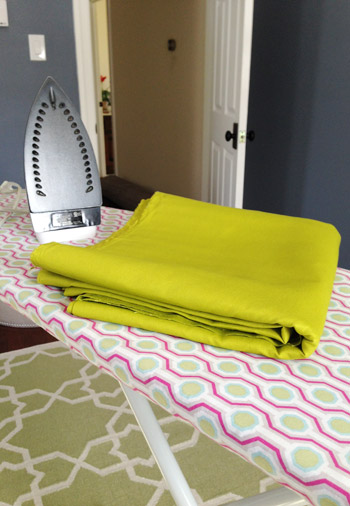
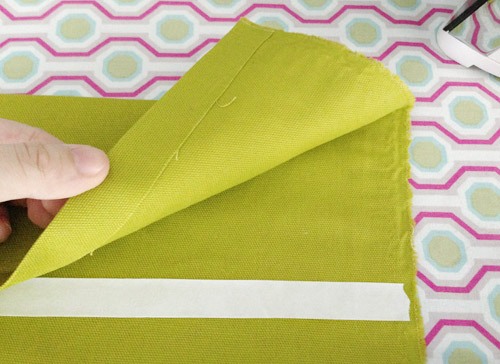
The first thing I did when I got it home was pre-wash it (this helps you avoid shrinkage on the back-end, which can result in highwater panels if you wash them later). Then I laid my fabric on the floor and folded it in half (length-wise, not width-wise) and cut along the fold so I was left with two equally sized 99″ panels. My desired finished length was 88″ so that meant I could have a nice weighty 5.5″ hem at the top and the bottom. First I hemmed the top and bottom of the panel just about an inch from the edge with hem tape, like so:
Heavy duty Heat N’ Bond is a favorite of mine, just because I’ve made a few curtain panels with my sewing machine and others with hem tape and find that hem tape is easier for me to get a nice straight seam instead of a slightly meandering one. I’ve also had luck with durability (and washability) in a nursery/kids room with it over the last 3.5 years (all of Clara’s curtains have been hemmed with the stuff) so that made it an easy choice.
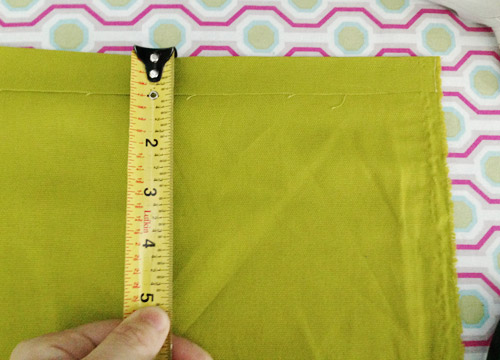
After making that first 1″ hem on the top and bottom of the panel, I folded each one of them over again to make a 4.5″ cuff, so I was left with a nice finished looking edge on each end (that’s why I did that little 1″ hem first). Even though it’s the back of the panel, it doesn’t take much time to make that extra little fold, and it ends up looking nice and clean.
Again I used hem tape to secure that flap of fabric at that 4.5″ mark.
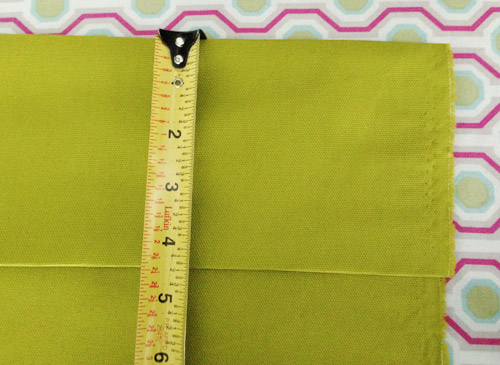
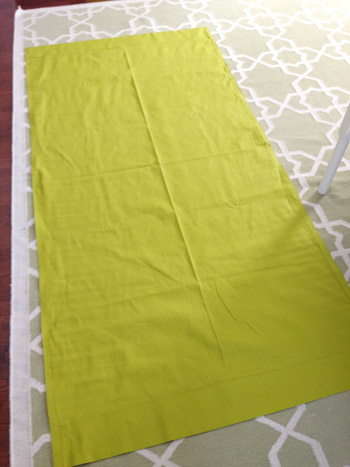
After securing each of those top and bottom hems, I hemmed the sides (just with simple 1″ one) to keep the panel as wide as possible, but give it a finished edge. Here’s what one panel looked like on the floor with the backside-up, wrinkles and all.
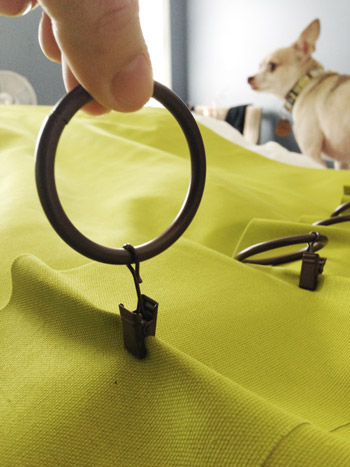
Next I ironed each panel to get a bunch of the wrinkles out (they honestly still could use a steam-session now that they’re hanging in place) and then it was time to give the whole “pinch-pleat effect” a try. Instead of my usual MO of clipping rings to the top edge of the fabric (so the curtains hang like this or like this), I pinched the fabric in ten equal increments and secured the clip to the back of the top hem, about 2.5″ from the top of the panel. Burger was intrigued.

Here’s a close up for you of that top hem along the back of the panel (again, I just used ten ring hooks and spaced them out by eye in as-equal-as-possible increments).
This is John holding up the rod after I strung one panel on so I could snap a picture of the back for you guys.
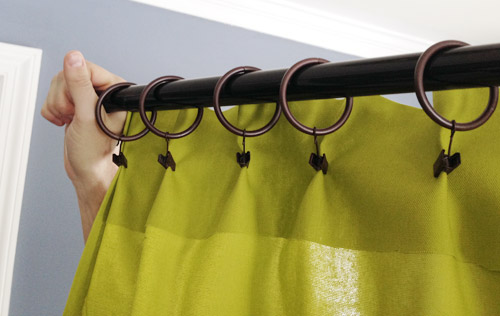
And here’s what they look like from the front after hanging them with the anchors and screws that came with the rod we picked up at Home Depot:
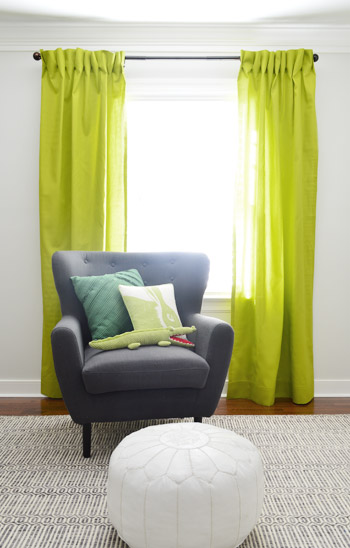
Don’t those pleats add a little something extra? I like that they’re not super perfect & uniform (it’s more of a casual pleat if that makes sense) but they still feel a bit more upgraded than the regular old ring-hook look that I’m used to. If you’re at home thinking “I’d make those, but I wish each pleat was identical and super uniform” – fear not. You could probably stand on a stepladder and tweak the clips in the back to even everything out. John and I just thought they looked sort of effortlessly cool this way. Either that or we’re too lazy to break out the step-ladder.
Update #1: We’re getting a bunch of questions about if we’re planning to use blackouts and/or if these curtains can close to block light. They can close (they’re each 56″ wide) but we have light-blocking faux wood blinds on all of the upstairs windows (more on those here) so we typically just close those instead of the curtains. Although I might add some blackout panels to the back of these panels like we did in Clara’s room if this guy ends up loving total darkness like her. Will keep you posted!
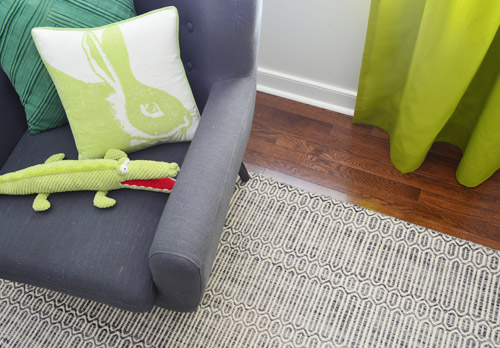
Update #2: Also getting questions about where the chair’s from. We bought that from Joss & Main a few years ago (it used to be in the corner of the kitchen across from the fireplace in our old house, and was in our office at this house until we realized it made more sense in the nursery). The white pouf is a sale find from J&M too.
It’s definitely feeling a bit more like home (and making this baby on-the-way thing feel a bit more real) to see how much this space has changed since we bought the house.
I’m telling you, curtains make the difference. Ok, and a new floor, some wall paint, a pair of built-ins, crown molding, and furniture help too.
So that’s what’s new in the nursery. And Operation Homemade Mobile is actually in progress, so I hope to share that with you guys soon – along with some updates to the completely blank wall across from the crib. Have any of you ever done pinch-pleats, either with the sewing method or the ring-clip method? Do they make you feel fancy? Was your dog super interested the entire time?
Psst- Wanna know where we got something in our house or what paint color we used? Just click on this button:


Ammie says
Hi Sherry and John,
I’m going to try this hem tape on some material and I was going through the instructions for the curtains in this post. If I do the 4.5″ hem on top and bottom, then fold the sides over for a nice 1″ hem, won’t I close up the hole where the curtain rod is supposed to go? Or am I missing something?
Thanks,
Ammie
YoungHouseLove says
Oh yes, you close up the hole because all you need is a panel, and then you either use ring clips along the top of it or behind it (so there’s not a pocket that the rod slips through, just a straight panel that you pleat or hang with clips).
xo
s
Ammie says
Oh duh! Now I feel like a bonehead. I’ll blame it on baby-brain (35 weeks with baby boy #3). Thanks for clarifying, I really had overthought this!
YoungHouseLove says
No worries at all!
xo
s
Cheryl says
You just need to do the side hems first if you want a rod pocket at the top.
I usually make my curtains with side hems first then the top hem and/or rod pocket and then hang them up for a few days before marking the bottom hem. Sometimes no matter how well I think I’ve measured the panels don’t end up exactly the same after hanging for a few days.
If the fabric & trims are washable I always machine wash & dry both before cutting anything – then I usually can wash & dry the finished curtains until still damp and hang without having to iron them.
Avone says
Ammie, if you do the side first and then fold the top down, you will be left with an open rod pocket. Good luck!
Avone says
Oops. Just saw that Cheryl addressed that.
Kristin F says
I’m at work so don’t have time to read through all the comments so please forgive me if this is a repeat.
I’ve hung most of our curtains, both homemade and store bought with ring clips in this house so I wanted to give you my down-home method of making even spacing of ring clips. I fold my panel in half (the width) and put a clip at the fold, which makes it dead center regardless of how wide your panel is. I also put a clip on the furthest outside edge I want to use–usually for me it’s the hemmed edge. Then I fold my “half panel” into half again and put another clip in the center fold of each side, and so on until all clips are on. I also usually only use 5 clips per panel versus 10 as we don’t really close the curtains due to our blinds.
YoungHouseLove says
So smart!
xo
s
Steph says
I’m glad to see some color in this room! I can’t stop thinking that the apple green and kelly green would look REALLY, REALLY GOOD with teal, being an analogous color scheme and all. Good job on your progress so far!
YoungHouseLove says
That’s a fun idea! I had some teal in the photoshopped mobile (along with some teal things on the built-ins) so I’d love that!
xo
s
Taylee @ twist me fit says
Love the curtains. The room is turning out more homey everyday!
Erin Billups says
I became a curtain convert since we got preggo one month after moving into our new house. I was far too tired to follow through with my paint plans so I focused on curtains instead. I love them so much now that I find myself choosing curtains and then designing the rest of a room around them. I am no seamstress so I love the funky and inexpensive options at Ikea. We already had our nursery done in neutral colors so I missed out on the fun of doing a new nursery, but had a blast doing our 2yr olds big girl room instead. My boy just arrived three weeks early during the snow storm so so knows when your little barnacle will arrive. So excited for y’all!!
YoungHouseLove says
Congrats on your little snow storm boy!
xo
s
Leslie Stocker says
The nursery is wonderful, very sweet and modern. I always make my curtains too, what could be easier than 4 straight seams. But thanks for showing your method for simple pleats, they give the panels a fuller more professional look. I am constantly learning from you. And yes my golden retriever always lays on top of my fabric when I’m trying to cut it. It must be a dog thing. Hope you are feeling better.
YoungHouseLove says
You’re so sweet Leslie! Thanks so much!
xo
s
Celina @ My Cajun Trinity says
Oh my gosh, I’m totally stealing your pinching secret. I just put up curtains in my master and they just don’t look right. I have a feeling this will be the answer I’m looking for.
Thanks for the great tip!
Carly says
Thank you!!!! I have been looking for white 2″ rings to match a rod we inherited when we moved. They are hard to find. But I can just clip them from behind! I can hang my daughter’s curtains!
You saved me!
YoungHouseLove says
So glad! Good luck Carly!
xo
s
Michelle says
Looks great!
Can you provide some insight as to what type of fabric you look for when shopping for curtain fabric? Do you stick to upholstery fabrics? Cottons? Quilting fabric? How do you know if a fabric will make good curtains?
Thanks!
YoungHouseLove says
Quilting fabric tends to be too thin most times, so I look in the upholstery/decorative aisle (the bolts tend to be wider as well). Generally I just try to note the fabric of curtain panels that I see and like in person (the weight, the weave, etc) and look for things that are similar to that when I shop.
xo
s
Erin says
Are you planning on doing anything on the opposite wall of the crib? Like a changing table or anything? Obviously you probably don’t need another dresser!
Also, Just popped into my mind but does this bedroom not have overhead lighting? I noticed that little doohickey on the ceiling but no light? The living room in our 50’s ranch doesn’t have an overhead light (and neither does my parent’s ranch and their living room is like 400+ sq) and it drives me nuts!
YoungHouseLove says
Yes, some toy storage and a changing station will go on that wall along with some fun art and we would love to add some overhead lighting (with a dimmer) before this guy arrives! None of our upstairs bedrooms have them, and you don’t realize how convenient they are until they’re gone!
xo
s
Erin says
Wow, I can agree with that! Must have been a “fad” to not have overhead lighting.. good for lampmakers I guess! That makes an interesting twist for you guys, but I will say you much have good lamps because none of your pictures ever look dark! I’d love to see a post on adding in overhead lights, I feel like that is something that would add value to your house!
YoungHouseLove says
Aw thanks Erin! We do our best to take photos during the day when it’s nice and bright (using a tripod allows us to have longer exposures so rooms don’t look as dark).
xo
s
Holly says
How do you decide where to place the curtain rod? I never know how high or wide to go… Thanks!
YoungHouseLove says
I’m a fan of mounting the rod a few inches below the ceiling or crown and 12-18? outside of the window trim on the sides (so the curtains hang in front of the wall and make the window feel bigger instead of hanging in front of the window and blocking light).
xo
s
Brooke says
I understand you enjoy heat applied hem tape, and that you explained you feel it’s an easier way for you to get straight seams. However, you won’t get better at sewing without practice! And since these panels were definitely affordable, it would have made for a great practice project. Pinning, ironing, and careful watching on the machine will help you get that straight line you’re after. And well, even the best seamstresses have to rip out a line of stitching every now and then! I’ve been sewing for over 10 years now and I’ve had more than my fair share of atrocities from my machine. But I kept at it, and with lots and lots of practice (and a few ripped seams) I can at least say I can now sew a straight line! Haha. Good luck with your future textile endeavors!
YoungHouseLove says
Thanks Brooke! I definitely plan to sew some items for this little guy, just like I have for Clara (so far I’ve sewn her a quilt, a beanbag, a party table runner, a birthday banner, and a doll crib pillow) so I’m hoping to get more practice along the way for her younger brother as well :)
xo
s
Rachel K says
I really love the multiple shades of green going on. You guys are really good with color!
YoungHouseLove says
Thanks so much Rachel!
xo
s
bekah says
Wow those change the room so much! I recently did new panels for the boys room and they are DEFINITELY the hero of the room now. Here are some pics if you feel like seeing them, I seriously love them!
http://www.countrymousetales.com/2014/02/blogger-challenge-patterns.html
I love the direction you guys are heading, and I am looking forward to seeing it ‘fill in’ as your little dude lives there!
YoungHouseLove says
Those curtains are so much fun! And I love the initials over their beds.
xo
s
Carla says
Oh, I just noticed the way you clipped the curtains on the back. That’s such a wonderful idea. I’m sure tons of people have already commented on it, but I can’t help but ask. How did you decide on where to clip them (the spacing)?
YoungHouseLove says
Thanks Carla! I just spaced 10 of them out along the back (one on each side, and then one every 5″ or so between those). It was actually pretty easy to eye it.
xo
s
Diana says
I love the pleated look!! Now I’m too excited for our next house so I have more windows to make curtains for… =)
LW says
I was wondering if Clara ever asks for toys that are more commercial? I started out with the wooden toys and unique things that appeal to an adult for my first daughter’s nursery. When my second daughter was born and grew into a toddler, she really liked more commercial toys so while we still purchase unique things, there are Frozen and Sophia toys, etc. mixed in. She prefers plastic fruit to wooden. I think I realize now that we tend to pick what we like for a room instead of what a child would respond to. Just something to think about.
YoungHouseLove says
Oh yes, Clara loves plastic blocks like Lego and Duplo (you can frequently see them on her play table) and also loves those Disney barbie-like dolls (she has Belle, Merida, and Tiana) along with a lot of other little plastic figurines (like the ones you see here). So those are definitely in the mix!
xo
s
Lauren says
Funny – when I first saw this shade of green I was confused since I thought you were doing the more true green (like the crib skirt). But the more I look at it, the more I love it! Everything will tie together in a non-matchy-matchy kind of way! Especially once you get more art, the mobile, etc. in there. Even just adding the white poof makes the white crib look better!
And I still think a dark green door would look great! But maybe a fun shade of blue would be nice? It would complement the shades of blue all over the bookshelves.
Can’t wait to see the rest!
YoungHouseLove says
Aw thanks Lauren! We’re so excited to see where we end up!
xo
s
Elisa says
How clever are you?! And I love how Burger is lined up with all the curtain rings in one of the middle photos.
YoungHouseLove says
Dude was totally modeling.
xo
s
Sarah says
Ikea has a chair that is VERY similar to this one! Called Strandmon
http://www.ikea.com/us/en/catalog/products/90251659/
YoungHouseLove says
Love that one!
xo
s
Barcy says
I love that color! The next time I make curtains I am definitely going to try those pinch pleats. Such a clever idea!!
Kateri says
Looks great! I do have a question and would like to get your opinion. Our son’s nursery has a sloped ceiling and the wall with the window is only around 6 feet tall. So we originally put a black out rolling shade up but it really doesn’t blackout light. I’ve debated adding drapes but think it will look funky with such a short wall. Do you think it would look odd? Any other suggestions? I thought roman shade but fear a custom one would be real expensive. Here is a link to the nursery so it can make more sense. Thanks!
http://kateriandpaul.blogspot.com/2013/05/the-lincoln-bedroom.html?m=1
YoungHouseLove says
Hmm, I’m tempted to say that trying curtains could work and solve your problem so maybe try that first? You could get some from Target or Ikea and return them if they don’t work.
xo
s
Tara says
Our twins’ nursery has similar small, strange windows. There are two solutions, and whichever works best/is easiest for you is about the same result.
First is that you can use a darker fabric and spray adhesive it to your current roller shade. You wouldn’t have to cover the entire length of the shade, obviously, but the length of your window + another 6″ or so works great.
The second option would be to make a sort of roman shade out of miniblinds ala Jenny @ Little Green Notebook. She does a whole tutorial on it here: http://littlegreennotebook.blogspot.com/2013/02/diy-roman-shades-from-mini-blinds.html
I did this one and added blackout behind it. She does sew for this version and if you can sew straight lines it makes it much more secure and finished. There is a link in there for how she did it with fabric glue, too, but after doing both versions, I strongly suggest the sewing!
YoungHouseLove says
Great tip, and thanks so much for sharing the link for Kateri!
xo
s
jlrva says
As a local I am curious about which Homegoods you guys frequent. I feel like the one in Short Pump has more selection than the one in Chesterfield!
YoungHouseLove says
The Chesterfield one is closer to us so we get most things there but also love the Short Pump one when we’re out that way.
xo
s
Kelley says
Are you kidding me?
The clipping of the curtain rings on the back of the panel, not on the top?
WHY DIDN’T I THINK OF THAT?!?
I just hung curtains using those exact rings and I hated how it looked. But this way will make a world of difference! Thank you!
jlrva says
What is your rule of thumb for curtain width? Do you just double the size of the window?
YoungHouseLove says
We generally just do single width panels (around 56″ if you get upholstery fabric) and those typically work and close. If it’s a super giant window doubling the width would be really full and gorgeous though!
xo
s
Leah: ) says
Oh wow…the nursery looks so cheerful and bright!!! I’d love to know where the bunny pillow is from? My kids would love it, since we just recently added a bunny to the family.: )
Thanks!
Leah
BTW – Second try with Fjell was much better! Definitely something wrong with the drawer glides on our first one!
YoungHouseLove says
So glad! And as for that pillow it’s from HomeGoods, maybe a year ago?
xo
s
Cat says
Sherry, This is more of a parenting question than a curtain question and I hope you don’t mind. We are expecting our first at the same time you are expecting the bun, and we were going to do the same thing you two did with Clara by having our baby sleep in its crib from the very first night. I get funny looks every time I tell someone this (you know how people love to comment on other people’s parenting choices) so I was wondering if you were comfortable sharing why you made that choice? Honestly, I got the idea from you two ever since reading about Clara and how good of a sleeper she was, and the nursery is literally right next to our somewhat small room, so it seems to make sense. It also seems like it might still keep our room as “our room” but I don’t know if that even makes sense!
YoungHouseLove says
Yes that was completely a functional decision (we didn’t even have room for a bassinet in our first master and the nursery was about five steps away across the hall) but it really worked out well. We have no idea how much was nature and how much was nurture, but Clara has been an amazing sleeper, so we are planning to do the same thing with the bun and hope for the best – especially since his nursery is just next door.
xo
s
Claire says
With the clip rings, when the Barnacle is beginning to pull himself up and get into anything and everything isn’t there a risk that he might grab the curtains and all the clips pull off and it comes down on top of him? I suppose that’s preferable though to the whole curtain rod coming down on top of him so maybe it’s a safety feature!?
YoungHouseLove says
Yes, we actually chose ring clips for Clara’s room so if she pulled on them just the panel would come down and not the whole rod. Has never happened but we figure it’s not a bad thing if the fabric slips down separately instead of the whole thing.
xo
s
Connie says
Before you make more curtains or anything else with hems, invest in a Dritz Ezy-Hem—a metal ruler to press the edge over as you measure. One side is for curved hems, the other side for straight hems.
http://www.nancysnotions.com/product/ezy+hem+gauge.do Since it’s Dritz, I assume JoAnn sells them. It’s rather expensive for a piece of metal with black lines but the time and aggravation saved is worth it.
YoungHouseLove says
Thanks so much! It sounds awesome!
xo
s
Tarynkay says
They look nice, but I think they would look a lot better lined, even if just with regular curtain lining rather than black out lining. This room is just so tailored (which is very nice) that the unlined curtains detract from the overall crisp orderliness.
YoungHouseLove says
That would be fun to learn how to do!
xo
s
Rachel says
What beautiful curtains!! Thank you so much for putting this tutorial out there. I am embarrassed to say but we don’t have any curtains at all in our home because I thought I could never be able to sew them and cannot really afford to buy them but this gives me such hope. Seriously, I am definitely going to try this! Thank you again. And I love the color you picked – they look awesome :-)
MP says
Hi there – this is meant as super-friendly constructive criticism, but it’s better to hem the sides first, then the top/bottom in case you need to change the height at a later date. You can release the bottom hem for example, and make it longer. Oh I forgot, you used some sort of glue bonding, so I guess your curtain lengths can’t be changed! Another pro-tip is to iron the curtain before hemming, keep things more even.
YoungHouseLove says
SO SMART! Thanks so much for the tip MP.
xo
s
Katie says
can you tell me what section of joann you found the fabric in? I’m always confused when I go there where I should look for good curtain fabric.
YoungHouseLove says
This was in the decorative/upholstery fabric section in the back of the store. Those bolts tend to be wider and the fabric is thicker than quilting stuff, which seems to drape better for most curtain projects (unless you’re going for sheers).
xo
s
Lisa says
Oh.My.Goodness. THANK YOU for the creative ring-clip idea. For the past several months I’ve been staring at my Bed Bath & Beyond ring-clips on my living room curtains, having buyer’s remorse because they just don’t look right. I can’t wait to try out your method tonight! As dramatic as it sounds, you may have helped to take me out of my curtain misery. :)
YoungHouseLove says
You’re so sweet Lisa! Best of luck with everything!
xo
s
Mary says
That green color is SCARING me! However, I have complete confidence that the room will be spectacular when you are finished. As always. I think. (yikes)
I, too, was brought back to the time I spent decorating nurseries for my children. It was such fun preparing even with my third pregnancy. In my ninth month I’m up on a ladder stenciling pink bows while my husband is relaxing in his recliner watching The Ten Commandments for the fiftieth time. Bye husband!
Hillary says
This is just amazing. This nursery looks awesome.
Molly says
My dog regularly lies down directly on top of my fabric whenever I need to lay it out on the floor (typically for cutting large pieces). (Oh, thanks for the new dog bed! He seems to say.) It drives me nuts! And usually, I spend time vacuuming prior to starting my sewing project to cut down on the dog hair in the first place. So, now I block him out using furniture to prevent him thinking my curtain fabric is his new dog bed.
I’m more of the sew-it type who saves heat bond for craft projects like baby onesies. I love this tutorial for making lined curtain panels and have referenced it often. http://annasnest.com/article/how-to-make-lined-curtains
YoungHouseLove says
Thanks so much for the link Molly!
xo
s
Rona says
I LOVE the color of the curtains! I made blackout curtains for my daughter following your tutorial for Clara. Now I’ll have to try this pleated trick. Barnacle’s room looks huge in these pictures, by the way.
Steph says
Don’t take this the wrong way, but when I pulled this up on my iphone, I thought, hmmm interesting color. Later when I saw it on my monitor, it made a lot more sense! Funny how color can look distorted like that. Everything is looking great! Can’t wait to see the mobile! Great work :)
YoungHouseLove says
Oh yes, on an iPhone I think it looks crazy – like neon green slime! Haha! On an iPad too. Must have to do with screen brightness or something!
xo
s
Abby says
What a wonderful idea! I’ll have to give this method a shot. Random question: do you guys never do two posts in one day anymore? If I remember correctly, there used to be a few days each week that you did two posts (10 and 2)…but it seems that now the only “second post” is Fab Freebie. I still always check in around 2 hoping to see a second post, but it looks like that is no longer a thing! Just curious!
YoungHouseLove says
Aw, thanks Abby! For the last three months we’ve actually just been posting twice on Mondays, and once the rest of the week (with 1-2 bonus posts over on Young House Life most weeks). We used to also post twice on Wednesdays, but shared a little update at the top of this post from November about that change :)
xo
s
Wrenaria says
I agree about curtains making a room! Especially as a renter who can’t really do the whole painting thing yet, curtains are always my go to for adding a punch of personality to the room. They always make thing feel more cozy and homey too.
Also I always opt to grab the curtain from behind like that when I use curtain rings, because I personally am not a fan of having the clips be visible. I don’t mind seeing the rings peak over the top though!
This is an old old post from a very neglected blog but you can see I did it that way here: http://wrenariantroves.blogspot.com/2013/07/bedroom-transformation.html
YoungHouseLove says
So cool! Thanks for the link Wrenaria!
xo
s
Karen says
Ya know, I’d love to see photos of Clara’s nursery, too! It would be interesting to see how your design elements changed, etc.
And yes, the room before curtains was too austere. Also, love me some Burger.
YoungHouseLove says
Here’s her nursery for ya! https://www.younghouselove.com/2010/04/the-big-nursery-reveal/
xo
s
katalina says
wow you come a long way Sherry!
(this is from someone who made valences by draping patterned pillow cases
over a tention rod with honeycomb shades to make valences…)
I think sewing skips a generation.
YoungHouseLove says
Haha!
xo
s
Abby J. says
Looking great – I love the color palette. You need a changing table in there – can’t wait to see what you come up with.
Traci says
I love the color of the curtains against the lightness of the rest of the room, and clipping the curtains as such makes the process so much easier. I had never thought of that. Thanks for sharing!
Avone says
Brilliant! We recently moved from a newer home with 10 ft ceilings to an older, two-story. I haven’t done anything to the curtains yet (they’re in a much-too-big puddle right now), and this will buy me a few inches without having to re-hem them all. Thanks!
Kayla says
I saw this on Etsy and thought of your nursery… seems like the colors may be too bluish to go in the room, but it’s so sweet.
http://mytinyurl.com/5ztsfnp57t
YoungHouseLove says
SO SWEET! I love that quote so much!
xo
s
Karen says
Sherry,
Love the curtains! I was thinking this might be an idea for the backs on your bookcases…
http://www.flimsypi.com/wordpress/2014/02/17/wood-shim-built-in-bookcase
I did this to mine and it really made it pop…cheap too!
YoungHouseLove says
Such a cool project! Love that, Karen!
xo
s
Stardancer says
Ooh, the curtains do great things for the room. I have to say that I’m among the number not entirely convinced by the multiple shades of green–but then I was SUPREMELY unconvinced by the “middle” of Clara’s room (with just the seemingly random pops of color on what looked like stark white). Even the built-ins in this room: when I saw the sketches and future color, I thought they’d stick out like a pair of sore thumbs, but they already look like they belong there. So I’m holding off on being unconvinced until you say it’s done!
YoungHouseLove says
Aw thanks Stardancer! Even we get all confused in the middle (we even wrote a post about it) but we try to have faith that things will gel in the end. It really does seem to work out that way… and if they don’t, we just course correct and rely on good ol’ trial and error :)
xo
s
Amy says
I have to say, the number one thing I’ve learned from your blog and the many projects you’ve shared with us is how a simple change can make a huge difference! These curtains are no exception, and GREAT color choice! I still can’t believe how different the room looks :)
YoungHouseLove says
Thanks so much Amy!
xo
s