Our master bedroom has moved leaps and bounds over the last few days in terms of not looking like a big empty room with a bed in it. And by leaps and bounds, I mean frames and curtains. And more frames. Plus a few more frames after that.
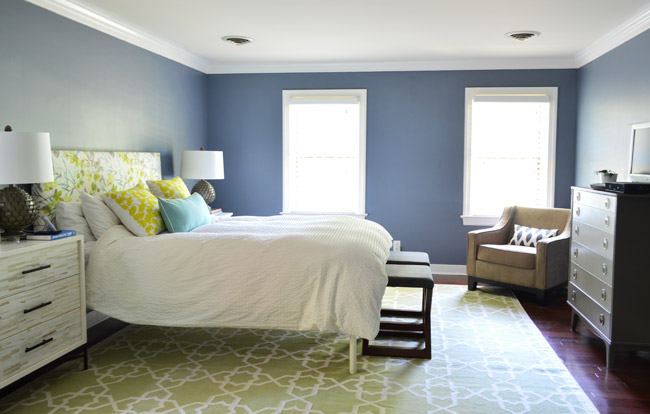
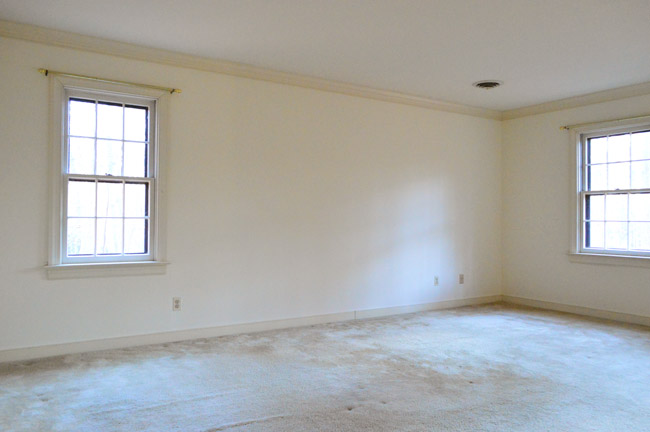
Before we started putting a bunch of holes in our walls, this is what the room looked like (and what it has pretty much looked like since we painted it nine months ago). It was in desperate need of curtains at the very least, but we’re not done with those yet, so just ignore those and let’s talk about the frames.
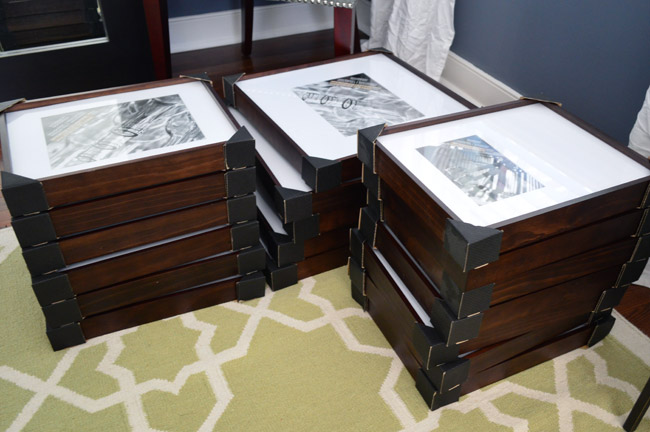
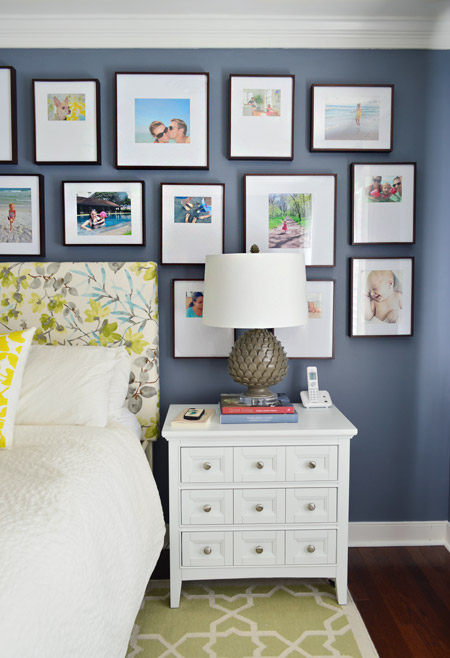
We had long talked about doing a gallery wall over our bed, and after stewing on it for a few months we decided we wanted to go with big dark frames (gasp! not white ones?!?) with nice mats. We have a gradual goal of amassing nicer frames in the house as we go (some real wood ones with nice big mats with glass and not plexi) so after shopping around at a few frame places, these large wood ones from Michaels fit the bill best. At $39 each for the biggest ones and $29 for the slightly smaller size, they weren’t cheap – but thanks to a two-for-one sale, it took the average down to $15 to $20 each, which is closer to what we spend for cheaper frames of that size.
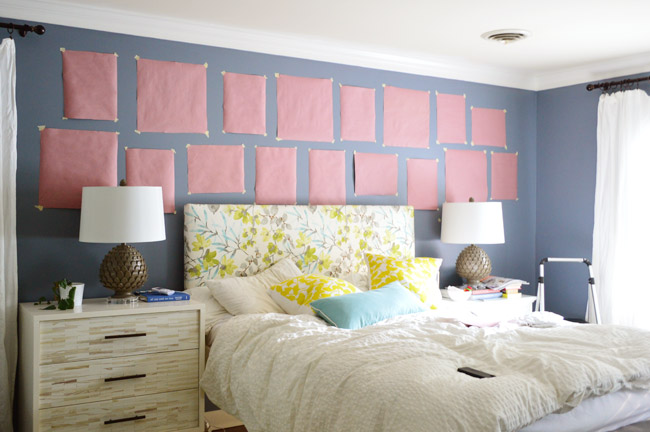
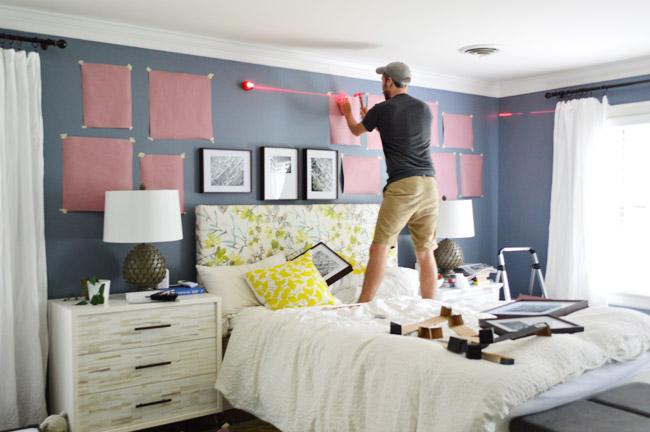
Once home with our original frame haul, Sherry cut a bunch of templates out of leftover rosin paper that we had from projects like this and this, and we taped up a rough, mostly-symmetrical arrangement.

Neither of us was totally sold on it. It just felt a little too perfectly lined up. So Sherry took a stab at loosening up the rows and columns a bit. Kinda the gallery wall equivalent of unbuttoning the top button of your dress shirt. It instantly looked more relaxed and casual than the more formal/balanced arrangement that we had tried first.
Next it was frame-hanging time. Considering the number of them (at this point we had 17), it wasn’t too bad. These frames hang nicely on one or two nails each (there’s a groove on the back lip of the wood frame) and since we had worked out their placement with paper templates it was pretty simple. Since the arrangement is somewhat mirrored from one side of the bed to the other, we used a laser level to make sure the frame on the left side was at the same height of its sister on the right (and we used a yardstick to make sure our side-to-side gaps between frames were about the same).
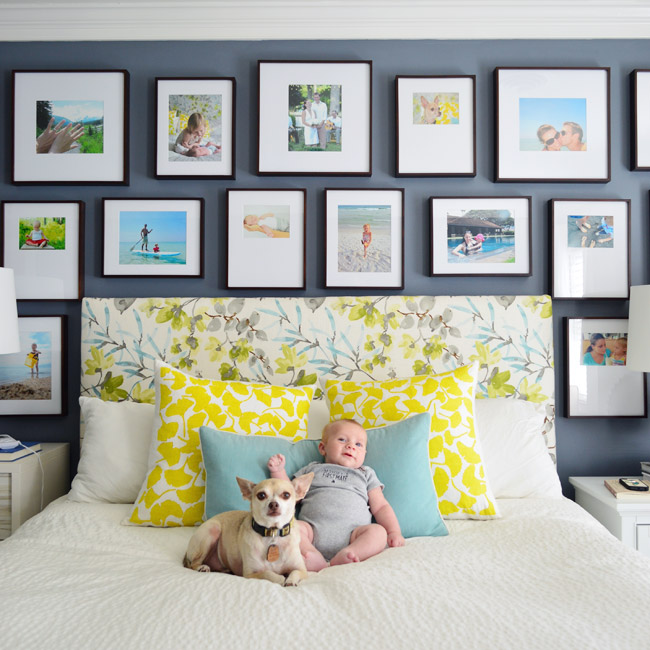
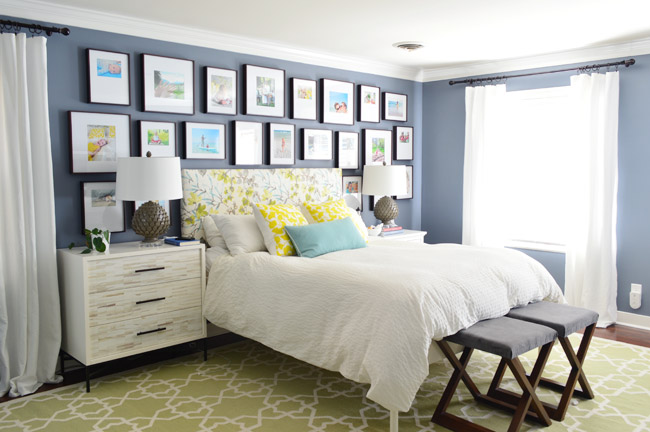
After we got the initial set of frames hung, we liked where it was going… but the whole thing was feeling a little too much like a stripe across the top of the bed, so we picked up five more frames to fill the space above each night stand for more of a full-wall-of-frames look. So when it was all said and done, we purchased five of the larger frames (they’re 11.5 x 14.5″ with an 8 x 10″ opening in the mat) and seventeen of the slightly smaller 16.5 x 16.5″ size (some of which had 8 x 10″ openings and some that had 5 x 7″ openings). Note: We later realized that the bare spot on the top left (by the curtain) felt off to us, so we inched a few frames around to make it more balanced looking (you’ll see that tweak three photos below this one).
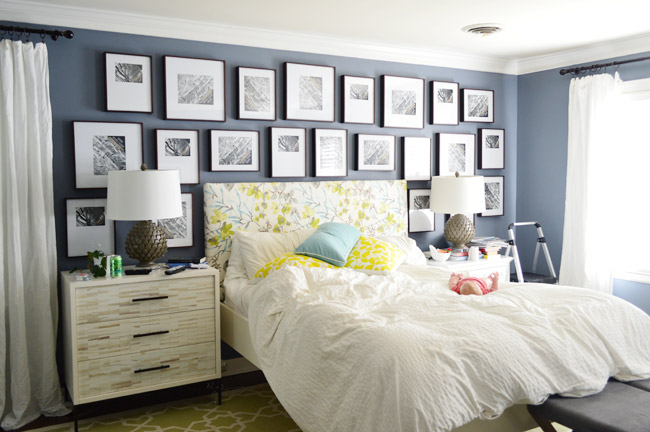
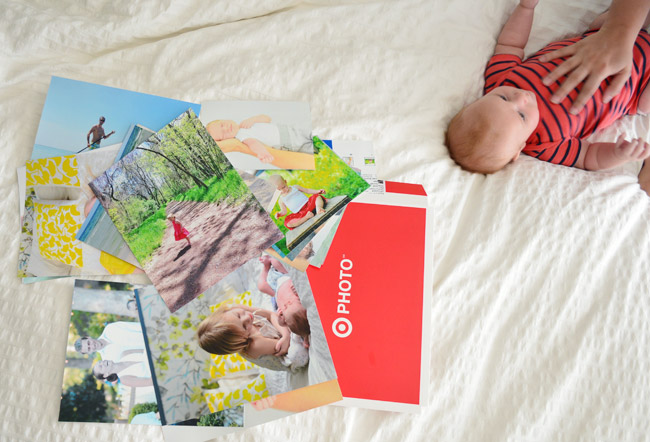
Although we’re big fans of putting just about anything in a frame, we had been looking at our family photos and realized that we had a lot of special-to-us photos that we wanted to properly frame, so a wall of family photos was the goal here. It felt especially right for a more personal space like a bedroom, and we had never seen many of these photos printed out in a nice large size like 8 x 10. So we picked a bunch and placed an in-store pickup order on Target’s website (which we discovered was cheaper for 8 x 10s than our usual go-to, Shutterfly).
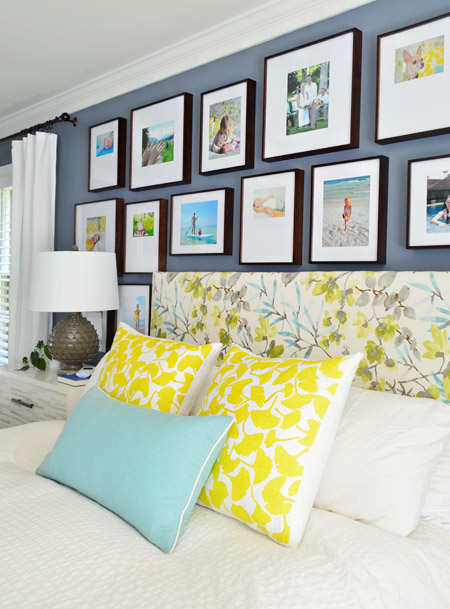
Here’s everything all framed up. We really liked going with colorful prints instead of black and white ones, especially on such a dark wall. They’re a nice balance of classic/handsome (wood frames & crisp white mats) + cheer (colorful family photos). And we like how the bolder prints tie into the colorful pillows and our headboard.

The process for picking photos was pretty straightforward: we scrolled through our family photo folders in iPhoto (we have one for each year, ordered chronologically) and flagged our favorites. That produced WAAAY too many options, so we whittled it down to the 22 we needed by choosing favorites from the favorites (for some reason it’s easier for us to pick top choices from the group than decide which ones to nix).
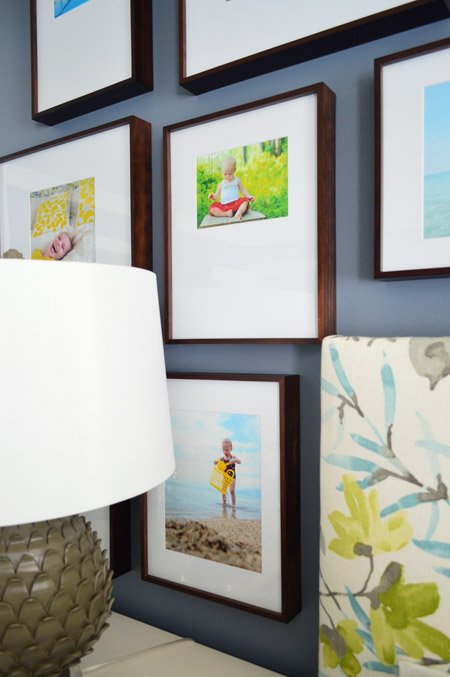
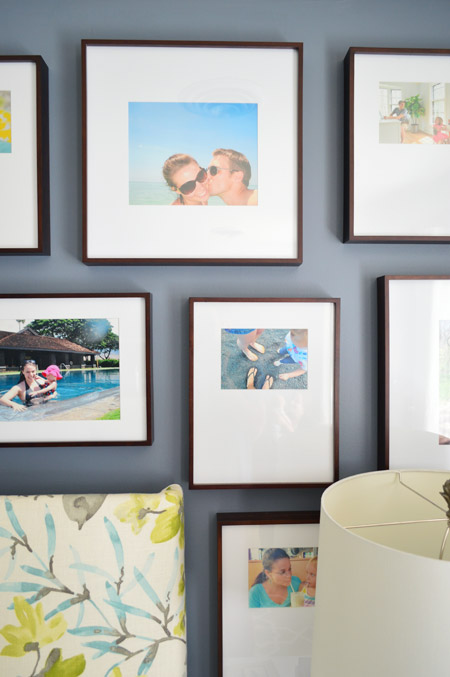
We didn’t keep any sort of color scheme in mind (there’s every color in the rainbow going on) but we did seem to subconsciously choose photos that looked more like a moment in time than a posed everyone-stare-at-the-camera shot. I think maybe we knew that a whole lot of eyeballs staring out at us might feel strange. So most of them feature people looking down, at each other, off to the side, etc. There are only a few with eyes that actually looked at the lens, like the Teddy beach shot in the top left corner.
It wasn’t until we had everything hung that we realized a few other commonalities emerged. We stepped back and laughed about “all that water.” Turns out around a third of them feature us on the beach or in some other form of water (the lake, a pool, etc). It’s probably because a lot of our favorite photos were from trips we took. We actually counted six different states being represented in our photos (from Alaska and Hawaii to Florida and Delaware). Another funny realization was that three of the photos in our gallery were taken on the very bed that they now sit above. So we’re apparently a family who likes to travel… or stay in bed.
After we were all done hanging and framing everything, our formerly nondescript bedroom wall had sort of morphed into a photographic celebration of our family, which has been pretty awesome as the first and last thing we look at every day. In fact, as much as we loved the frame hallway in our last house (we didn’t think we’d ever love a frame arrangement more), our new family-gallery is right up there with it.
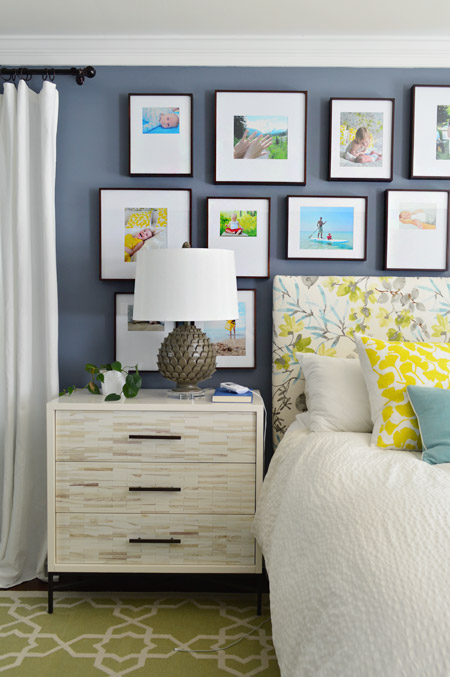
Oh, and even though it looks like those pictures behind the lamp are impossible to see, they’re actually some of the ones we see the most from bed and/or when we walk into the room. It’s all about the angle y’all.
We hope our new family wall will encourage us to keep breaking out the camera and documenting family moments. Heck, it doesn’t even have to be the nice camera. We realized almost half of the pictures up here were from our iPhones or our old point-and-shoot.
Clara was napping when we finished hanging everything, so we stole the opportunity to give Teddy and Burger some brother time in front of the camera. And knowing our penchant for framing the photos taken on this bed, there’s a chance this shot could end up on the wall at some point. So meta, I know.
We can’t really picture the “before” of this room in our heads anymore without pulling up the actual before photos…
… but we’re certainly grateful for how far it has come. It’s looking a little busy to us right now, but we think a few other to-do list items should hopefully fix that. We’d like a better bench at the end of the bed and a proper set of end tables so we can use the dresser on another wall. We also still have to finish the curtains, need an overhead light, etc. Slowly, slowly.
Anyone else doing bedroom updates? Or hanging a collection of family frames? Have you noticed any subconscious themes afterwards, like a love of water, travel, or being in bed? What about eyeballs? Are they all staring out at you? Do they follow your every move, Mona-Lisa style?
Psst- Wanna know where we got something in our house or what paint color we used? Just click on this button:


Stephanie says
Absolutely love this! I may go look at those frames. I want to do a gallery wall in our entryway (remove the old pub/hook/mirror). So jealous of all the awesome water photos you have.
Chrissie says
I LOVE this – you guys are always so creative and great at putting your personal touches on a room. It looks so crisp and fresh, too.
And a question: I love your bedding and setup, but was wondering what you would do if the pillows on your bed that you sleep on aren’t so great for displaying? My husband and I use Tempurpedic pillows (love them, but they’re definitely not the light and fluffy variety), and during the day I keep them on the bed and put two shams in front of them, but it’s still not ideal. We’re in a small apartment so there’s nowhere else to store them (and I’m lazy, so there’s that too). Any tips for hiding them/making it look better?
YoungHouseLove says
Hmm, do you have a chair near the bed you can toss the pretty pillows on before bed? That’s what we do (our sleeping pillows are behind the leafy ones and the blue bolster so we toss those on the chair or the floor). Otherwise, can you get pretty pillow cases for your tempurpedic pillows? Maybe that would make them look nicer?
xo
s
Chrissie says
Thanks Sherry! I do remove the two shams (they’re larger pillows) at nite, but I think my main issue is that when they’re on the bed during the day, they’re basically covering the Temperpedic pillows behind them, but don’t look as nice as if there were larger fluffy pillows there instead (like yours behind the leafy ones). They’re just kind of propped up in front of them. Maybe if I added more? Just wondering if there’s some kind of work-around that I haven’t thought of yet to dealing with flatter sleeping pillows!
YoungHouseLove says
Oh, gotcha! Maybe just two more pillows in front with white cases to hide them? Since you’re taking off the other accent pillows it might not take much longer to toss those off to the side too?
xo
s
Chrissie says
Thanks for the response, Sherry – I appreciate the tip! Also, I hardly ever comment but I read every post, and I love your style and all the updates you guys are making to your new house. It looks great – thanks so much for sharing! :)
YoungHouseLove says
You’re so sweet, Chrissie. Of course!
xo
s
Karen says
How did you get the mats to only open at one end of the frame on some of them?
YoungHouseLove says
Those came like that (there was an 8×10 opening option and another frame with the opening for a 5×7 picture at the top like that).
xo
s
Roxanne M says
I love the photo wall! I love how some of the photos on the bed just tie in the yellow of the headboard…well, because they are of the bed :) We love our trip travel photos as well and our gallery wall isn’t quite as big as yours but features trip pictures! We love to use metallic paper to print ocean photos. It makes the blues just ‘pop’! Also looks great for black and white pictures.
Sue Erneta from Sue at Home says
Love your photo wall!!!
I covered a wall in my dining room – yes, my dining room! – with 141 personal pictures. And since you math nerds love some numbers, check this out:
75% were taken outdoors.
23% are from our beloved vacation spot, Aruba.
On the wall, there are 56 pairs of sunglasses, 44 bathing suits, 27 hats, and 11 Halloween costumes!!
Check it out: http://sueathome.com/2013/12/09/photo-wall-or-my-new-favorite-thing-in-my-house/
YoungHouseLove says
LOVE IT!
xo
s
Jamie says
LOVE this idea!! Random question..where are your bedside lamps from?! I’m in the market for some for our master bedroom and that color/style would be perfect!
YoungHouseLove says
Thanks Jamie! They’re from HomeGoods a while back.
xo
s
Miranda says
It looks stunning! I love how the pictures all seem to compliment one another. We have a large, bare wall that is simply begging to become a gallery wall. Our only hiccup – behind the layer of drywall is either brick or plaster – not conducive to nails (we’ve already tried and they all fell down!).
Any recommendations for hanging up frames on this tricky wall? Thanks you guys :)
YoungHouseLove says
A few people said they love 3M Command velcro for hanging stuff so maybe try that? They said it can hold up pretty heavy stuff!
xo
s
Susan says
Wish there was a good option for California earthquake country. I would love to do a wall over the bed but it’s not a good situation if all your lovely family photos fall on you on the middle of the night. I wish someone would invent squishy frames or something.
YoungHouseLove says
Someone should invent something to keep them up, like an earthquake tether or something! Maybe that makes no sense…
xo
s
Raquel says
In LOVE with it! Pinning this for when we paint our bedroom:)
Marie says
What a wonderful gallery, I like it very much!
Thank you for sharing your ideas.
Greetings from Europe
Marie
beth says
Stunning….I love it. I honestly think it is my favorite thing you have done
…..ever!
YoungHouseLove says
Thanks so much Beth!
xo
s
Ellen says
I’m sure I’ve probably read this before… but where did you buy the pillows? I LOVE the fabric! :)
YoungHouseLove says
They’re something we found in a shop in DC but the label says Dermond Peterson if that helps.
xo
s
Elena says
Hey guys. I’m sure I probably missed it, but where did you get your night stands? I love them both.
YoungHouseLove says
Thanks Elena! The one with all the small drawers is from Joss & Main a while back, and the wood inlay one is from West Elm.
xo
s
Kelly Camden says
Looks great!! Good job. Did you have the photos printed in glossy or matte finish? Thanks!
YoungHouseLove says
I think they only allowed glossy online, so we did that.
xo
s
Gia Anne says
Ummm…i may be the only one but my eyes hurt looking at that wall:(
lynne says
great timing guys, i was working on a small photo wall this winter but kind of gave up because i just couldn’t choose my favourites. SO. HARD. but just last week was thinking of it again and maybe your post will get the fires burning again. anyway you probably mention it somewhere on your site but i’m just wondering about printing photos… i worry that mine may need tweaking before printing, with that whole ‘looking brighter on a lit screen’ issue. do you guys do anything to photos to get them ready to print? i’m quite sure my photos are not as perfect as yours (and that’s ok, i’m no pro!) but i do want them to be vibrant and … discernible…. once they are on the wall! thanks!
YoungHouseLove says
Thanks Lynne! Our DSLR usually gives us pretty vibrant colors, especially if we shoot with enough natural light. And on our phones for the most part we just try to take photos with a lot of natural light and tap the screen to focus beforehand. Sometimes we shoot in HDR mode but it tends to make moving people look blurrier, but it can be more vibrant. If you already have photos you want to brighten, maybe a program like GIMP (it’s free to download) can help?
xo
s
linda says
You obviously do not live in an earthquake zone! I you did, you would know to put nothing above your bed.
Gandolphino says
While I love a good gallery wall, and you guys did an excellent job hanging it, and I do love the wood frames you chose. This, however, looks very cluttered and busy to me, especially for a bedroom, in which I prefer to have more restful and uncluttered look. I typically love your style and all you do. So, if it makes you guys happy, then that is good. Ciao! Gandy
monica green says
so beautiful!I will decorate my house like this! thank you.
Briel K. says
I always love your gallery walls. Looks great!
Sara C. says
Ohh, love it. But not in CA! Too much of an earthquake risk, having all of those heavy glass and wood frames above the bed. Would love to figure out how to get a similar look with something softer/less deadly.
Nelle says
LOVE this! What a transformation and an amazing bedroom!! I love the gallery wall – it just pops on that darker wall, good call guys
Ciara says
Beautiful colors. Did you use any particular software to make the pics more saturated?
YoungHouseLove says
Our DSLR usually gives us pretty vibrant colors, especially if we shoot with enough natural light. And on our phones for the most part we just try to take photos with a lot of natural light and tap the screen to focus beforehand. Sometimes we shoot in HDR mode but it tends to make moving people look blurrier, but it can be more vibrant. If you already have photos you want to brighten, maybe a program like GIMP (it’s free to download) can help?
xo
s
Kellie says
I love your gallery wall! I just finished one above my bed too. You can check mine out on my blog :)
Maria @ Something Decorated says
The collection of frames is perfect for this space. Intimate for your bedroom setting, and all of the colors seem to pick themselves up throughout the room. I don’t think you could have selected better photos for this space!
Mary b says
Bravo, you’ve done it again. Looks amazing.
Rachel says
Hi! I was wondering if you know if these frames are still available! Would love to try this but can’t find frames with similar matting. Did you buy them with the matting together, or make the matting yourself? Thanks!
YoungHouseLove says
They came with the mats from Michaels (couldn’t find them online, only in store).
xo
s
sue says
I have seen those frames before….What’s the name of these frames? you bought them at Michael’s? I cant find them on their website…
YoungHouseLove says
I couldn’t find them on their site, only in the store. Hope it helps!
xo
s