Our master bedroom has moved leaps and bounds over the last few days in terms of not looking like a big empty room with a bed in it. And by leaps and bounds, I mean frames and curtains. And more frames. Plus a few more frames after that.
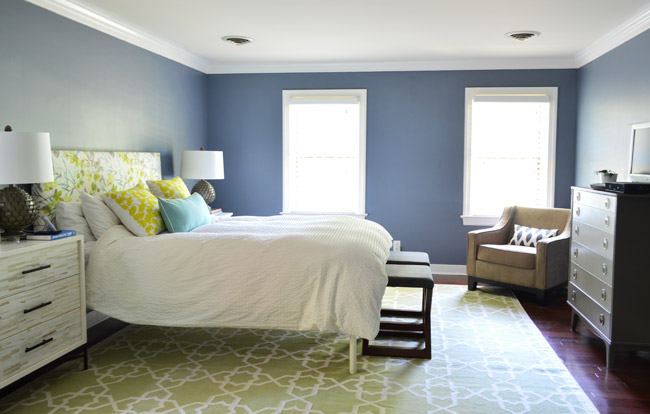
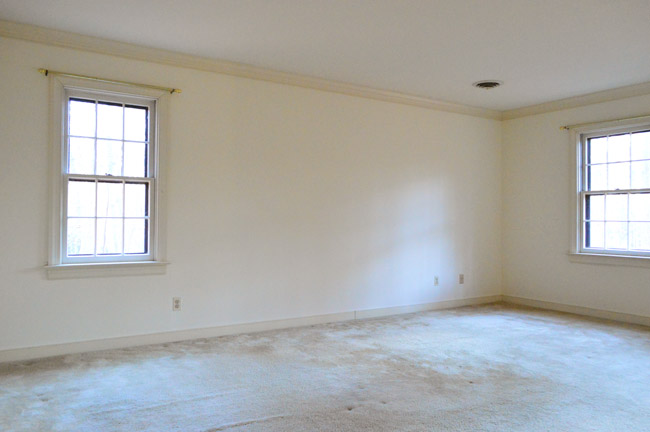
Before we started putting a bunch of holes in our walls, this is what the room looked like (and what it has pretty much looked like since we painted it nine months ago). It was in desperate need of curtains at the very least, but we’re not done with those yet, so just ignore those and let’s talk about the frames.
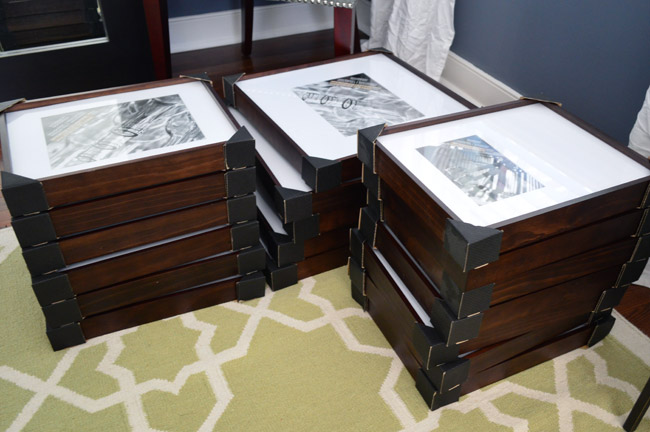
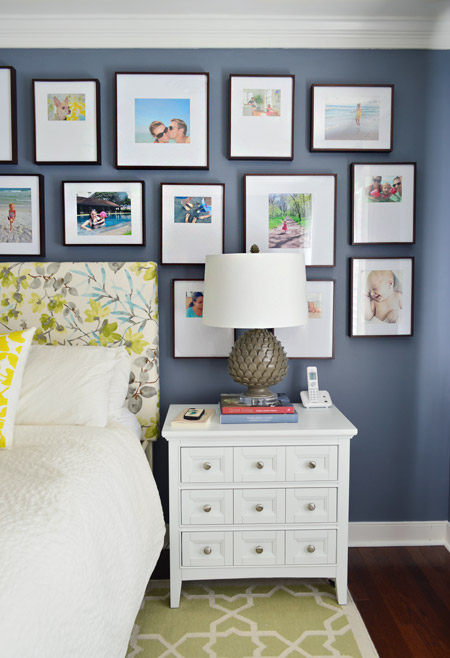
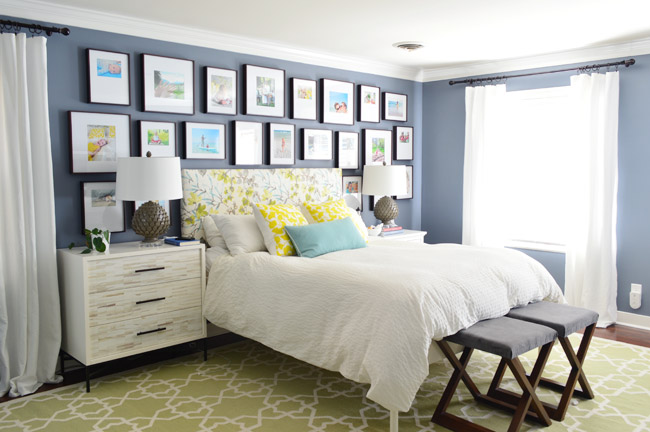
We had long talked about doing a gallery wall over our bed, and after stewing on it for a few months we decided we wanted to go with big dark frames (gasp! not white ones?!?) with nice mats. We have a gradual goal of amassing nicer frames in the house as we go (some real wood ones with nice big mats with glass and not plexi) so after shopping around at a few frame places, these large wood ones from Michaels fit the bill best. At $39 each for the biggest ones and $29 for the slightly smaller size, they weren’t cheap – but thanks to a two-for-one sale, it took the average down to $15 to $20 each, which is closer to what we spend for cheaper frames of that size.
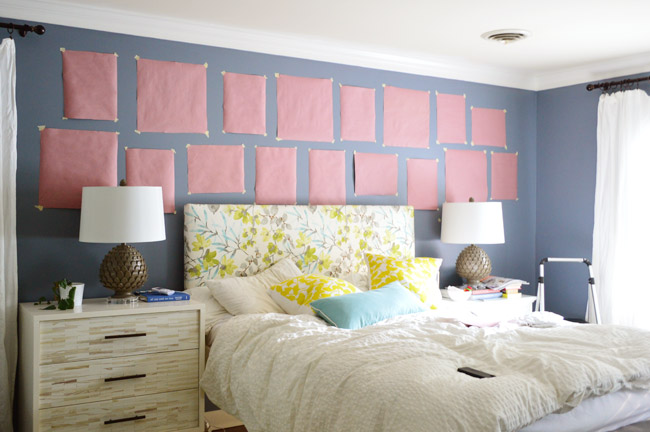
Once home with our original frame haul, Sherry cut a bunch of templates out of leftover rosin paper that we had from projects like this and this, and we taped up a rough, mostly-symmetrical arrangement.

Neither of us was totally sold on it. It just felt a little too perfectly lined up. So Sherry took a stab at loosening up the rows and columns a bit. Kinda the gallery wall equivalent of unbuttoning the top button of your dress shirt. It instantly looked more relaxed and casual than the more formal/balanced arrangement that we had tried first.
Next it was frame-hanging time. Considering the number of them (at this point we had 17), it wasn’t too bad. These frames hang nicely on one or two nails each (there’s a groove on the back lip of the wood frame) and since we had worked out their placement with paper templates it was pretty simple. Since the arrangement is somewhat mirrored from one side of the bed to the other, we used a laser level to make sure the frame on the left side was at the same height of its sister on the right (and we used a yardstick to make sure our side-to-side gaps between frames were about the same).
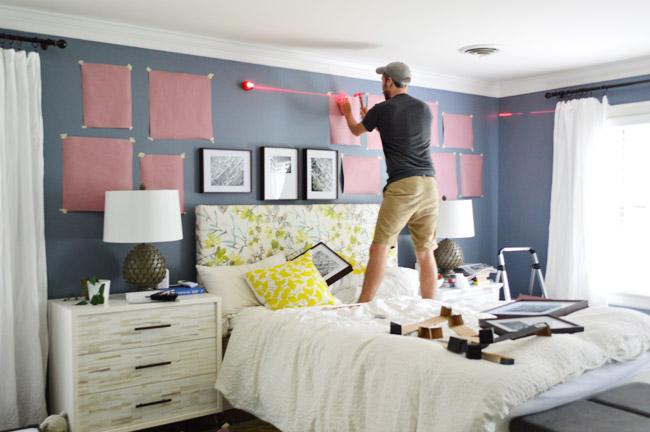
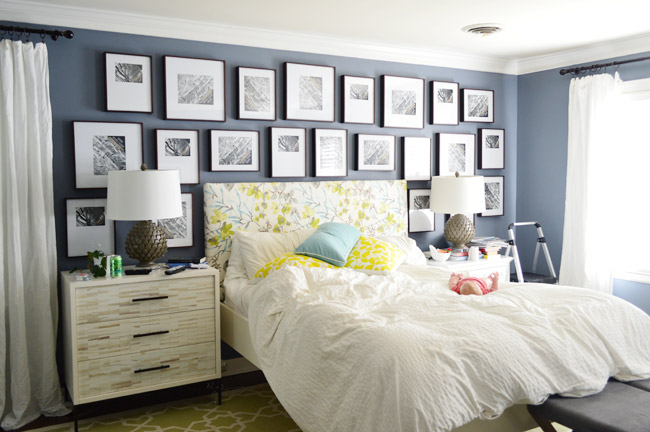
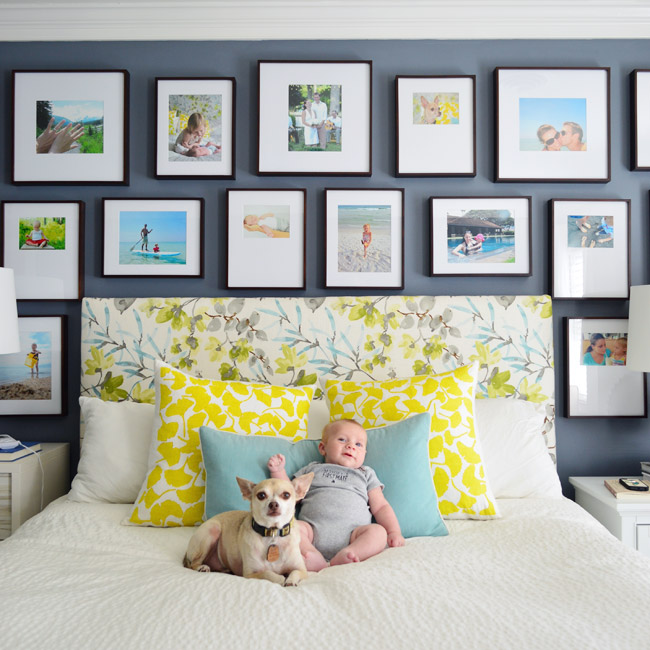
After we got the initial set of frames hung, we liked where it was going… but the whole thing was feeling a little too much like a stripe across the top of the bed, so we picked up five more frames to fill the space above each night stand for more of a full-wall-of-frames look. So when it was all said and done, we purchased five of the larger frames (they’re 11.5 x 14.5″ with an 8 x 10″ opening in the mat) and seventeen of the slightly smaller 16.5 x 16.5″ size (some of which had 8 x 10″ openings and some that had 5 x 7″ openings). Note: We later realized that the bare spot on the top left (by the curtain) felt off to us, so we inched a few frames around to make it more balanced looking (you’ll see that tweak three photos below this one).
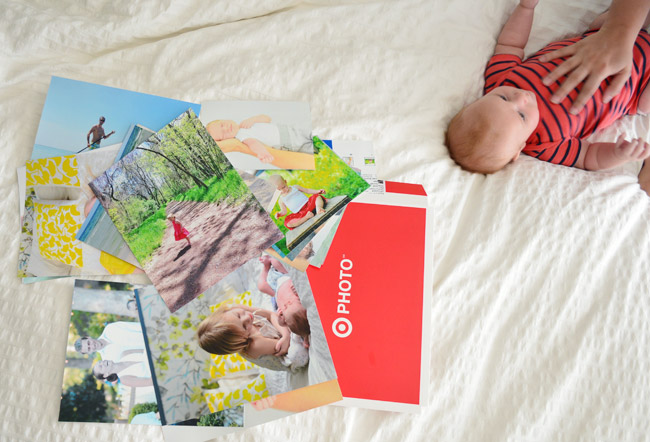
Although we’re big fans of putting just about anything in a frame, we had been looking at our family photos and realized that we had a lot of special-to-us photos that we wanted to properly frame, so a wall of family photos was the goal here. It felt especially right for a more personal space like a bedroom, and we had never seen many of these photos printed out in a nice large size like 8 x 10. So we picked a bunch and placed an in-store pickup order on Target’s website (which we discovered was cheaper for 8 x 10s than our usual go-to, Shutterfly).
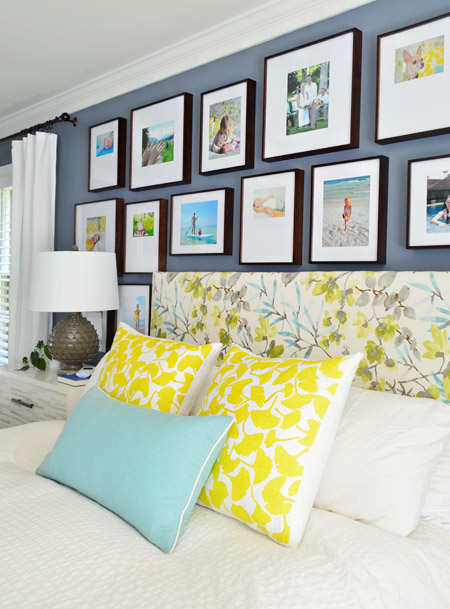
Here’s everything all framed up. We really liked going with colorful prints instead of black and white ones, especially on such a dark wall. They’re a nice balance of classic/handsome (wood frames & crisp white mats) + cheer (colorful family photos). And we like how the bolder prints tie into the colorful pillows and our headboard.

The process for picking photos was pretty straightforward: we scrolled through our family photo folders in iPhoto (we have one for each year, ordered chronologically) and flagged our favorites. That produced WAAAY too many options, so we whittled it down to the 22 we needed by choosing favorites from the favorites (for some reason it’s easier for us to pick top choices from the group than decide which ones to nix).
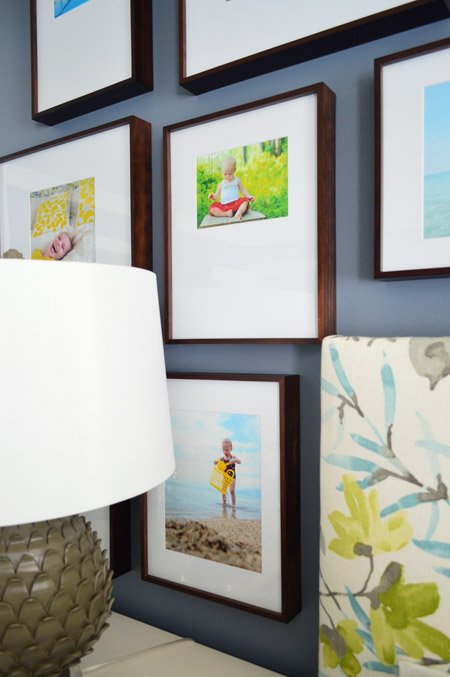
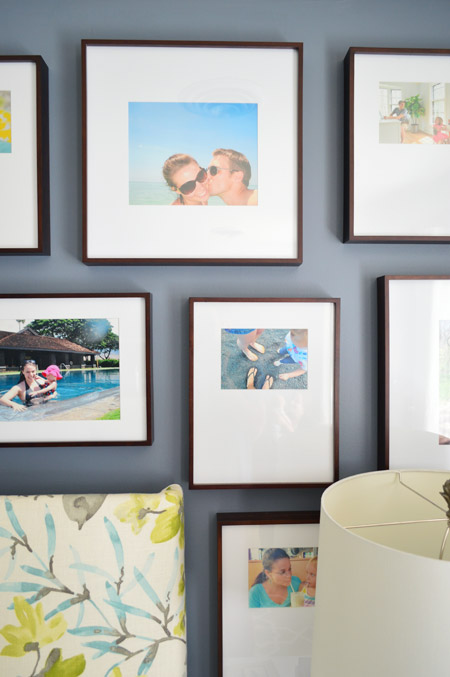
We didn’t keep any sort of color scheme in mind (there’s every color in the rainbow going on) but we did seem to subconsciously choose photos that looked more like a moment in time than a posed everyone-stare-at-the-camera shot. I think maybe we knew that a whole lot of eyeballs staring out at us might feel strange. So most of them feature people looking down, at each other, off to the side, etc. There are only a few with eyes that actually looked at the lens, like the Teddy beach shot in the top left corner.
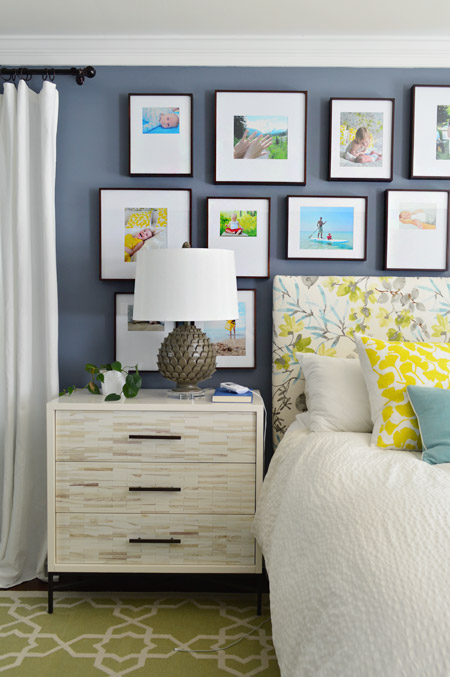
It wasn’t until we had everything hung that we realized a few other commonalities emerged. We stepped back and laughed about “all that water.” Turns out around a third of them feature us on the beach or in some other form of water (the lake, a pool, etc). It’s probably because a lot of our favorite photos were from trips we took. We actually counted six different states being represented in our photos (from Alaska and Hawaii to Florida and Delaware). Another funny realization was that three of the photos in our gallery were taken on the very bed that they now sit above. So we’re apparently a family who likes to travel… or stay in bed.
After we were all done hanging and framing everything, our formerly nondescript bedroom wall had sort of morphed into a photographic celebration of our family, which has been pretty awesome as the first and last thing we look at every day. In fact, as much as we loved the frame hallway in our last house (we didn’t think we’d ever love a frame arrangement more), our new family-gallery is right up there with it.
Oh, and even though it looks like those pictures behind the lamp are impossible to see, they’re actually some of the ones we see the most from bed and/or when we walk into the room. It’s all about the angle y’all.
We hope our new family wall will encourage us to keep breaking out the camera and documenting family moments. Heck, it doesn’t even have to be the nice camera. We realized almost half of the pictures up here were from our iPhones or our old point-and-shoot.
Clara was napping when we finished hanging everything, so we stole the opportunity to give Teddy and Burger some brother time in front of the camera. And knowing our penchant for framing the photos taken on this bed, there’s a chance this shot could end up on the wall at some point. So meta, I know.
We can’t really picture the “before” of this room in our heads anymore without pulling up the actual before photos…
… but we’re certainly grateful for how far it has come. It’s looking a little busy to us right now, but we think a few other to-do list items should hopefully fix that. We’d like a better bench at the end of the bed and a proper set of end tables so we can use the dresser on another wall. We also still have to finish the curtains, need an overhead light, etc. Slowly, slowly.
Anyone else doing bedroom updates? Or hanging a collection of family frames? Have you noticed any subconscious themes afterwards, like a love of water, travel, or being in bed? What about eyeballs? Are they all staring out at you? Do they follow your every move, Mona-Lisa style?
Psst- Wanna know where we got something in our house or what paint color we used? Just click on this button:


Petra says
Looks fab! However, I would never do a gallery wall above the bed here in earthquake country. :)
Amy says
I have a pile of frames waiting to do this exact project. Just building up the guts to put all kinds of holes in our freshly painted walls. I know I’ll love it in the end, because your wall is beautiful.
nally says
Hi sweet friends,
Where is your white comforter/duvet cover from? Love how simple it is!
YoungHouseLove says
Thanks! Ikea!
xo
s
Susan says
Love your picture wall and seeing how big Teddy is getting!
Quick question: Now that you’ve purchased all of these frames, does that mean that you’ve decided against built-ins in your bedroom?
YoungHouseLove says
Yes, I think since we did built-ins to flank Teddy’s crib (and future bed) in the room next door, we thought they’d be a little too repetitive in here :)
xo
s
Lindsey says
Thanks for asking this because I was wondering the exact same thing!
Great job you guys. It looks fantastic!!
Laurielulu says
Oh goodness how I need to have the same gallery wall. I used to buy inexpensive frames at TJ, Marshall’s and Homesgoods, but what a dummy. They are all sitting frames and hang horribly on the walls. (Even when I remove the velvet stand). So I have an ugly unfinished gallery wall that I look at everyday and loathe. Ha! Nothing like making myself crazy everyday.
LOVE your improved bedroom and marvel at what you still accomplish so much with a newborn.
carli says
This looks fantastic guys! We just hung a big gallery wall in our bedroom, across from our bed and we love it! There’s something incredibly special about seeing so many fond memories captured and displayed in a room we spend so much time in :)
Meredith says
I just added a side table to my bedroom. Though it is a small addition, it seems to have made a big impact.
Jesse says
So pretty! But I thought you were planning a wall of built-ins for this room. Is this a Phase 1 thing?
YoungHouseLove says
I think since we did built-ins to flank Teddy’s crib (and future bed) in the room next door, we thought they’d be a little too repetitive in here :)
xo
s
Jill says
All the “water” photos reminded me of something…my favorite art piece from the old house was the under water swimmer painting…just curious if that made it up somewhere and I missed it?
YoungHouseLove says
Yes, we love that one by Samantha French! It’s in our foyer right next to the front door. One of the first things we hung :)
xo
s
Amanda Taylor says
LOVE LOVE LOVE it!!!
Amanda says
Love the dark frames! I’ve been looking around for some so that I can finally start hanging some family pictures (only took me two years lol); I’ll have to go to Michael’s and look at those in person.
Tracey says
From a design standpoint, this photo wall looks so striking and pleasing to the eye, From an emotional standpoint, this wall will comfort your soul every evening when you go to bed. It shows so much LOVE. You placed this photo wall in the most perfect place in the home! Ur painting that says “All you need is love” would go perfectly in the center because the message is perfect for this. Maybe on a bed pillow so as not to mess up the perfect pictures? GREAT job guys!
YoungHouseLove says
Aw thanks Tracey!
xo
s
Korie says
Love this gallery wall. Such a great idea for the space over the bed. Boring question… But where did you get your rods and curtain panels? Lovely!!
YoungHouseLove says
Thanks Korie! We generally like buying rods from Lowe’s or Home Depot and our curtains can be something we make from fabric or purchase from a store (that tends to vary for us). As soon as we’re done with the curtains in here we’ll share all the details :)
xo
s
Emily @ Table + Hearth says
I love the look of using the same frames for a gallery wall in a bedroom, versus a mix of frames, so cohesive and simple. I have been wanting to do one on a side wall in ours and think I may try to find these (or similar) frames! Gorgeous! P.S. Teddy is getting so big now!!
Lauren Nicole says
I am planning a similar wall opposite the bed in our master. Having never done a gallery wall, it didn’t occur to me to start with the empty frames and then pick the photos. I was going to pick the photos and then get the frames, but it makes SO much more sense to do it the way you guys did here. Thanks for posting your whole process so that I could learn from you and save myself a lot of extra work!
YoungHouseLove says
Good luck Lauren Nicole!
xo
s
Ashley says
If that photo of Teddy and Burger does end up on the wall make sure to also photoshop it in it’s frame before printing. Talk about meta. :)
YoungHouseLove says
Haha!
xo
s
sina says
You guys are always so good at doing gallery walls! You should come over to my house and get a few in motion- it is in DESPERATE need!!!
Great work! Love the pictures you chose!
Liz || Shopping My Closet says
Love the collage and how it’s so bright against the darker background!
Liz @ http://www.shoppingmycloset.com
Weekly Style Me Wednesday link-up
Faith@The Stirring Place says
I usually use shutterfly too. hadn’t even thought about trying target which kinda boggles the mind as it’s my usual go-to for just about everything else. on that.
Lori says
I don’t understand why you think Michaels frames are any nicer than ikea frames. The color of the fake wood looks nicer, but they are still cheap craft store frames.
YoungHouseLove says
These are so much nicer! They have substantial metal slide things on the back to hold the backing instead of those little metal tabs that fall off of Ikea frames, and there’s a nice built-in hanging system on the back instead of those ziplock baggies that Ikea gives you with a hanging wire. We also love that the mats are thick and white (Ikea’s tend to be more of an off-white/cream color). I’m sure there are much nicer frames than these, but we needed to buy 22 of them, so these seemed like a nice step up for us without costing $500+ :)
xo
s
Lori says
Thanks for explaining! That makes a lot more sense.
AEB says
Love it.
Did you guys make your own headboard? I’m looking to switch from a sleigh bed to a nice headboard and basic frame to gain some space in a very small master bedroom.
YoungHouseLove says
Yes, here’s that post for ya: https://www.younghouselove.com/2012/06/the-headboard-adventures-part-2/
xo
s
Annie says
Love it, although these days for my own gallery walls I am really into mixing in lots of different frames and even a few mat colors to make it look more collected over time.
diana maria says
it looks so great!!!
Bailey says
Love this!!! The way the colors coincide with the headboard/bedding is genius, even if it was unintentional.
Claire says
I love the new wall! I’m especially excited about it because I’ve been gathering the same frames in the same sizes and finish to create photo walls in my own house, but I’ve been hesitant to bite the bullet. Seeing them used beautifully elsewhere will help me move along with my project- my husband will be so happy to finally get the pictures hung!
Jen @ The Decor Scene says
OMG I love how this turned out!!! Now that our daughter is almost a year old, you have inspired me to get more pictures up on our walls. I need to do this kind of project. After our daughters first birthday seems like the perfect time to look at the pictures over the last year and get some of them on the walls of our home. Thank you for the inspiration!!! :)
Molly | Awfully Big Adventure Blog says
That’s it. You guys are officially enablers of my gallery wall addiction. This is so charming- love how the colors pop out of the frames and tie in with the bedroom decor. So so cute! I’ve never thought of the paper cut-out spacing idea- will definitely give that a try on my next gallery wall.
Lesli says
Love, love, love those lamps!
ryanres1 says
Looks great! Would you post all the pics so we can see them better? There’s one of Teddy (I think) that looks adorable!
YoungHouseLove says
We’ll see if we can upload a folder to flickr or something. In the meantime, a lot of them are on our instagram account and there’s a baby Teddy one from this post :)
xo
s
Sarah says
I love this, but I primarily distracted with a blinding jealousy that Clara still naps.
YoungHouseLove says
Don’t you jinx it, Sarah! Haha!
xo
s
Shan says
What color is your wall? Love it!
YoungHouseLove says
It’s Black Pepper by Ben Moore.
xo
s
Carly says
Love these!
Oriah says
I think this would be lovely in the upstairs hall but is visually a bit too much for a bedroom. I’m also one of “those people” who believes the only photos a couple should have in a bedroom are photos of them together. It would sort of creep me out to have a photo of my son sort of “watching over” my husband and me in the bedroom.
Sheila@Chinaberry says
You have a knack for these photo walls. I found myself smiling as I looked at each photo. What a nice way to surround yourself with the ones you love, hehe!
Kristen says
I love the curtains, which look like the nice (reasonable!) linen ones from IKEA to my eye–am I right? I have those in my dining room and own bedroom, if that is the case. I’m working up to working on a gallery wall myself, and I think I’ll incorporate your helpful tips.
YoungHouseLove says
Yes, they’re their nicer white linen-like ones. Still not done with them, but they’re looking better after the first round of ironing ;)
xo
s
Simi says
I have a hard time printing good quality pictures from my iPhone. Everytine I print they look distorted or just bad. Is there a trick you all do or resize/edit before you upload to target website? That’s another reason why I never print pics. Sometimes they print out a lot bigger than the size in the pic and the faces get cut off. Help.
YoungHouseLove says
Maybe it depends on the megapixels of your phone’s camera (we have iphones but not new ones, but the camera seems to be pretty good). Anyone have tips for Simi? As for the size, maybe bringing them into a free program like Gimp will allow you to size them before printing so nothing gets cut off?
xo
s
Kim R says
I thought you were going to do built-ins in your bedroom. Or was that around the windows? Or was that in the guest room? Or was that already completed in the nursery?
YoungHouseLove says
Ha! We had lots of built-in possibilities bouncing around for a while. Since we did some that flank the crib (and future bed) in Teddy’s room, which is right next door, we thought they might be redundant in here :)
xo
s
Kim R says
Oops. I see it’s already been answered above. (Maybe post an addendum in the blog post?
YoungHouseLove says
Thanks Kim! No worries :)
xo
s
Kayla says
I love all the family photos. It’s totally motivating me to take more family pics and get them in frames on the wall!! (We have a six week old baby and have been living in our house over six months and haven’t hung a darn thing, oops!!) Have you guys ever used the command Velcro strips to hang pictures? I’ve always wondered since it would prevent tons of holes in situations like this.
YoungHouseLove says
We have used those occasionally for lighter frames, but like to use Ook hooks or picture nails for bigger stuff like this. They’re great for smaller frames though!
xo
s
Iryna says
Wow, you guys make it seem so easy. I have 2 frames laying around waiting to be hung, but it’s taken me forever to choose the images. I finally opted for ready made prints found at Hobby Lobby. So now just need to cut the matting and hang them up! Great tip for using the laser to make sure the photos are hung at the same height!
Kim says
Hey, Guys! Love the gallery wall. Any tips for backing up pictures from iPhoto? I categorize mine by year and then by event but exporting them folder by folder into my external hard drive has turned in to quite the project.
YoungHouseLove says
We actually just keep one iPhoto folder for each year of family pics (ex: Family 2013, Family 2014). Since it orders them chronologically, events are grouped anyway, but they’re all in one place. We like to use external hard drives to back things up as we go (just replacing the Family 2014 data on that drive every week or so, so all the newer photos are covered).
xo
s
Angel p says
I’ve been slowly making a collage collection on my daughters wall with photos, maps, medals, and even a wooden crocodile toy that I picked up from a business trip. I used the Command picture hanging strips to hang everything and they have worked beautifully. No more accidentally hanging something wonky or too far apart and the bonus is that I don’t have to fill in a bunch of holes later. You can buy them at Joanns and use a coupon to get them a bit cheaper. As much as you like to hang things up and change things I think they would work for you as well.
YoungHouseLove says
Thanks for the tip Angel! Do you find they can hold up large wood & glass frames like this? I would worry these would be too heavy!
xo
s
Amanda says
I use them all the time, even for large frames and mirros. After selling our first house and having to patch and repaint so many holes in the walls, I swore I wouldn’t put any holes in our new house unless absolutely necessary. If you buy the large strips they say they hold 16 pounds each. The box comes with a chart that shows how many strips and where to position them based on the size and weight of what you are hanging.
YoungHouseLove says
Thanks Amanda!
xo
s
Shelby says
I am also in the middle of sorting through all my frames and art/photos to decorate the walls of our new place. Its such a daunting process, but I’ve decided to not over think it and just get some stuff up on the walls! Tweek and rearrange later if needed! I am hoping to not make the mistake of never getting everything up like I intended to do, but never got around to doing in our last place.
Looks great guys, gives me some motivation to get through it myself!
Jenna Pizzigati-Coppola says
Gorgeous- Love the colors and the perfect picture layout!! Gives the room a complete photo finished look…
Kudos,
Jenna
http://pizzigatidesigns.tumblr.com
Anele @ Success Along the Weigh says
Those look beautiful. I’ve been considering a gallery wall but am scared to death that I will screw it up. I don’t know which way I want to go with it…symmetrical or that kind of jumbly look that every one but me seems capable of.
YoungHouseLove says
Definitely try the paper template method Anele! It really does help you test run a bunch of arrangements before making a singe hole :)
xo
s
Michelle says
You all NAILED it! This gallery wall is so beautiful. I’ve always been so apprehensive about a gallery wall and you are really opening me up to the prospect at our new house. I am one of those who has the frames and just leaves the standard photo that comes with them and doesn’t change it to a family photo because I’m less than thrilled with the way they look on the wall. So thank you! :)
Diana says
Ahhh, I don’t think there is anything I don’t love about this. Love.
Kami says
What color is on the walls???
YoungHouseLove says
It’s Black Pepper by Ben Moore.
xo
s
Kristy says
Did you cut the mats yourselves? I like the different asymmetrical sizes of the mat openings and was wondering if you did that yourselves or if they came like that in the frames?
YoungHouseLove says
They came that way. We really liked the variety!
xo
s
Kristen @ LoveK Blog says
The photo wall looks great!! I love a house with lots of family pictures out! This weekend we added a ceiling fan to our bedroom. It’s not the most beautiful thing ever but it sure does make sleep more comfy!