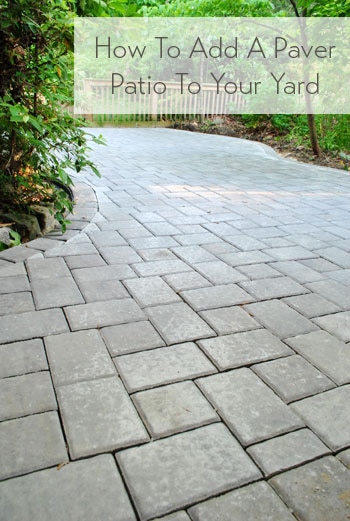
Hallelujah, the patio is done!
I’ve caught my breath a little bit and regained feeling in most of my muscles, so I’m back to tell you the end of the tale. Let’s see, where did we leave off? Oh yeah, with us me passed out on the mostly-laid pavers late Friday night.
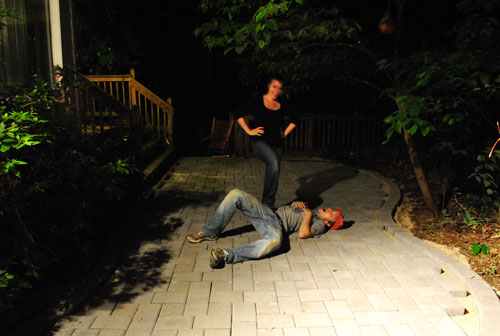
As you know from Sherry’s post yesterday, we took Saturday off to have some family time / start Mother’s Day early. Then on Sunday afternoon, I decided to take an hour or two to finish cutting the pavers around the edge. Apparently my day away from patio made me forget how much effort each step of this process takes. My “hour or two” turned into “seven or eight.”
Allow me to demonstrate my process to explain why. Naturally, curved edges require lots of cuts. This I knew going in. But residual confidence from tiling our old bathroom had me ready to take on this more-than-beginner design.
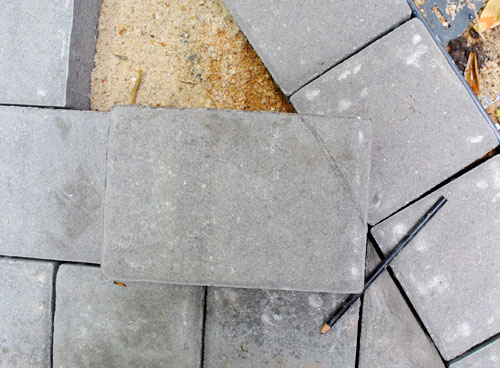
So to determine where to place each cut, I laid my full stone in place against the border pavers (which I’ve learned is called “a soldier course”) and marked where my cut should go (the area that overlapped the border) with a pencil.
To cut, I entrusted my brother-from-an-inanimate-object-mother: the wet saw. You may remember I fell in love with this guy during the bathroom project in our first house. But after all of the recent patio craziness, we aren’t so chummy anymore (we’re not “tight” or “aight” as the kids say).
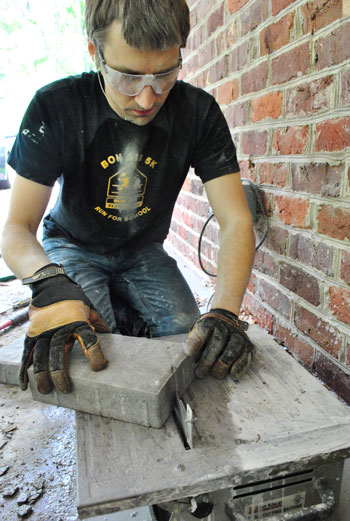
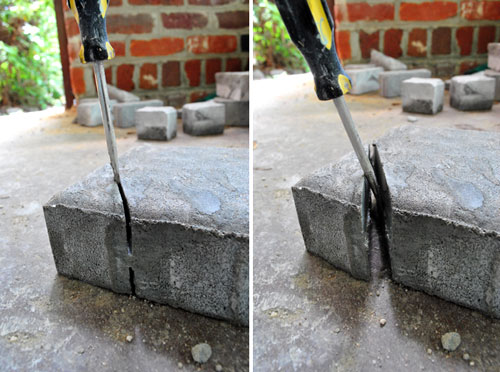
It’s really not the poor saw’s fault. He just wasn’t meant for this type of job. But since he was free (aka, on loan from my dad, who paid $99 for it btw) I wanted to give him a shot, instead of dropping $700 on his big brother. The issue is that my blade wouldn’t cut through all 2.5-ish inches of paver (those suckers were thick). So I had to do 2 cuts per paver – one, then another one from the other side once the paver was flipped over. Some particularly long cuts even required 4 trips down ol’ Wet Saw Lane because part of the machine blocked the whole stone from sliding through all of the way. And even after two to four cuts per paver, I still had to break the stones apart with a quick chisel-like move (thanks to a hammer and screwdriver) to smash the piece in the middle that my blade clearly still couldn’t reach:
So multiply two to four cuts per paver by the 50+ stones that needed cutting and you’ll start to understand why it took me so long. That $700 big daddy wet saw was starting to look well worth the money by about hour three. But I’m cheap. So I stuck with the borrowed (free) one.
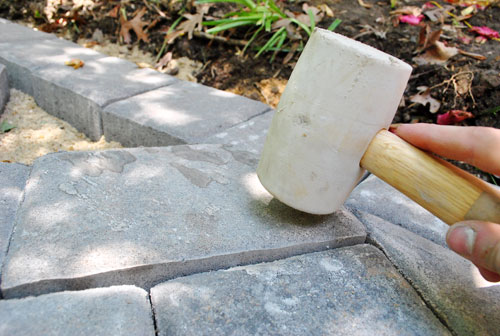
Assuming my cut was accurate (which it wasn’t always, unfortunately) all I had to do was lay the cut stone in place and tap it down gently with a rubber mallet (which we used when setting all of the pavers in the middle and along the border of the patio as well, just so they sunk slightly into the bed of sand and were level/secure).
Despite all of the hassle, when it works – it’s a beautiful thing (plus I later learned that the sand that I’d brush between the stones would camouflage some of the less perfect cuts really well).
By the end of Sunday I had finished all of my cuts and even had enough energy to remove and re-attach one of our sagging gates (it threatened to scrape the stone a bit when closed).
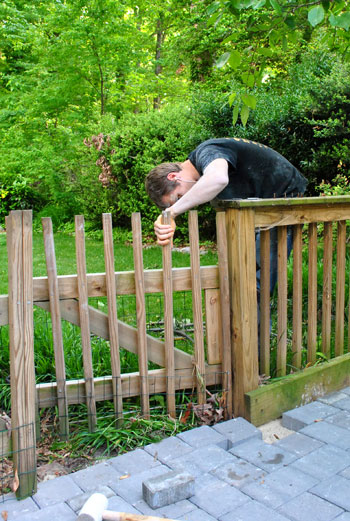
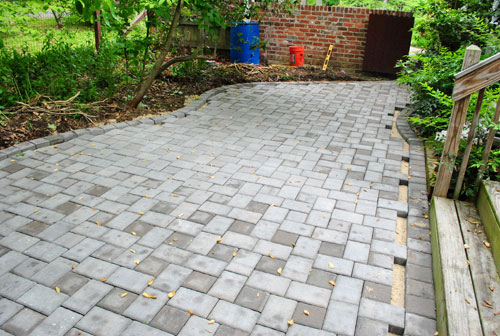
So here’s the patio in all of it’s pre-sand glory (the whiter edge pavers are just lighter from wet saw dust that hadn’t been hosed off yet).
And here I amid all of my post-paver cutting sexiness. Happy Mother’s Day to Sherry, right? That’s spray from the wet saw all over my shirt and face (thank goodness for goggles, wish I had bought a mask). And notice the yellow hands? That’s some sort of strange stain from my work gloves (apparently they don’t like getting wet).

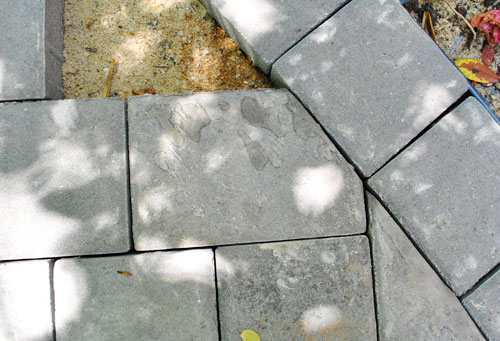
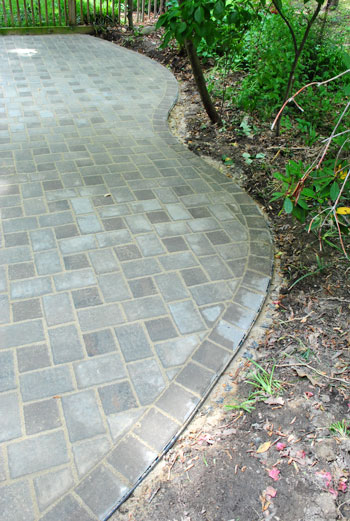
Oh, and since I promised more info about the pattern – here it is a bit closer:
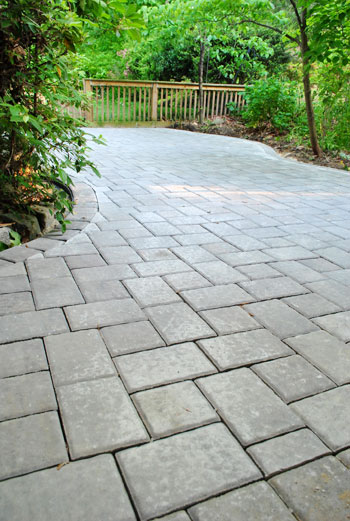
We’ve heard it called both an “I Pattern” and a “K Pattern” (so feel free to split the alphabetical difference and go with “J Pattern”). Although sometimes I see it as more of an “H” – made up of two 6 x 9″ pavers and four 6 x 6″s – and flanked by more 6 x 9″s on all sides. There’s a diagram here that might make seeing the whole H thing more clear than our pic above.
The reason we opted for this pattern in the first place is because it’s what the previous owners chose for the pavers in our driveway (and we wanted a cohesive look). Plus we like that it looks sort of like organized chaos. It appears random but there’s really a method behind it all. We’re nerds for that stuff. The lady at the stone yard warned us that it can be more difficult than some of the truly random patio patterns, but we honestly found it pretty straightforward once we got our first few pavers down. We just constructed one or two of those H-looking shapes and built out from there.
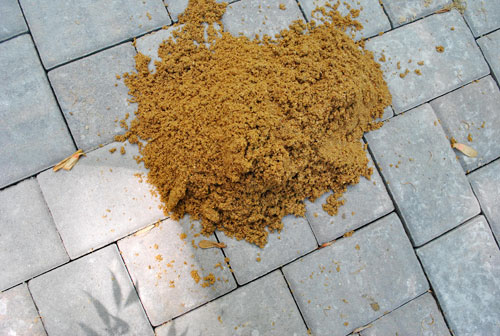
When Monday rolled around, I prepared for the final step by breaking out a broom and some leftover bags of paver sand (when I ran short on Friday and grabbed sand at Lowe’s, I must’ve overcompensated a bit so I still had a lot left). The purpose of this top application of sand is to fill the cracks between the pavers so they don’t shift. The process was pretty straightforward. Step one: dump sand on pavers.
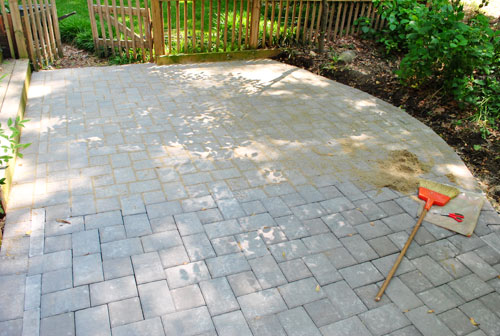
Step two: Push it around with your broom ’til all of the cracks have sand in them (this was just from one bag so far):
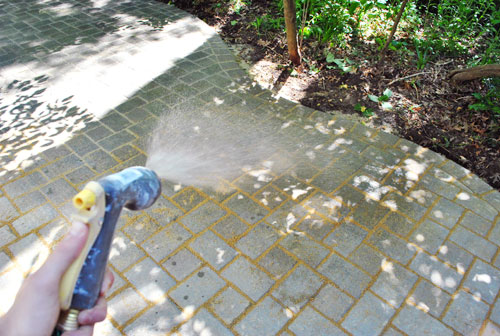
Step three: lightly mist the surface with water so that the sand slides down into the cracks.
Though it really is more like a twenty step process, because like shampoo-ing, it’s one of those “rinse and repeat” situations (or at least it was for me). See, my wet crack sand (wait, that sounds gross) did a lot of sliding between the pavers – making things not so pretty on top.
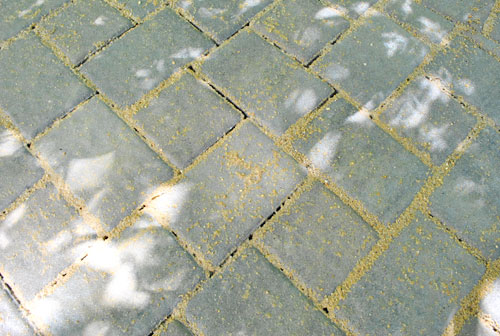
So I repeated. And repeated again. And then did some touch ups. This step seemed to take longer than I expected (consider it to be the theme of this whole project) but by Monday afternoon it all seemed pretty settled into place for a consistent and even look. And happily the yellow-orange tint to the sand disappeared when it dried out (it was really wet and clumpy when we applied it but it thinned and dried to a nice complementary gray tone).
Oh and here’s a note for all you fancy patio DIYers. If you have it in the budget you can splurge for Polymeric Sand (which basically gets brushed on and then misted with water, which turns it into a concrete-like consistency so it sets up hard to discourage weeds and all that good stuff). But thanks to our bursting patio budget, we opted to use standard paver sand which was about $100 cheaper (it was used on the patio at our last house which we enjoyed for 3+ years without much more than very occasional weeding so we knew it would work for now). And we can always upgrade to the good sand later (if we have $100 to spare down the road, it’s as simple as spraying the sand out of the cracks with the highest hose setting and switching to the fancy Polymeric stuff).
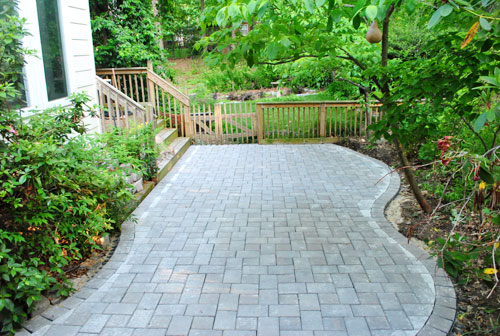
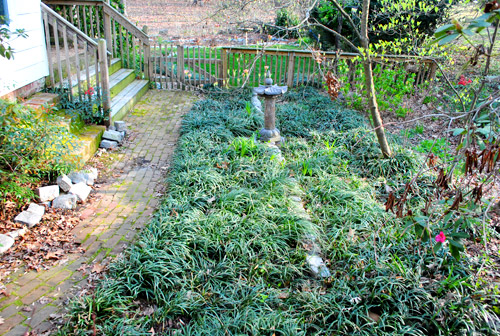
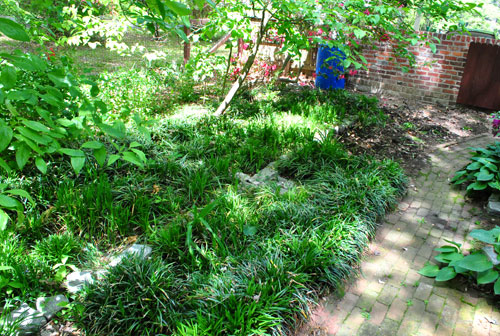
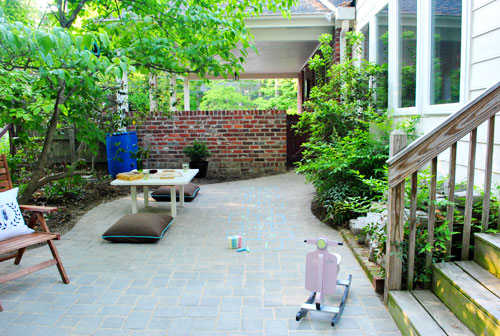
Anyway, with my sand step done, I jubilantly (yes, I was beyond excited to be almost done) moved on to my last task before handing things over to Sherry, which was backfilling the edges of the patio with dirt (since exposed plastic edging is akin to VPL). I forgot to take an “after” of my borders all filled in with dirt, so let’s fast forward to the real after afters. But first, let’s enjoy a look back at two liriope-filled before shots:
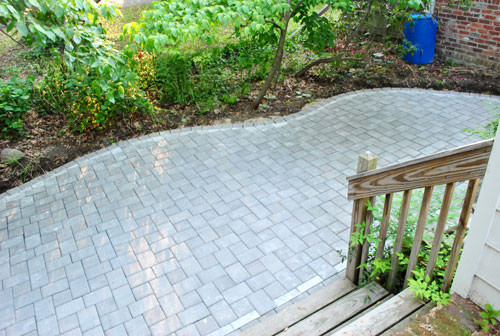
And now the patio-tastic after fest- complete with totally temporary furniture:
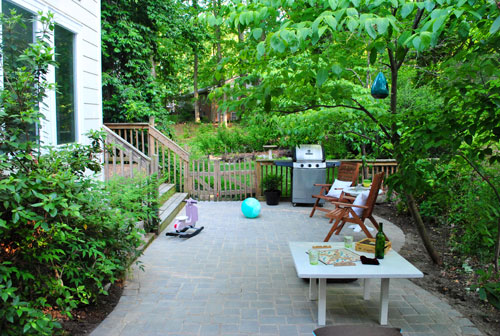
Since we sold all of our old patio furniture before we moved (which wouldn’t have worked well in this layout anyway) this is all random stuff that we had in the sunroom/basement/cluttered playroom. Actually a lot of it isn’t rain-proof at all, so Sherry just dragged it out there for fun (yes, after pics with temporary furniture is her idea of a good time because she thinks an empty patio reveal would have been “a real womp-womp”). I definitely agree that it helps with scale and stuff (and who am I to deny my wife of an hour of playing with already-owned pillows and random furniture?). I think we both just liked the idea of beginning to picture various ways that we can enjoy our new 300 square feet of added outdoor living space. And of course it’ll look a lot better with not temporary furniture when we can invest in some down the line.
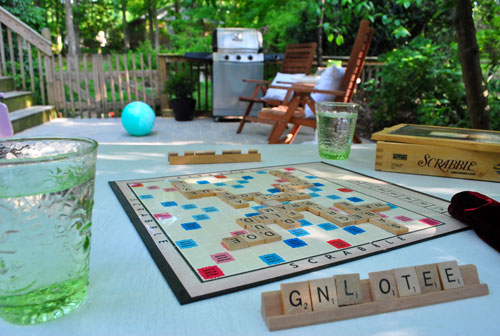
Our long-term dream is to have some sort of daybed/loveseat with a coffee table to create a casual “outdoor living room” along with a spot for a sandbox slash baby pool for Clara. Because we have plans for a big outdoor dining zone somewhere else (but with an “outdoor living room” situation on the patio, we could still enjoy casual meals there).
Of course Sherry went nuts with the whole fantasy world and played scrabble with herself to conjure up this cozy scene (and even got two water glasses to suggest that she wasn’t out on the patio alone playing against herself). Busted.
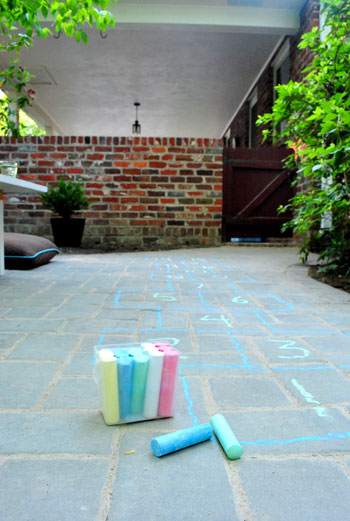
But speaking of playing, we do seriously hope this is a space that Clara gets a lot of use out of. Since we no longer have that huge driveway behind our old house, we’ve wanted a spot where she can be outside, minus the fears of her running into the road. So this gated-on-all-sides area is perfect for whenever she doesn’t feel like playing in the grassy backyard beyond. Because chalk just isn’t as much fun in the grass.
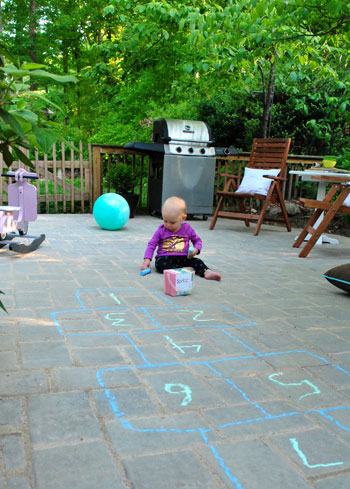
Although Clara may be a few developmental milestones away from actually enjoying a game of hopscotch, at least it’s not too soon to tap sticks of chalk together.

And she only tried to eat it twice. That my friends, is progress.
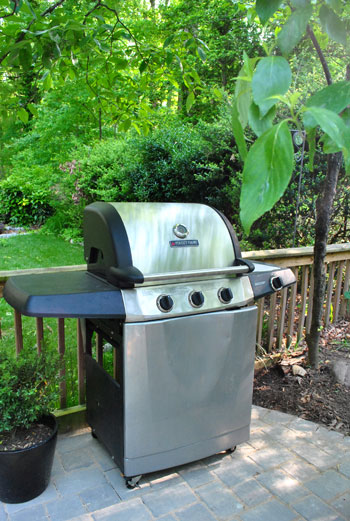
The only item in our 100% temporary patio layout that will be permanent is the grill. It’s been hiding in my basement workroom since we moved because I had no other spot for it (it lived in the carport for a while but that was just weird). So from the moment we first started talking about Project Patio I had an area all planned out for this baby. And although I’m talking like I’m some big macho grillmaster, I’ve probably used the darn thing less than a dozen times. Hopefully its beautiful new home will inspire us to get better acquainted. Especially when we get some permanent outdoor furniture to go with it.
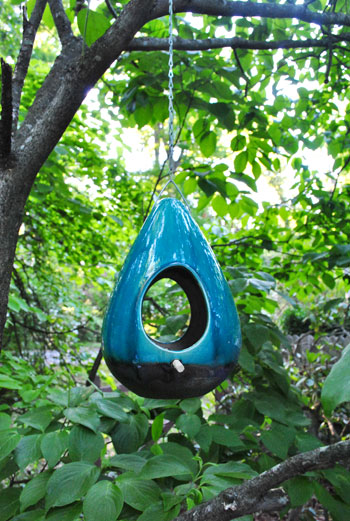
As for Sherry, she’s more excited about the “crowning jewel” of the patio as she likes to call it: a ceramic bird feeder that she snagged at Marshall’s for $9.99 a few weeks back. It’s been sitting on the counter next to our bathroom sink (away from roaming Clara hands) just waiting for a new patio to preside over. And it looks a heckova lot better out here than it did near the sink.
So there you have it, the end to our patio-building party. And it’s just in time to start setting up for the real party (Clara’s birthday on Saturday). Perhaps we’ll challenge our guests to some hopscotch?
We wouldn’t mind a few crossed fingers for good weather this Saturday. It rained on Clara’s birthday last year so we unscientifically decided that it couldn’t rain again this year (although the odds are probably the same every year). And as soon as we finished the patio I turned to Sherry and said “You know what this means right? We finished the patio in time so it’s going to rain on Saturday. We jinxed ourselves.” Here’s hoping I’m wrong.
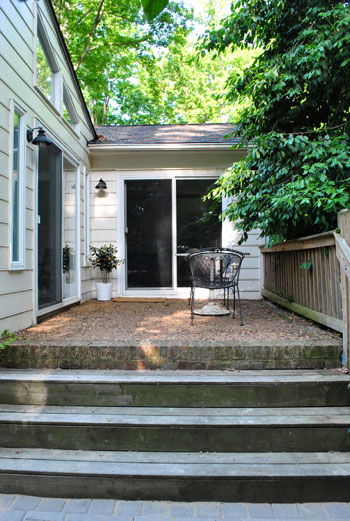
Oh and here’s a rarely seen angle taken from the new lower patio looking up at the upper patio (which was always there) and the sliders in the living room and sunroom that lead out to it. That area was too small to accommodate our grill (let alone any larger seating arrangements) so we’re so glad that we expanded our outdoor living space with the addition of the paver patio below.
We estimate that we spent about 30 hours on the whole patio project, from planning to clean-up (but we did mess around with lots of curves and hit some crazy concrete during the demo phase, so it won’t necessarily take everyone that long). And now for the big ol’ budget breakdown:
- 300 square feet of Cottage Stone pavers (from Southside Building Supply): $621
- Heavy duty plastic patio edging and spikes (from Southside Building Supply): $69.00
- Paver sand (from Southside Building Supply & Lowe’s): $107
- Gravel (from Southside Building Supply): $240
- Delivery for pavers, sand, and gravel (from Southside Building Supply): $145
- Miscellaneous supplies (wood stakes, line levels, nylon string, and hand tamper from Home Depot): $40
- Weed blocking fabric & crampons (from Home Depot): $30
- Grand (ouch) total: $1,252*
*We actually paid $1,332 but got an $80 deposit back when we returned the bags that our gravel and sand came in.
We already chatted about how our original under 1K budget was blown here (well, in the waaay beginning Sherry proclaimed that this would be a two-day-under-$500 project, how wrong she was). But in the end we’re happy to have spent what we did and to have worked our buns off to save nearly 4K instead of hiring a pro (estimates for a patio with curves of this size started around $5,000). Totally worth the blood, sweat, tears, and creepy orange glove-stained hands. But if you’re asking me if I’d do it again tomorrow, the answer is: chiiiill. Let me relax for a hot second.
Psst- Want to look back on the entire patio process from beginning to end? Here’s the first post (about planning), the second post (about prepping the area), the third post (about unexpected budget breakage), the fourth post (about further prepping the area), and the fifth post (about adding the gravel & sand along with the majority of the pavers).

Allison says
Sorry to request more work from you on this subject, but would you add on a video tour of the space at some point? I’d love to see how it transitions from the carport. It looks so good!! Hooray for more livable space!
YoungHouseLove says
Sure! Plus if it’s nice weather this weekend and the party is outside I bet the pics for that will help orient you (since we plan to have people in the carport, the lower patio, the upper patio and the sunroom all milling around. Oh man, but by the hour rain seems more likely. Boo.
xo,
s
heyruthie says
gorgeous! i am so impressed.
was it really only 30 hours of labor? wow! it actually seemed like a lot more, reading it on the blog. i couldn’t believe how much work it was! (does that include both the patio and the liriope digging time?…and John, Sherry and friends who helpd?) my muscles have been sore all week on John’s behalf…
YoungHouseLove says
Yup, those 30 hours include everything (although it’s an estimation so it might be off a few hours each way). Even with long eight hour days, it takes a few of those to add up to 30, and of course digging and stuff were just a few hours at a time! Haha. John thought it would be longer too but we added it all up, and bam: 30 hours.
xo,
s
carolinaheartstrings says
Job well done! It looks spectacular and I cannot wait to see how y’all “decorate” it.
Frances Bentley says
I nearly spit my drink all over the keyboard when I read “wet crack sand.” It made me laugh so hard. You guys are going to just love that patio…it’s beautiful!
Ekaterina says
WOW! It looks UNBELIEVABLY AMAZING! Great job, John! And Sherry and Clara are just adorable! Such beautiful and lucky ladies :)
Lindsay says
Oh man, it looks FABULOUS, you guys! I’d definitely hire you to come make us a patio! (You travel to Los Angeles, right?)
In other news, the only sure fire way to ensure it doesn’t rain for your party is to have a bunch of umbrellas at the ready. Works every time. ;)
YoungHouseLove says
That’s true! Maybe we need to buy ten along with a big tent. Haha. It’ll be hot and dry.
xo,
s
heather says
Lindsay! You just made my day haha. So, the fact that we (we meaning my fiance) just finished putting the steel roof on our barn, and the fact that we rented a huge tent for our wedding in a few weeks DEFINITELY means it will be totally dry. Right?
Rhiannon says
Looks Awesome John! We’ve been laying our patio for eight months! You Rock!
justine @ you're so martha says
it looks really, really great. great job! and thanks for the play-by-play for reference if needed.
libbie says
Looks great! Bravo to John for all the hard work! I have a feeling you guys will be spending plenty of time out there grilling and chilling as a family. Enjoy!!
Manda says
This is amazing — you should be so proud of yourself! I would never have the courage to take on a project like that.
Stacey says
GAW-JUS!!!
Wish hubby and I had half your design sense and an ounce of your motivation! (I’ll blame our being 10+ yrs. older w/ 3 kiddos ;) )
Crossing my fingers, toes, eyes that Saturday is sunny! My boys’ bdays are 5/25 & 5/26, so I’m all too familiar w/ obsessively tracking the weather during mid- to late-May.
Ashley says
Looks amazing guys! Great job!
I love that John came out of it looking a lot like a mime. : )
Christin says
Wow! Great work! That is seriously fantastic. Oh how I can’t wait to have any outdoor yard/living space!
Lena says
Wow – it is absolutely amazing!! You guys could put contractors out of business. I swear, you guys make me want to buy a hoome and rehab it, but my husband and I are not as handy as you two are. We are buying a nice size condo with a not so pretty kitchen. Our patio is so tiny (4X4) that all it will have is a grill and herb planter hanging over the edge. Please please please can you house crash some folks who live in condos that have done some minor-ish, $$ conscious kitchen redos? Thanks for keeping us educated and entertained in your construction and decorating advertures.
YoungHouseLove says
Yes! We’re equal opportunity house crashers! Anyone with a fab condo or apartment is welcome to email us! We’d love to snoop around.
xo,
s
Trude says
It looks absolutely amazing! You guys must be so proud! Back when my family moved from a condo to a “real” house with a big patio, my parents invested in a Tropitone patio set and it still looks almost as good as the day they bought it – after 3 kids, tons of parties and several pets! :) Its kinda spensy, but they haven’t had to replace anything in 15 years.
Candice says
Wow! So impressed! Okay John, you must officially STOP referring to yourself as a nerd now. I hereby knight you “Maize Hands Mighty”. Unfortunately, in creating this nickname, I accidentally increased my overall nerdiness. But it was for the greater good…
Have a GREAT first birthday party for Clara!
YoungHouseLove says
Haha, so honored to be knighted. Knights can still be nerds, right?
-John
Hallie says
Hey Guys–congratulations and good work!! I am impressed and TOTALY INSPIRED by your efforts and excellent results–sewing, too!!!!!!
I want to thank you for the level of detail you provide. I love each and every excruciating detail. And I’ve read your statement that you are not against bloggers receiving free stuff for their use, but I thank you very much for your decision not to accept such gifts.
Because I read decorating/home blogs for inspiration, ideas, and especially how-to, I am often discouraged by the magical appearance of the “best” thing during a project. I am much more interested in the “we did it ourselves” or “we saved up for six months by eating dry pasta” or “we cut corners here and splurged here” stories.
Once again, thank you and best wishes!
Lisa T. says
John, you are a rock star! Amazing work on your patio!
Steph says
It looks great. My husband has been working on our patio for nearly 12 months. You’re amazing.
K says
Oh, wow…so much work. It looks lovely though!
LARY says
Love it! Great Job John! Sherry and Clara are very lucky! The final pics Sherry are too cute! I would’ve recreated something for the final pics too! hehe
It looks so inviting! :) Now you guys can just create great memories out there as a happy little family… Hope Burger loves it too! :)
Carolyn says
Love it! Great place to enjoy the spring weather. I love the bird feeder, have the squirrels found a way to get at it yet? We always have such a hard time keeping them out of the bird food no matter what we do or what type of feeder we get.
YoungHouseLove says
Nope, but it’s probably because we haven’t added food yet. Haha. Once we do we call them squirrel feeders.
xo,
s
Diane says
Gorgeous! Congrats on all your hard work!
Maya says
It looks AMAZING… I’m not even that big of a fan of pavers, usually… they usually look too “new” to me, I like a rustic look… but I LOVE your patio! It seems to fit so well with the nature around it!
Oksana says
You guys are unbelievable! Doing the patio on my own would have been total rocket science to me. Good for you and I can’t wait to see what you do next.
Oksana from http://www.ordermatters.com/blog
Nicki says
OH my goodness! It looks so so amazing!
Erin says
Great job John! I’m so impressed. It looks really, really good. And it only took 30 hours? If I were to do it, I’m sure it would take a good 6 months.
Jessi E says
It looks amazing! Great job-probably one of my favorite projects that you guys have ever done.
Alicia says
I can’t imagine all the hard work and sweat that has gone into this patio. It looks AMAZING. Totally professional. Nice job!
gemma@thesweetestdigs says
WOW! What a transformation. I’m sure you guys will get great use of that new space over the summer.
Nice work!
Christine says
That looks so AMAZING! I know you guys say you are just normal, homeowning DIY’ers, but this proves beyond a doubt that you both in fact posess some sort of ninja-turbo-home improvement gene. The NTHI gene.
karen @ our slo house says
It’s absolutely gorgeous. You did such a great job!!
Although, John… I’m a little suspicious of your yellow hands. Are you sure you weren’t trying some experimental self-tanning techniques?? ;)
YoungHouseLove says
Haha, he’s all about the hand tan.
xo,
s
Kay says
you guys as usual knocked it out of the ballpark! it looks really good and like other have said-you make it look soooo easy….mad props John!!!
Alexa says
You did an AMAZING job!!! And $1200 is still a great cost. Just think, you did $3800 worth of labor! That’s $126 and hour you saved yourself. Pat yourself on the back, and take a few days off.
Sarah S. says
WOW!! Way to go guys! You did an amazing job. I bet it feels great to have it over with so you can enjoy the fruits of your labor. That patio is going to get a lot of love!
Kristi says
John is a machine! Seriously, I’m so impressed that he did that all by himself. Sherry – I think you owe a certain husband a nice long backrub tonight… and every day for the next week! ;)
Carla says
There’s nothing I can add that hasn’t already been said, except for maybe this: I’m probably one of the few visitors to your website that feels a tinge of sadness every time I come here. I’m childless and husband-less and now in my 40s. And my life long dream of owning my very own little home is feeling increasingly distant from me.
So I feel sad when I see such a loving family and lovely home. But it also gives me feelings of hope that maybe someday I’ll have a special place to hang a beautiful green bird feeder just like yours. But it’s not going to happen with the crazy real estate prices in California. I’ve been dreaming of Kentucky for years and can already feel a sweet little cottage there waiting for me to get my act together.
Yippeee!!!! (Man, life would be rough without hope.)
Carla says
(Ugh, what a soppy whine. What are the chances you’d be kind enough to delete that last comment of mine? Thanks!!)
Jill @ Mission Decorate says
WOW! Very impressive and professional. This is where your amazing attention to detail really pays off! When you find a spot to get quality but fairly priced patio furniture (or come up with a an even better YHL idea)let us know. I have a huge and empty patio that needs some love!
Katie Truelove says
Congrats! It looks awesome! Sooo jealous of that bbq as well:);)
Amy says
This is A-MA-ZING! Was wondering if you think that it would have saved any time if you made the patio rectangular?
YoungHouseLove says
Yup, most definitely. John’s curved cuts took him about 2-3 hours longer. But in the end we’re so glad we went the extra
milehours. Haha.xo,
s
Valerie says
Thanks John for introducing me to the acronym VPL! hahahaha! So good!
Jenn says
You guys are amazing… We started our patio project this weekend ( total of 387 sq feet for a front walkway and back patio) and my wrists and back are killing me. Thank you for pointing me in the right direction for tutorials! Seeing your progress makes me want to knock this baby out this weekend. Hope you enjoy some gorgeous weather! Alaska hasn’t warmed up quite enough yet ;-)
Cate says
Your patio looks absolutely gorgeous–this is by far my favorite project that you have done in your new home so far!
I have to admit though, when I scrolled to the picture of the hopscotch drawing, I found myself with my hand over my mouth, and a “NOOOOOOOOOOOOO” escaping from my mouth. And I may or may not have almost spilled my coffee. I know it’s only washable chalk, but I just couldn’t bring myself to draw on something so gorgeous and brand new. Sherry, please hand over your anal-retentive type-A cards. They are hereby revoked! ;)
YoungHouseLove says
Haha, picture me virtually passing them your way as I type this. Hilarious.
xo,
s
Wendy says
I thought the same thing!!
Kayla says
I’m in love with the patio! It looks amazing! Great work you guys!
liz tsang says
way to go, john! not just for the fantastic patio, but for the vpl reference… that killed me :)
Future Mama says
I LOVE IT! Well worth all the hours, I think :-) Can’t wait to see it in full action for the big birthday party.
Much love,
Future Mama
http://expectingablessing.blogspot.com/
Becky S. says
It looks gorgeous!!!! Way to go John! And I was super amused that you used the phrase “organized chaos” and said you like that! My husband is all about organized chaos. I gave him our over-sized garage (more like a giant barn really) to use as his “man cave” because I can’t stand chaos in any manner…organized or not! When I go out there, I often wonder how he can find anything in the mess, but he knows right where everything is…even if its not neat and orderly the way I like things. And I thought he was the only weird person that can funciton like that! (Not that I am calling you guys weird or anything!).
Katie says
was well worth the hard work and frustration. looks amazing, especially love the pattern! thanks for the inspiration :)
Zoe Feast says
Fan f**ing tastic! Wonderful job. Have you ever played rude scrabble. You get an extra 10 points for any rude or vaguely rude word you put down!
YoungHouseLove says
Ooh I like that. We’ll have to play that tonight. And if John’s not in the mood I’ll just challenge myself. Haha.
xo,
s