Oh what a feeling… dancing on the ceiling. Which is much easier when your ceiling is on the floor.
But let’s rewind to a time when our sunroom ceiling was more ceiling-like. We’ve mentioned we wanted to try vaulting the ceiling in here to make it feel even more open (here’s a link to some of our inspiration). We’ve never vaulted a ceiling before but we figured this was a pretty low-risk spot to finally give it a go.
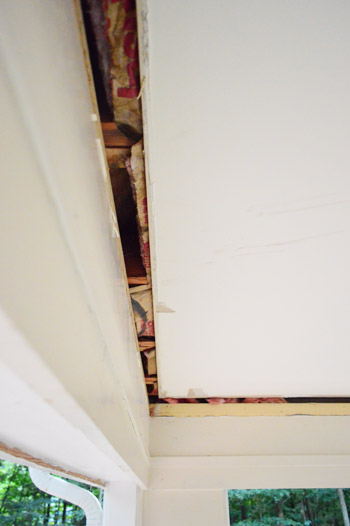
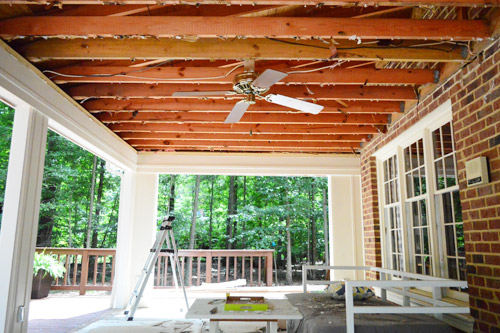
We realized from the start that we might need to hire a pro for part of the job since structural ramifications like “the roof could cave in” is one of those failing answers to our “what’s the worst that could happen if we DIY it?” test. But we figured we could at least do the demo part ourselves (just of the ceiling, not of any support beams). Why pay someone else to tear stuff up when I could have all the fun myself, amiright? So I started by turning off the power to the entire house (always a good first step when you’re ripping things apart) and then I got busy prying off the crown.

That step revealed what we were both expecting (I guess?): insulation and some sort of wood framing.
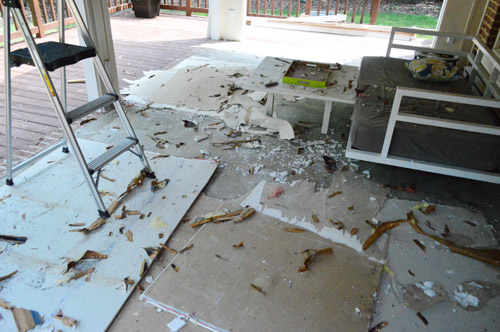
The ceiling itself was some kind of moisture resistant drywall, which surprised me because for some reason I assumed it was plywood like the walls. So my plan to meticulously cut and pry it out turned into “let me just pull on this a little bit to see what happens…”
One down, about 5 more to go!
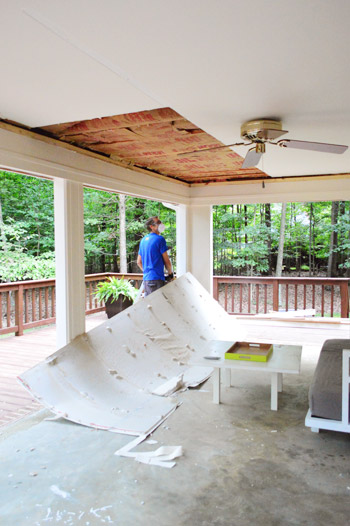
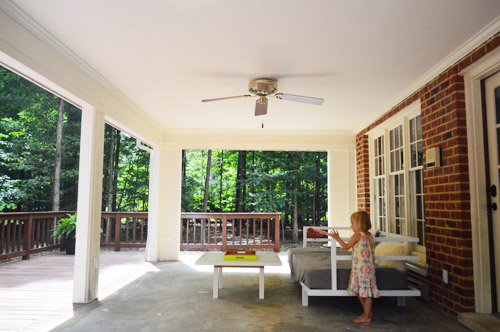
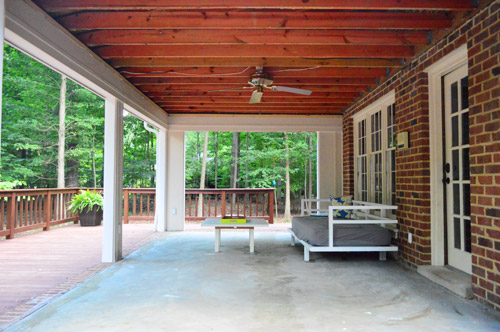
That should have been the moment where we moved the daybed and the table out of the way, but we just got so excited to bust things out and the drywall was surprisingly light (especially compared to the idea of it being plywood). Both the daybed and the table are on our “need a new paint-job” list as well, so I think that made us less protective of them, but thankfully no furniture was hurt in the making of this post (you can see it all alive and well in the last shot).
Taking it down was pretty easy, very satisfying, and apparently highly entertaining. Get this girl some popcorn!
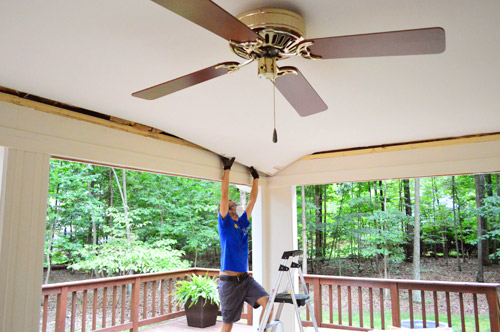
It only took me about 15 minutes to get the whole ceiling drywall-free. That was the easy part. I was even able to get it out around the fan which I probably should’ve just taken down – but the drywall was so pliable that I could easily pull it down around the fan without damaging the blades. In the end it was nice to keep it up there in case this phase of ceiling reconstruction takes weeks (so we can still stay cool while we work).
With the drywall down, I turned my attention (and my mad pulling-things-down skillz) to the insulation.
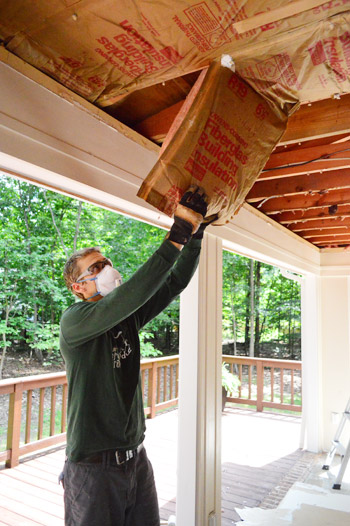
It too came down pretty easily, although it took a few hours (spread across a few days) and I filled about eight big garbage bags with the stuff.
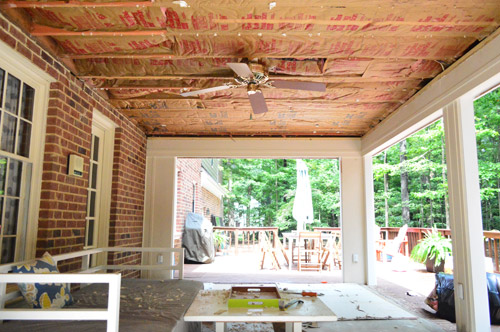
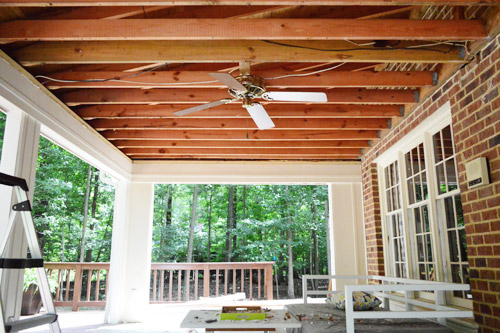
Here’s a shot where you can better see what it looks like up there. We love all of the rafters way up there for eventually nailing beadboard to. It’s just all of those lower joists that are in the way.

I’m not an engineer so it took me 0.0002 seconds to admit that I had no idea what to do. A reader named Kate commented with how they dealt with a similar situation in their home, but I wasn’t feeling gutsy enough to assume the same method would work for us. So my next step was tidying up the still messy looking joists by prying off all of the leftover drywall nails and lingering insulation.
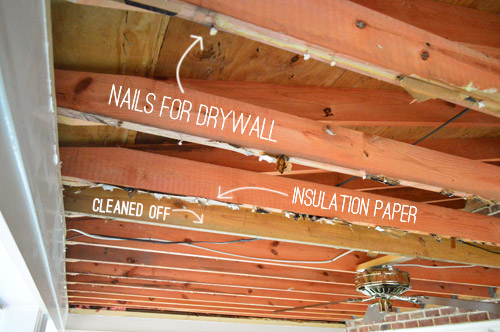
If we were going to have to wait for a pro to lend us a hand, at least the exposed wood could look a bit less scraggly, right? And that way when we finally get to tear it down (fingers crossed) we won’t have to worry about all of those half-sunk nails piercing us on the way down.
So this is where we are now. Just waiting on a pro for more info about how to proceed (he’s coming this morning actually). I feel like if this were an HGTV show this would be the part where the homeowner “happens to stop by” mid-renovation, freaks out about how torn up their house is, and confesses to the camera that they doubt the designer will ever get things together but will just have to trust him. So yeah, the homeowner in us is a bit uneasy by not having an exact plan yet, so we’re waiting with bated breath for the doorbell to ring.
At least while we wait we got to cross a few more things off the to-do list in here. Does this mean we’re halfway there? Maybe after we finish lofting…
Rip up the old carpeting(check that step out here)
Remove the sliding doors and tracks to open things up(we did that here)
Convert outlets to outdoor-safe rain-proof ones with covers(we also did that here)Add fresh casing to the openings and caulk like crazy to waterproof everything(here’s the post about that)
Demo the old ceiling in hopes of possibly lofting the ceiling (get a pro in here for advice)- Remove old beams, reinforce ceiling stability, and install painted beadboard
- Add a hanging ceiling fan (or two?) and possibly recessed lighting or hanging lanterns from posts
- Repaint the columns and interior of the sunroom with exterior paint
- Tile the floors with something outdoor-safe that’s less slick than the glue-stained concrete (we’ve already been poking around a few tile places…)
- Get a rug, furniture, and maybe even add some outdoor curtains?
- Build an outdoor fireplace like this down the line
Until we have some “this is happening next” info, we’re turning our attention back to some indoor projects. Thankfully I don’t think any of those will involve ripping down any more ceilings, as much fun as this one was…

Jerrica says
What do you guys do with the garbage bags full of stuff when you are done? Do your garbage men take them, dumpster it, haul it to the dump, store it in the garage? We are DIYing our house too and this is a problem we have yet to find a great solution for! Seems like everything makes its way to the garage and then before you know it, it’s time for a dumpster. There has got to be a better way!!
YoungHouseLove says
We are allowed to get two trash cans picked up each week for trash day, so we’re planning to use a second one full of three bags a week or so to get rid of the insulation over a series of weeks. you can look into renting a Bagster through Home Depot too (we’ve done that in the past for a ton of scrap wood and junk from our last house’s basement).
xo
s
Alex the air hostess says
I posted a listing on Craigslist free to get rid of most of my removed materials. I got rid of lots of insulation from my garage ceiling, I listed where it had come from and suggested it should be used in non-living space functions (garage, shed, fish house, etc.). Got 19 responses of people wanting my used fiberglass insulation. I was very happy to keep it out of the landfill.
Tess says
We have an outdoor covered porch and put up a screen for outdoor movies…Best thing ever!!! Put a valence over it and nobody notices until it’s movie time!!
Emily @ Life on Food says
I would be excited and freaked out all at once. It looks like an amazing space. I hope it all works out the way you want.
angel says
So exciting!
Cindy says
When we added a screened porch to our house (totally necessary due to mosquitoes, a heavily wooded back yard and a husband sensitive to all insect bites) we had the ceiling vaulted and added two skylights (should have added 4)and an outdoor ceiling fan. Even though it seems very light to you do consider skylights. Our porch ceiling is vaulted and finished with beadboard and instead of painting it we left it natural and sealed it with spar varnish. It’s awesome so I think you should consider leaving it natural especially with a tiled floor and your white trim.
Geri Hand says
Have you considered staining the concrete or having a stamped concrete on top. That would be a lot cheaper than tile. I’ve seen it where the concrete looks like wood decking. Perhaps something else to explore.
YoungHouseLove says
We have thought about that but we have noticed that since Clara’s feet are often wet from her water table or baby pool, the concrete is crazy slippery. So we’re worried that going with more concrete would continue the slippery issue, whereas they sell stone flooring that has nice “grip” to it and is meant to be outside. We’ll have to see where we end up though!
xo
s
Charlotte @ Ciburbanity says
What a pleasant surprise to hear about a demo project NOT riddled with unforeseen issues! Every time we go to open up a wall, there’s ALWAYS something unexpected in there. Looks amazing!!
Also, I think that ceiling space is just screaming for a great mural of the family floating in the clouds a la Modern Family or the Sistine Chapel. Just go for it!
xx Charlotte
Lauren says
This project is so exciting!
How did you go about finding a someone to take a look at this? We’re thinking about buying a house that has a wall inside that we would like to remove, but we don’t know if it’s structural or not. What kind of “pro” would be able to tell us? An engineer? Contractor? We’re lost :)
YoungHouseLove says
I would have a home inspection if you’re going to buy it and the inspector can look around and usually tell you what’s going on, who you will need to hire, and can even give you a ballpark price range and a recommendation. I would also check out Angie’s list for recommendations if you don’t have a friend or neighbor or relative to give you advice. As for this project, an engineer or a contractor/framing expert would be great for the job.
xo
s
Brooke says
So jealous! That is (great already) going to be so cozy and awesome when it rains!
Kate says
I hope you’ll consider donating that insulation, or putting it on craigslist. We recently removed batt insulation at our house (to make way for spray foam insulation!) and put it up on craigslist for free. So many people wanted free insulation! We were just happy it would have another life.
YoungHouseLove says
Never even thought about that! Great idea!
xo
s
Juliane at Modern Mural says
This looks like it’s going to gorgeous. I love how just a little more space opens up the area so much more. Good luck!
Peggy McKee says
You might want to consider re-insulating the ceiling before you put on bead board. If the porch gets direct sun, it will stay cooler if it’s insulated. I like the rigid insulation, but it’s not cheap.
YoungHouseLove says
Thanks Peggy! We assumed since it’s so open to the air on all sides that insulation wouldn’t make much difference since there are four garage-door-sized openings for warm or cool air to escape. We’ll have to look into stuff and see if it would be worth it!
xo
s
Lizzy says
I agree with Peggy. Even after vaulting the ceiling, if you put a layer of insulation along the roof, that room should stay much cooler. I doubt it would make much of a difference in the winter but it would act as a barrier from the hot summer sun beating down on the roof and stop that heat from getting into your living space.
We are almost at the end of a 2nd floor renovation that has been going on all summer. We have had our windows wide open 24-7 all summer but when our roof was being replaced and reinsulated, we noticed a ridiculous spike in temp even on our first floor. Once the insulation was put back in the roof, every room of the house was significantly cooler – upstairs AND downstairs. We were shocked at what a difference it made to the whole house.
YoungHouseLove says
Thanks Lizzy! Never even thought about it!
xo
s
Kara @ Mates 2 Renovate says
I am loving watching this and taking mad notes so the Hubs and I can attempt to do something like this! I want my ceiling gone… a drop ceiling in a house is a ridiculous idea… our previous owners did some funny things.
Kim says
I’ve been curious to know at what point you call in a professional for help/advice! Thanks for answering the question…”What’s the worst that could happen” test!
YoungHouseLove says
Totally! If the answer is “we might have to repaint” we DIY it. But if the answer is “the house could collapse/flood/catch on fire” it’s time for an expert!
xo
s
Jaime Lopez says
I am such a huge fan of outdoor curtains in white. They add privacy, can block out the sun and really warm up the space. It could look really nice and balance out bringing the outside in and vice versa. Loving the updates!
– Jaime
Julianne says
I always feel so repetitive when I post, but man, you guys are amazing! It looks great already & I can totally visualize where you’re going with this. I can’t wait to see it all come together. So excited for you guys to be relaxing in front of a cozy outdoor fireplace on your comfy couch, enjoying a glass of something nice in the evening. What a special space you are creating! :0)
YoungHouseLove says
Aw thanks Julianne!
xo
s
libradesigneye says
S & J,
Just a note for the finishing touches. I could not believe my eyes what hanging curtains did for my covered patio. I also was really pleased that I went for a muted color (in my case / brass or gold / that worked with the tan color of my posts, my exterior peanut butter stucco wall tone, and is a different hue of the pale honey tone on the walls in my family room adjacent) instead of the standard white. My california ranch has a tile roof so I avoid bright white on the exterior in favor of winter white.
Here’s why I write – I looked long and hard and being thrifty gal, would not go for buying the expensive outdoor curtain rods I saw for sale. Didn’t even want to pay for indoor rods that linked due to length to cover like yours – my “veranda” is 33′ feet long and I needed 8 curtain panels just to frame each “opening” since I have more posts.
For my hardware, I used stainless cable from home depot linked to a turnbuckle at each end – hd sells the hardware to put a loop end / crimp and attach these to turnbuckles.
One turnbuckle is too large / goes on the house first / for my grommet topped curtains but won’t come down in a storm and one that fits right through the grommets like a curtain rod. I set stainless eyebolts to support the cable at intervals along my beam just like you might use curtain rod support anchors. I put the eyebolts centered on each bay since I wanted the curtains to hang by the posts most of the time and knew the cable would naturally sag a bit between eyebolts and tend to send the curtains to that low point. Now, you do have to thread the curtains on as you run the cable thru each step, but the cost of the stainless cable and crimp hardware, eyebolts and turnbuckle were 25% what drapery hardware would normally run and it disappears from the eye completely. I also confess to waiting until jcpenney had non-exterior curtains on sale for less than $15 a panel since I had to buy so many. Three years later, they have faded a bit, but are strong as new – and living in socal, i have left them up year round, which is roughly akin to 6 – 9 east coast summers – if outdoor curtains last 10 summers, i think you’ve got your $ from them and I got my $ out of these the first year since I got them for a steal. Helped that I wanted that funky color no one wanted in their living room . . . .
just an idea for you as you figure out what you want – nnothing says you can’t orb out stainless cable for contrast . .
YoungHouseLove says
Thanks for the tip! So crafty of you!
xo
s
Caroline (the DIY nurse) says
I didn’t expect you to tackle this so soon!! I thought you would be like me and take a year ;) but now I’m freaky excited. Can’t wait to hear the news. It’s gonna look so good!
Peggy McKee says
If you decide to insulate the new ceiling, you might be able to reuse the old insulation. From the photos, it looked in pretty good shape, although fiber glass is not fun to work with.
Also, when you take down the joists, save them–they are better quality than you can buy today and you’ll probably have a use for them in the not too distant future.
YoungHouseLove says
Thanks for the tips Peggy! Love those ideas.
xo
s
Miss V says
I have been just a silent observer but secretly wishing we (hubby and I) could turn back the clock 30 yrs and be where you are and doing what you are doing! I get so excited with each new project and am amazed at how little time it takes you guys and it appears minimal effort working on each project. I will just have to be satisfied with watching your progress and waiting impatiently for your next post! Thanks for literally letting us visit with you even when the house is a mess :)
YoungHouseLove says
Thanks Miss V! You’re so sweet!
xo
s
Erin says
Oh man, this porch is going to be awesome. I can tell already.
I have a (slightly) vaulted patio ceiling, with beams similar to yours. I’ll be interested to see what you guys do with the beadboard, and how you go about getting it up there. I’m anxiously awaiting your choices and insight on a project like this. Any info you come across that includes mold/mildew resistance on both sides of the beadboard would be great.
I can’t wait to see what you guys do! Good luck! :)
YoungHouseLove says
Someone commented with an awesome solution for the beaboard (there’s apparently some type that’s mold-mildew resistant and people use it for bathrooms or backsplashes) so we’ll definitely be looking into that!
xo
s
Jennie says
The space looks so much bigger now! It’s amazing what a little open air can do :) Looks great, can’t wait to see the ceiling results!
Bec says
I might be the only one, but I kind of love the beams! I’d just finish off the ceiling above them and then hang hundreds of twinkly lights across the beams :) Hang some bittersweet up there in the fall. So pretty.
Betty (the sweaty betty) says
Ahhhhh! I can’t wait to hear what happens! I’m sure it will look good no matter what!
Kate HM says
Hi, just a thought, but what does this do to your square footage and does that really matter? I know I would rather have an awesome covered patio than a musty sunroom (and would pay the premium for it too), but does the lower square footage put you in a different “bracket” for your neighborhood? Does that make any sense?
YoungHouseLove says
Great question! The sunroom square footage actually didn’t count when we bought the house since a room has to be heated to count, but once we finish the storage room above the garage we’ll add a lot more square footage to this house than when we bought it, so we’re excited for that since it’ll bring up the value.
xo
s
Aimee says
If y’all need to get glue off of the concrete, don’t waste time/money on any kind of solvents. We just got done stripping glue off of our ginormous 700 sq. ft. concrete back porch (after ripping up carpet) and the thing that worked the best was dish soap and water. We let it sit for about an hour and then the glue came up with a hand scraper (the kind with a changeable razor blade on the end). It looks great and now we’re ready for paint or tile!
YoungHouseLove says
That’s amazing! Thanks for the tip! Our other issue with the concrete is that it’s super slippery when wet (Clara plays with her water table and baby pool and has slipped a few times) so we’re leaning towards something like an outdoor tile for the added grip.
xo
s
Lindsay says
OMG exciting!! I didn’t know what beadboard was so I googled it and this picture caught my eye: http://perfectdesignpatios.com/yahoo_site_admin/assets/images/IMG_1239.14793012_std.JPG
I feel like yours will be even more gorgeous after!
YoungHouseLove says
Holy cow that’s gorgeous!
xo
s
John says
Its crazy how descriptive you can be. As a licensed contractor we do not agree. Everything can be done just takes time and effort to do it the right way. Many contractors are lazy, however, we know what it takes to get the job done.
Overall great work!
YoungHouseLove says
Thanks John! We agree that most things are usually possible it just depends if it’s within our budget (so a 5K quote would be out for us, but it looks like a much easier fix than that). Update soon!
xo
s
Ann Marie says
You guys are amazing and very brave. I am so very impressed!
Christeen says
Its funny seeing you pull down a ceiling. The ceiling in our Alfresco(the house is only 7yo) just fell down a couple of months ago(luckily when we were out!) and we just paid AUS$2500 for a plasterer to replace it. We never gave it a thought to do something different but having seen your inspiration photo maybe we should have.
YoungHouseLove says
Oh no, that sounds so stressful! So sorry Christeen!
xo
s
Cassie Dearborn says
I’m glad I’m not the only one who impulsively starts demolishing things without thinking:) In one of our apartments, I ‘accidentally’ started pulling up the corner of peeling wallpaper… it was painful to finish the rest of that job knowing we were moving in a few months.
Keila says
I’ve been reading your blog for a few months now and I just have to say, this project totally impresses me! I love how you guys are just going for it and tearing down walls and ceilings and trying something outside the normal comfort zone. It’s totally inspiring me to rethink what renovations I can do to my own house!
Shannon [Our Home Notebook] says
So exciting! I’m enjoying seeing this come together.
Penny Smith says
Is it a “sunroom” anymore when it’s a roof overhang with no walls? :) So for “resale value” (which I get you don’t have to worry about) do you officially lose square feet? You don’t want it enclosed at all?
YoungHouseLove says
It never was square footage for us (things have to be heated to count) and once we finish the storage room above the garage we’ll add more finished square footage to the house than sealing up the sunroom and heating it could have added, and that works better for us so we’re happy about that alternative!
xo
s
sooze98148 says
It looks like the three sunroom walls are supporting the sunroom roof. If so, you may not need extra support for the roof.
If you’re going to cover the beams, consider “sistering” them, just for extra support.
tracy says
I am not sure why you didn’t take the insulation and use it in your attic of your house instead of throwing it away ???
YoungHouseLove says
We still have the bags of it in the garage, so we didn’t throw them away – and we’re actually thinking about donating it or freecycling it since our attic is already insulated and a reader recommended that. We also might use some of it to re-insulate the sunroom before we hang the beadboard since some folks thought it would cut the heat from the sun beating down on it (others said it could cause mold so we’re still looking into it).
xo
s