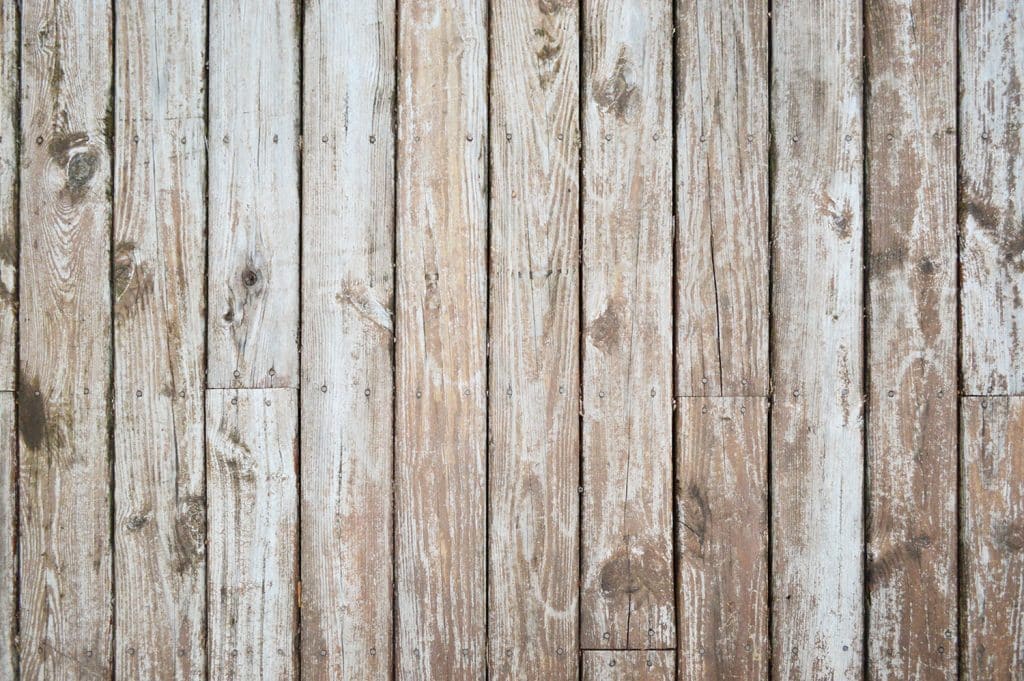
When we bought our house, the deck was in ROUGH shape. Before we could revive it with a fresh coat of stain, we had to strip off the old stain first. It definitely took some time and effort – our deck is nearly 700 sq. ft! But it was totally a doable weekend project for even a first-time stripper. Sorry, I couldn’t help myself.
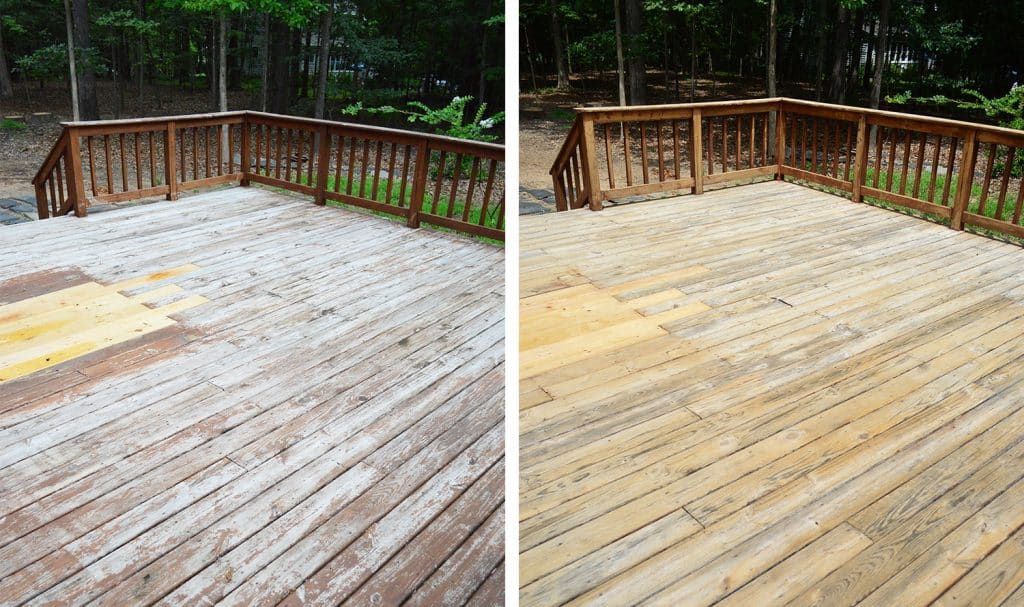
That’s the before-and-after of the stripping process, but if you’d like to see how it turned out with the new stain, check out our How To Stain & Seal A Deck tutorial.
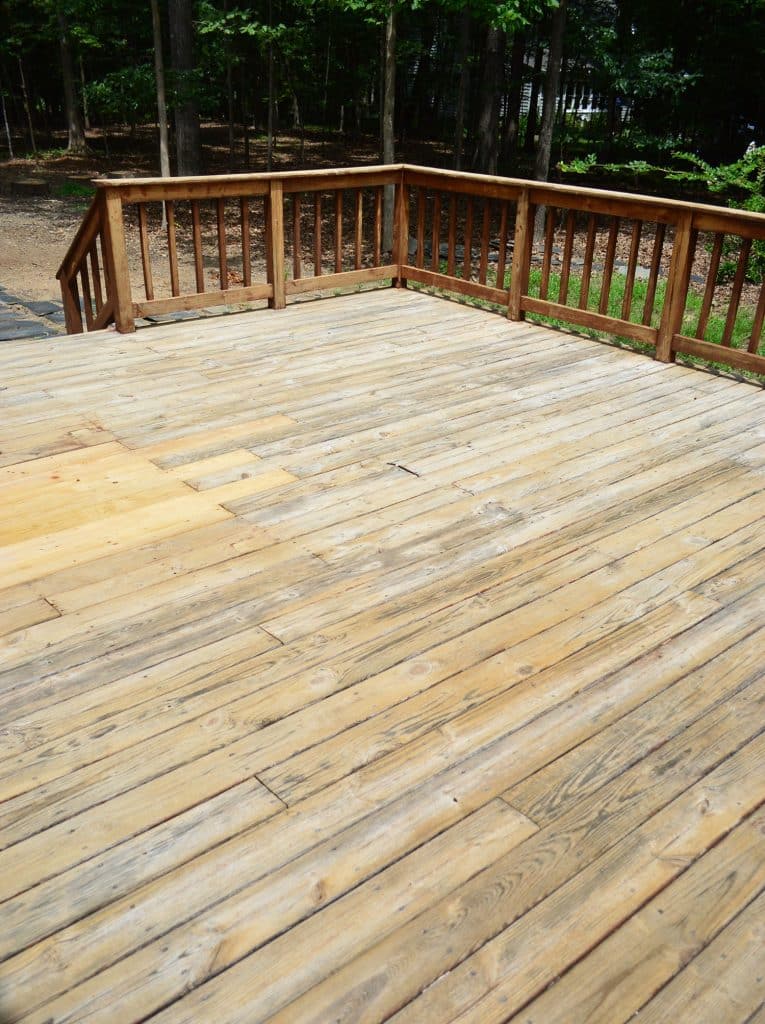
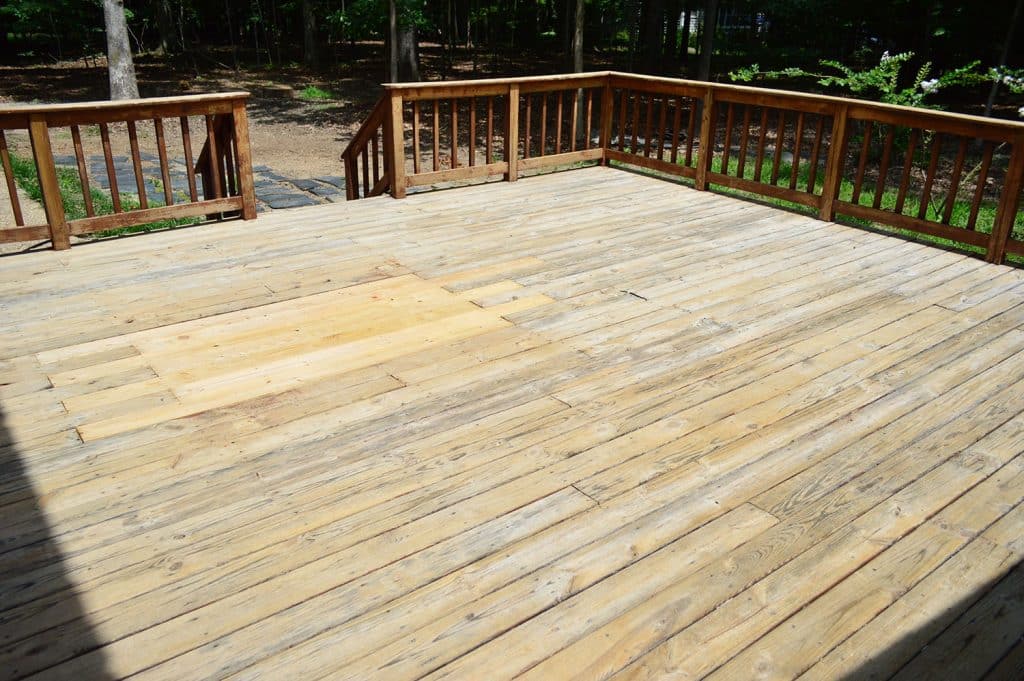
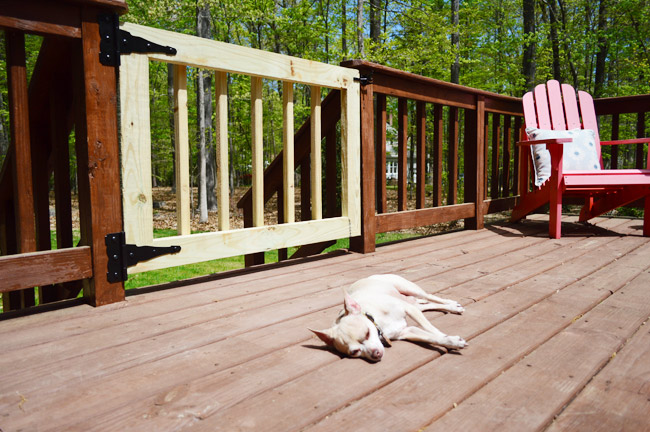
And ignore the patch of new wood. We had to repair a section where a tree had been growing through the deck. We also have a tutorial for Patching a Wood Deck if you need it!
Can I Skip The Stripping Step?
If you plan on restaining or repainting you wood deck, you need to remove the old finish for the best, more durable bond. However, there ARE some products that are designed to be applied directly over your existing coat. Both Rust-Oleum Restore and Behr DeckOver create a thick layer of paint over your deck for almost a plastic-like end result. We personally didn’t like the rough texture of Restore and, while DeckOver was smoother, it would’ve been pretty costly. We also wanted a more traditional stained wood finish in the end, not the thicker coat those products would’ve given us. So that’s why we chose to proceed with stripping our deck.
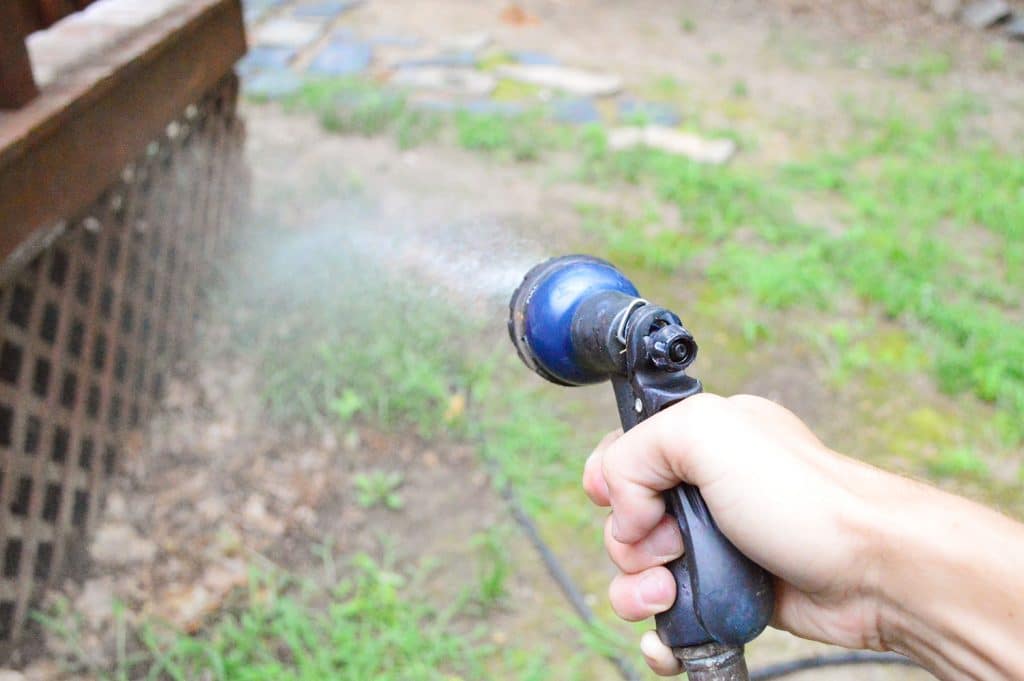
Can I Just Use a Pressure Washer?
Maybe! Power washing CAN be a really quick and effective way to strip old paint or stain from a surface, especially when combined with some of the chemical cleaners listed below. In fact, we used our pressure washer to help revive the wooden outdoor shower at our current home. We weren’t removed stain though, just layers of dirt, grime, and mildew, so we didn’t use any chemical to clean it.
For the deck shown in this post, we chose NOT to use a pressure washer because the wood was in such rough condition. It was soft in some spots and rotting in others and we feared the pressured water would damage the wood too much. We knew the wood on this old deck was way past its prime, so our goal in refinishing it was to extend its life another couple of years before we could afford to replace it.
But if you want to try using a power washer, you can read our Pressure Washing Guide here and grab our favorite power washer for just $99!
How To Strip Your Deck Yourself
Here’s a quick overview the 6 steps to stripping the finish off your old deck, porch, stairs, or railings. Depending on the size of your deck, it can easily be completed in a day or maybe a weekend.
- Ready You Deck
- Wet Your Landscaping
- Apply Your Stripper With A Roller
- Scrub Off The Old Paint Or Stain
- Neutralize The Deck Stripper
- Enjoy Your Results!
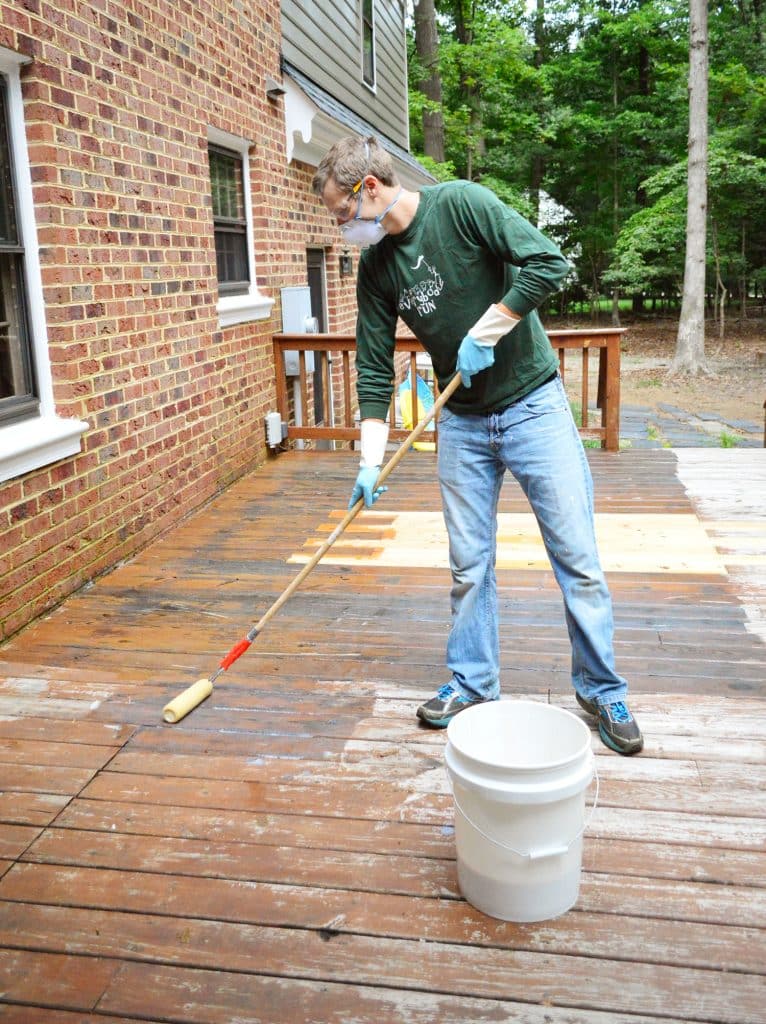
Tools & Supplies To Strip Your Deck
Here are the materials we gathered to strip the old finish off our deck:
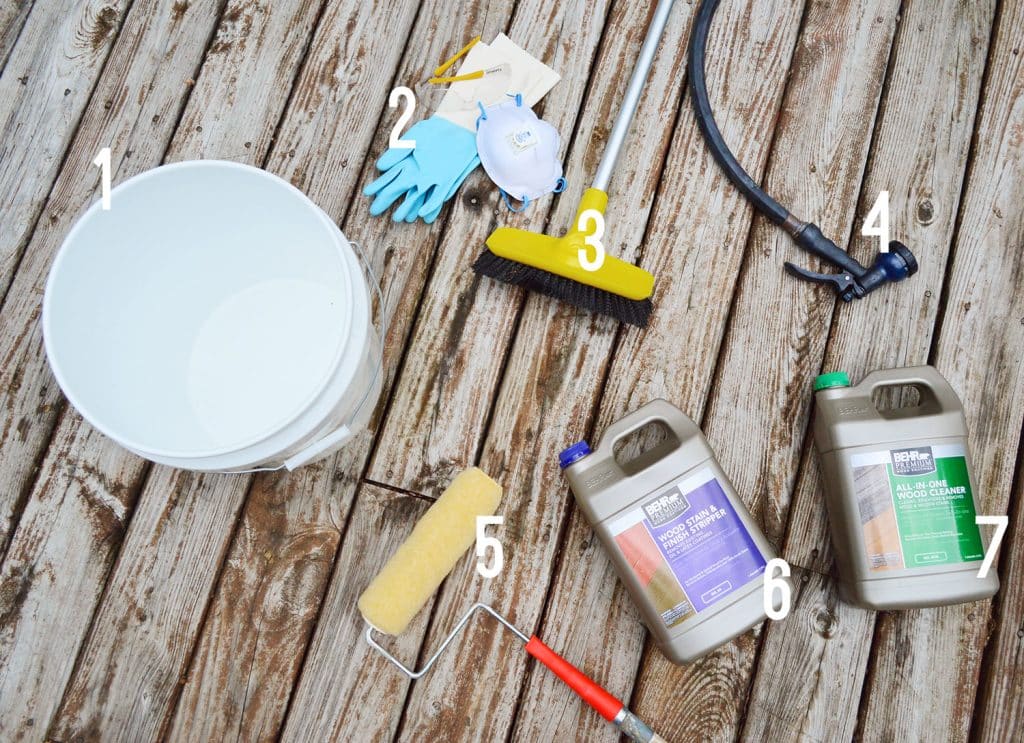
- Bucket – to pour the stripper into for easy dipping of my roller
- Protective Gear – rubber gloves, goggles, and a mask (this stuff STINKS)
- Stiff Bristle Brush With Pole
- Hose
- 1/2″ Nap Paint Roller With Extension Pole
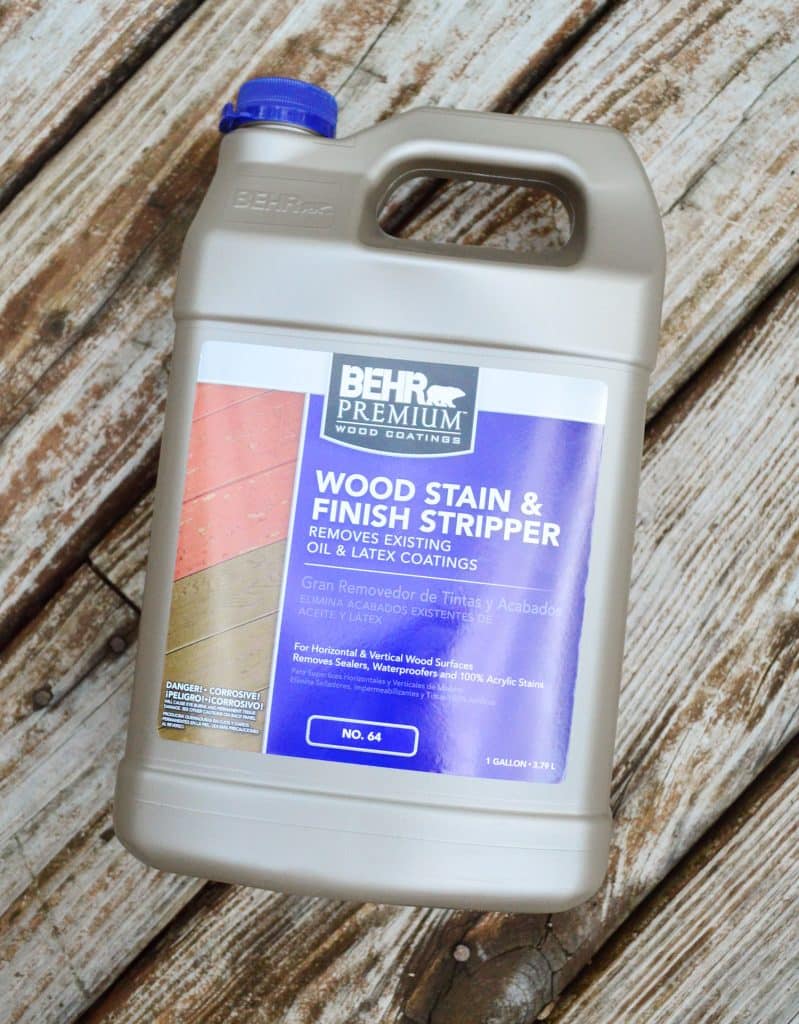
- Wood Stain & Finish Stripper – we bought 4 bottles (at $19 each) but ended up only needing 3
- All-In-One Wood Cleaner
- Pump Sprayer (not pictured) – we still had this one leftover from cleaning our last deck
Step 1: Ready Your Deck
Prep your deck by removing any furniture or obstacles that may prevent you from accessing the whole space. You’ll also want to check your weather forecast to make sure you have time to complete your entire deck without interruption from rain. Preferably it’s a cloudy, cooler day too because you don’t want the stripper fully drying during the application process.
Step 2: Wet Your Landscaping
Before you begin, use your hose to wet down any surrounding plants to help protect them from the runoff. The stripping agent is “biodegradable with easy water clean-up” but you still don’t want it sitting on your bushes in high concentrations. We don’t have much greenery worth saving around the deck, but I did it anyway. You know me, I’m a rebel rule follower without a cause.
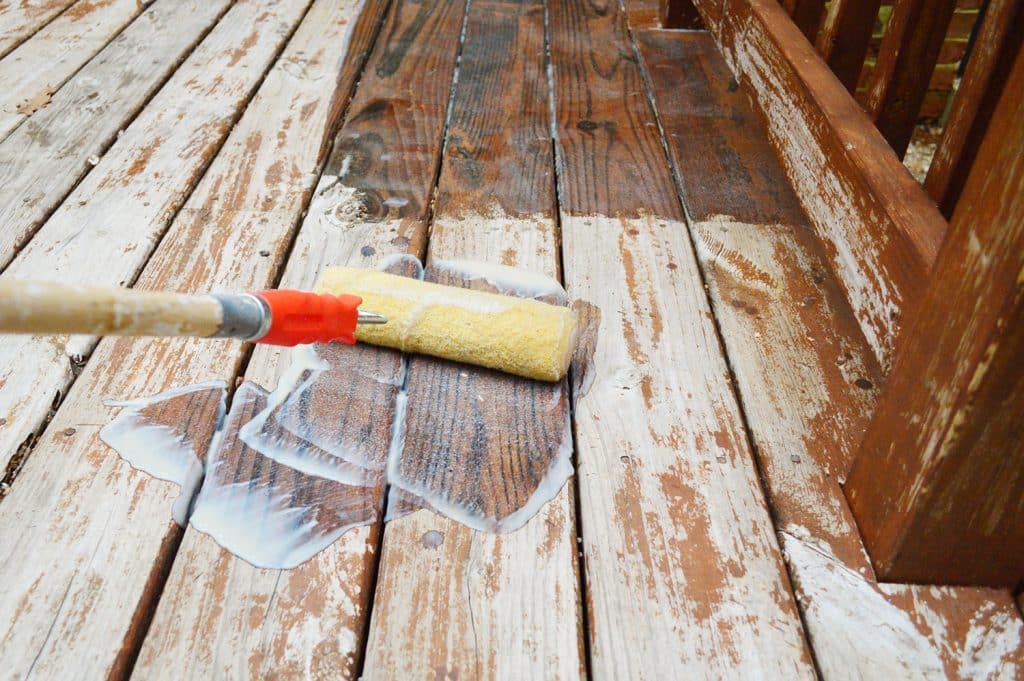
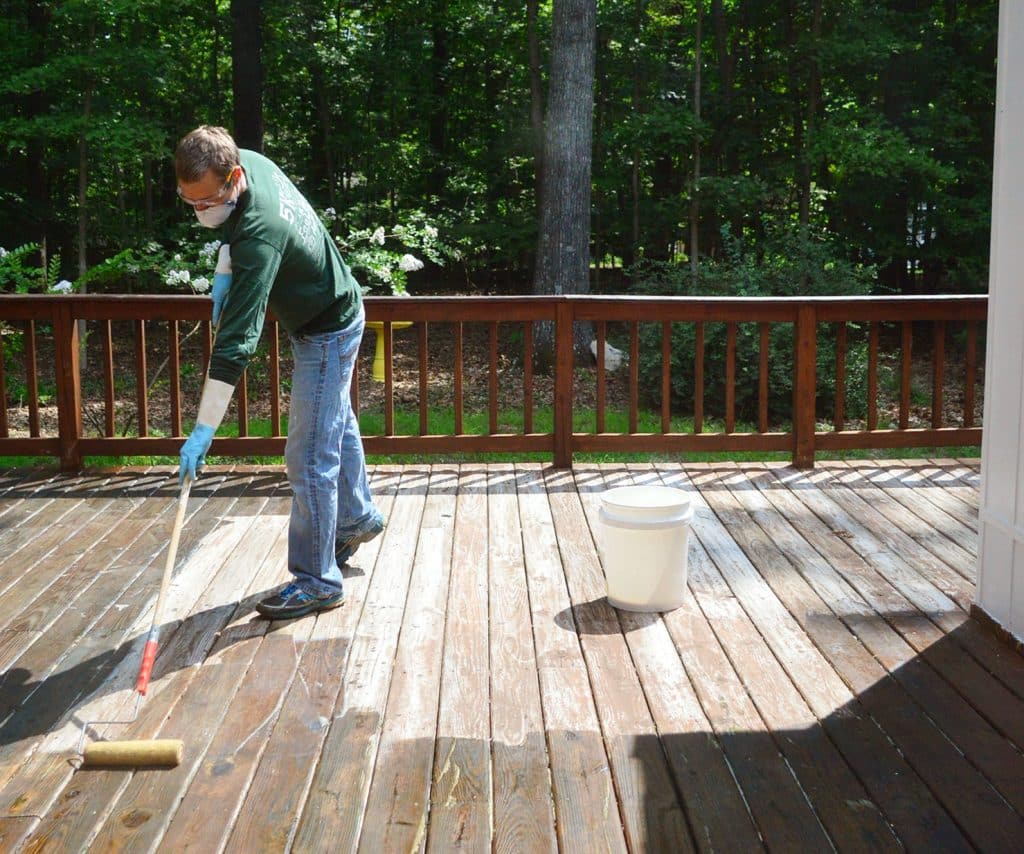
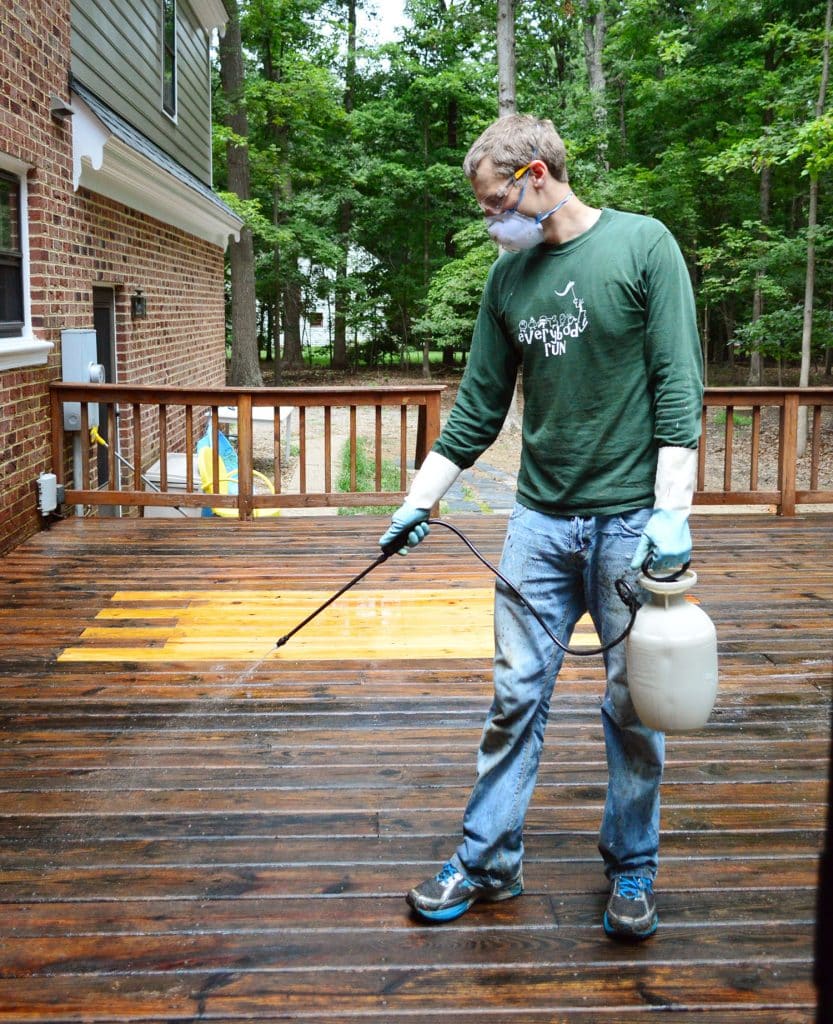
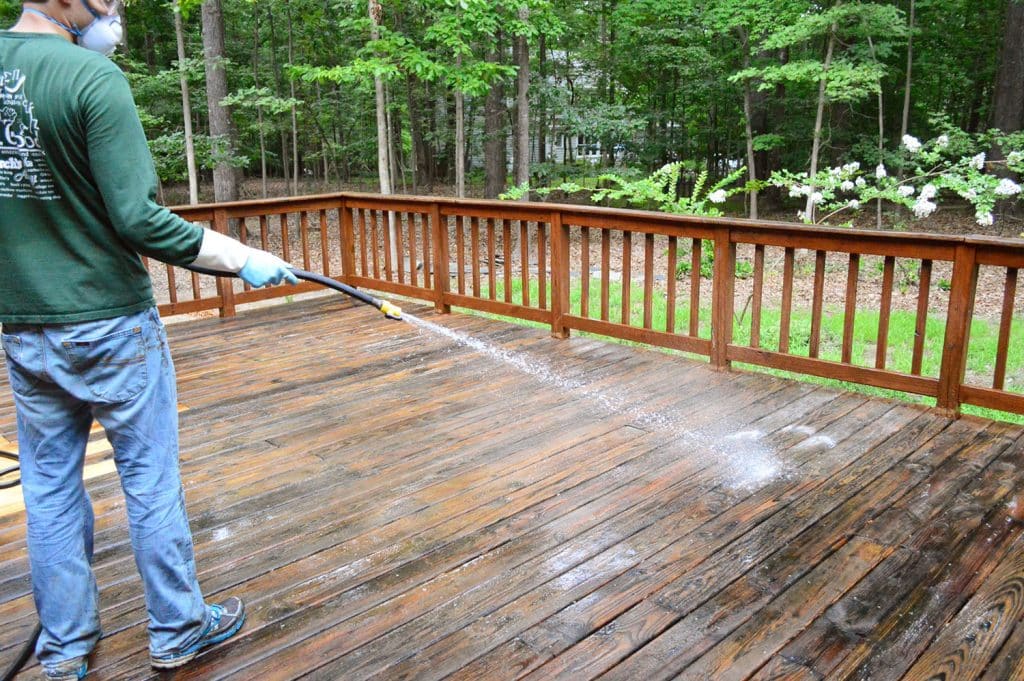
Step 3: Apply Your Deck Stripper With A Roller
Since we’d be applying this stain stripper with a roller, I combined a couple of bottles into the bucket for easy dipping. A deep paint tray would work as well, although I found the bucket really helped me get my roller saturated.
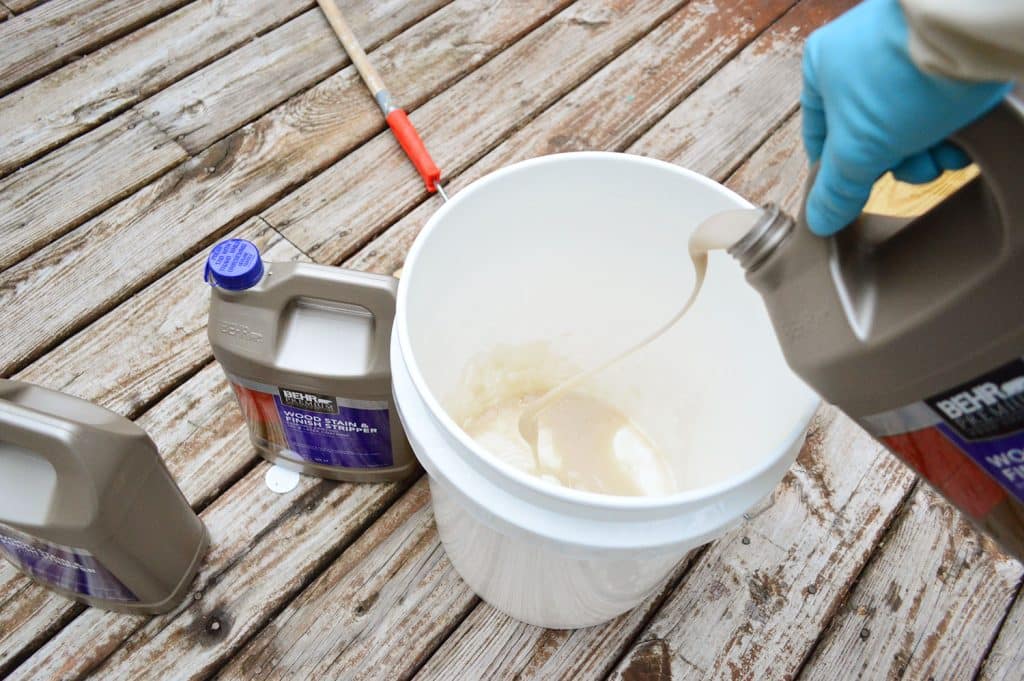
The deck stain stripper is pretty gloopy (a technical term). Almost a gluelike consistentcy. I imagine it to be what porridge looks and feels like. But hopefully not what it smells like. Otherwise Goldilocks has terrible taste in stolen snacks.
The consistency actually makes it really easy to apply. It’s thick enough not to drip off your roller too wildly, but thin enough to spread nicely. We just worked methodically to make sure we coated every board.
The instructions tell you to spread it “liberally” over the surface and let it sit for 5-45 minutes. In that time you’re supposed to not let it fully dry, which is why choosing a cloudy, cool day is best.
I waited a good two weeks for the “perfect day” and even then it turned out to be to sunnier than I had hoped. Stupid clouds never stay put, do they?
Luckily, the instructions tell you to just lightly mist any spots with water if they are drying out before you can finish your application.
One warning – this stuff is also pretty slippery. I did my best not to walk on it at all, but when I did it felt like it was almost moving under my feet.
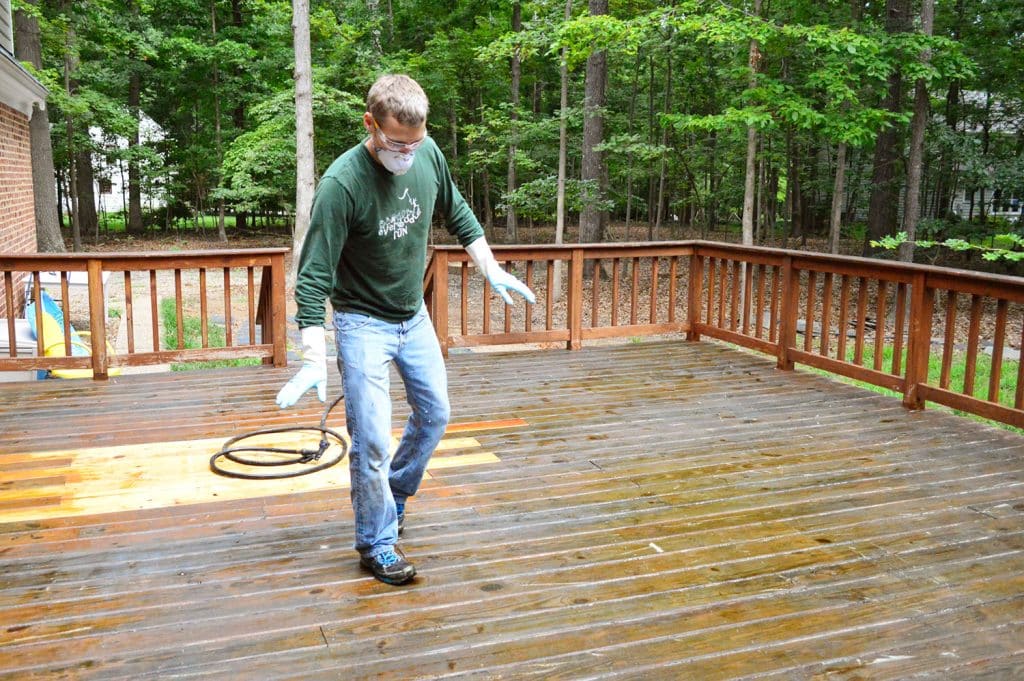
That’s when I realized it WAS MOVING UNDER MY FEET. It was slippery because the finish was literally coming off under my feet. Suddenly my caution turned to excitement. It was working!
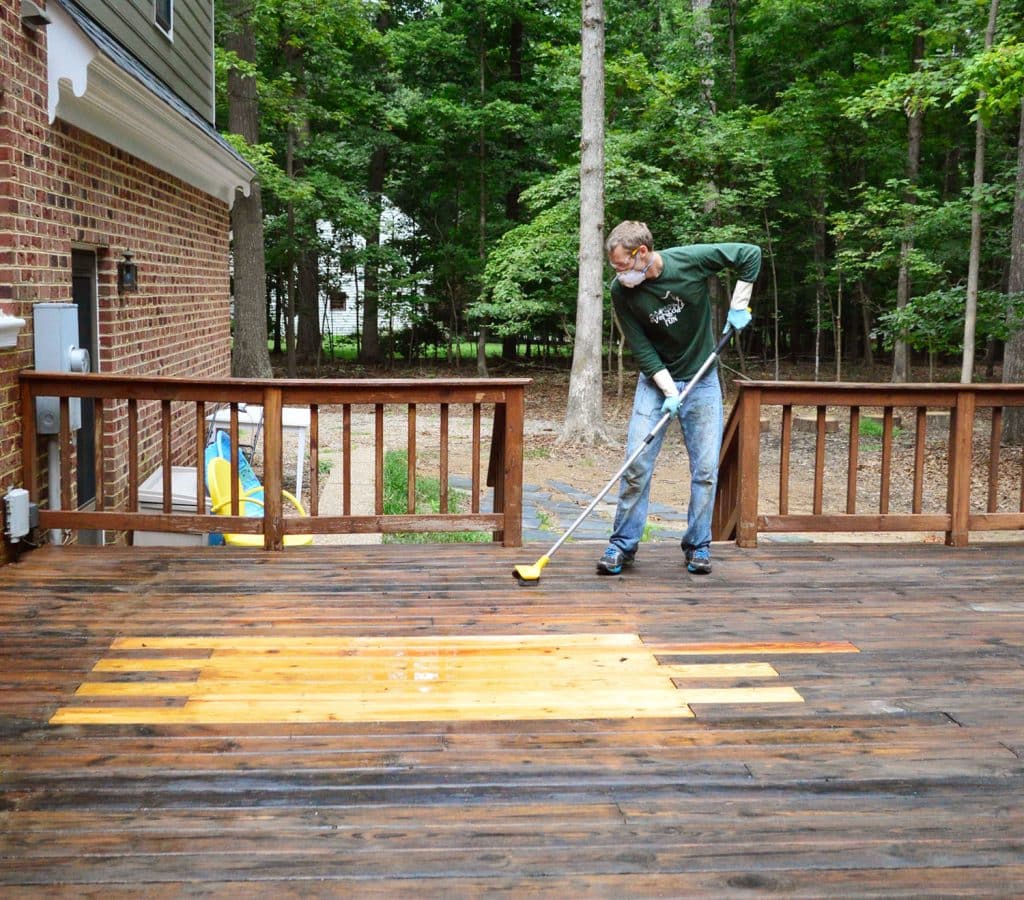
Step 4: Scrub Off The Old Paint Or Stain
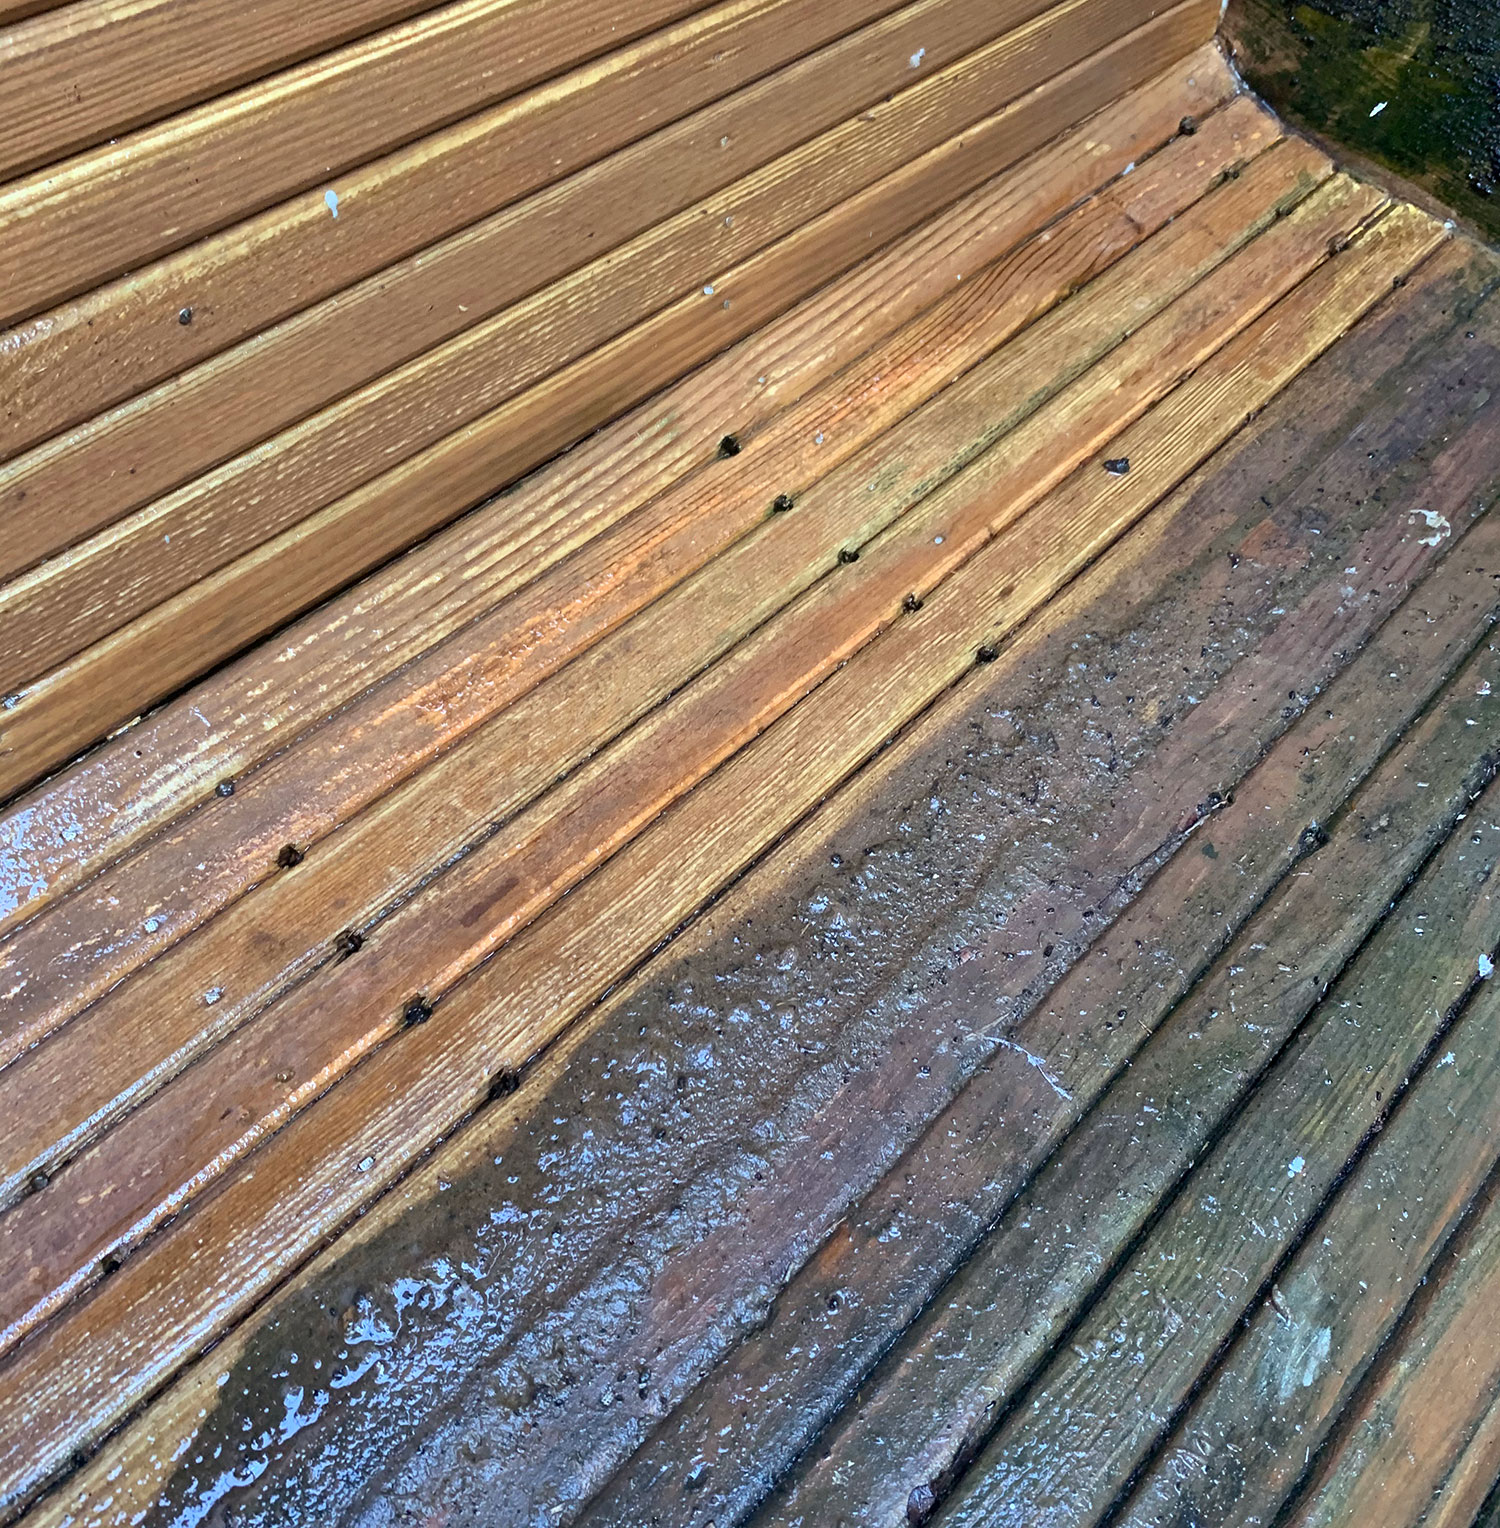
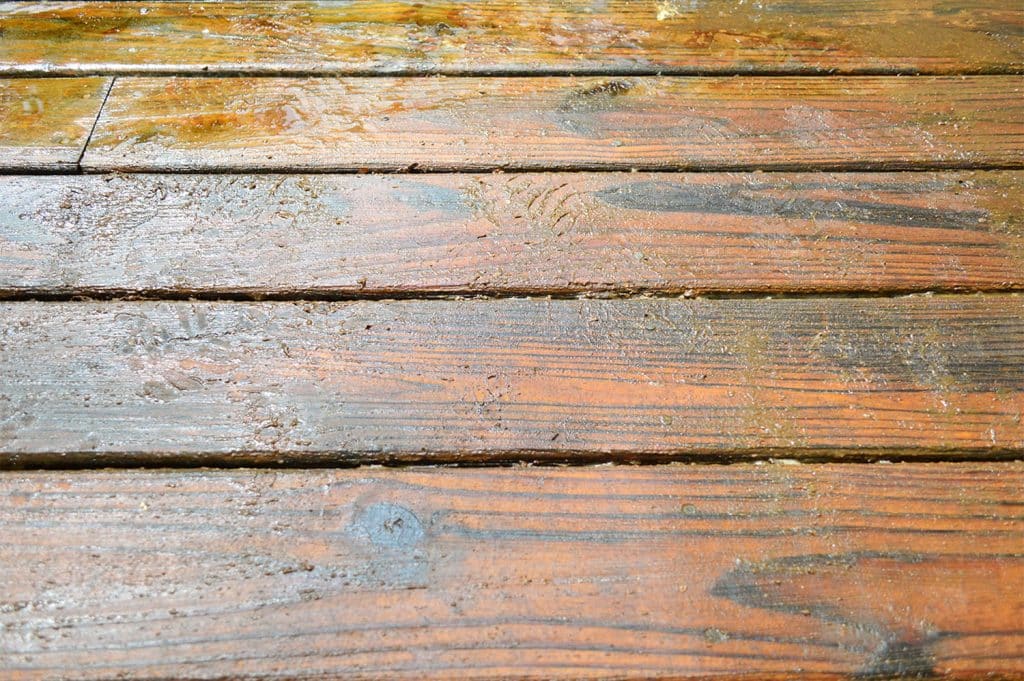
The stripper will help lift the old finish, but it needs some friction to actually remove it from your deck. It had been about 25 minutes since we started and, since it was literally coming off under my feet, we took that as our cue to move on scrubbing!
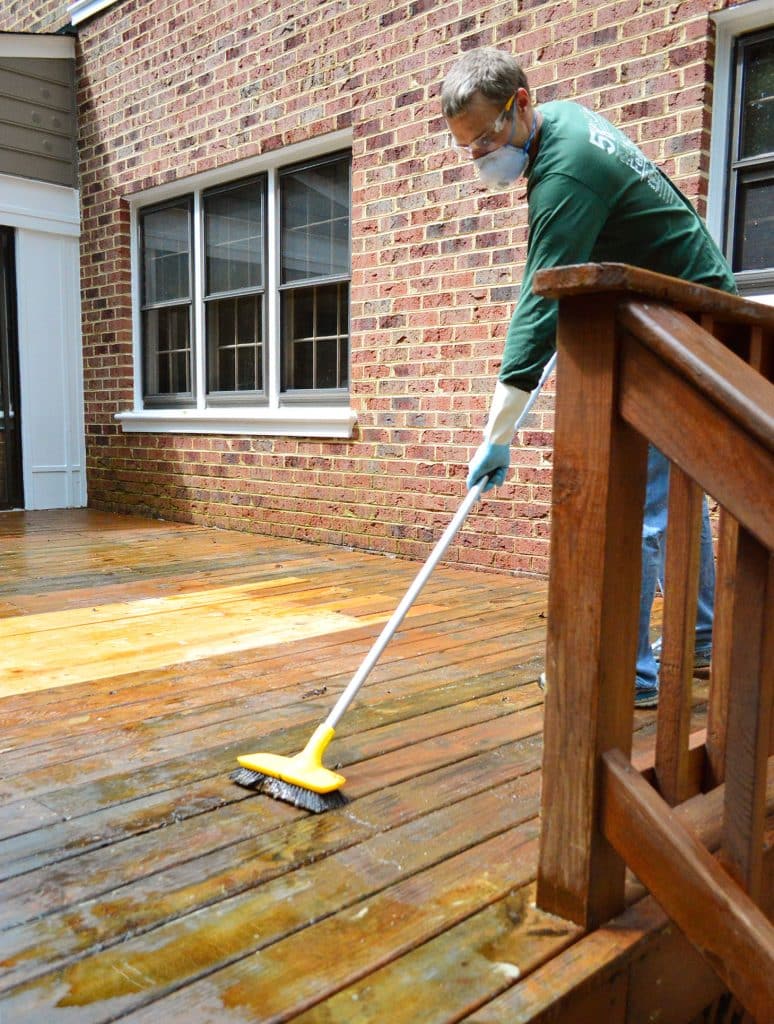
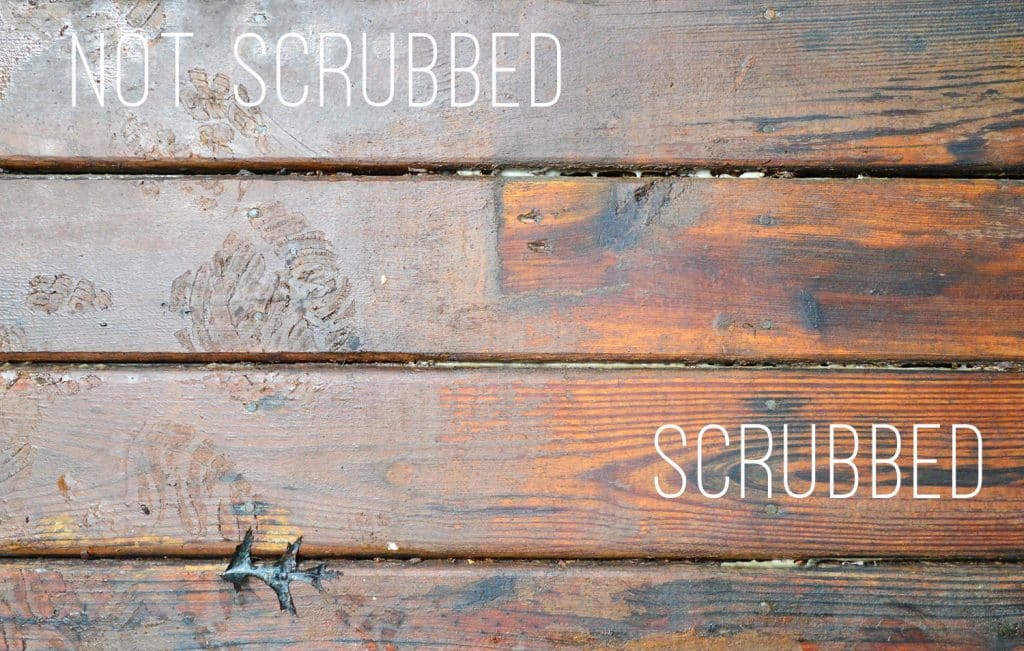
This stiff-bristled broom did a great job, but it did take a little bit of force/pressure. In most cases I could get the finish off with just a couple of swift strokes on each board. It came off in sort of a brown sludge, but after a rinse you could really see how the wood grain was reappearing.
The job went a lot faster once I realized I could hook up my hose to the back of the brush I had bought. It meant I could kinda scrub and rinse all at the same time, which made it easier to see the progress I was making.
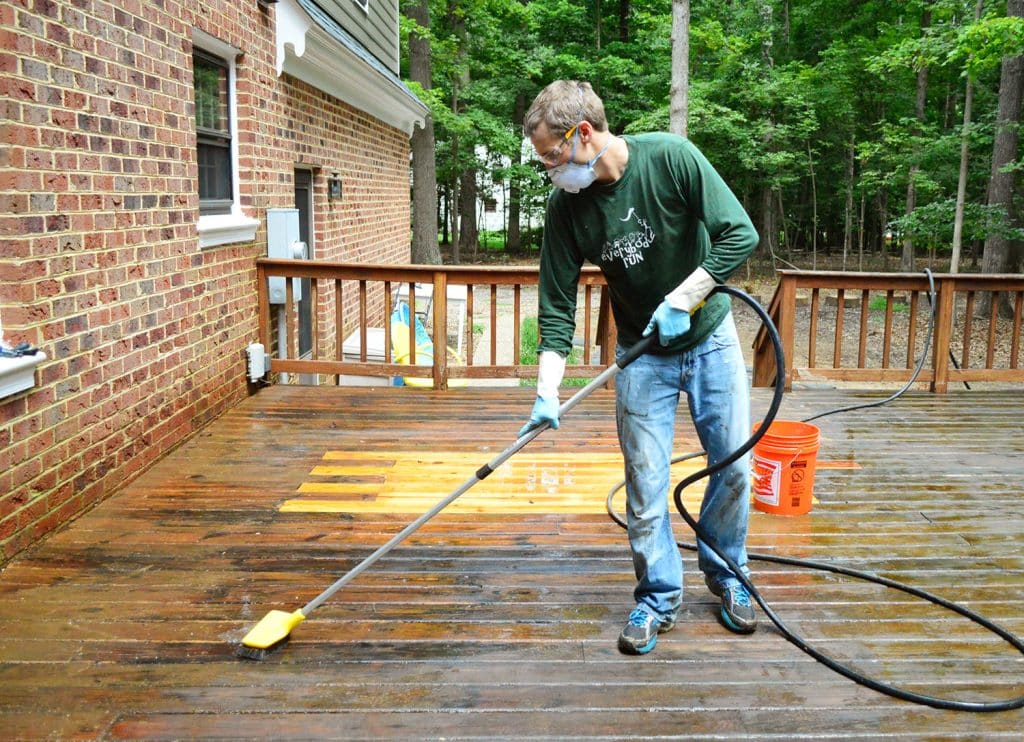
The scrubbing part was definitely the longest part of the process. It took me about 45 minutes to do my first pass, and then I went back and spot scrubbed parts that I had missed or that took a bit more oopmh. Even then it took two or three rinses to make me feel like I had actually gotten all of the sludge off.
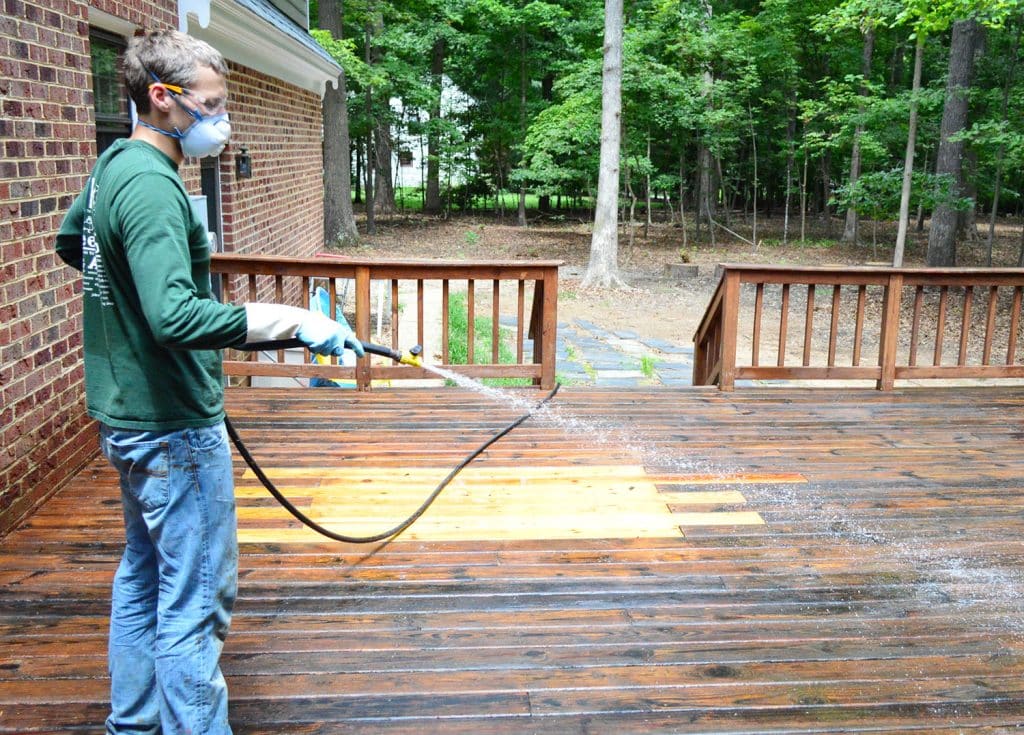
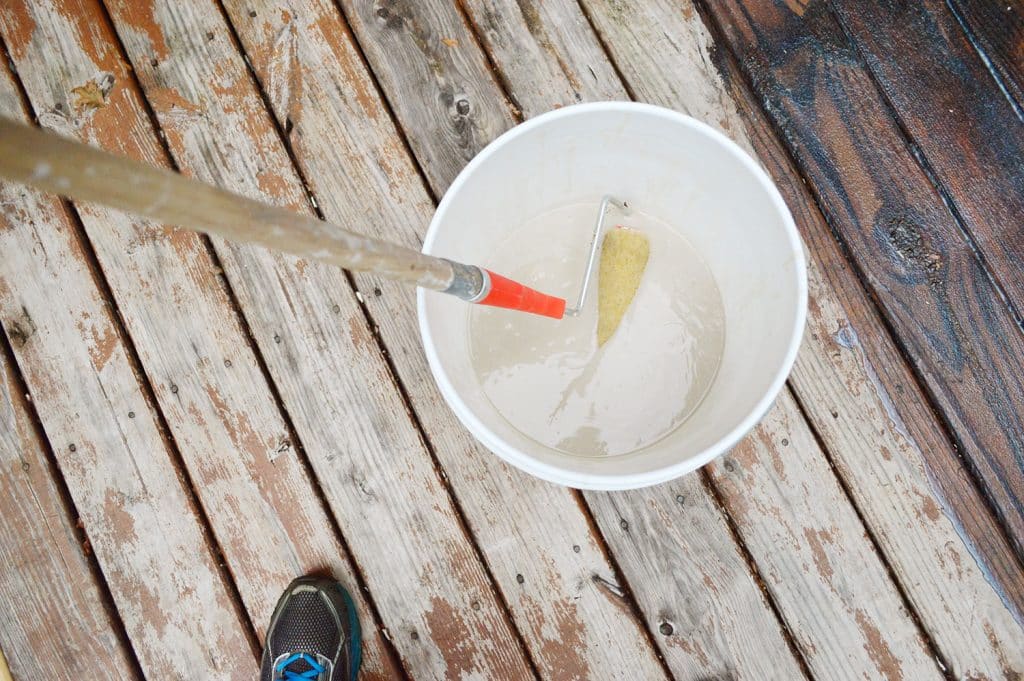
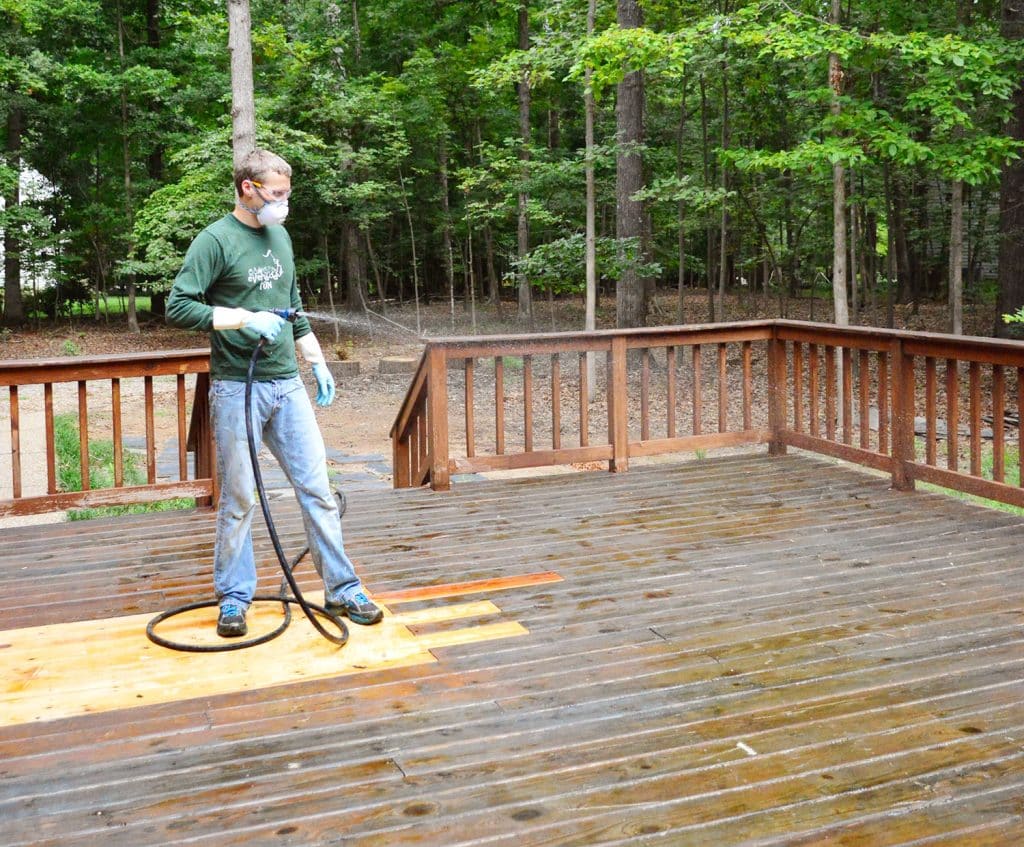
Step 5: Neutralize The Deck Stripper
To finish the process, you need to apply a deck cleaner to brighten the stripped wood and, more importantly (to me at least) neutralize the stripping chemical. We applied this with a basic pump sprayer filled with 1 part water and 1 part cleaner. You don’t need a thick coat, just be sure to get every spot you applied the stripper.
The Behr cleaner recommends that you scrub the deck cleaner into the wood after letting it sit for a few minutes. So after thoroughly cleaning our brush, went spent about 20 minutes or so of brushing our giant deck again. It said it would “foam” but I didn’t get much foaming action.
But foam or no foam, I proceeded by giving the deck one last good rinse down to hopefully rid it of any residual deck stripper and cleaner.
Step 6: Enjoy Your Results!
We were VERY impressed with the results. It seems to have gotten rid of not just the peeling paint, but a lot of the gray weathering too. It almost looked like new, albeit bleached, wood. It almost blended perfectly with the new wood we added where we had to have a tree removed.
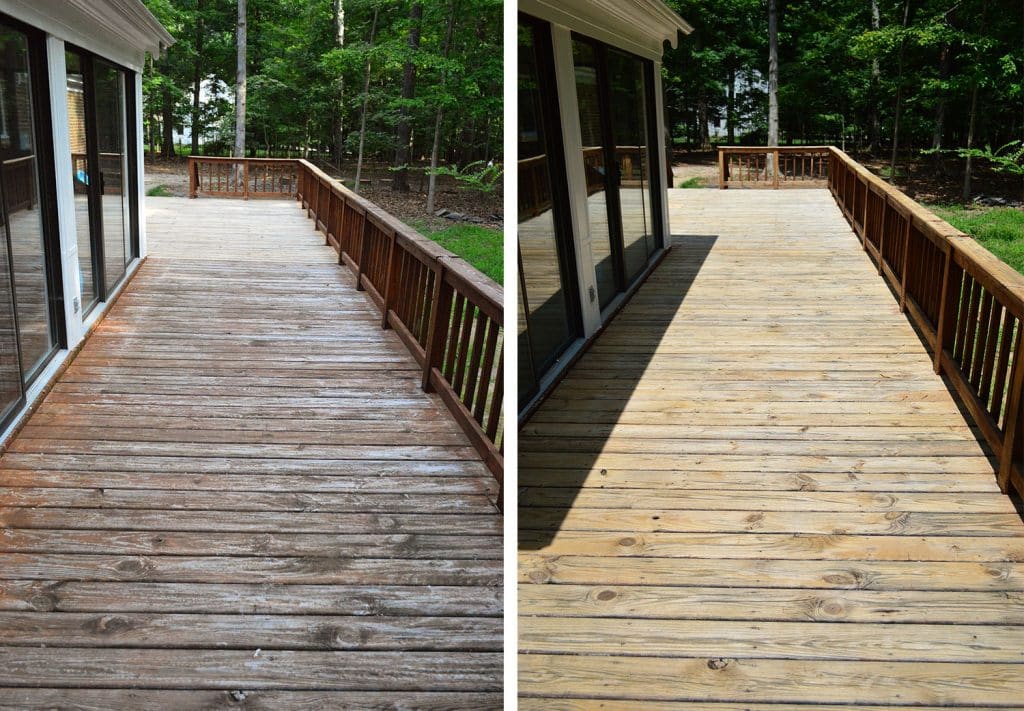
Here’s that before and after again so you can see how much better it looks, even without the new stain coat applied yet!
The whole process took me about 3.5 hours and I was pretty tired and sweaty (okay, and hungry). Wearing pants and long-sleeves in 85° will do that to ya. So we actually did our deck in two sections, and we completed the next area the following day. But at least my half-attempt makes it easier to see the difference the stripping made. See that obvious line where the sunroom ends?
Our plan now is to stain it with a semi-transparent stain that’s similar in color to the previous rich brown color. It must have been glorious in its day, before it started to wear away. In fact we didn’t go through the trouble to fully strip the small vertical railings (because it would’ve taken a million years, but also because we liked their color and they were in much better shape). So we’re hoping using something close in color that will make the whole thing look seamless when we’re done.
UPDATE: You can see how the stained deck turned out here!
So yeah, that’s the stripping story. I guess the lesson is that even if you have a rough-looking deck, some elbow grease (I think I scrubbed this thing thirty times) might just save it. Either way, we’re pretty pumped about being one step away from breathing new life into this baby. Deck stain, here we come!
BONUS: More Deck Posts
We’ve got more tutorials for making the most of your deck (or, at least, how we made the most of ours). Here are some other posts you might be interested in!
- How To Build A Gate For Your Deck
- How To Stain & Seal Your Deck
- How To Build A Deck
- Why We Decided To Tear Our Deck Down
*This post contains affiliate links, so we may earn a small commission when you make a purchase through links on our site at no additional cost to you.

Wendy @ New Moms Talk says
Thanks for the great “how to” on stripping.
I’m curious, though, if this sentence “That when I realized it was.” was intended to be “That’s…”
YoungHouseLove says
Yes, thanks Wendy! All fixed!
xo
s
Emily R says
THIS is exactly why I wouldn’t stain it! I like a nice natural grey patina with just some clear sealer on it. And you won’t have to take HOURS to remove it once it’s gone kaput!
Michele says
I totally agree — I’d just seal the deck too. I like the contrast of the clean deck with the darker rails. Having re-stained decking every few years around a pool when I was growing up really gave me an appreciation for unstained decking.
Kacie says
This looks great! We had a company stain our deck two years ago, and I’m bummed that it’s already wearing in places. It needed some attention this summer, but that’s not going to happen. Next summer, absolutely.
I was hoping to get more years out of it, but it seems like in some areas 2 years is the most you can expect.
I’m also interested in the rustoleum or Behr type finishes this time.
Also — we had sap seep through the wood in some places. I dunno what that was about.
Liz says
Our first home had it’s deck in about the same shape. The neighbor that lived behind us had 11 tall trees at the end of their property line, some branches we could grab from our deck…. We ended up cutting those branches and my hubby power washed the deck, all that tree sap and mildew on the surface of it made it gross looking.
After it was power washed it looked brand new again. We ended up staining it in a walnut coloured transparent stain. I wanted a transparent stain cause I still wanted the wood grain coming thru…. It looked amazing. But unfortunately we too had to re-stain it every two years. But it wasn’t so much work as the first time.
Impressed says
Wow! Really impressive job. A lot of deck loving has been going on over the past year. You’re a pro.
Jennifer I. says
Thank you for this post! We are at the exact same spot, we have just stripped an old red opaque stain off about 200 sq feet of decking, including railing posting and stairs (uggh) by using stripper and power washing (it has been a PAIN to say the least), taken us several weekends. We are finally up to the point where we can put some semi-transparent stain on it, so I’m hoping your post pops up this week so I can see and make an educated choice!! Love, love, love your deck :)
Lindsey says
Such a huge piece of your exterior – what an accomplishment! It’s going to look great when it’s all done! Is the stain you’ll use an all-in-one or do you need some sort of sealer, too? I guess I don’t know much about these things.
YoungHouseLove says
Oh yes, it’ll be an all in one (almost all of them are these days, thankfully!)
xo
s
Renee says
So did the stripping not rough up the wood texture and cause splintering? We had to sand ours and replace a lot of pieces, but maybe ours was just too miscared for to save.
YoungHouseLove says
It didn’t at all- that’s why we chose it over pressure washing, which we heard could splinter or fuzz-out the wood (and we wanted something as new/smooth looking as possible).
xo
s
Nick says
Why didn’t you just use a pressure washer. I recently did my fence that was stained red and my pw did a beautiful job of removing the ugy red and now I have a beautiful natural wood fence again. No chemicals needed.
YoungHouseLove says
We actually talked to a bunch of people about that and they said since the wood was older it could have ended up fuzzy and splintered, so in the interest of a smoother surface for Clara’s little feet, we opted to put in more labor to keep the boards from getting more beat up.
xo
s
Maureen says
You were right to not pressure wash. We recently replaced our deck flooring and not the steps and railings, and when we went to pressure wash the stairs and railings to clean them up a bit, and make them match until we got new ones, they absolutely were splintered and fuzzy. Definitely not the way to go if you aren’t replacing them like we are.
Lesley says
The age of the wood factors HEAVILY in the strip versus spray debate. The wood pulp between the grain (or if you cut it down, the rings of the tree) gets soft over time, when you apply pressurized water it blows it out from between the grain leaving the ridges.
The chemicals seem like a harsh solution, but the same applies to removing paint from brick on a house; pressure washing/sand blasting removes the paint AND the protective coating on the bricks. When we had our house inspected the inspector looked closely at the brick and stated that we were lucky is was chemically peeled, and wouldn’t have to ultimately replace all of the brick on the front of our house. Apparently it becomes a sponge and results in moisture damage in the walls of your house!!!
Claire says
Our deck is stained red as well – we were originally going to pressure wash it, but might do this process instead. The only problem is, because it is stained red, we definitely need to strip all the spindles, railings, fence, and pergola along with the deck floor. Stripping all of that would be impossible! Would you recommend pw for those other parts and stripping for the floor? Any idea how pressure washing would work on spindles/railings?
YoungHouseLove says
That’s a good idea! Maybe just power wash the railings and then you can sand them if they’re fuzzy/splintered before staining them to seal them all up again.
xo
s
Emily says
We wanted to change our deck color from one of the standard (boring) premixed colors to something more rich as well. We used all these same products with awesome results! We then stained it Cordova Brown semi-transparent from Behr (hige Home Depot fans here!). I love love love this color – it’s a a darker brown with a bit of grayish undertones that really makes all the greenery and our inlaid black metal star pop. Since colors don’t show well through computers I don’t know if this matches yours or not but I just wanted to attest to its awesomeness :)
YoungHouseLove says
Thanks Emily!
xo
s
Ann says
That looks AWESOME! (Insert inappropriate “Magic Mike” joke here.) Question, though: so is all that sludgy stuff now just hanging out under the deck? Or does it kind of dissolve during the rinse?
YoungHouseLove says
Oddly enough between rinsing it and scrubbing it and rinsing it again and scrubbing it again and then following with the cleaner, it seemed to dissolve – so there thankfully aren’t globs of brown stuff around the deck.
xo
s
Meghan says
I am telling my parents about this. Their deck needs stripping before they put it on the market and this is perfect. Do you think it would be difficult for an older couple to do (60’s)? I may have to go up and help them. Thanks!!
YoungHouseLove says
I think if they did it on a cool day (or over a few cool days, in smaller sections) they can totally do it! A great scrubbing brush that allows a hose to be inserted will definitely make it easier.
xo
s
Erin @ One Project at a Time says
Wow! I wasn’t sure if it was worth all that work until I saw the photos next to the sun room, and literally gasped OMGeee out loud. That stuff really works! We have 3 biggie decks on our home and we’ve been looking for a solution. Thanks!
Rebecca says
We’re in the process of using Behr Deck Over right now! Chose it over Home Depot’s option because of the smoother finish as well! The ease of just cleaning the deck first with their product (instead of stripping or anything first) pretty much sold us since our deck was still structurally sound. I say in the process because you can’t have rain for 24 hours after applying and we’ve been in a every other day rain segment for the past 2 weeks.
Sabrina says
We redid our humongous back deck this spring with behr deck over. Part of the deck was new and part was original. It was pretty labor intensive going on (we did the railings as well) but it has been completely worth it. We did a smoother finish and love it. It has just enough texture to it to be non-slip around the pool area. Also the older portion of our deck gave our two younger daughters splinters ins regular basis and I can happily say we had zero splinters this summer!
katie {deranchification} says
Wow – that made such a difference! Can’t wait to see how it turns out once you stain it! We need to strip and re-stain our deck, too — it has been stained 2 different colors over time and now it’s starting to peel in a bunch of places so you can see both colors. Nice… May be hard to find a day that it’s under 90 degrees here and not raining for a while, though :(
Tandra@LittleHousesBigDogs says
I just had a fence staining PTSD flashback, I wish, oh wish I had a power washer back then. The deck looks great guys! I vote the natural wood/clear stain too!=)
Sarah A says
I did this exact process with the same products last summer to our old deck. My advice is to apply the new stain on a much cooler day because when it is 85 degrees the stain dries and gets sucked in so quickly that I think I over-applied it because now, one year later, it has flaked off in a new places. (I only had time in August, but it’s hard to find a cooler day in Northern Virginia in August!) All in all, it still looks 100 times better than it did before I stripped and re-stained, though – yours will, too.
YoungHouseLove says
Great tip Sarah, thanks!
xo
s
KathyG says
I think maybe that is true, the stain really has to be applied “just right” for it not to flake. I did mine three years inarow ugh. Then I primed and painted with a SW porch paint, and it’s been perfect for 4 years now.
nick says
Love that the patch looks so seemless with the old decking. Great job John.
Sabrina says
Can’t wait to see this finished. We have a tiered deck that needs some boards replaced. It’s also painted dark red (so does not match the house) I have no idea where to start lol Google and you guys helps!
Elizabeth says
We desperately need to do this to our back porch/deck, which needs to be restained, and in fact have been waiting for you guys to do yours so I would get some tips. Or ummm tips for my husband. :)
Question: did you have any mildewed areas? Our deck has dark greenish mildew stains on some boards, and I’m not sure if this would address it. Maybe we need to power wash it first? I will take tips from anyone. :)
YoungHouseLove says
We didn’t have any of those, but I’d imagine that between the stripper and the cleaner you’d completely bleach/remove those.
xo
s
kismet says
We live in Oregon and had a lot of mold/mildew on our deck (which also made it slippery when wet) and the solution is to use household bleach and dish soap. There is a product called 30 sec mildew or something like that but all it is is bleach. Works great.
Julie says
Be careful if you use bleach! We had a deck built last summer and didn’t get around to staining it until this year and had to clean it first. Dumb me used straight bleach in a sprayer and it fuzzed up the wood. It worked great, but be sure to dilute it! I diluted it about 2 parts water/1 part bleach when I did the steps and it worked just as good. If I had it to do over I would buy a deck cleaner. I then stained it with Behr Semi-Transparent Redwood. Not particularly pleased with the color. The dog’s muddy footprints show on it.
Liz says
John, I am impressed with your deck skills. I can’t believe the difference that stripper made (ha!).
Sarah B says
We have used the Rust-Oleum Restore product and it worked ok but it’s already starting to split on the seams and we only put it on last year. We put it on our pontoon boat, top side instead of putting carpeting down.
YoungHouseLove says
Oh no! So sorry to hear that Sarah.
xo
s
Mary says
We did our deck with the Rustoleum Restore too and this summer it’s coming up in sheets. Now we have to scrape it all up and re-stain. Be glad you didn’t choose that option.
YoungHouseLove says
OH CRAP. That sucks Mary. I’m so sorry.
xo
s
erin says
wow! that looks AMAZING! and i’m glad you stripped it because I don’t think i would be feeling the other materials besides a stain on a deck like that.
Carolyn L says
This looks AWE-SOME!!!
Meghan says
We tried the Behr stain stripper/cleaner but yours turned out much better! Perhaps we need to give it another go with your instructions…I think our impatience won out. Our deck is about a third of the size of yours though so it should be slightly quicker. My husband was on his hands and needs to apply–so maybe I’ll go out and get him a longer handle for the roller to try and coax him to give it another shot ;) Thanks for the play by play–looks awesome!
YoungHouseLove says
Oh yes, long handled scrubbers and rollers ALL THE WAY!
xo
s
Carrie B says
Wow!! That looks SO GOOD – Great work!
Meghan says
Oh AND…will you guys do the spindles ( i have no clue what they’re really called…but you know, the wall of the deck :) )? Or are yours looking pretty nice still?
YoungHouseLove says
That’s in the post for ya! Since they were in better shape and we’d like to use a stain in that same tone, we’re leaving them so it’ll hopefully be all seamless when we’re done.
xo
s
Meghan says
Oooo! Sorry—I was so excited for the pictures I looked over it!
YoungHouseLove says
No worries at all!
xo
s
Kristin says
Looks great! Wish I could tell you which craptastic stain we used after going through the whole stripping, scrubbing, cleaning process, because ours lasted one whole year. I know it wasn’t an el-cheapo kind, but it was lousy. I’m tempted to go with a solid color acrylic next time, hoping it will hide the leftovers of the lousy stain. I’m sure you’ll read the reviews though, and get a great one!
lindsey says
This is going to look so great when it’s finished; what an accomplishment to have gotten this much done! When you use your stain, do you have to use a separate sealer or is it an all-in-one product?
PS: I used your tutorial on painting floors to paint our utility room floor a soft gray (using that glossy Valspar Porch and Floor Paint), and it looks beautiful – thanks so much for all you do!
YoungHouseLove says
Thankfully they’re almost all all-in-one products these days, like the one we used to stain/seal our last house’s deck. And your utility room floor sounds so pretty! So glad it worked out so well.
xo
s
Karen J says
Wow, that’s a lot of work. We hired someone to strip and restain our wood fence a few years ago. They used a power wawsher instead of chemicals. It looked soooooo great when it was done, but two years later it’s pretty faded again. The 100 degree heat here really beats up wood!
Stephanie says
That was a lot of hard work and it looks amazing. Well done!!
Hilary says
I’m going to tell my dad about this stuff. He’s about to try and strip the old deck in my parents backyard and he’s not sure what to use. It’ll be hard to get a day under 100degrees here in Texas though lol
Andrea says
Looks awesome! We did the same thing this year (so I know how great it feels to accomplish that big of a project).
We have a HUGE front porch, back porch and back deck… so we were at it for a while — although we used a power washer and the sludge, dirt, stain, paint, grime, etc. came right off. We do have a pretty nice power washer, but there were no chemicals (or scrubbing) involved and it was a really “easy” way to remove all the gunky build-up from the railings and spindles too.
So while it looks like you’re all set for this house (at least for a few years) you might consider trying your hand at power washing if there’s ever a “next time”. I know we are super happy with the results!
YoungHouseLove says
We heard from a bunch of people that power washing our old deck might cause the wood to “fuzz” and splinter, resulting in it being rougher and looking more beat up, so that’s why we opted for the more-elbow-grease method of scrubbing and cleaning it – in the hopes that our wood wouldn’t get damaged in the process. I think power washing newer wood that’s in better shape might have a better result though (we just heard with old wood it’s better to skip the power washer).
xo
s
Heather says
Power-washing can raise the fibers in the wood as they dry, which is what that “fuzzy” feeling is. The step missing is that a power-washed deck should be sanded down afterwards before sealing. It’s the difference between a potentially splintery deck and a smooth deck.
YoungHouseLove says
Who knew?! Great tip Heather!
xo
s
Stephanie says
Power wash is the way to go. Our deck got fuzzies and splinters but a good sanding took care of that. (We just used sand paper). It probably was about the same amount of work as you did but just water.
We clean (using a deck cleaner) and stain every 2-3 years because we like the worn look a little. But have only power washed it once in 6 years.
I agree that a see through stain is better. Either way looks nice. Keep up the maintenance and it will never be this much work again.
Lindsey says
Oh, the stripper puns. I once had to write an article about concrete block manufacturing, and it included multiple paragraphs about strippers and vibrating tables. There was no room for jokes in the article, but I was sure tempted!
Great job on the deck!
Cassie @ LittleRedWindow says
Did you look into any more eco-friendly options for this project? Or do eco-friendly paint strippers even exist? It does look great though!
YoungHouseLove says
We didn’t want anything that would linger once we rinsed it (ex: chemicals washing off of the deck into the grass = our nightmare) but thankfully everything in the products we picked was neutralized after it was sprayed and wiped down, so no chemicals remain after the job is done. It’s actually listed as “biodegradable with easy water clean-up” right on the label. Wearing a mask while applying it is definitely important too!
xo
s
Pamela says
Looks really good! Our deck looks a lot like your before pictures and we have been debating what to do with it. I am intrigued by the Deck Over stuff, but the directions for it indicate that it’s necessary to do the same steps that you did anyway. Am I missing something?? I want to take the easy route, but I don’t want to screw it up.
YoungHouseLove says
We thought the steps said just to clean it (which can be done in a much shorter time since the stripping was the harder part). We didn’t think you had to strip anything before applying DeckOver. Anyone else know?
xo
s
Pamela says
This is the website I was looking at – if you have new wood, you can just do the cleaning, but it looks like if you have any old peeling paint, you have to strip it too.
http://bit.ly/14HzSNp
YoungHouseLove says
Oh yeah, that makes sense if it’s flaking or peeling you’d have to get it smooth. Ours was mostly smooth, just worn really really far down, so I think it could have been cleaned and DeckOvered without the stripping, but if you literally have flakes of paint or stain coming off that would be necessary to have a good “base” for the new coat of DeckOver.
xo
s
Heather P. says
Great job! I can’t wait to see it all stained and beautiful again!
Leah says
Wow! That looks awesome. You make me wish I had a deck.
Carrie says
What a difference! The new boards really blend in much better now. Can’t wait to see the final result.
One question since I have only ever had concrete pads/patios: is a wooden deck something you have checked out as part of your home inspection, or do you guys just have enough experience to eyeball it and see if it is still in good shape(structurally)?
YoungHouseLove says
Oh yes we had it all checked at inspection! Thankfully he said it was just beat up looking but structurally it was very sound.
xo
s
Amanda H says
Has me wondering how these products might work for removing old flaky, peeling paint from a wooden door & trim (exterior)… Know you guys have painted several doors, is it just best to sand them? This guy, bless his heart, is in rough shape where layers of paint (and perhaps, the incorrect paint to begin with) are involved…
YoungHouseLove says
I would first check it for lead paint (danger!) and then if it’s all clear I would try sanding it first just because scrubbing vertical surfaces with stuff made for deck floors might be rough. Hope it helps!
xo
s
John @ Our Home from Scratch says
There’s a joke somewhere here about a fist full of one dollar bills… I’ll get back to you on that.
For a little over $100, the deck looks brilliant! Good project.
Wait, here it is: “This was exactly like my bachelor party.”
YoungHouseLove says
Hahahahaha!
xo
s
pat says
I couldn’t imagine not power washing the deck. Once you hit the wood too close with high pressure, or maybe you hit your toe, you’ll never make that mistake again. Glad you guys are back in to work & the deck looks fantastic.
-p
sue b. says
Ugh! The top image is what our deck looks like right now… I am not looking forward to this project, but it has to be done, we did it five years ago and it has to be done again :-( I think we’ll use the Berh stripping product too
Heidi says
Is your decking still fairly smooth, or does it need sanding to protect Clara’s little piggies?
YoungHouseLove says
Thankfully it was smooth, just really worn down.
xo
s
Pat S says
Wow, it looks great. I know that was a lot of work but it’s going to be worth it. After everything was stripped and cleaned, the patchwork part barely even shows in the photos. I’m betting it just about disappears altogether once you get the stain on.
Andrea says
It looks amazing. We always just do a little power-washing when we restain our deck, but this is such a clean slate, I’m tempted to (tell my husband to) use a stripper the next time.
Sophie says
I went to Home Depot recently to buy something to strip an old chair I got for an upholstery class, and said to the greeter, who was this jovial, older man in his late 50s, early 60s, “Hi, can you tell me where I can find a fast-acting stripper?” He says, “Honey, I ask myself that every night.”
Awkward :o/
Your deck looks fab. I was nervous some of the wood was cracked or warped but it’s in great shape. Can’t wait to see it all stained.
YoungHouseLove says
That’s hilarious. Dude was having a little comedy hour!
xo
s
Karyn says
Looks great!
Sorry to point these out but:
– I’m thinking it should be “terrible” in the sentence “it’s not terribly but it’s not our favorite” when you’re talking about the texture of Rust-oleum Restore.
– that should be “Behr Wood Stain & Finish Stripper” for the link not “Strain”.
Karyn says
And the Behr DeckOver link is broken/misdirected.
YoungHouseLove says
All fixed!
xo
s
Elizabeth says
In the link to the stripper, it’s written as Behr Wood Strain instead of stain, I’m sure that was a freudian slip. :) Looks fantastic!
YoungHouseLove says
Haha, all fixed!
xo
s
Dena says
What’s your plan with the railings? Replace? Or strip those and stain/paint? Just curious — have an old deck, too that we need to rehab soon.
YoungHouseLove says
That’s in the post for ya.
xo
s
Barb says
I’ve always admired how you go about projects around your home. This one rubs me the wrong way though and prompted my very first comment. I’m surprised that you went this route considering how environmentally friendly you’ve proclaimed to be in the past (i.e. Ms. Meyers, low-VOC paint, etc.) I’m sure there are better options than going with a highly toxic stripper. I’m really concerned about your readers now taking this information and pouring gallons of chemicals into the earth.
YoungHouseLove says
We’re folks who don’t even use weed killer (we pick them all by hand or embrace them as “flair” – haha!) so we definitely didn’t want anything that would remain or do any lasting damage. So if you follow the link to that stripping agent you’ll see that it’s “biodegradable with easy water clean-up.” Chemicals washing off of the deck into the grass = our nightmare, but thankfully everything in the products we picked was neutralized after it was sprayed and wiped down. Wearing a mask while applying it definitely is important too! We’ll add an update to the post to spread the word :)
xo
s