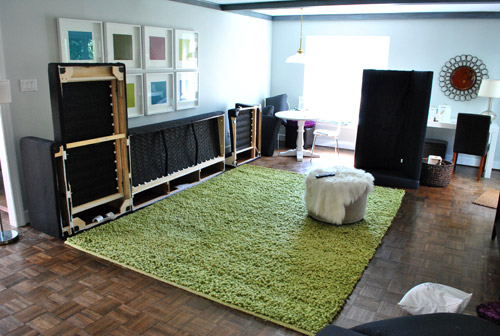
That’s right, Karl‘s legs are pale no more. After some thought we decided to give all 12 of our sectional’s cheap looking birch legs a coat of oil-rubbed bronze spray paint to deepen them and give them a subtle sheen and dimension that brown paint just wouldn’t offer. It was pretty easy except it necessitated a bit of Karl disassembly. Poor guy.
But once we got all of those legs off it was as simple as sanding each of them with low grit paper by hand (I used 60 grit stuff I had around).

Although the legs looked pale and stain-less, they actually had some sort of clear finish on them (here’s one before sanding):
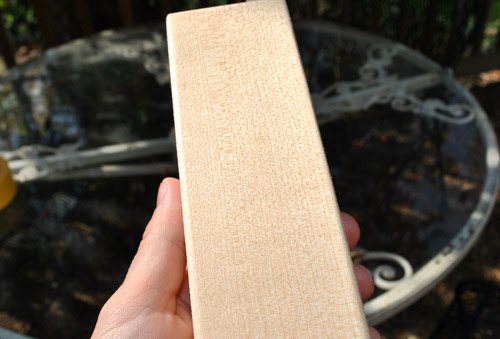
So in order to get the best adhesion for long-term durability, we wanted to make sure to create the most gritty (and grippy) wood surface that we could. Hence the quick sanding step (here’s the same leg after sanding):

It’s subtle in the pics, but hopefully you can see how the sandpaper stripped off that shine and left the wood looking raw and ready for paint (which always sticks a lot better to non-glossy surfaces).
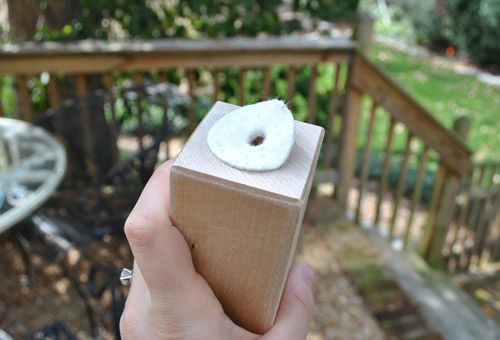
And before I sprayed them, I also removed the little furry floor-protecting pads on the bottom since I didn’t want them to get all gunked up with paint. They peeled off pretty easily and still had enough sticky stuff left to go back on nice and securely afterwards.
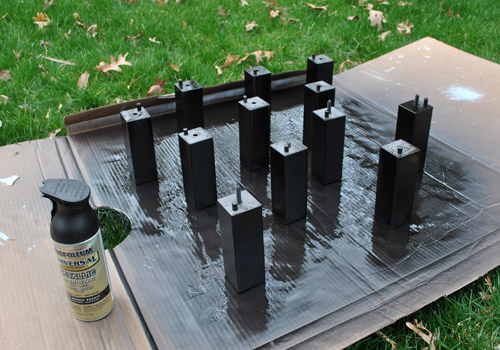
So after each leg was un-padded it was time for their little makeover. Here’s what I went with: Rustoelum Universal Metallic spray paint in “oil-rubbed bronze” with a trigger spray nozzle (here’s an affiliate link to it on Amazon for anyone looking for it). It’s pretty fumey stuff so I laid out some cardboard and did all the spraying outside while wearing a mask that I’m sure freaked out all of the neighborhood squirrels.
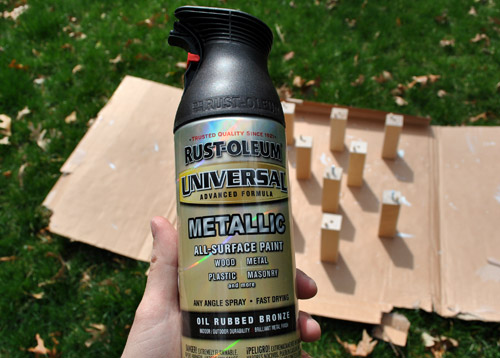
Here are all of Karl’s legs after being doused with coat one of their new “spray tan” (I actually applied three thin coats for super even and non-drippy coverage):
Oh and for those of you looking for a few quick spray painting tips, here ya go:
- Skip the cheap $2 stuff in favor of the $7+ quality stuff (I like Rustoleum’s trigger spray nozzle because it goes on thin and even and doesn’t get all over your fingers).
- Always keep the can moving. If you’re a-sprayin’ your arm better be a-swayin’.
- Keep the nozzle about 8-10″ away from whatever you’re spray painting.
- You really want a mist, not a heavy wet coating.
- Three thin and even coats are better than one thick and drippy one.
- Spray paint has yet to go no-VOC, so apply it outside with a mask, and let it fully cure as long as the can recommends outside whenever you can (usually 24 hours, we try to double that just to be even safer).
- You can “seal” any spray paint (to limit any off-gassing at all once you bring it inside) by applying two thin coats of Safecoat Acrylacq, which is low-VOC and non-toxic.
So once I applied my three supa thin coats of oil-rubbed bronze spray paint, I just let them “cure” outside for 48 hours (12 of them were spent in the sun and the next 36 were spent in the carport because I worried it might rain) while our living room looked like this:
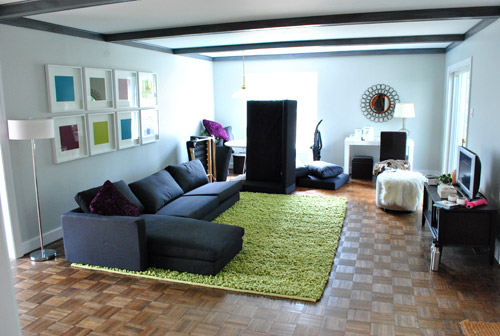
Yup, for two days that was the look. It was actually kind of fun to sit on our super low sofa. And Clara had a ball climbing on and off of it like she never could when it was up on legs. It was almost a shame to put them back on. Except for the fact that our living room looked crazy and getting off of such a low sofa while holding a 20 pound baby girl wasn’t exactly enjoyable.
Thanks to two days of outdoor drying time, by the time I brought in our newly bronzed legs they were nice and hard. Almost coin-like thanks to the oil-rubbed bronze paint that created a sleek finish. It’s hard to depict that in photos, but it has a nice metal-like sheen when you see it from different angles. And when the light hits it, it sort of bounces off and reflects like glass. Thankfully they didn’t smell all nasty and spray-paint-y after 48 hours of drying time outside (even when I stuck my nose right up against them like a weirdo). If they had I definitely would have applied two thin coats of Safecoat Acrylacq as I mentioned in the last bullet above though.
Then all that was left to do was to stick those furry floor-protecting pads back onto the bottom of each leg and cheer John on as he screwed them back into place (he’s the allen wrench ninja of our house). Bam, Karl was back to his old self. Only slightly more handsome and dapper. And can I just say that it felt inordinately awesome to have the living room put back together again?
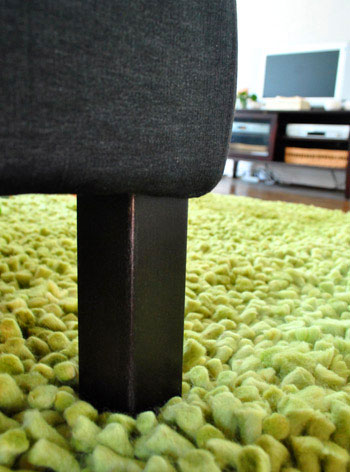
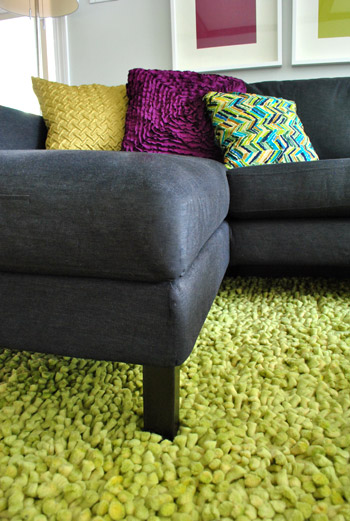
See how the side of this leg seems to glimmer in the pic above? That’s the difference between choosing a metallic oil-rubbed spray paint and a deep brown paint or stain. That smidge of glitz just does it for me. But of course stain or paint could have totally worked too, it just depends what tickles your fancy.
Actually from certain angles and in lower lighting situations (like at night) it reads a bit more like a rich chocolate wood stain, which we definitely don’t mind.
So just for kicks, let’s flash back to Karl’s legs when they were all pale and birch-y:
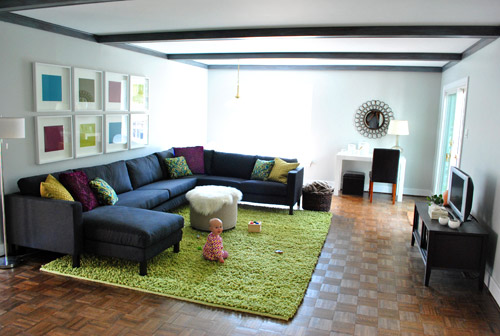
And here’s the man of the house now. The difference isn’t heart-stoppingly amazing or anything, but as far as details go, it’s definitely a bit less “look at my squat little birch legs” than the original look. Most of all, look how happy Beansie is about the change. Just kidding, she’s just psyched to be on her favorite rug ever with a few toys. Oh to be a baby again.
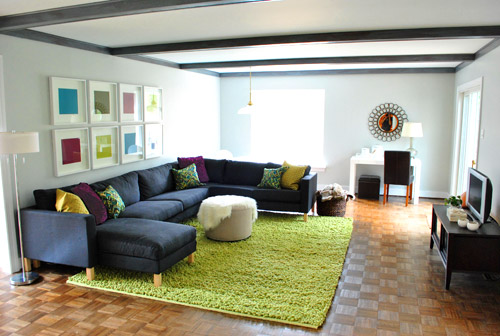
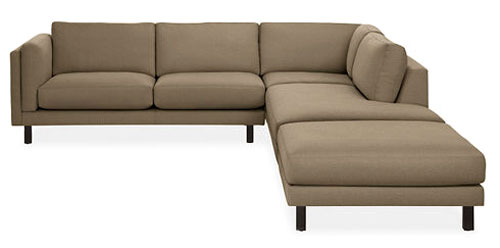
And it’ll probably feel even more cohesive in there when we add oil-rubbed bronze curtain rods to the window and sliders (along with all the other stuff we’re craving, like a big console table behind Karl and a larger entertainment unit to add balance). But for now we’re just loving how our giant $1,248 sectional looks even more like the too-rich-for-our-blood $4,496 version from Room & Board that we fell in love with a while back:
Yay for a little sectional elevating sandpaper & spray paint adventure. If only my blindingly pale leg problem was that easy to solve…
Psst- Check out the weirdest baby toy that we’ve ever seen (p.s. Clara adores it) right here on BabyCenter.

COLLEEN says
I’ts all in the details!!! Looks awesome what a difference dark legs can make!!
Bryn says
Love the new look! What a difference it makes!
Kayakgirl73 says
Nice. I like it. The legs don’t scream at you anymore.
Rochelle says
What a difference! Looks a lot nicer.
Amanda @ Our Humble A{Bowe}d says
The dark legs looks SO MUCH BETTER! And, I love the slight metallic touch. So cool, and this would work on so many pieces!
Paige says
Looks fantastic! What a diference.
Melody says
Karl definitely has a more commanding presence with those oil-rubbed bronze legs. I never would have thought to use that metallic spray paint, but it works!
Cait @ Hernando House says
I never would have thought to use metallic spray paint either. Great job, youngsters!
dana says
Such a big difference for a little project! Way to go!
Jessica says
Perfection! Love the darker finish.
Katherine says
Ooo, love the change! Amazing how the little things can make a big difference.
And thanks for the spray painting tips–once the weather warms up here in Ohio, I’ll be doing a whole (rather ancient) dining room set. Meep!
Rose says
That looks great! I have that same spray paint and I’ve used it to spruce up a handful of things around the house that were too dull or too shiny or too bronze or too white. It’s a great product.
Maya says
Makes a huge (but subtle) difference… great job!
Abercrombie Wife says
It makes all the difference. It makes Karl look so much more handsome than he was before. he looks more expensive. Love the change!
blog is the new black says
I dig it and I am still obsessed with your Sue-the-Napkin DIY pillow!
Katie says
Love this — it really does make Karl look a lot more sophisticated. And such an easy fix! Will definitely keep this in mind for the future. Thanks for sharing!
Danielle says
A simple change but makes such a difference.
Nicole says
Ok, its time for summer. When I read the first paragraph, My mind erased the word ‘paint’ and all I saw was “oil-rubbed bronze spray” and I excitedly scrolled down thinking there was some new trick using Banana Boat bronzer or something along those lines.
Anyhoo. The new dark painted legs look great.
Jessica says
Where is the “like” button? This comment is full of win.
liz @ btb says
Ha, I just bought tat same exact spray pant for my curtain rods. I took them out to the front yard to give them a quick coat and as soon as I walked away they fell into the grass… smh.
Your new ‘tanned’ legs make a subtle but noticable difference!
annabelvita says
Karl’s looking sexy
Kristen Miller says
Your before/after photos make me want to play the “see if you can find/circle what’s different” game. :)
Carrie says
Haha! I thought the same thing! :)
karen @ our slo house says
They look great. You’ve got mad spray tan skillz. If this blog-gig doesn’t work out for ya, I think some celebs in Hollywood would hire you! ;)
YoungHouseLove says
It’s true. I can spray on those fake abs if you’d like. Haha.
xo,
s
Rebecca @ the lil house that could says
I use that spray paint with the trigger thingy often, I love it! The shimmer looks great on the legs, Karl got a spray tan AND some glittered lotion ;)
YoungHouseLove says
Haha, it’s true. Such a diva our sectional is.
xo,
s
Danielle says
It’s always amazing how such a simple thing can make such a difference. Gotta love the power of a can of spray paint!
Emily g. says
Looks great!
This spray paint seems a bit safer…. Have you two or any readers out there tried it?
http://www.krylon.com/products/h2o_latex/
I’m planning on tackling a Little Tykes playhouse makeover this weekend…wish me luck.
YoungHouseLove says
Ooh good luck! Has anyone used this yet?
xo,
s
Reenie says
I have used Krylon spray paint….or I should say “tried” using it. It has always dripped while I’m spraying. I won’t buy it again.
I love Rust-o-leum ~ a lil paint can give you a whole new look….and you can paint anything! ;)
Love Karl’s new look ~ and love that we got to see lil Clara :)
Ted says
For the eco-review:
http://www.treehugger.com/files/2009/03/krylon-latex-spray-paint-is-better-but-not-best.php
Better than other spray paints, but still a spray paint.
YoungHouseLove says
Thanks Ted!
xo,
s
Jen says
Such a huge improvement! Before I thought Karl looked like a college frat house couch…now I think he might look great in our basement game room once we get some drywall up.
Christie says
Great job! You guys have taken Karl from a boy to a man. Loving his new look. :)
YoungHouseLove says
Haha, go Karl!
xo,
s
Future Mama says
Hilarious Christie!
Much love,
Future Mama
http://expectingablessing.blogspot.com/
renee says
I vote that Christie wins comment o’ the day!
YoungHouseLove says
Agreed. Due to popular demand I dub Christie as our comment o’ the day winner. Congrats C!
xo,
s
LittleMissEclectic says
Love it. It makes a huge difference!
Kim says
Oh wow, it makes a huge difference!!! Love it! I’m also glad to hear that someone has used an “oil rubbed bronze” spray paint and was happy with the finished product. My hubby and I are going to reno our kitchen and I purchased a gold-tone chandalier from Craigslist ($10) that I plan to spray paint with “oil rubbed bronze”. Fingers crossed that it turns out as nice as yours did.
YoungHouseLove says
Good luck! I bet it’ll look awesome.
xo,
s
Sara says
Good luck, Kim.
We just used this same spray paint on our kitchen cabinetry hardware and were really pleased with the results. We bought the house in November, and just didn’t have the budget to replace 44 brass pulls at this time. So we decided to spray them for the interim. I gotta tell you, they look so good, we may never replace them with the real deal!
We are also planning on using the paint on our brass chandelier in the dining room… again, slated to be a temporary solution, but maybe we’ll be just as pleased!
Hope you like it as well as we did!
Alicia M says
Kim, I think you will be pleasantly surprised! We just took the light fixture in our kitchen and our canister lids from bright shiny chrome to hammered oil rubbed bronze with spray paint and it looks AWESOME! Like a whole new set! I wish I had only thought ahead and taken before/after pics. :(
Best wishes!!!
Kim Bauer says
Thanks! Now I’m super excited to get started!
Robin says
very classy YHL.
sophie says
I guess I’m the odd one out. I miss the light legs and find this way too monochromatic. But then, my heart is scandinavian and I love light wood.
Heather says
Looks great! I wish I had looked for this spray paint…I took the long way around and mixed black paint with metallic copper craft paint to get that look on a chest of drawers.
Are you planning on doing the legs of the new Parsons too?
YoungHouseLove says
We’re actually planning to keep those legs as-is since they tie into the color of the table so well. But with fresh green covers or upholstery they’ll hopefully look nice and updated.
xo,
s
Allison says
I’m jealous of your vibrant green grass! -Coming from Minnesota where we still have snow on the ground :(
Courtney says
Haha! I’m with you – I was mainly drawn to the green grass in the background! :) Here in Calgary, Alberta it was snowing LAST NIGHT! Ugh. So ready for spring.
Karl looks great! I sent my husband pictures from your blog to further convince him that we should get a Karl of our own for the basement. Much easier to get down the stairs than a giant sofa.
Kristen says
LOVE the new look!
Rachel H. says
Nice legs, indeed! Karl looks hot. And, wow, that baby toy is really freaky! But as long as Clara likes it, that’s all that matters!
Katie says
What a great idea! I was just wondering what to do with some floor registers and an old, out dated, stair railing… A little clean up and nice spray paint could do wonders. I really like the safecoat idea, too. I can’t wait to try it out!
Erin says
I actually do think it makes quite a difference! It takes it from the first apartment/dorm room look to worthy of taking center stage in the beautiful second house look! It ties into shaggy green even better now! Looks great!
Witty Wife says
I love it. You two are totally brilliant when it comes to DIY!
I am so envious, and I feel like I can do some of these things, because you’re ‘normal’ people!
If you two every wrote a book (hint, hint), I would immediately snatch it up. I’d love having lots of your tips right at my fingertips!
YoungHouseLove says
Aw thanks Witty Wife. Good news- were actually writing a book. Bad news- books take a long time. Haha. More details here.
xo,
s
Witty Wife says
So glad to hear you’re writing a book! Thanks for sharing… I must have missed the news.
Sally says
Will your book be different than your daily blog posts? The couch looks great.
YoungHouseLove says
Yup, we’re not just going to print out our posts and make a book, so it’ll be full of new ideas and photos that we haven’t shared before. Should be fun. At least we hope it is. Haha.
xo,
s
DanielleR says
Ha! My 6 year old nephew plays with that creepy toy like it’s going out of style lol. Skin-a-mar-in-ki-dinky-dink! Skin-a-mar-ring-ki-doo! Iiii … love … you! <— That's what his sings!
YoungHouseLove says
Haha, they crack me up! But they seem to be loved by all kids!
xo,
s
Hannah says
WOW! What a difference a little spray paint makes! I use the oil rubbed bronze paint all the time and it holds up really well (even on parts that are used daily) and looks amazing. Great choice!
skye says
as always you take something so simple and make it look amazing! i would have never thought to do that – adding this to my list of things to remember to do one day when i have a living room big enough for a couch. great job guys! :)
Barb says
Once again….IT’S THE LITTLE THINGS IN LIFE THAT GET US BY!” Looks great and that much richer.
Bravo to Karl.
B.
Paige says
oooo nice. he’s lookin’ sexier with every change.
Bobbie Brown says
Your subtle changes always ‘wow’ me! LOVE :)
Stephanie Phillips says
It definitely makes a difference! All in the details, baby…
And THANK YOU for using the word inordinately. I get made fun of for saying it (on FB, no less) so I can defend myself in that the smarty-pants over at YHL use big words, too!
Paige says
oh and that toy is ridiculous. I first saw it around Christmas time…so funny.
Future Mama says
Lookin’ good Karl!!
Much love,
Future Mama
http://expectingablessing.blogspot.com/
Kristen says
Love it! Looks so nice!
leah says
Wow… what a difference a little paint makes. I didn’t think it looked bad before until I saw the after. Amazing!
Kim says
Looks great! Its amazing how the smallest little details can make such a big impact.
Kel says
Totally agree
Joan G says
Looks great! Where did you get the console the tv sits on? We’re in the market for something new…
YoungHouseLove says
That’s from Target a while back. We’ll be craigslisting ours someday (when we get something more appropriately sized for our giant living room), so if you’re local we’ll post about that for ya when we do.
xo,
s
Joan G says
Not so local…actually in Astoria ;)