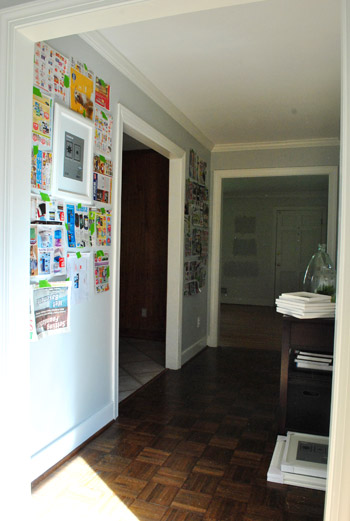
Isn’t it strange how you can start a project (in this case the gallery of frames that we wanted to “wallpaper” our hallway walls with) and then just leave the other half of it undone for a month. Not weeks. Literally a month. What’s wrong with us? And it’s not like we weren’t obsessed with the results of the first half of the project (recounted here):
We just ran out of frame gas or something, so we switched over to console building and chair painting and closet organizing and ceramic dog gluing and tree trimming and sectional leg spray-painting and all the other odd things that we’ve tackled since our little wall-hole-making spree. It’s so weird. What possesses DIY folks to work in fits and starts like that? Oh well, who cares, we’re back on the frame-hanging bandwagon now. All is right with the world.
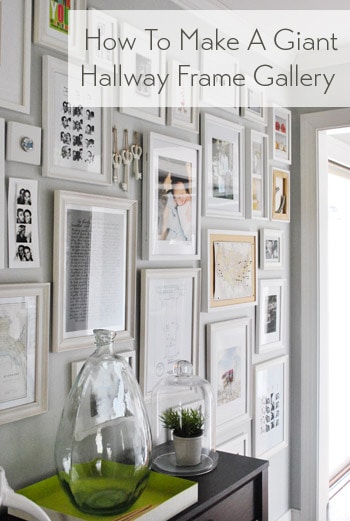
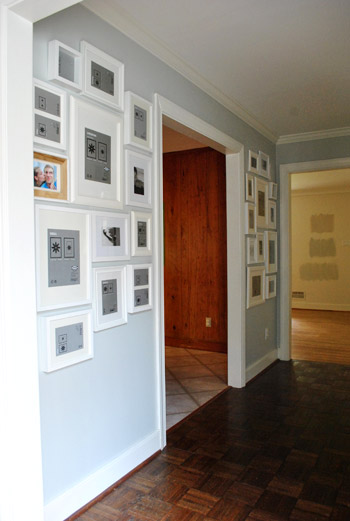
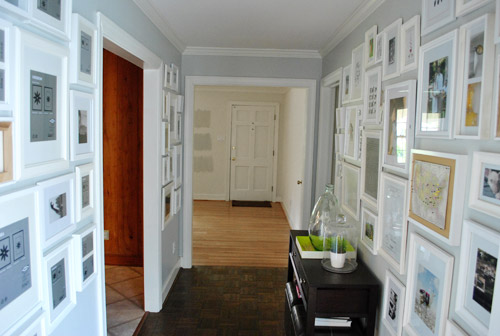
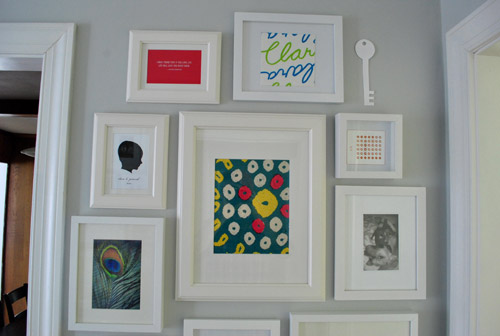
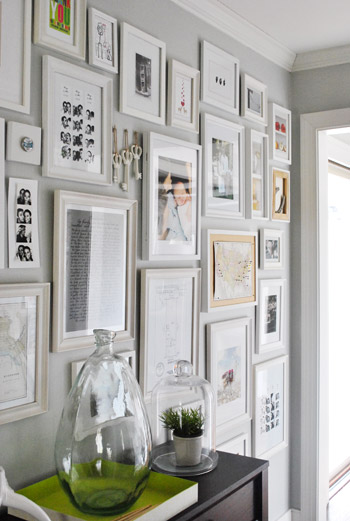
Yup, after a month of staring at taped up newspaper templates and a big ol’ stack of frames on the floor we finally mustered up the motivation to hang them up, thereby completing the big hallway o’ frames. Booyah. Here’s the whole shebang:
It’s everything we imagined and then some. And it only took a few hours of hammering and hammering and hammering and framing random sentimental objects (and my birthday prints) that I lurve. As for where the frames came from, we already owned around 10 (originally from Ikea and Target on clearance) and we also picked up 14 new ones from Ikea (thanks to a sweet b-day gift card from the fam). Although all of the frames aren’t the exact same shade of white, it’s a soft layered look with some creams and other more crisp white tones that just seem to work even though they don’t match perfectly. We even embraced the whole “layered and different” theme and picked new Ikea frames in varying styles (some more modern and some more decorative or traditional).
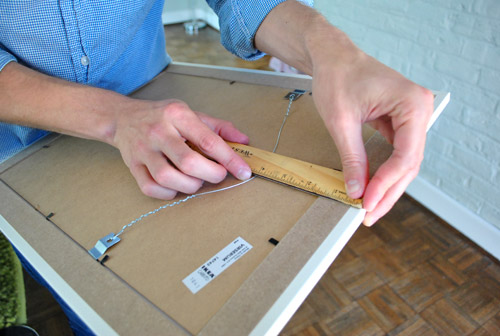
We already explained the template-making process of creating a frame wall here, but John thought we should throw in a tip about where to put the nail (with pics, because that’s how my brain “eats” info). First John measures down from the top of the frame to see how many inches below the top the nail will actually sit.
Then he finds the center of the newspaper template and measures down the same amount (4″ in this instance).
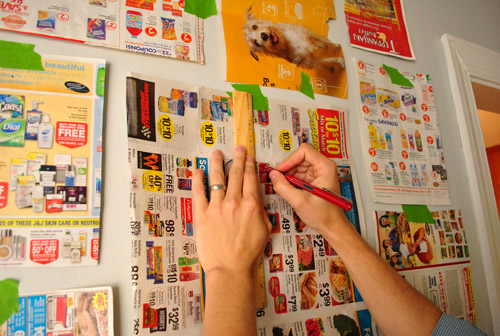
He marks the template with an x, and then just hammers right into that x and through the template.
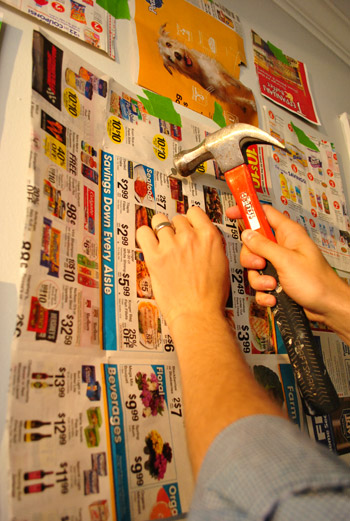
Once the nail’s in the wall in the right place, he rips the paper template from the wall and slips the frame onto the nail. Bam, a frame in the exact spot that we had the template. Yay math. Or yay rulers. Or more accurately, yay smart hubby.
Oh and you’ll notice that we started with the big frame in the middle of the arrangement (which we intentionally planned for that spot to sort of balance and ground things) so that’s another tip. If you start from the center and work out from there all the frames won’t migrate left or right or up or down as much since you’re starting in the center. And choosing a big frame for the middle should help things feel kind of balanced and well-planned (even if the edges of the smaller frames around it don’t line up and it’s more of an asymmetrical layout from that big frame on).
Here we have all of the frames hung without any art. Except for that backwards canvas on the left. Yup I hung it with the wood on the back exposed instead of the front canvas side (I taped a pic of J & I into it a while back and liked the raw kind of rustic look). You’ll also notice a few black and white photos that we used to have hanging behind the sofa in our old den in 8 x 10 frames (some of them were now hanging sideways though, so there was still some work to be done on those).
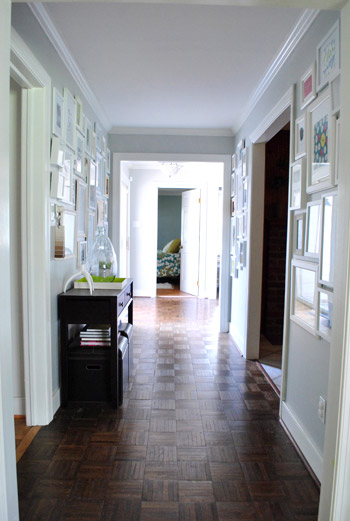
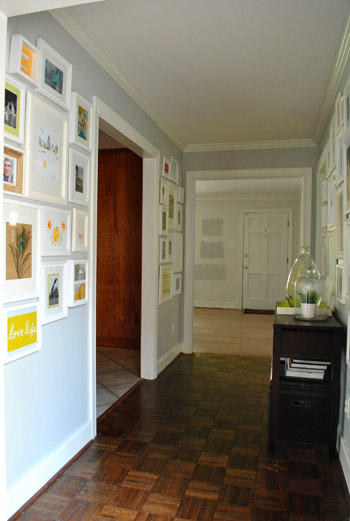
Here’s another angle, just because I like to pretend I’m fancy with the camera.
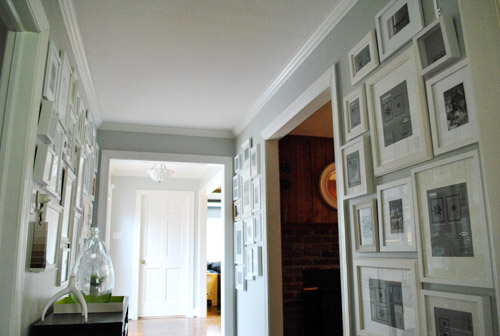
And yet another art-less frame POV of the whole hallway:
Oh and when it comes to babyproofing, we do plan to add heavy duty Command velcro to the lower frames that may be within Clara’s reach when she starts toddling around. She’s a pretty docile girl who definitely seems to listen when we ask her to be gentle (when petting her big brother Burger for example) so our plan is to sweetly request that she be nice to the frames and “look with her eyes.” But of course if we think those few low frames ever start to pose a safety hazard (or even just become too high maintenance for the way we live) we’ll definitely just get rid of them until the bean is a little older.
Anyway, back to the after pics. Here are those frames full of stuff that we already had (from these sweet birthday prints that I got last month to a ton of sentimental keepsakes, photos, and even some pretty non-traditional items that we’ll get to in a minute).
Here’s a closer look at the little gallery on the left side:
It’s full of everything from craft paper with two fortune cookies taped to it (top left) to a black & white wedding pic and even a sweet artsy photo of a water droplet in front of some patterned fabric (top right) that was snapped by my friend Laura.
The bottom half of the arrangement has an old craft store peacock feather (I didn’t even put that on paper, the tan color is just the naturally-toned-frame-back showing through the glass), my sweet Etsy bee-day print from John, and even a book cover (remember he also got me a book called Love Life for my b-day? I just took off the paper dust jacket to reveal the pretty cloth cover beneath it, and then decided to repurpose the paper cover as art).
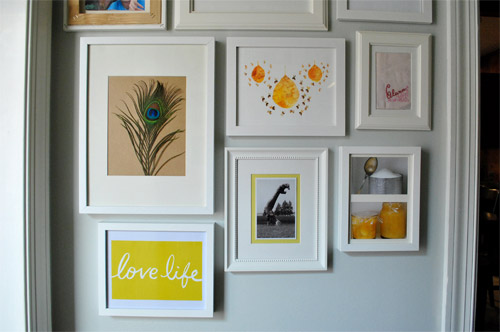
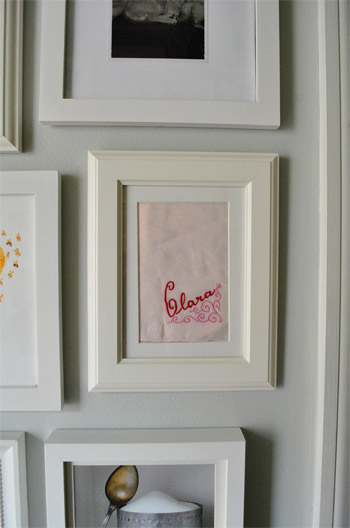
And see that light pink rectangle with Clara’s name on it? That makes me melt. It’s a cute vintage hankie that happened to be embroidered with her moniker. A good friend of ours (thanks Terri!) couldn’t help grabbing it when she realized it was such a coincidence to find something with her name on it. It’s actually really rare to see Clara on anything (they never sell Clara magnets or keychains in stores). I love it so much, and framing it is perfect since the bean doesn’t exactly grasp the whole nose blowing concept yet.
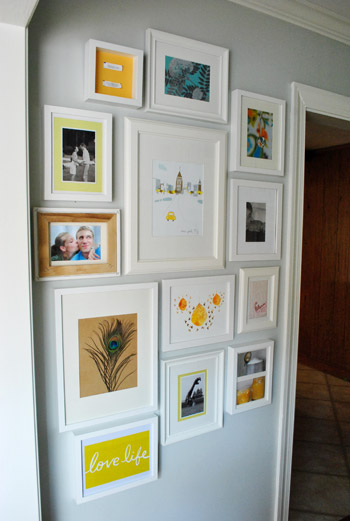
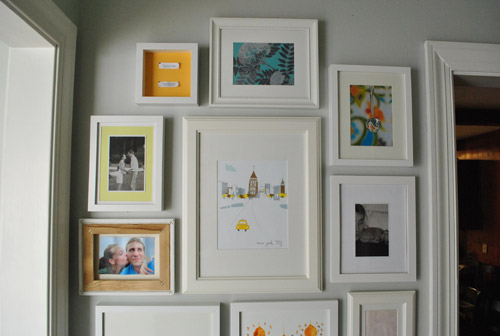
Now we’ll move over to the little gallery on the right side.
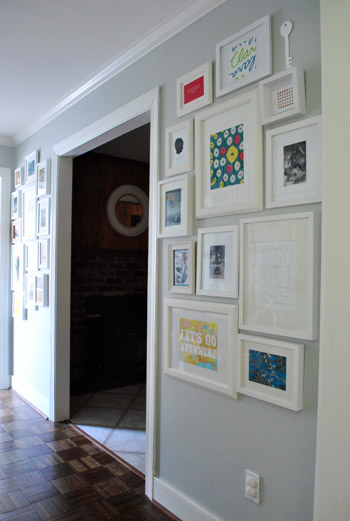
The picture below makes me realize that if I’m ever bored I want to move every frame about an inch and a half to the right. Never noticed it “in person” but it seems to hug the doorway on the left a bit more closely. Isn’t it funny how photos make you see things you can’t ever see right in front of you? Anyway, on this side we have our card stock place-holder key that used to be taped up on the other side of the wall, which we have big plans for (someday I want to DIY a white-ceramic-looking key with clay from the craft store). We also framed everything from an old fabric swatch, a quote that I wrote out by hand, more black & white family photos, and even a silhouette of our bald girl.

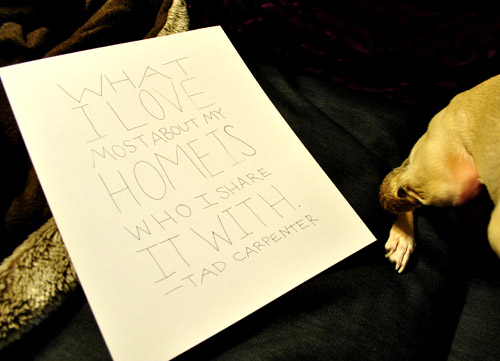
Here’s a closer shot of the handwritten quote. I love how soft it looks while other things on the wall jump out. It makes you want to lean in and read it (kind of like how you lean in and pay close attention when someone whispers a secret to you).
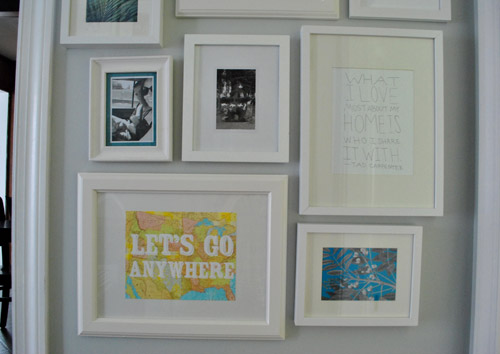
It’s a quote by Tad Carpenter that I found on Pinterest (where I’ve been living lately, haha) that’s originally from here. I loved the idea of penning something that meaningful in my own chicken scratch handwriting and glorifying it behind glass for all to see (although I spaced it out a bit differently – in 7 lines instead of 8 – to better fit my frame). And yes, that’s a Burger foot (and somebody needs to get his nails cut). He likes to sneaking in photos any way he can. I can’t tell you how many dog-butt-in-the-background shots don’t make the blog.
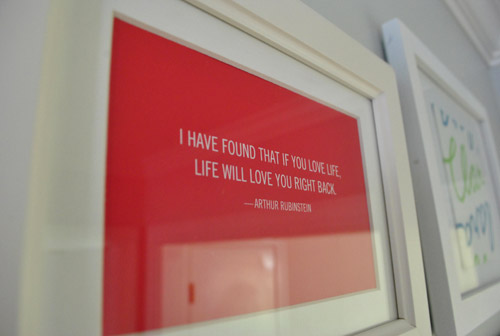
Oh and here’s the back of the Love Life paper book jacket that I also decided to frame. Waste not, want not, right? Only the tiny spine of the book cover was tossed into the trash since I used “all other parts” of it for the frame wall. Haha. It’s a quote by Arthur Rubenstein that says “I have found that if you love life, life will love you right back.” It’s true I think.
Here’s another quick little making-art-from-something-else adventure. We had these charming little desk calendar pages around for each month of the year (from here) but we always deferred to our day planner and my iPhone instead of using/enjoying them. So I took the one for July and drew a thin red frame around the outside of it with a red Sharpie. Remember when you used to color the edges of paper like that to make straight lines on other pages beneath it in grade school? I did that all the time. When I wasn’t doodling Steven’s name (my elementary crush, oh how I longed to hold his hand with my marker stained fingers).
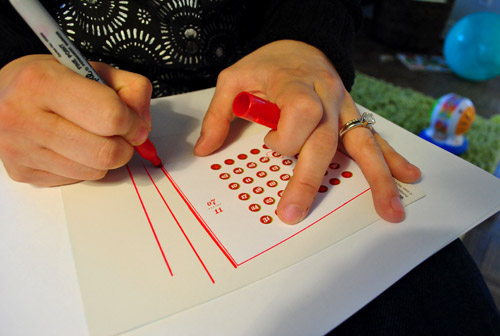
Then with a thin red pen I drew a heart around the 7th. Because we were married on July 7th, so it feels like a sweet way to honor that special day with something beautiful that we already had on hand (which was shoved into a drawer instead of being enjoyed).

And here’s a funny story about that fabric in the middle. It was actually used as “wrapping paper” from a friend (she didn’t have conventional stuff around but she had that fabric sample so she made it into a little gift pouch). How chic is she? I liked it so much I put a ring frame on it.
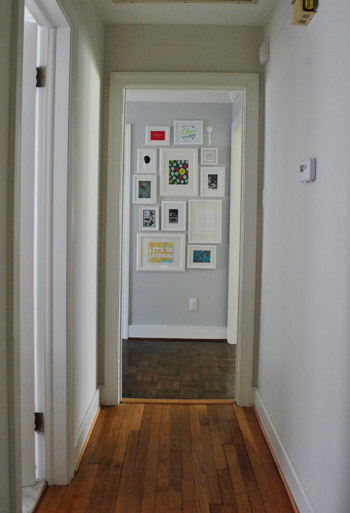
One of the fun things about the frame wall is that it’s visible from the hallway that leads to Clara’s room, the hall bath, the playroom, and the guest room. Makes me smile every time I walk back out towards the kitchen. Even when I’m carrying a bunch of laundry or happened to have just stubbed my toe on something. Seriously, the frame wall is like Prozac to me.
So there it is. One project finished.
Except we’ve only just begun because I’m sure we’ll end up switching everything out a million times. But that’s kind of the fun of it. I can’t wait for Clara to make me some scribbly art for me to proudly display.
Have you guys framed anything unusual lately? Do you have special memories stuffed into a box or a drawer that you’re dying to get behind some glass? Did you have an elementary school crush on a boy named Steven? Are you Steven, my long lost love? Haha, just kidding. We’re friends on Facebook now. It’s all very PG and he knows I no longer want to hold his hand.

emily says
this is awesome. i am now inspired to find a place for all my photos and whatnot. you guys are incredible!
Rana says
I love this. This is what I’m working on at my home. I’m on the 2nd coat of paint on the hallway walls. I’m slowly gathering photos and frames. Hopefully mine will be done before summer is over at the pace I’m going. Yours looks beautiful and you have given me some great ideas to go with what I had in mind. Thanks for sharing.
Liz C says
My husband recently went on a man-crafting spree, and finished up deep frames for his antique Scottish stuff (including his great-grandfather’s military kilt… even with great-grandpa being one of the small-sized Scotsmen, that’s a big frame!)
Next on the list is finishing up the botanical frame, filled with really gorgeous moths and beetles from all over the world. We’re also repurposing an antique photo album (from the 1870s) to hold maps and notes from the fictional explorer who “collected” all the samples.
Love the tip on getting the nail in the right spot. I’m showing that to DH. Brilliant!
lounytoon says
would love to know what color grey/blue it is that you painted the walls? so soothing, and just enough to make the frames POP!
YoungHouseLove says
That’s Benjamin Moore’s Moonshine (color matched to Olympic’s no-VOC paint). Hope it helps!
xo,
s
Emilee says
The finished product looks awesome!! I would just keep walking past this hallway even if it was out of my way!! :)
Jayme & Mendi says
Amazing you guys!! We’re wiping the drool off our chin as we type. Love all the inspiration YHL provides us daily. :)
Jayme & Mendi @ Her Late Night Cravings
http://www.herlatenightcravings.blogspot.com/
Monica says
Honestly, I wasn’t sure what to think when you guys started mentioning this idea, but to see it in full form blows my mind! I will definitely be incorporating this into my own home someday!
Andrea says
Is it just me or is there a ceramic greyhound in your dining room now??? Did you replace him?
YoungHouseLove says
That’s our concrete greyhound. We’ve had him for years (along with our white ceramic pooch, but he’s the one who sadly broke).
xo,
s
Robin @ Our Semi Organic Life says
I never realized that Clara was such an obscure name! I always thought it was pretty standard – despite not knowing anyone by that name. I really love it and hope that she’ll always enjoy a cute an ‘knowable’ but not common name!
Becky says
I hope your upcoming book cover can be turned into some DIY art. :)
Brandy says
Thank you for what the details on what everything “was”. I was wondering!
JR says
How do you get the fluff out of the Ikea frames? No matter how long I clean the inside of the glass (with paper towels, or a rag) I keep getting bits of sawdust like stuff on the glass – drives me nuts!
YoungHouseLove says
This might sound weird but I just blow on them. Seems to work to flick all of the dust out so they look pretty clean from the front.
xo,
s
Danielle Aquiline says
LOVE this! I’m totally planning to do this in our place.
What line of Ikea frames are you using? In the past, I’ve brought Ikea frames home only to realize they were more ivory than true white. Yours seem to be a bright clean white–which I want!
YoungHouseLove says
They’re definitely all shades of white and cream and off white- it has a nice layered and collected over time look. We have used nearly every line of Ikea frame as well as some clearance frames from Target so they don’t match but they all seem to “go.” Hope it helps!
xo,
s
Sally says
We have our own Clara who will turn 14 on May 31. Love the hanky with “Clara” embroidered on it! You’re right about never being able to find the typical things with our daughters’ name on them…but that’s just fine with me!
rooth says
That is so clever! I’m definitely copying the way your husband measures out where the nail goes.
Jamie says
Hi youngsters! This may seem like a silly question, but I know you’ve mentioned that there has been a stack of ikea frames in your room forever and a day. How did you figure out how many to buy slash in what sizes? Did you just wing it and buy 20 small 10 medium and 5 big ones? or was there some planning to it?
Thanks for all of your fabulous posts! I love reading them!
YoungHouseLove says
We just hung paper templates that we made in a number of standard frame sizes and played around with the layout until we liked it. Then we just counted out how many of each sized frame we needed to complete the arrangement (many of them were frames we already owned, so we only needed to buy a little over a dozen frames to do the entire hallway). Hope it helps!
xo,
s
Ivette says
LOVE the way it came out, it looks great and I love the mix of prints, photos, and other items like the keys, it really looks great and reflects who you guys are :)
Danielle says
You may have talked about this before, but what is the significance of the pins on the map of United States. Is that all the places you’ve traveled together?
Also I think gallery walls are awesome, great job!
YoungHouseLove says
Yup, one color is all the places John and I have been together. And then we added yellow ones for all the places we have been together with Clara (so she can see where she has been when she gets older).
xo,
s
Emi says
Beautiful and eclectic at the same time. What is the color of the paint on your wall? It really makes the white frames “pop”. Thank you for the inspiration.
YoungHouseLove says
It’s Benjamin Moore’s Moonshine (color matched to Olympic Premium no-VOC paint). Hope it helps!
xo,
s
Ali says
It looks great! We’ve mostly stuck to pictures of family and friends, but I want to get more into framing other things. I love the Clara hanky idea, it reminds me of a personalized sweet (tiny) blankie that someone gave to my son Dean. I wanted to know what to do with it, and that’s a great idea.
Also, thanks for the step-by-step of how to hang the picture in the right place! I know I probably could have figured it out on my own, but somehow it wasn’t sinking in. I think the pictures help my brain, too!
Lynda says
I LOVE the look – but more importantly I love that you hung your frame selection FIRST and filled them after with what would you best in the arrangement! Well done!
When I did our gallery styled wall, I first started with a collection of all mirrors. It was nice for holiday, but I knew I wanted it to hit the ceiling and “wallpaper” the wall. A month later, I filled it in with my B&W photography images. Although all the frames are all black & silver, I’m now wanting to paint a few gold and update some of the images for cards & scarpbook paper prints for a more mixed look – yours looks wonderful in all white!
:D Lynda
Michelle says
love love love! This is permanently bookmarked as inspiration for my own wall someday… you did a fabulous job!
Danielle says
Hi Sherry,
I had a question somewhat related to this post about picture frames. I’m on the lookout for an old wooden frame from a thrift store or on craigslist in my area to re-do into this wonderful necklace organizer seen here:
http://pinterest.com/pin/15313085/
I would really love to buy a wooden frame and paint it black. I’ve also thought about a distressed aqua colour or bright red. Do you have any suggestions on sanding, priming, painting a wooden frame, etc?
Thanks so much!
YoungHouseLove says
Ooh that’s really pretty! When it comes to sanding, priming and painting a wood frame it’s pretty straightforward (you sand, prime, and paint, haha). For a distressed look you can paint it one color (like brown) and then go over that with a few coats of aqua, and then sand away some of the aqua to show some of the brown paint for a nice distressed look. Hope it helps!
xo,
s
Nellene says
I think this is my favorite part of your new house so far! Love the framing of quotes and the Clara fabric. Totally off the subject of this post, but is your new couch comfy? Sometimes Ikea stuff is kinda cheapy and not so cushy. Any input on that would be great…thanks!
YoungHouseLove says
So comfy! We have had one from Pottery Barn and two from Rowe and we think our Ikea sectional is as comfy as the two from Rowe and more comfy than the Pottery Barn one!
xo,
s
Elizabeth says
this turned out so nicely! I have been slowly building a gallery wall with black frames and I found some of my favourite artwork inside my old CD cases. The album art just rocks my boat :)
erin rosenow says
hiya!! love your site, super cute and very inspiring. i’m sure you have already mentioned this but i was wondering what the paint color was in your hallway of frames? its so lovely.
thanks!!
YoungHouseLove says
It’s Benjamin Moore’s Moonshine (color matched to Olympic No-VOC premium paint). Hope it helps!
xo,
s
Kristyne says
This is brilliant. I love all the white. And thank you for showing the neat trick of making paper templates with nailing positions! I’m going to do that … someday … when I have a house big enough! :)
Danielle says
Sherry,
Thanks for your advice awhile back on distressing old wooden frames :)
I finally got that necklace display done as well as an earring one, and one is still in-progress! Check it out here: http://framedfrosting.blogspot.com/
Thanks again!
YoungHouseLove says
So cute! Love that fun zebra print!
xo,
s
Beatrice says
Hi Guys,
Just wondering what color your walls were? It looks awesome against the white frames!
YoungHouseLove says
They’re Moonshine by Benjamin Moore color matched to Olympic No-VOC paint. Hope it helps!
xo,
s
Katie says
Thanks for posting and inspiring all of us to do a little DIYing ourselves… This photo wall inspired me to do my own (though not nearly as exciting as yours) what do ya think?!
http://ktdlzll.blogspot.com/2011/05/red-wall-of-looove.html
Have a great day guys!
YoungHouseLove says
Oh my gosh I love the kitten’s first collars idea!!! It came out great!
xo,
s
KLL says
quick question, to do a gallery of frames, do you think all the frames have to be the same color?
I am on a major budget and went to the dollar store to grabe a TON of frames for a HUGE wall where I want to do a gallery of frames, but they’re half cream and half black. and will go on a sunny yellow wall. I’m having a little freak out over whether I should only use the black ones or if I should try to spray paint them all the same color. Suggestions?
YoungHouseLove says
I would try it and see how you like it. You can always spray paint them all for a few bucks if you don’t like it, but mixed and matched can be really fun!
xo,
s
KLL says
This is going to sound crazy, but it honestly didn’t occur to me to hang them as is and see if it works first. That’s such a big help. Sometimes you’re just too close to a project to get the kind of perspective that says ‘hey, goofball, if you don’t like them, you can always take them down and then paint them.’ That’s a palm to the forehead moment for sure. Thank you!
KLL
YoungHouseLove says
Haha, I have those moments all the time! Good luck!
xo,
s
Belinda says
I love the gallery wall – particularly the framed Clara hanky. As someone who also never found magnets or keychains with her name on them, I can tell you it is really special. That’s why, when I vacationed in Cuba 3 years ago and found a small pink Cigar box with gold and blue detailing with the brand name Belinda I scooped them up (even though I don’t smoke and think it is a disgusting habit!). The box is in a shadow frame along with the cover of a kids book “Belinda the Ballerina” in my own quirky wall collage! Cheers to original names!
Stacy says
LOVE! It’s gorgeous! Did you have to worry about hitting studs with the larger frames? Or using special hooks?
YoungHouseLove says
Hitting studs is a good thing! They hold things nice and firmly! We just used nails and they held really well (nothing was too heavy but if it was we’d use anchors and screws- which we love with our plaster walls).
xo
s
Kerry says
Am embarking on this project myself – you’ve inspired me! Am sure I will come back to this post a million times during it! But the best part is how your collection is just like one big scrapbook of memories and items that mean something to you all instead of just photos. Incredible job – love it!
Rachel says
Hi,
Just stumbled across your blog. Obsessed! Loving every bit of it…
I have two walls that I’ve been dying to do this to. But, I’m afraid I don’t have the creative eye for. My two walls look similar to the two of your walls that are separated by the entrance. I’d love to know how many frames in what sizes you used. I know, I know…that’s kind of annoying. Was thinking that maybe you had it written down already somewhere. It would be SUPER helpful. I’ve been stocking up on white frames but I need to find some more.
Thank you!
YoungHouseLove says
We used a variety of 4 x 6″, 5 x 5″, 5 x 7″, 8 x 10″, 11 x 17″, and 15 x 19″ frames from Ikea and Target. Probably about 50 frames total. Maybe try using the paper template method that we linked to in the beginning of this post to try out different sizes and configurations to pin down the right layout? Good luck!
xo,
s
Rachel says
Thank you, thank you! Made my way to Target and IKEA today. IKEA was out of the big White ones but I got my hands on some other ones at Target. Hoping to work on this with my husband for big reveal on Father’s Day. I know it’s ambitious considering Father’s Day is so soon! Wish me luck..
BTW: I LOVE the pictures of Clara opening up for the Big Spoon at Goodwill. My daughter does the same thing if you pretend your feeding her. So sweet.
Lori m says
I have a really dumb question–did you know everything you were going to frame BEFORE you hung the frames or did you hang the frames and then figure out what was going to go in them?
This is just part of my ongoing procrastination in getting my wall done…
Thanks for any insight!
YoungHouseLove says
We had not one clue what we’d hang until they were on the wall! I just had a little pile of prints I liked and objects to pop into shadow boxes and slowly worked my way around framing and reframing stuff. It was really fun to troll the house to see what we had (instead of having to buy a bunch of new stuff). It all came together pretty easily, so maybe that’ll help get you excited! Good luck!
xo,
s
orange says
Love love love it!
Mallory says
What is your wall color, I love how light and airy it is. Props on how well this all turned out, you gave me so many ideas!
YoungHouseLove says
It’s Moonshine by Benjamin Moore (color matched to Olympic No-VOC paint). Hope it helps!
xo,
s
Arianna says
Where did you get that fab vase and the cloche on the console table in the hallway? I have to steal them! LOL
YoungHouseLove says
The cloche was $4 from a yard sale and the vase was from zgallerie a while back (but I’ve seen them at Marshall’s and TJ Maxx and HomeGoods recently). Hope it helps!
xo,
s
Jonna says
I love your hallway of frames! I was looking for inspiration for my hallway, but all I could find were a bunch of identical frames that were way to perfectly aligned. I like your semi of matching frames and the asymmetrical arrangement of them. Thank you for the inspiration and the newspaper template idea!
ashlee says
i linked to this page in my blog when i wrote a quick blab about my future gallery walls. i hope you don’t mind.
YoungHouseLove says
Aw thanks Ashlee!
xo,
s
Meaghan says
Hey Sherry! Hey John,
So, I’ve looooong been coveting the gallery wall, and I’m ready to make a move! (Hence my long overdue comment/question). Your gallery wall is pinned several times on my Pinterest, and I’m really excited!
But, I have a question- I have a bunch of Ikea frames, some of them seem like they’d be easy to hang on a nail, but some of them don’t really have anywhere to hang from. Did you run into this problem? How did you rig yours to hang from nails if it didn’t come with the wire to attach or the lip of the frame to hang it on. (Some of the frames have the “lip” that I can hang on a nail, but some don’t. And now I’m stuck! Ugh.
Help?
YoungHouseLove says
The ones without a little hook thing usually come with wire and a hook that snaps onto the cardboard backing. I’m not explaining that well, but if yours didn’t come with any hanging stuff you can probably get it for free in the “spare parts” area at Ikea or get little hanging zig zag things that look like teeth from michael’s for a few bucks and hammer them gently into the back wood part of the frame (we have done that with a few that we wanted to hang more securely). Oh and sometimes 3M heavy duty velcro will hold them up without any nails!
xo,
s
Michelle says
Looks great! The crafty pieces keep my attention, that would be lost if it was all pictures. Very creative!
Julie says
I think this looks really great – how do you get all the frames level? I like the idea of putting paper on the wall to map out where to hang everything but after you have hung them are you constantly adjusting the frames when you walk down the hallway? That’s what I do and it drives me nuts!
YoungHouseLove says
Many of them hang on a wire across a nail, or with one of those teeth-nail things, so they don’t tend to tip much. Sometimes I’ll adjust one or two- maybe once a month? You can also use 3M velcro to hold them perfectly straight for the long haul! We have that on some of the bottom ones to secure them for Clara.
xo,
s
Sarah says
Hey just wondering about your choice in nail. Do you usually just hang things with nails or do you ever use the little picture hanging hooks? I’ve got my wall covered in traced frame paper and am just debating the type of hanger/nail to use. I want it to be the safest and least likely to fall since I have a wee one around!
Thanks!
YoungHouseLove says
Those picture hanging hooks can work too (sometimes we use anchors and screws when hanging something heavy, which is the most secure). Nails are great when they go into a stud though (very strong). Hope it helps!
xo,
s
Tine says
Amazing!!!! Absolutely beautiful. May I ask what color paint that is? I’ve been looking for the perfect gray for our Walls and u nailed it!
YoungHouseLove says
That’s Benjamin Moore’s Moonshine. Hope it helps!
xo,
s
Tine says
What an amazing wall! Can I ask where u got the yellow live life print and go anywhere print. Love them! Ps I found ur work after googling rooms painted in moonshine BM. We just did our basement in that color. Great choice! Bright airy gray
YoungHouseLove says
Aw thanks! So glad you found us. The yellow Live Life print is actually a book cover (the book is of that name, so hopefully it turns up on amazon or ebay). As for the Go Anywhere print- that’s from etsy! Hope it helps!
xo,
s
Kimberly says
I love this! I am slowly collecting frames to hang on our one good empty wall. Do you think white “ornate” kind of chic frames would go well mismatched with plain white frames? I found so many cute ones at TJ Maxx with swirls and flowers.
YoungHouseLove says
Oh yeah, totally! It’ll look so charming!
xo,
s