Isn’t it strange how you can start a project (in this case the gallery of frames that we wanted to “wallpaper” our hallway walls with) and then just leave the other half of it undone for a month. Not weeks. Literally a month. What’s wrong with us? And it’s not like we weren’t obsessed with the results of the first half of the project (recounted here):
We just ran out of frame gas or something, so we switched over to console building and chair painting and closet organizing and ceramic dog gluing and tree trimming and sectional leg spray-painting and all the other odd things that we’ve tackled since our little wall-hole-making spree. It’s so weird. What possesses DIY folks to work in fits and starts like that? Oh well, who cares, we’re back on the frame-hanging bandwagon now. All is right with the world.
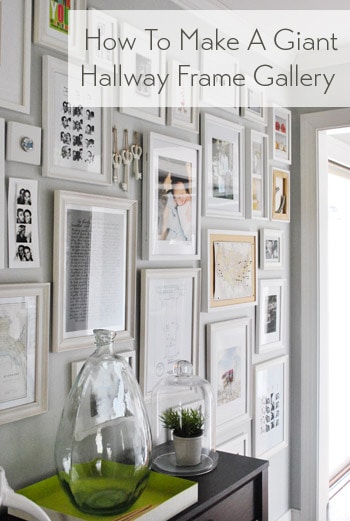
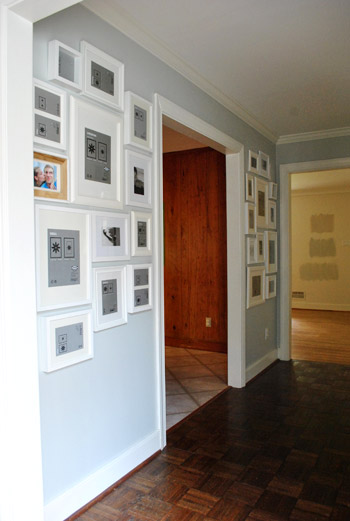
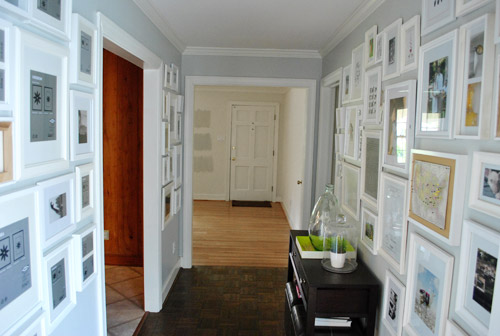
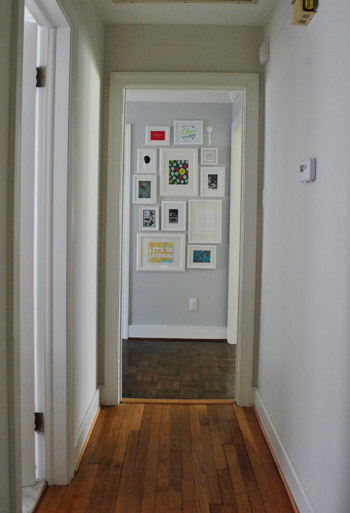
Yup, after a month of staring at taped up newspaper templates and a big ol’ stack of frames on the floor we finally mustered up the motivation to hang them up, thereby completing the big hallway o’ frames. Booyah. Here’s the whole shebang:
It’s everything we imagined and then some. And it only took a few hours of hammering and hammering and hammering and framing random sentimental objects (and my birthday prints) that I lurve. As for where the frames came from, we already owned around 10 (originally from Ikea and Target on clearance) and we also picked up 14 new ones from Ikea (thanks to a sweet b-day gift card from the fam). Although all of the frames aren’t the exact same shade of white, it’s a soft layered look with some creams and other more crisp white tones that just seem to work even though they don’t match perfectly. We even embraced the whole “layered and different” theme and picked new Ikea frames in varying styles (some more modern and some more decorative or traditional).
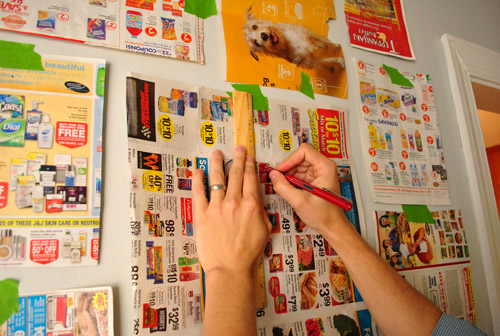
We already explained the template-making process of creating a frame wall here, but John thought we should throw in a tip about where to put the nail (with pics, because that’s how my brain “eats” info). First John measures down from the top of the frame to see how many inches below the top the nail will actually sit.
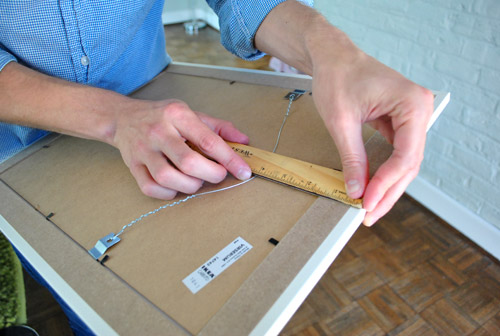
Then he finds the center of the newspaper template and measures down the same amount (4″ in this instance).
He marks the template with an x, and then just hammers right into that x and through the template.
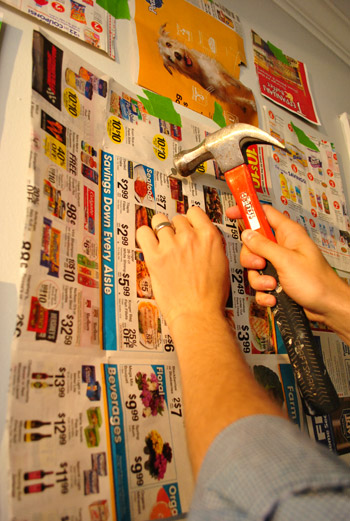
Once the nail’s in the wall in the right place, he rips the paper template from the wall and slips the frame onto the nail. Bam, a frame in the exact spot that we had the template. Yay math. Or yay rulers. Or more accurately, yay smart hubby.
Oh and you’ll notice that we started with the big frame in the middle of the arrangement (which we intentionally planned for that spot to sort of balance and ground things) so that’s another tip. If you start from the center and work out from there all the frames won’t migrate left or right or up or down as much since you’re starting in the center. And choosing a big frame for the middle should help things feel kind of balanced and well-planned (even if the edges of the smaller frames around it don’t line up and it’s more of an asymmetrical layout from that big frame on).
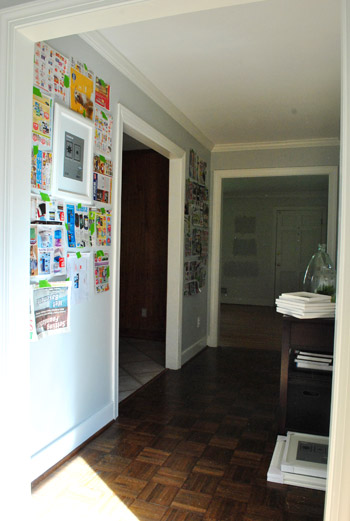
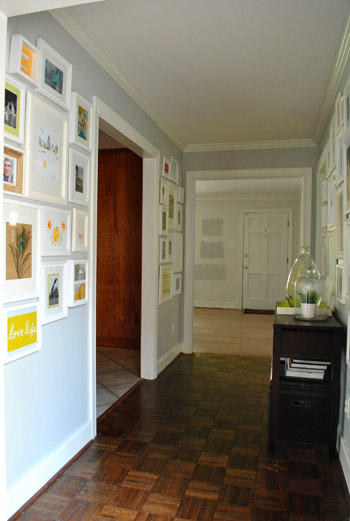
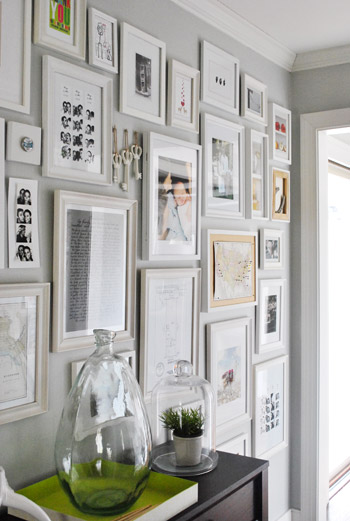
Here we have all of the frames hung without any art. Except for that backwards canvas on the left. Yup I hung it with the wood on the back exposed instead of the front canvas side (I taped a pic of J & I into it a while back and liked the raw kind of rustic look). You’ll also notice a few black and white photos that we used to have hanging behind the sofa in our old den in 8 x 10 frames (some of them were now hanging sideways though, so there was still some work to be done on those).
Here’s another angle, just because I like to pretend I’m fancy with the camera.
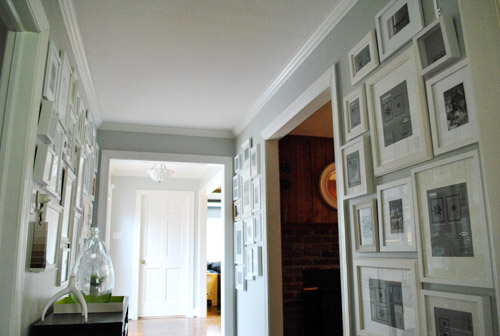
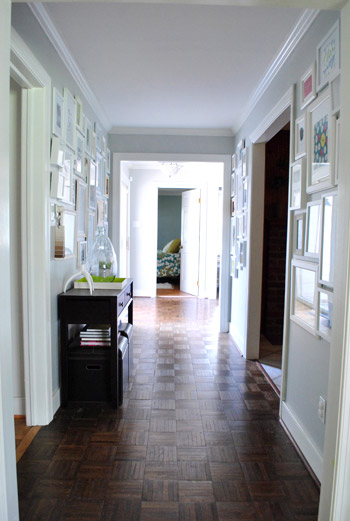
And yet another art-less frame POV of the whole hallway:
Oh and when it comes to babyproofing, we do plan to add heavy duty Command velcro to the lower frames that may be within Clara’s reach when she starts toddling around. She’s a pretty docile girl who definitely seems to listen when we ask her to be gentle (when petting her big brother Burger for example) so our plan is to sweetly request that she be nice to the frames and “look with her eyes.” But of course if we think those few low frames ever start to pose a safety hazard (or even just become too high maintenance for the way we live) we’ll definitely just get rid of them until the bean is a little older.
Anyway, back to the after pics. Here are those frames full of stuff that we already had (from these sweet birthday prints that I got last month to a ton of sentimental keepsakes, photos, and even some pretty non-traditional items that we’ll get to in a minute).
Here’s a closer look at the little gallery on the left side:
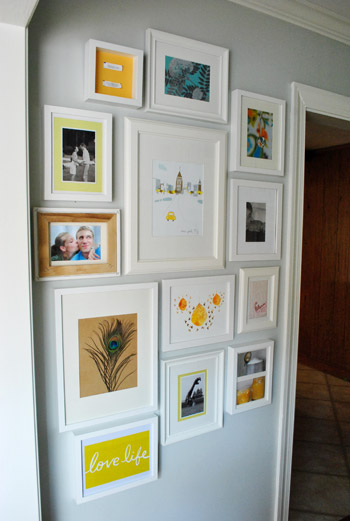
It’s full of everything from craft paper with two fortune cookies taped to it (top left) to a black & white wedding pic and even a sweet artsy photo of a water droplet in front of some patterned fabric (top right) that was snapped by my friend Laura.
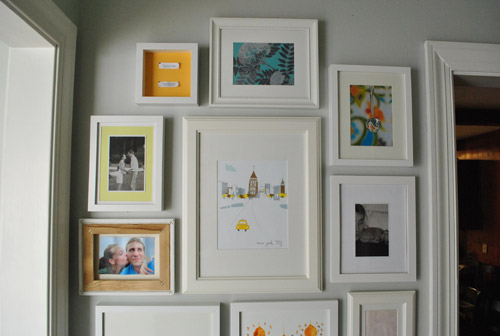
The bottom half of the arrangement has an old craft store peacock feather (I didn’t even put that on paper, the tan color is just the naturally-toned-frame-back showing through the glass), my sweet Etsy bee-day print from John, and even a book cover (remember he also got me a book called Love Life for my b-day? I just took off the paper dust jacket to reveal the pretty cloth cover beneath it, and then decided to repurpose the paper cover as art).
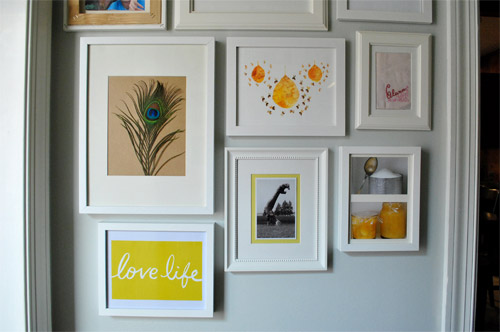
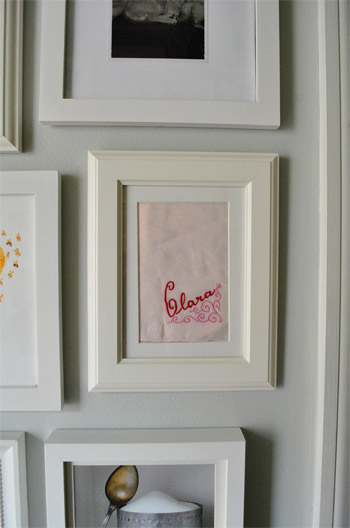
And see that light pink rectangle with Clara’s name on it? That makes me melt. It’s a cute vintage hankie that happened to be embroidered with her moniker. A good friend of ours (thanks Terri!) couldn’t help grabbing it when she realized it was such a coincidence to find something with her name on it. It’s actually really rare to see Clara on anything (they never sell Clara magnets or keychains in stores). I love it so much, and framing it is perfect since the bean doesn’t exactly grasp the whole nose blowing concept yet.
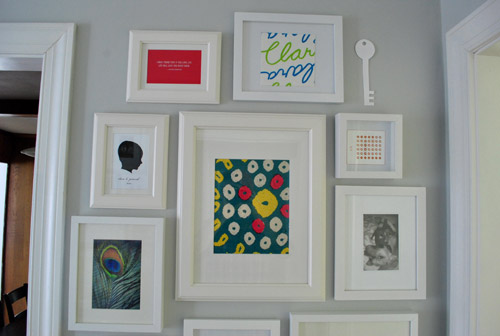
Now we’ll move over to the little gallery on the right side.
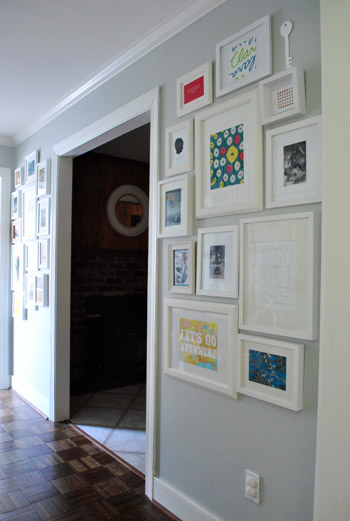
The picture below makes me realize that if I’m ever bored I want to move every frame about an inch and a half to the right. Never noticed it “in person” but it seems to hug the doorway on the left a bit more closely. Isn’t it funny how photos make you see things you can’t ever see right in front of you? Anyway, on this side we have our card stock place-holder key that used to be taped up on the other side of the wall, which we have big plans for (someday I want to DIY a white-ceramic-looking key with clay from the craft store). We also framed everything from an old fabric swatch, a quote that I wrote out by hand, more black & white family photos, and even a silhouette of our bald girl.

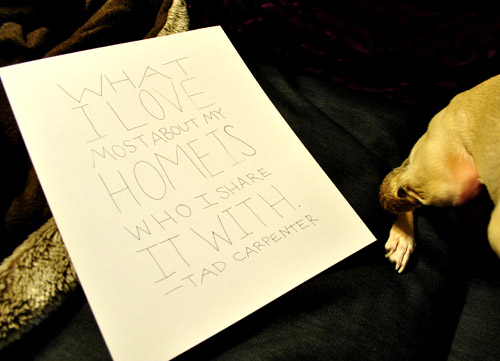
Here’s a closer shot of the handwritten quote. I love how soft it looks while other things on the wall jump out. It makes you want to lean in and read it (kind of like how you lean in and pay close attention when someone whispers a secret to you).
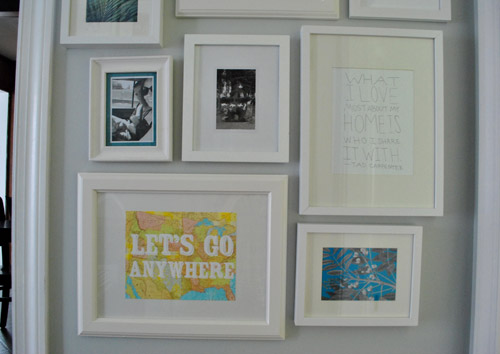
It’s a quote by Tad Carpenter that I found on Pinterest (where I’ve been living lately, haha) that’s originally from here. I loved the idea of penning something that meaningful in my own chicken scratch handwriting and glorifying it behind glass for all to see (although I spaced it out a bit differently – in 7 lines instead of 8 – to better fit my frame). And yes, that’s a Burger foot (and somebody needs to get his nails cut). He likes to sneaking in photos any way he can. I can’t tell you how many dog-butt-in-the-background shots don’t make the blog.
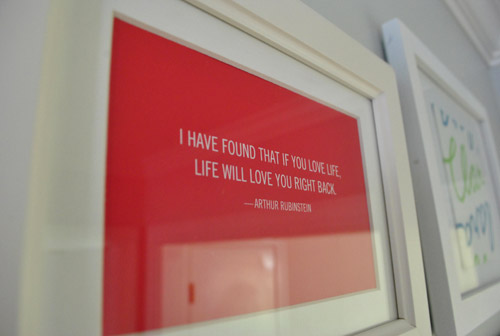
Oh and here’s the back of the Love Life paper book jacket that I also decided to frame. Waste not, want not, right? Only the tiny spine of the book cover was tossed into the trash since I used “all other parts” of it for the frame wall. Haha. It’s a quote by Arthur Rubenstein that says “I have found that if you love life, life will love you right back.” It’s true I think.
Here’s another quick little making-art-from-something-else adventure. We had these charming little desk calendar pages around for each month of the year (from here) but we always deferred to our day planner and my iPhone instead of using/enjoying them. So I took the one for July and drew a thin red frame around the outside of it with a red Sharpie. Remember when you used to color the edges of paper like that to make straight lines on other pages beneath it in grade school? I did that all the time. When I wasn’t doodling Steven’s name (my elementary crush, oh how I longed to hold his hand with my marker stained fingers).
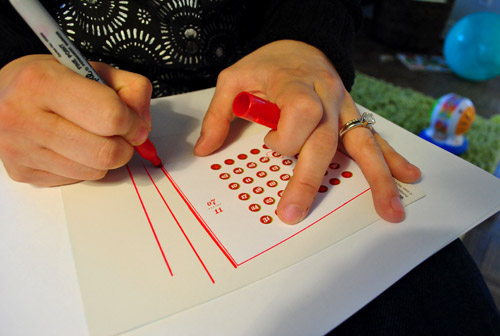
Then with a thin red pen I drew a heart around the 7th. Because we were married on July 7th, so it feels like a sweet way to honor that special day with something beautiful that we already had on hand (which was shoved into a drawer instead of being enjoyed).

And here’s a funny story about that fabric in the middle. It was actually used as “wrapping paper” from a friend (she didn’t have conventional stuff around but she had that fabric sample so she made it into a little gift pouch). How chic is she? I liked it so much I put a ring frame on it.
One of the fun things about the frame wall is that it’s visible from the hallway that leads to Clara’s room, the hall bath, the playroom, and the guest room. Makes me smile every time I walk back out towards the kitchen. Even when I’m carrying a bunch of laundry or happened to have just stubbed my toe on something. Seriously, the frame wall is like Prozac to me.
So there it is. One project finished.
Except we’ve only just begun because I’m sure we’ll end up switching everything out a million times. But that’s kind of the fun of it. I can’t wait for Clara to make me some scribbly art for me to proudly display.
Have you guys framed anything unusual lately? Do you have special memories stuffed into a box or a drawer that you’re dying to get behind some glass? Did you have an elementary school crush on a boy named Steven? Are you Steven, my long lost love? Haha, just kidding. We’re friends on Facebook now. It’s all very PG and he knows I no longer want to hold his hand.

ava says
LOVE how y’all have made art out of “nothing” — so many creative ideas! Congrats on creating something that will always make you smile.
PS — Is there a typo in the last sentence? You and Steven are “all very PG” now? ;-)
YoungHouseLove says
Yup, it’s all very PG now. As in PG rated, not pregnant. Haha.
xo,
s
Lauren says
I love this– so pretty!
I have a question about the big square frame you hung first. Is it the Virserum 20×20″ frame? I picked two of these up from Ikea literally 2 hours ago, and was wondering if they were so heavy that they need wall anchors or to be nailed into a stud. What did you do?
YoungHouseLove says
Ours is 14″ x 18″ (so not the 20×20″ one) and we’re not sure if it was called the Virserum, but we used just one heavy duty nail (not a thin picture hanging one) and it worked in our plaster walls. Hope it helps!
xo,
s
ava says
oh I get it! I was thinking ‘PC’ :)
YoungHouseLove says
Oh gotcha. Haha. That works too.
xo,
s
Caitlin @ Desert Domicile says
LOVE! LOVE! LOVE!
Makes me want to start my gallery hallway so much sooner :)
Lynda says
I love the look of your gallery walls. I’m wondering, how wide your hallway is. Do you think doing something similar would work in a narrow hallway (ours is only 3 feet wide) with little natural light?
Thanks for the great DIY tips and for sharing your home!
YoungHouseLove says
Ours is 5′ wide, so it is nice and spacious but I think spacing your frames out more so they’re less busy and more airy should work. Just try using paper templates to see how it all feels. Good luck!
xo,
s
Amy Thomas says
I love, love, love the work that you guys have done on both houses. Several women at work follow you religiously. :) One question: what is the color on the walls in your hallway. I would love that color in our master bedroom.
YoungHouseLove says
They’re Benjamin Moore’s Moonshine (color matched to Olympic Premium’s No-VOC paint).
xo,
s
Ashley says
Love how colorful and lighthearted the arrangement is. You’ve inspired me to do something similar! Gorgeous work as always. :)
Lauren says
Well, framing our wedding photo and hanging it probably doesn’t sound unusual … until I tell you that we were married in 2005 … and I just bought the frame to finally hang it two weeks ago … and the frame is still wrapped in plastic on my bedroom floor right now …
In other words, I completely relate to the whole working in “fits and starts’ thing.
mallory says
that look a-mazing. obsessed with it!
Meagan says
First, I must say thanks for doing this project!! I live in an 85 year old house that has these weird wooden panels about 1 1/2 in wide that go vertically down all of the walls in my living and dining rooms. Trying to figure out the best way to hang stuff on my walls has been a nightmare. Until now. So I’m doing something similar around the buffet in my dining room. Already bought the frames and hung the newspaper clippings. :)
And for the living room wall, I bought a plastic map at the flea market on Saturday. I’m going to pin it with the places we’ve been, then hang frames around the map with pictures from those places. If I decide to get really crazy, I *might* tie string from each pin to the corresponding photo.
Anyway, thanks for being awesome and solving my wall-hanging-woes. :)
Katie P. says
Very elegant and classy! Would you ever consider painting the hallway a slightly darker shade to contrast all the white frames? I like the way it’s all bright and neutral, but I think it would look amazing with a higher contrast too!
YoungHouseLove says
Maybe someday down the line we would, we never know when it comes to paint! For now we like the soft sort of tone on tone thing that we have going on though. Since it’s connected to so many rooms and spaces we didn’t want it to feel too jarring.
xo,
s
kayla says
looooove and pinning right now. pinterest has changed my life. ahhh the simple things!
joyjoy says
I love it! It’s totally inspiring me to finish my own frame project that I started…two years ago. :-P I need to get on that.
KOS! (Keep On S'myelin!) says
I love the wall galleries and the little things you’ve added to go along with the photos. You did a great job!
How did you figure out what size frames you needed to make them go with the ones you already had and to fit in the space? Did you just guess?
YoungHouseLove says
We used newspaper templates on the wall in a bunch of shapes of frames that we already had and other standard sizes. Then I just picked up around 14 more from Ikea in the sizes of the templates that worked on the wall in each arrangement.
xo,
s
Megan says
Your gallery of frames looks great! We’ve been in our house for seven months now and just hung the first thing two weeks ago. We’re getting there slowly…ha!
Stephanie says
All right. Convinced me. I’m doing it. In our entry way (already has a mirror and a black framed phrase in it) and around the corner down a small hallway. yay!!! And maybe I can actually do it myself and MEASURE instead of eyeball it! Awesome! :)
Abby says
Love it! And using it as inspiration to create a gallery wall in my kitchen. My beloved dad passed away recently and I have portfolios full of samples from his career as an advertising art director (I followed in his footsteps). I am framing some classic samples of his work, along with some old b/w family photos, and will do an asymmetrical arrangement to celebrate his creativity and memory. Thanks for the great ideas.
Traci says
I just love your wall o’ frames!!
What did your 2 fortunes say?
I always save mine in my wallet….what a great idea to frame them! :)
YoungHouseLove says
One says “We find confidence from those who agree and growth from those who don’t” and the other says “Your treasure has already been found.”
xo,
s
blake says
Love it!
I totally sympathize with DIY paralysis. I love starting projects, especially demo, but have trouble following through when lots of planning/decisions are involved. I’ve learned from your blog, though, that it’s better to see something through to completion than to start a million things and feel overwhelmed.
Haley says
I starting to collect frames now and going through my mementos. I plan on putting a bunch of travel memories on the wall including the coins. Don’t have much of a plan yet.
I already hung a picture frame with black/white Mickey Mouse scrap paper, wrote Welcome on the glass, and put two photo booth strips in the corners on an angle. The picture hang on the wall in front of the door. I really love it!
Ashley says
Hi there – I don’t know if someone already asked this question but, where did you end up finding most of your frames? They are so great and seem to fit together perfectly. I had to spray paint a lot of mine that I found around the house. :)
YoungHouseLove says
Almost all of them were from Ikea or Target on clearance (some were from thrift stores, garage sales, Michael’s, etc). They’re definitely a variety of styles and even different tones of white but it somehow works for a nice layered look.
xo,
s
Amanda says
Another great cheap way to get frames is to wait for a frame sale at Michaels to happen the same week they are running a 25% of all frames (even sale frames) coupon in their circular. They match up every few months or so and I’ve gotten nice 8 x 10 frames with a mat for ~$3-4 this way.
Danielle says
Absolutely love this! Been wanting to do this for a long time. My question is about your process- do you randomly buy different size frames and see how it all fits together, or do you have a plan from the beginning?? I am having such a hard time starting. Thanks!
YoungHouseLove says
The key is just making paper templates for all of the frames that you already own and just taping them up to see how your arrangement looks. Good luck!
xo,
s
Paige says
Oooh, those look great!
The most interesting thing we have framed is a record, Steve Miller’s “Abracadabra.” No sleeve or anything, just the record in all its cheesy glory.
Patti says
This looks faboosh! And I love that you came up with all those different things to frame … ya got me saying why didn’t I think of that?! Thanks for another awesomely creative tip YHLovers!
Juliette says
We are renovating a ranch that is very similar. I love seeing what you have done!!!
Ruth says
I love it! Looks fantastic guys. But the real reason for this comment was inspired by Clara’s little hankie framed up there…I have to tell you my husband and I are SO jealous you got to name your little girl Clara. Seriously, it comes up regularly after reading your daily posts. We have a little girl about a year older than the bean, and Clara was at the top of our name list. Unfortunately, our last name rhymes with Clara, and the combo just isn’t something we can bring ourselves to saddle a kid with :( So we look longingly at all of your little Clara decor knowing we’ll never have some and in the mean time are glad your beautiful daughter is blessed with such a beautiful name!!
YoungHouseLove says
Aw that’s sweet! The funny thing is that there are lots of P names that we love but we think they sound crazy with Petersik (like Paterson Petersik or Parker Petersik) but we’re so glad we went with Clara.
xo,
s
Kate says
Awesome! I dedicated yesterday to finally completing my own gallery wall which I blogged about here: http://k8theskate.blogspot.com/2011/04/my-sunday-project-gallery-wall.html (I mentioned you guys)
Mine is just a mini-version to fit my very mini-apartment but I absolutely heart it too!
Jen G. says
I heart this so much and I really want to do this in our home. Here’s the question: Do I do a frame wall in our living room or down the hallway (that would really only be visible to my family and not guests??). Hmmmm….. AND, our home is a rental, so I’m not sure how our landlord would feel about a million little nail holes in his walls. I guess I’ll just keep coming back here to gaze longingly at your beautiful wall….
YoungHouseLove says
Maybe try taping paper templates up in both places and see what you prefer? Good luck!
xo,
s
Carrie says
Have you used Velcro on a wall before? I did and then found it IMPOSSIBLE to remove. All the adhesive stuck or it peeled the paper off the Sheetrock. The goo-removing products that I tried also left greasy spots that were hard to cover, even with primer and 2 coats of paint. I’d love to hear your tips/experience with this.
YoungHouseLove says
So sorry for the confusion – I mean the 3M command velcro that’s meant for walls because it’s removable by tugging the little easy-release strip. We’ll post all about it when we get there!
xo,
s
Tesse says
I was so inspired by your initial framing spree that we spent this weekend repainting the hall a mustard color, then I bunched every black frame we had in the house into the long wall. I think it looks amazing and I totally credit you guys for it.
I do have one question though – do you ever NOT agree on something that goes up? For example, I inherited a sweet little cross stitch from my Grandma that I think matches, creates a vintage-y juxtaposition with our more modern frames & art – but hubbie HATES it. I asked him to give it a week – but I have a feeling it’s coming down. How do you handle this (if you do have a disagreement)? Thanks!
YoungHouseLove says
We have a full agreement agreement, which basically means that if we don’t both like something (when buying or hanging, etc) we don’t go with it. We just don’t want anyone to feel less represented in our house or to hold any grudges against each other for a purchase or paint/art choice that one of us loves more than the other. Hopefully your hubby will end up loving the cross stitch or maybe you can come up with something that doesn’t rub him the wrong way as much (like hanging it in your walk in closet or framing it on your night table or in some other zone that reads more as “your” space so it feels like it’s not encroaching on the common area. Haha. Hope it helps!
xo,
s
Tesse says
Thanks! Good idea on the my-space.
Jordon W says
We’re anniversary twins! Yay!
threadbndr says
I am SO doing this up the stairs to the guest room. Random art, family pics and needlework. Now my only decision is white or black frames……….
Paige says
love this. growing up my mom always had a slightly outdated version of this in every upstairs hallway we had…I say outdated because it was ALL family photos and mostly darker, wooden frames. However, I always found myself looking at the pictures no matter how many times I walked up and down the stairs…you can’t not stare at something like that.
anyway, all your frame/art collages (especially the one in Clara’s room) have inspired me to start collecting some cheap-o frames so one day I can do something similar.
Elisa says
Lovely!
Sherry – that picture of you creating the calendar art made me just get up and clean my wedding rings. Shiny!!
Lindsey says
I heart it as well. Great job! You have given me soooo many good ideas for my hallway. Thank you :)
kim says
Wow! It looks amazing! Your blog is such an inspiration. Do you mind if I ask what paint color you used in the hallway?
Thanks for sharing your life with us!
YoungHouseLove says
It’s Benjamin Moore’s Moonshine (color matched to Olympic Premium’s no-VOC paint).
xo,
s
hi-d says
What a genius idea to use a template for hanging pictures. Awesome!!
Would you mind if I mention you in my blog post today? I’m doing another weekly photo of my baby and wanted to give credit to you for the idea. I’d like to put your link in my post if you don’t mind.
Thanks!!
hi-d
http://hi-dho.blogspot.com
YoungHouseLove says
Sure, we always appreciate link love! Cool beans.
xo,
s
Azure says
I would like to do this, but our hallway is very narrow. Do you think it would look bad since it is impossible to stand back to take the whole thing in? What if I didn’t go down as low or as high? Yours looks great!
YoungHouseLove says
Yeah I bet if you didn’t go as high or as low and spaced things out so it felt airier it could work. Maybe try using paper templates just to see how it feels and going from there is the best approach? Good luck!
xo,
s
Charlotte says
Ummm, love! You are so creative! I want to copy like six of these ideas. I recently crocheted a little flower and put it in a frame and really liked it. Maybe I should take a tip from you and do more stuff like that!
Nicole says
Hey Guys! Did all of the frames come with mats? I always find cheap frames, but usually the mats dont come with them…and i’ve gone to michael’s…but they’re a little expensive at 3.99 a pop!
YoungHouseLove says
Yup, many Ikea and Target frames come with them already. And if they don’t I use cardstock or colored paper or even just the back of the frame (like I did with the peacock feather) instead. I don’t ever actually buy mats. Haha.
xo,
s
Lindsay J says
I framed propellers from my dad. He had a business when I was younger repairing boat propellers. When my parents were moving, I found a couple and wanted to hang them in my house. It’s a little odd to frame boat propellers, but I love them. They are my Prozac.
Erin says
FYI – word on the street is that your bf Nate Burkus was filming a bit at HomeGoods in Parsippany this afternoon.
YoungHouseLove says
Shut the front door. I’m from Parsippany. Did you know that? Went to Par Hills. Insanity.
xo,
s
Erin says
Not to sound like a stalker – but yes – you mentioned you were from Parsippany in one of your previous posts. I grew up there (I think you went to high school with one of my younger sisters – I went to Morris Catholic) and was chatting with my sister this afternoon when she called me from the Marshalls/HomeGoods parking lot to tell me he was there. Thought you would get a kick out of this! Small world!
YoungHouseLove says
No way- that’s hilarious! I wish I was there to bump into my main man Nate!
xo,
s
alg says
A quick tip I figured out all on my own about childproofing photo frames.
Cut a piece of thin, clear plastic film (page protectors — Staples) the size of the mat using an exacto knife. Place between glass & frame. That way, if the frame falls & the glass breaks, it will eliminate (or at least greatly minimize) shards from falling all over. And it’s completely invisible unless you look REALLY closely.
Kristen says
That turned out so awesome!! I’m so jealous of that space. We don’t have a good gallery spot in our house.
JD says
Your gallery wall is unbelievable! I have never seen one that neat or extensive!
I also wanted to post an idea on an earlier post of yours but couldn’t find it. I remember you posting about how you were disappointed in your slipcover couch from Potterybarn. I can understand how it can be a bit of a hassle but I just got finished cutting strips of foam and inserting them behind the cushion and along the armrest in the crevices of the couch. It’s a new couch! The slipcover stays in place and it looks sharp! I just thought it may be a helpful hint for you to pass on to anyone else!
Laura says
I hate to bug you guys…there are like 270 comments on here, but I have a real gallery wall problem. I collected a bunch of really cool old Ohio maps to frame for a gallery wall and then realized they aren’t standard sizes! Each one will require a custom matt. So I went to JoAnns framing guy and he wants $16 a piece to cut mats. I think that is too much when you can get a nice frame with a mat there for half that! Any great tips for me?
YoungHouseLove says
We cut prints all the time to fit. Our solution would just be to trim those maps until they fit into standard sized frames. Of course if they’re too sentimental or valuable to trim you could also make your own mats (with map board, a t-square, and an exacto knife- we used to make them in art school). Or just shell out the money for the ones from JoAnns but use one of their 50% coupons if you can. Good luck!
xo,
s
Vanessa says
I see this and it just makes my heart happy. I have had a terrible time decorating my living room…and every time I change it, i’m not happy with it. At the end of the day…I think all I want is a large photo collage like this one along my whole wall (I have a rectangular living room)….is this appropriate?? OR is it a total no no to do a photo collage on the entire longer wall of our living room??
YoungHouseLove says
Totally appropriate and fun. We say go for it!
xo,
s
Lindsay says
I absolutely love your gray walls. Can you please share what color you used?
LOVE LOVE LOVE your website!
YoungHouseLove says
We went with Benjamin Moore’s Moonshine (color matched to Olympic Premium’s No-VOC paint). Hope it helps!
xo,
s
Kristin says
I love the Calendar Anniversary frame. What a neat idea!
Jen @ The Decor Scene says
Love it all!!! Wish I had a hall like that to do this kind of a project. Drooling over here! Love all the pieces you used for so many different reasons. Very creative!!! :D