Isn’t it strange how you can start a project (in this case the gallery of frames that we wanted to “wallpaper” our hallway walls with) and then just leave the other half of it undone for a month. Not weeks. Literally a month. What’s wrong with us? And it’s not like we weren’t obsessed with the results of the first half of the project (recounted here):
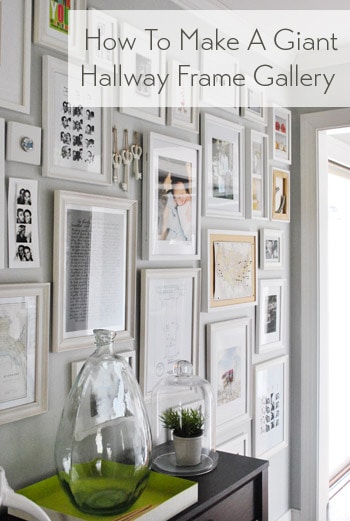
We just ran out of frame gas or something, so we switched over to console building and chair painting and closet organizing and ceramic dog gluing and tree trimming and sectional leg spray-painting and all the other odd things that we’ve tackled since our little wall-hole-making spree. It’s so weird. What possesses DIY folks to work in fits and starts like that? Oh well, who cares, we’re back on the frame-hanging bandwagon now. All is right with the world.
Yup, after a month of staring at taped up newspaper templates and a big ol’ stack of frames on the floor we finally mustered up the motivation to hang them up, thereby completing the big hallway o’ frames. Booyah. Here’s the whole shebang:
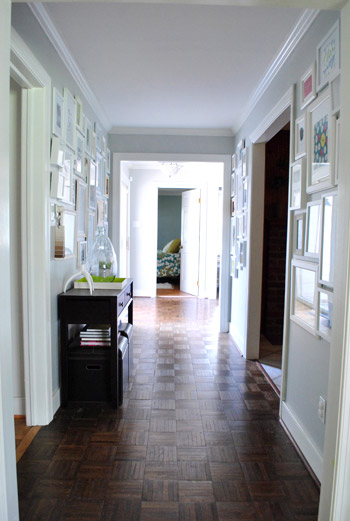
It’s everything we imagined and then some. And it only took a few hours of hammering and hammering and hammering and framing random sentimental objects (and my birthday prints) that I lurve. As for where the frames came from, we already owned around 10 (originally from Ikea and Target on clearance) and we also picked up 14 new ones from Ikea (thanks to a sweet b-day gift card from the fam). Although all of the frames aren’t the exact same shade of white, it’s a soft layered look with some creams and other more crisp white tones that just seem to work even though they don’t match perfectly. We even embraced the whole “layered and different” theme and picked new Ikea frames in varying styles (some more modern and some more decorative or traditional).
We already explained the template-making process of creating a frame wall here, but John thought we should throw in a tip about where to put the nail (with pics, because that’s how my brain “eats” info). First John measures down from the top of the frame to see how many inches below the top the nail will actually sit.
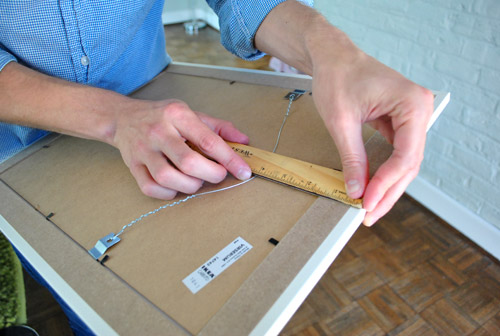
Then he finds the center of the newspaper template and measures down the same amount (4″ in this instance).
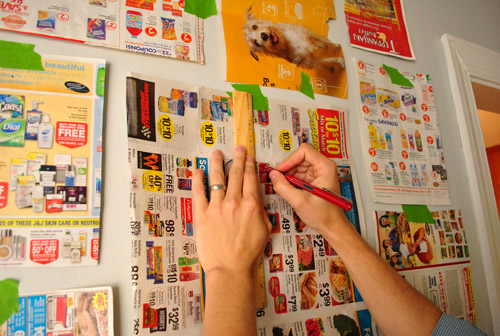
He marks the template with an x, and then just hammers right into that x and through the template.
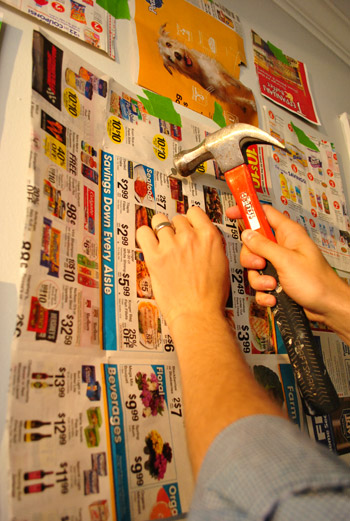
Once the nail’s in the wall in the right place, he rips the paper template from the wall and slips the frame onto the nail. Bam, a frame in the exact spot that we had the template. Yay math. Or yay rulers. Or more accurately, yay smart hubby.
Oh and you’ll notice that we started with the big frame in the middle of the arrangement (which we intentionally planned for that spot to sort of balance and ground things) so that’s another tip. If you start from the center and work out from there all the frames won’t migrate left or right or up or down as much since you’re starting in the center. And choosing a big frame for the middle should help things feel kind of balanced and well-planned (even if the edges of the smaller frames around it don’t line up and it’s more of an asymmetrical layout from that big frame on).
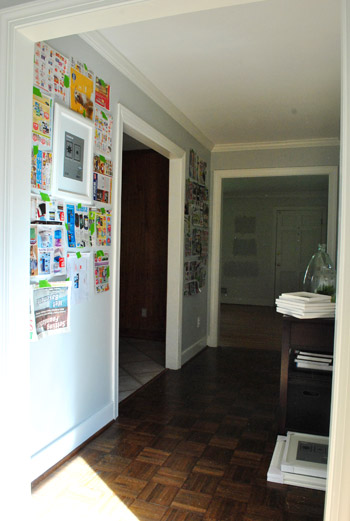
Here we have all of the frames hung without any art. Except for that backwards canvas on the left. Yup I hung it with the wood on the back exposed instead of the front canvas side (I taped a pic of J & I into it a while back and liked the raw kind of rustic look). You’ll also notice a few black and white photos that we used to have hanging behind the sofa in our old den in 8 x 10 frames (some of them were now hanging sideways though, so there was still some work to be done on those).
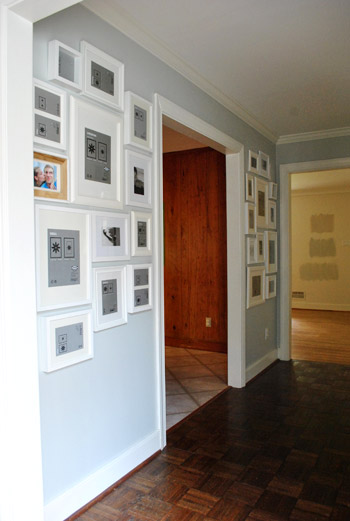
Here’s another angle, just because I like to pretend I’m fancy with the camera.
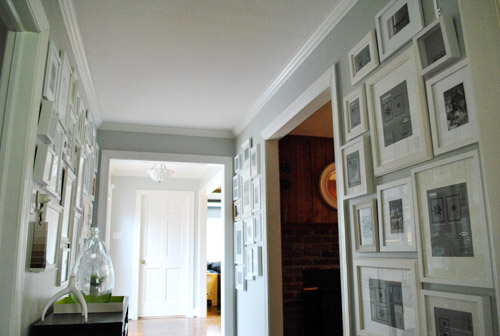
And yet another art-less frame POV of the whole hallway:
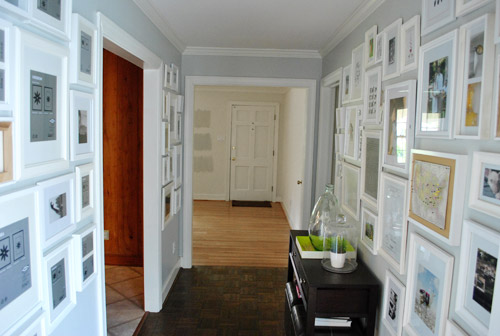
Oh and when it comes to babyproofing, we do plan to add heavy duty Command velcro to the lower frames that may be within Clara’s reach when she starts toddling around. She’s a pretty docile girl who definitely seems to listen when we ask her to be gentle (when petting her big brother Burger for example) so our plan is to sweetly request that she be nice to the frames and “look with her eyes.” But of course if we think those few low frames ever start to pose a safety hazard (or even just become too high maintenance for the way we live) we’ll definitely just get rid of them until the bean is a little older.
Anyway, back to the after pics. Here are those frames full of stuff that we already had (from these sweet birthday prints that I got last month to a ton of sentimental keepsakes, photos, and even some pretty non-traditional items that we’ll get to in a minute).
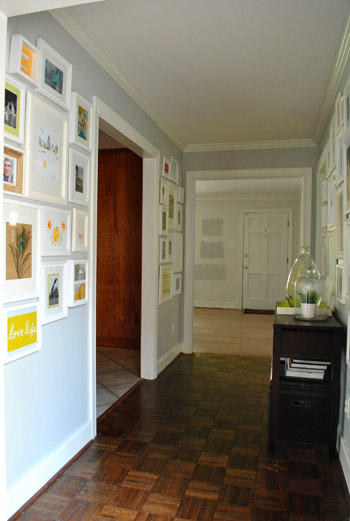
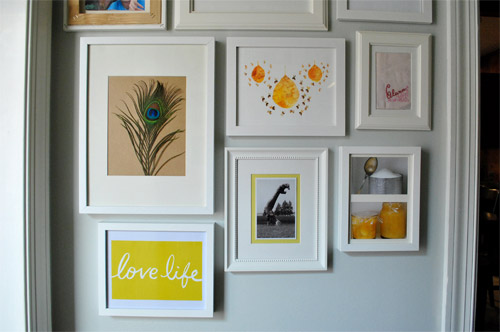
Here’s a closer look at the little gallery on the left side:
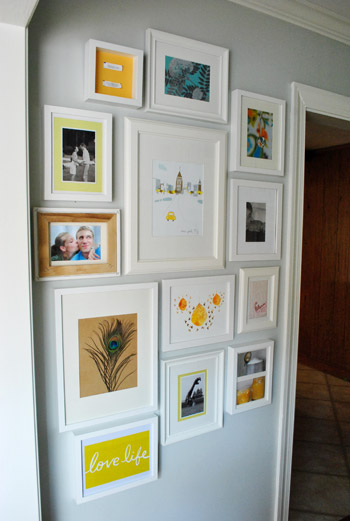
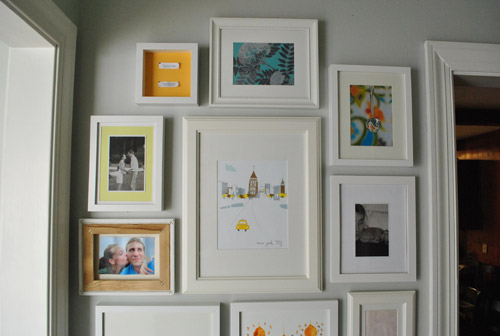
It’s full of everything from craft paper with two fortune cookies taped to it (top left) to a black & white wedding pic and even a sweet artsy photo of a water droplet in front of some patterned fabric (top right) that was snapped by my friend Laura.
The bottom half of the arrangement has an old craft store peacock feather (I didn’t even put that on paper, the tan color is just the naturally-toned-frame-back showing through the glass), my sweet Etsy bee-day print from John, and even a book cover (remember he also got me a book called Love Life for my b-day? I just took off the paper dust jacket to reveal the pretty cloth cover beneath it, and then decided to repurpose the paper cover as art).
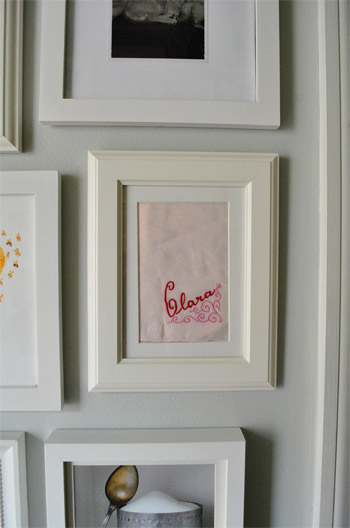
And see that light pink rectangle with Clara’s name on it? That makes me melt. It’s a cute vintage hankie that happened to be embroidered with her moniker. A good friend of ours (thanks Terri!) couldn’t help grabbing it when she realized it was such a coincidence to find something with her name on it. It’s actually really rare to see Clara on anything (they never sell Clara magnets or keychains in stores). I love it so much, and framing it is perfect since the bean doesn’t exactly grasp the whole nose blowing concept yet.
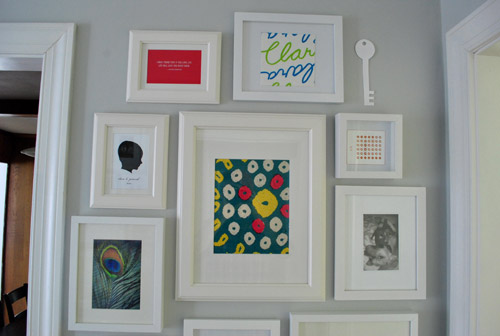
Now we’ll move over to the little gallery on the right side.
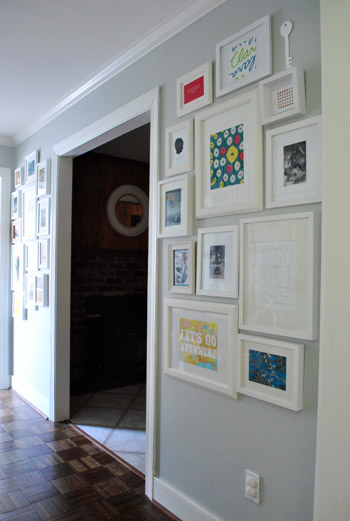
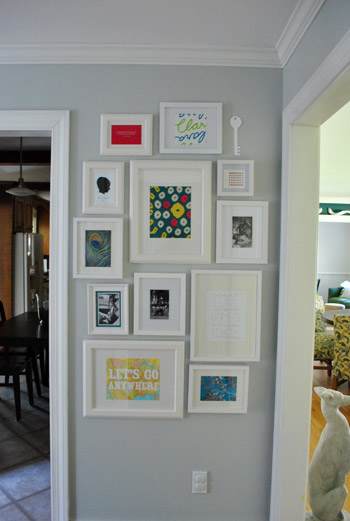
The picture below makes me realize that if I’m ever bored I want to move every frame about an inch and a half to the right. Never noticed it “in person” but it seems to hug the doorway on the left a bit more closely. Isn’t it funny how photos make you see things you can’t ever see right in front of you? Anyway, on this side we have our card stock place-holder key that used to be taped up on the other side of the wall, which we have big plans for (someday I want to DIY a white-ceramic-looking key with clay from the craft store). We also framed everything from an old fabric swatch, a quote that I wrote out by hand, more black & white family photos, and even a silhouette of our bald girl.
Here’s a closer shot of the handwritten quote. I love how soft it looks while other things on the wall jump out. It makes you want to lean in and read it (kind of like how you lean in and pay close attention when someone whispers a secret to you).
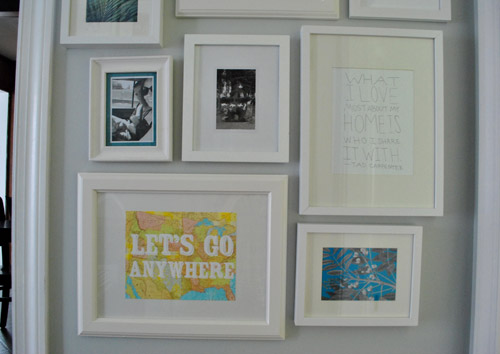
It’s a quote by Tad Carpenter that I found on Pinterest (where I’ve been living lately, haha) that’s originally from here. I loved the idea of penning something that meaningful in my own chicken scratch handwriting and glorifying it behind glass for all to see (although I spaced it out a bit differently – in 7 lines instead of 8 – to better fit my frame). And yes, that’s a Burger foot (and somebody needs to get his nails cut). He likes to sneaking in photos any way he can. I can’t tell you how many dog-butt-in-the-background shots don’t make the blog.

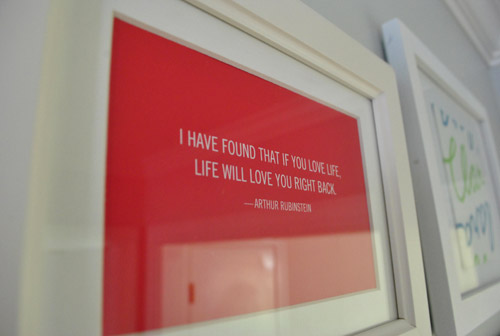
Oh and here’s the back of the Love Life paper book jacket that I also decided to frame. Waste not, want not, right? Only the tiny spine of the book cover was tossed into the trash since I used “all other parts” of it for the frame wall. Haha. It’s a quote by Arthur Rubenstein that says “I have found that if you love life, life will love you right back.” It’s true I think.
Here’s another quick little making-art-from-something-else adventure. We had these charming little desk calendar pages around for each month of the year (from here) but we always deferred to our day planner and my iPhone instead of using/enjoying them. So I took the one for July and drew a thin red frame around the outside of it with a red Sharpie. Remember when you used to color the edges of paper like that to make straight lines on other pages beneath it in grade school? I did that all the time. When I wasn’t doodling Steven’s name (my elementary crush, oh how I longed to hold his hand with my marker stained fingers).
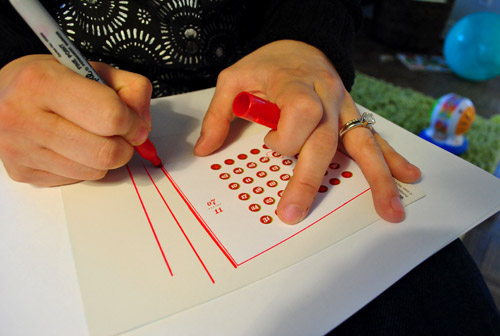
Then with a thin red pen I drew a heart around the 7th. Because we were married on July 7th, so it feels like a sweet way to honor that special day with something beautiful that we already had on hand (which was shoved into a drawer instead of being enjoyed).
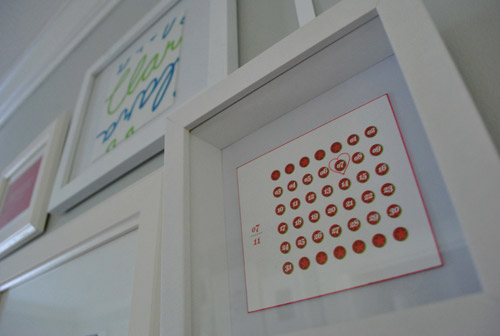
And here’s a funny story about that fabric in the middle. It was actually used as “wrapping paper” from a friend (she didn’t have conventional stuff around but she had that fabric sample so she made it into a little gift pouch). How chic is she? I liked it so much I put a ring frame on it.
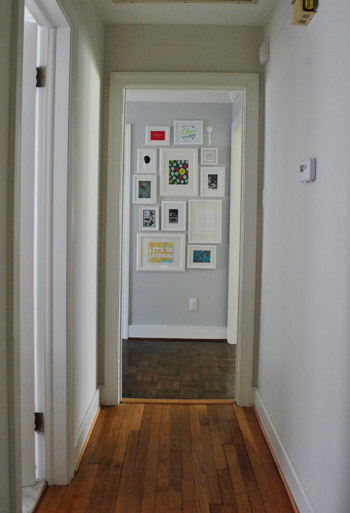
One of the fun things about the frame wall is that it’s visible from the hallway that leads to Clara’s room, the hall bath, the playroom, and the guest room. Makes me smile every time I walk back out towards the kitchen. Even when I’m carrying a bunch of laundry or happened to have just stubbed my toe on something. Seriously, the frame wall is like Prozac to me.
So there it is. One project finished.
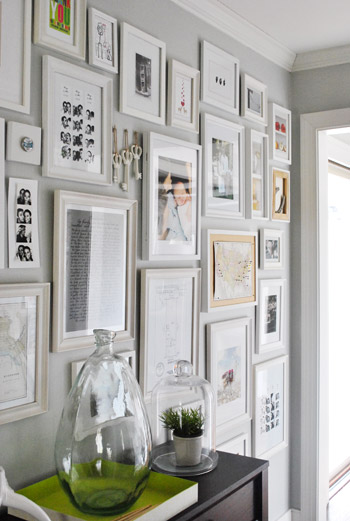
Except we’ve only just begun because I’m sure we’ll end up switching everything out a million times. But that’s kind of the fun of it. I can’t wait for Clara to make me some scribbly art for me to proudly display.

Have you guys framed anything unusual lately? Do you have special memories stuffed into a box or a drawer that you’re dying to get behind some glass? Did you have an elementary school crush on a boy named Steven? Are you Steven, my long lost love? Haha, just kidding. We’re friends on Facebook now. It’s all very PG and he knows I no longer want to hold his hand.

Anna says
Oh wow, it turned out wonderful! I really love this project!
Cristina says
oh well done boys! nice work!
Sherry I saw a DIY project that I thought to share with you (king & queen of DIY;-) in case one day you’ll need a sort of a library for one of your rooms..
Hope you’ll like it!
http://conigliogiallo.blogspot.com/2011/04/libreria-diy.html
YoungHouseLove says
Wow- I love it. So creative!
xo,
s
Jackie says
LOVE the photo wall. Did you accidentally post an after picture on your current house tour a few weeks ago?… I could of sworn I saw these there.
YoungHouseLove says
We had already completed and revealed one side of it a month ago (the big side) which would have been in our house tour already. We just finally finished the other two walls on the other side in the past few days, so we couldn’t wait to share the whole effect.
xo,
s
rachel says
Love the outcome! And your ability to turn any thing special or pretty into art is definitely a talent!
Blair says
Looks amazing. What a great way to brighten up a long hallway!
~Blair
http://thefirstapartment.blogspot.com/
Lindsay @ A Walk in the Closet says
The two of you are so inspiring! I love all the creative ideas you come up with but most importantly, your patience and planning. All the hard work really pays off!
I love both the gallery (what a conversation piece or rather…WALLS for your guests!) and the mirrors turned white boards. So cool. :)
Lisa says
OBSESSED! I love it!! Just sent the link to my husband saying “this is so our next home project…” Great job, guys!
Christen says
It looks so chic and fun! I especially love the framed calendar page= inventive!
allison says
Am I seeing a cork board in one (or more?) of those frames? That’s such a fabulous idea…and now I’m finally getting ideas of what I can do with a couple pieces of cork I’ve had sitting around for way too long!
YoungHouseLove says
There’s cork on the map one for us to sink the pins into (on the big original wall). Love it so much! Some of the other tan tones are just the natural sand-colored frame backs (we didn’t use white paper behind everything).
xo,
s
allison says
Brilliant!
Jessicah says
I also heart it! I want to try something like that in my house maybe…we have a big blank staircase wall just crying out for some frames… :)
Meredith says
I love it! I think you may have convinced me to get cracking on a gallery wall of our very own!
annabelvita says
Ohhh, just saw this project and immediately thought it would be cute for Clara’s room (I’m a sad case I know) and then it turns out they were inspired by you in the first place!
http://lifeflix.blogspot.com/2010/05/how-to-faux-sheepskin-cloud-rug.html
YoungHouseLove says
Haha, that’s so cute! I love it!!!
xo,
s
Ashley @ DesignBuildLove.co says
LOVE those!!! Too cute!
Amber of Hawthorn and Holly says
Hey guys, love the gallery wall! I’m building up a frame collection to fill up a wall in our house so this has been a big help!
Quick question–I was always under the impression that you should have all your photos the same color (all b&w, all sepia, or all color). Do you think it looks better mix-and-match? I’m worried I would end up with something chaotic rather than “WOW.”
PS: Sherry, I can’t wait to see how you DIY that ceramic key!
YoungHouseLove says
It’s really all about what you like. A lot of the frame galleries in my inspiration folders had mixed and matched art so I knew it was a look I liked. Just see what you gravitate towards!
xo,
s
Kate says
Your walls look amazing! I’d love to have the space to do such a large ‘gallery’ some day. For now I stick with one small portion of our living room wall.
Here’s a fun dog-themed cutout I made that I know you guys will appreciate. I desperately want a French Bulldog but our current apartment won’t allow dogs… so I figured I’d make a fake one for the time being. =) http://throughkateslens.typepad.com/blog/2010/05/sometimes-i-like-to-make-stuff.html
YoungHouseLove says
OH MY GOSH I LOVE IT!
xo,
s
Ana Silva says
I love it so much! I need to stop procrastinating and get to work. It’s hard for me though since I work 12 or more hours a day and when I get my two days off all I want to do it be lazy…but no excuse right. My favorite is the art on the left wall. I love the bright yellows and oranges that pop from the white frames; yellow is my favorite color too :)
JenWoodhouse.com says
Looks great!
I recently finished doing a salon-style gallery wall in our house too. I framed our magazine monogram and sea fan, a la YHL. As soon as I get around to blogging about it, I’ll letcha know so you can see!
Orrrr… you can see in person, if you decide to come to our little shin-dig this Friday!
YoungHouseLove says
Wahoo! We’d love to see it in person Jen! It’s all about if the bean feels like it (haha, we have to work around her these days). Good luck either way!
xo,
s
Kristina says
I am making my own gallery wall over my couch. Some interesting things I have done are: taking a painting that my son had done in preschool and cutting a 4×6 out of it at the most interesting part and framing that. I also bought a book for scrapbooking that contains real image pages. I am framing some of those too. They are large and beautiful. I also plan on adding some of the graphic fabric pieces that I had stretched over canvas. Hope it turns out half as well as yours has.
Kathy says
I’m planning on doing a similar layout but on the wall going up our stairs. Do you have suggestions on how to get the frames level? Would you suggest your same method?
thanks!
ps. love your wall ‘o frames!
YoungHouseLove says
Oh yes I’m a huge believer in the paper template method now. I’d just use use templates and eye it to see what you like. Good luck!
xo,
s
Hilary @ My So-Called Home says
The first print I ever bought off Etsy is living in my bathroom and I love seeing it every day.
http://www.mysocalledhome.com/2011/02/penguins-cant-fly.html
Laura says
It turned out wonderful and I am honored to be a part of it!
I am loving that peacock feather in there, and Clara’s beautiful hankie.
Anita says
Beautiful! About how much of a gap did you end up leaving between each frame?
YoungHouseLove says
There are about two inch gaps between most of the frames, but it’s not perfect at all, so some are closer and some are further away.
xo,
s
Kylie says
This is absolutely lovely. I love the velcro idea. I always tell my step-children they can “touch with just one finger” (it’s pretty hard for them to do much damage with just one finger ;P).
Vicki says
Ohhh it looks amazing! Great job on finishing it!
Though I think my eyes are broken, because when I first glanced at that framed fabric sample the first thing I saw was one of those biological diagrams of sperm going towards an egg?!
YoungHouseLove says
Hahaha, now I actually see that. Haha.
xo,
s
Jennifer says
Ahhhh, what a sweet wall! Nice work, YHL. I gotta say, though, I love pictures of hands with wedding rings and the few in this post made my heart skip a beat. What a beautiful symbol.
Have a great day!
Ingrida says
LOVE IT!!! Would love to have something like this at our house, but I am not sure if I would be able to pull it off.
L says
Love your completed project! And I am another who would love to steal your great ideas — but I’m curious: how wide is your “gallery” er, hallway? It looks lovely and light-filled in the pictures, and I’m guessing is at least 4 ft. wide?
YoungHouseLove says
Ours is 5′ wide, so yes, it’s nice and wide! I think a more narrow hallway could still work with a bit more airy and spaced out arrangement that’s low contrast (maybe all white frames on a light colored wall with black and white or subtle low-contrast colored prints). Good luck!
xo,
s
SushiMama says
Love this- I’m working on my own gallery wall and trying to figure out what all to put in it. I don’t want it to be all photos, or all quotes (which I love). Thanks for the inspiration.
Vicki J says
I so love the frames and have thought seriously about re-doing our picture collage wall to go floor to ceiling and add quotes etc like yours. But do you think yours works so well because your walls and frames are all the same color?
I have an Orange hallway and thought perhaps black frames?? but I am not sure if it would have the same impact as your tone on tone wall.
YoungHouseLove says
Why not just hold up some black frames against it to see how it works? Or even make black frame templates with fake art taped in the middle to see how that effect will look? Our walls are gray and our frames are white so it gives us soft of a soft look, but black or even wood frames could look really amazing on orange walls. Good luck!
xo,
s
Katie Kildal says
This looks so great! Where is the “let’s go anywhere” print from?
YoungHouseLove says
It was a gift for my b-day from John’s family from Etsy. More in this post: https://www.younghouselove.com/2011/03/the-big-two-nine/
xo,
s
Sara @ House Bella says
I love it! My gallery wall frames are still empty, I am in one of those “I don’t want to deal with it now because I’m doing other things” modes too. Oops!
andrea worley says
It looks amazing! So well put together, and just the right mix of personal items, and art! So inspiring! Great job!
Ashley @ DesignBuildLove.co says
Looks beautiful guys! I particularly love the quote about loving life (those are words to live by!) and the nice little quote that you hand-penned! Such a personal touch and a wonderful reminder of how to live and appreciate life! :)
PS- all the pops of color are awesome too!!! Still deciding where to do a photo gallery in my house and I just can’t decide… I’m debating the hallways, family room, dining room… (and I might do a small collage in the master bedroom just for Eric and I- relationship commemorative stuff :)) Can’t wait to share when I eventually get around to it!!!
Alexa says
Looks great!
I keep seeing your gray paint samples up on the entry / dinning room wall. Are you taking a painting break, or just waiting for the perfect apple green chair covers?
YoungHouseLove says
I think just like we ran out of framing gas for a month or so, we’ve run out of painting gas. We even have the paint and the rollers and the brushes on hand but we’re still not ready to make it happen just yet. Haha. Too many other things on the to-do list that we want to tackle first. We’re all over the place. Someday though.
xo,
s
Cameron says
I love, love, love the cool, eclectic mix of things you’ve chosen to frame. I bet you’ll find every guest that comes to your house standing mesmerized in front of your gallery, checking out every piece of art. It really looks awesome. (But you know you’re asking for the wrath of Bob with your art talk ;) )
YoungHouseLove says
Haha, yeah I’m waiting for him to pop in and say hello.
xo,
s
Michelle says
Beautiful!
Our latest take-it-out-of-the-closet-and-repurpose-it project was my husband’s collection of the 50-state quarters. They were in this massive bifold cardboard map of the US… giant, obnoxious, and I didn’t want to look at it.
So, in a stroke of genius with a michael’s coupon in hand I got a frame (already 60% off!), used my coupon on the mat, and just hot glued the quarters to some cardstock I already had. Now they are hanging on the wall, appreciated, and they’re fun to look at!
YoungHouseLove says
Ooh that’s a fun collection to display! Especially since hot glue is easy to remove!
xo,
s
Katherine says
Ha! Some of our projects around here take waaaaay longer than a month to complete. It looks fabulous!
Joan says
totally off topic, but this made me think of you guys – target is celebrating earth week with sales on some really great green, earth friendly items!! check out their circular if you haven’t already! good deals! :)
YoungHouseLove says
Wahoo- thanks for the tip!
xo,
s
Jane says
Glad I didn’t see in the post any sad incident such as a ceramic dog getting hurt last time you were hanging the pictures. Well, at least you haven’t told us YET of anything that went wrong…
YoungHouseLove says
Nope, we definitely learned our lesson about moving everything underneath just in case!
x,
s
Molly Moo says
totally true story, my elementary school crush was named steven… and I used to doodle his name all over everything as stephan so that people wouldn’t know who it was.
YoungHouseLove says
Hahaha, hilarious. You were so much smarter than me!
xo,
s
andrea says
RANDOM AWESOMENESS TO SHARE:
http://thekrazycouponlady.com/2011/04/16/seventh-generation-cleaners-at-target-only-0-49/
YoungHouseLove says
Ooh that is a good deal!
xo,
s
carolinaheartstrings says
That just looks fantastic. What a great gallery of memories, new and old.
Katie says
It looks so good! And I can’t believe no one has asked this, or maybe it’s posted somewhere else but what color of paint is in the hallway?
YoungHouseLove says
It’s Benjamin Moore’s Moonshine (color matched to Olympic No-VOC paint).
xo,
s
Connie says
I LOVE the photo/art gallery wall. Love the paint swatches on the dining room wall too. LOL!
Whitney Dupuis says
Man, I can’t wait to try this in my home. Two questions though.
1. My hallways is pretty narrow and very short (only about 8-10 feet long). Would you recommend only doing one side or would it look ok to cover both sides anyway?
2. Where do you suggest getting all of the frames? It seems pretty expensive to get so many and I don’t have an IKEA nearby. :(
Thanks so much!
YoungHouseLove says
I would just try to use paper templates (maybe just white printing paper or tan craft paper so it’s not too busy) to see what looks good. Something airier and more spaced out might work on both walls if you do something low contrast so it’s not too busy (white frames with soft black & white photos for example). Good luck! Oh and as for where to get the frames, you get can them for a dollar at thrift stores and garage sales and then spray paint them all to match.
xo,
s
Megan says
I got 6 black 8×10 frames at Wal-Mart a few weeks ago for under $4 a piece, if I remember correctly.
Adrienne says
Your gallery wall looks great – love the idea of using not only photos but sayings and other meaningful mementos! We’re doing the same kind of thing. And taking a month to get it done – so not a long time.
We took about a year to put up our gallery wall, which is in our dining room. Well, it’s up but only about half of the frames have anything in them! I just started to narrow down which photos, drawings, etc. we were going to use…
And now we’ve decided to paint the dining room a new color – haha! My poor husband – at least he only has to paint the walls though and not the ceiling, wainscoting, or trim.
You guys have done a great job and thanks so much for sharing your progress and ideas!
Lara says
Thanks for sharing all the nitty-gritty details of your picture hanging. I SO need to hang pics in our house–I have a pile of framed pictures in my closet just waiting…waiting…
My method requires my husband’s help (and pushes him waaay past his patience mark). I arrange the frames on the ground in front of the wall, then have him hold them up against the wall…balancing…
Me: “Up a little higher…”
Him: (Lip pursing)
Me: “To the left…”
Him: (Lip pursing)
Me: “No, no, back to the right.”
And so on, until his lips completely disappear & he stops making eye contact with me.
Then pencil mark the frame edges on the wall, measure the frame for its hanging point, transfer that to the wall, nail, hang pics…then make adjustments & possibly renail as necessary.
What? It’s how my parents did it.
Anyway…maybe I should try it your way:)
r8chel says
A friend of mine just had a baby and named her Clara, so maybe the name is making a comeback. Here’s hoping Clara will someday have a chance to buy all those little knick-knacks with her name on it… :)
YoungHouseLove says
Haha, it’s possible. So far we have only met two other Claras. But we also like that it’s an unusual name so there hopefully won’t be a million Clara’s in her class. You never know though. Who would have thought once-rare names like Olivia and Ella would be so big now! You just never know.
xo,
s
Julie says
I got a book called “She.” for my girls’ nursery and loved the quotes. I wanted one of them for a frame in her room but didn’t want to cut it out so I just made one that looked similar in Publisher, saved it as a jpeg and had it printed out like a picture for pennies – that’s one of my favorited ways to recreate.
I think the hankerchief is my fav! (they never have anything with my girls’ names either)
Brooke says
I LOVE it. Oh, my goodness… now I just need a house. :)
Jenny B says
Jenny is a copycat, Jenny is a copycat. Just so you know. You guys inspire me so much and I’m copying (with my own stuff) your hallway. So much fun! Another cool thing that I did recently was pull out honeymoon pics of Italy taken in 2007–I grabbed the more abstract and architectural ones and played with them in sepia and black and white tones on our pharmacy/photo website. The sepia ones are incredible looking! I found an online 1/2 price coupon code and wound up with about 20 prints in various sizes for about $12.00. I ordered them in matt finished and they’ll be framed in a collage in the living room. Can’t wait!!
YoungHouseLove says
Aw it sounds like so much fun! Good luck and post pics on FB for sure!
xo,
s