Remember when I admitted that I was glad this was over? I’m even more glad that the following project has come to an end. Let’s just say standing on a stepladder leaning back and up to paint three sides of five beams plus crown molding and quarter round around a mammoth 25 x 15′ room isn’t exactly a picnic according to this girl. I’d point to myself with my thumbs as I said that but I’m too sore. That’s right, my thumbs are sore. Along with my neck, back, chin (yes, chin) and various other body parts (calves, glutes, even my obliques for some odd reason). So to those of you who guessed that beam painting might burn more calories than rolling (see this post) I can assure you that it’s moderately to severely more uncomfortable, so I’m betting there were some calories that were burned (along with some muscles that were pulled and a few chins that were strained- all of which were mine).
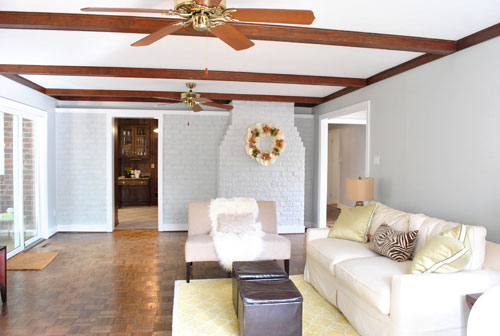
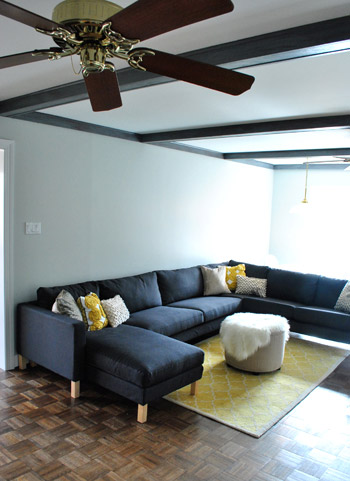
But it’s worth it. Oh so worth it! The beams went from a reddish tone that we tried to love, but just couldn’t (to us they just looked like they stuck out like a sore thumb)…
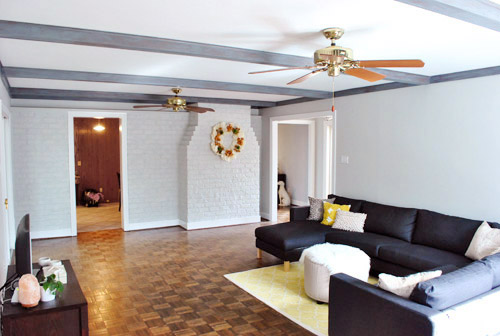
… to a warm rustic gray tone with enough of the brown wood color still peeking through.
We definitely still have to deal with the ceiling and those fans among a few other things, so this is just the beginning of the top 5% of the room’s transformation. We have no idea what color we’ll paint the ceiling but we’ll share all the details when we reach a final decision. Promise.
And the soft gray color washed over the beams seems to be a really good start when it comes to making the living room feel more like us. We think it’s kinda charming and dramatic without feeling nearly as heavy as the old dark reddy-brown beams felt. See how the thin wash of paint sort of diffused those sharp red undertones?
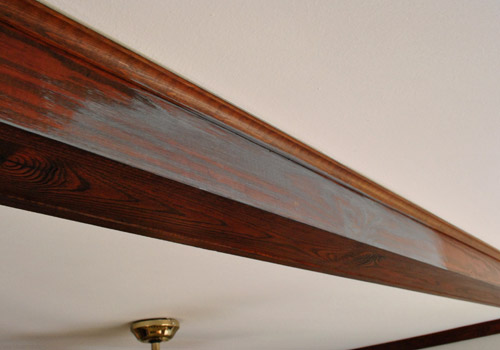
Here’s another detail shot of the beams more thoroughly painted so you can appreciate the dimension and the wood grain that shows through:
Ah, victory. It doesn’t feel any less good, even when you’re slowly shuffling around like an achey old grandma. I know some people love the look of untouched wood beams but they just weren’t right for us. And as the light changes the freshly gray-ified beams go from soft and rustic to deeper and more dramatic. Which is definitely fun since the room seems to get a bit swankier and more moody as the sun sets. See how the beams look deeper later in the day? We love it.
And for those who aren’t quite convinced, just remember that the room is about 8% done. We have a too-small rug and media center, huge honking fans on either side of the room (centered over nothing) that will be coming down, giant naked windows and sliders crying out for some curtains, nothing on the walls at all, etc. Heck, just adding in a bright 8 x 10 rug (instead of our current 5 x 8 one) and hanging some bold floor length curtains panels high and wide on those windows and glass doors will make this space feel 500 times more finished (and help the beams fit right in with the other textures and saturated colors that we’ll be adding in).
Can’t forget art either. Right now the walls are bare, but along with a bold rug and some punchy curtain panels we really want to add in some large scale brightly colored art which will also keep the room from feeling like a cold gray box and balance out the boldness of the beams with a bit more going on (so they’re not the only thing you see, they’re layered and lovely among a room full of color, contrast, shapes, fabrics, etc). Of course you’ll have to bear with us since this isn’t HGTV, so we definitely can’t snap our fingers and finish the room in 30 minutes. Instead you’ll get to watch it slowly evolve one project at a time along with the rest of our house – in real-time, on a real budget. And we think the beams will fit right in with our vision for the space as we slowly add in more color, art, fabrics, etc.
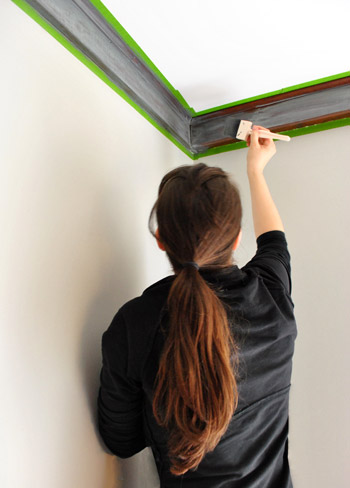
But anyway, on to how I did it. Yes, that’s the word I. John gets no credit for helping. Well except for Clara-sitting (and blog-sitting) while it all went down. Which was supremely helpful, but let’s just say that his neck and back didn’t revolt for three consecutive days like mine did. But again- it was so (so so so so) worth it. I walk into the room and smile now (we even catch Clara gazing up and grinning at our “new” beams). I might have even been smiling as I painted – although I think that face could probably best be described as a grimace. Hence this back-only progress shot.
Yes that picture alone spurred me to get a haircut the very next day (the first one I got since Clara was born 9 months ago). Insanity. Just a $14 trim at Haircuttery though. Nothing too crazy.
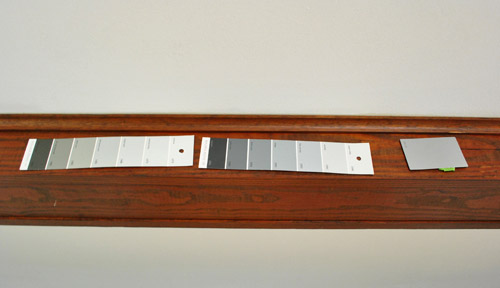
But on with the beam painting project. I’d actually use the term “painting” very loosely when it comes to this process. What I did to the beams could best be described as a combination between whitewashing graywashing, sponging, and drybrushing. But let’s start at the beginning. First we taped a few different swatch cards up on the beams and picked the three gray tones we liked best (which ended up being the last three swatches on the middle card from Benjamin Moore: Shaker Gray 1594, Rocky Coast 1595, and Nightfall 1596).
Then we went to Lowe’s and had them color match those three colors (they had them in the computer so they didn’t even have to scan our swatch card) to three small test pots of satin Olympic Premium No-VOC paint. We returned home with those three test pots and did a series of applications on the beams to see what we liked best. We picked an out of the way back edge of a beam that you can only really see when you’re standing in the corner (where the desk currently is) in the back corner of the room – just in case anything we didn’t like stuck around. But luckily everything we did was easily wiped down after each test was conducted. Especially the first attempt. We tried watering down a drop of paint on a ceramic plate and applying it with a foam brush.

That was a disaster. Ok, disaster is probably a bit too dramatic, but it was so watery it ran right off the beam I was test painting and onto the floor. It was gross and drippy and just not working. Then I tried using a dry foam brush to lightly brush on some paint directly from the tester. No watering down (or brush wetting) at all. As soon as I feathered it out, it started to look pretty cool. So we picked the test pot color that we liked best with the dry brush method (which happened to be the lightest of the grays that we brought home- Shaker Gray 1594 by Benjamin Moore) and used a wet rag to wipe down the other two test applications on the beam. Amazingly the unchosen paint applications came right off since they were so freshly applied and we left the winning one up there as a starting point. Here’s what it looked like at that stage in the game:
Next John helped me tape off the area around the beams and crown (since the 2″ foam brush wasn’t nearly as easy to control as my usual short handled brush). Then it was as easy as as simple as as mindnumbingly repetitive as using the 2″ foam brush to softly dry brush the medium gray paint all over the bottom and sides of each beam, piece of trim, and piece of quarter round for an imperfect but soft and charming weathered gray wood effect. We went with only one coat (which was very thinly applied, I’d stretch the paint as long as possible, dragging the foam brush so it would spread it out for a nice thin and translucent effect). In fact, although the project took me three days to fully complete (parts of Friday, Saturday, and Sunday – mostly because I couldn’t stay up on the stepladder for more than a few hours at a time since my neck got so cramped and my extended arm got so shaky) it probably only took about 6 hours total.
So sorry to sound so complainey- it was just an honest to goodness hard a$$ job. And you know we vowed to keep it real, so it just wouldn’t make sense to say things like “it was as easy as pie” when it wasn’t particularly difficult with regard to skill level, but a bit tough when it came to things like strength and endurance. Especially when you’re height-challenged like my 5’2″ self. Hah.
Oh and here’s a good demonstration of how much I stretched that paint. The entire project didn’t even exhaust the small amount of paint that we originally picked up to use just as a tester. This is a pic of our Shaker Gray test paint pot when we were completely done painting the beams with it. And there’s still about 10% left on the bottom! Who knew the paint used for this project would cost us just $2.80? Amazing.
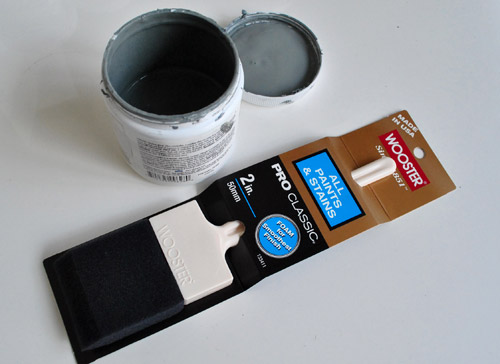
Oh and see the foam brush in the photo above? That’s an extra one I grabbed just in case my first one got beat up (I’m pleased to report that it made it through) so I stuck the extra guy in the picture above for anyone wondering exactly what foam brush I used (it’s from Lowe’s btw).
Anyway, back to the paint job. We love how the paint grabs the knots in the wood so it looks stained instead of painted for a subtle diffused look:
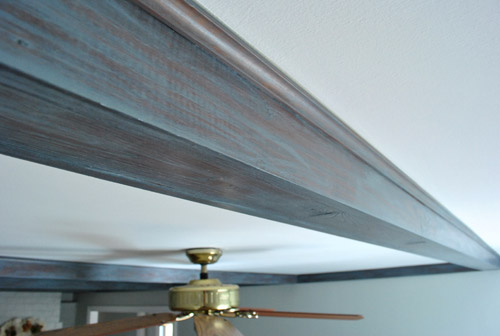
It’s almost as if we turned down the red and upped the weathered gray tones for a soft aged effect that fits right in thanks to the deep charcoal sectional on the ground (which definitely does its part to balance out the dark beams). And again, once we bring in a larger rug and media cabinet, remove the fans, add some art, hang lots of textured and bold curtains, etc – this room should really start to come together and warm up (since it’s pretty much a gray sandwich right now).
In the end, we both love that we took a risk and went waaaaay outside of our paint-it-white comfort zone and did something that looks weathered and stately and polished yet surprisingly soft. We definitely think it’s a risk that’ll pay off as the room starts to come together over the next few months. And we think it’ll look even more finished once we figure out what color we’ll add to the ceiling (a soft metallic champagne color? a light blue or green or yellow tone? wallpaper? more details on that as soon as we’re 100% sure about our direction).
And now we’ll end this beam-altering diatribe with a fun little journey back in time to this shot of the room as it looked when we moved in less than two months ago:
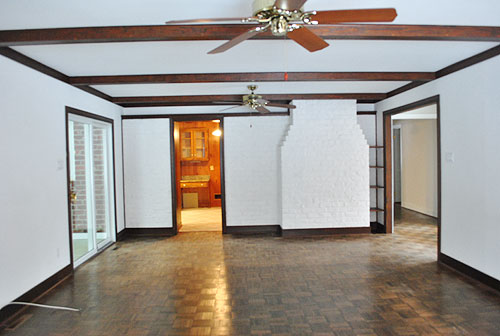
So crazy. You’ve come a long way baby living room. Can’t wait to start in on a few more projects…

Relevant Notes says
They look so good! I love watching how the room is coming together.
Erika says
Looks amazing. I would never have thought to do a thin coat so that you can still see the natural wood grain, it looks awesome!
jenny G. says
Your hard work paid off! The beams look FABULOUS! I am totally diggin’ the aesthetic you’ve already got going on in this room. Can’t wait to see more!
Debbie Whalen says
Wow! Wow! Wow! That’s all I’ve got. Wow! Good job!
Emily says
Looks fab! And I love the idea of wallpaper on the ceiling. Although, it also looks pretty great as is.
Ali says
It looks terrific! I can only imagine how uncomforatable it was for you – way to go hanging in and getting it done. Amazing what you have accomplished already :)
Harinee says
Looking good!
jordan says
LOVE the result! Sherry, did you tape around each and every beam?
YoungHouseLove says
Yup, thank goodness John helped with that! The foam brush was just not at all controllable, so in order to get into the corners of the wood we needed to tape things off. That took a good hour or so on its own but then made painting go faster since I didn’t have to worry about staying in the lines!
xo,
s
heather s. says
It looks great! I’m glad you also listened to a couple of us and repainted the trim along the top of the brick wall – it looks much nicer without that line of white so close to the beams.
YoungHouseLove says
Oh yeah I did that about an hour after you guys confirmed my lingering suspicions that it never should have gone white in the first place! It’s much less zany looking now!
xo,
s
Kristine Quick says
looks great! We have a cedar ceiling in our living room that is warm honey coloured. I don’t like it. The problem is that it has fairly shiney varnish on it. Did your beams have varnish on them or were they just stained wood? thanks! very excited to follow you through the progress.
YoungHouseLove says
Our beams were not very glossy at all. They felt dry and chalky actually, so we knew they’d soak up the paint really well instead of repel it. It sounds like yours might need some sanding or even some chemical stripping to get to that point. Maybe ask around at your local home improvement center for help? Good luck!
xo,
s
amy good house says
Looks great – I have to admit I was a little skeptical when you said you were going with dark grey – but what a difference! So sophisticated :)
ellis says
Love love love love love love LOVE it! Soooo glad you didn’t go white on those gorgeous beams and love that you can see the grain coming through. Fantastic job!
annabelvita says
So far so good! Can’t wait to see what the room looks like once you’ve got more stuff on the walls.
I hope you rewarded yourself with a nice long bath!
Abby says
Looks great! Have you come up with a plan for the floor yet?
YoungHouseLove says
Someday we’d love to refinish all the mismatched wood floors in our house so they feel a lot more cohesive. Someday…
xo,
s
karen @ our slo house says
They are gorgeous! I can only imagine how neck-breaking that was, but it was SO worth it!
Do the previous homeowners know about your blog? Do you think they ever wonder, “How come we never did that?!” : )
YoungHouseLove says
Haha, they do read our blog and seem really excited to watch us do all the work! Too funny, right?!
xo,
s
RebeccaNYC says
Sorry that was such a pain, and I will leave my final verdict until the very end of the project, as you so wisely advise. But my gut response at this stage? Paint those ugly things white. I can’t wait to read your blog everyday to catch up with what you “kids” have been doing! Great job, all around.
nikki says
Looks great!!! I am insanely jealous that John is on board with grey. It’s one of my favourite colours in all variations and the hubby is dead set against it :(
Leah says
Love the beams! The room is starting to come together! (PS – the pics didn’t show up on my Google Reader? I thought you were rambling on and on to build suspense and have pics at the end but then there was nothing! lol.)
YoungHouseLove says
That’s so weird!!!! They showed up in ours. Is anyone else having that issue? Maybe try unsubscribing and resubscribing to reset things? So sorry for the glitch!
xo,
s
Randa says
The pics show up fine for me but I’m using a Mac and looking at the site on Safari.
On another note, I love this improvement, and especially love how the molding around the beams looks like a nice silvery tone… at least in the pics :) Looks a lot more cohesive already.
Barb says
I have this problem for the first 30 minutes or so after the post has been posted. It happens pretty often. I’ve always figured it has to do with pictures being uploaded to the server or something like that…
YoungHouseLove says
To be clear, you also have the problem when in Google Reader like Leah? But not over on our site? So odd! We have no idea what’s up. So sorry for any inconvenience!
xo,
s
Barb says
I have the problem on both google reader and your site. But it is really not a big deal, the pictures show up eventually.
YoungHouseLove says
That’s so odd! I wonder if you and Leah are using the same internet provider (like Time Warner) and they take a bit longer to get the data? So sorry for the trouble!
xo,
s
Leah says
If it helps, I’m using Mozilla and my internet server is Clearwire and they notoriously suck. When I clicked through to your site they showed up no problem.
YoungHouseLove says
Thanks! That does help!
xo,
s
Paige says
Love it! I also love how you guys took a risk. Painting it white seemed like the obvious choice, but this looks so cool. I love how you guys are working through your second house with a “fierce” and dramatic attitude. I love the old house, but I’m definiltey loving this house too…plus I get to see the process. Can’t wait to see the room evolve. Just an fyi…I think the room I’m MOST excited to see progress in is the Kitchen *patiently waiting*…
Cait @ Hernando House says
Glad you’re enjoying the gray beams.
Jessica says
I think the room looks great and your hard work definitely paid off. I’d tell you to give yourself a pat on the back but that might too painful just yet. LOL
I totally know that you are taking things one day at a time, etc. but can you tell us what colors you are rolling around in your head for the accent colors of the room? I’m not asking you to spill the beans prematurely, just wondering what you are envisioning.
YoungHouseLove says
Well we have Sue the napkin as our inspiration for the whole house (with inky blues, apple greens, soft celery, deep navy, plum, etc) so all of those are contenders. We also have to admit that we love how the yellow rug and pillows that we already have look with the charcoal sectional, so we’ll just have to see where we end up with curtain fabric and art (which will probably inform the rest of the room’s direction). Should be interesting…
xo,
s
Erica says
What a difference! I love that the wood grain shows through. Also, I think you deserve a massage!
Momlady says
I feel your pain(or perhaps I should say I’ve felt this pain before)..no..really! I’ve done the looking up for days kinda painting projects. I’m looking at doing another one this year. Hope mine turns out this well! Kudos to you!
J'Anns says
I feel for you! Congrats on the award btw, I voted for you :-)
Gina M. says
Absolutely beautiful! Great color choice.
Cheryl says
Question: I’m going to paint a brown wicker accent table from Pier 1 that we’ve had for “a spell,” — going gray but I want that weathered look you’re talking about in this post. I could try to get Shaker Gray BM and sponge it on but it would seem like that would take forever for wicker (with all those crevices, nooks and crannies). If I could find a soft gray spray paint, do you think using a wire brush to it after it dries might create that weathered look? LOVE gray wicker and this is a perfectly good accent table and I don’t want to shun it. I want to use it.
Your beams are beautiful!!!! Feel sorry for your body — You will have to take long soaks in the bathtub while Clara naps. Epson salts?
YoungHouseLove says
The only way we’d recommend tackling wicker would be with high quality spray paint to get into all of those crannies. They come in a ton of colors so I’m sure they have a nice gray tone that you’ll like- and we like the Rustoleum stuff with the trigger pull (which is expensive at $6-7, but well worth it when it comes to quality). Definitely spray it outside and let it dry and set out there to keep the house from getting all fumey though! Good luck!
xo,
s
annabelvita says
My mum painted a wicker stool with gloss before, it changes the texture a bit but I really liked it (it actually made it look quite old, which is sort of like weathered!)
Sami says
Maybe the crackle finish spray paint. It might not be the wood-grain showing through look you want – but it might be the weathered look you want. Not sure how it would work with wicker. Anyway just a thought.
Amanda says
In the most recent DIY magazine they painted a wicker chair. Pretty sure they used spray paint. You could look in that magazine for a tutorial.
Katie says
Impressed! It looks beautiful. It’s like your sistine chapel! But Michelangelo painted it lying down on a scaffold, didn’t he? You didn’t take any shortcuts like he did! Great job.
YoungHouseLove says
Now that would have been so nice! I love to lay down on the job.
xo,
s
Lena says
From http://arthistory.about.com/od/famous_paintings/a/sischap_ceiling.htm:
Did Michelangelo Really Paint Lying on His Back?
No. Charlton Heston did in the movie, but the real Michelangelo didn’t lay on his back to paint the ceiling. He conceived and had constructed a unique scaffolding system. It was sturdy enough to hold workers and materials, but began high up the walls of the chapel in order that Mass might still be celebrated below.
The scaffolding curved at its top, mimicking the curvature of the ceiling’s vault. Michelangelo often had to bend backwards and paint over his head – an awkward position which must’ve made his neck and back ache, his arms burn painfully and, according to him, permanently screwed up his vision. But he wasn’t lying flat on his back.
YoungHouseLove says
No way! So interesting!
xo,
s
Mallory @ R. Simple Life says
I didn’t know what I was going to think {I’m a huge fan of exposed wood beams} but it looks awesome! I’m impressed that you decided to go against the grain {haha punny} and do what would work best in your house and with your style. So many people would have left them natural, just because you’re supposed to.
But what am I saying, you two never have any issues with doing what you want to do. I’m working on becoming more like you!
Sherry, I saw that picture of your hair and immediately felt the need to grow mine out. You’re blessed with such thick hair! Lucky.
Thao says
I gasped when I saw this. It looks amazing!
brier says
Hey!
Want to sell me your too-small yellow rug??? (Once you get your new one, of course!)
:)
The beams look awesome. I’m a wood beam gal myself, but only if there isn’t a red/orange undertone. We have a lot of orange undertone wood in our house that is in dire need of a facelift!
YoungHouseLove says
Haha- no way! We love it too much. We plan to reuse it in another (smaller) room- like the guest bedroom which conveniently has a yellow bathroom attached to it!
xo,
s
Lauren says
I love that you can still see the grain of the wood, but the color fits the room so much better now! Looking forward to seeing what else you do with this room :-)
Felicity @ Our Little Beehive says
I love the way it looks! The room is coming together so nicely. Just a tip if anyone else is looking to do the same, Benjamin Moore makes semi-solid stain (the solid is more like paint) that might do the same without having drag the brush and thin everything out. It would probably have saved your poor neck and arm! But it’s not no-voc so there’s a trade off. Open windows in February anyone? :)
Dawn says
Note to John – Valentine’s day is coming up and I think Sherry needs to get a really nice massage from the spa. I know what a pain in the neck (literally) it is to paint a ceiling. I can only imagine painting beams in a huge room. Plus I don’t know about you but I always end up with different color hair. By the way it looks great.
Barb says
BRILLIANT!!!!!
Rest yourself today…you deserve it!! A job well done!!!
Simply gorgeous. Can’t wait for the curtains (which will help with heat cost!!!) and all the other finishing touches.
I think John is “loving” you for the completion of this project. YOU ROCK SHERRY!!!
Relax and enjoy!
Lindsay says
these look so good! it makes me wish we had reddish-brown beams in our house that i could pain grey… well, almost.
Melissa says
I cannot believe that you did that for less than $3.00 (although maybe a bit more since you probably needed a lot motrin to get through it all). Look awesome – and I love how you let the wood show through. Wall art and curtains are really going to be the show stoppers in this room!
Lori and Ethne at wom-mom.com says
WOW! What a fabulous transformation. I hurt thinking about it.
Take care and make sure you get a neck and back rub from John! You deserve it.
Jenn L says
Oh wow it changes the whole look of the room! It’s amazing what painting the beams did for the entire area =) Well worth the effort <3
were you thinking of subbing for other fans? lighting? funky chandeliers? or a combo of different things? hehe I'm beyond curious! I have no idea what i'd even do!
xoXOxo
Jenn @ Peas & Crayons
YoungHouseLove says
We’re actually going to formally terminate those fixture boxes since they’re so oddly placed (they make the whole room feel skewed). Someday we do hope to drop a light fixture in over the seating area though. Until then we’ll work with what we have (floor lamps and table lamps) and see what we come up with!
xo,
s
Heather says
painting above your head is such a pain in the neck, literally. i am putting off painting our ceiling because i just don’t want to feel the neck and chin pain again!
it looks great and i think the ceiling would look GREAT in a soft metallic champagne color. can’t wait to see more.
Megan says
I like it! We know all about being sore after painting a room. It makes me feel so out of shape!
Brittany says
LOVE IT!
My Shucking Life says
Looks great! My hubs and I recently spent an entire Saturday painting the ceilings and moldings at my parent’s new fixer upper. We are also very glad that’s outta the way!
Shreya says
It looks amazing!
Unbelievably great job!
Kristina says
I agree. You deserve a massage for your hard work. It looks lovely.
Jenny @ Art, Wine and Design says
I’m loving the transformation!
ashley c says
They turned out really nice!
Jennifer says
The gray beams are definitely better than the wood, but I gotta say I’m with RebeccaNYC on this one — those ceilings are simply too low to have such a prominent “calling card.”
Painting them white would still allow the beams to lend some architectural interest without closing the room in so much.
That said, I have no doubt whatever you end up with will ultimately look great…AT voters have spoken!
Ashley @ Simply Creative Things says
I can totally emphasize with you on the neck/back/all over body pain of painting over your head, but I agree that it looks so worth it!
Liz@WashingtonPharmGirl says
I love the effect. In my boys room, I put the first layer of whit paint on the door. I loved how the grain showed through, a delicate white wash. I left it like that. Sometimes, less IS more!
d says
It definitely opens up the room!