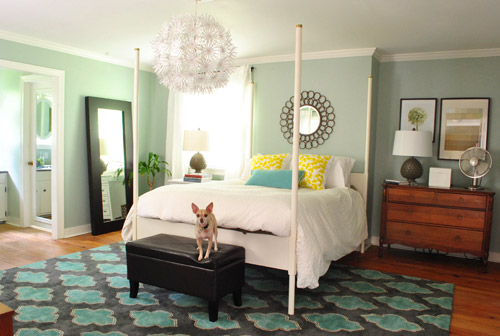
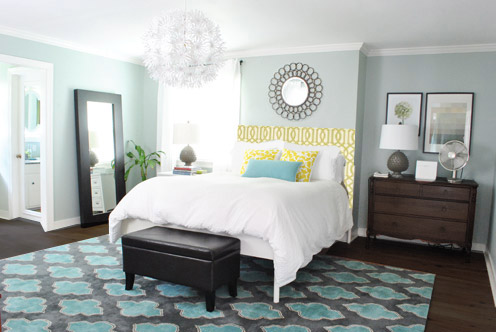
Yup, we finally gave Ed a little haircut. For over a year and a half we tried to work with the posts on Ed the bed, but the realization that we didn’t have a lofted ceiling or a floor plan that made sense of those big dramatic posts slowly worked its way into our conscious and we finally decided that just because Ed was born with long hair posts doesn’t mean that a little haircut is cruel and unusual bed punishment. So here he is before…
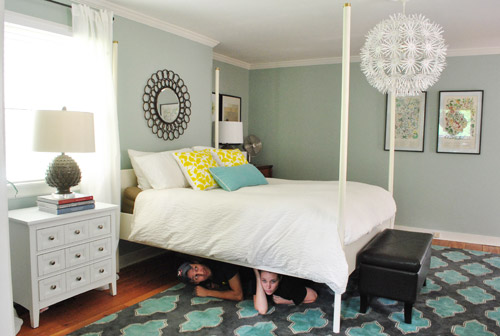
… during…
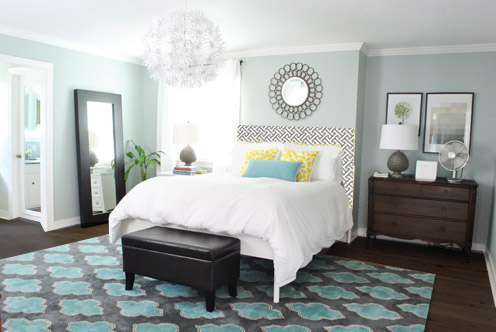
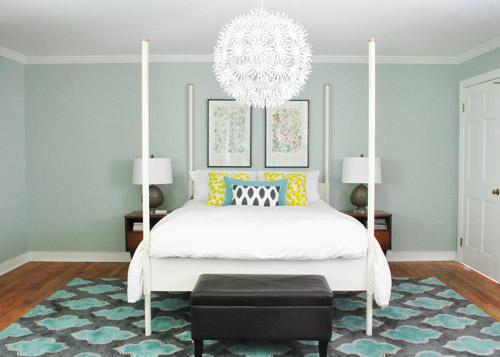
… and after…
This whole bed-trimming project was free, took about an hour of work, and we totally dig the more open look. It was just too much vertical stuff going on- especially with the bed right next to the window (with those floor length curtains going on). Ed’s totally crying out for a large fabric headboard so we can raise the mirror above the bed about another foot or two (like this poorly photoshopped rendering) and someday we’d love to stain the floors (and possibly the dresser) darker…
… but we’re getting there. And just because I can’t stop at one photoshopped headboard option, here are some more I had fun with:
But back to reality. You know we like to use what we have, and we love Ed for so many reasons. The height, the comfort, and the thin airy legs that he sits on which allow us to hang out be weird under the bed…
… so instead of completely scrapping him (ex: craigslisting him and buying a new bed) we devised a completely reversible plan to give his posts a little trim. How is it reversible? Well, while they don’t just screw off or anything, they’re solid wood posts. So we can always reattach them by adding a nice long metal screw to the center of each post that we could just screw back into the bed frame to attach them (it’s how a bunch of Ikea items are made, like how Lack tables have legs that can be screwed on and off). So although we don’t foresee any reason to put those suckers back on, who knows… maybe someday we’ll end up in a house with lofted ceilings and we’ll wish we could put Ed back together – and now, theoretically we can. Haha.
So after concocting our little Ed-tweaking plan, this is how it all went down (complete with insanely embarrassing not-meant-to-sound-perverted comments by yours truly):
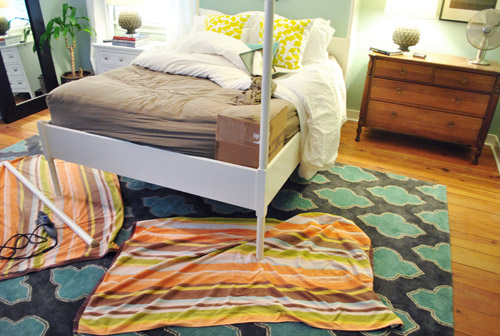
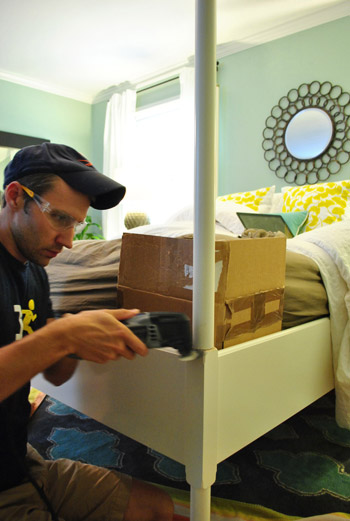
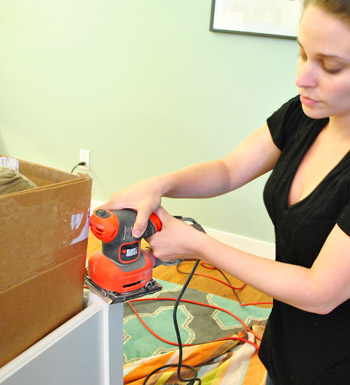
For those who can’t watch the video (perhaps you’re at work, although it pretty much tells the story on mute) we snapped some photos for ya too. We basically just lined the Dremel up (we have a Multimax, and used the wood cutting attachment) with the base of the post and slowly sawed around it.
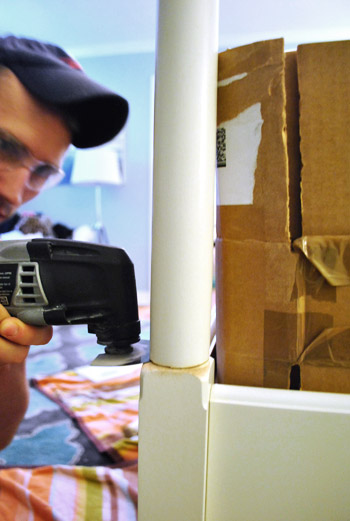
Oh and see how we put a piece of cardboard between the mattress and the post? Just wanted to make sure we didn’t get too chop-happy near the mattress (and moving our organic mattress takes the strength of ten vampires, so we just didn’t have it in us).
Thankfully we had no mattress casualties and each post came down after around five minutes of careful cutting.

We actually got much better at making super clean cuts as we went, so we’re glad we started on the two bottom posts of the bed (which will always be covered by the comforter anyway) and worked our way up to the top two posts, which are seen a lot more.
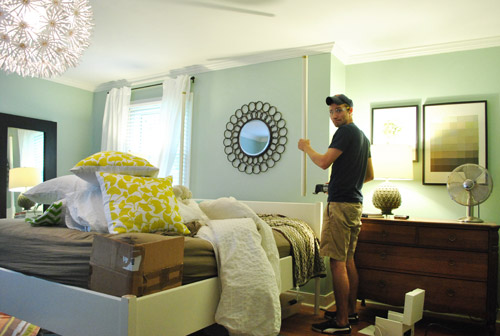
John even let me take a spin. I had to wrestle the Dremel from his cold dead tool-loving hands, but it was worth the trouble. Girls need a romp with a power tool every once in a while too. Especially because safety glasses are so undeniably sexy.
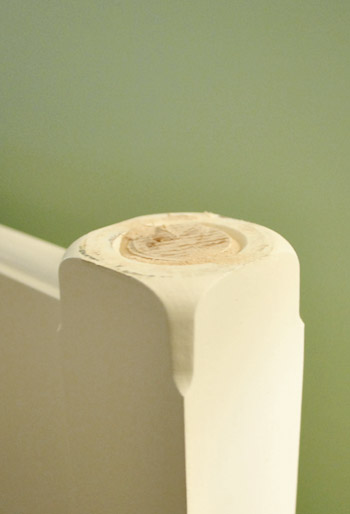
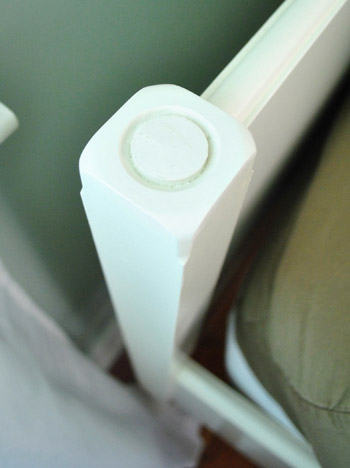
We were really surprised how nice the top posts looked when they were cut. See the circle detail that they ended up sporting (the bottom posts didn’t have those)? They made it look like a decorative design, so they looked convincing. Like they were meant to be this way. Total happy accident.
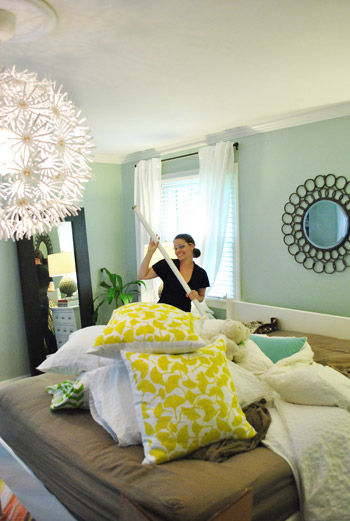
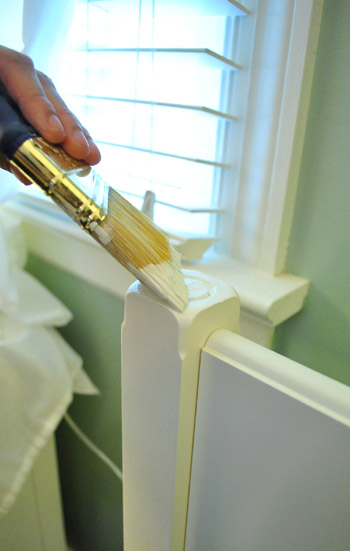
Then we just did some sanding to get everything smooth…
… and I used the Ikea-white paint (I did a little hunting to find the perfect white paint that matches Ikea’s white tone here) that we had leftover from another project.
Check out the top right post after cutting, sanding, and painting…

… and the top left post after the same rigmarole.
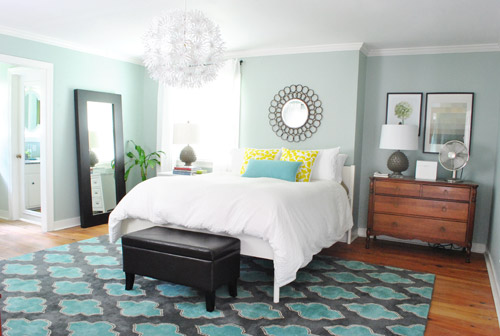
By the time the paint dried and we made the bed it totally looked like Ed was born this way. Cue the Lady Gaga dance-a-thon.
Here’s John breaking it down. Just kidding. He ran through the shot and kicked his leg up in some sort of weird victory cry and somehow the camera caught his ghosted karate move. Hilarious.
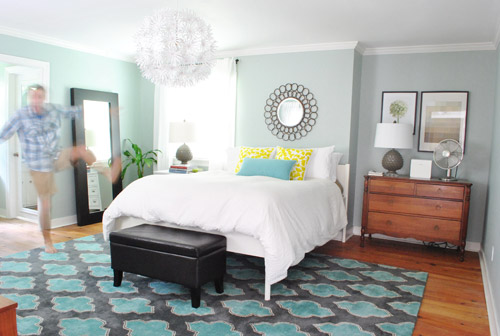
Here are things from another angle. Obviously we need nice large art where those botanicals are floating on that wall on the right of this picture (we’ll rehang the botanicals over a chair that we have in another corner), but we’re getting there. Especially once we build an upholstered headboard for Ed and move the mirror a bit higher, so it further ties into the chandelier.
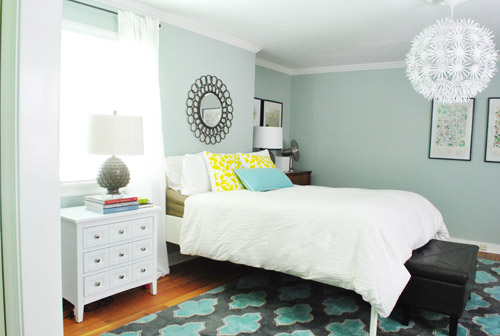
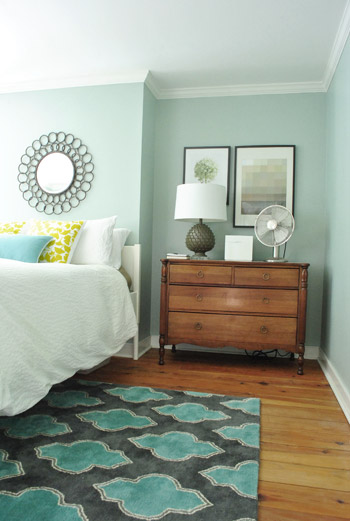
I can’t tell you how much we like this hand-me-down dresser from John’s parents in the nook. It’s the perfect fit.
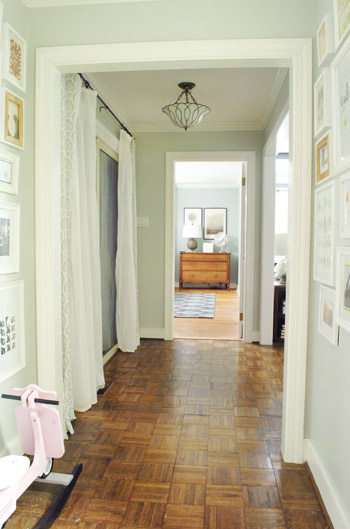
We already shared how it looks from the hallway in this morning’s post, but here’s that shot again, just to refresh the ol’ memory:
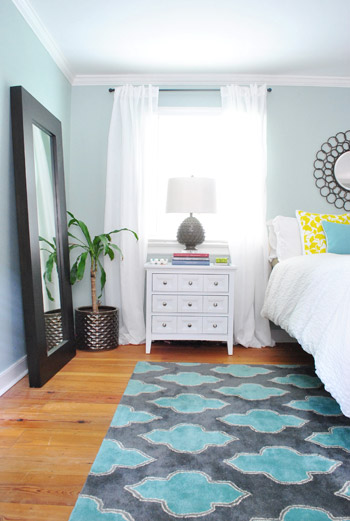
Although it definitely doesn’t match the wood dresser on the other side, there’s something charming about the little white nightstand in the window. And the fact that we have the same bedside lamps on each one sort of connects the two pieces, even though they’re very different.
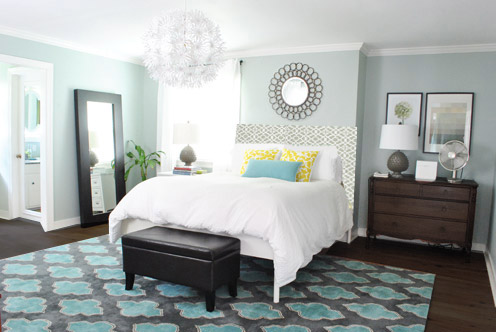
Here’s a straight shot of the bed as it looks now. I’m definitely itching to get on that headboard project so I can bump the mirror up a bit higher so not everything will be in the same line (the art on the right and the mirror are so perfectly lined up, I think the bed will feel more special with a big fabric headboard and a higher focal point above it). And as for the color of the dresser and the white nightstand, we’re open to painting or staining something, but we’re not rushing into anything.
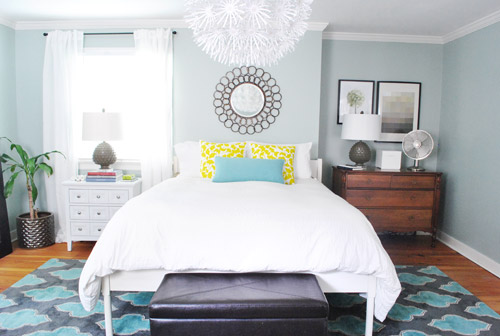
One thing is for sure, it definitely feels more homey and full than it used to look back when the bed was on the wall near the door.
And it’s so much nicer to walk into this view, instead of stepping three steps in the door and hitting the bed.
So that’s the latest bedroom tweak, but we’re probably a good dozen tweaks from being done in here. Haha, you know us. Inching along. But you know we’ll keep you posted when we tackle other things, like dealing with the bare wall across from the bed, making a giant fabric headboard and moving the mirror up, etc. Should be fun…
Oh and how funny is this? Every morning around 10am the sun shines through the window above the sink (this pic is from before Ed’s move and subsequent haircut)…
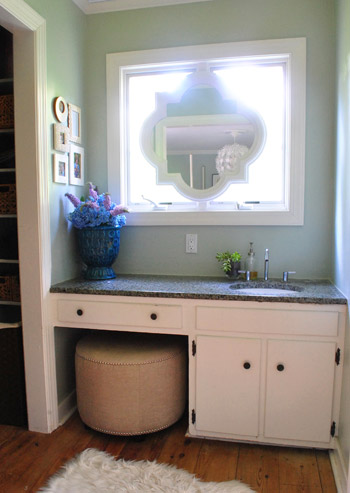
… and this shape is reflected on the rug:
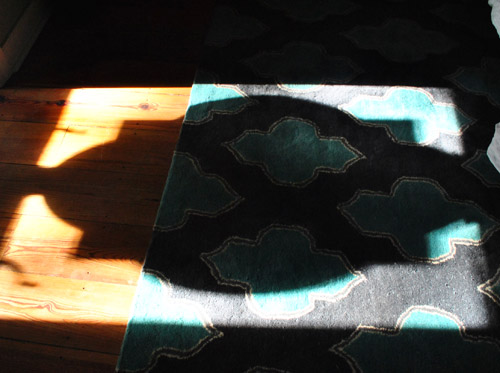
Yup, the elongated shadow is pretty much exactly the same shape that’s on the rug itself. The weirdest thing is that when we fell in love with this rug and snatched it up at a local outlet, we made absolutely no connection that it had a similar shape to the mirror above the sink. Hooray for happy accidents.
What are you guys up to in the bedroom (decor wise, I mean – let’s not get saucy). Has anyone else altered their bed to make it work better for their room? Or straight up built one from scratch? Anyone else planning to make a headboard in the next few weeks? I can’t wait to go fabric shopping…

Marla says
So somehow I got confused and thought that “Ed” was the light fixture and was completely horrified by the plan. All I could picture was the pretty chandelier looking like he got the worst haircut ever. I’m glad Ed the Bed fared much better.
Ashley McCormick says
Soooo much better! I absolutely LOVE the way it looks without the posts. And all rearranged! I absolutely love this room now :)
heather says
Victory is mine! :) j/k but I’m glad you finally cut off those posts since I’ve been bugging you for it for a while now. :)
Karen M. says
Hey guys, Your room looks great. Nice job.
Lauren O. says
After nearly two years of living with our bed dominating the alcove(of our alcove studio), I finally convinced my husband to let me banish our (awesome, trash-picked from around the corner of our old apt in Gramercy, solid wood, I-can’t-believe-people-just-put-stuff-like-this-in-the-trash) bed frame to our ever-growing store of furniture in my mom’s garage. The big change gave us enough inches at the foot of our bed so that we no longer have to crawl OVER the bed to reach our closets! Ohh, the little victories of NYC living. I followed the diy that Jenny from Little Green Notebook posted to make a tufted headboard, so we have a new and different finished looking bed while not having to go commando-roll-style to reach our clothing each morning.
Carley says
This really brings the room together. While the posts were nice, the lack of them looks do polished! Love!
Christina Murray says
I always felt like the bed posts didn’t quite fit, they were just awkwardly there, and this just looks FANTASTIC! The whole room looks much more cohesive to me. Love it! :)
Paige says
What are you doing with the old nightstands? I’ve been looking for a pair of mid-century nightstands for a few months now and can’t find anything around Raleigh. I’ll send my carrier pigeon to pick them up if you’re nixing them, haha.
YoungHouseLove says
Not sure what we’ll do with them, but if we ebay or craigslist them we’ll definitely share the link!
xo,
s
Pam C says
So much better!
Mary K says
Sherry I love your sign off! “I’m going to press stop now.” Had me laughing for a good minute. I’m still obsessed with your new rug in there and definitely like Ed’s new look. Can’t wait to see what changes you bring next.
YoungHouseLove says
Oh my gosh, could I get dorkier? Imagine that was you talking and you had to share it with the interwebs. I’m a dweeb.
xo,
s
Tara says
I didn’t dislike your room before– it just never had a big punch to me and make me think “wow, I love what they’ve done.” But today… with the move and the chopping I am loving it!! It fits the proportions of the room so much better in my opinion. Way to take a risk!
We’re doing a complete decorating (it’s not “re” since it’s just a mismatch of pieces we combined when we first got married more than 4 years ago) of our Master. Last Saturday, we picked up our custom made (!!!) storage bed that ended up being better quality and saving us over $1500 if we had bought something similar at a store. Now I just need to upholster the headboard, re-stain the nightstands, paint a wardrobe, find some accessories & art, install ev.ery.thing, and save up some more money to buy a new mattress in a few months. But it feels so much closer now that the [disassembled] bed is in our house!
YoungHouseLove says
That sounds like so much fun! Good luck Tara!
xo,
s
Ashley says
LOVE!! Great work and great courage. I say stain that dresser though! The stained mock up really pulled everything together.
Lea says
Man oh man is my husband gonna hate you! We inherited a four post bed several years ago, and it’s been a rare day that I haven’t envisioned taking an axe in hand. I’m definitely gonna channel my inner Paula Bunyan now that you’ve inspired me. The Photoshopped version of your room is fabulous. The darker tone on the dresser ties in beautifully with the leaning mirror and ottoman. Though my style is much more traditional than yours, I tune in on a daily basis to see what you guys are changing up. Thanks for the daily dose of eye candy and much loved nerdiness.
YoungHouseLove says
Haha, thanks Lea! Good luck!
xo,
s
Jill says
WOW! What a difference. Very clever on your part. You all do a great job of identifying exactly what you like and don’t like then finding an interesting (& usually unexpected) outcome.
Yea, you!
Rachel K says
Love the room change up.
Sara says
Love this look! Can’t wait to see the headboard. Our bed needs a better one. We thought my husband’s aunt’s headboard fit a queen bed but it was made for a double. So it is awkwardly pushed against the bed and it just doesn’t work. :-( Actually our whole bedroom is just awkward and I hope to fix it soon using some of your tips!
Jen says
What a small change to make such a big difference! Love it.
Erica says
Wow, what a great transformation for that bed. It’s amazing to not have the visual space taken up by those poles. I do think I will cry crocodile tears if you stain the dresser. I LOVE that dresser as is. But, yes, I understand that decision is not mine to make. :)
Crystal says
Just a crazy idea that I have to share. We live in a Cape Cod and a bedroom upstairs had an unbalanced feel– the ceiling came down further on one side than the other. We gave up some floor space and added built in shelves on one side of the room. This created the balance we needed and is an amazing storage solution. Your nook does fit the dresser but you could wall off that section and create built in shelves that mirror the window. Or not.
YoungHouseLove says
Oh yes, always another possibility down the line!
xo,
s
Katie says
Love the new room and Ed looks so much better with short hair (most handsome things do). Actually this post confused me big time, I popped on over to read your post after just waking up (New Zealand reader! HIIIII!) and couldn’t for the life of me figure out what blog I was on (had to double check) and whose house you were in because the room looked so different. Turns out you just did two posts on bedroom updates and I had missed the first. I love the new set up! Looks like it has come right out of a magazine :)
YoungHouseLove says
Haha- that’s so funny!
xo,
s
Sue says
Much better without the posts. Much more homey and inviting. The other set up was ok, but felt flat. This feels cozy and wonderful. Nice work!
Kelsey says
Looks great guys! Do NOT stain that lovely dresser! It’s so hard to find new pieces with that patina (trust me, it’s been my mission for like a year) and a lot of the old ones from garage sales smell weird (I did not have your luck with the vinegar trick you used on the nightstands boooo). Keep the rest of the fun changes coming though! :) :)
Lisa G says
That is hot.
I’ve been iffy about your room for a while, but I knew you’d make it awesome (as always) and now you’ve done it. It truly looks like a young house room and like it belongs in a magazine/catalog.
YoungHouseLove says
Aw thanks Lisa G! We’re just blindly feeling our way through! Haha.
xo,
s
Karisa says
This is so genius! Every time you guys posted about your bedroom I couldn’t help thinking the bed frame seemed out of place, but now it looks PERFECT! This totally makes me want to tweak our master bedroom now!
Cassie Helwig says
Looks awesome!!!
We haven’t done anything in our room, but we recently rearranged the furniture in our daughter’s room and had to fix her bed. We just moved so we are still figuring out what works well where in her room… as for fixing… well, toddler beds are pretty horribly made. Her bed was $50 at a local thrift shop and looks great, but the bottom support slats simply slide into indentations on the side boards, so when she jumped on the bed, all of the slats slid slightly sideways and fell out of the bed, so we had to go get screws and fix it. The screw heads can’t go all of the way into the wood for some reason, so we are trying to figure out how to smooth it out so that she won’t scratch herself on a screw at some point :(
Reenie says
Ahhhhhhhhh ~ much much better =)
Lindsay says
Loving the rearrangements! The dresser & floors will look amazing when they get darker!
Emily says
It looks great! I love how you layered the accessories and how cozy it feels. I have been on the lookout for white curtains to drape one wall with awkward windows a la Mrs. Bower and then flop flop furniture placement. I am hoping to finish up this week fingers crossed.
Erin says
When I was reading your earlier post I kept thinking how much better it would look with out the post on the bed. I assumed that they couldn’t come off or that you didn’t want to cut them off! It looks amazing! It make a huge difference!
Hannah B. W. says
I loved the bed before, but this looks so much better! Perfect for your space. I’m building a barn door headboard in the next few weeks. I can’t wait to share how it turns out! No fabric on mine, but a headboard project none the less. Good luck! I know yours will look great!I am just a 22 year old beginning DIYer. Hopefully I will get to your level one day :)
Laura says
This looks so great – and the dresser in the nook almost looks like an extension of the floorboard since they match in color!
Kristiina says
I can’t believe how much I love it…so much cleaner and open. I also absolutely love the new layout. I LOVE rearranging….it gives a totally new energy/vibe when you walk in :)
how2home says
*gasp* you guys cut off the post! looking even more awesome Sherry! My vote is for the grey color headboard i think it brings the whole room together, the yellow looks lovely but i think it puts too much focus on the bed, don’t you think? Is John loving the dremel kit yet? It’s such a versatile tool right!
YoungHouseLove says
Oh yes, he’s in love with the dremel. As for the headboard, I think I’m still open to whatever fabric woos me. Haha. Will keep you posted!
xo,
s
Sam says
LOVE the new look Ed is sporting! And the {future} master makeover is gorgeous!
Ashley says
I absolutely love the new bedroom setup AND the “new” bed. It is so much more rich looking, and like you, I would be thrilled with the new view from the hallway. I just want to crawl in your bed and take a nap, it is much more inviting this way (by myself – not with either of you)!! I’m not sure if that’s what you were going for with the changes, but I think you catch my drift.haha. The placement of the dresser looks awesome and allows guests to view all of the special touches that you have worked so hard on. KUDOS!!
Lori says
Wow, these little tweaks made such a HUGE difference in your room! I love the photoshopped photos of the stained dresser and floor. The room is really becoming much more “you” now!
Jamie says
I love the new arrangement! Here’s a link to the headboard we made out of hollow doors – it was cheap but makes a big, dramatic statement!
http://feldmeyers.blogspot.com/2012/03/dio-headboard.html
YoungHouseLove says
Love that!
xo,
s
Michele A says
Love it! Love the reorg and the post cut. Looks GREAT!!!!
Sarah says
Cutting those posts off make all the difference! I was totally unconvinced (one of the few times on your blog!) about the room switcheroo posted earlier in the day, and now suddenly seeing Ed chopped makes much more sense of the room. It looks lovely and snuggly now! :) Sarah x
Lianne says
I just finished making my own headboard! I did a deep sap green velvet in a low modern rectangle with piping and button tufting in three rows. Man the piping took forever, (on both the front and back to give it a clean polished look) as did finding someone to make me buttons. The bed is dressed in greys, white, and beige :)
(Plans from:
http://www.bigboxdetox.com/diy-make-own-upholstered-bed
But adapted from:
http://ana-white.com/2010/06/furniture-plans-low-modern-cutout.html)
I tried so many times with the DIY buttons from fabric stores (where you push it into a cap) but when I went to pull it through the foam and batting and fabric, it would pop off. If you decide on making buttons, find an upholster who can do it for you using prong back buttons. They resemble long paper fasteners on the back (two long, strong prongs). That way you push them through and bend them and they will never budge, or pop off!
YoungHouseLove says
That’s awesome! Such a cool project!
xo,
s
Whitney Dupuis says
This. looks. AWESOME.
Way to go, Petersiks. Way to go.
Jennifer says
This is going to sound like a backhanded compliment, but your master bedroom was never something I was a fan of, but now…WOW!! It looks amazing both with the new layout and Ed’s long hair gone. Like you said, so much cozier and homey. It looks really put together.
Megan says
It all looks so much better. I think the bed facing the door is a big improvement and trimming the posts makes it look cleaner. Great job!
Lauren says
So, so much better. Love it!
Kate says
The hubby and I just built our bed over the weekend — we’re looking forward to relaxing each night in a bed we made ourselves!
Next weekend’s project — painting it. But now I can’t find a brown to match Ikea’s brown. Any ideas?!
YoungHouseLove says
Anyone know? I would bring home swatches an hold them up to find one that matches.
xo,
s
Jessie says
nice job, ya’ll!
Laura says
Love the new arrangment! I liked your bedroom the other way, but there was always some head-scratching going on like, ‘how could this be better?’ And now you’ve found it!
ALSO it would really help a sister out if you could make your headboard in the next six weeks or so….I am planning a headboard-making project in that timeframe and would appreciate a tutorial from my favorite DIY bloggers before I tackle it. Pretty please? And how about a tuft or two on that headboard while you’re at it? :)
YoungHouseLove says
We’re hoping to tackle it within the next two weeks for sure!
xo,
s
lindsay o says
the “new” bedroom looks great! i didn’t want to be one of those internet people who tell you what to do with your home so it’s nice that you just read my mind ;) glad i can live vicariously through your bedroom changes, while in reality i can’t find ANY bedroom furniture that i like.
Sara says
Yaaaaay! ::Joins in with a slow clap::
YoungHouseLove says
Haha- thanks Sara!
xo,
s
Stephanie says
Ok, so I know only one thing about feng shui and I could even be wrong. It’s the only thing that stuck wtih me from a friend that claimed to know… when lying in bed, your feet shouldn’t point toward your toilet because allyour money will go down the toilet too. Here’s to more money!
YoungHouseLove says
Haha- good to know!
xo,
s