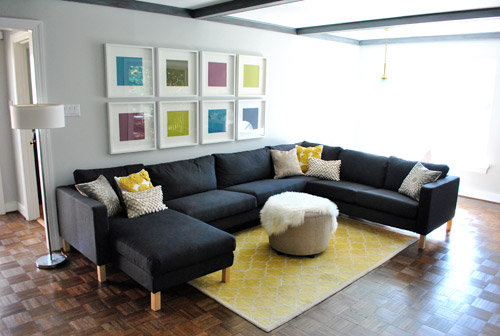
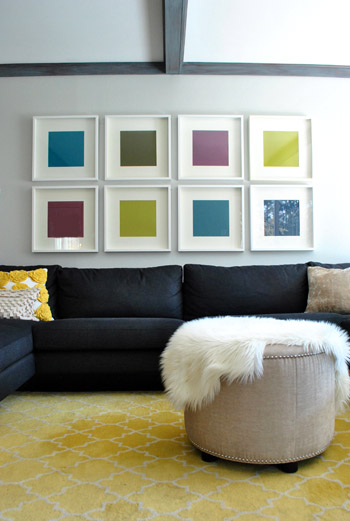
Remember that grid of eight Ribba frames above our sectional (that we got right the second time around)?
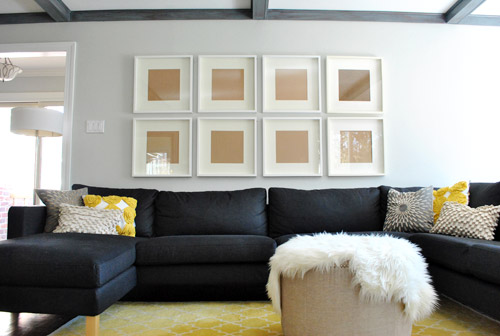
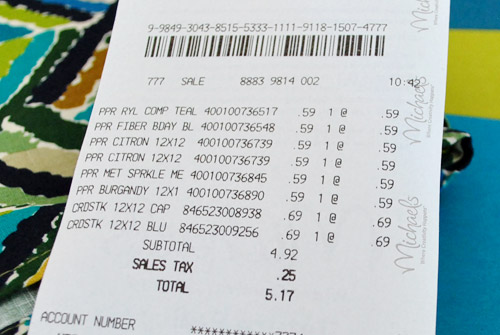
Well, we figured out some in-the-meantime “art” for them (so we don’t have to stare at those brown squares every night). You know, until we come up with something better. And it only cost us five bucks. Okay, $5.17 if you’re being picky. So worth it.
We’re still not 100% sure what we want there in the long run, but we’re leaning towards something graphic and colorful. And since the brown frame back is the opposite of that, we wanted to at least put something in there temporarily that wouldn’t cost much or take any time to toss together. Enter one of our favorite solutions: 12 x 12″ craft paper from Michael’s.

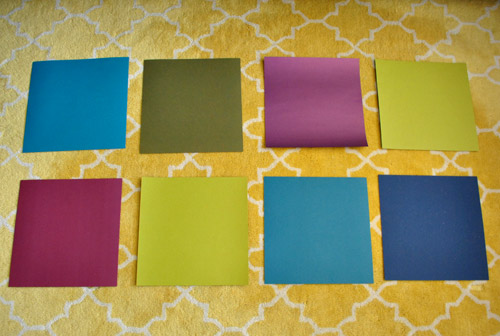
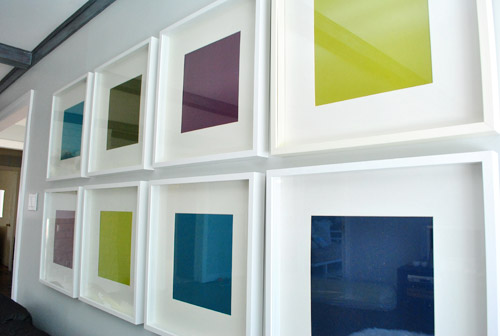
We picked out eight sheets that complement Sue (aka: our inspiration napkin). They were the perfect size to slip in our 12 x 12 Ribba frames and at about 60 cents a pop it was kind of a no-brainer.
We tried a few different arrangements on the floor before putting anything in frames. Since we had picked a couple of duplicate colors, we wanted to keep them far enough away from one another, so we ended up with this grouping:
The frames definitely helped them feel less like sixty-cent craft paper and more like something worthy of being displayed behind glass (seriously, what can’t you slap in a frame for a more polished look?). It definitely added that temporary injection of color we were looking for, and it was kind of reminiscent of the cool art that we saw – and loved – in this House Crashing adventure from back in the day (aka: a month ago).
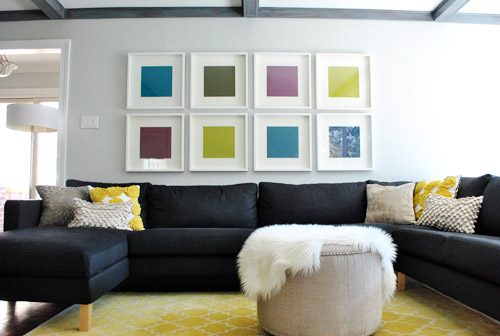
It’s kind of like a simplified version of Sue the napkin now lives on our walls, eh?
We’ve been living with them for the last 24 hours and might be in danger of falling in love with them as a not-so-temporary solution. Uh oh.
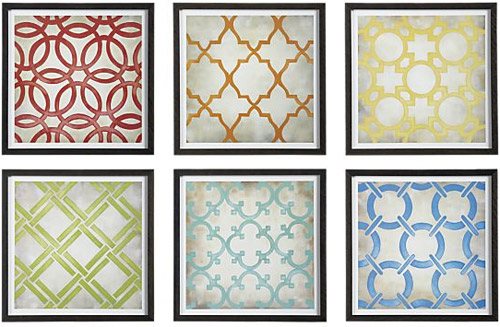
They just look so much nicer than the brown frame backs they covered. Actually, what we’re thinking that we might do is try to build on the concept somehow, like adding some modern white doilies, stencils, or layering some other pattern in front of them so we still can enjoy the color scheme that “shows through” while creating something a little more graphic. Almost like a custom version of those Classical Symmetry prints from Crate & Barrel (this set of six retails for $369, btw).
Or we might still consider doing the personal photo thing by using the colorful paper as large mats around small square black & white pictures. Sherry even mentioned sticking tiny fortune cookie fortunes in the center of each colored sheet of paper. So you have to get really close to read them. ‘Til we decide on anything, we’re kinda loving the cost-of-a-Subway-footlong solution for these eight frames. And of course we’ll keep you posted when we finally get around to updating them for the long haul.
Do you guys have any colorful art that you’re loving? Or affordable sets of images that you’ve spotted? Oh and how cool is this solution to empty Ribba frames that Krissy posted on our Facebook page? As Sherry says (way too much) “um yeah, love it.”
Psst- We announced the winner of this week’s giveaway. Click here to see if it’s you.

claire says
Awesome! High style at a very low price! :)
Emily says
I’ve currently got Dabney Lee in my gallery wall frames… I just flipped the 2010 calendar over and voila! Granted, I had to cut mats for them because the calendar was 5.5″ square… still, I love how happy the images are!
:-)
Kari says
just a thought (sorry if this has already been mentioned) – I was at Michael’s today and saw that they had some stencil like scrapbook paper. I thought of you guys since you talked about making something like that for the frames. They came in lots of different colors. Not sure how many styles though. Anyhow!
Courtney Lanae says
I don’t usually leave comments since you get like a bagillion, but I squealed a little bit when I saw this:
http://www.marthastewart.com/photogallery/home-tour-bold-texas-duplex#slide_4
It’s so similar to yours! Just with a little wood grain. Fun fun.
YoungHouseLove says
Ooh pretty.
xo,
s
Melissa says
Sorry if this question has been asked, but do you know of an easy tutorial on how to hang frames symmetrically like you guys did? I don’t want to end up a million holes in my wall, lol! Thanks!
YoungHouseLove says
Our tip would be to use hanging wire to hang them so you can adjust the wire and not make extra holes. And definitely try to use paper templates to plan things out so you don’t make this mistake: https://www.younghouselove.com/2011/03/2-4-6-8-who-do-we-appreciate/
Good luck!
xo,
s
Karen McConnaughey says
What I like best about this idea is that depending on shadows and sunlight, and where you’re standing, these little jewels can look different every time depending on the reflection. I think this is a great idea. Love your blog.
HB says
I love this and recently did the same thing with scrap paper from Michaels..I was initially going to use different patterns of scrapbooking paper (like the CB prints), but found the solid color blocks a tad more modern and cleaner…I love it as is.
Chaucea says
Oh! I saw a really clever idea posted on Re-Nest using paint chips:
http://www.re-nest.com/re-nest/creative-reuse/paint-chip-art-by-allison-patrick-141649
YoungHouseLove says
Oh yeah that’s such a great project! Love it.
xo,
s
Lianne says
Heyo,
Not sure if you still read these this far past the post date, but AT recently posted this and I immediately thought of you to. Just keep on snagging paint chips every time you go to a home hardware store and you’ll be good to go!
http://www.re-nest.com/re-nest/creative-reuse/paint-chip-art-by-allison-patrick-141649
Lianne says
op, apparently a few up someone else posted it, ha!
YoungHouseLove says
Love it!
xo,
s
NIKKI P says
Have you seen the Martha Stewart Crafts Die-Cut Pages?
http://shop.marthastewart.com/Martha-Stewart-Crafts-DieCut-Pages-12/A/B003EH2770.htm
I saw them in Michael’s this weekend and scoured my Goggle Reader until I re-found this post! What about one of these (I’d probably paint each sheet a different color, no offense Martha) on top of what you have? That would almost totally channel the C&B art.
It’s a little busy but I wonder if there is a way to “loosen” up each design???
OOORRR- and this just came to me as I was typing… what about just getting a couple of cool stencils, painting them, and actually putting the stencil in the frame (not using the stencil).
M’kay, that’s enough from me, sorry. *This is why I’m only allowed in Michael’s once a month*
YoungHouseLove says
Haha, hilarious. You’re quite the Michael’s fan. Haha. Us too. Love the suggestions!
xo,
s
Monica V. says
In case you need ideas for what to put in those frames (if you end up deciding to do something different down the road) I just discovered that Costco’s online photo center has an Art & Image gallery with thousands of photos and images (including some famous art) that you can print at their regular low prices for prints. It’s a great way to find coordinating images/art for a project like this one!
YoungHouseLove says
Thanks for the tip Monica!
xo,
s
Tracy says
Ok, sorry I’m commenting on such a long ago post, but it’s pertinent to the subject matter. So I was looking through some past posts of http://ourhumbleabowed.wordpress.com/ and she often finds cool artwork on etsy. She linked to this seller Crafterall, and I fell in love with the great lakes art (I live in SW MI, 10 minutes from the beach). Anyway, to get to the point, they have a manhattan piece http://www.etsy.com/listing/67794130/manhattan-in-royal-original-8-x-10 that could look really cool in one of your frames and you can customize the color. Just thought I’d pass along the link. bye!
YoungHouseLove says
Ooh love it! Thanks for the link!
xo,
s
Tiffany says
So one of my favorite blogs posted the best “copycat” of the C&B prints I’ve seen yet. They used printed craft paper & re-created them for around $50 total (including the frames). I’ve seen you mention a few times how much you love them so I thought I would share the link: http://blog.effortless-style.com/2011/04/look-for-less-classical-symmetry-prints/
I love your “sue”table solution to the wall art problem though. (hehe, couldn’t resist)
YoungHouseLove says
Oh yes I love that blog and that post! Such a better deal.
xo,
s
Kathy C. says
Hey John and Sherry! I just love your blog! Been following you guys for about a year! Just wanted to say thanks for all the inspiration! I recently went to Ikea and bought some of these Ribba frames to do a collage wall. I mentioned you guys and in my blog post as an inspiration source! Come check it out if you get a chance!
http://lovelacefiles.blogspot.com/2011/05/progress-reveal-living-room.html
Continue the awesome DIY projects!
YoungHouseLove says
Those are gorgeous! Amazing job. I love the pretty room.
xo,
s
Kelsey says
Awesome – I was inspired by the Crate & Barrel prints as well and about a year ago did the same thing for my dining room! I bought fun patterned paper from a scrapbooking store that ties together colors from various rooms of the house so it cost more like $9 for 6 than $5 for 8, but it’s no temporary solution, that’s on the wall for good!
Ciddie says
Where did you guys find those frames? I want them!
YoungHouseLove says
Those are from Ikea (called the Ribba frame). They’re $19 each (with the mat included).
xo,
s
stephanie says
Hi guys! I love this collage of frames and was wondering if you could tell me how far you spaced them apart? Thanks so much! I follow this blog religiously btw!
YoungHouseLove says
They’re about 3″ apart. Hope it helps!
xo,
s
stephanie says
DO YOU MIND SHARING HOW FAR APART YOU SPACED THE FRAMES?
YoungHouseLove says
If you scroll down to the comment below, I mentioned that they’re about 3″ apart. Hope it helps!
xo,
s
Tania says
Thanks so much for this post. I used it as my inspiration for a corner of our family room. Thanks for showing me that art doesn’t have to be difficult!
http://carnoustielane.blogspot.com/2011/10/homework-area-in-family-room.html
YoungHouseLove says
Looks great Tania! Love that lamp too.
-John
Jo says
This is absolutely perfect! Such a great way to bring bright colors into a small space but still make a huge impact. Another quick and easy (and of course, inexpensive!) DIY project can be found here: http://jmariediy.com/easy-abstract-wall-art/
Thanks so much for all the great content–you guys are simply the best at what you do!
Jaya says
Hi there-
Hope you guys are having a great weekend.
I think I asked a question yesterday but somehow must have done something wrong since it didn’t post!
I am trying to hang up the large square ribba frames, like the ones in this post and I was curious what you used to hang them? I tried 2 of the 1 1/4 finishing nails (which I used for some of the smaller frames, but they seemed too flimsy. I then tried one of those picture hanger hooks with the wire on the ribba but those lean away from the wall.
What do you guys use to hang the larger ikea frames?
I would really appreciate any suggestions.
Thanks so much for looking at this over your weekend.
YoungHouseLove says
Your question actually did come through and I responded to it but maybe it’s hiding on the back page and you’re looking on the front one? Anyway, here it is again for ya if that helps: I use the wire that comes with them to hang them over two nails or screws with anchors – usually placed a few inches apart. It keeps the wire more taut so it doesn’t hang so much out from the wall. Good luck with everything Jaya!
xo
s