We’re back with the fireplace update that we mentioned in yesterday’s post about removing our old not-baby-safe wood stove.
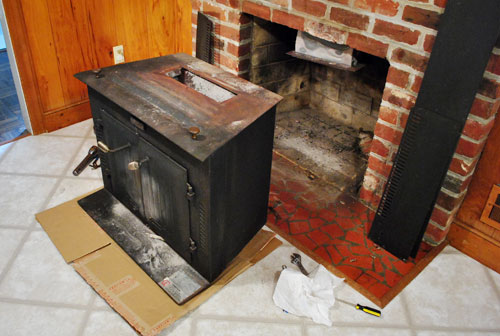
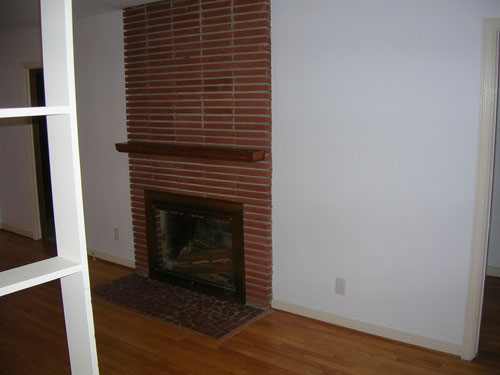
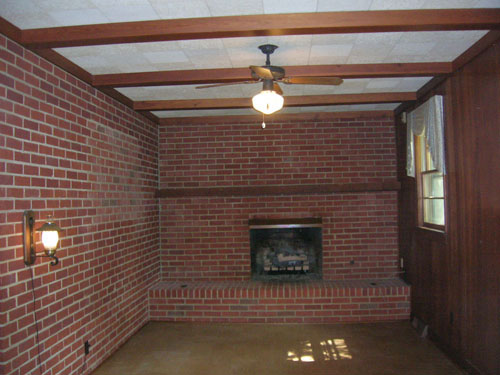
This next step is definitely just the beginning of our fireplace makeover (as in step two of probably fifteen). We figure we’ll tackle this baby in stages (just like we do pretty much everything else around here) so the first step was to spend as little as possible to get it looking better for the short-term (since it might be a while until Phase Two kicks in). So here’s what it looked like yesterday morning:
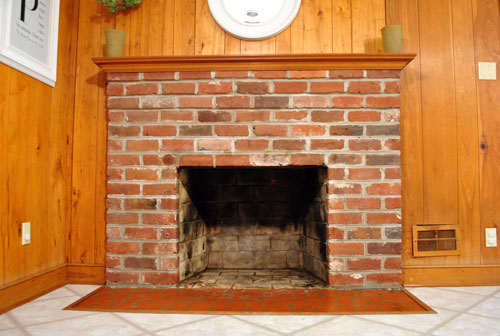
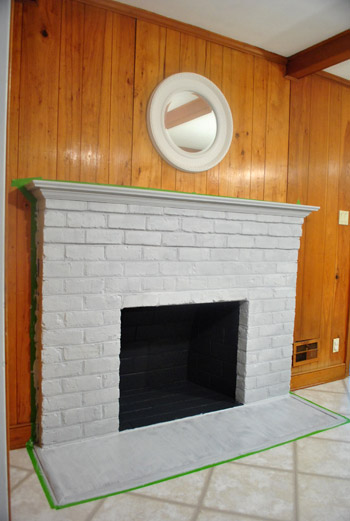
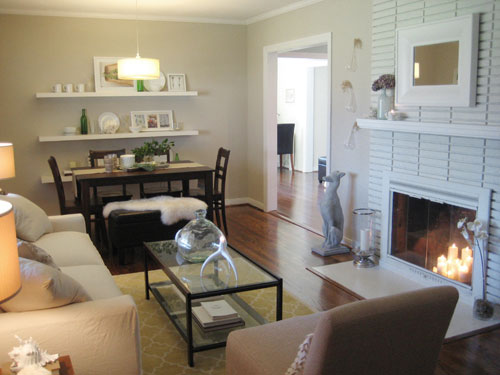
And here’s what it looked like yesterday evening:
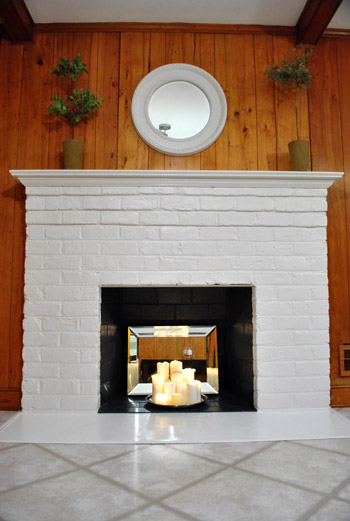
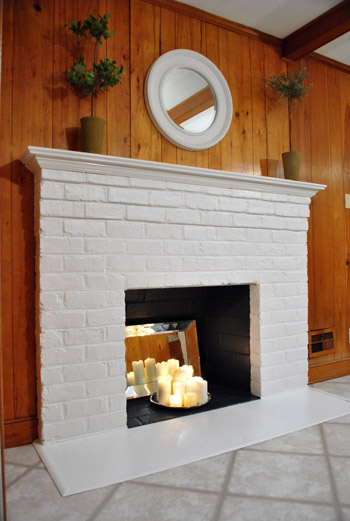
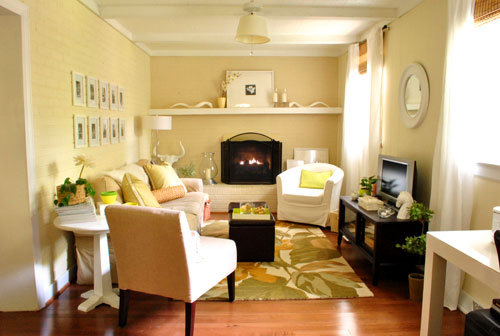
I know, I know – the orange paneling makes it look craZy with a capital Z. But just scroll down a bit to the dark den from our first house (which also had paneling and brick) to see just how transformative paint can be (we didn’t remove the paneling in there, just primed and painted it). So try to envision some fresh paint in a soft color on the paneled walls with glossy white beams and trim to match the same semi-gloss paint on the fireplace. Can you see it?
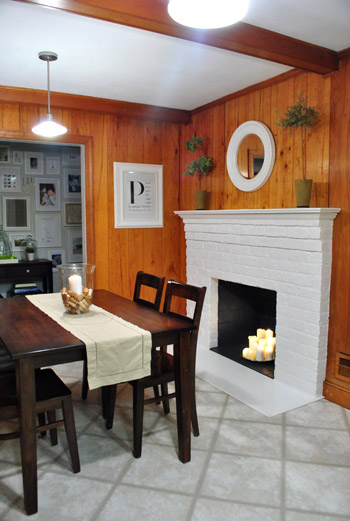
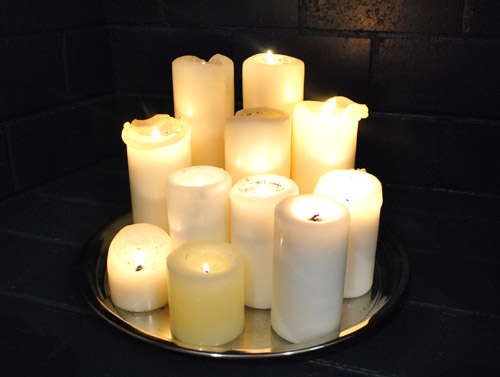
And now for a word about the candles and the mirror that I tossed into the firebox. Those are definitely not Clara-friendly. That was just mommy psychosis (I wanted something cute in there for the pics, even if there won’t be a thing in there for a while during Clara’s waking hours). It was such a quick little addition that it gave me some baby’s-in-bed-let’s-have-date-night ideas (you know as opposed to baby’s-in-bed-let’s-upload-fireplace-photos-and-write-the-post-for-the-morning ideas). The latter won out, so maybe I’ll break out this look for anniversaries. Me-ow.
But when it comes to the day to day stuff, l fully expect to find pillows, stuffed animals, books, and whatever else Clara decides to put in there awaiting me when I walk into the kitchen. The girl loves hiding stuff around the house, so I’m guessing that she’ll appreciate this new little nook. Maybe we’ll even be able to sneak a picture of her chilling in her not-hot-and-not-sharp-anymore zone reading a book or snuggling with Gee (her stuffed giraffe that she named herself).
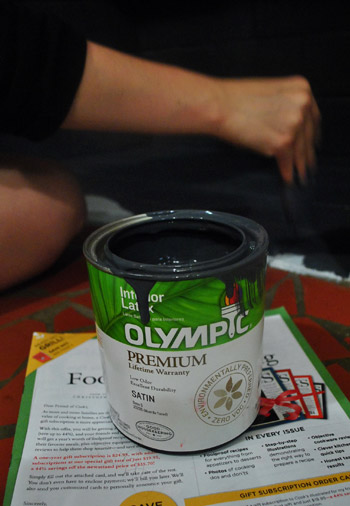
The best thing about this little fireplace facelift is that it took us about five hours (on and off with drying time in between coats) and it only cost eight dollars (and three cents, to be exact). We just used primer that we had leftover from painting the guest room (Olympic Premium No-VOC primer), some white semi-gloss paint that we always have around for trim touch ups (Olympic Premium No-VOC paint) and a quart of Benjamin Moore’s Temptation in satin that we picked up from Lowe’s (color matched to, you guessed it, Olympic Premium No-VOC paint). Primer isn’t always necessary (we’ve gone without it while painting brick before) but we had it on hand so we figured we might as well use it.
You guys know we’re no strangers to painting brick fireplaces since we tackled not one but two in our first house. Remember this guy who went from this…
… to this:

And this one that went from this…
… to this:
You can check out our original fireplace-painting tutorial here, but since we’re nothing if not even chattier these days, we thought we’d recap the steps we took when it came to prepping our current fireplace for paint. First we:
- Closed the damper and declared the fireplace inoperable (we never used the woodburning fireplace in our last house and plan to either install a double-sided gas or electric insert down the road).
- Scrubbed the heck out of the firebox, exterior brick, mantel, and hearth with soap and water to cut the grease/ash (we used Dr. Bronners + water).
- Let everything dry.
Then it was time to prime and paint. Here’s what we did:
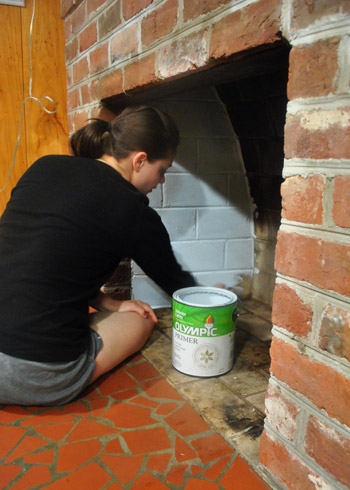
- Primed the firebox with Olympic Premium No-VOC Primer (remember, we’re not going to use this fireplace for wood burning, so if you’ll be using your fireplace either leave the firebox unpainted or hunt down high-heat options that are meant for the job).
- Painted the firebox with Ben Moore’s Temptation in satin (color matched to Olympic Premium No-VOC paint).
- Taped off the wall around the fireplace (since you have to smash a paint brush into craggy brick, it’s hard to stay in the lines).
- Caulked the big crack between the tile hearth and the firebox so it would look seamless when painted.
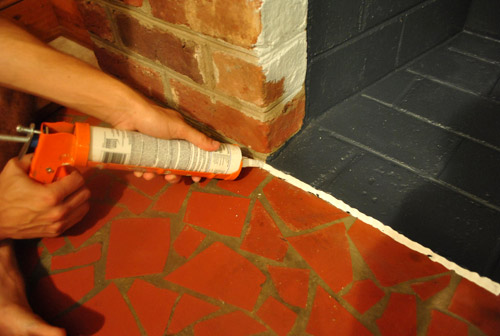
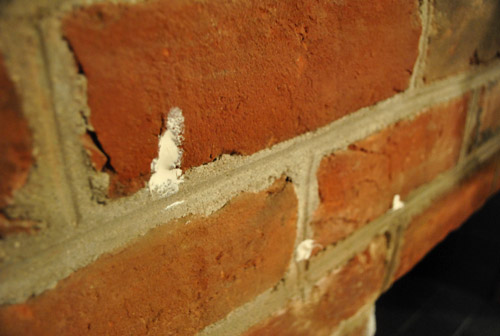
- Caulked other especially cavernous holes in the craggy brick so it looked less shadow-y and chipped when painted.
- Primed the brick fireplace surround, wood mantel, and even the tiled hearth (yup, the tiled hearth… more on that in a minute).
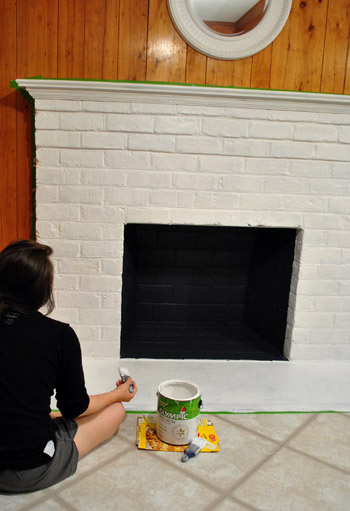
- Painted the brick fireplace surround, wood mantel, and tiled hearth with two coats of Olympic Premium No-VOC semi-gloss paint in off-the-shelf white (some folks like more contrast when it comes to mantel and hearth color, but we’ve always loved the all white look – although later when we build out or even tile the fireplace & surround we might add more varied colors and materials for fun).
- Applied three thin and even coats of Safecoat Acrylacq (a low-VOC non-toxic alternative to polyurethane) to just the tiled hearth on the floor. Be warned that certain polyurethane types will leave a nasty yellow tint so the only two that we trust are the Safecoat I mentioned above and Minwax Water-Based Polycrylic Protective Finish in “Clear Gloss.”
You think we’re crazy for painting the tile on the floor huh? Check this out. We did the exact same thing to the exact same heart floor in our first house. See the same little smashed up tile?
The whole prime, paint, and poly technique was meant as a very very temporary solution (we planned to replace the tile pretty soon thereafter). But it stuck. Literally. It still looked mint four and a half years later when we sold the house! Even with foot traffic (in shoes) and small nephews of ours ramming it with metal matchbox cars. Here’s where I’d add a close up shot, but sniffle, we don’t live there anymore. So here’s the last wide shot we took of the room (you can see that it still looks glossy and white):
So although painting ceramic tile, especially tile that gets walked on, is nothing the pros recommend, we’re totally cool with doing it as a temporary fix (although doing it in a bathroom is probably a terrible idea because it can get slick when walked on with sopping wet feet). I should mention that in both cases the tile was terra cotta which is really matte and porous (and not slick and shiny), which might be why it grabbed the paint and held the heck on for such a long time. Who knows, it could inexplicably show a lot more wear and tear than it did in the last house (you know we’ll tell ya if things quickly go south). But either way we’re pretty sure we’ll bring in some awesome new tile for the hearth and maybe the entire fireplace when we get down the road a bit (read: save enough loot to tackle the kitchen in a more major way).
Have you guys painted any brick lately? Or ever primed, painted, and poly’d tile- just to see what would happen? Has your husband ever taken terribly unflattering photos of you painting something to get you back for sharing pics of him scrubbing brick in his high school gym shorts?

Sophie says
Hey Sherry, I’m back again because I managed to get a photo with all the stripes on my wall in it – even if I did have to take it in the reflection in my mirror… :|
So yeah, this is what it looks like:
http://27.media.tumblr.com/tumblr_lmu7y0Lj1F1qc1vfyo1_500.jpg
Doesn’t it just cheer you up so much? :D
x
YoungHouseLove says
THAT’S AMAZING! Seriously, I’m in love. And you spaced them so perfectly and they look so crisp. I’m so inspired! Thanks for sharing the pic!
xo,
s
LARY says
WOWWWWWWW! What a HUGE difference a little paint can do! You guys took that fireplace right in our time from whatever era she was stuck in! haha You guys are so inspiring!
Barbara says
Okay, full disclosure – my mom painted our brink fireplace FIRST THING when we moved into our house in 1966. So I LOVE painted brick. And yours looks AWESOME.
My question is this: Does no one love firescreens any more? There are some really cool ones and that would keep little Clara bug from going inside when candles are burning. Am I crazy, or are they just not cool any more?
YoungHouseLove says
I think my fear with freestanding screens is that she’ll pull it down on herself (she’s still a little tipsy, haha). And the attached ones have to be the exact right size and cost a bit more so I guess that’s why people don’t go for them off the bat? I also just can’t wait to see Clara in there reading a book. Hah. So I don’t want to block her out just yet.
xo,
s
Caitlin @ Desert Domicile says
Looks GREAT! So much brighter and I love the mirror/candle idea :)
We painted the (non-smashed up) tile around our fireplace but find that it’s constantly chipping and getting scraped up, especially the hearth. Maybe doing some quick touchups and adding a coat of poly would help!
YoungHouseLove says
Yeah if the tile was glossy (ours was terra cotta, which is really matte and absorbent) you might want to sand it and prime it and paint it and then use the specific poly I mentioned by name. It seems to be the best way to get things to stick long-term!
xo,
s
MelissaG says
I think this looks awesome…even with the paneling it’s such a transformation. Love it!
AmyK says
Hey Sherry! I tagged you in this pin on pinterest. I thought you might like the fireplace idea.
http://assets4.designsponge.com/wp-content/uploads/2011/06/chenin_after.jpg?0
YoungHouseLove says
Oh my gosh- so charming!!!
xo,
s
Julie says
I love it! We had to paint our fireplace when we moved it because the old owners painted it an icky red, so re-painting was a no brainer (http://renodoozins.blogspot.com/2011/03/fireplace-before-and-after.html). We experimented with a three-tone paint job that I’m digging for now, but you’ve got me thinking about a more cohesive white paint job in the future if I get sick of this one.
I’m also now itching to paint the inside of the firebox and the ugly red brick in front! Our fireplace isn’t up to code so we don’t use it (also it’s summer in Los Angeles so we’re not exactly chilly) but I’d love to pretty it up. Do you think that painting over the brick hearth would stand up to 2 crazy dogs running all over it?
YoungHouseLove says
Hmm, I’m not sure. If the brick is sealed so that it’s really shiny and slick those little dog nails might scrape the paint right off. Maybe try sanding it so it’s a lot less smooth and then doing the whole primer, paint, and poly thing? Oh and thin even coats (not thick gloopy ones) will help it stick snugly and hopefully avoid cracking or scraping off. Good luck!
xo,
s
EvY says
Completely off topic and I’m sure someone told you about it already but did you see you can get that ceramic dog that broke replaced for $95:
http://www.modernchichome.com/p1159/Greyhound-Dog-Statue-NEW/product_info.html
YoungHouseLove says
Love it!!
xo,
s
Pam says
I think the updated fireplace looks great. I really like the ruffled pillow in the last pinterest picture :)
Jaime says
Thats it! I am tackling my brick fireplace ASAP! Too bad my future renters will be the ones enjoying it since we are moving in Oct..oh well. It will make the very tiny condo look so much bigger! Yay!!
Question: I wont be touching the inside of the fireplace since it is your standard wood burning kind (no insert) and I would like to keep it that way, but is all the paint you used on the brick hearth still safe to use or will I need to get special heat resistant kind??
Thank you! :)
YoungHouseLove says
John’s sister Emily painted the exterior of her wood burning fireplace with regular old white latex paint and used it for five winters straight and it held up perfectly. There were some soot stains that she just painted over before selling, but it didn’t crack or bubble from the heat or anything. I think they’re designed so the interior gets hot but the bricks outside stay pretty cool for the most part. Good luck!
xo,
s
Ashley says
Great work! That’s a five hours well worth it!
I’m about to tackle my fireplace – it has large, 12″ squares of textured tile. I know I can paint and prime over that, but how did you handle the grout? Your end result looks so smooth – did you do anything else? Caulk? Wood fill? Or did you just do several thin coats of primer and paint to achieve the smoothness?
YoungHouseLove says
Just primed and painted right over the grout and tile. No caulking or any filling! Grout is absorbent so it soaks paint right up. And of course thin and even coats of primer and paint are key to a smooth finish. Good luck!
xo,
s
Hanna says
Sherry and John-
you’ve inspired a design-obsessed 19 year old (who is currently home from college, unemplpyed- not so relevant) to start her own blog! I know y’all are busy with Clara and your own blog but it would mean the world to me if you stopped by!
http://passiontravelbeautydesign.blogspot.com/
p.s. you have inspired me to redo my room, my sisters room, and more rooms in my house to come. whenever i don’t know how to do something (i.e. make curtains, upholster a chair, this is the first and only site I go to.
YoungHouseLove says
Wahoo! Happy blogging. I love that Calypso Blue paint that you sneak peeked- post the after pics for sure!!!
xo,
s
r8chel says
Wow – what a tremendous improvement!!
Gina says
I am suffering from some major talent envy. You guys are great!
Sam says
Hey Guys, Looks A-MAZING!! I had a quick question. Do you ever have a problem with the tiles on the floor which you varnished turning yellow compared with the rest of the ‘just painted’ surround? I often find that Polyurethane (sp?? :S) ends up looking super yellow on white painted things. Any hints or tips??
Thanks :D x
YoungHouseLove says
Poly is the worst! Nearly ever kind we have tried get a little yellow tint except for the two that we mention by name in our tutorials (the Minwax water-based Polycrilic in the blue can and the Safecoat Acrylacq). Now I won’t use anything else!
xo,
s
Tanya from Dans le Townhouse says
Wondered what you were going to do with the crackled tile. Looks fabulous – such a surprise your old house had it too. I never noticed! Mmmm. Paint is swell.
John says
Try painting a poster board with some flames on it for those cold winters we have in Richmond. You could also take a picture or paint a picture of the living room as though you were looking through the fireplace. Then insert an enlarged picture on the kitchen side.
Taylor @ TheProposalEnthusiast says
I love it. I have a brick fireplace in my house and I can’t decide if I should paint it or not. This gives me motivation to try it out!
Lynnie says
That’s an amazing transformation, it improves the look of the whole room! We have a shockingly ugly fireplace in our new-to-us rented apartment (huge shiny black & silvered marble surround and hearth, urgh) and I wish we could do something like this with it.
The saddest part is that our landlord or a previous owner removed the gorgeous original Arts & Crafts fireplace, which looked something like this http://www.christies.com/LotFinder/lot_details.aspx?intObjectID=4396198
Sigh.
YoungHouseLove says
Oh no. So sad.
xo,
s
Meredith @ Making a Dream Home says
Awesome job on the fireplace, with some great tips! Repainting our fireplace is on our LONG list of future projects.
Emily says
When I first saw the mirror I totally thought you had moved on the phase two without me noticing! (which would have blown my mind) Luckily for my mind I realized it was a quick fix and almost had my mind blown again (you guys are good at that). It looks amazing!
Elisabeth@SimpleGreenishLiving says
It looks so clean and fresh, nice work!
Giggity Giggity says
What are your thoughts on white washing the paneling? We have a den with judges paneling and are considering white washing the walls (though we’re not extremely sure how faint we want to go – if that faint at all).
YoungHouseLove says
It’s definitely another option for sure! We love the look of solid paint for our own home (and actually want to bring in a little color) but we’ve seen rooms with gorgeous whitewashed paneling so if that’s what you prefer we say go for it!
xo,
s
Sarah says
Nice work! The tile especially looks good, and I love candles in fireplaces. Very romantic!
I finally painted our fireplace last month and got around to posting about it just last week. We did sort of the opposite of you guys, however. I painted our faux brick to look like real brick! Hubby is not a fan of white fireplaces so that option got scrapped quickly. I think our compromise turned out pretty well – we both love the result and everyone says you can’t tell it’s been painted! Our tile still leaves a lot to be desired, and you may have just inspired me to try painting it too!
http://smarkas.wordpress.com/2011/06/09/faux-real-fireplace-makeover
YoungHouseLove says
Wow- that really does look convincing! Awesome job!
xo,
s
Lindsay says
I love the fireplace! It looks a million times better already. Thanks for sharing!
I had to tell you a few things. (1) I heard it was National Elephant week/month (I forget) but your post on the Elephant in the room was very fitting. (2) My son, Hudson, named his fave monkey, Goo, when he was around Clara’s age. So similar to her Giraffe, Gee. He still plays with Goo the Monkey a year and a half later and we have fun telling him how he named him all by himself. :)
YoungHouseLove says
That’s so cute! We also got a stuffed chihuahua who looks exactly like Burger in Georgia while visiting the Bowers so we started calling her Georgia. Now we can tell Clara to get Gee or get Georgia and she knows which is which. It’s adorable!
xo,
s
cassy says
I love it! I wonder…how do you keep your baby from all the cute decorations in your house? Isn’t she into everything because mine are!
YoungHouseLove says
Check out the post for that info! I just stuck that in there for a second (while she was in bed for the night) but then removed the candles and mirror before adult bedtime. It’s fun to toss in there for a romantic date-night look once the bean is sleeping though!
xo,
s
Stefanie says
I am looking and searching but I can’t find an unflattering picture of either of you in the whole bunch!
The fireplace in our house – ours 14 mos now (Woot! Woot!) had an awful floor to ceiling faux brick fireplace. We almost painted it (pics of your house’s before-and-afters were very convincing) but all the trim in our house is off-white and we didn’t want an off-white fireplace – not to mention we were unsure how well one could paint faux brick. The faux stuff was so destructive to the wall the hubs had to re-drywall the whole area above the actual fireplace. Then he tiled. It was quite a to-do. I just took pics since I was preggo – lovely excuse! Now we just need a new mantle – but that’s another story…
Sorry for the tangent! Any thoughts on faux brick painting?
YoungHouseLove says
We painted faux brick in our last house (the backsplash was like that in the original kitchen) and it was a super easy quick-fix. It sucked up the paint so it took a few coats but it was nice and glossy and clean looking!
xo,
s
Chelsea@ThisFreshFossil says
Looks great! One day we’ll get around to remodeling our 70’s faux lava rock fireplace… one day.
My Mom painted over these ceramic peptol-bismol pink tiles in her bathroom shower surround about 10 years ago as a temporary fix. Amazingly, they’ve held up perfectly over the years (even being in a shower!) and you still can’t even tell they are painted (just look like white ceramic tiles with white grout)! No idea what paint she used, but painting tile can totally be done and can last quite awhile. ;)
~Chelsea
Bekah says
When we bought our 1960s ranch house, the brick fireplace was already painted white (thankfully), but I tackled it to add another coat to make the color more seamless – the bricks are craggy and textured and suck up paint like crazy.
Also – Colonials Class of 2000 flashback! I totally still wear the same high school gym shorts!!! (Hi John – I was in band with you freshman year at TJ – French horn – Rebekah Cutler.)
YoungHouseLove says
I totally remember you! No way. Go French horn.
-John
Adriane (aka the greenhorn) says
Such a huge difference already!
And, those stuffed logs @annabelvita mentioned are soooo adorable.
Also in the adorable category is Clara’s 13 month picture! Just saw it today. Congrats on your new stage–year 2!
YoungHouseLove says
Aw thanks Adriane! We can’t believe the difference between her 12 month and her 13 month pics!
xo,
s
Kristen in Hawaii says
Looks fantastic, even with the orange paneling. The room looks bigger and brighter already! As for painting tile, yes, I’ve done it, and lived to tell the tale. We’ve been fixing up a vacation rental and the old coffee table that was in there was a deadly combo of veneer and laminate with a tile top. And the tile wasn’t grouted, but sealed in with latex caulk. It was tan and brown and yellowed and cigarette-burned and absolutely hideous.
I scuffed up the tile, rolled on some BIN primer, sanded a little, applied 3 thin coats of Behr Swiss Coffee (barely off white), sanded some more, and then sealed it with 3 thin coats of gloss polycrylic. I was super worried about brush marks on such a smooth surface, or the paint just not sticking…but so far it’s holding up well to wet glasses and propped up feet! Here’s some pics of the transformation:
http://www.hawaiihillsidehideaway.com/coffee-table/
YoungHouseLove says
Wow- that looks great!
xo,
s
Katie Truelove says
It never ceases to amaze me what a change you can create with paint! I’m still scared to paint brick but these pictures might convince me otherwise if I have the opportunity someday;):)
Lauren says
It looks great!! I can’t wait to see it with the walls painted.
In your first house, did you clean up and paint the glass doors on your dining room/living room fireplace, or did you get a new insert? We have glass doors on our fireplace that are not looking so great, and the 1983 brass is not exactly our style. Any (inexpensive) suggestions?
YoungHouseLove says
Yup, I just painted those with a brush, but spraying them works too (and is faster). Metal takes paint really well. Oh and I used a straight razor to get excess paint off the glass. Hope it helps!
xo,
s
Erica says
I LOVE the white and how it just pops! It looks SO clean!
hatchlife.blogspot.com
J'Ann says
WOW you guys out did yourself! love it!
A Girl’s Next Best Friend
Amanda says
It looks fantastic! I love how much difference a little ol’ coat of paint can make!
Ana Silva says
So much better Sherry! I love it, what a huge difference some white paint makes. I am so glad you mentioned not to paint the inside if you plan on actually using the fireplace. I was debating painting mine until you said that. I would have been making a huge mistake. Once again though you have motivated me to get up and get to work on my house.
Kelsey Gardner says
This transformation is awesome, and I love that you painted the floor too!
Do you by chance a close-up photo of what the floor looks like after being painted?
Thanks :)
YoungHouseLove says
You’re not the first to ask for one! It’s officially on our to-do list!
xo,
s
Erika says
That looks great, you guys!
Jamie says
We plan on painting the brick on our house, it’s a dreadful yellow. Going to go with darkish gray!! Hopefully it works out!! Thanks for the caulking tip! We plan on doing this within the next few weeks!!
Coral says
Hi guys! My fireplace is sans mantel and unfortunately, my hubby and I are both lacking in the DIY department. ;) Have you ever installed a mantel/have any tips/ know of any sites to visit for a few pointers?
thank you!
YoungHouseLove says
We haven’t tackled that but I’d google around for a tutorial using search terms like “how to install a mantel” or “hang a mantel.” I would imagine you could ask around for advice at the hardware store (maybe they’ll suggest a masonry bit to predrill holes for long screws and maybe even anchors too). Good luck!
xo,
s
lara says
look into cork for the kitchen floor! LOVE mine. comfy on the feet, kid friendly, eco friendly, and dish dropping friendly too!
Jami says
We painted the fireplace we had of course we were blog lookers but not readers because we just slapped on the paint, we’re paying for it now and needs to be touched up badly! I’m really excited to see what you have planned. I would love to get rid of our fireplace and replace it but my husband is seriously attached to it so I’ll wait.
Here is a mini before and a semi after (we’ve since made some serious changes, like getting rid of that giant tv!
http://whatthegraham.com/?p=1853
YoungHouseLove says
Ooh looks good. Love the fun paint color too!
xo,
s
PatC says
Nice! It brightens up the whole room. :o)
Elizabeth says
Your fireplace looks awesome! I love the staging you did in it. Can’t wait for the doublesided someday fireplace!
We recently did our fireplace too (following your tutorial…sort of), but we left the mantle for now. We have pretty wood in our house (just too much of it) so we didn’t want to paint it until we decide what we’re doing in the room for sure :-) We did accidentally use oil based primer and then latex paint over it (which we didn’t know was a no-no) so it’s really sticky, but I’m not in the mood to deal with it yet, so that’s a later project..haha
http://diytheory.wordpress.com/2011/05/12/introducing-our-new-fireplace/
YoungHouseLove says
Oil based primer followed by latex paint is actually what the pros recommend (we’ve done it that way too). It’s oil based paint that shouldn’t be covered with latex paint (it can crack and peel) but with primer you’re good. Maybe it just needs more drying time or went on a little thick?
xo,
s
Megan says
I just painted my fireplace white too and want to paint the inside black, but I’m going to hunt down the high heat kind…even though we don’t use it, I’d rather buy it now in case we ever get it fixed and whatnot… But we keep candles in our’s too… we don’t normally light them either (we have a 2 year old!), but like you said, there’s always the chance! Haven’t gotten a pic of it finished yet… but the room has seen a lot of progress over the last two weeks…
http://thependletonhouse.blogspot.com/search/label/living%20room
YoungHouseLove says
Wow- you’ve been busy! Looks great!
xo,
s
Karla says
What a transformation!! Looks gorgeous :)
Courtney says
Wow! The fireplace is looking amazing! I am so excited that I found your blog this Spring! We just bought a late 1940s “rambler ranch” and we have some very similar projects in our near future. Thanks for the inspiration and detailed explanations. You guys rock! :) -Courtney
Mara says
Absolutely love it. I totally pinned this and the LC’s makeover too. We have a painted brick fireplace that needs a little bit of an update during naptimes!
Ciara says
I’ve loved the look of a white painted fireplace since I saw the pics from your first house but just haven’t had the guts to paint my own. Seeing this most recent transformation has given me the courage to go for it! I have a working brick fireplace and was wondering if you knew how well the painted brick on the outside of the fireplace will hold up to heat.
YoungHouseLove says
John’s sister painted her fireplace’s exterior brick and used it five winters in a row (a lot) and it was great! A few soot stains (that she repainted before she sold) popped up, but no issues with the paint holding. I think most of the heat stays in the fireplace so the exterior brick doesn’t get too hot.
xo,
s