We’re back with the fireplace update that we mentioned in yesterday’s post about removing our old not-baby-safe wood stove.
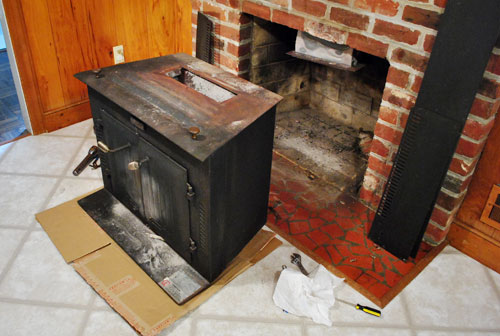
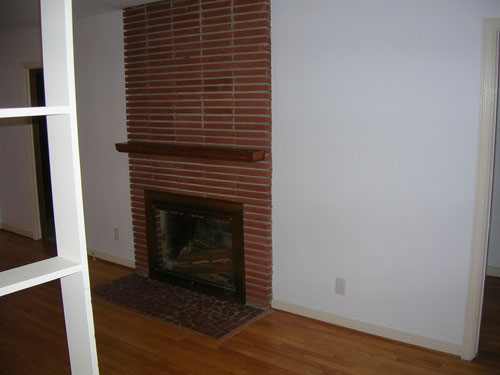
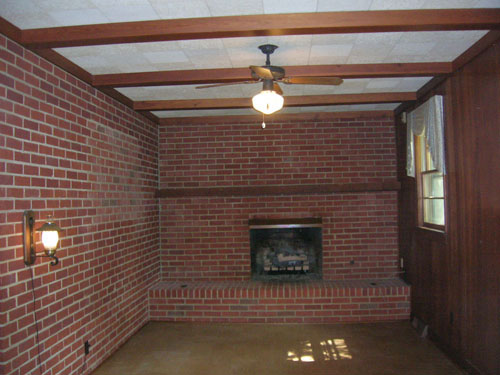
This next step is definitely just the beginning of our fireplace makeover (as in step two of probably fifteen). We figure we’ll tackle this baby in stages (just like we do pretty much everything else around here) so the first step was to spend as little as possible to get it looking better for the short-term (since it might be a while until Phase Two kicks in). So here’s what it looked like yesterday morning:
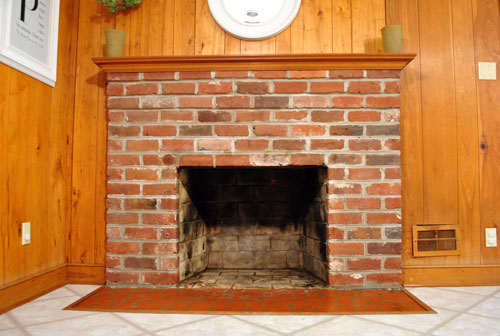
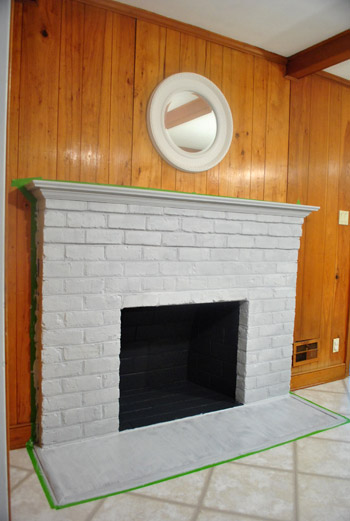
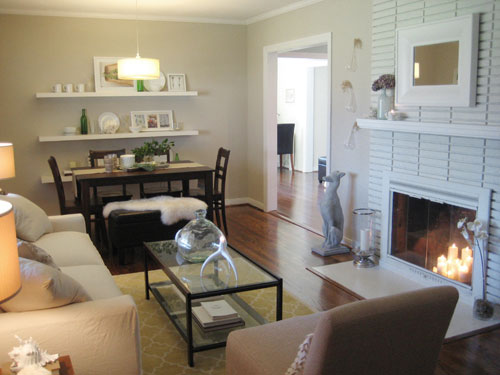
And here’s what it looked like yesterday evening:
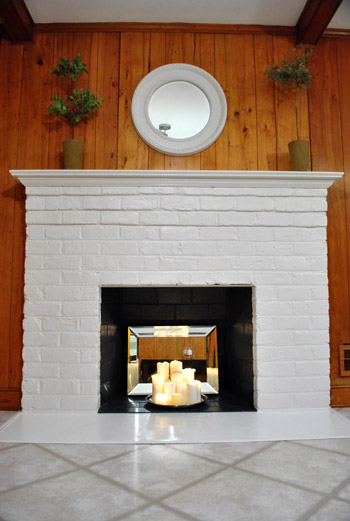
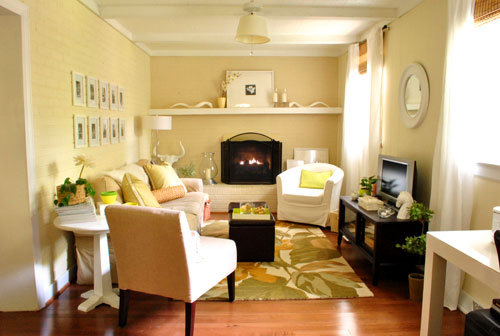
I know, I know – the orange paneling makes it look craZy with a capital Z. But just scroll down a bit to the dark den from our first house (which also had paneling and brick) to see just how transformative paint can be (we didn’t remove the paneling in there, just primed and painted it). So try to envision some fresh paint in a soft color on the paneled walls with glossy white beams and trim to match the same semi-gloss paint on the fireplace. Can you see it?
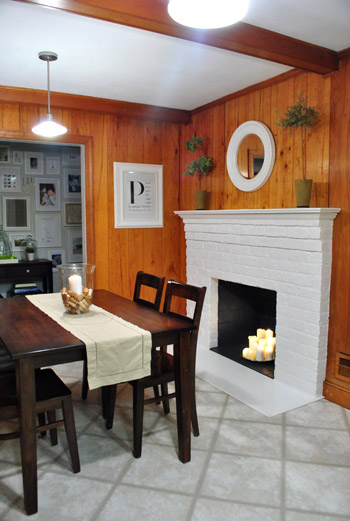
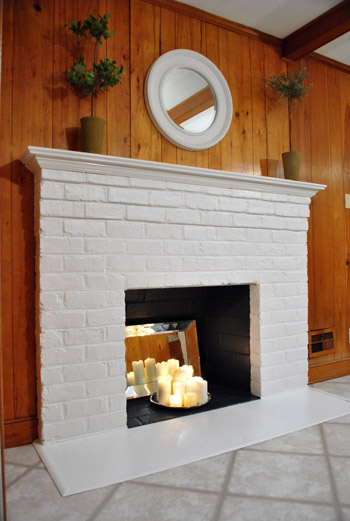
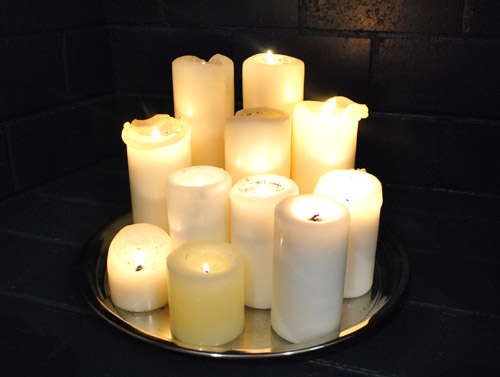
And now for a word about the candles and the mirror that I tossed into the firebox. Those are definitely not Clara-friendly. That was just mommy psychosis (I wanted something cute in there for the pics, even if there won’t be a thing in there for a while during Clara’s waking hours). It was such a quick little addition that it gave me some baby’s-in-bed-let’s-have-date-night ideas (you know as opposed to baby’s-in-bed-let’s-upload-fireplace-photos-and-write-the-post-for-the-morning ideas). The latter won out, so maybe I’ll break out this look for anniversaries. Me-ow.
But when it comes to the day to day stuff, l fully expect to find pillows, stuffed animals, books, and whatever else Clara decides to put in there awaiting me when I walk into the kitchen. The girl loves hiding stuff around the house, so I’m guessing that she’ll appreciate this new little nook. Maybe we’ll even be able to sneak a picture of her chilling in her not-hot-and-not-sharp-anymore zone reading a book or snuggling with Gee (her stuffed giraffe that she named herself).
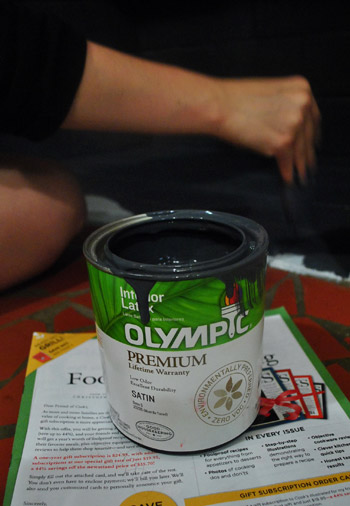
The best thing about this little fireplace facelift is that it took us about five hours (on and off with drying time in between coats) and it only cost eight dollars (and three cents, to be exact). We just used primer that we had leftover from painting the guest room (Olympic Premium No-VOC primer), some white semi-gloss paint that we always have around for trim touch ups (Olympic Premium No-VOC paint) and a quart of Benjamin Moore’s Temptation in satin that we picked up from Lowe’s (color matched to, you guessed it, Olympic Premium No-VOC paint). Primer isn’t always necessary (we’ve gone without it while painting brick before) but we had it on hand so we figured we might as well use it.
You guys know we’re no strangers to painting brick fireplaces since we tackled not one but two in our first house. Remember this guy who went from this…
… to this:

And this one that went from this…
… to this:
You can check out our original fireplace-painting tutorial here, but since we’re nothing if not even chattier these days, we thought we’d recap the steps we took when it came to prepping our current fireplace for paint. First we:
- Closed the damper and declared the fireplace inoperable (we never used the woodburning fireplace in our last house and plan to either install a double-sided gas or electric insert down the road).
- Scrubbed the heck out of the firebox, exterior brick, mantel, and hearth with soap and water to cut the grease/ash (we used Dr. Bronners + water).
- Let everything dry.
Then it was time to prime and paint. Here’s what we did:
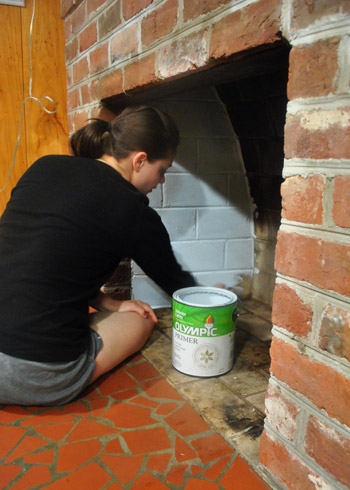
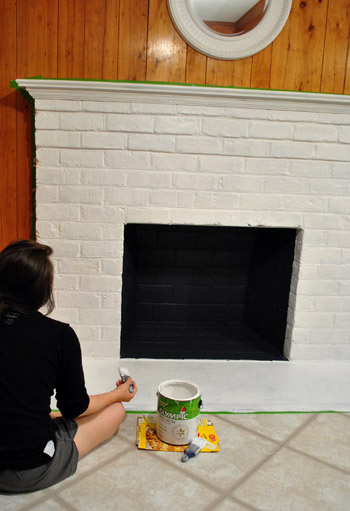
- Primed the firebox with Olympic Premium No-VOC Primer (remember, we’re not going to use this fireplace for wood burning, so if you’ll be using your fireplace either leave the firebox unpainted or hunt down high-heat options that are meant for the job).
- Painted the firebox with Ben Moore’s Temptation in satin (color matched to Olympic Premium No-VOC paint).
- Taped off the wall around the fireplace (since you have to smash a paint brush into craggy brick, it’s hard to stay in the lines).
- Caulked the big crack between the tile hearth and the firebox so it would look seamless when painted.
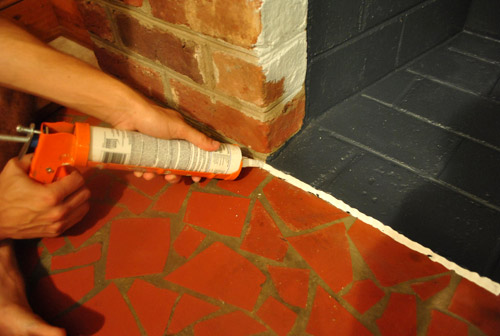
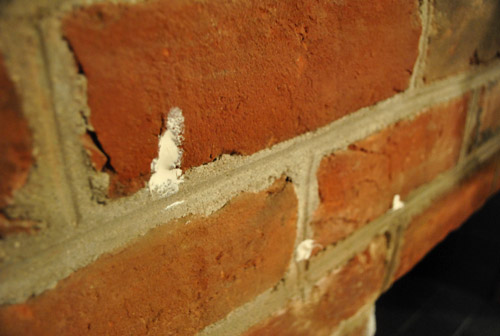
- Caulked other especially cavernous holes in the craggy brick so it looked less shadow-y and chipped when painted.
- Primed the brick fireplace surround, wood mantel, and even the tiled hearth (yup, the tiled hearth… more on that in a minute).
- Painted the brick fireplace surround, wood mantel, and tiled hearth with two coats of Olympic Premium No-VOC semi-gloss paint in off-the-shelf white (some folks like more contrast when it comes to mantel and hearth color, but we’ve always loved the all white look – although later when we build out or even tile the fireplace & surround we might add more varied colors and materials for fun).
- Applied three thin and even coats of Safecoat Acrylacq (a low-VOC non-toxic alternative to polyurethane) to just the tiled hearth on the floor. Be warned that certain polyurethane types will leave a nasty yellow tint so the only two that we trust are the Safecoat I mentioned above and Minwax Water-Based Polycrylic Protective Finish in “Clear Gloss.”
You think we’re crazy for painting the tile on the floor huh? Check this out. We did the exact same thing to the exact same heart floor in our first house. See the same little smashed up tile?
The whole prime, paint, and poly technique was meant as a very very temporary solution (we planned to replace the tile pretty soon thereafter). But it stuck. Literally. It still looked mint four and a half years later when we sold the house! Even with foot traffic (in shoes) and small nephews of ours ramming it with metal matchbox cars. Here’s where I’d add a close up shot, but sniffle, we don’t live there anymore. So here’s the last wide shot we took of the room (you can see that it still looks glossy and white):
So although painting ceramic tile, especially tile that gets walked on, is nothing the pros recommend, we’re totally cool with doing it as a temporary fix (although doing it in a bathroom is probably a terrible idea because it can get slick when walked on with sopping wet feet). I should mention that in both cases the tile was terra cotta which is really matte and porous (and not slick and shiny), which might be why it grabbed the paint and held the heck on for such a long time. Who knows, it could inexplicably show a lot more wear and tear than it did in the last house (you know we’ll tell ya if things quickly go south). But either way we’re pretty sure we’ll bring in some awesome new tile for the hearth and maybe the entire fireplace when we get down the road a bit (read: save enough loot to tackle the kitchen in a more major way).
Have you guys painted any brick lately? Or ever primed, painted, and poly’d tile- just to see what would happen? Has your husband ever taken terribly unflattering photos of you painting something to get you back for sharing pics of him scrubbing brick in his high school gym shorts?

Kari says
You’ve seen this link right…..
talk about fireplace love…
http://theletteredcottage.net/?s=fireplace
YoungHouseLove says
Oh yeah we linked over to that in yesterday’s post. So inspiring!
xo,
s
Angela says
What a huge difference! That is amazing! The mirror is my favorite. It adds so much depth.
Melody says
What an amazing improvement! I expected it to look good, but not that good. Great job!
Amanda Wells says
I swear white paint never ceases to amaze me with the transformations it makes. It looks great! can’t wait to see what you guys do with the paneling.
Have a fun giveaway on my blog today – http://www.amandadovewells.com/?page_id=45
Julie says
Holy AMAZING!!! I love the mirror, it makes it so bright and cheery! I’d LOVE to paint the firebox on our non-functioning fireplace, but we plan to convert to gas at some point and I’m afraid that wouldn’t be safe…?
YoungHouseLove says
We spoke with a chimney expert since we have debated turning our fireplace into a double sided one with a gas or electric insert down the line and he said using regular paint instead of high heat paint is just fine with either insert. The heat from the inserts could cause some “general wear and tear” but it’ll be covered by the insert at that point. Hope it helps!
xo,
s
Nina says
What a big difference! Looks great! I can totally imagine how it could look with the painted paneling…
We changed the look of our fireplace as well but left the brick as is
http://livingin40.blogspot.com/2011/03/finished-fireplace.html
YoungHouseLove says
SOOOO pretty!
xo,
s
Nina says
Thanks Sherry!:)
Angela says
SO pretty! It is looking like you now. I love it. It is amazing what a little paint can do.
Heidi says
always thought that you needed a special paint for the inside of the fireplace because of the heat… did I miss something?
YoungHouseLove says
Yup, if you’re going to be using the fireplace as a wood burning one you need high head paint (we mentioned we sealed the damper and proclaimed ours as “inoperable”). We never used our last house’s wood burning stove so we’re ok with not using this one either. We might add a gas or electric insert later (which is fine with a painted firebox). Hope it helps!
xo,
s
sarah says
You guys have quickly become my new favorite blog! Love, love, LOVE the before and after projects. Now you’ve got me thinking about painting my own brick fireplace!
Becca says
Love the candles! Have you considered getting battery operated candles and using them in the fireplace? We have a pre-schooler and we have six battery-operated candles in our fireplace. It works great for us and they look pretty good!
YoungHouseLove says
Ooh that’s a great idea! Although I’m not sure Clara is old enough not to throw/break them just yet. Maybe next year…
xo,
s
Melissa @ HOUSEography says
I love the transformation. I’m picturing some great molding treatment above painted out to match the fireplace – more height, etc. Of course, that paneling needs to be painted ASAP. It must be driving you batty… unless it’s already in the works of course.
Stacey says
I’ll make you guys a deal…if you can convince my hubby to let me paint our brick fireplace, I’ll give you all the FREE babysitting you need!!! ;)
I want to paint that big brick blob SOOOO badly and the hubs thinks painting brick is a violation of some home-owner commandment and, if we do so, we’ll be plagued by locusts or something *rolls eyes*
I’ll definitely be adding your pics to my file for my next waterboarding session ;)
Stephanie says
I LOVE the way the fireplace looks with the candles and the mirror!!!!
I don’t think I could bring myself to paint brick though. Fortunately not a problem, since, as I described in my comment on your previous fireplace post, our only fireplace has a wood frame/mantle and I had no problem whatsoever painting that. :-)
Sarah says
Love it!! I almost wish we had a fireplace to paint.
You must to do the paneling soon… consider that a third-party “hint, hint” to John’s parents :)
Amanda says
This looks great. I would love to see a close up shot of the hearth! :)
YoungHouseLove says
For those requesting a closer shot of the hearth, I’d love to add one if I get a moment in the next few days!
xo,
s
Christine says
So wait..all you did to the tile was prime, paint, and poly? How well can you still make out the shapes of the tile?
I would totally do that with ours [Hi, I’m the girl with Whoa Nellie the friendly Fireplace Hearth from yesterday..] but I’m worried that you’ll still be able to see the RIDICULOUS shapes. You know, with shadows and all that.
YoungHouseLove says
You can feel the shape of the tile, but since it’s all glossy white your eye kind of glazes over it. It looks like one big slab of white concrete as opposed to a jagged mosaic of broken tile. Hope it helps!
xo,
s
Jo @ Jo In the Kitchen says
Oh my gosh, I love the transformation!!
Paige says
WOW….amazing! I love it!
Josh says
Looks so much better!! We did the same exact thing to ours…. the semi gloss white really transform the old red brick. Really like the mirror idea.
becky says
this is so funny! we’re in the middle of a big remodel and we just did this days ago – and we used a lime technique i swear you guys posted about another read a year or so ago. our house is turning out a bit too clean and modern – and my husband picked out the karlstad as well – so i thought i needed to add a bit of texture here and there and went back and sanded the lime covered brick down a bit. and everyone is freaking out because i’m debating painting it a deep plum brown – or peacock blue/green. anyhoo, it’s fun to see we’re not the only crazy ones (though the look on my mother-in-law’s face says we are)…if you go over to my blog – there’s a link over to the house blog (don’t judge – it’s just for friends and family)…you’ll see what we just did.
Gloria says
Love it! I found you guys a couple of years ago while searching for a tutorial on painting brick fireplaces. Now, I’m totally going to paint the ugly tile in front of my fireplace. I still need to send you a pic of the pull string piñata I made for my 3 year old’s bday. It was a hit! You guys rock!
Kate says
Wow! I was skeptical at first but what a transformation. And it looks great in the shot where you can see the “hall of P” – it will flow nicely once the kitchen is complete. Way to go, guys!
Jackie says
Wowza! My jaw literally just dropped! What a transformation! Great job you guys!
Mandie says
I would love to see a close up of the floor tile- as we have that in a full room in our sunroom, but it works for now. As for the candles, what about a fern in there? maybe a fake one so it is CLara proof?
As for the paneling- my parents had the same paneling- so dark and orangey- they painted it and it looks awesome- just a thought- paint is cheaper that pulling it out. :)
love the progress.
YoungHouseLove says
Oh yeah we plan to paint the paneling for sure! As for a close up of the floor tile, we’ll have to see if we can add one soon. A faux plant is a good idea, although I wonder if we’ll just leave it bare for now so the dog and baby can hang out in there. Haha.
xo,
s
Ashley @ DesignBuildLove.co says
It’s amazing what a little paint can do! The fireplace now fits sooooo much better with your home, and I LOVE the mirrored tray and candles (even if they are temporary!)!
Also, how crazy is that they this fireplace had the same smashed-up tile hearth floor as your old house?!?!? That must’a been all the rage back then! NEVER in my life would I do something like that now… BUT I would totally use your method to cover it up! You did an amazing job before and now! :)
I’ve been working to figure out some style inspiration for our fireplace ever since House Crashers put it in! http://designbuildlove.co/?p=282
It’s an amazing Eco-Smart ethanol-burning fireplace, but it feels like it was just an afterthought at the moment… gotta think of some tiling/styling/framing ideas!!! (maybe I’ll use this as my first Pinterest project!)
Thanks for the inspiration guys!
jesse says
I said “yay!” out loud when I scrolled down to the newly white fireplace. I am a dork!But it looks great! so glad y’all posted your fireplace work into two consecutive posts so we can really see the whole transformation. Great job!
Steph @ BirdHouse Family says
Looks amazing!!! I can’t believe you guys got this accomplished so quickly!
mary says
Do you have any suggestions for remodeling a fireplace with cracked granite (marble) around it? Anyone?
YoungHouseLove says
Hmm, maybe try sanding it to rough up the smoothness, filling in those creacked areas with caulk, and priming and painting it all one seamless color (chocolate brown, white, cream, mocha, grey, etc)? Not sure how good it would work long-term though…
xo,
s
Alison says
Wow guys it looks soo good! That mirror is deceiving, at first glance I definetely thought you punched out the back of the fireplace and that I was looking straight through to another room. And painting the tile obviously turned out great! Nice work…
MaNell Hembree says
I absolutely love this transformation! (Well, let’s be honest… all of your transformations!) I am a design junky, I’ll admit. But you guys just have my heart… speak my language when it comes to design. (and we share a quite quirky sense of humor, which is just the icing on the cake!) I have to thank you so much. You are such a great source of joy for the end of my day, nearly everyday. You (and the “Real Housewives”) are my guilty pleasure! I love it when everyone is in bed, and I can sit down with my laptop and see your most recent post. It just makes me happy. What else can I say? If loving you is wrong, this girl doesn’t want to be right. I have a few questions that I would love your expert feedback on. How do I message you? I would like to attach photos to explain my questions! Thanks so much!
YoungHouseLove says
Aw thanks for all the sweetness. As for photos and questions, feel free to post them on our Facebook page (see that button on the top right hand side of our sidebar?) so that everyone can get in on the fun!
xo,
s
Lori says
Wow what a great transformation! Since Clara likes nooks you should try to get a pic of her looking up the chimney at christmas time, like she’s looking for santa! It’s very cute if it turns out right.
YoungHouseLove says
Cuuuute! Done.
xo,
s
Paige says
Oh man, that makes a HUGE difference already! I think it tones down the paneling several notches.
The mirror threw me off for a second and I thought, “How did they bust through the fireplace so fast?!” Ha ha.
Sloane says
I love this! I’ve never even thought about painting the hearth tile…this could seriously help upgrade my living room from awful to awesome. I don’t know what type of tile is used for our fireplace area, but it’s the slick kind, often found in bathrooms. Is it possible to paint that? Or maybe I should ask if there’s any tile that you CAN’T paint?
YoungHouseLove says
Here’s what I would do. I’d sand the heck out of it, so it feels rough and matte instead of slick and glossy. Then I’d prime and paint it. Hopefully it’ll hold! Of course the experts never recommend painting tile (especially the slick kind) so maybe it’s only worth playing around with it if you’re planning to possibly replace it down the line anyway?
xo,
s
rachael says
goodness. i WISH i had the energy and motivation you guys do. or maybe even a tenth. haha. it looks awesome.
carolinaheartstrings says
You are well on the way. It is looking great already.
Janette@The2Seasons says
Elbow grease and paint – you gotta love ’em. Great results!
joyjoy says
That mirror totally had me fooled. For a second I thought you had already punched a hole through to the other side of the fireplace! I was so confused as to how you could have done all that in one day. :-P
audrey says
Aw, I would’ve loved to have seen you guys just do the mantle and that bit on the floor. That brick was so charming…I will confess I do not like painted brick. At all. I figured you guys might choose to live with it because y’all said you were gonna do things differently this time around…still looks good, but I don’t like it as much as I could have. But then the beauty here is it’s your house. ;-)
Heidi says
Agggrrr I think I’m going to cry, painting my fireplace has been torturing me for days, I can’t sleep thinking about it. All the brick fireplaces I find that look good have been painted white, then yesterday I found a bunch of red brick pics that looked good with like a little bit of airbrushed white and even posted about it last night…I called it “a case for red brick” and now your gorgeous makeovers have me doubting again, how crazy am I? Do you usually see people having a hard time about taking this decision of painting brick?
YoungHouseLove says
I always say that if you have even the slightest hesitation don’t paint brick! It’s too hard to undo. Wait until you’re can’t-go-another-day-without-painting (if you ever get there). Then go for it!
xo,
s
Julie - Corbett Capers says
I’ll have you know that you guys inspired my husband and me to paint our fireplace white over two years ago now. My hubby was Googling “painted brick fireplaces” when he stumbled across your blog (and man, am I glad he did!).
You’re never going to believe how we painted our fireplace: my hubby put paint into a Round-Up weed sprayer (watered down a bit so that it would spray through without getting clogged. He then proceeded to spray the paint (actually it was more like a dripping process than a spraying process) while I stood below with a paintbrush and pulled the paint into the nooks and crannies.
And yes, paint got all over the floor, but we were going to replace the flooring anyway, so it didn’t matter. Wow — that was a crazy (but fun) process. You can see the before and after of the fireplace here: http://onthedotcreations.typepad.com/photos/house_before_and_after/den-before-and-after.html
We think of you every time we look at our fireplace. How cool is that?? :)
YoungHouseLove says
Haha- that’s so crazy and fun. I love it! And wow- what an awesome makeover!
xo,
s
Erin says
Oh gawd … that’s SO much better. Personally I LOVE white painted brick fireplaces and if I were building a house or something I’d be inclined to put in a brick fireplace just to paint it white. A thousand trillion times better and that will go up to a gazillion when you get the paneling painted.
Shay says
LOVE IT! The mirror threw me for a minute I thought you had already broke through to the other side. :)
Question What is in the frame to the left of the fireplace…? I assume it’s something to do with your last name since it has a “P” in it.
YoungHouseLove says
Yup that’s a little square that we cut out of a magazine and enlarged- we call it our magazine monogram. Haha. Here’s a post about that for ya: https://www.younghouselove.com/2009/10/how-to-make-a-magazine-monogram/
xo,
s
Amy @ Triangle Honeymoon says
Looks fantastic! Love the mirror behind the candles. great touch.
Katie says
I love the white fireplace! We have a huge brick fireplace that’s was painted white when we moved (I’m not a fan of the unusually large bricks…the white I don’t mind), but it’s starting to chip – mostly on the hearth, but also on the brick “beams” that go up the wall. What do you use to make sure there’s no chipping, exposing the original brick underneath?
YoungHouseLove says
Primer can definitely help with that. Also applying thing even coats (instead of one thick one that can flake off). Hope it helps!
xo,
s
banclothing says
I love seeing kitchen improvements on your home. Not sure why but I JUST can’t wait for you to tackle the kitchen!
Brittni says
Hey, looks great! I love the transformation from your last basement – amazing!
I am moving into a house with two fireplaces, one with a wood stove that is not certified and needs to be removed, so these could not have come at a better time.
I would love to know what you would do or what ideas you have for an ugly, MARBLE fireplace? Like, swirly pinky creamy orangy. Yuck.
YoungHouseLove says
Eeks. If it were me I’d sand the heck out of it (to rough it up so it’s not too glossy) and then prime, paint, and poly it like I did to the floor tile. Might not last forever, but for the short term it’ll hide that pinky creamy orange for sure!
xo,
s
GoHausGo says
It’s coming together and looking fantastic! I can see your vision!! You guys are accomplishing getting the house together like rockstars. You better slow your roll or you’ll be needing a new house to re-do sooner rather than later!
Meredith says
Looks fantastic y’all. Very impressed!
katharine says
I love how you make the in-between stages pretty. It is very inspiring. My tendency would be to wait and do nothing until I can do the big plan in my head. I like your approach.
Lora D. says
Wow, looks sooo great! So fresh. I have a question about the paint color “temptation” that you used. Since it’s hard to tell on a monitor sometimes. It looks great on screen, and I am looking for a perfect charcoal gray to paint some cabinetry. Would you say the color is a black or more of a charcoal gray? Thanks.
YoungHouseLove says
If you hold it up against black it’s definitely not black and much more in the charcoal family. But seeing it against the white paint still makes it read as pretty black. Know what I mean? It really depends what’s next to it.
xo,
s