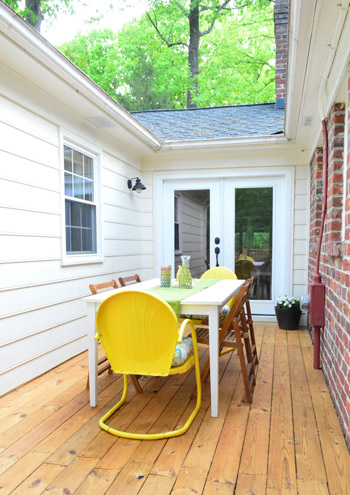
With our power washing done we could finally stain and seal our deck, which we completed and re-furnished on Tuesday (literally hours before our first showing!).
But let’s rewind to where we left off yesterday. We mentioned that after finishing it in late August we were told to give the pressure treated wood 2-3 months to dry out before sealing any of the moisture from the treatment in (apparently sealing or staining PT wood too soon can lead to terrible results). So by the time staining was advised, it was too cold out to apply the stain. But even after spring rolled around and we power washed, it still wasn’t quite ready.
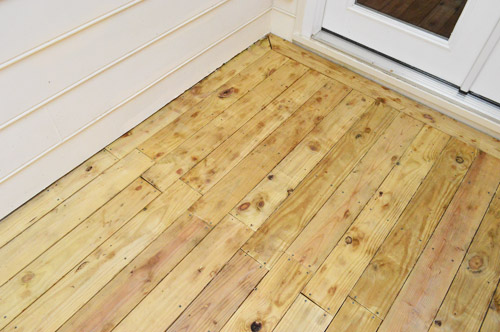
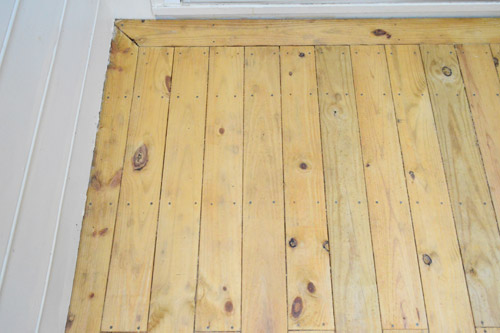
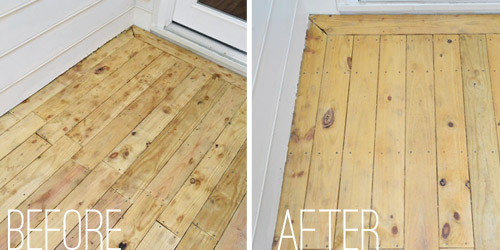
What was standing in our way? Some lingering grime that the pressure washer didn’t remove in this corner. Sherry didn’t think it was that noticeable, but I was determined to get things cleaner before staining (I feared that we’d seal them in and potentially darken those spots even more if we didn’t get them off first). Yes, you can call me Nerdy McWorrypants.
Since we hadn’t used a cleaner during the pressure washing process, I decided to try one after the fact. Lots of deck staining tutorials (like this one and this one) recommend applying some sort of cleaner first, so I didn’t want to skip that step. We grabbed this $7 “Deck Wash” because we liked that it could just be sprayed by attaching it to a garden hose.
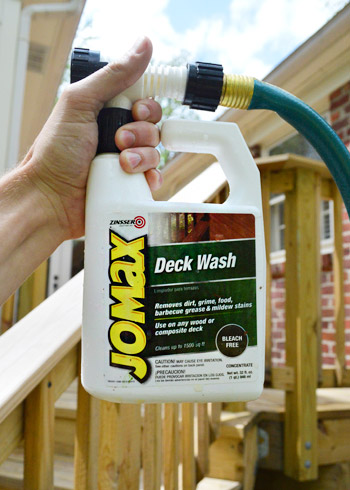
I followed the instructions, which was basically spray it, let it sit for about 5 minutes and then rinse it off. Could cleaning a deck really be that simple?
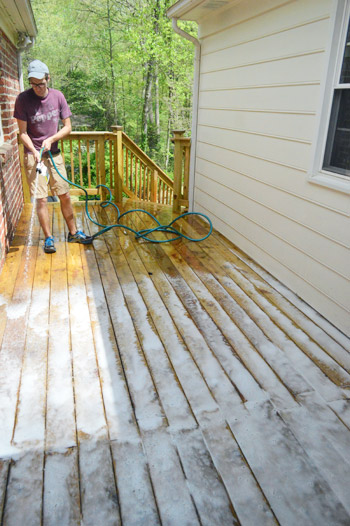
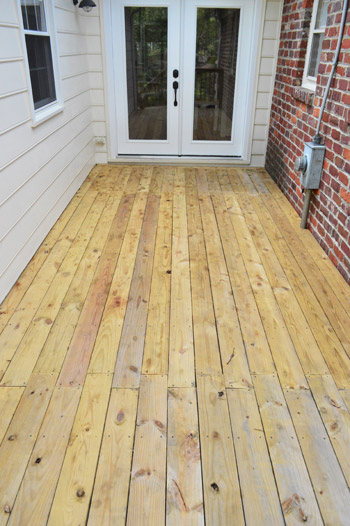
Apparently not. I didn’t even bother taking an “after” photo because it looked exactly like the before.
After two attempts (pressure washer, then cleaner) I was about to admit defeat. But I decided to give cleaning one more try, this time in the form of an $8 Olympic brand cleaner. I had bypassed it originally because it required buying this $11 sprayer.

Well, this cleaner most definitely made a difference. The same spray process commenced, I let it sit for a few minutes, and then rinsed it off, but this time it seemed to essentially bleach the whole deck clean. I was a smidge panicked with the result at first (although I had read that a bleach mixture is a commonly recommended deck cleaner) but in the end it was the exact blank slate that we needed to apply a nice even coat of stain. So to anyone wondering if the $8 product with the $11 sprayer can be that much better than the $7 one that works with a hose… in our experience the first one did nothing and the second one worked overtime.
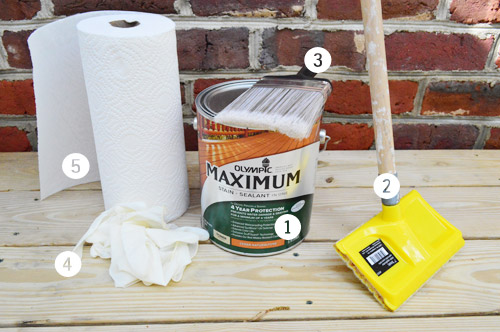
Next up was applying the stain/sealer, which Sherry and I were both eagerly anticipating (literally the minute Clara was tucked in for her nap we sprinted out to get started in the hopes that we could finish everything before she woke up). Here were our supplies:
- Olympic Maximum Toner in Cedar Naturaltone color (it’s a stain/sealant all in one, and was $37 from Lowe’s)
- Deck Stain Applicator ($7 from Lowe’s)
- Large brush ($6 from Lowe’s)
- Rubber gloves (already owned) – and yes, I now realize they kinda look like a certain other rubber item…
- Paper towels (rags would also work)
As for choosing the type of stain + sealer to go with, we heard a lot of great things about it from a friend of ours who recently used it (and a few readers mentioned the same one as well). We chose a toner over a semi-transparent finish because the color would be subtler and more of the wood would show through. We’d grown so used to the “natural” look of the wood that we didn’t want to go too dark (especially with the dark brick wall on one side) and our only other hope was that it wouldn’t look too red-orange either. Of course if you look at the photo below, straight out of the can it was pretty darn orange, but thankfully it dried to look a lot more subtle.
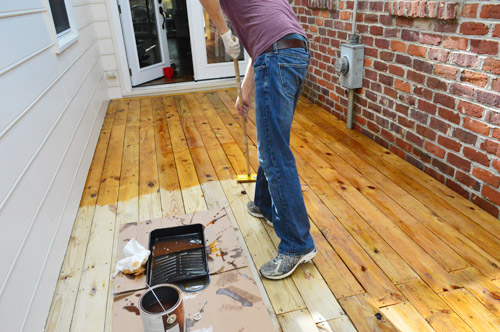
Before taking the train to Staining Town, we had read up on several options for applying it – spraying, rolling, brushing, etc. – and we opted to use a sponge-y “deck stain applicator” because we had seen my dad use one before at my Granny’s house. Both in watching my dad, and in our case, it was pretty easy to use and seemed to make things go really quickly. The only catch is that you need to “backbrush” afterwards, which keeps the stain from pooling in any place and also apparently helps work the stain into the wood. So as usual, I did the rolling-ish step (in this case, it was the sponge applicator) and Sherry was the brush girl (she followed quickly behind me, brushing over everything I stained to work the stain into the cracks and keep it from pooling anywhere).
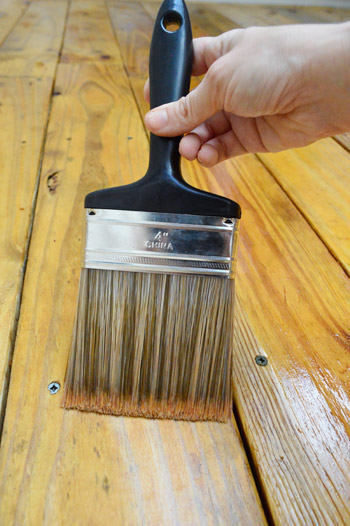
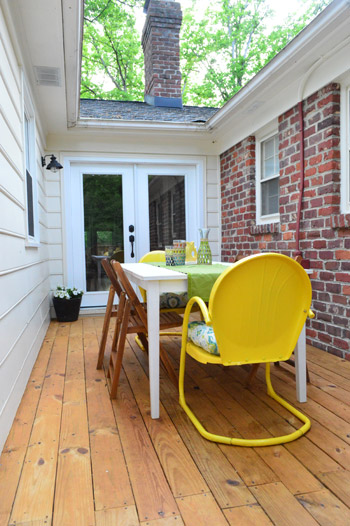
The top portion of the deck probably took us 15-20 minutes (this stain + sealer only calls for one coat). So that part was waaaay faster than we expected. It was the stairs and railings that ground us to a halt. That part had to be done with the brush making sure that we got all sides of each post while watching out for drips and puddles. So it took us more time and focus than we expected. Maybe two hours in total for that part? We kind of lost track, but Clara woke up before we were finished so I went in to watch her and Sherry “The Paintbrush” Petersik stayed back and got ‘er done.
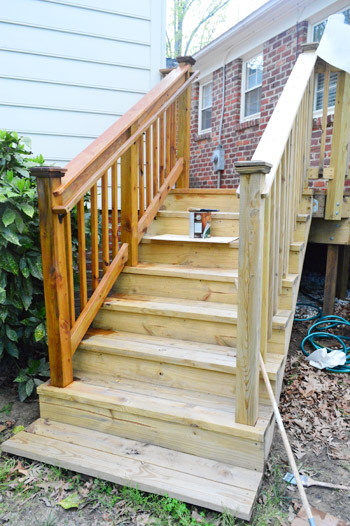
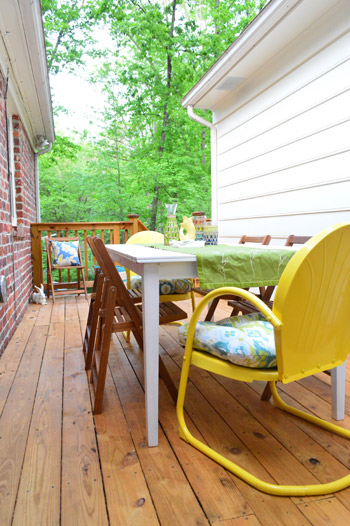
When the stain was still wet we worried that the color was redder than we had wanted, but when it dried it did exactly what we wanted – it just “toned” the wood, so it still looks similar to the other exterior wood around the house (like the fence around the patio, etc). Oh and you might notice that Sherry took a moment to paint the utility box to blend a little more with the brick, just like she did at our first house. It only took a test pot of paint (around $2.50), so although it’s hardly invisible, it’s a lot less “Look at me!” in person. And I think you can tell in the photos when you compare it to the picture a few photos up.
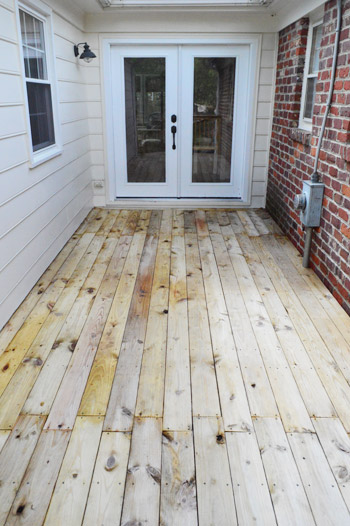
Best of all, I was totally redeemed from my failed-ish attempts at cleaning. Here’s that corner that was especially dirty looking.
It’s not flawless, but it’s much improved over where we were post-pressure washing.
So now, eight long months after construction on the deck wrapped up (and 10 since it started!) it’s officially stained and sealed. And I’m still just as proud of her. Thankfully we got to enjoy the deck all through late fall and early spring (even before she was cleaned and stained) but it’s nice to know that she’s 100% complete and future acorns and leaves can’t do as much damage if they decide to hang out too long.
We also finally calculated the long awaited deck budget breakdown for you guys (we wanted to get her stained/sealed before breaking down the benjamins) so here it is:
Permit – $114
First lumber & hardware order – $1007
First auger rental – $60
Second lumber & hardware order – $251
Second auger rental – $60
Flashing – $40
Misc hardware & supplies – $95
Powerwash – $80
Cleaner & Stain – $76
Total: $1783
I definitely think if you didn’t have to build such a large staircase (ours has 8 steps with long railings on either side) you could save a good chunk of money. And if you don’t fail your first inspection and have to rent the auger again, you’d save 60 more bucks. Oh and you can save seven more if you buy the good cleaner the first time. Ha!
I think this project was one of my biggest (it’s right up there with our first house’s bathroom gut-job) and it certainly saved us money to DIY it (it probably would have been around 6-8K to get this hired out) but most of all it gave me confidence. Dude, I built a deck. And the permit guy said it would hold a bunch of elephants. I’m a proud poppa.
That odd little alley of ours has definitely come a long way. Here’s a picture we took during our first walk through back in 2010.
Anyone else staining a deck? Did the stain look crazy bright right after it went on? Have you tried one of those deck stain applicators on a stick? I really think in combination with the brush it was a fast yet thorough method.

katalina says
I had a friend come in the door and she thinks it is mold smell which is bad because I am allergic to mold bigtime– just have to figure out where it is coming from!
YoungHouseLove says
Oh no! Good luck Katalina!
xo
s
Charlotte @ Ciburbanity says
Please don’t look at what time this comment came through… loser on a big Sat. night. Reading all these comments and thinking about your new house To Do list made me wonder whether you guys work off an editorial calendar for the blog? Or do you just work through your project list and post accordingly? I’m thinking maybe my blog routine’s a little haphazard! :) Thanks!
xo Charlotte
YoungHouseLove says
Not to worry – we’re completely unorganized! We try to jot down in a notebook when we think we’ll share things about a day or two in advance, but it usually switches around a lot (we’ll forget about a pinterest challenge and drop that in, or have a bunch of questions on something and add an FAQ post and drop that in and bump other stuff back. It’s completely haphazard, so the easiest thing for us is just to try to post things in order as we go whenever we can :)
xo
s
Frances says
sanded, sealed delivered i’m yours da da da dadadadaaaa!
Sorry i tried real hard not to but I just couldn’t!
Love the blogeo! xxx
Danette says
We were told by a decking specialist to use ‘nappy san’, not sure what you have in the US, I’m in Australia, but it is bleaching powder for stain and whitening etc. I used that on our newly built deck and was amazed at how much colour came out. Most of the men at the hardware shops recommended the ‘acid’ wash type, but we have kids and a dog…not to mention me!! Just thought I’d let you know incase you need to do another deck ;)
YoungHouseLove says
Thanks Danette!
xo
s
James says
Nice job guys! keep up the hard work.
lauren says
HAVE YOU GUYS SEEN THIS:
http://www.anthropologie.com/anthro/catalog/productdetail.jsp?navAction=jump&id=27210285&cm_mmc=CJ-_-Affiliates-_-rewardStyle-_-11292623
if you have, sorry for the ALL CAPS.
but if you haven’t: AAHHH!
YoungHouseLove says
I KNOW RIGHT?????!!!!! I had the same reaction. Haha! Lots of screaming and flapping around.
xo
s
Kelci says
This post could not come at a better time!!!! I need to power-wash and stain my deck but I was not sure where to start!!! Thank you for the great tips and your deck looks amazing!! I also love those yellow chairs-great pop of color!
YoungHouseLove says
Thanks Kelci! Good luck with everything!
xo
s
katalina says
The whale bookends are totally you with your cool 2 whale trays on your wall BUT I did not see that your book was between the head and tail! WOW! DOUBLE WHALE WOW!
Pete says
Nice job!
In my humble opinion, nothing beats the look of polished wood, you have brought out all the highlights in the wood.
Gotta like that!
TJ says
Brilliant post. We’re planning to build a deck soon so no doubt i’ll be trawling back through your old posts for tips & tricks :)
Ellen says
We tried the Jomax deck wash on our composite deck and it did nothing!! We had to return to Home Depot and buy a second type which actually worked.
Jomax is a waste!!! Glad you had the same results :)
Laura says
I also have a love affair with my pressure washer. It’s magical.
Abbey T. says
Thank you so much for this post. It was exactly the kick in the pants I needed to clean and reseal our back deck, which was looking pretty rough after three years of direct sunlight and a big Rottie. I went out Friday after work and bought the same cleaner, sprayer and applicator sponge you recommended and we got the whole project knocked out yesterday. It looks beautiful and ready for summer!
Angel says
I had no idea about the wait time, oops!
Side note: the Kentucky derby winner is named, ORB. Maybe a YHL fan? ;)
YoungHouseLove says
Hahah isn’t that funny?!
xo,
s
Jennifer says
Deck looks so good. 1200 spent I bet it adds 5000 to equity. It looks so great there, a great spot on warm sunny mornings. Great job guys! And I am so jealous of the house. We couldn’t touch anything like that here in upstate NY. It would sell as is for over 350 easy, depending on how much property there is with it. Can’t wait to follow your upgrades. DIY on!!!
Patricia Miller says
Thanks so much for this info! I bought my first house over the winter and the deck is definitely in need of some TLC. So this post will help a lot.
Lesley says
Thanks for doing the “Consumer Report” legwork for us on the deck cleaner. After my husband had a bad slip late this winter on our deck stairs, we realised how much we needed to give it a very thorough cleaning after 9 years of a quick scrub with bleach and Sunlight.
I would have gone with the Zinsser product too, but thanks to you I by-passed it and sought out the Olympic product. It is a harder item to find in Canada (for those reading along, Lowe’s carries it) and is, not surprisingly, much more expensive ($20 compared to your $8), so in an effort to save a bit we bought a smaller fertilizer applicator as the bottle of product states you can. The Olympic brand applicator would have set us back $40 more, and the one we bought was $17.
Anyway…. all of that, including the added Loonies, was WELL worth it. My husband was astounded at the outcome. Our elderly neighbour was pricing out having someone come pressure wash hers, so instead she has offered us a dinner in exchange for doing hers next weekend. We’ll happily take it!
YoungHouseLove says
So glad!!
xo
s
jackie says
Omg..we used the exact Olympic deck cleaner and it was super amazing. Then we used the new Rust-Oleum Restore deck concrete for our deck.. Great products..Jackie
Mary says
Perhaps my eyes deceive me but it appears that you have attached an additional hand rail on the stairs coming off your deck. If I am correct, where did you buy it? Our local stores (Lowes and Home Depot) do not carry anything like that. Perhaps a millwork specialty store?
YoungHouseLove says
In order to meet code and pass inspection that was required when we built the deck, so John just built that with wood and screws. So sorry not to have better pics or a description of the process (we don’t remember how we did it now).
xo
s
Julie says
Oh my, I just cleaned and stained my deck, and didn’t do nearly as good a job! I, too, used a cleaner that did not seem to clean…and I left it like that. I used a semi-transparent. And, I did not backbrush. I think I may have created myself a lot more work, because it sounds like I could run into issues later on. Yours turned out so beautiful! You did a fantastic job!
YoungHouseLove says
Aw, I bet it looks great Julie! Hope it lasts a nice long time and doesn’t give you any problems at all.
xo
s
Mohanraj says
Hi, great job with the deck! I just wanted to ask, if I were to stain my wood flooring a dark colour, is it possible for me to stain the same wood flooring (now dark) to a lighter colour?
I’d really appreciate your reply. Please and thank you! :D
YoungHouseLove says
I think you’d need to use a stripper or a strong powerwasher to remove the dark stain first.
xo
s
Chad says
How long did you wait between cleaning and staining deck?
YoungHouseLove says
Oh man, I just asked John and we can’t remember. Maybe 48 hours?
xo
s
ajay says
Hi,
nice deck
what sealer? stain? u used?
I like the natural clear look of your PT deck
thanks
ajay
YoungHouseLove says
We used Olympic Maximum Toner in Cedar Naturaltone color (it’s a stain/sealant all in one, and was $37 from Lowe’s).
xo
s
Kathleen says
Hey guys –
We are bought some of this stain for our deck recently but after reading the reviews on their website I’m a little hesitant. How did this hold up to the elements? Did you guys experience any peeling or flaking with this deck or the deck on your current home?
YoungHouseLove says
No peeling or flaking at either home, although the stuff we used for the deck at our current house seems to have faded really fast!
xo
s