Ever since we updated the light fixture in our bathroom back in April, one thing has been bothering us: its proximity to the shower curtain. Okay, two things actually: its proximity to the shower curtain AND the fact that we didn’t have the energy to remedy the situation back in April (when we switched out the old light for a new one and did some slight drywall patching and painting- nothing nearly as involved as relocating the fixture box by a few feet).
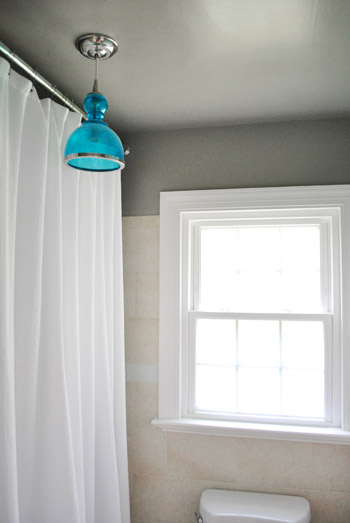
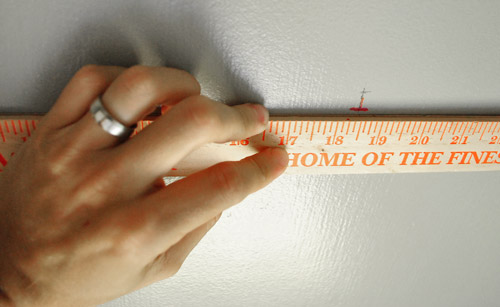
So now that we’ve spent three months building up the energy to shift that light into the right spot, once and for all, we were ready to get going. The process began with measuring and marking the ceiling so that we could center the light directly in front of the window (which also would make it centered on the door). This way it would look like it was always supposed to be that way, instead of being centered in the room – which put it only a few inches away from the shower curtain – it was just weird, weird, weird.
Then we turned off the power and disconnected the light from the fixture box.
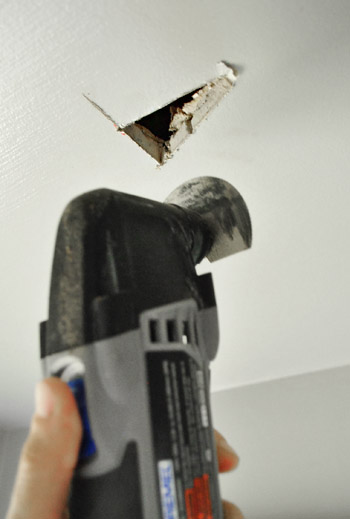
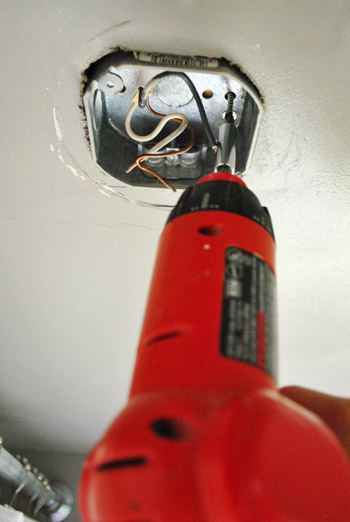
We had kind of forgotten where our beams were in the ceiling so we started off by drilling a couple of very small holes to see if we hit anything (nothing but drywall and air!) and then took it a step further by cutting a small hole in the drywall big enough to slip my hand into and feel around a bit. I could’ve just used my drywall saw, but my Dremel Multimax was already out, so I grabbed that.
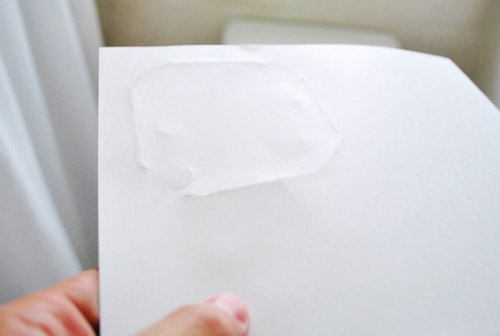
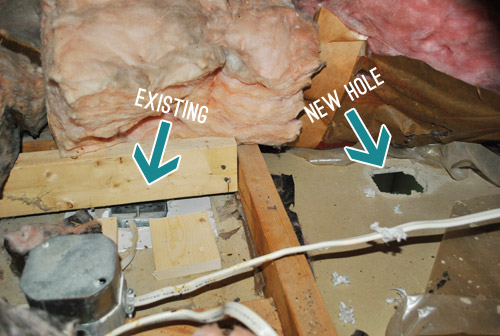
Once our little feel-around mission confirmed that our intended placement for the fixture box wouldn’t be thwarted by any beams, we decided to mark the shape that we’d need to cut out for the metal fixture box. Since we didn’t have any spare boxes around to help us trace the squarish shape onto the ceiling, we made a quick template by pressing a piece of cardstock along the hard edges of the one that was still in the ceiling. It worked surprisingly well – as you can see from the impression below.
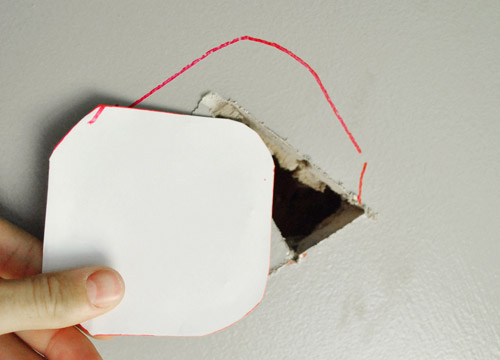
Once we cut out that template, we were able to trace it onto the ceiling so I’d know exactly where to cut – that way I’d cut it large enough for the whole box to fix through, but not so large that the fixture’s cover doesn’t hide it all. Oh, and we don’t usually mark in red sharpie but our pencil marks where disappearing on the gray paint so we went for red so we (and you guys) could see it more clearly. It was all going to get cut/covered anyway.
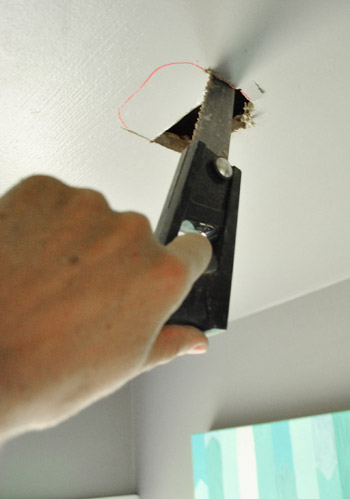
Then I used my drywall saw (which I finally worked up the energy to hunt down, since the Mutlimax wouldn’t cut the rounded corners as well) to put a bigger, fixture-boxed-sized hole in the ceiling.
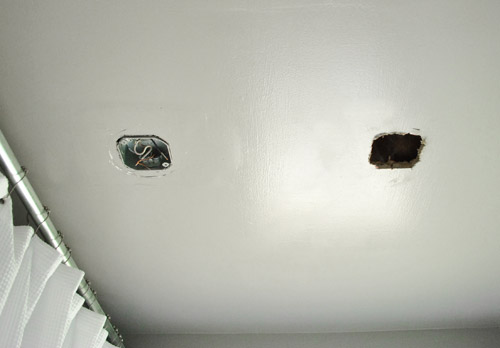
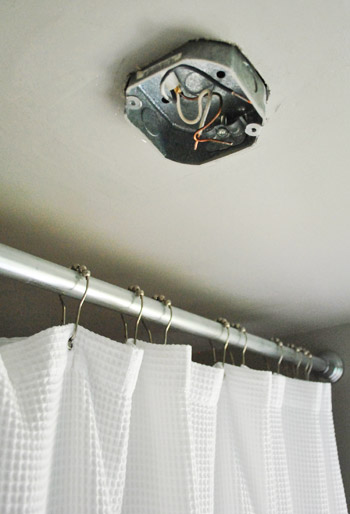
It’s starting to look beautiful, isn’t it? Okay, not really. But this, my friends, is what progress looks like.
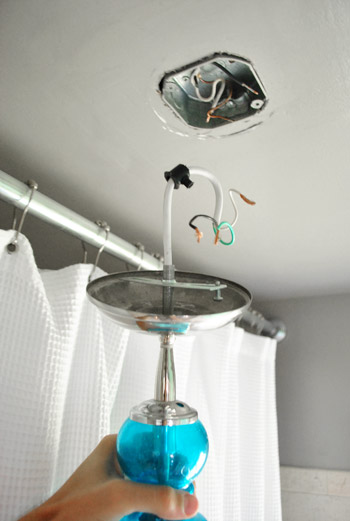
Before going into the attic to move the box, Sherry noticed a couple of screws that we’d need to remove from below, so she took care of that.
Taking those two screws out was all it took for it to hang loose in the existing space.
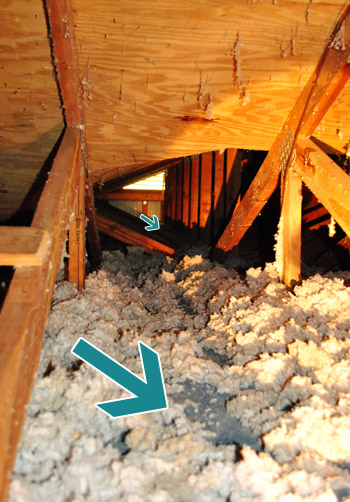
Now here’s the fun part. Going in the attic. On a 98-degree day. The hot, cramped, un-air-conditioned, distinctly Nick-Lachey-less attic (yes, that was a 98 Degrees pun). The attic that requires crawling on your hands and knees across narrow beams (see big arrow below) through nasty blown insulation. And for this particular assignment, it actually required crawling to just about the furthest nook in said attic (see little arrow below).
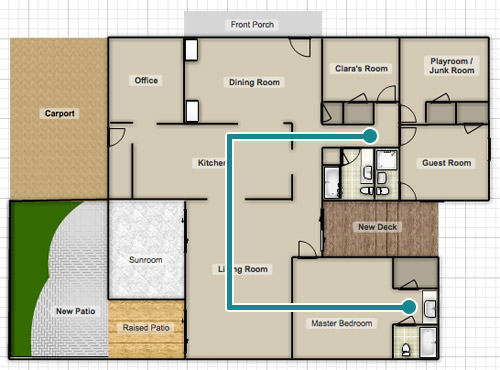
In case my efforts to earn sympathy points weren’t obvious enough yet, allow me to lay it on a little thicker. By the time I was done moving the light fixture, it took FOUR trips back and forth to my attic work area (for various reasons – like needing another tool and Clara’s singing being too loud for Sherry to hear my calls for assistance). And since our attic access is located outside of our hall bath (and the only pathway to my destination was not direct), here’s a map of the approximate trip I had to make each of those FOUR times by crawling on my hands and knees, in a sweltering full-of-insulation space that literally felt like a sauna.
In a word: it was miserable.
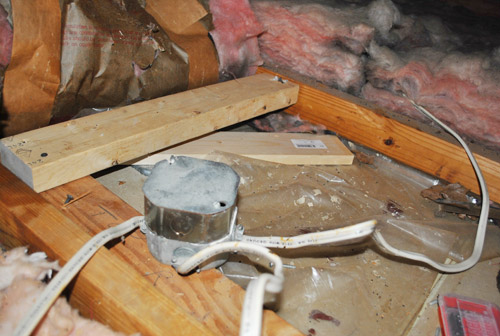
Now that I’ve sufficiently explained my less-than-ideal-humane conditions (have I not? don’t worry – there’s still more later), let’s get back to the task at hand. Here’s the situation up in the attic.
I’m not an electrician. Nor am I apparently one to spend any more time in a cramped sweatbox than necessary (I was pretty much working in the fetal position it was so tight – which at least made my “I want my mommy” whimpers a bit more appropriate). So I only snapped this “after” photo of having moved the fixture box into it’s new home. It took some unscrewing and rescrewing of the board that spanned between two beams, as well as moving the junction box (in foreground) so I wouldn’t have to add any actual wire. Did I mention I’m not an electrician?
When I was done, I asked Sherry to take a picture of the hot, sweaty, hyper-ventilating mess that was John Petersik. She pointed the camera and said “smile.” This is the best I could do. Yes, that’s sweat on my shirt.

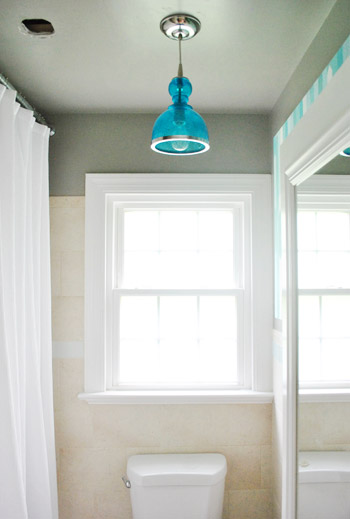
But once I had cooled down, rehydrated, and (most importantly) showered in the hall bathroom – Sherry and I headed back to our bathroom to admire our progress.
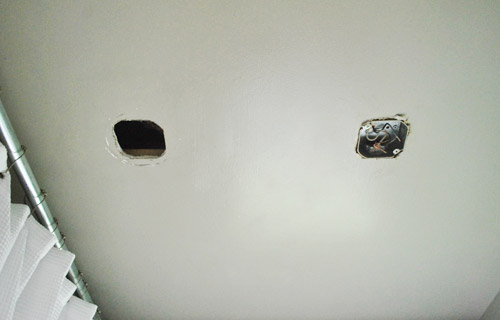
Once we screwed the new fixture boxed up into the support boards (just like we had unscrewed it in the original spot), it was time for the light itself to be reinstalled. We still need to patch the old hole (using this method) but Sherry agreed to do that part since, if you couldn’t tell, I really milked how difficult my part of this task was. See how much better our light fixture placement is now that it’s centered on the window/toilet/door. It’s like it was always meant to be this way. Whew.
Honestly, had it not been ten million degrees in our attic, this project wouldn’t have been that bad. The task itself was pretty straightforward, it was just the conditions that made it challenging (crawling into the crammed little corner of the attic multiple times on a freakishly hot day made it a lot more complex than someone with super easy attic-access on a mild day). Perhaps it’s the universe’s way of saying “Yeah, you really should have done this in April.” But for anyone who asked back in April why we didn’t just “quickly reposition the light fixture while we were switching it out” – this is why. All that attic work is a pain – and just to access that part of the ceiling basically requires that you David Blane yourself (aka: assume the fetal position in a space so tight it might as well be a suitcase). So sometimes taking bigger projects and breaking them down into manageable phases that we tackle over time is what works best for us. That and complaining a lot after you’re done with the especially annoying stuff. Haha.
Anyone else have fun in their attic or another similarly cramped & hot space recently? If you haven’t, I highly recommend it… or not. We’ll be back this afternoon with the patched ceiling and a bunch of shots of the whole room along with a budget breakdown because we’re officially calling this little bathroom upgrade done. Woot! And – spoiler alert – we think all the sweat that we’ve put into this tiny rectangle of a room was totally worth it. Just don’t ask me to crawl back into that corner of the attic for at least another week…
Psst- To follow this bathroom sprucing project from the start, check out this planning post, this painting post, this light-swapping post, this art and trim-painting post, this toilet-updating post, this window frosting and shampoo wrangling post, this door trimming post, this border tile demo post, and this border retiling post.

Renee says
Wow – Looks great now! Love that light fixture! Recent HOT attic projects in our house: empty all storage items out of the attic to make room for central air installation. Bring all storage items back up there – except for 6 boxes to sort through. Bring all sorted memories back up (now 5 boxes). And bring some stored baby items down to start preparing for LO’s arrival in Nov. The remaining baby items are waiting ’til cooler weather.
Lisa C says
I laughed and then called my husband telling him “YHL is moving light fixtures too! And he’s not an electrician either!” I’m heavily laying on the encouragement over here and this was just another way to toss in a hoo-rah moment.
Although I don’t know if I’ll send him the link – all the attic griping might kill the “I can do it” buzz ;)
My dad is an electrician but he lives 3.5 hours away and unfortunately won’t be here in time to help, so Lee is tackling 4 bedroom lights on his own. As a non-electrician (but with electrical understanding), he has his reservations, but we need to move them soon – so that we can do knock-down ceilings so that we can put new flooring in so that I can stop having allergic reactions to the 41 year old carpet in the fixer-upper house we just moved into.
YoungHouseLove says
My apologies to your husband…
-John
quirkstreet says
John, you are a hero! That looks soooo much better. And you can pass the hero batten to Sherry once she has patched the hole.
Not to belittle your efforts, but it often amazes me how one simple thing can make a huge difference.
Great work guys!
CampDallas says
I just revisited all the post about this bathroom, because I am dealing with a similiar situation now. Beige on beige on beige on beige are 2 of our bathrooms, plus just a lot of our house. And this is coming from the queen of neutrals! I am kind of overwhelmed by it all, but your posts have inspired me to just take it one beige thing at a time (and move ‘get rid of almond toilet’ higher up on the list). Thanks, guys!
YoungHouseLove says
Haha, oh yes – chip away at it slowly! One beige thing at a time!
xo,
s
Tirsa says
Big props to John for braving the stifling heat and claustrophobic conditions in the name of finishing off a project sooner rather than later. (I need to learn from you.) The bathroom looks even better now. Way to go, John!
Lauren H says
Your light and entire bathroom look beautiful! Do you have any issues hitting the light when you are drying your hair or raising your arms up after getting out of the shower? I’m fairly tall and I would worry about bumping into the light all the time.
YoungHouseLove says
Thankfully I’m 6 feet tall and it has been great. I flail around like the best of them and have yet to hit it.
-John
Kelly says
We have a tri-level, and the only way to get into the attic above the top level is through a tiny (1.5′ x 3′ hole in our master bedroom closet. Our closet is small, with bifold doors, and a shlef on the top that my husband has to shimmy around in order to get into the tiny hole! He and my dad replaced the vent fan in our attic in May, and they were miserable getting up and down from there and crawling on their stomachs to the location of the fan. At one point, being the “helpful” wife, I turned the fan on to see if it would work while my husband was in the crawl space holding onto the duct work having it spray him in the face! Needless to say, we won’t be doing any projects that require attic work for awhile!
YoungHouseLove says
Oh man! That sounds like a nightmare! Glad you got ‘er done in the end!
xo,
s
John@Our Home From Scratch says
That’s a beautiful light. Thanks for that paper outline tip! I’m going to keep that one in my back pocket.
Meg W says
Ohhh man I feel your pain John!! Sweaty hotness plus that blown in insulation is no fun! We just bought and now working on a place that has lots of the blown in insulation. We’ve taken out a few walls, and I’ve just been coated in that stuff for the past week.
April says
Ok, gotta add pity points… try doing it 4 months pregnant! A couple years ago I helped my dad install a ceiling fan in our Master bedroom (no AC in our house) and since he’s handicap, my mom was painting, & hubby was deployed, yours truly got the job of crawling up into our attic. It could have been worse, I think the outside temp was only in the 80’s. Btw, your’s looks way better centered.
YoungHouseLove says
Whew! I bet that was exhausting!
xo,
s
Amy says
Looks great John! Totally worth the effort… Can’t wait to see the official after photos!
Angela Reindl says
Whew! I’m all sweaty just reading that post! I like to use the “I just had a baby” excuse. It works wonders until people realize my baby is almost 2…. darn it. John- you get lots of sympathy points from me!
Looks good! I love that light fixture- I need to find a place to put one like that! :)
YoungHouseLove says
Haha, I loved the “I’m still nursing” excuse, but that ended about half a year ago. Haha. Oh well, I kinda had fun patching that hole. Haha.
xo,
s
how2home says
You are super handy! Funny b/c you referred about Nick Lachey….laughed out loud a little You guys chose a great fixture for the bathroom, the color is perfect! The new spot for the fixture makes it look better for sure! Great job guys.
how2home says
What are your plans to fill the other hole back up?
YoungHouseLove says
I just use a patch kit and spackle, sand, and paint. We have blogged about that process before. It’s not too bad!
xo,
s
John says
OK Sherry now for the blue tape around your head with the sticky side out to catch the drywall dust.
YoungHouseLove says
Haha, sounds like a plan!
xo,
s
John says
Is your computer clock off by 27 minutes?
YoungHouseLove says
Yes, somehow the wordpress clock is off (nothing we can control on our end, we have tried a few times!). No idea why, but maybe someday it’ll magically fix itself. Haha.
xo,
s
rachael says
It looks so much better centered! We put a light in our living room, we lived here for four years without one, so one day we got my hubby’s electrician uncle to come over and do it. My husband lucked out that time, but then we had a torrential downpour and our daughters bedroom ceiling leaked and he had to go up there and rake back the insulation, and lay down some plastic. He came out looking like you did in that one picture. We had the roof re-shingled and fixed after that. That was 6 weeks ago and he still hasn’t mustered up enough courage/strength/sanity to go back up and rake the insulation back. I think we’ll wait until fall.
YoungHouseLove says
Oh man- that’s a big job!
xo,
s
Amy Knisely says
We have “Attic-Extravaganza” or “Attic-palooza” coming up soon. Fortunately, we have a pretty huge space up there (that doesn’t require crawling around on blown-in insulation) that we’re finishing into a guest room with the potential for a 3/4 bath (maybe). The space is 28×19, but the gabled walls make it feel much smaller.
Laura says
The bathroom looks amazing!! Oh, and by the way, I saw your re-made stool on Better Homes and Gardens today:
http://www.bhg.com/decorating/makeovers/furniture/thrifted-furniture-makeovers/?sssdmh=dm17.607976&esrc=nwcu071712&email=4274757962#page=6
I knew it looked familiar, then I saw your names! :)
YoungHouseLove says
So funny! What a small world. I loved that little stool…
xo,
s
Henna says
“especially the more trusted sources like major home improvement sites” which sites specifically do you use? also is there a good diy forum?
YoungHouseLove says
We have used a number of them, but we just look at the source (ex: diy.com or hgtv.com or askthebuilder.com generally have great info and some obscure site without any photos or extra info might not be as helpful). Oh and videos on youtube.com can help a ton too!
xo,
s
Lisa says
Serious small world – great shirt! PSP alum, Alpha Rho chapter, from your rival school down in Blacksburg :)
YoungHouseLove says
Oooh, a rival and a brother… I’m so torn! :)
-John
Randi says
That is one of the prettiest light fixtures I’ve ever seen. The color is gorgeous and exactly what I used in my kitchen. LOVE it. Wish I had found it before I put in the current fixtures in my kitchen!
Ashley@AttemptsAtDomestication says
Yay for things being centered! And those attics are brutal right now! Jesse was just in ours the other day and when he climbed down it looked like he had jumped in a pool! Sweat was pouring off of him! Turns out our attic fan is broken and not cooling properly, so now he has to climb back up there and try to replace the fan.
seabluelee says
A small change, but what a big difference! It looks great and I can feel your satisfaction that it’s finally RIGHT.
Why do architects and/or builders so often center light fixtures in the ceiling rather than to the room’s logical layout? I don’t know how many dining rooms I’ve seen (and lived with) that had a ceiling fixture centered in a spot that no one would ever put a table under. People seldom put their table dead-center in the room, but that’s inevitably where the light is.
Koliti says
John, you deserve a special treat – ice cream with caramel and fudge? What’s your idea of a “job-well-done” treat?
I much enjoyed that “action-shot” of your Dremel Multi-Max!
Your sacrafice for the team has beautiful results! Bravo!
YoungHouseLove says
A giant bowl of ice cream. Wait I have one of those ever night…
-John
cheep3r5 says
Great job on a hot day. Question – Is the insulation in that area that thin or just moved out of the way? If think, hy thee to a big box home center and get more soon. They also have companies that do retro spray finishing with closed cell foam. And there is also retrofit foil panels that go up against the attic ceiling. I do not have those names in front of me at this time.
YoungHouseLove says
Just moved out of the way so I could crawl through!
-John
Heidi P. says
Ahhhh, centered. Nice work! I hope you went out for ice cream afterward as a reward/to cool off.
p.s. I’m so sorry for my inappropriate comment yesterday with the giveaway! I don’t know what got into me. That was so not like me. :( Sorry.
YoungHouseLove says
Haha, we thought it was funny!
xo,
s
Lissa says
What a HOT dude you are!!!!!
YoungHouseLove says
Haha- amen!
xo
s
Korie Roberts says
Just wondering, what brand is your waffle weave shower curtain? I had gotten one on amazon but it is a shiny, polyester knock off… ); We are now the proud owners of a 28 yr old center hall colonial in need of much updating. Your blog and website are like my bible!! Thanks!!!
YoungHouseLove says
Aw thanks Korie! It’s actually from amazon.com but the weirdest thing is that it was from Target. Their “home” brand I think. It arrived in a Target box and everything. Oddly enough they don’t seem to sell them on target.com though- only amazon for the extra long ones!
xo,
s
Robin says
Love this blog, but I got extra giddy when I saw the Phi Sigma Pi shirt! Gamma Mu chapter here… always great to see brothers doing amazing things!
Teresa B says
Can’t even imagine working up there in this heat. We are in coastal VA and when I opened my attic access yesterday to get the cat carrier out, it set off the heat sensor in my fire alarm that was 10 feet away! Thankfully I was able to get a hold of the alarm company before the FD was dispatched.
YoungHouseLove says
Oh my gosh! So glad you got a hold of them in time!
xo,
s
eileen marie says
God, I love that light fixture. I must say that “small” change (I sympathize w/ your tribulation, John) made a really big difference!
Margaret says
Could you have used a “old work” box with wings and spent more time below the ceiling? I do anything to avoid attics in the summer!
YoungHouseLove says
We haven’t ever tried that- sounds intriguing though!
-John
Tanya Maia says
PHILIA!!!!!!
Love from Alpha Tau chapter!!
Jane says
So what do you do if you live in a 2 story house and want to move a fixture on the first floor?? Do I have to tear up the floor above it?!
YoungHouseLove says
You may just need to remove more of the ceiling to expose your work area. But someone who’s dealt with that situation (or an electrician) might be of more help!
-John
Tracey says
Hey guys, I’m a bit behind on your posts and I’m catching myself up but I wanted to say I enjoy reading your blog and have even gotten some inspiration from you all – totally doing the weekly photos with my 9 month old and my husband is repainting our kitchen cabinets white in an effort to get our house ready to sell (and I can’t stand to look at the oak cabinets a second longer!). The reason why I’m finally inspired to comment though is to say, “Philia!” to John…love the shirt! I’m a Phi Sig brother as well from the Alpha Chi chapter at UNCG (class of ’01). I got all excited when I saw Phi Sigma Pi! Sherry- I’m also from Jersey, so I totally appreciate and love your humor. Keep up the great work, guys!
YoungHouseLove says
No way! Philia to you too Tracey!
-John
Lesle Alvarado says
I totally would have made the old hole big enough to pop up through the ceiling to reposition the light fixture so I could spend as little time as possible in the attic crawl space. I’m claustrophobic so the idea of crawling around up there gives me the heebie jeebies.
Audrey says
My husband & I are, well, just a bit older than you so we have had the distinct pleasure of wallowing around in a few more attics (& crawl spaces). See what you have to look forward to? I just counted – this is our eighth house. It better be the last! One thing we have done to our last four (4) houses is to increase the attic ventilation. Some of our houses were old & did not meet current code – others met code but, often code is often a minimum requirement. Attic roof vents are fairly easy to install & the benefits are multi-fold – cooler in the attic, lower utility bills, longer shingle life. Best of all, you can do the work on the roof, not in the attic! Do your very best not to drop into the attic the roof material you cut out – you will lose sleep thinking about the OSB that is smashing your insulation & your conscious will force you to retrieve it. Blessings to you.
YoungHouseLove says
Haha great tips!
xo,
s