It’s Tuesday the 30th… so it’s time to share this season’s (completely unofficial) Pinterest Challenge project (not sponsored by Pinterest or anyone else, just dreamed up by Katie to make us stop pinning and start doing). Huzzah!

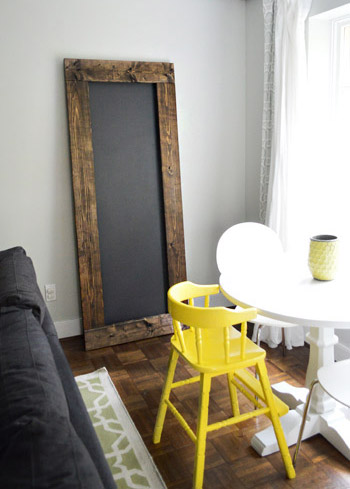
This time John and I tried our hand at making a large chunky-framed leaning mirror – except instead of it actually being a mirror we made it into a giant chalkboard (since chalkboard paint is probably the most Pinterest-tastic material out there, haha).
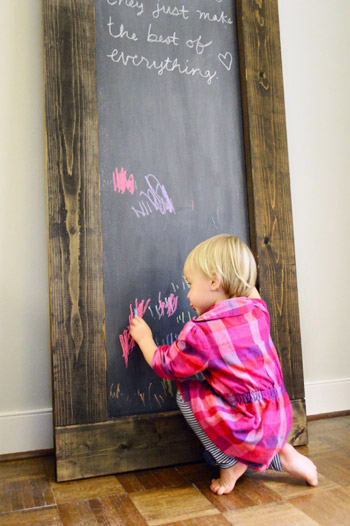
By designing it like a large leaning mirror, it can move from room to room, and it can be a place where we write sweet notes, make lists, and enjoy Clara-scribble (we secured it to the wall with leaning mirror hardware so it’s kid-safe – more on that method here).
As per the challenge rules, I took inspiration (or Pintspiration, har-har) from the projects that I linked up to in last Tuesday’s post and did my own spin. Here’s a recap of them for ya:
- Top left: this big arse chalkboard from here
- Top right: this leaning easel board found here from this awesome blog
- Bottom right: this door-chalkboard from here
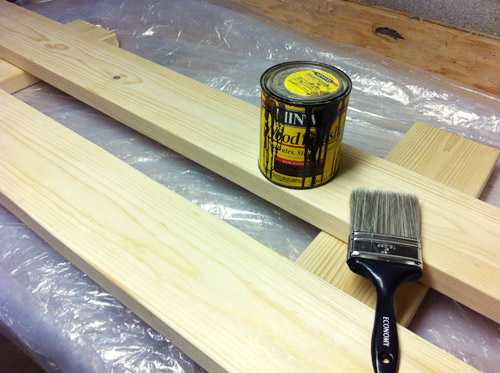
And here’s how we tackled our own version. The cool thing is that we were able to use a big board of plywood that we already had leftover from building in the fridge back in November of last year (yes, it was just chilling in our basement since then). But before we got to the chalkboard paint application, we rolled on some magnetic paint (since we already had a quart of that from this project in our first house). Sorry this isn’t a full shot of the plywood board, but it’s 68″ tall and 21″ wide if that helps.
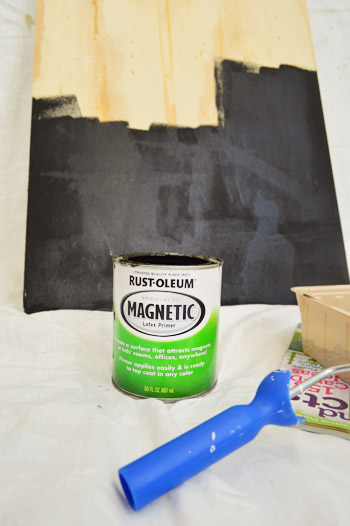
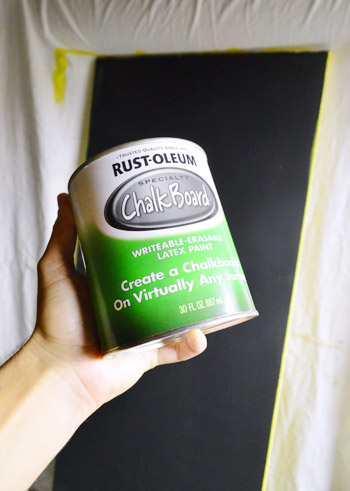
After a four coats of magnetic paint (we wanted it to be pretty strong) it was time to add the chalkboard paint. So we grabbed this can from Home Depot for ten bucks and we rolled on two coats of it. We only applied it to the front side of the board, but you can see from this pic that we actually had some fun with the back side too, but we’ll get to that in a second.
As for building this whole shebang, we set out to make it without the need of any fancy saws or tools. And because Home Depot is happy to cut plywood to size for you to make the board, and you can also get them to cut a few 1″ x 6″ boards to create the frame… this project calls for no cuts at home at all. Woot!
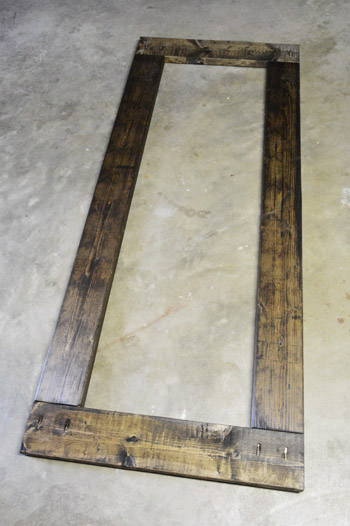
For our 68″ x 21″ piece of plywood we got two 29.5″ 1 x 6″ boards for the top and bottom of the frame, and two 63″ pieces for the sides. This allows for a little bit of overlap when the frame is assembled so the board looks as if it sits inside the frame (but really rests behind it). The total height and width of the entire finished project is 29.5″ wide by 74″ tall.
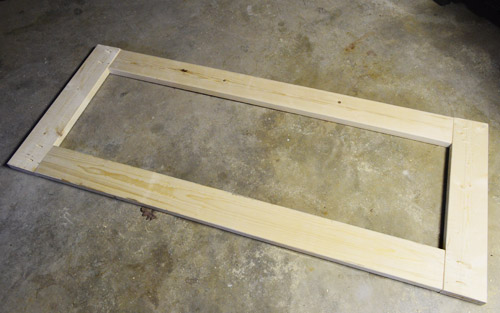
As for the stain, we went with our old favorite (leftover from a bunch of other projects) which is Minwax in Dark Walnut. We stained the wood before we assembled the frame because it seemed easier not to have to worry about getting stain on the chalkboard part of the board.
After the frame was all stained and dried, we just used our Kreg Jig to attach them (but if you don’t have one you could easily use metal brackets to hold them together from behind or just try to screw them together from behind without a jig).
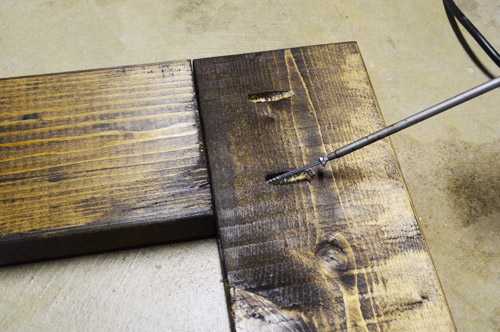
Bam. A dark walnut frame. Without a miter saw, angle calculations, or anything else that could get complicated.
Then we attached the chalkboard part to the frame from behind. And… surprise! John got a wild hair and painted the back in Citron (a leftover pot of BM paint that we had), just because he said the bare beat-up back was bugging him. Sure, we’ll probably only see it once every few years when we carry it around the house (you know we like to move things around) but I love that man for adding that secret plane of color just because he knows it’s there. Haha.
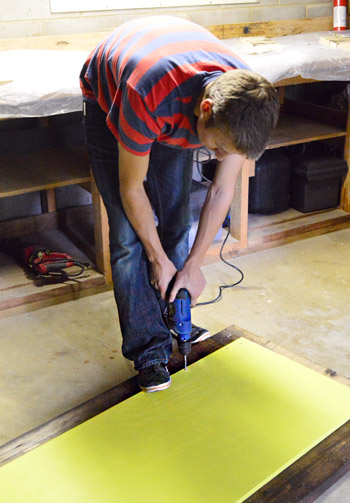
Oh and to be clear about how you attach the chalkboard part to the frame, you just screw around the edge of the chalkboard from behind because it overlaps the frame slightly, so as long as your screws are long enough to go through the plywood and into the stained frame (without poking all the way through the front) you’re golden. I think the length we used for those screws was an inch and a quarter.
Then we just let it air out/cure for a while (chalkboard paint + stain are both stiiinky until they fully cure) and it was finally time to bring it up into the living room along the wall where we wanted to lean it. Then we just secured it to keep it from tipping over (using the same dealio that we used here). Don’t want it bonking the bean!
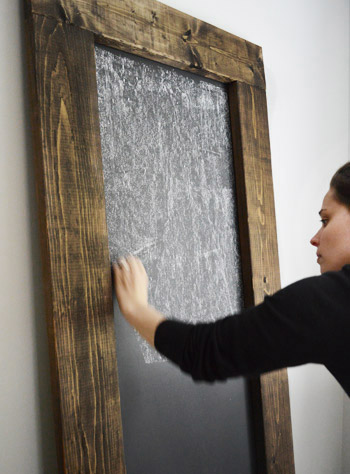
Next it was time to “condition” it by rubbing the side of a piece of chalk all over it and then wiping it all off. Boom. Conditioned.
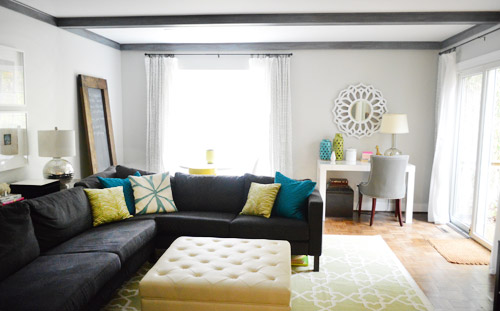
Ta-daaaaa! I know in the pics it seems to be one of the only wood tones in the room, but the console behind the sofa is the same finish and we’d love to build/repurpose a cabinet for the TV in the same rustic finish, so we think it’ll be more balanced and make more sense as the rest of the room comes together. One nice thing we didn’t even think about is that the color of the chalkboard paint ties into the sofa and the beams, so it sort of “marries” the wood console and the gray items in the room. Gotta love a “bridge piece.”
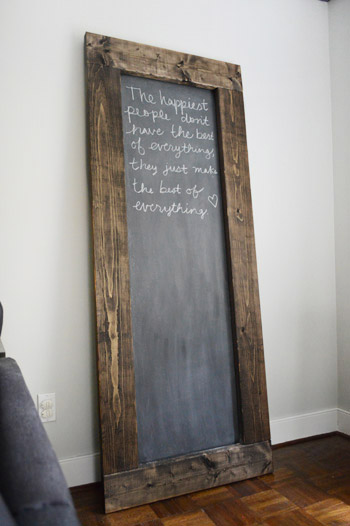
I’m sure the scribbles will constantly be changing (we have a fun Thanksgiving idea to implement when November rolls around) but for now I just wrote a quote that I love up on the top. It says “the happiest people don’t have the best of everything, they just make the best of everything.”
Then Clara woke up from her nap to see it hanging out in the living room and cautiously approached it. For a second she didn’t know what to think, but when we told her she got to draw on it and handed her a box of chalk…
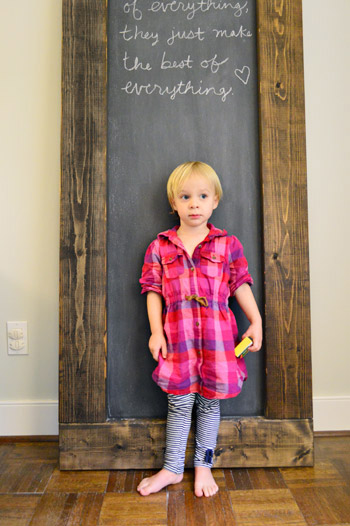
… let’s just say she got pretty darn excited. Haha.
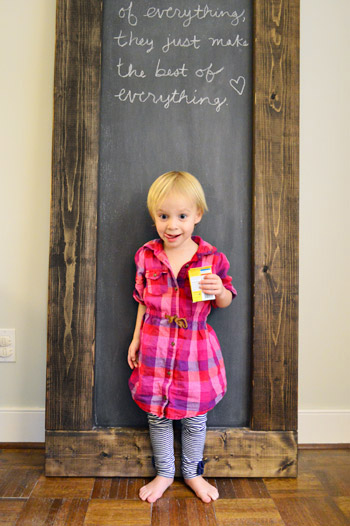
Here’s a video of her in action for ya:
It must be a mom thing, but I totally think my kid’s scribbles are THE BEST. I mean, have you ever seen anything so beautiful?
So that’s how it all went down. As for the money stuff, here’s a little budget breakdown:
- $0 – leftover plywood board, leftover stain, leftover magnetic paint (a guess for buying all of these might be $45?)
- $10 – chalkboard paint from Home Depot
- $16 – four 1 x 6″ boards to make the frame
- Total: $26 (this project could potentially cost around 70 bucks if you don’t have leftover materials)
Don’t forget to check in on Katie, Carmel, and Sarah to see what awesomesauce projects they’ve whipped up (they’ll all be sharing theirs sometime today as well)!

And now here’s the part where we tip our homemade hats to you guys and invite you to share all of the fun Pinterest Challenge projects that you’ve tackled in the last week (right along with us, well at least virtually with us). If you’ve already blogged about it, just:
- click on the blue “Add Your Link” button with the odd cartoon head at the bottom of this post (you might have to do some scrolling, depending how many projects are added)
- add a link to your specific blog post about your project in the url field (not your home page)
- where it says “name” write a descriptive name for your project (ex: “Homemade Leaf Wreath”) as opposed to your actual name
- we’d also love if you could quickly link back over to our project posts within your own (here’s Katie’s, Carmel’s and Sarah’s) – it’s also nice to link to your inspiration project on Pinterest as well as to directly link to the original project/site, just so they get some love too.
And if you’d rather just link over to your project in the comment section, feel free to do that – or even add a link to a free photo sharing site like Flickr with your pics if you don’t have a blog (remember to set the gallery to public so we can all see it). We’re crazypants excited to see what you guys have been up to!

Cara says
What type of wood do you use for your stained projects? Southern yellow pine? I want to make a mirror frame like that and a chalkboard for my daughter. Great project! I need to get some boards cut for a mantel I am working on. I am nervous to ask the home stores to do it for some reason. Probably because I got a grumpy guy once.
YoungHouseLove says
We just used framing lumber. Cheap and untreated :)
xo,
s
Meg says
Do I see a lefty in Clara?!
YoungHouseLove says
Yup, she’s my leftie girl!
xo,
s
Karen says
Love it! It came out great!!
I’ll be posting my successful project on my blog tomorrow- I got days mixed up a bit I guess. Face-palm. Oh well. I did post about the epic fail of my first try though today: http://yearofserendipity.wordpress.com/2012/10/30/epic-fail/
YoungHouseLove says
Aw man, we can all relate to that! Sometimes things just don’t work out. So glad you try tried again!
xo
s
Karen says
A day late, but a bit more successful than my first try http://yearofserendipity.wordpress.com/2012/10/31/i-juju-do-you/
YoungHouseLove says
So much fun!
xo
s
Wendy says
I’m loving the chalk board! Such a great idea to have it lean, since it makes it look more like a piece of art or decoration rather than a kid’s toy! A few weeks ago I started painting the nook that leads to our laundry room with black chalkboard paint. My plan is to hang a gallery of gold frames on one wall & use the other wall for notes & drawings! I can’t wait till it’s done, especially since we’ve been stepping over the frame layout (on the floor) for a week now!
Thanks for hosting the challenge! This is my first time linking up! (#121 Gold Coffee Table if you want to check it out in all your spare time! Ha!) Anyway, thanks for hosting…Can’t wait to pin some more projects!
Anjali says
Have you ever experimented with making chalkboard paint in different colors? There’s a recipe floating around by Martha Stewart using flat paint and unsanded grout to make chalkboard paint in any color. http://www.marthastewart.com/271574/custom-color-chalkboard-paint
Sounds cool!
YoungHouseLove says
Oh yeah we played around with that in our book actually! It was one of our secret projects. Was really simple!
xo
s
Laura says
Great idea! Thanks for hosting the challenge!
And I just love Clara’s “kicky feet”–so cute!
Amanda Phillips says
Her name starts with 1, she can only draw 1’s…someone switched Clara with a robot! A super cute robot…
Kim @ Yellow Brick Home says
Awww, I love it! The frame is so perfect and rustic looking! And John, that citron paint absolutely MAKES it.
Tiffany says
My hubby wants a big chalkboard in our newly finished library bar, and this is exactly what I had in mind. Plus, it looks easy enough that I could do it all by myself. Thanks so much for showing the steps.
Susan Dawson says
Clara is going to think little elves live in your house. Every time she wakes up from a nap or in the morning something is different in the house. :)
Ashley@AttemptsAtDomestication says
Hahaha! She is adorable! “I can’t try right now”
Oh yea and the chalkboard is nice too! ;)
Meg says
This project came out so perfect! I love how big it is and it looks so good in your living room. Now you have me thinking about making one for my mini mud room!
I already have the paint (I paint my Halloween pumpkins with it!) and my husband is the king of the cull lumber bin at home depot – sounds like a great project for this weekend.
Darnetha @ ChippaSunshine says
I love your project,if we had the space I would definitly do this. My kids would love me forever :)! I wanted so badly to join in on the fun but my project is half finished. We had too much fall fun this weekend for me to finish! Here’s wishing for the next go round.
michelle@decorandthedog says
This is one classy chalkboard! Good work!
Mary Ellen says
Hi Sherry,
So i am doing my first fall tablescape ever, inspired by pinterest, but I dont have my own blog, I just lurk on yours and Katies.. Can i still participate in the link party? Maybe I can just post pics on tumbler and link to that? I am never sure whether link parties are meant for bloggers only.
Love you guys and can’t wait to get my book. It should be delivered soon.
Mary Ellen
YoungHouseLove says
Sure!! You can post your pics to a place like flickr (free!) and then share the link in the comments or try to link over to tumbler right in the link party (hope that works!).
xo
s
Rebecca @ the lil house that could says
This is the first Pinterest challenge I’m missing. In NJ and I was upset for a min when our power went out mid project yesterday at 4:30, but Sandy was so much bigger than our bookcases. Still without power, but thankful I still have a home. Many here aren’t as lucky.
YoungHouseLove says
Amen! So thankful you’re ok Rebecca!
xo
s
Heather says
I love that stain! I’ve been eyeing our tv stand and trying to decide on colors and I think I’ve now found a winner. No power this week means I might actually get it done haha.
Charity says
Excuse me missy… I have NOT seen that new sofa ottoman yet!!! Is it new or did I miss the post?!
YoungHouseLove says
Sorry Charity! That’s old news (got it around a year ago! haha!). Here’s the link: https://www.younghouselove.com/2011/12/living-room-cha-cha-cha-changes/
xo
s
Jenny @ We G Three says
Oooh, I love that! That walnut stain is amazing!
John’s need to paint the back citron was actually a really wise idea. I learned from my dad (engineer and handy-guy extraordinaire) that if you are painting a large piece of wood, you need to do both sides or it will eventually warp out. The citron was a nice touch!
YoungHouseLove says
Such a great tip!
xo
s
pen@newyorknonsense says
I love this! We have a smaller chalkboard hanging in our dining area, and I would like to think it will last long enough for our kids to play on it one day like this too.
P.S. Hope your family is well in Jersey, Sherry! This Jersey footage of the hurricane is insane.
YoungHouseLove says
Yes, I haven’t been able to get through to everyone yet, but hope they’re all ok! Picture me waiting by the phone…
xo
s
Kati Mallory says
Just wondering how the magnetic part is holding up? I am hoping to do the same thing in my kitchen but heard the magnetic paint is only so-so.
Looks great though!
YoungHouseLove says
We got those little disk magnets (that look like altoids) and they seem to work great so far!
xo
s
Laura Henry says
Hi Sherry,
Love it! I have a large cabinet wall that is the side of our fridge in the kitchen, which i painted with the magnetic primer and then chalkboard paint. The magnetic primer however didn’t work. I bought one can and I couldn’t even mix it, and so I brought it back for another can and had the paint guy shake it for me so all the magnetic material didn’t settle in the can, but again it didn’t work. Did you do do thick or think layers of it? Any tips on how you applied it? Did you sand in between coats? for me, it actually left the wall bumpy, I continued with the chalkboard paint hoping it might smooth out a little but I am going to have to just sand it all down again.
YoungHouseLove says
We did a few thin coats (that’s what we did at our first house too when we used it on the wall). Having them shake it was what we did too (the first time, and then we shook it a lot before using it the second time).
xo
s
Sylvie says
Looks great! In case you didn’t already know this, but you can make your own chalkboard pain by mixing in non-sanded tile grout into any color acrylic paint. I did this with a navy blue Martha Stewart paint sample (forgot the exact color) and painted the top of a play table. It was much cheaper (only $3) and you can literally have any color chalkboard.
YoungHouseLove says
Oh yes, we love that! We tried it out for a secret book project! Was really easy!
xo
s
Molly says
My roommates and I are all in our 20’s but this would be fun to have in our apartment! (Interesting things would be written on it after coming back on friday and saturday nights i’m sure!)
Next hurricane day i’ll have to devote to a project like this.
I did my first room reveal post on my blog and it motivated me to put more effort into it–I can see how you guys must enjoy posting and then going back and “fixing” the rooms!
http://www.sheransheworkedsheconquered.wordpress.com
(sorry for posting the link, I don’t want it to seem spammy, I just feel cool knowing the YHL eyes have seen it!)
YoungHouseLove says
We love the links Molly! Thanks everyone for sharing!
xo
s
Gretchen says
Love the chalkboard! I’ve started to feel kind of sad about the lack of chalkboard paint anywhere in my house, so I’m contemplating totally erring in the other direction and painting a whole giant wall in my kitchen with it. Go big or go home, right? I didn’t manage a pinterest challenge of my own, so now I’m off to follow links and live vicariously!
Leslie@MsMagpieWrites says
I absolutely love this – especially the fact that it goes all the way to the ground where Clara can reach it. I can’t wait to see what you do with it for the holidays.
Hannah@TheErohs says
Oooh, I’m inspired to make my own chalkboard project now. I’ve just got to find some space in my tiny house. My almost 2.5 year old daughter has the same leggings as Clara does by the way. Gotta love Old Navy sales!
Megan @ Rappsody in Rooms says
I think I have a new Pinterest project thanks to you! And I totally fail at directions…I put my name, not the project description.
YoungHouseLove says
Haha, I totally have almost done that a bunch of times!
xo
s
Katie says
I like that you include what the project cost you as well as the cost for someone who didn’t have the materials around. :)
Super cute!
YoungHouseLove says
Thanks Katie!
xo
s
Ginny @ Goofy Monkeys says
I really like the chalkboard! Unfortunately Sandy ate my weekend and I wasn’t able to complete the project I had planned.
Off to peruse all the party projects!
Bethany says
Did you know your website shows up wonky on the iPhone (at least for me)? The pic of Burger and your book is tiled behind everything, so the words are hard to read. :( It may just be me, but I wanted to let you know!
YoungHouseLove says
Oh yes it’s just a smart phone glitch. If you clear your cache/cookies/data it should be all better :)
xo
s
Nicole @ Liberty Belles says
So impressed with the end result! I’ve always been obsessed with thick-framed mirrors, chalkboards, etc. and that one is gorg. And love how it requires no real power tools.
Also – second anyone who’s asking for book tour updated this weekend. Hoping everything stays on schedule but do let us NJ-ers know if anything changes!
YoungHouseLove says
We hope so too! We probably won’t know anything until tomorrow, but we’ll definitely keep you posted!
xo
s
Cassondra says
So adorable! I have plans of what I’d like to make for this but wasn’t able to find the supplies yesterday at the only store I had time to get out to. Today our new windows are going in so I’ll see if I can sneak away at some point. I’d really like to make one of those letter wreaths with the holly berries for my front door. A nice pop of color for the holidays. The chalkboard turned out great!
amanda says
Is Magnetic paint necessary? Did it keep the chalkboard paint on better or was it for the frame to stick to the wall? Thanks!
YoungHouseLove says
Oh no, it’s optional! It’s just so it’s not only a chalkboard, it’s a magnet board too (so Clara can stick letter magnets or animal magnets up there too).
xo
s
amanda says
thats such a great idea!
Mary @ Ms Redo says
Clara is just too cute, love her art work. She talks like such a BIG girl!
Margaret says
I think you crashed Katie’s site again. :)
YoungHouseLove says
She just texted to say she’s having some hosting issues, but she’s working on it right now!
xo
s
Margaret says
I think you crashed Katie’s site again :)
YoungHouseLove says
Sadly, she’s having issues with Bluehost, but she’s working on it right now!
xo
s
Margaret says
Oops! False alarm! It was just taking a little longer to load.
Elena @ `a casarella says
Love the chalkboard! And thanks for hosting this each season. I always look forward to it :)
Emily | Sparkle Meets Pop says
Love your chalk board idea! It reminds me about how cool any ole wood can look with stain. And I didn’t know you could clasp the board in such a way that it can lean and still be attached. Good to know in earthquake country!
Anne says
Oh, if that doesn’t look great! That video was sweet of Clara. “There we are!” I thought you had repurposed that one big mirror you have. Super cool that there are no cuts. Easier DIY! :) I have a magnetic chalkboard in the works. Can’t wait. Cool project!
Michelle @ Simply Seashell says
Love the rustic-ally cool chalkboard (and the safety gadget on back adds more awesomeness from the mom perspective).
Wanted to also say thanks for hosting (your blog rocks) and for the polite kick in the caboose to “stop-pinning-and-start-doing.” Exactly what I needed to get myself moving on this project:
http://www.simplyseashell.com/2012/10/29/all-the-worlds-a-stage/
My daughter is ecstatically happy over her new stage and is thankful to you both for giving her mama a little nudge.
YoungHouseLove says
Aw thanks Michelle! Love all the links everyone is sharing!
xo
s
Heather says
My absolutely favorite project to date. I can’t explain why, but it is just is. <3 You guys are amazing parents, honestly. I know there are temper tantrums, frustrations etc. but just seeing the things you do for Clara, and how you interact with her in video is incredible. It makes me so happy to see such interactive and loving parents.
YoungHouseLove says
Aw thanks Heather. Sniffle. She’s the best girl ever. We’re totally the lucky ones!
xo
s
Sarah@SBrandesDesigns says
Sigh. Can’t wait until we get to move again & I have enough room for pinterest projects again…. Our current place is so small there isn’t a whole lot of room to make the stuff OR to put the stuff when it is done (and quite a bit of my craft stuff is packed away in storage bc space is an issue). Thankfully this is temporary (another 6 months-ish) & in the meantime my “pinterest projects” are going to have to be mostly limited to food items
Jessica @ The Desert Abode says
I love this! Being able to move it from room to room (instead of committing to a wall or door) is GENIUS.
Pinning for our daughter in utero! :)
Plein Jane says
I often think that waking up from one of Clara’s naps must be like waking up on Christmas morning. You’ve surprised her so often after just a quick lie-down! Does she ever say, “What? There’s nothing new to look at?”
YoungHouseLove says
Haha! Yes! Well, she has awakened and said “what’s different?” looking around to see what we changed. She’s always surprised when nothing is different. Haha!
xo
s
Katrina says
Ahh this project is so sweet :) thanks for the information the leaning mirror kit! I want a leaning mirror in my bedroom, just don’t want any mirror mirror, this gives my a sigh of relief!
Shifra says
Now that I have another whole day at home (in nyc, didn’t lose power thank goodness!) this is perfect! Now I have hundreds of interesting projects to explore :)
Any news on your NY signing on Thursday? I’ve been looking forward to it for ages but are you going to be able to get out here?!
Shifra says
Besides the flight, the Flor store probably doesn’t have power, may be flooded… things are pretty crazy downtown!
YoungHouseLove says
Yes, we were planning to drive or take the train in, but we have already heard that Flor will probably be postponed. Trying to get through to CT and NJ to see about those (no one seems to have power) but we’ll keep you guys posted!
xo
s
Autumn@fallfordesign.com says
Aww, super cute of Clara! I have come to the conclusion that your daughter is exceptionally very extremely smart (I realized this because she talks like an adult). :)
YoungHouseLove says
Aw, thanks Autumn! She cracks us up. This morning she started using “of course” – as in “do you want some lunch Clara?” “Of course I want some lunch mommy!” (so funny since it used to just be “yes, lunch!”
xo
s
Hannah says
Really like it! Love the chunky wood tones it adds to the room.
And, ah!, the photo of Clara smiling with her tongue!! Love hearing her on the video. Her speech is so impressive! It doesn’t feel that long ago that John was trying to translate her sentences and songs. ‘Turn around. We take turns and dont whine!’
Glad you are ok and hope you hear from all your family and friends soon.
Katie says
Your chalk is so vibrant! What kind did you use??
YoungHouseLove says
It’s just the regular crayola kind from Target for a buck!
xo
s