Update: Holy cow, you guys are full of so many fun ideas today! I’m having trouble keeping up with comments since they’re rolling in so furiously, but please know I’m reading them all and loving all the suggestions!
Happy Friday! We’ve been all over the place this week, painting the walls/trim/ceiling in the bathroom & closet, diving into some basket craftiness, de-wallpapering our biggest room yet (the 21′ long kitchen), and now we have a little Clara-room update along with some photoshop percolating as we plot our next move in there. But first, here’s the tiny (and twinkly) addition:

Things just got a little brighter in here…
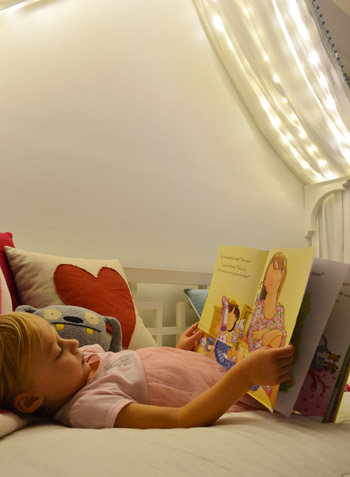
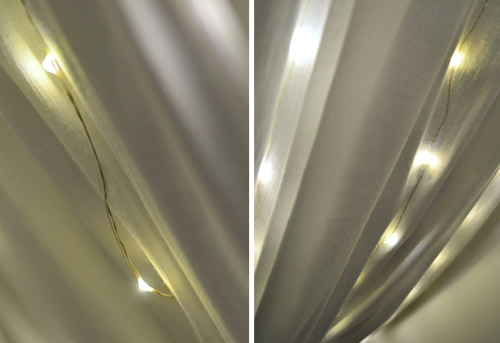
Ever since we hung her canopy, we’ve thought about adding lights to it. Both for the magic of it (Clara loves them) and also for the function of it being a well-lit place for bedtime stories. We feared traditional Christmas lights would be too heavy and make the fabric sag in weird ways (plus, they could look a little messy when they were off) so after some hunting online, we came across what are often dubbed “Fairy Lights.”
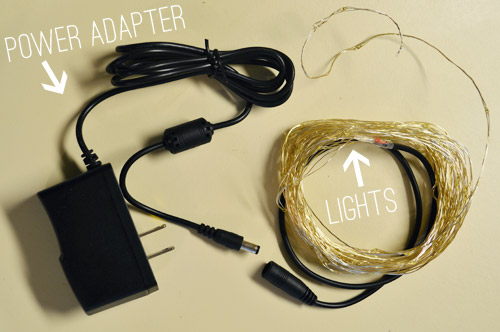
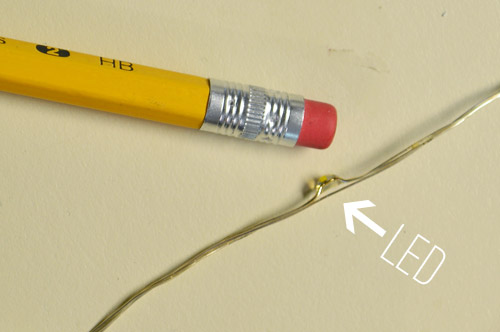
They’re basically small LEDs (check out this picture for scale – they’re tiny) that are strung on a thin wire. The particular set that we bought was 33 feet long and sold for $14 on Amazon. They’re not longer available but here’s an affiliate link for something similar.
The wire itself is extremely light and pretty moldable, so it was easy to weave it back and forth across the 18″ corbels that the fabric rests on. And by some luck of the draw, 33 feet was just about the perfect length to go back and forth four times on each side of the peak to the side brackets and secure them at each turn with white tape, so they’re not something Clara easily unwind and swing around like a lasso – but they will easily release under her weight, so she couldn’t strangle on them.
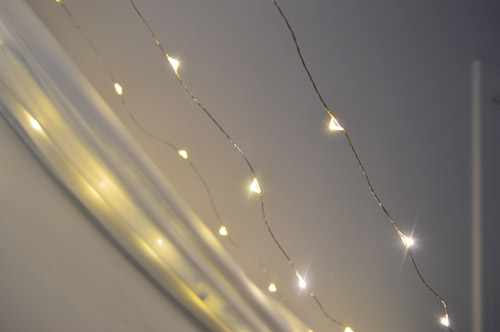
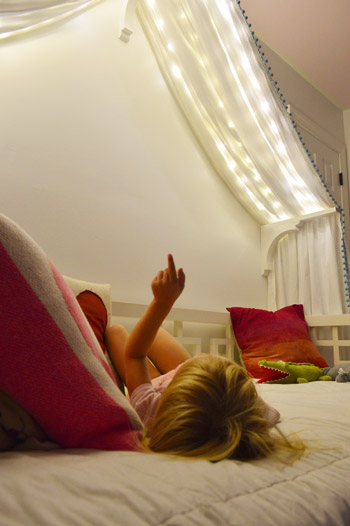
The next step was just draping the canopy back over them. The LEDs are so small that they tuck into the folds and are barely visible when they’re off. And when they’re on, well, you can see how they twinkle below. And since they’re LEDs, they’re completely cool to the touch – so we don’t have any fear of them being against fabric. I also love that they’re small resin-ish glowing dots instead of larger glass bulbs that could shatter.
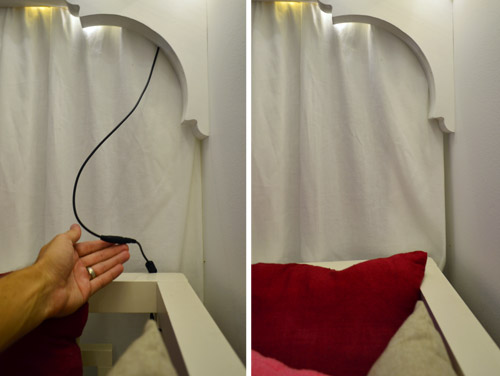
I wish the part that plugs in weren’t big and black, but we were able to plug it in behind the bed and wrap the cord around the bed in a way that it’s able to be hidden behind the canopy most of the time, but easily accessed when it’s time to connect the cords to the power adapter. See how you can see it on the left, but it’s tucked away and invisible on the right? Thank you John, hand model of the ages.
Clara LOVES them. Partly because they’re called “Fairy Lights” but mostly because she feels very special having her own set of secret lights above the bed. We intended just to put them on for story time at night or other special play times, but they actually put off a fair amount of light, so we’ve found ourselves putting them on just about any time we’re in the room and the sun isn’t fully out.
We’ve had them up there for a week or two (didn’t want to sing their praises too soon only to have them burn out or something weird) and so far they have been awesome for our gentle girl. She hasn’t touched them once, but loves gazing up at them. Meanwhile, my best friend’s four year old daughter is nothing short of an acrobat, so we laughed about how she’d probably scale the canopy and hang from the fabric like she was Pink in concert.
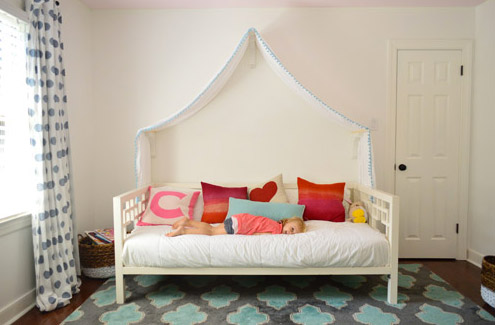
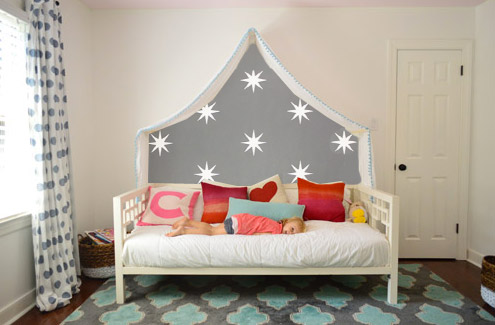
But even with the addition of the lights, the canopy is still definitely missing something above it. There’s still so much white on white on white that we’ve been brainstorming which way we want to go. We’ve debated painting just that peaked area under the canopy for a while and then adding something else in there (like a hanging paper lantern or mobile or even a cute little animal head or something). So here are a few ideas, thanks to our good friend Photoshop.
Idea #1: A gray tone on the walls to add drama and a little dreaminess to the canopy, inspired by this wallpaper by Osborne And Little.
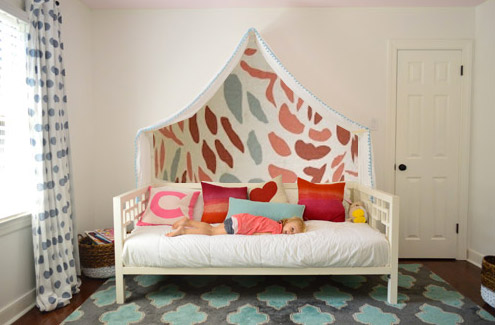
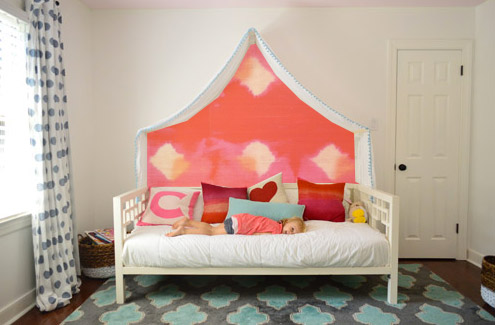
Idea #2: Maybe I could freehand some sort of imperfect painterly-ish mural, inspired by this awesome fabric covered lamp shade?
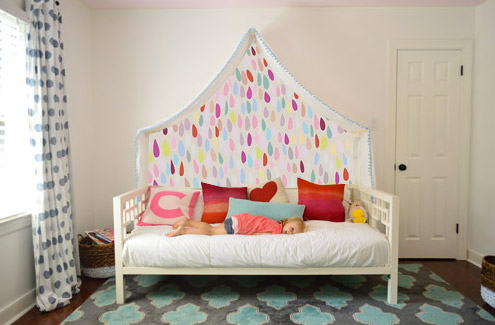
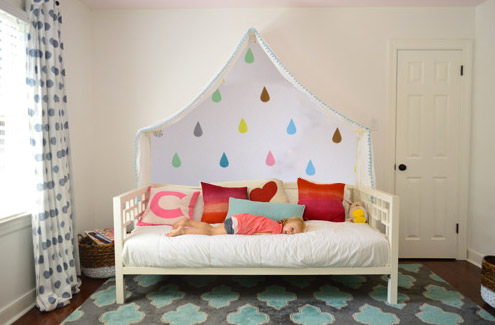
Idea #3: Another hand painted mural possibility could be something like this cluster of colorful raindrops in a variety of colors (inspired by this amazing but sadly sold out print).
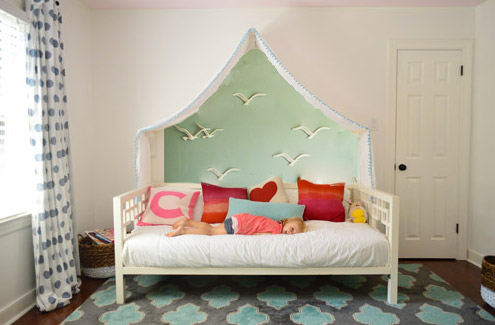
Idea #4: Then I saw this picture of a pretty blue-green wall with little birds on it and thought that could be fun.
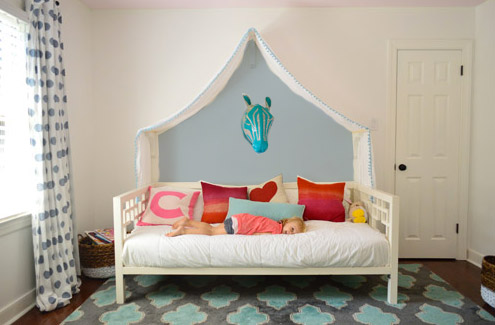
Idea #5: Since Clara’s quite the animal lover, we thought maybe a friendly giraffe or zebra (like this one from Dwell Studio) peering down at her while she sleeps could be fun with a blue-gray wall.
Idea #6: These little teardrops in a few different colors had my mind spinning with possibilities too.
Idea #7: Then I thought about a colorful fabric hung along that back wall, perhaps something with the same large-scale boldness of this pink and red wall coverings that Jenny shared here.
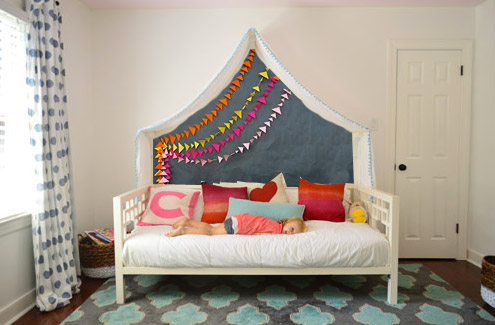
Idea #8: And then there was the possibility of even darker charcoal paint on the walls and some asymmetrical handmade banners in a few colors like these (which were actually a super cool photo background for this party). Update: since this one looks chalkboard-ish there have been a lot of suggestions to do that so Clara can doodle away, but we worry that chalk dust over her bed might not be the best call (there are chalk markers but they’re not as charming, so we’ll have to see where we end up).
What do you guys think? Any favorites? Or combos? I think we’re leaning towards the gray background tone in Idea #1 or the dark charcoal color in Idea #8, but we’re not sure if we’ll stencil stars or something else – and we might just combine it with something 3D (like a little felt circle bunting or a hanging paper lantern or something). We’d love for Clara to weigh in on things too, and then I’m hoping to work on it this weekend (along with stenciling the bathroom floor and helping John finish that sunroom tile). What are you guys up to this weekend?
Update: Clara weighed in on these photoshopped pics as well as some more that we made based on people’s suggestions and then we made one last photoshopped picture for her, since she wanted to combine a few ideas (we even video-taped her reaction, which was pretty funny). Can’t wait to get it done and share what she liked best!

Dallas says
Me again – had another look and realised it just needs a big ‘C’ in there. A big ol’ capital ‘C’, so there are no doubts as to who resides there.
Morgan says
I love the birds or the bunting
Sara says
Sorry me again… Or do a light gray on the walls sort of akin to #1.
elizabeth says
The OCD in me would be bothered by the shadow a 3D object (be it an animal head or paper lantern) would cast when the twinkle lights are on, so I’m more partial to the designs on the wall. What about option #1, which compliments the other colors/patterns in the room really well, but with glow-in-the-dark stars for some extra fun once the lights are off? Are glow-in-the-dark stars even cool anymore?
YoungHouseLove says
I think Clara would love them!
xo
s
MonW says
Hmm,
Have you considered adding some stars on the wall under the canopy? Actual real handdrawn constellations?
You could do the constellations visible on her birthday, or just the favorite animal constellations- plenty of options.
Could do the stars, stars with connecting lines or faint drawings around the stars showing the illustrated constellations.
If you used glow in the dark paint or the peel and stick stars, would be a power-free feature after the canopy is turned off.
http://www.marthastewart.com/893079/zodiac-constellation-artwork – without the leds, just glow paint or glow stars
http://www.clipartpal.com/clipart_pd/space/constellations1.html
http://www.dibonsmith.com/constel.htm
http://commons.wikimedia.org/wiki/Category:Former_constellations
http://commons.wikimedia.org/wiki/Category:Constellations_of_the_Zodiac
YoungHouseLove says
A few others have suggested that too and I love it! It would be lots of fun I think!
xo
s
Megan C. says
What about an ombré type treatment of the entire wall. Like light blue to dark of a night sky. And the part that appears in the canopy can have painted stars. You could do this with grays too.
YoungHouseLove says
That would be fun too! I’ve mentioned a few times in all these comments (so I don’t blame you if you can’t find it, hah!) that I worry about making that wall an accent wall instead of just painting under the canopy because it’s not the back, centered wall of the room (it’s on the side) and it has a big door on the right, so I worry that rectangle of white might not make the whole accent wall feel balanced. We’ll have to see where we end up though! I could totally eat those words!
xo
s
Tammy says
#8 is really cute, but banners seem to be overdone right now in children’s bedrooms. I think #4 is just as pretty, but a little different…plus, fun and 3 dimensional.
Christy Niebaum says
#3 and #8 are my favorites. The just seem more Clara-esque to me and the punches of color really brighten the space.
Margaret says
I’m definitely partial to the gray/charcoal options, too: The darker colors seem cozy while letting the pillows and bedding really stand out, and either the stencil or some felt bunting would give it enough interest to keep it fun and happy without competing with everything else on the bed. I think I’d worry that the other options would be a little much “muchness,” if you know what I mean…might be hard to keep it from fighting the rest of the room. But hey, I’ve been wrong before! Definitely interested to see what you guys come up with…
Shanna Gilbert says
I love the lights! I think either the zebra head or #8.
Jess Hogue says
#1, for the win!!!
Lucy says
Not sure if anyone else has made this suggestion yet… but perhaps this area is a prime candidate for another Sherry-Petersik-Potato-Print perhaps idea number 3 would work? :-)
Katie G. says
I like 1 and 8 the best!!!
Dawn says
I like idea #3 cluster of rain drops. That’s the most fun and perfect for a little girl. A lot of the other ideas could be used somewhere else in the room if you love them. I’m not a fan of chalkboard paint, at least not on a bedroom wall. It can get messy and colored chalk is not the easiest to clean up. Not a fan of sticker clings on the wall either; you guys are way to creative to resort to that. Love the lights on her canopy and I love watching you guys revamp your new house.
Meg says
Maybe this is a completely bizarre idea but what if you started with idea #1 (love that medium gray) and did felt start that velcro with command picture hanging velcro – and then make velcro birds, woodland animals, and banners. This was you don’t have to commit to one item and Clara could switch them for different playtime adventures.
YoungHouseLove says
That’s a fun idea too! Thanks to everyone for sharing tips and suggestions today! I had no idea this post would get this many ideas pouring in!
xo
s
Lissa says
Your ideas are lovely. I think #8 is my favorite.
I am working on a wall of dots on my baby girl’s nursery (inspired by this project, but I’m still struggling with copper v. stainless steel colored contact paper): http://www.designsponge.com/2012/02/mini-sneak-peek-oh-joys-nursery.html.
I don’t know if that would be too much dot action, given Clara’s curtains, but I loved the concept of using contact paper to make stick-able shapes, since it can easily removed down the road. Just an idea!
Emily @ Life on Food says
I really like number 8 and 1.
Laurel says
You can put fabric on the wall with liquid starch or use vinyl cut outs until you figure what you love. You have used so many amazing fabrics for Clara’s photo shoots you could just pick one and give it a try, if you hate it the starch washes out and you still can have fabric to play with. I like #1 but not quite so dark, because then the rest of the room looks pale. What about upping the pink from her ceiling and using that with raindrops made from paper mache’ so you have texture and light weight? Have a fun weekend and I love that you are asking Clara. I vote that her favorites win :)
Andrea says
The fairy lights are AMAZING (double bold underline a thousand exclamation points).
I’m not sold on painting just the peak under the canopy. I think because the rest of the wall looks so bare. I like the idea of doing the whole wall in a color and then maybe hanging some art under the peak. Option 1 is my favorite, and I love the idea of the paper lantern. Whatever you guys do will be fabulous!
lisa says
I love how this turned out! I kinda want it for my 31 year old self ;) I think 3, 4 and 8 are my faves. I admittedly haven’t read through all the answers so maybe this has been suggested, but have you thought of making a pattern by pinning faux flowers to the wall? They would add nice a pop of colours and a 3D aspect too. I’ve done it before by using flowers from the dollar store, taking off the stem and sticking a pin through the green plastic part that holds the flower together.
Morgan says
I love the dark gray paint in #8 and the stars in #1…could also try glow in the dark stars – either painted or the plastic stick-on variety. Such a cozy and magical place to dream.
Karly says
#8 for sure! Love the dark charcoal!
Eva says
The flying birds !
Miranda says
I love number 4 with the green and the birds. But…are you sure that the “inside” of the canopy is what needs something? I almost think darker color on the outside so that the canopy area is the oasis. Or something on the wall outside…. Maybe even oversized fairies with wings.
Theresa says
My favs: 1, 3, or 8. :D
Wouldn’t you worry about an animal head getting bonked on- when there’s some monkey business? Anyway, I love all of them and the idea is great! :) I wonder though, if a dark one (like #8) would take away from the fairy-ness of the lights when it’s dark? You know what I mean? Like, would the gray light up as much as something bright and pink? Hmmmm… so many choices! :)
YoungHouseLove says
We would get one of those paper mache or soft ones (they have knitted ones and funny stuffed ones too) so it wouldn’t be like an anvil overhead or anything, haha!
xo
s
Theresa says
Oh duh! Ha, love it. Can’t wait to see it when it’s done.
Liz says
Fabric wallpaper? I recently did it in my bathroom after seeing it all over Pinterest and works great! Since its just up with cornstarch, it’s cheap, easy, nontoxic, and changeable. Could let Clara pick or design something or cut out shapes, animals, whatever like decal accents. Also, our Home Goods has loads of the animal heads for a steal! My boy has a rhino in hopes room (not over his bed) and loooves it!
YoungHouseLove says
This is such a fun idea but I wonder if she’ll peel things that are starched to the wall like a big ol’ sticker. Although she’s a pretty obedient gal if we tell her something is just for looking or touching with one finger (that’s how we got her not to pull the christmas tree over when she was younger, haha).
xo
s
seansmom says
Ok..Haven’t read through all the comments, so don’t know if anyone else has suggested this or not, but I’d leave the whole wall the color it is now, and just “sparkle” the area under the canopy(think fairy dust)with a dry brushing or stippling of gold paint. Sometimes less is more? :>)
YoungHouseLove says
That’s a sweet idea too! Love them all! How will Clara choose?!
xo
s
Kimberly @ paintedloveblog says
Sherry! I’m one of the reasons The Rain print (http://windandwillowhome.bigcartel.com/product/the-rain-print) is out of stock. I’ve got it hanging in my hallway right now! But good news! They have an Etsy shop and you can still purchase the print here…http://www.etsy.com/listing/76813366/abstract-art-print-the-rain-8-x-10-open?ref=shop_home_active
YoungHouseLove says
Thanks for the tip Kimberly!!
xo
s
Brittany says
I think number one is my favorite. It adds contrast but also ties in very nicely with the rug and curtains…I dunno it seems to pull it together for me! A lot of the other options are fun too though. I don’t think a chalkboard above the bed is a good idea. Chalk markers are nice but I have a feeling if she sees you guys writing on the wall she’ll want to…and I think even those may be too messy for sweet little Clara. Plus chalk dust + bed = a mess. No thanks, lol.
Lisa says
Voting for option #7 – cheerful and fun
Gina T says
I vote for #3 all the way! She’s a little girl and should have lots of fun, bright colors in her room!
Laura says
What a great functional additional & so fun too. My favorites are numbers one and three. Number one is moody & dramatic while number three is playful & fun. I think I’d opt for idea number three as I think it fits with the rest of the decor in the room & the personality of the room’s resident better than idea number one does.
Dawn says
I like #1, but I think using fabric rather than painting would be fun since you could change it out periodically (i.e. seasons, holidays, etc.)
Yvonne says
mmmm you are right something is missing there. The space is not fully grounded somehow and looks a little cold. I think it needs more texture to counter all the white. Almost all the walls in my house are white and at first it looked too stark but once I added some texture it was awesome. I think adding a high upholstered tufted headboard would do it…you would have to edit the bed though….or have more fabric cover the wall behind as well…. like so http://cdn.decorpad.com/photos/2009/03/16/3fc9acaa91ce.jpg
Melissa@TheChicDream says
I love option 1. So dreamy. It reminds me of when I stenciled silver and gold stars all over my bedroom walls when I was a teenager. It was awesome! I can’t wait to see what you guys end up doing.
Barbara says
How about something simpler like hanging colorful paper lanterns? That way, you’re way more open to change as Clara gets older, changes her mind, etc. I think a bunch of colored lanterns would be so cute!
Gudrun H says
This was a wonderfull idea. I really love number 4, it looks so calming for bed time :)
Amanda Schroeder says
Those multicolor raindrops would have been my fav when I was Clara’s age or candy strips in varied widths and colors
Carolina says
I love the lighter grey with stars… Maybe a mixture of pearl white, silver, brass and gold stars? very sparkly!
Kathy says
FABRIC…folds of fabric. The wall/door/bed all have hard lines IMO, and some soft colorful fabric with lots of folds and drapes would be my choice. A bed is always most inviting when it has lots of softness. Is it that’s she’s too young for fabric (aka the Pink in concert thing)…I haven’t been around 3-4 yo in a while.
YoungHouseLove says
Sounds dreamy! Love all the suggestions guys! Can’t believe how many you guys have! It’s amazing.
xo
s
Hope says
Love these ideas! I have put fairy light along my headboard for years come Christmastime! Personally I like options #3 and 6
Robyn T. says
Love the gray! Maybe on the whole wall as previously mentioned and then add some really pretty star decals that WallQuotes.com could make for you! I know where you can get a code to use for a really great discount too!
#gratefulforthediscount
Laurel says
I vote for either #1 or #4. So cute!
Kay says
I don’t really like the painting idea. I’m still focused on the white outside the canopy. I’d hang something like this http://1.bp.blogspot.com/-Z5-CL-iEHG8/UkMNgxYqWiI/AAAAAAAAHOQ/yBRWg8gG-xE/s1600/tea+party+decor+1.jpg in the left corner of the ceiling (with one or two small ones on the right if it’s not too busy) and then maybe find a sheer fabric in coordinating colors above the white canopy fabric and the lights on top of that because it may give off little specks of colored light too.
Jenna says
Why not create a felt backboard in that color of charcoal? You know, like the felt story boards we used to have in school. Then you can have different shapes like the birds or stars that stick on to the felt board and she can create different pictures and moods for different days.
YoungHouseLove says
That’s a fun idea a bunch of people have recommended (along with magnetic paint) so we’ll have to chat with Clara and see what she likes! My only thought is I wouldn’t want her rearranging things during the night when she’s sleeping, so maybe something more static might be better for over the bed – but who knows!
xo
s
Kimberly @ Turning It Home says
So many choices! I found a bird just like those in idea #4 at a thrift store for less than a dollar (http://www.turningithome.com/2013/05/april-thrift-store-finds.html), I love the way they look all together.
I’m excited to see what you guys settle on. I personally like the charcoal color.
YoungHouseLove says
So cute!
xo
s
Emily says
I like the idea of raindrops, but maybe as decals on top of the white walls instead of putting a different color of paint back there? I would just worry that the canopy would shift around all the time, and the paint wouldn’t line up perfectly.
http://www.etsy.com/listing/68959089/wall-decals-clouds-reusable-and?ref=sr_gallery_22&ga_search_query=raindrop+decal&ga_view_type=gallery&ga_ship_to=US&ga_search_type=all
Stephanie says
I only got through 1 page of comments so i’m not sure if others have said this, but what about hanging a disco ball? When the twinkle lights are on it would be awesome. I agree with some of the others that said it might be funky to have color just under the canopy, but you’re in the space, you know the way it would look with the doors white against a colored wall. Would she leave art alone if you just put it up with washi tape or something? That might provide some color but not have to deal with paint looking funny if the canopy shifts.
YoungHouseLove says
Fun ideas everyone! Thanks so much for sharing!
xo
s
Ashley Davis says
#1!
Ashley says
I love the chalkboard look/colors, but not the idea of chalkboard. The chalkboard paints come in different colors though! Hmm, might be cute anyways!!
You should pick up an on/off switch from the hardware dept that plugs right into the outlet and then the cord plugs into it. :) We have a few for our Christmas tree and other lights, they’re just a few dollars!! My kids love them bc they can use them without worries! :)
YoungHouseLove says
Love that tip!
xo
s