Update: Holy cow, you guys are full of so many fun ideas today! I’m having trouble keeping up with comments since they’re rolling in so furiously, but please know I’m reading them all and loving all the suggestions!
Happy Friday! We’ve been all over the place this week, painting the walls/trim/ceiling in the bathroom & closet, diving into some basket craftiness, de-wallpapering our biggest room yet (the 21′ long kitchen), and now we have a little Clara-room update along with some photoshop percolating as we plot our next move in there. But first, here’s the tiny (and twinkly) addition:

Things just got a little brighter in here…
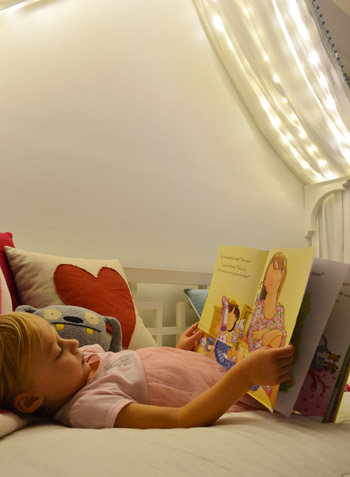
Ever since we hung her canopy, we’ve thought about adding lights to it. Both for the magic of it (Clara loves them) and also for the function of it being a well-lit place for bedtime stories. We feared traditional Christmas lights would be too heavy and make the fabric sag in weird ways (plus, they could look a little messy when they were off) so after some hunting online, we came across what are often dubbed “Fairy Lights.”
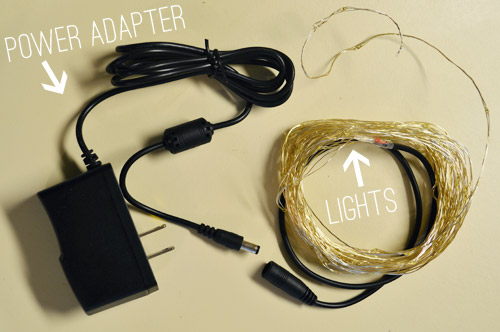
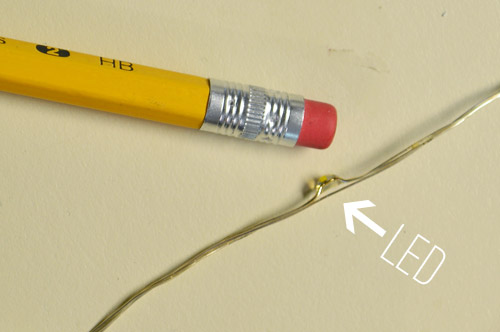
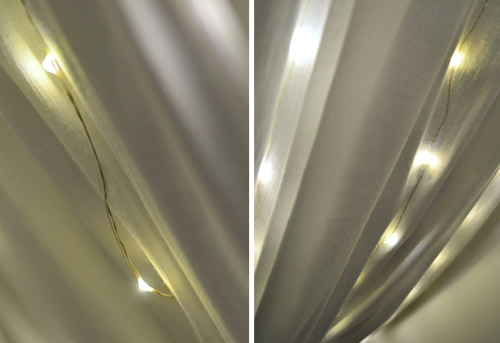
They’re basically small LEDs (check out this picture for scale – they’re tiny) that are strung on a thin wire. The particular set that we bought was 33 feet long and sold for $14 on Amazon. They’re not longer available but here’s an affiliate link for something similar.
The wire itself is extremely light and pretty moldable, so it was easy to weave it back and forth across the 18″ corbels that the fabric rests on. And by some luck of the draw, 33 feet was just about the perfect length to go back and forth four times on each side of the peak to the side brackets and secure them at each turn with white tape, so they’re not something Clara easily unwind and swing around like a lasso – but they will easily release under her weight, so she couldn’t strangle on them.
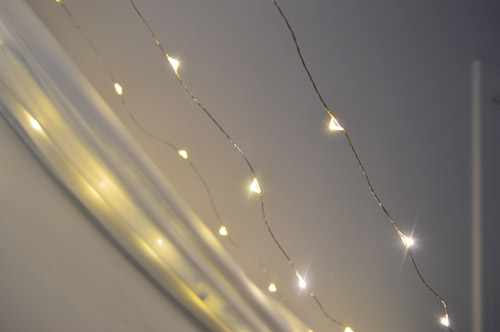
The next step was just draping the canopy back over them. The LEDs are so small that they tuck into the folds and are barely visible when they’re off. And when they’re on, well, you can see how they twinkle below. And since they’re LEDs, they’re completely cool to the touch – so we don’t have any fear of them being against fabric. I also love that they’re small resin-ish glowing dots instead of larger glass bulbs that could shatter.
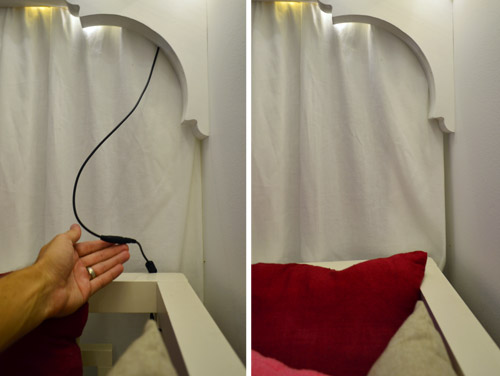
I wish the part that plugs in weren’t big and black, but we were able to plug it in behind the bed and wrap the cord around the bed in a way that it’s able to be hidden behind the canopy most of the time, but easily accessed when it’s time to connect the cords to the power adapter. See how you can see it on the left, but it’s tucked away and invisible on the right? Thank you John, hand model of the ages.
Clara LOVES them. Partly because they’re called “Fairy Lights” but mostly because she feels very special having her own set of secret lights above the bed. We intended just to put them on for story time at night or other special play times, but they actually put off a fair amount of light, so we’ve found ourselves putting them on just about any time we’re in the room and the sun isn’t fully out.
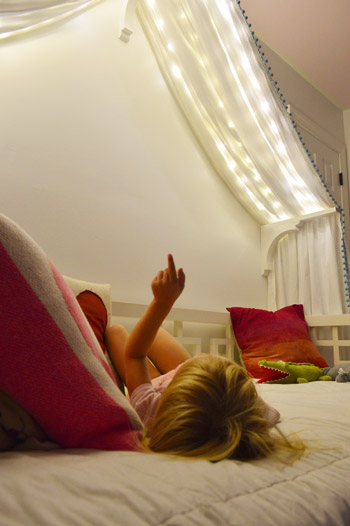
We’ve had them up there for a week or two (didn’t want to sing their praises too soon only to have them burn out or something weird) and so far they have been awesome for our gentle girl. She hasn’t touched them once, but loves gazing up at them. Meanwhile, my best friend’s four year old daughter is nothing short of an acrobat, so we laughed about how she’d probably scale the canopy and hang from the fabric like she was Pink in concert.
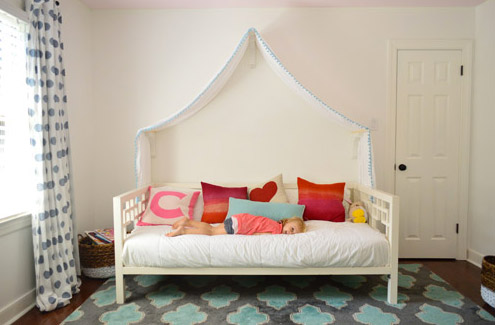
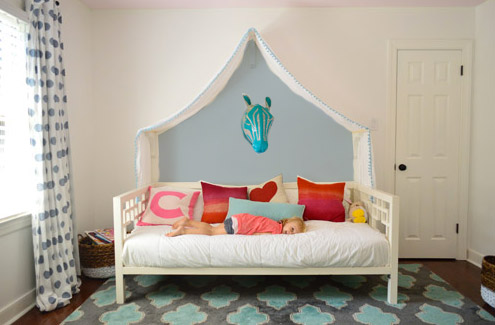
But even with the addition of the lights, the canopy is still definitely missing something above it. There’s still so much white on white on white that we’ve been brainstorming which way we want to go. We’ve debated painting just that peaked area under the canopy for a while and then adding something else in there (like a hanging paper lantern or mobile or even a cute little animal head or something). So here are a few ideas, thanks to our good friend Photoshop.
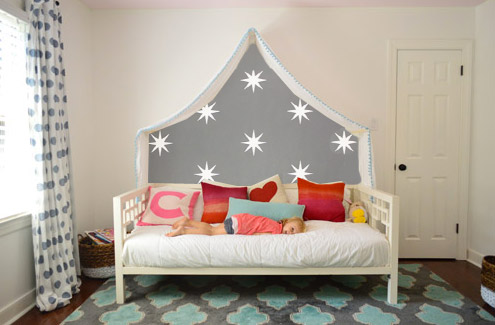
Idea #1: A gray tone on the walls to add drama and a little dreaminess to the canopy, inspired by this wallpaper by Osborne And Little.
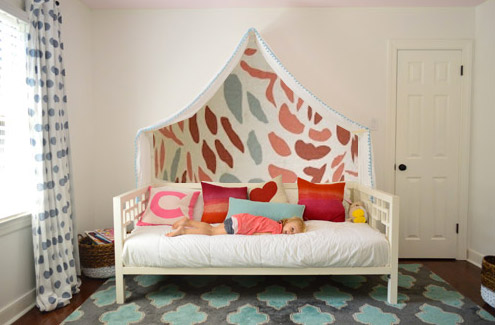
Idea #2: Maybe I could freehand some sort of imperfect painterly-ish mural, inspired by this awesome fabric covered lamp shade?
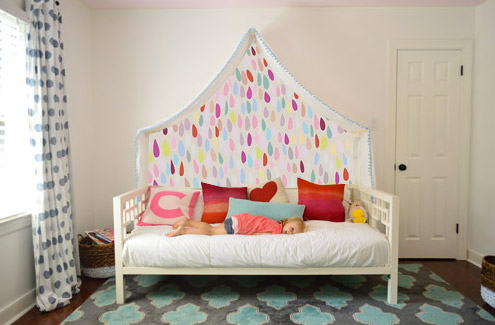
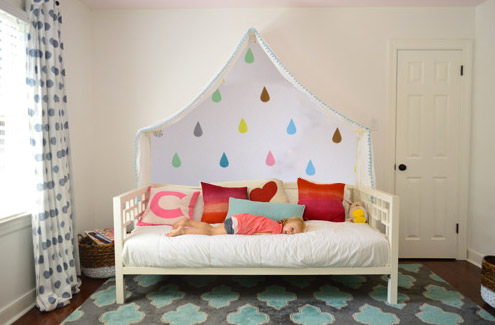
Idea #3: Another hand painted mural possibility could be something like this cluster of colorful raindrops in a variety of colors (inspired by this amazing but sadly sold out print).
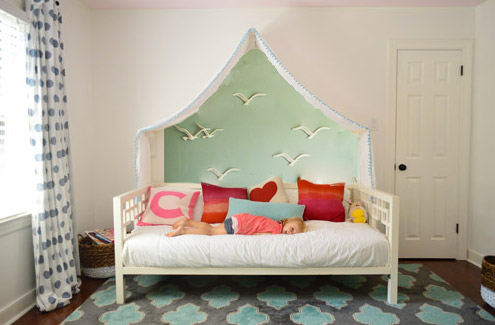
Idea #4: Then I saw this picture of a pretty blue-green wall with little birds on it and thought that could be fun.
Idea #5: Since Clara’s quite the animal lover, we thought maybe a friendly giraffe or zebra (like this one from Dwell Studio) peering down at her while she sleeps could be fun with a blue-gray wall.
Idea #6: These little teardrops in a few different colors had my mind spinning with possibilities too.
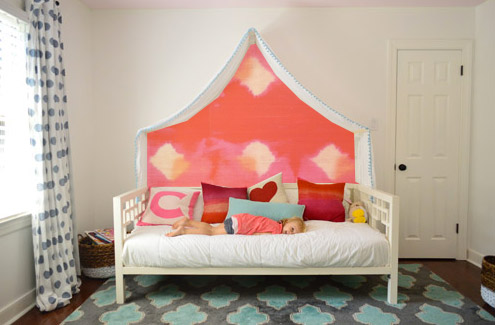
Idea #7: Then I thought about a colorful fabric hung along that back wall, perhaps something with the same large-scale boldness of this pink and red wall coverings that Jenny shared here.
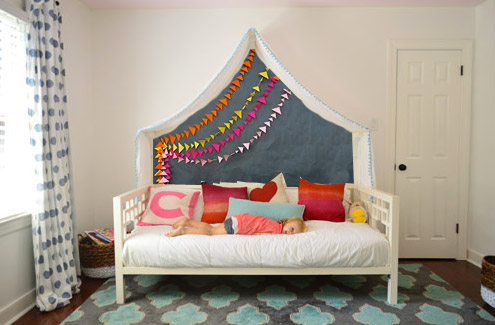
Idea #8: And then there was the possibility of even darker charcoal paint on the walls and some asymmetrical handmade banners in a few colors like these (which were actually a super cool photo background for this party). Update: since this one looks chalkboard-ish there have been a lot of suggestions to do that so Clara can doodle away, but we worry that chalk dust over her bed might not be the best call (there are chalk markers but they’re not as charming, so we’ll have to see where we end up).
What do you guys think? Any favorites? Or combos? I think we’re leaning towards the gray background tone in Idea #1 or the dark charcoal color in Idea #8, but we’re not sure if we’ll stencil stars or something else – and we might just combine it with something 3D (like a little felt circle bunting or a hanging paper lantern or something). We’d love for Clara to weigh in on things too, and then I’m hoping to work on it this weekend (along with stenciling the bathroom floor and helping John finish that sunroom tile). What are you guys up to this weekend?
Update: Clara weighed in on these photoshopped pics as well as some more that we made based on people’s suggestions and then we made one last photoshopped picture for her, since she wanted to combine a few ideas (we even video-taped her reaction, which was pretty funny). Can’t wait to get it done and share what she liked best!

Katie says
1, 3 or 7. Love all of those, but mostly it should be whatever Clara will love!
Tali L. of Typically Tali says
I like #1 and $8. Def like the contrast of a darker color with the white + pink. The grey works really well! With the bright color patterns the canopy seems to get lost. And the canopy and the lights should be highlighted :)
http://www.typicallytali.com
Katie says
I love option #1 and #8.
1 seems so whimsical yet classic and 8 seems like a party under the stars. Both marvelous places to dream.
Your wonderful and varied ideas make me wish you guys still did mood boards!
YoungHouseLove says
Love all the feedback and ideas guys! Thanks for weighing in!
xo
s
Elizabeth L. says
#1 all the way! So fun especially if you made the stars 3D!
Erica says
Love the lights! My faves are 2 and 7! I would use a cardboard bust instead of the ceramic type just in case it falls are she knocks it off the wall.
crystal says
you had me at #1.
Abby says
Number 4 is my favourite.
Jess M says
LOVE #8. The buntings/banners against the charcoal really pop. And you can change them out seasonally or when you get tired of them
Lauren says
I vote idea #3 – so cute & love the colors!
Gwen says
Love the lights! The canopy gets lost in the white wall. I’d paint the entire wall. Then do one of the fun things inside the canopy.
Alexandra Schelling says
I think fabric would work the best, it seems like it would be hard to get the canopy to line up exactly with the paint lines on the wall. I like the grey and charcoal options most! :)
Sandy says
Number 1 is my favorite! I wasn’t sure when you mentioned painting that area under the canopy but when I scrolled down and saw the grey with stars it actually took my breath away. The others are all cute options as well. Oh but the stars are magical just like the fairy lights. I want a canopy with fairy lights over my bed now! :)
caroline says
I love your ideas….I thought maybe homemade doilies strung across. Take string and just fold the doilies in half over the string & tack in place with a few stitches of thread.You could get different color fabric ones or make fabric banners to hang with Clara’s favorite colors…that looks sweet!!! When she gets sick of it you could just change it to something else!! Have a great weekend!!! ;)
Richelle says
1, 2 and 3 are my favorites. I thought it would look funny when you were describing painting just inside the canopy, but the photoshop pictures all look great! Can’t wait to see what you decide.
Deb says
How about some sort of fairies in the sky/clouds, etc? There are some really quaint (non-tacky) ideas on Pinterest.
Kelly says
1 or 4 are both fun and peaceful. Personally I love the soft green.
Reenie says
Love the lights…. how magical for Clara.
Def #1 :)
Kelly says
All great options. I was taken with #1 because it seems magical to go along with the lights and canopy. Her own night sky in her room. Maybe you could use some glow in the dark paint on the stars or something that glitters a little? #5 was fun too like a window to a beach.
Anne says
Sorry, I didn’t read the other comments in case someone else already asked this. Is she still into her giraffe, Gee? Number 2 really made me think of giraffes for some reason. I loved the bright stars of #1 and the teardrops of #6. The teardrops really stood out to me, too. I can see that in different colors for sure. What a sweet setup for Clara! Does your heart melt every time you see her on her bed with the lights on?? :-)
YoungHouseLove says
Yes, she loves Gee just as much! And whenever the lights are on I’m that weirdo permasmiling in the corner. Ha!
xo
s
Sumati says
I LOVE #8. I like #1 right after that.. but I am a sucker for gray. #8 is just so fun.
Gaelle says
I would do #1 or #6 BUT do it on the wall outside the canopy, including painting and decorating the door frame and the door so that everything blends in. I’m not sure why but I think doing the part inside the canopy is too small of an area and takes away from the canopy and bed. If you do it outside but also treat the door frame and door the same way, then the canopy would stand out even more and you don’t have to worry about the door standing out in a weird way.
Claire says
Love #1 ~ what a lucky little girl!!
Leah says
Raindrops, most definitely!
Sarah says
I love 1 and 4, especially with the thought of how it would look with the lights on in the evening!
Ethne @ Wom Mom Blog says
#1 – I love the starts – they just work with the fairy lights. And maybe you could hang some fairies from the canopy. You could make or buy fabric one(s). Super lightweight.
susan toohy says
Love the lights! Pic #2! So adorable
Jen says
oooo 3 and 4 are my personal favorites (I may just do this for myself!)… but the gray and charcoal options look awesome too. If I went with those I’d hang one of those star lanterns in there. Great.. now you have my wheels turning and I want to do this!
Cassie says
I have these on a small gray accent wall in my bedroom and I love them! Similar to the birds, I suppose:
http://www.amazon.com/Umbra-Wallflower-Wall-D%C3%A9cor-White/dp/B0015TI1RE/ref=sr_1_3?ie=UTF8&qid=1382106648&sr=8-3&keywords=wall+flower
Audrey says
Idea #1 emphatically gets my vote!
I think the reds and animal prints, etc. are just too busy when taken with the rest of her room, and the stars are still very fun/ not too boring for a kid’s room.
Love the fairy lights in the canopy, regardless of what you do underneath. Clara’s one lucky girl to have such a great room!
P.S. I’m SOOOOOOO excited to see what you do for the bun’s nursery. Like, too excited considering I don’t know you in real life. Congrats again! I hope your nausea has gone down since you last did a bun update!
Jon says
Instead of a paper lantern, you could DIY a marqui star like this one from “Festoration Blardware” hahaha.
I think it would go nicely with the theme of the fairy lights!!!
http://www.rhbabyandchild.com/rooms/shopByRoom.jsp?slideId=rhbc361003&id=rhbc319003&cm_ven=cheetahmail&cm_cat=10182013&cm_pla=10.18.2013%20BC%20Fall%20Lighting%20BB4EM544&cm_ite=weller&cm_lm=cm:jon@trufinancialgroup.com&source=BB4EM544#/rhbc361003
YoungHouseLove says
Haha!
xo
s
Abby M says
My suggestion would be to go a little more subtle with the under-canopy color because if the swagged canopy moves a tad you may see it above, or see the lighter wall color below if it tightens. I love it, though :)
Amy in PA says
How about her monogram in a beautiful script? Or just a powerful C on its own? Either one could look stunning on one of the color backgrounds you photoshopped or on the white wall in it’s own beautiful color.
YoungHouseLove says
Holy cow, there are so many ideas rolling in we can’t keep up! Thanks to everyone for sharing their thoughts and fun suggestions!
xo
s
Ann says
This is amazing.. and I am definitely a fan of option 1. I think the stars with the lights on would be very, very cool.
Good luck choosing!
Caitlyn says
The last one is my favorite! And I love the fairy lights!
Sara B says
How about these fabric wall stickers? You can even paint an easy mural of pale gray branches and stick these on top.
http://windandwillowhome.bigcartel.com/product/flying-friends-fabric-wall-stickers
Gauri says
Ohhhh what about magnetic paint with big felt bird magnets that could “fly” around? Definitely less messy than a chalkboard, but still interactive. I would love that!
Now, I’m off to go plan a magnetic wall in my own house…
Amy says
Have you thought about using removable wallpaper so it’s easy to change? You can even design your own at Spoonflower. http://www.muralsyourway.com has a lot of neat designs too.
Cammy says
I like #1, #8, and the one with the birds the best. I think of all those #8 is the best, but I’m excited to see what Clara will chose.
Autumn says
We have plush animal heads in my 3 year old’s room from Lucy’s Toys. They call them “Wall Mounts.” I like them because if they ever fall from above her bed, it’s just a big soft zebra landing on her instead of something hard and sculptural. We have the zebra and the rhino. She loves to dress them up with scarves, headbands, and jewelry too. They will be at the Sugarloaf Craft Show in Chantilly, VA in Dec, but they also have a website if that drive is too far for you.
Ashleigh says
The dark charcoal one got me to thinking what about using blackboard paint so she can update it as she pleases? If not I really like the 1st one with the stars or the raindrops. xox
YoungHouseLove says
Just added an update to the post about chalkboard paint since so many people are mentioning it! It’s tacked onto #8!
xo
s
erica says
#8, but with magnetic chalkboard paint for Clara to play with!!!
Stacey says
The lights are dreamy! A fabulous spot for daydreaming and reading. <3
Careen says
I like #3 or #4 for the potential of imaginative daydreams that could come from those looks.
kelsey says
love the moody charcoal color, if you want something 3D (b/c i agree chalkboard over a bed just seems like a bad call) maybe look at the Umbra line of wall decor, they have butterflies, flowers,my favorite are the dragonflies (you can find them on amazon). super easy to use and so much fun!
Jen D says
Big fan of #1! #4 is a distant second. :)
Trisha says
Love #3!
dkl says
Temporary wall paper! The kind that works like a big removable wall decal.
Jenny says
Love idea # 3!
heather says
I love the idea of doing fabric, which will be easy to attach and so easy to remove if Clara changes her mind (or you guys do) on either the whole canopy thing all together or just the background. I really love the idea of the last one only using dark gray charcoal burlap for it, and then stringing the bunting banners across it. The holes in the burlap would allow you to use a clear thread to easily tack the bunting banner to.
I also love the idea of the tiny raindrops, but in a similar fashion – tacking them (or painting them onto) fabric. If you made them out of felt or something it would give a tactile component which could be awesome for Clara.
Hanna Cage says
I LOVE the stars, but also like the idea of the area behind the canopy being a kind of window into another place – it feels a little like a window to a seascape with the seagull print one. I love the peace of the seagull one too.
Or maybe create a window into someplace more fantasical? http://www.whatisblik.com/shop/imaginary-castle