Update: Holy cow, you guys are full of so many fun ideas today! I’m having trouble keeping up with comments since they’re rolling in so furiously, but please know I’m reading them all and loving all the suggestions!
Happy Friday! We’ve been all over the place this week, painting the walls/trim/ceiling in the bathroom & closet, diving into some basket craftiness, de-wallpapering our biggest room yet (the 21′ long kitchen), and now we have a little Clara-room update along with some photoshop percolating as we plot our next move in there. But first, here’s the tiny (and twinkly) addition:

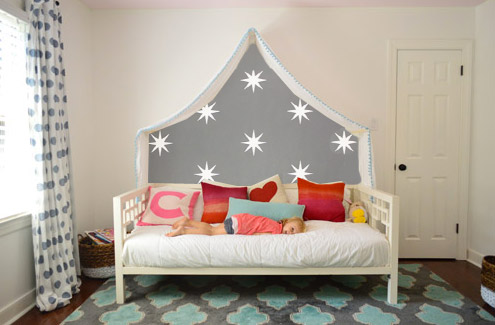
Things just got a little brighter in here…
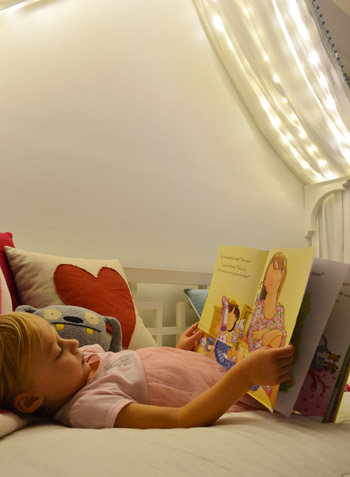
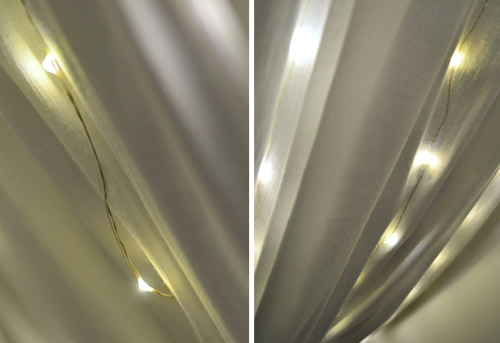
Ever since we hung her canopy, we’ve thought about adding lights to it. Both for the magic of it (Clara loves them) and also for the function of it being a well-lit place for bedtime stories. We feared traditional Christmas lights would be too heavy and make the fabric sag in weird ways (plus, they could look a little messy when they were off) so after some hunting online, we came across what are often dubbed “Fairy Lights.”
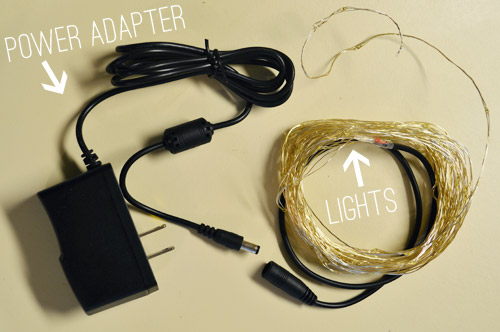
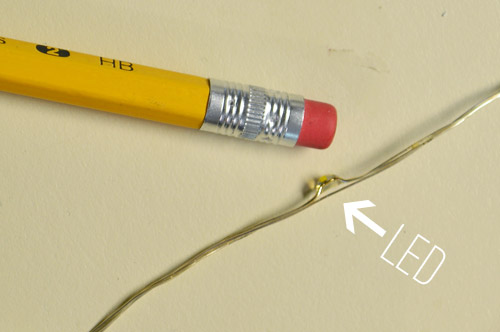
They’re basically small LEDs (check out this picture for scale – they’re tiny) that are strung on a thin wire. The particular set that we bought was 33 feet long and sold for $14 on Amazon. They’re not longer available but here’s an affiliate link for something similar.
The wire itself is extremely light and pretty moldable, so it was easy to weave it back and forth across the 18″ corbels that the fabric rests on. And by some luck of the draw, 33 feet was just about the perfect length to go back and forth four times on each side of the peak to the side brackets and secure them at each turn with white tape, so they’re not something Clara easily unwind and swing around like a lasso – but they will easily release under her weight, so she couldn’t strangle on them.
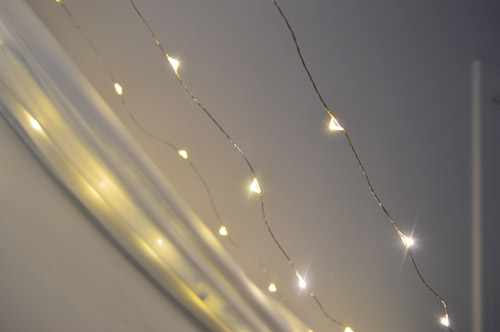
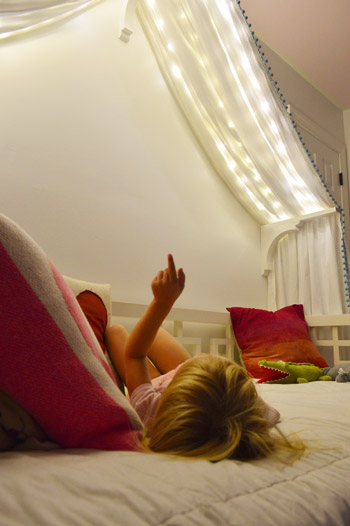
The next step was just draping the canopy back over them. The LEDs are so small that they tuck into the folds and are barely visible when they’re off. And when they’re on, well, you can see how they twinkle below. And since they’re LEDs, they’re completely cool to the touch – so we don’t have any fear of them being against fabric. I also love that they’re small resin-ish glowing dots instead of larger glass bulbs that could shatter.
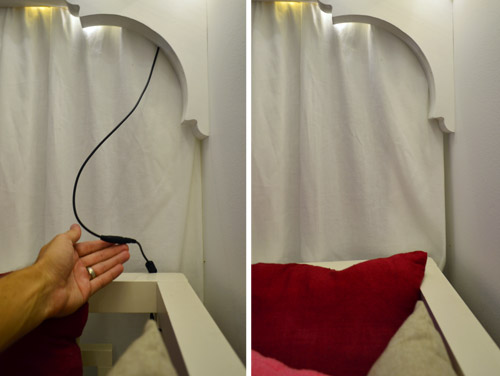
I wish the part that plugs in weren’t big and black, but we were able to plug it in behind the bed and wrap the cord around the bed in a way that it’s able to be hidden behind the canopy most of the time, but easily accessed when it’s time to connect the cords to the power adapter. See how you can see it on the left, but it’s tucked away and invisible on the right? Thank you John, hand model of the ages.
Clara LOVES them. Partly because they’re called “Fairy Lights” but mostly because she feels very special having her own set of secret lights above the bed. We intended just to put them on for story time at night or other special play times, but they actually put off a fair amount of light, so we’ve found ourselves putting them on just about any time we’re in the room and the sun isn’t fully out.
We’ve had them up there for a week or two (didn’t want to sing their praises too soon only to have them burn out or something weird) and so far they have been awesome for our gentle girl. She hasn’t touched them once, but loves gazing up at them. Meanwhile, my best friend’s four year old daughter is nothing short of an acrobat, so we laughed about how she’d probably scale the canopy and hang from the fabric like she was Pink in concert.
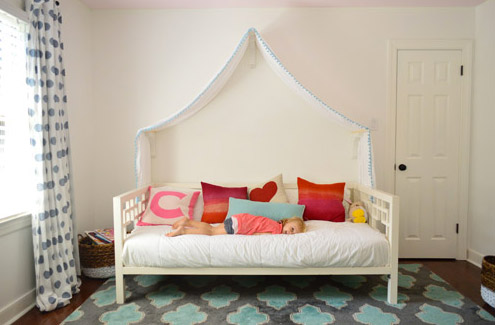
But even with the addition of the lights, the canopy is still definitely missing something above it. There’s still so much white on white on white that we’ve been brainstorming which way we want to go. We’ve debated painting just that peaked area under the canopy for a while and then adding something else in there (like a hanging paper lantern or mobile or even a cute little animal head or something). So here are a few ideas, thanks to our good friend Photoshop.
Idea #1: A gray tone on the walls to add drama and a little dreaminess to the canopy, inspired by this wallpaper by Osborne And Little.
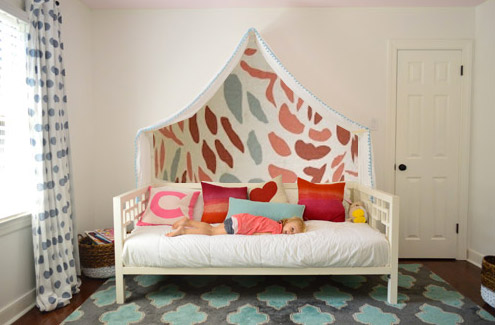
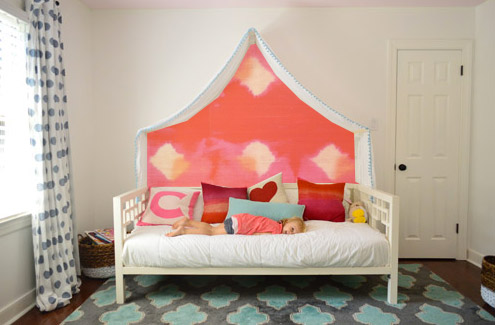
Idea #2: Maybe I could freehand some sort of imperfect painterly-ish mural, inspired by this awesome fabric covered lamp shade?
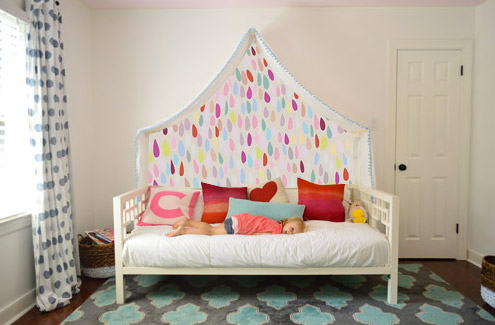
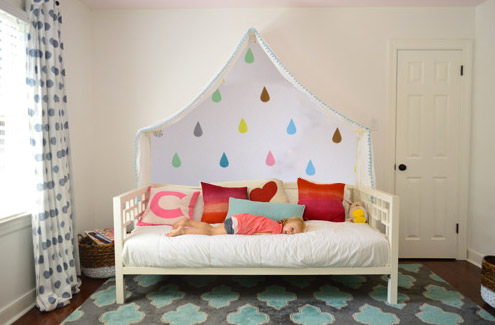
Idea #3: Another hand painted mural possibility could be something like this cluster of colorful raindrops in a variety of colors (inspired by this amazing but sadly sold out print).
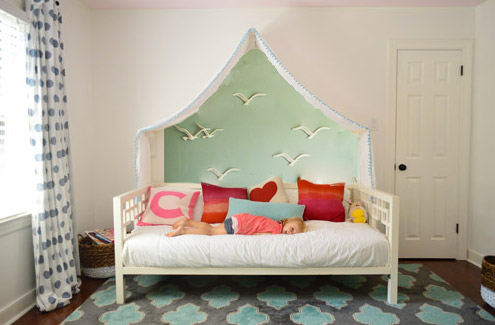
Idea #4: Then I saw this picture of a pretty blue-green wall with little birds on it and thought that could be fun.
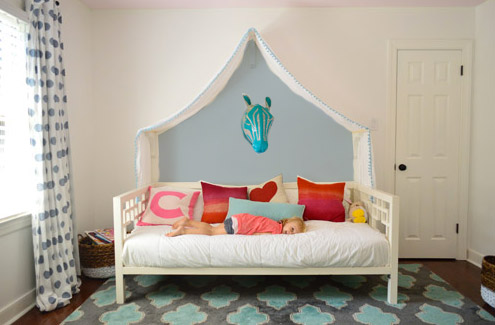
Idea #5: Since Clara’s quite the animal lover, we thought maybe a friendly giraffe or zebra (like this one from Dwell Studio) peering down at her while she sleeps could be fun with a blue-gray wall.
Idea #6: These little teardrops in a few different colors had my mind spinning with possibilities too.
Idea #7: Then I thought about a colorful fabric hung along that back wall, perhaps something with the same large-scale boldness of this pink and red wall coverings that Jenny shared here.
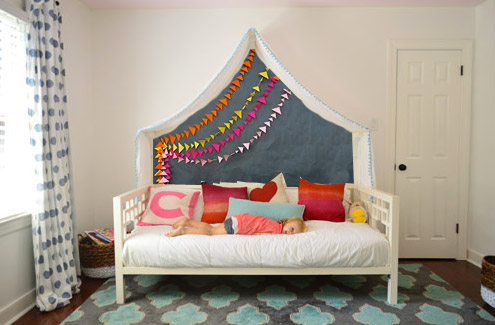
Idea #8: And then there was the possibility of even darker charcoal paint on the walls and some asymmetrical handmade banners in a few colors like these (which were actually a super cool photo background for this party). Update: since this one looks chalkboard-ish there have been a lot of suggestions to do that so Clara can doodle away, but we worry that chalk dust over her bed might not be the best call (there are chalk markers but they’re not as charming, so we’ll have to see where we end up).
What do you guys think? Any favorites? Or combos? I think we’re leaning towards the gray background tone in Idea #1 or the dark charcoal color in Idea #8, but we’re not sure if we’ll stencil stars or something else – and we might just combine it with something 3D (like a little felt circle bunting or a hanging paper lantern or something). We’d love for Clara to weigh in on things too, and then I’m hoping to work on it this weekend (along with stenciling the bathroom floor and helping John finish that sunroom tile). What are you guys up to this weekend?
Update: Clara weighed in on these photoshopped pics as well as some more that we made based on people’s suggestions and then we made one last photoshopped picture for her, since she wanted to combine a few ideas (we even video-taped her reaction, which was pretty funny). Can’t wait to get it done and share what she liked best!

Laura @ Lulu Belle Design says
Definitely #1 or #2!
Cathering says
Combine the birds and idea #1! its so whimsical without being cartoonish! Sophisticated toddler!
Erika says
I love the gray with white stars option, but I would paint that whole wall that way. Then the white canopy would pop out visually from that.
LOVE the fairy lights! Thinking on how I can use those for my teen!
Erica says
You could use starch to paste up fabric under there, a fun way to get pattern in a less permanent way than paint, and the texture would increase the coziness. I’ve had good success with that staying on the wall.
Mayra says
I love #1 and another option would be to add silver vinyl stars . Either way the whole star theme would look so nice with the lights.
Emily says
I’ve been looking for a set of lights just like these but I hadn’t been able to find a long length and you solved that problem!! Thank you!! Also, I looked at every new canopy idea and it wasn’t until that last one that I realized little Clara is laying on the bed! Hilarious! Love your blog =)
Emily
LucyLu says
Holy cow. This canopy bed is just b.a.d. And getting worse…The posts sticking out of the wall, the cheap flimsy too-short fabric, THE POM POMs, lights are questionable (exactly how many times will you be plugging those in?), and now painting the wall-shape underneath… I really really am trying to find something redeemable about this whole situation but I am struggling. With 3 girls whose rooms I LOVE to decorate, there is not 1 thing I would take away from this room. This is definitely not a question of style, it’s doing quality work :( I mean, this is what you’re doing full time, for money, and asking for the public’s opinion – if this were a friend of mine I would never give my opinion.
katrina says
My favorites are the birds (#4) and the banner (#8), boy you sure came up with options though. Love you blog guys, u always have fun and educational posts.
Susan says
Have you thought of using magnetic paint under whatever you choose, be it paint, cloth or whatever so Clara could use it as a bulletin board?
YoungHouseLove says
Yes, a bunch of folks have suggested that! Thanks Susan!
xo
s
Ted says
Haven’t had time to catch up on the blog for a couple of weeks and just getting back, so sorry for the late comment.
Something to consider is to put up colored or textured contact paper and then give her some washable markers that could be used to draw on the contact paper. Doesn’t leave dust like chalk and is washable. We’ve had good success with washable markers for our 2 year old twins. It comes off of skin and out of clothes easily with water. Now you may not want her to think that she can draw on just any wall, but if you aren’t worried about that, this could be fun. And it will clean off with a wet paper towel or baby wipe.
Emily says
I like option #1, but what if you put the magnetic paint under the final paint color and put up the magnetic wall flowers!
ettie says
My daughter also loves the ‘big sister book’ – my mother in law got it for her when I was expecting my second. I vote for the first option, I love stars, and with our princesses as stars the connection is totally there. Looking forward to hearing which option you go with.
Julianne says
What if you were to paint stars like option 1 on the outside of the canopy instead of the inside, so her canopy would have the effect of a “safe” spot with the stars around it all?
SpinGirl says
Love Clara’s room. Where did you get that amazing rug???!!!
Great projects as always!
YoungHouseLove says
Thanks! It’s from a local outlet called The Decorating Outlet (also have seen it on Joss & Main).
xo
s
Eva says
How about doing something like this? Pretty fabric on the back wall with a fake chandelier? Saw it on Instagram today and immediately thought of Clara :)
http://instagram.com/p/f5Wth5gc2J/#
YoungHouseLove says
Oh yes, I love that shot! We’re halfway through our little update and will be sharing it on Monday!
xo
s
Kodi says
In case you wanted it — that gorgeous rain print is no longer sold out!
YoungHouseLove says
Thanks Kodi!
xo
s
Maria @ Inspiration Affirmation says
I love the lights so much! Clara is a very lucky little girl! :-)
Thread says
what an outstanding amount of decorating ideas based on one bed. I loved the raindrops and fairy lights
Nicole says
I love the idea of using Photoshop to visualize what a finished project might look like! Do you use a certain version of Photoshop? Would love to be able to use this very useful tool. Thanks!
YoungHouseLove says
We just have Adobe Photoshop (the kind that comes with Adobe Creative Suite although we didn’t buy the whole suite). Mostly I drag images in, cut them out, skew or scale them and place them on top of the original image. Hope it helps!
xo
s
Staci Torgerson says
I just ordered 2 sets of the lights to incorporate into my girls rooms also. Love the finished room. Wondering if you’d share your rug source for this room and the size you bought. I love these colors and it looks the right size for my family room.
YoungHouseLove says
Thanks Staci! It’s from a local shop called The Decorating Outlet but I’ve seen it on joss & main too!
xo
s
Suze says
I bought these lights and love how small and sparkly they are, but found the tape connecting the lights to the plug got very hot. Did you find that as well?
YoungHouseLove says
Weird! I don’t think ours have tape. Nothing bear the plug gets hot. Maybe that’s packaging stuff that should have been removed? Or they changed the design? Anyone have info for Suze?
xo
s
Brooke says
I just ordered my fairy lights! I am adding this around my daughters crib to liven up her very small room. Thank you for taking all the planning out of this project for me!
Sarah says
I had a quick question about the fairy lights. I ordered the exact same product from Amazon to hang above my boys’ room curtains and I received them today. I noticed on the packaging that it said “Electrostatic sensitive”. Have you had any issues with the lights hanging with the fabric? Also, I noticed that quite a few of the reviews said that near the adapter it got hot. Have you had issues with this?
YoungHouseLove says
Someone else mentioned this and I think the lights they’re selling may have slightly changed. Ours doesn’t get hot at all and didn’t have that warning, so I wonder if this is a new set being sold or something. Sorry I can’t be of more help!
xo
s
Sarah says
Thank you! I will try them out and can always return them! Thank goodness for Amazon!
Nan says
What do you use to hold up the fairy lights? I’m thinking of putting them up under my son’s Ikea Kura (loft bed) and don’t know how to hold them up against the wood frame safely. Beginner…
YoungHouseLove says
The wire itself is really easy to wrap around things, so we just wove it back and forth around the corbels and used small pieces of masking tape to hold them in place (they’re really light).
xo
s