Update: Holy cow, you guys are full of so many fun ideas today! I’m having trouble keeping up with comments since they’re rolling in so furiously, but please know I’m reading them all and loving all the suggestions!
Happy Friday! We’ve been all over the place this week, painting the walls/trim/ceiling in the bathroom & closet, diving into some basket craftiness, de-wallpapering our biggest room yet (the 21′ long kitchen), and now we have a little Clara-room update along with some photoshop percolating as we plot our next move in there. But first, here’s the tiny (and twinkly) addition:

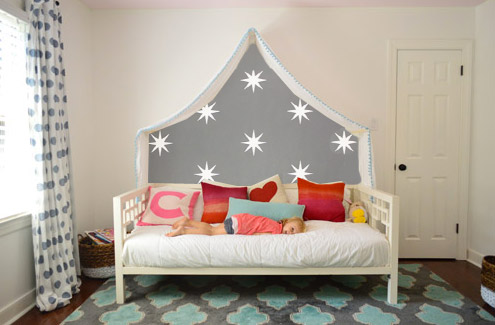
Things just got a little brighter in here…
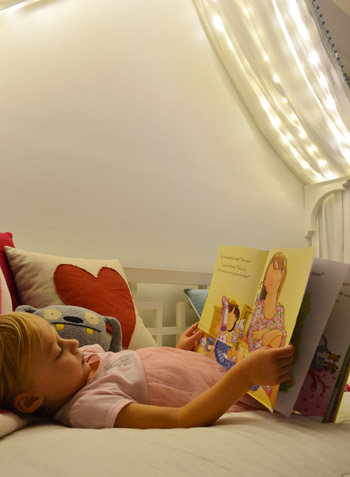
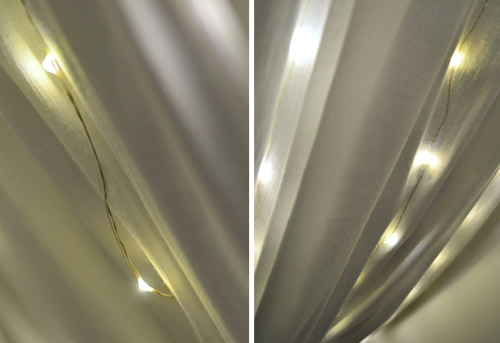
Ever since we hung her canopy, we’ve thought about adding lights to it. Both for the magic of it (Clara loves them) and also for the function of it being a well-lit place for bedtime stories. We feared traditional Christmas lights would be too heavy and make the fabric sag in weird ways (plus, they could look a little messy when they were off) so after some hunting online, we came across what are often dubbed “Fairy Lights.”
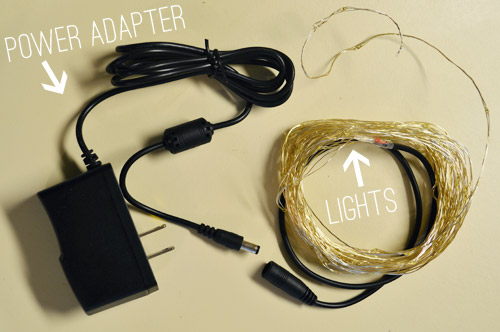
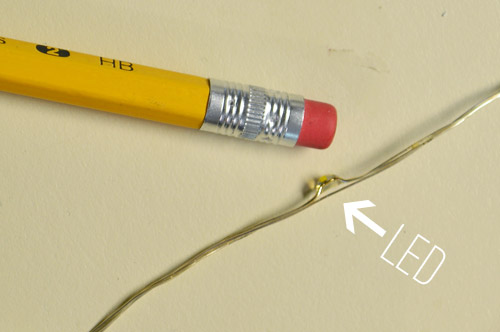
They’re basically small LEDs (check out this picture for scale – they’re tiny) that are strung on a thin wire. The particular set that we bought was 33 feet long and sold for $14 on Amazon. They’re not longer available but here’s an affiliate link for something similar.
The wire itself is extremely light and pretty moldable, so it was easy to weave it back and forth across the 18″ corbels that the fabric rests on. And by some luck of the draw, 33 feet was just about the perfect length to go back and forth four times on each side of the peak to the side brackets and secure them at each turn with white tape, so they’re not something Clara easily unwind and swing around like a lasso – but they will easily release under her weight, so she couldn’t strangle on them.
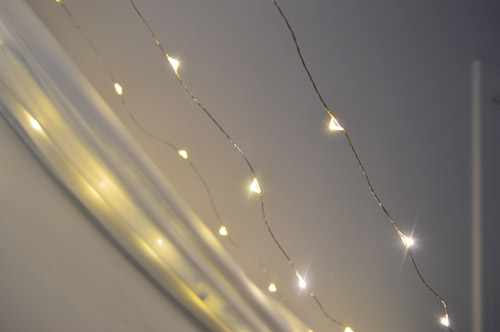
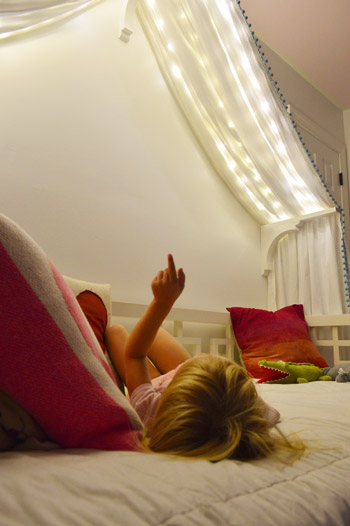
The next step was just draping the canopy back over them. The LEDs are so small that they tuck into the folds and are barely visible when they’re off. And when they’re on, well, you can see how they twinkle below. And since they’re LEDs, they’re completely cool to the touch – so we don’t have any fear of them being against fabric. I also love that they’re small resin-ish glowing dots instead of larger glass bulbs that could shatter.
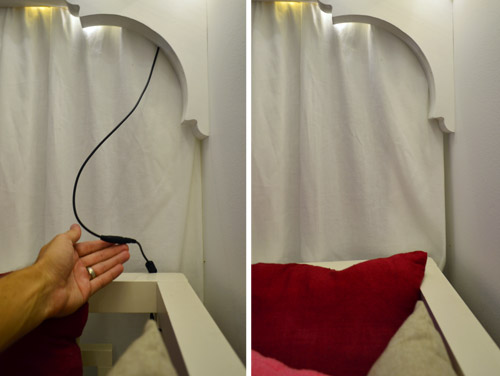
I wish the part that plugs in weren’t big and black, but we were able to plug it in behind the bed and wrap the cord around the bed in a way that it’s able to be hidden behind the canopy most of the time, but easily accessed when it’s time to connect the cords to the power adapter. See how you can see it on the left, but it’s tucked away and invisible on the right? Thank you John, hand model of the ages.
Clara LOVES them. Partly because they’re called “Fairy Lights” but mostly because she feels very special having her own set of secret lights above the bed. We intended just to put them on for story time at night or other special play times, but they actually put off a fair amount of light, so we’ve found ourselves putting them on just about any time we’re in the room and the sun isn’t fully out.
We’ve had them up there for a week or two (didn’t want to sing their praises too soon only to have them burn out or something weird) and so far they have been awesome for our gentle girl. She hasn’t touched them once, but loves gazing up at them. Meanwhile, my best friend’s four year old daughter is nothing short of an acrobat, so we laughed about how she’d probably scale the canopy and hang from the fabric like she was Pink in concert.
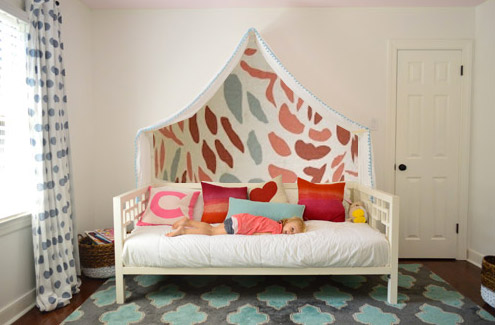
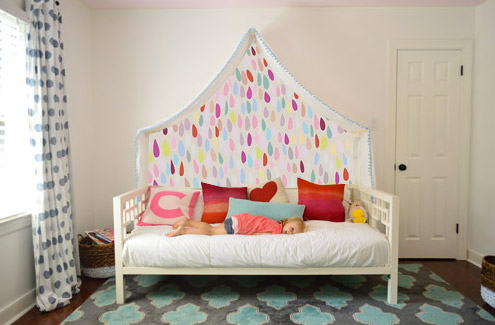
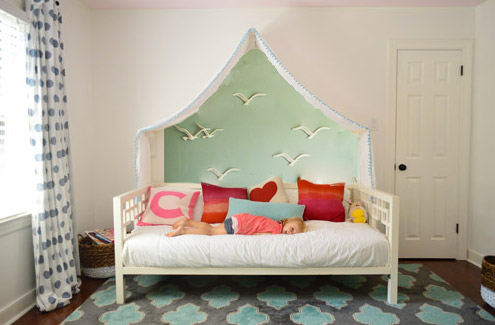
But even with the addition of the lights, the canopy is still definitely missing something above it. There’s still so much white on white on white that we’ve been brainstorming which way we want to go. We’ve debated painting just that peaked area under the canopy for a while and then adding something else in there (like a hanging paper lantern or mobile or even a cute little animal head or something). So here are a few ideas, thanks to our good friend Photoshop.
Idea #1: A gray tone on the walls to add drama and a little dreaminess to the canopy, inspired by this wallpaper by Osborne And Little.
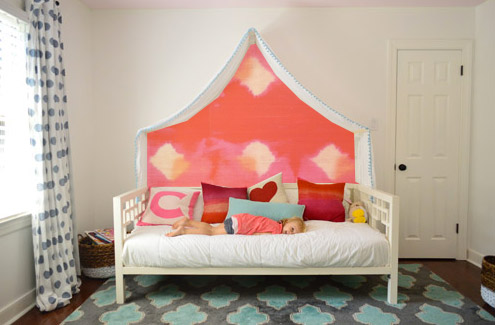
Idea #2: Maybe I could freehand some sort of imperfect painterly-ish mural, inspired by this awesome fabric covered lamp shade?
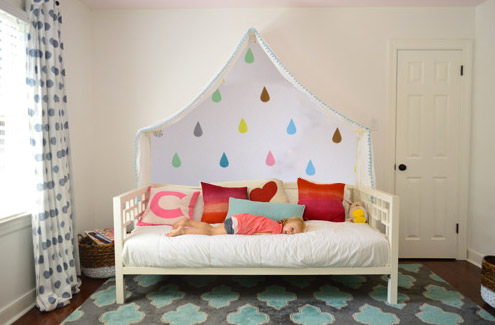
Idea #3: Another hand painted mural possibility could be something like this cluster of colorful raindrops in a variety of colors (inspired by this amazing but sadly sold out print).
Idea #4: Then I saw this picture of a pretty blue-green wall with little birds on it and thought that could be fun.
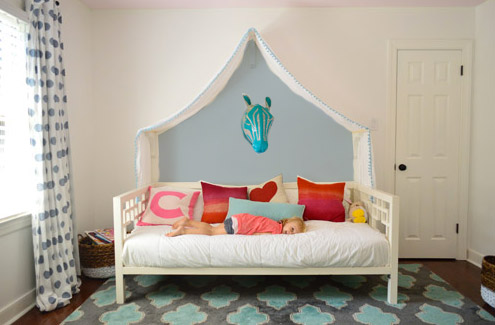
Idea #5: Since Clara’s quite the animal lover, we thought maybe a friendly giraffe or zebra (like this one from Dwell Studio) peering down at her while she sleeps could be fun with a blue-gray wall.
Idea #6: These little teardrops in a few different colors had my mind spinning with possibilities too.
Idea #7: Then I thought about a colorful fabric hung along that back wall, perhaps something with the same large-scale boldness of this pink and red wall coverings that Jenny shared here.
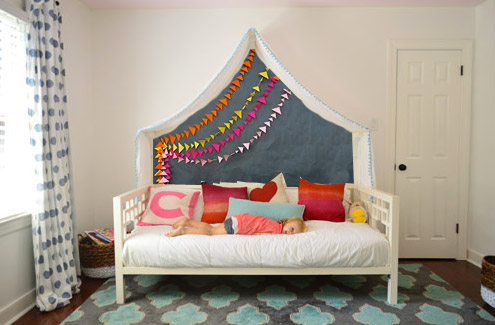
Idea #8: And then there was the possibility of even darker charcoal paint on the walls and some asymmetrical handmade banners in a few colors like these (which were actually a super cool photo background for this party). Update: since this one looks chalkboard-ish there have been a lot of suggestions to do that so Clara can doodle away, but we worry that chalk dust over her bed might not be the best call (there are chalk markers but they’re not as charming, so we’ll have to see where we end up).
What do you guys think? Any favorites? Or combos? I think we’re leaning towards the gray background tone in Idea #1 or the dark charcoal color in Idea #8, but we’re not sure if we’ll stencil stars or something else – and we might just combine it with something 3D (like a little felt circle bunting or a hanging paper lantern or something). We’d love for Clara to weigh in on things too, and then I’m hoping to work on it this weekend (along with stenciling the bathroom floor and helping John finish that sunroom tile). What are you guys up to this weekend?
Update: Clara weighed in on these photoshopped pics as well as some more that we made based on people’s suggestions and then we made one last photoshopped picture for her, since she wanted to combine a few ideas (we even video-taped her reaction, which was pretty funny). Can’t wait to get it done and share what she liked best!

Hilary says
I think the zebra head would be awesome!
Lauren says
How about magnet paint? (the kind that allows magnets to stick too the wall). As far as I know, it can be used under normal paint, so you could either paint a nice colour over it or, if the curtain shifts around to much, paint the whole wall the same colour bur have the (invisible) magnet paint underneath over the bed.
Then, you could change the decor around as you like- making magnets is super easy, after all: just glue magnets to the back of whatever (light) thing you want to use. Or you could cut out things from paper/ wallpaper leftovers/ felt etc.
You could have seasonal decor (Christmas, flowers and butterflies for spring, halloween decor, summery buntings) or something to go with whatever Clara is most interested in (animals? ballarinas? cars? dragons and worms!)
It would give you a lot of flexibility and allow her to get involved in making/ chosing magnets.
Zoe says
Why not ask Clara what she’d like above her bed?
YoungHouseLove says
Check out the last paragraph (we’re asking her this weekend when we can dive in and get to it). Just didn’t want to ask her too far in advance because waiting a few days is like years to a three year old! Haha!
xo
s
Kara says
This would be an awesome time for voting!
Samantha says
I absolutely LOVE the lights! So pretty and such a magical feel to them! Love all the options, but 3 and 8 are my favorite. I love the buntings in number 8. :)
Lu says
I’m sure this has already been mentioned, and it is also just a hassle but what if you switched the fabric the canopy was made out of for something darker and put it on the wall behind? (maybe that would make it too dark? i’m not sure. as a kid i loved anything that felt like a cave or my safe special tent but in this room the white light does look lovely!)
Kristen says
Curious – would you be painting the corbels as well? Just realized you photoshopped over them in the pictures!
Kristen says
Also – I’m totally feeling the birds! I was originally leaning toward the stars, but I love the birds!
YoungHouseLove says
I actually don’t think we will but I’m not sure! I was just a lazy photoshopper, haha! I think we’ll try without them and if they stick out and look weird we can slap some paint on them too!
xo
s
Sherri says
I love the twinkle lights. I can always think of a reason or a season to use sparkly lights. I like #1. I think chalk paint is dull and unsparkly, the opposite of what this is about. What a fun idea! I love seeing little projects like this. They make our homes full of happy spots!
Leah says
i love the idea of a different backdrop but think paint may look a little odd, especially if the fabric slips and you can see it above the canopy. What about hanging a bolder fabric from the center and draping it out to the sides, kinda like a curtain… it would make the whole thing sort of like a stage, while adding color, interest, etc. all with the ease and versatility of fabric. And i think it will make for cleaner lines where the two fabrics meet (pin/sew if needed). You could even do a “design your own fabric” like you’ve used in the past! Have her draw the stars or raindrops… :)
YoungHouseLove says
That’s definitely something many others have mentioned too! A definitely alternative possibility! Thanks again for all of the ideas guys.
xo
s
Ashley says
Love #8!!!
Jessica Diamond says
The print for “Idea #3” is back in stock. Just thought I’d let you know if you haven’t already figured it out. :)
YoungHouseLove says
Thanks Jessica!
xo
s
Sarah says
We had small lights in a room with white walls and when we painted the wall darker – the magic kind of disappeared. It was so much less vast. We ended up going back to a softer white. If you do go darker, you might want to experiment with light reflecting wall art (small mirrors or glittery things!) so the light can bounce around again.
YoungHouseLove says
So good to know! Thanks for the tip Sarah!
xo
s
Megan says
I LOVE this!!!I think #4 is my favorite, it seems like it goes with her room and your home! ( like how I act like I know you! haha) I’ve been having internal drama with myself about how to decorate the walls in our family room. And have asked myself what you would do soooo many times! So I’ve decided I need to hire yoU!! haha which is so against my religion because i’m a home decorating freak and HATE people hiring designers!! haha but i’m drowining in ideas and can’t pin one down!! HELP!! how do you weed through amazing good ideas and pick one??
YoungHouseLove says
Haha, you’re so sweet Megan! I think we just like to think until we’re sure, so if we ask Clara this weekend and she loves something and we come up with a plan to execute it we’ll dive right in. But if we show her everything and she didn’t like anything or came up with another idea we’d pause, think about how we could do that, and sort of regroup if that makes sense! So just take your time and only tackle things you’re sure about while letting other things percolate and oddly enough the solution to those other spaces seems to “float to the top” over time.
xo
s
Kim says
I like #8 as is, but am also thinking of almost any of the “painted” options but using fabric under there instead. You can find a fabric you like, that has the same colors and patterns as #s 1, 2, 3, 6 or 7, and cut it to fit under the existing canopy and mount it there (like wallpaper, but no glue). The idea of fabric is so much less committal than painting an area there. Now I know you guys aren’t afraid of paint, but I’m thinking more of the utility/longevity of the project (and you’ll have baby #2 by the time this would occur)…and how Clara might outgrow/develop different tastes for her room. If you paint the area under the canopy, you won’t be able to just rearrange Clara’s room whenever you feel like it (without priming b/c of dark color if you go with that, and re-painting part of that wall).
Deborah Nowland says
I really like the one with birds, maybe with the paint being a little more bluish to blend with the rug?
Judy says
Might have been said somewhere in comments, but how about a blue or blue-grey closer to #1 that compliments or matches the rug, with a moon (yellow or white) and stars painted in dark blue, and painted over with glow in the dark paint. Anything you choose will be beautiful regardless!
Judy says
or better yet, a Sun in yellow on one side with birds in dark blue or black, and then a moon painted in glow-in the dark on the other side and stars that you can’t see until the lights are out . ..
YoungHouseLove says
Sounds charming! Love all the ideas everyone! Thank you all for sharing!
xo
s
Lucy says
What about a wall decal of some sort? Easy to remove/update with a new one if she’s ever in the mood for something different: http://www.whatisblik.com/shop/explore?kids=195
Jessica says
Irrally like most of the options, especially 1 and 6 and I say paint the whole wall! I love the fairy lights so much and am now brainstorming how to incorporate into a little boys room who loves all things twinkly!
Meghan says
Definitely #1 – the stars and grey continue the calming, soft, resting feeling of the room.
MG says
I like the canopy but am not crazy about any of the options in the middle of it. I, personally, think it should be super calming and peaceful since it’s over her bed. Cool idea though!
Heidi says
Without knowing what others have suggested, too tired from jackhammering for a french drain at my place, I would go with a variation of option no. 1 with the stars, I really like it. Yet if you ever move the bed you’d have another painting job to do. plus or minus, your choice. I would reverse the colors and paint the stars grey or perhaps even a blue to match the pomp pomps trim on the canopy and leave the wall as is. Keep on trucking!
Laura says
Keep the background simple and hang a mobile! You can check out a couple of the ones I make over here: https://www.etsy.com/listing/166216346/custom-childrens-reptile-mobile-for-girl?ref=shop_home_active
It’s not mentioned in the listing, but I could customize the height and width so that it would fit perfectly under the canopy.
Rachel says
Hi, this is just my two cents, but we made this crazy awesome shape in middle school geometry class (a loooong time ago) out of straws and ribbon that might be a fun project and something neat to hang up there? If you make it with full-sized straws, it would be too big, but maybe if you cut the straws in thirds or fourths, it would be a nice scale. Anyway, the straws make the ribbon visible, so you could do pink or blue.
This is what the shape looks like: (it reminds me of your Moravian Star light)
https://www.google.com/search?q=stellated+dodecahedron&client=firefox-a&hs=m9w&rls=org.mozilla:en-US:official&source=lnms&tbm=isch&sa=X&ei=6ZNhUq7tLZTa8ATLzYDwBA&ved=0CAcQ_AUoAQ&biw=1787&bih=860&dpr=0.9#facrc=_&imgdii=_&imgrc=KJeNh1fK2TQq7M%3A%3B62SzLFcFr76h8M%3Bhttp%253A%252F%252Fwww.polyomino.org.uk%252Fmathematics%252Fcard-polyhedra%252Fsmall-stellated-dodecahedron.jpeg%3Bhttp%253A%252F%252Fwww.polyomino.org.uk%252Fmathematics%252Fcard-polyhedra%252F%3B990%3B874
and this is what it look like when it’s made out of straws (warning: kind of hard to see):
http://brutswife.tripod.com/page3.htm
YoungHouseLove says
That looks awesome Rachel! Thanks again to everyone for sharing links and tips and ideas today! Holy cow, over 700 of them!
xo
s
Vanessa says
Have you guys thought about switching the crib and bed (since the bun will be taking it in a little while) so you can make the wall an accent wall without a door unbalancing it? Seems like it would allow you to consider some of these other fantastic ideas. Can’t wait to see what you come up with!
YoungHouseLove says
The only wall the daybed works on is the wall it’s on (it’s very deep and boxy, so you’d walk into it right as you enter the room if it was on the wall where the crib is (that’s much smaller, so that’s why it works over there). So hard to see in pics!
xo
s
Danielle says
I love #3, it goes well with all the pillows on her bed. #4 is awesome too, but I think it would be better a different color than the greenish mint color. and my favorite one is def #8! Love the dark grey and the idea of having the banners.
lulu says
If you really need animal heads in there (and you might), how about little animal head finials at the ends of the beams holding back the curtains? Maybe something like these but bigger:
http://www.anthropologie.com/anthro/product/search/28287753.jsp?cm_vc=SEARCH_RESULTS
lulu says
or these: http://www.rockettstgeorge.co.uk/zoo-dear-animals-coat-hooks–knobs—white-rabbit-4983-p.asp
YoungHouseLove says
That’s fun too!
xo
s
Mindy says
I think you should totally do a pinwheel wall under the canopy like the one on “View Along the Way.” http://www.viewalongtheway.com/2012/04/pinwheel-art-tutorial/
YoungHouseLove says
THAT’S SO CHARMING! I love it! Bet Clara would too!
xo
s
Rachel says
SO awesome! I change my vote!! (PS I’m having major jealousy that I didn’t have such a cool light-up canopy when I was little) It looks so whimsical and not cheesy at all like I would have predicted if you’d said “We’re adding lights to the canopy!” I guess this is why you don’t run all of your decisions by your readers before you implement them :)
Reva says
I so love the lights! I love the idea of fabric in that area, including the fabric you have pictured. If you pick some nice texturey fabric, like velvet or even something fluffy (like a faux sheepskin), it will look so lovely under the lights. and it might be nice for her to snuggle up against. :)
Kierstin says
Option #1.
It pulls in the grey from the carpet, and mimics a dark, starry sky, without being too dark. Also neutral enough to allow your colors to pop, like your pillows.
Karen says
Osborne And Little!
Bobbie says
I’m loving the 1st option! It hits the spot for me.
:)
this is where I wanted this comment…not on the next post. lol
Kerrie says
I wonder how hard its going to be to paint the wall within the fabric without there being a problem with the paint line either being visible or above the fabric as it moves around. What about the stars or tear drops painted randomly (or using stick ons) with the existing wall colour? I am not a big fan of the animal head decorating idea – it is huge in the US tho, however I am a huge fan of chinese lanterns or similar instead :). Thanks for letting us all put our 2 cents in
YoungHouseLove says
Of course! We love hearing everyone’s ideas! This post has been so much fun!
xo
s
Amanda says
Wow, beautiful home! Looks like my dreamhouse…
JenWoodhouse.com says
Idea #4 has my vote. I also like the idea someone threw out there about the raindrops being outside of the canopy and inside it’s “dry”… cute! Whatever you guys decide, I’m sure it’ll be sweet and charming and Clara will love it! What a magical place to hang out!
Shareen says
I love option #1. It looks like you’re inside the tent and have opened up the flaps to see the beautiful sky. Perhaps you could use a similar technique to what you did in Clara’s closet in house #2 so the stars look subtle until the fairy lights are on and make them really glow.
Kathryn says
Ooh, I love option number 8! So pretty
Rachelle says
I love option #1 or 8! I think the darker colors are a great contrast for all the light whites in the room. Plus I feel it promotes sleep.
Sarah says
Hi Sherry! (and John)
My favorite would definitely be either the last one or the animal head. Since she loves pink, she could pick out her favorite animal and then you can paint it pink! I think that that would be super cute (:
Sarah
danielle says
what about magnetic paint? that would still be interactive and give an easily-changeable vibe without the chalk dust?
Julianne says
Love the idea of the night sky with stars. Very sweet idea for a special girl. Clara is one lucky princess! :0)
Leah says
Idea 3 or 8 would look super cute in her room!
Brittany says
#1,4 AND MY FAV #8 ;-)
Kay says
I scrolled through one page of comments to see if my suggestion has already been suggested and didn’t see but lost heart at continuing to scroll for 11 more pages of comments :D
Sooo, suggestion: what about painting the whole wall (I love the grey color) and then either stenciling or free-hand painting a quote from Clara’s favorite bedtime book or a poem or a song lyric under the canopy? I love Shel Silverstein’s “Listen to the Mustn’ts” and “If you are a dreamer.”
YoungHouseLove says
Oh yes, there are lots of whole wall suggestions! We’re not sure if it might look imbalanced (there’s a door on one side and this isn’t the back wall of the room like most accent walls, it’s a side wall) but we’ll have to see where we end up! Also… Shel Silverstein = the best.
xo
s
Tonya says
I am thinking some 3D white butterflies.
Love your work!
Natalie says
The first one for sure!! Please do it.
willow says
i don’t know if you guys ever read the blog abeautifulmess.com, but a few days ago they stamped a wall in their kitchen with diy fruit shaped cardboard stamps and it’s just about the most adorable thing I’ve ever seen. maybe something like this for Clara’s wall:
http://www.abeautifulmess.com/2013/10/hand-stamped-clementine-wall-1.html
??
YoungHouseLove says
Yeah, that turned out so awesome! I’m a massive fan!
xo
s
Michelle says
When you said you wanted to do something inside the canopy this image immediately popped into my head: http://www.pinterest.com/pin/204421270555601471/. The colorful creatures are cute, but the idea is easy to customize with your own art or even removable wall decals that you could change out whenever she outgrows them. Can’t wait to see where you go with it!
YoungHouseLove says
I’ve LOVED That forever! Had it pinned for years. Does anyone know where that wallpaper is from? I also thought it could be fun for the back wall of her closet since it’s so big in there it’s sort of a little playhouse within a room.
xo
s
Julia says
Forgive me if this has already been mentioned, but I kinda love the Zebra head idea, if perhaps you made a few changes. I’m kind of digging the ceramic zebra head idea — but only if it weren’t a zebra, you could totally go a bunch of directions with it. And for a toddler, ceramic is probably not the best choice. So, maybe let her pick out a giant stuffed animal — Unicorn? Moose? Dolphin? — and then “taxidermy” the head using the stuffing from the animal and upholstery tacks onto a board in a shape of your choosing (maybe one of those traditional English mounting boards used for awards, trophies, and animal heads? Painted in a fun color?). That way as a toddler, if she’s somehow jumping on her bed, no problem, stuffed animal head is no harm, and if she still loves it when she’s older and having sleepovers, no one will accidentally hit their head on it — although head bumping could be funny. Unicorn fist bump?
YoungHouseLove says
I thought that was paper mache! We definitely wouldn’t put a big ceramic head up there! Hah! I also love those stuffed ones too (I saw a cute bear). We’ll have to see which idea Clara likes the most and then hunt down whatever we need.
xo
s
Koliti says
Remember that remote light switch thingy you had in your last master bedroom that you mounted to the bed so John’s arm could take a break? Would you be able to utilize that with the fairy lights?
Hey, how about a dark grey panel of felt for that wall area under the tent? Then you and Clara can decorate felt shapes that can be “stuck” on the felt wall and change out the design whenever you want.
But it is official…if Clara’s not sleeping in her “big girl” bed by now, then I’m calling dibs :) Seriously, I’m buying my plane ticket now!
YoungHouseLove says
Haha, come on down! And I love all the ideas everyone! You came up with a million things I’d never think of myself!
xo
s
Pre says
When I was little (4 years old) the librarian at the local library had a felt board and she used it for story time! She cut out shapes of different characters (like little red riding hood, 3 little pigs, etc) and would put them on the board and move them around as she told the stories. It was awesome. Even if the felt wasn’t used behind the bed, a felt story board would be so fun for Clara’s room – even for felt dolls (like paper dolls but felt) – can dress them up!
YoungHouseLove says
That could be fun for her closet or somewhere else in her room if we don’t use it above the bed for sure!
xo
s