Update: Holy cow, you guys are full of so many fun ideas today! I’m having trouble keeping up with comments since they’re rolling in so furiously, but please know I’m reading them all and loving all the suggestions!
Happy Friday! We’ve been all over the place this week, painting the walls/trim/ceiling in the bathroom & closet, diving into some basket craftiness, de-wallpapering our biggest room yet (the 21′ long kitchen), and now we have a little Clara-room update along with some photoshop percolating as we plot our next move in there. But first, here’s the tiny (and twinkly) addition:

Things just got a little brighter in here…
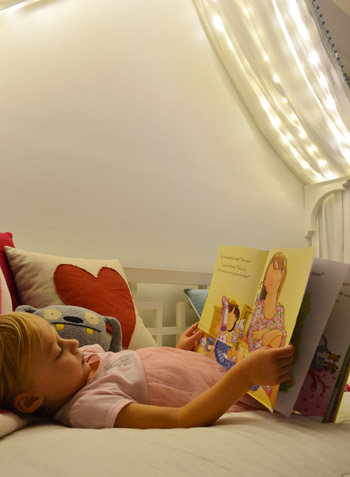
Ever since we hung her canopy, we’ve thought about adding lights to it. Both for the magic of it (Clara loves them) and also for the function of it being a well-lit place for bedtime stories. We feared traditional Christmas lights would be too heavy and make the fabric sag in weird ways (plus, they could look a little messy when they were off) so after some hunting online, we came across what are often dubbed “Fairy Lights.”
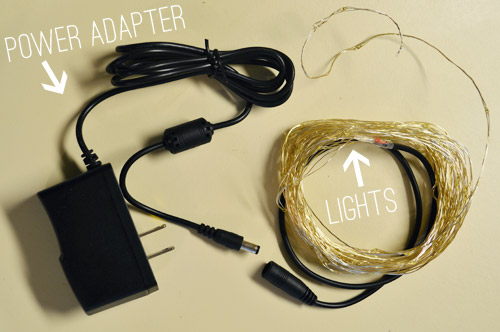
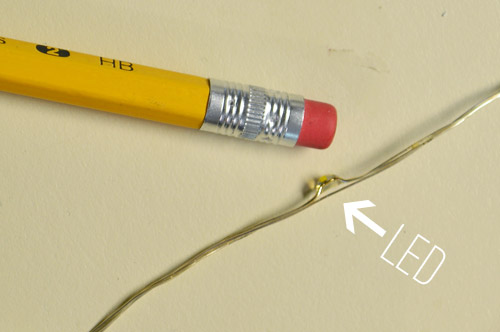
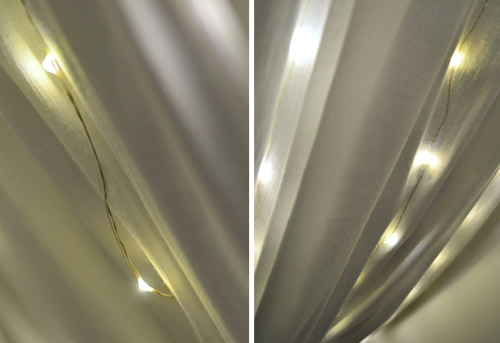
They’re basically small LEDs (check out this picture for scale – they’re tiny) that are strung on a thin wire. The particular set that we bought was 33 feet long and sold for $14 on Amazon. They’re not longer available but here’s an affiliate link for something similar.
The wire itself is extremely light and pretty moldable, so it was easy to weave it back and forth across the 18″ corbels that the fabric rests on. And by some luck of the draw, 33 feet was just about the perfect length to go back and forth four times on each side of the peak to the side brackets and secure them at each turn with white tape, so they’re not something Clara easily unwind and swing around like a lasso – but they will easily release under her weight, so she couldn’t strangle on them.
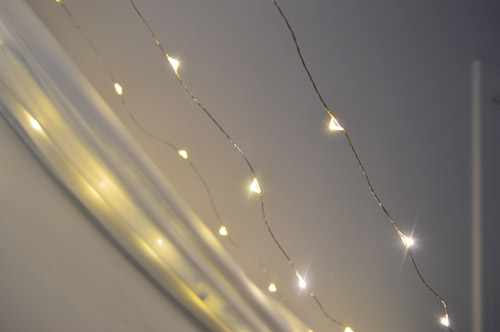
The next step was just draping the canopy back over them. The LEDs are so small that they tuck into the folds and are barely visible when they’re off. And when they’re on, well, you can see how they twinkle below. And since they’re LEDs, they’re completely cool to the touch – so we don’t have any fear of them being against fabric. I also love that they’re small resin-ish glowing dots instead of larger glass bulbs that could shatter.
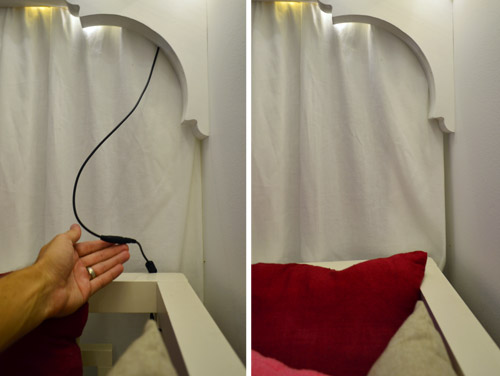
I wish the part that plugs in weren’t big and black, but we were able to plug it in behind the bed and wrap the cord around the bed in a way that it’s able to be hidden behind the canopy most of the time, but easily accessed when it’s time to connect the cords to the power adapter. See how you can see it on the left, but it’s tucked away and invisible on the right? Thank you John, hand model of the ages.
Clara LOVES them. Partly because they’re called “Fairy Lights” but mostly because she feels very special having her own set of secret lights above the bed. We intended just to put them on for story time at night or other special play times, but they actually put off a fair amount of light, so we’ve found ourselves putting them on just about any time we’re in the room and the sun isn’t fully out.
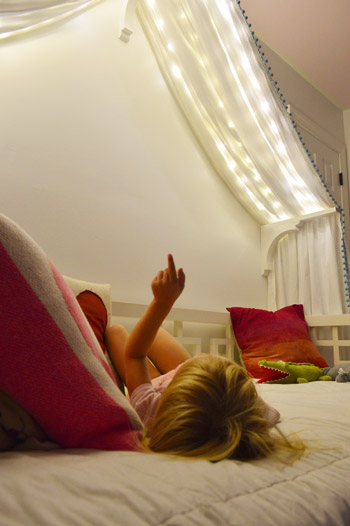
We’ve had them up there for a week or two (didn’t want to sing their praises too soon only to have them burn out or something weird) and so far they have been awesome for our gentle girl. She hasn’t touched them once, but loves gazing up at them. Meanwhile, my best friend’s four year old daughter is nothing short of an acrobat, so we laughed about how she’d probably scale the canopy and hang from the fabric like she was Pink in concert.
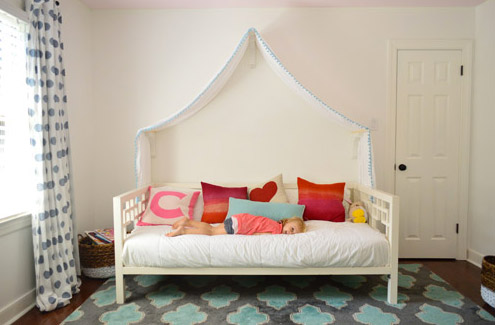
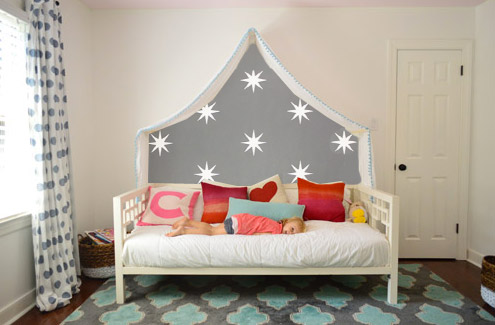
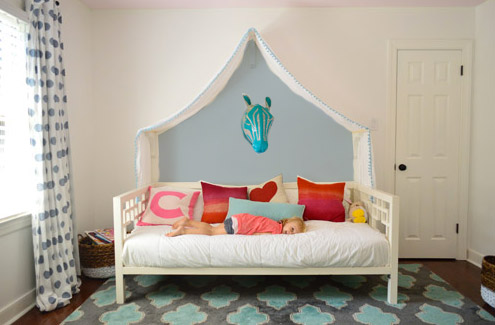
But even with the addition of the lights, the canopy is still definitely missing something above it. There’s still so much white on white on white that we’ve been brainstorming which way we want to go. We’ve debated painting just that peaked area under the canopy for a while and then adding something else in there (like a hanging paper lantern or mobile or even a cute little animal head or something). So here are a few ideas, thanks to our good friend Photoshop.
Idea #1: A gray tone on the walls to add drama and a little dreaminess to the canopy, inspired by this wallpaper by Osborne And Little.
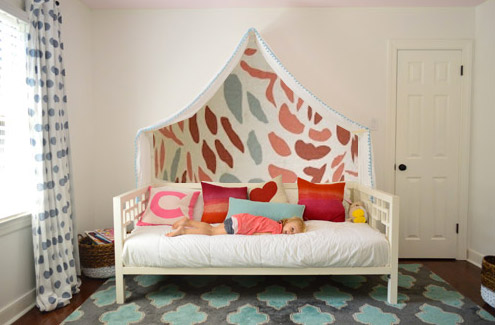
Idea #2: Maybe I could freehand some sort of imperfect painterly-ish mural, inspired by this awesome fabric covered lamp shade?
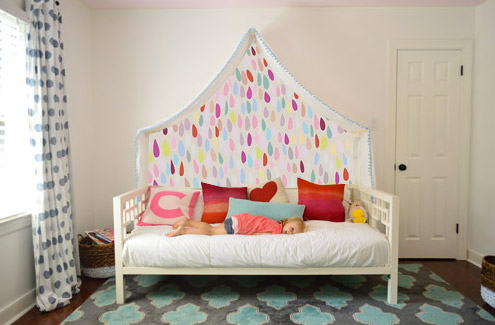
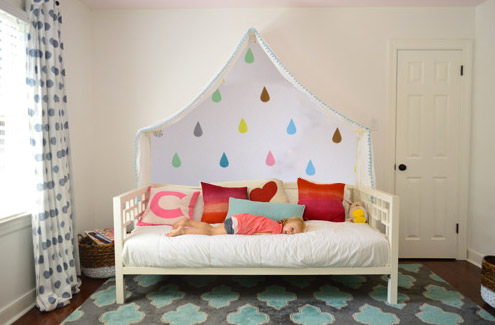
Idea #3: Another hand painted mural possibility could be something like this cluster of colorful raindrops in a variety of colors (inspired by this amazing but sadly sold out print).
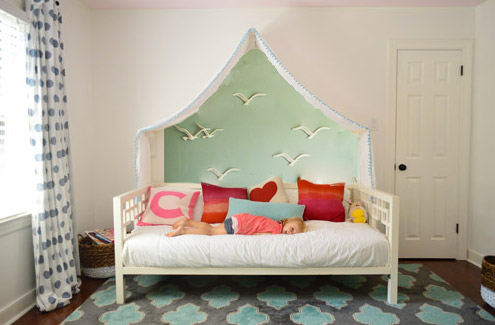
Idea #4: Then I saw this picture of a pretty blue-green wall with little birds on it and thought that could be fun.
Idea #5: Since Clara’s quite the animal lover, we thought maybe a friendly giraffe or zebra (like this one from Dwell Studio) peering down at her while she sleeps could be fun with a blue-gray wall.
Idea #6: These little teardrops in a few different colors had my mind spinning with possibilities too.
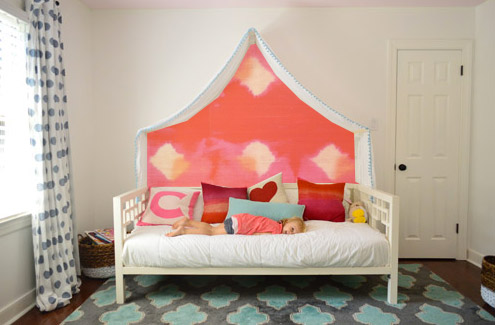
Idea #7: Then I thought about a colorful fabric hung along that back wall, perhaps something with the same large-scale boldness of this pink and red wall coverings that Jenny shared here.
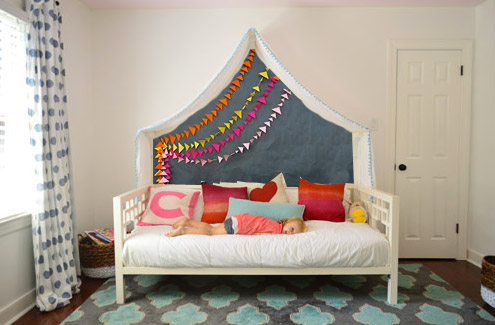
Idea #8: And then there was the possibility of even darker charcoal paint on the walls and some asymmetrical handmade banners in a few colors like these (which were actually a super cool photo background for this party). Update: since this one looks chalkboard-ish there have been a lot of suggestions to do that so Clara can doodle away, but we worry that chalk dust over her bed might not be the best call (there are chalk markers but they’re not as charming, so we’ll have to see where we end up).
What do you guys think? Any favorites? Or combos? I think we’re leaning towards the gray background tone in Idea #1 or the dark charcoal color in Idea #8, but we’re not sure if we’ll stencil stars or something else – and we might just combine it with something 3D (like a little felt circle bunting or a hanging paper lantern or something). We’d love for Clara to weigh in on things too, and then I’m hoping to work on it this weekend (along with stenciling the bathroom floor and helping John finish that sunroom tile). What are you guys up to this weekend?
Update: Clara weighed in on these photoshopped pics as well as some more that we made based on people’s suggestions and then we made one last photoshopped picture for her, since she wanted to combine a few ideas (we even video-taped her reaction, which was pretty funny). Can’t wait to get it done and share what she liked best!

Katy says
The birds all the way. I actually have some of those birds. You can buy them real cheap on Ebay, do a search for “Syroco”.
PS. Gonna copy this idea as well. I have daughter, and she has a West Elm daybed…it is our destiny.
Amanda says
I’m a big fan of #4 and #8.
4 is so whimsical and calming.
Betsy Gilberti says
Wow…so wonderful.
Option 1!!! It’s beautiful. So complementary to the curtains. I might tone it down one notch maybe, hmm.
I think hanging animals, heads or ?, for little ones are ominous. I think they belong lower than the us when we are small, so we have the advantage and so they cannot come off the wall in the night.
But I think #”s 3 & 6, compete with the shape on the curtain and take away from it’s loveliness.
I would love to see a very unique pillow on the daybed.
Also, that sweet mobile you made for Clara over her changing table would probably look pretty with the colors of the pillows and the “fairness” (word?) of the area…maybe outside it in the corner? May not go with the star shapes, but…somewhere, if you still have it?
Jodee says
I like #8 the best.
Andrea says
The girls over at A Beautiful Mess did fabric-lined built-ins that turned out super cute and would be easy to switch as Clara’s style changes. It might be worth looking into…
http://www.abeautifulmess.com/2013/09/try-this-fabric-lined-built-in-shelves.html
YoungHouseLove says
Oh yeah I love that project!
xo
s
Dana@chocolateandsunshine says
I’m with you on #1 or #8 — really enjoy the colorful banners. Please, not the animal sticking his head out! May be a little scary in the middle of the night.
The lights are an adorable idea. It’s so much fun to decorate a little girl’s room. Mine is 12 so just want you to know I’ve done her room 4 times already — their tastes are changing and of course she knows I love to decorate. Enjoy the moments!
Karen says
It’s been a long time since I commented, but I still read everyday… hoping to find some of the passion and inspiration that first drew me to YHL and made me like you so much. It seems to me that those days are gone.
This room makes me particularly sad. It’s filled with leftovers from house 2. It doesn’t reflect what I know to be Clara’s personality at all. It should be bright, imaginative, whimsical…. and it just feels sparse. That canopy in particular. It should be hung from the ceiling… full and billowy so that it encompasses the bed to create a magical secret place for Clara. As it is… it looks like a scarf draped over brackets. Painting behind it is only going to accent how meager it is.
I think back to how pretty her original nursery was… when you guys weren’t stuck in a cheap gray rut… and I wonder what happened.
Really… I’m not trying to snark and I don’t need to hear a bunch of comments from the indignant fan girls. I’m just genuinely sad and disappointed with this space.
YoungHouseLove says
No worries Karen, I don’t think you’re trying to snark and I don’t need anyone else to chime in on this at all! Everyone has different tastes in kids rooms, so you liked her 1st nursery best, and some other readers have said her 2nd was their favorite while others have said this one’s their favorite today! Our ultimate goal is just to make it a room that Clara loves, and we’re so grateful that she’s so happy with it (the whole thing would get retooled immediately if she weren’t). You should hear her talk about her “magic canopy”, her “dotty curtains”, her “dollhouse closet playhouse”, and her “ocean rug.” The room is literally full of fun Clara-ish things to us (the pink ceiling, the red backs of her chairs, the canopy, the closet reading nook, the bright pillows, the pouf she jumps off of everyday) and we can’t wait to see what she likes best for the canopy! I can see how it might be hard to get her full personality from the small snippets that we share, so maybe that’s why you don’t think it’s her, but perhaps once it comes together more (there are stark blank walls everywhere and a crib that will be moving out soon to make way for more play areas) maybe you’ll see where we’re going a little better. And maybe you won’t, but that’s ok too!
xo,
s
karen says
oh me lordy…they just moved in!
melinda says
Love it! Your blog is always a bright spot in my day– today it is literally a bright, twinkly spot! The charcoal ones are my favs, can’t wait to see what you/Clara choose. It’ll be the perfect choice for sure, she’s got opinions & a flair for decorating already!
Ellen says
OOH, fun. I like numero uno! Or what about a blue wall with clouds like the canopy holds a window to another world??
Have a good weekend! xo
YoungHouseLove says
That’s fun too! Love all the ideas guys!
xo
s
Jessica A says
#1 and #3 are my faves! :) I like the idea of painting that one wall & the door a solid color as well to really make the canopy pop.
Gabbi @ Retro Ranch Reno says
I adore the addition of those lights! I want some in my room! ;) And my favorite options are the first and last mock-ups! :)
Soffia says
I love it! I did something similar to my daughters bed and even though she´s 7 now she still loves it.
http://www.skreytumhus.is/wp-content/uploads/2013/05/2013-02-10-205912.jpg
YoungHouseLove says
So sweet!
xo
s
Anna says
#8 with origami cranes… It would be super cute.
Dina says
All of the options are cute!
Functionally, I’d go with a temporary fabric appllication. Starched fabric can be put up and torn down with only some soap and water clean up later.
Sarah J. says
if your not set on painting within the canopy, might i suggest the colorful rain drops outside of the canopy? i think that would be super cute and charming, almost like the canopy is keeping her dry. and i would probably add a few dashed lines to those falling drops with one or two looking like they bounced off the fabric and off to the side a little. just a thought. i have 2 ruff and tumble boys, so all this girli-ness is fun for me to read about. :)
Cassandra says
Knowing that you’re having another baby I’d be ready to take the whole canopy down. While Clara is loving it, #2 will likely tear it down when (s)he is old enough. Just my two cents (I also have 2 kiddos!).
Jenne says
I love the raindrops – what about reversing it, so the raindrops are outside the canopy, so it looks the canopy is protecting Miss Clara from the rain when she is under it?
I personally would add color outside the canopy, and let the space inside the canopy be the visual resting place.
Apologies if this was already suggested! :)
YoungHouseLove says
Love all the ideas guys! Thanks so much for sharing, we’re reading every one and can’t wait to see what Clara likes best!
xo
s
Sarah Jane says
Hands down, no doubt, number 4. Love the lightness of the color and how it feels like you are being transported to a light, dreamy, beautiful summer’s day.
Bonnie says
I think I would put the raindrops on the outside of the canopy and leave the inside white… like the canopy is keeping the rain out.
Love the lights!
Bell says
Oh i love the idea with the birds :) when i was a little girl my grampa painted my room blue and handpainted white clouds all through the room and hund little paperbirds in some places. I LOVED that room :)
Jess says
What about doing something with magnet paint (under whatever color you end up with)? I’m just remembering your magnetic wall flowers in your first house and I think it would be fun for Clara to play with magnets above her bed.
Jo @ To a Pretty Life says
You could do something similar to her pink, potato-stamped closet. I did my half-bathroom with potato-stamped silver star-bursts after seeing that closet.
Becca says
I LOVE the raindrops! So cute!
Alyssa says
Here’s a different idea…instead of having that stark white wall and the color only under the canopy, what if you painted the wall or all walls (minus the area under the canopy) one shade, say of a lighter grey, and the area under the canopy one shade darker. Or visa versa? (The wall dark and under the canopy one shade lighter). Then add the stars like in option 1. Or different size embroidery hoops filled with cute fabric or a grouping of starfish (I just saw that idea on Pinterest). That way Clara has her animal love, but it doesn’t stick out too far from the wall…either way I know whatever you choose will look amazing:)
HeatherM says
I totally understand the aversion to chalk dust in the bed. If you are open to fabric, then what do you think about sticky felt? Then Clara could still play with and reposition felt letters/ animals/ bunting/ etc. or what about painting the wall with colored magnetic paint. You could use magnetic clips to hang up her preschool artwork there too. Again it gives Clara the freedom to play, and it could grow with her a bit more too. Also, the whole thing just reminds me of a castle and I feel like it needs flags on the points (and at least one flag should have a “C” on it of course).
YoungHouseLove says
A few others had that idea too! Definitely sounds fun! Will see what Clara thinks!
xo
s
Lizzy says
I agree with others that the animal head is a little dangerous there… sitting up in bed, laying down… just lots of opportunities to whack your head on it.
What about letting Clara paint it (with guidance)?
YoungHouseLove says
Another fun idea for sure! She does love to paint…
xo
s
Nicole says
I like the background of #5 but maybe instead of the zebra head add something to do with fairies like a picture (e.g. http://www.etsy.com/listing/24408693/11×14-girls-nursery-wall-art-print-fairy?ref=sr_gallery_19&ga_search_query=fairy+wall+art&ga_view_type=gallery&ga_ship_to=US&ga_order=price_asc&ga_page=2&ga_search_type=handmade). Since she partly likes the lights because they’re called fairy light, why not add on that and make it a whole magical fairy land or something. Well, that’s just an idea, off course. But I really like the lights. :)
Lorelei Reed says
did not read all comments…maybe someone already said this…paint the raindrops at an angle outside the canopy so it looks like the canopy is serving it’s purpose of protecting her…or paint a giant gone-to-seed dandelion (plenty of images to copy on Pinterest) with all the little seedlings drifting over the canopy…or shooting stars outside the canopy, or a darker wall like the night sky with silvery constellations outside (the constellations of your birth signs?) and a warm cozy pink inside the canopy area for her little “haven” call me I will come and help paint!
YoungHouseLove says
So sweet! There are lots of suggestions for the rain outside and a little haven in there so we’ll have to photoshop it and see what Clara thinks!
xo
s
Crystal says
My favorites are #3 & #8! So fun!!!
Julia | alivingspace says
OMG IDEA #3!!! I’m dying. I want that so bad for myself (or maybe my future children can have it…)
Katy says
I like the idea of something more 3-dimensional like the lantern you mentioned or even a pretty kite! I also like #1
rachel laree says
1 hands down!!!!!!!
Jennifer says
Love the canopy! The first option with the stars is my favorite! Don’t think I could sleep under a zebra head ;-) I’d add some smaller stars or maybe some tiny mirrors for the lights to bounce off of.
Kelly says
I’d love to see something 3D like a bright teal tufted headboard that matched the canopy shape!! I also like the paper banners for that reason.
Something seems wrong to me about paiting the wall since the fabric outline could shift around over time and then not match. It is easy to tack fabric to the wall with push pins. I made curtains for my dorm room this way since we weren’t allowed to hang anything that required real hardware. Of course then you have to worry about wrinkles or make them part of the design.
Have you checked out wall decals? This shop has some super cute stuff ;) Plus it says customizable!
http://www.ecowalldecals.com/products/rhinos-large-1
I’ve seen DIY wall decals using shelf contact paper pre-sprayed with soap to dull the skickyness.
Also, I’d suggest a foot switch for the lights. Easy on and off! We have a few from Target kind of like this one: http://www.amazon.com/Woods-11203W-Extension-Lighted-15-Foot/dp/B000HE8QZU/ref=sr_1_1?ie=UTF8&qid=1382116521&sr=8-1&keywords=foot+switch
YoungHouseLove says
Thanks for all the ideas guys!
xo
s
Leah says
What about hanging the bird cages in the corner?
Loey says
What about painting it to look like a ‘big top’ circus tent? Red and white stripes? The canopy reminds me of that image. Like some out of ‘Olivia saves the circus’?
Although I like the stars too….
Virginia says
Have you seen the movie “The Holiday”, with Cameron Diaz and Kate Winslet?
This scene: http://www.youtube.com/watch?v=kjhUKCJYdFg
That tent is so cool! You guys could hang some stars!
YoungHouseLove says
So pretty!
xo
s
janetl says
I really like the idea of #4 because it’s like the drape is lifted up to show a secret world…maybe blue like a sky or ocean.
Andrea says
I’ll throw my hat in with the people who say paint the entire wall. I think it’ll look neater that way.
And call me crazy but I love the zebra head (or any other animal head, for that matter). My kids would love that — it’d become another “friend” for them to play with.
Good luck! Can’t wait to see what you pick :)
Emily says
#1 #4 or #8!!
Sammy says
I think my favourites are nº1 and nº6, and of the two possibly number 1. Though to be fair they all look great. Have to agree with other comments though, the zebra head…not so much.
And the lights look gorgeous!
Katie says
I love Idea #1. It ties in so nicely with the new fairy lights and brings an artist/dreamy tone to the room, but since it’s bold it also makes a strong impact while grounding the bed.
Love all of your ideas and that you never stop “playing” while you design!
caitlin says
I love idea 1! All the others are so creative I kept thinking to myself “how does she come up with these?!” But I think idea 1 matches the fairy lights best and adds to the whole magical/fairy vibe. Love the idea of adding something from the peak of the canopy as well!
Erin says
Too many comments to read through them all to see if this has been suggested. The teacher in me was thinking a felt background where you can change the pieces, tell stories, decorate for seasons, etc. Not sure how it would look.
karen says
i would do the whole wall…not just the inner part.
Joanna says
I think creating the most restful and relaxing space is the most important part of designing a bedroom. As a mom of four I wouldn’t think anything interactive like chalk markers would help my child get into sleep mode! Good luck!
Jennifer says
I like 1 and it immediately gave me a Moroccan vibe with the rug which totally looks cool with the lights. Maybe a cool Moroccan type light for the room too?
Victoria says
Love the fairy lights! What a magical place to inhabit.
Love the grey with the stars or the flying birds.
PLEASE no creepy big game hunter SEVERED heads! Quelle horror.
I know you guys only look at these heads as sculpture but they make my stomach turn. You are such amazing parents and such good gentle people so I know you don’t mean any disrespect to animals.
I once went swimming in an indoor pool at a very rich person’s home and the entire pool was surrounded with mounted severed animal heads, many of which were endangered or extinct species. I still have nightmares. And they bragged about these trophies with glee.
Something magical and gentle as you all are.
Mary Ann Myer says
What about vinyl stickers that Clara could peel off and repostion? Maybe paint a forest scene but have the stickers be fairy doors, windows, furniture and fairies that she can position like she does in her doll house.
Mirullia says
I like #4 the best. I think the birds are so lovely. I am also fond of #1.