Yesterday you saw how our board and batten project came out for the Pinterest Challenge, so today we’re back with the full tutorial shebang. And hold onto your safety goggles, it’s 2,000 words long. But don’t let all the words fool you, we’d say that this was one of the biggest bang-for-you-buck / most fool-proof ways to make an easy upgrade that we’ve encountered in a while. Wow, just realized I’m five sentences into this and I’ve already said “bang” twice. Not sure if that’s a good sign or what…
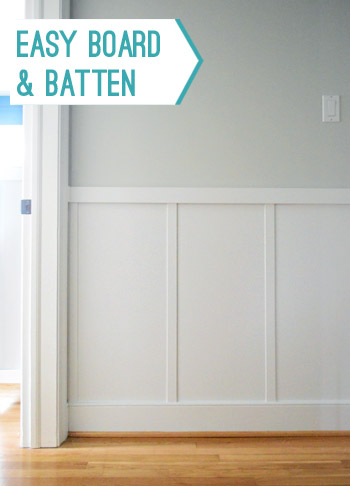
We had long known that adding some sort of molding feature to our hallway was in our future… and now we’re just kicking ourselves for waiting so long. It cost us a mere $57 for the materials (we did buy a tool on top of that, but we’ll get to that in a second) and it only took a few hour-or-two-long work periods over the course of 6 days (including some break days for paint-curing) to finally bring some oomph to our boring hall. So anyone who’s looking to tackle this on nights and weekends could hopefully do it within a week since each step only took a few hours and could be spaced out across each evening.
Planning Our Board & Batten
We were inspired by a few other tutorials – like Ana’s, Kate’s, Sarah’s, and Emily’s – and took pieces and parts of each to figure out what worked best for us. So our tutorial below may not be exactly what your space needs, but between the lot of us there should be a fitting solution in there! Let’s just say that we learned that there are many different ways that you can approach board and batten, so a lot is about personal preference, what suits your home, etc.
As for our approach, there are a few things to note upfront:
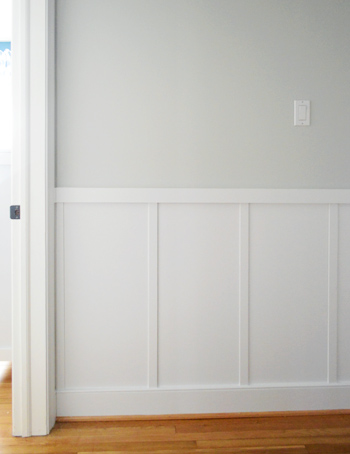
- We did not add any “board” to the wall – i.e. large flat panels. Since our walls are smooth (not textured) we just used the existing drywall as the backdrop for our vertical battens. Once everything was painted it all looked seamless and gleaming, just like a board would have looked. But if you have textured walls, check out Kate’s tutorial above.
- We used our existing baseboards. Why? Because it was easier – and you know we love to use what we have. Simply by choosing battens that were thinner than our baseboards, we could keep them in place and work with them (saving us time and money). But if you can’t or don’t want to take this approach, both Ana and Kate’s tutorials above talk about replacing the baseboard.
Oh, and if you’re not the word-reading type we made two videos of the process for you (one for the building portion and one for the finishing). So here’s how it all went down when it came to installing the rails and battens (including tips for how to keep the boards level, how to space them out, how to keep them from bowing too far from the walls, etc).
And here’s how we finished everything (including how we filled the nail holes, how I cut in without taping off, and a bunch of other stuff that we shoved in there):
And fret not if you can’t watch the videos (if, say, you’re at work) – we broke down all the steps with photos and descriptions right here (note: watching them later if you’re planning to tackle this might simplify things a lot – I always think videos make things less intimidating).
Measuring & Shopping For Materials
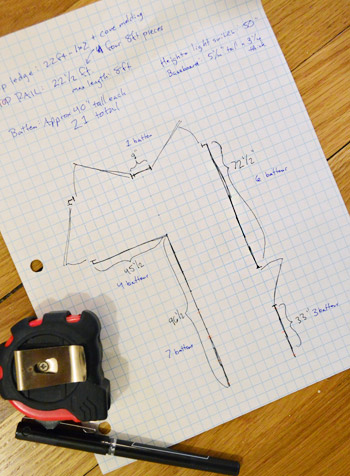
To start, we measured the space and planned our materials. My graph-paper sketch was probably overkill, but it made me feel better. It helped us plan how many boards we needed for the top rail and ledge, as well as count how many battens (the vertical strips) we might need.
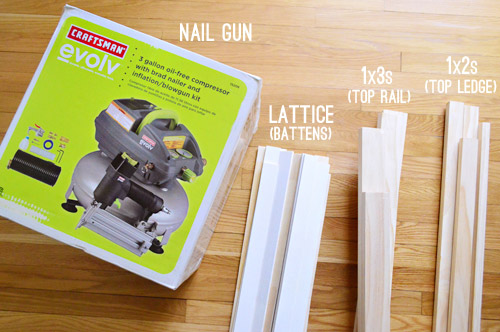
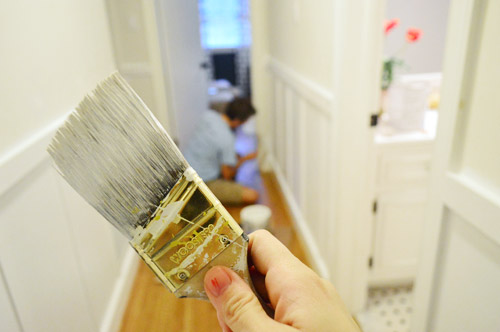
Next up was a supply run. We had most of what we needed on hand, so the only four items that we ended up purchasing are pictured below (the nail gun being a belated birthday gift from my sweet wife who was just waiting for me to pick out the one I wanted). Update: The nail gun shown below is no longer sold, but we’ve switched over to using this compressor-less nail gun these days anyways.
Tools & Supplies Needed
Here’s a full list of supplies & materials that we used (many of which we had on hand, along with the things we purchased above):
- Pneumatic brad nail gun
- Pre-primed lattice strips (our came in 12ft lengths, so I cut them down in store for easier transport)
- 1 x 3″ pine boards (for top rail)
- 1 x 2″ pine boards (for top ledge)
- Measuring tape
- Laser level (optional)
- Level
- Stud finder
- Miter saw (you can also use another saw for cutting wood, or even have them pre-cut in the store)
- Spackle, joint compound, or wood filler (for filling nail holes)
- Paintable white caulk meant for moldings & a caulk gun
- Sandpaper and/or palm sander
- Primer
- White paint (we used an extra durable cabinet-type paint in a satin finish)
- Paint brush, roller, and other painting supplies
*Buy your wood around a week before you start the project and just let it sit in your house (this is called “acclimating” the wood) to avoid any cracks caused by expansion or contraction, which happens if it’s not acclimated when it’s installed.
Installing The Top Rail
We opted to use 1 x 3″ pine boards for the top rails, which we wanted to attach first (after their acclimation period). So I cut them with my miter saw to fit snugly along each stretch of wall. If you have exact measurements for your space you can even get them pre-cut for you at Home Depot, so don’t let the use of a saw scare you off from this project.
Before attaching them to the wall, we had to do a few things – like deciding the height of our board and batten. We first assumed “the higher the better!” and held it just under our light switches and thermostat. But after stepping back, we realized the high placement was just making our eight foot ceilings look lower than they already are.
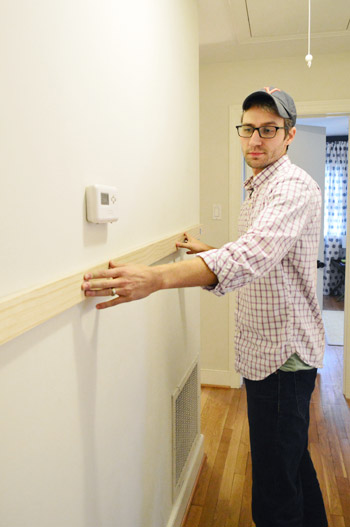
So, as you’ll see, we later landed on a more traditional height of 40″ off the floor, which is a lot closer to the “traditional range.” But again, many aspects of installing board and batten are just a personal preference thing, so go with whatever you think looks best for your space. I’m sure rooms with tall ceilings or ornate crown molding might look awesome with higher board and batten (as well as mudrooms and other entryway areas, etc).
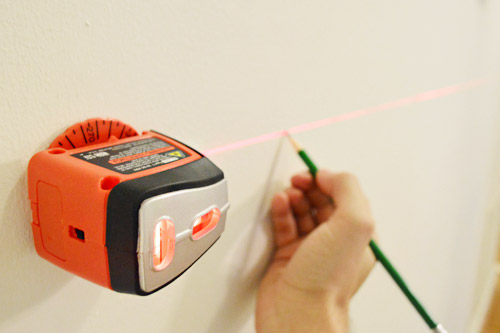
Since floors and baseboards aren’t always level, we relied on this cheap laser level that I picked up a while ago to mark the 40″ line on a few spots along each wall. Those marks created a guide for us when holding our 1 x 3″ board in place.
And since nails are always more secure when they go into studs, we also broke out our stud finder to mark each to-be-nailed spot along the wall. Obviously just remember to make your marks low enough that they won’t be covered when you hold up your top rail piece.

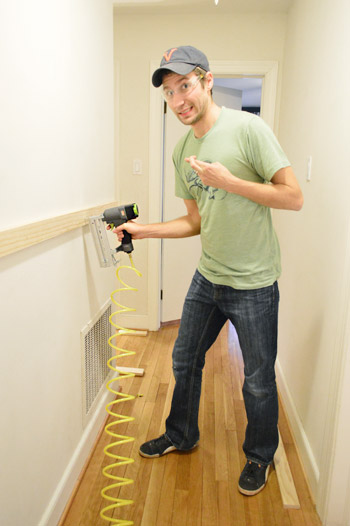
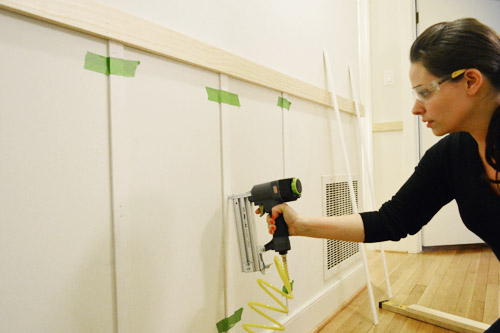
Next up was nailing the rails into place with my new pneumatic (i.e. air compressor powered) brad nail gun (the one photographed has been discontinued, but we switched to using this air-less nail gun anyways). This was my first time ever using one and it intimidated me the first few times, but now I’m in love with it (not as much as Sherry, who says she wants to marry it). I’ll write a separate post about it later, but let’s just say it was the saving grace of this project. It probably would’ve taken us three or four times as long to complete the construction portion of this project without it. We bought a pretty basic, but well-reviewed Craftsman model (here’s an affiliate link to it for ya).
So here are all of the top rails in place. We opted not to glue them to the wall in addition to nailing them into studs simply because if we ever decide to remove or replace this, we don’t want to rip off chunks of drywall in the process. The good news is that the boards are so light – especially all of the vertical lattice pieces – that nails shot into studs with a nail gun are supremely secure… especially with the caulking that we did around any cracks to hold them even more firmly.
But even if you opted to glue things on top of nailing them, it wouldn’t add much time or cost to the project (a tube of Liquid Nails is just a few bucks). Speaking of time, if you subtract the time it took us to set up and figure out the nail gun, I’d say the process of measuring / cutting / nailing these took us about an hour.
Adding The Vertical Battens
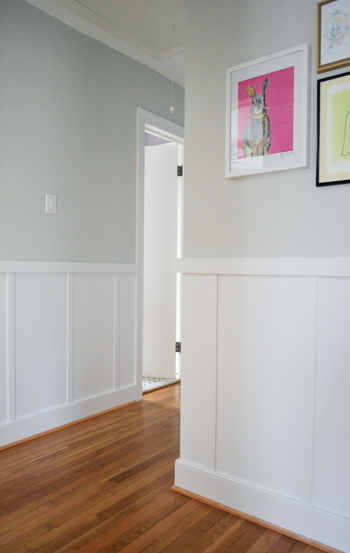
We used lattice strips at Sarah and Emily’s suggestion because they were cheap (66 cents per foot!) and they didn’t stick out past our existing baseboard. Had we used 1 x 2″ boards like some folks do, it would’ve hung over our baseboards. We could’ve replaced our baseboards too, but then they would’ve stuck out past the trim around the four (count ’em four!) doors in our hallway. So yes, chunkier battens could be nice in less narrow spaces (we didn’t want ours to jut out too far and close things in) but in our case we actually thought the lattice + rail setup was ideal and we like the dimensional-but-not-crazy-thick result.
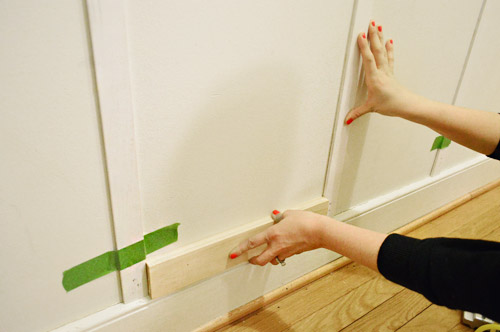
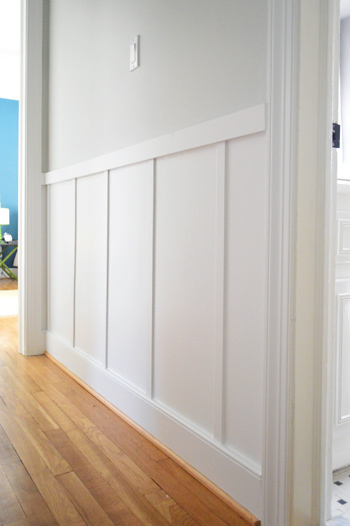
We chose to space our battens at 16″ intervals because our studs are 16″ apart and this meant that more nails would go into studs, not just into drywall. Plus, when we held up a few spacing options it looked pretty darn good (seriously, half of this project is just deciding what looks best and going with it). To make our lives easy, we used a scrap piece of 1 x 3″ board to make a spacer (a 14.5″ spacer kept the lattice 16″ apart from center to center).
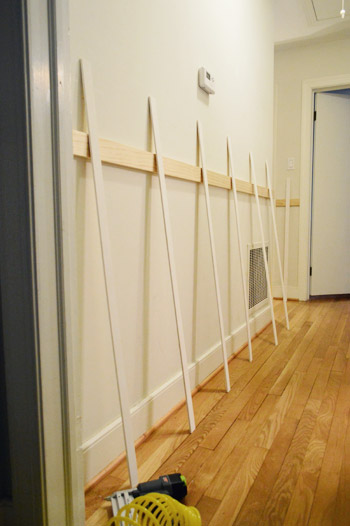
The lattice was light enough that tape held it to the wall while we used a level to make sure each batten was perfectly vertical. Then Sherry went back with the nail gun and secured them in place. Is it wrong to say that watching my lady concentrate so hard while wielding a power tool got me a little hot and bothered?
About an hour-ish later, all of the battens were cut to size and nailed into place.
Since we wanted the batten on the facing walls to line up (and that’s where the studs were, which added stability), the placement was pretty easy to determine. But if you were tackling this and not every batten could end up in a stud to accomplish a balanced look, I’d go with balanced placement over hitting every stud (they’re seriously as heavy as a paint stirrer, so they’ll likely hold up fine either way).
At around this stage of the project, Clara saw it for the first time – and here’s her reaction word for word: “Wow! It’s beautiful! Did a man come while I was sleeping and bring that?” Is that kid hilarious or what? She totally didn’t give us credit for it. We think it’s because that morning the heating guy came with an oil delivery for us, so she remembered a man coming to help with something and assumed he came back to fix up the hallway for us. Naturally.
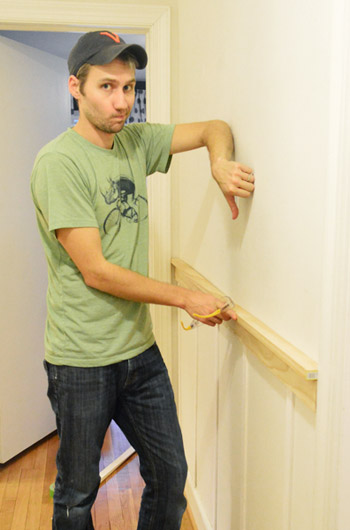
Lots of the tutorials we saw included adding a ledge along the top to sort of beef things up or create a spot to lean art or other items. We bought some 1 x 2″ pine for this purpose but as soon as we held it in place we realized we didn’t really like it. Since it wasn’t going to be a functional ledge for us, it basically just narrowed the hallway more and created a few hazardous little corners for tiny heads to walk into. So we scrapped the idea, returned the wood, and enjoyed calling the construction phase: COMPLETE.
Prepare For Painting
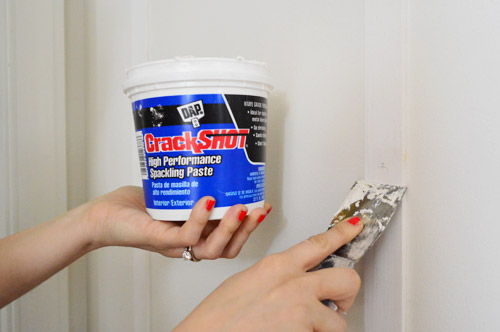
The next day we started to prep the space for painting by filling nail holes and caulking gaps. At the recommendation of some of you guys, we went with spackle over wood putty (we hear joint compound works too) since it’s said to be easier to work with and holds up better over time. It certainly went on easier than wood filler so assuming it keeps looking as good as it looks right now, we’re completely sold on that approach for filling nail holes after your rails and battens are hung.
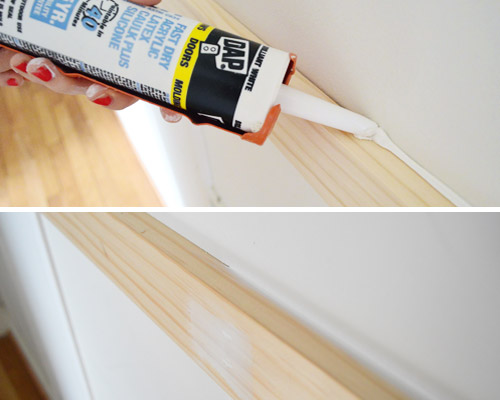
After all of the nail holes were spackled (not a fast process, but not too bad – maybe it took an hour total?) we used paintable white caulk to fill some of the gaps between our boards and the wall. Since our old house doesn’t have perfectly flat walls, this was a necessary step to keep the project looking nice and polished in the end. We didn’t do every edge, just the ones that needed it (across the top rail and a few places along the battens). I’d say the caulking step added another hour of work in case you’re wondering. Oh and definitely watch the finishing video in this post for more details about exactly what caulk we used, how I smoothed it, etc.
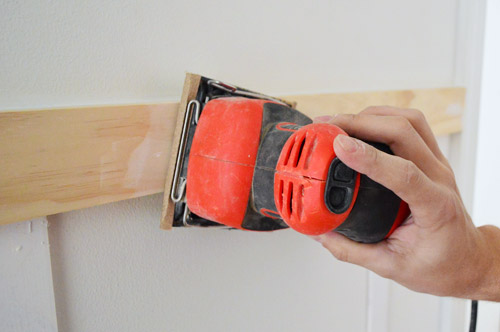
Later that day we broke out the palm sander to get rid of any excess spackle around the nail holes.
Prime & Paint
After that, the rails and battens were ready for primer. We already had Kilz Premium (which is a stainblocking primer) on hand, so we used a brush and a small foam roller to put one coat of primer on each piece of wood to prevent any bleed-through in the wood down the road (always a worthwhile “insurance” step). And we went over the battens too, just to be safe (even though they came pre-primed). Here’s the whole thing primed and almost ready for paint. Just had to let the primer dry.
The next day it was finally time to paint the board and batten. We used Benjamin Moore Advance paint in Decorator’s White in a satin finish leftover from our office cabinet painting project. Advance paint is especially durable (we used it on our kitchen cabinets too) so we figured it was a good choice for hallway molding that might get its fair share of wear and tear.
Admittedly, the finished picture of the painting step isn’t very dramatic since the walls above were still off-white.
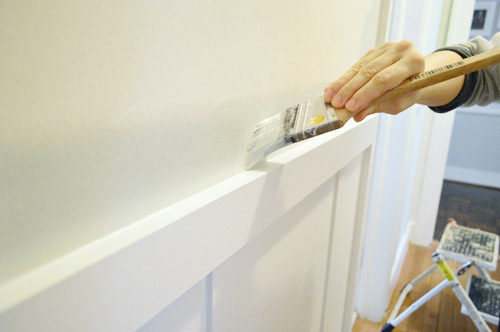
So after letting the paint cure for a couple of days we tackled painting the walls above the board and batten. Sherry was still nervous that taping the freshly-painted top rail could peel paint off, so she opted to cut in by hand around the top rails (you can read her tips for doing that here and watch the video in this post and the video here for even more tips). She did a great job, despite not having her usual short-handled brush handy.
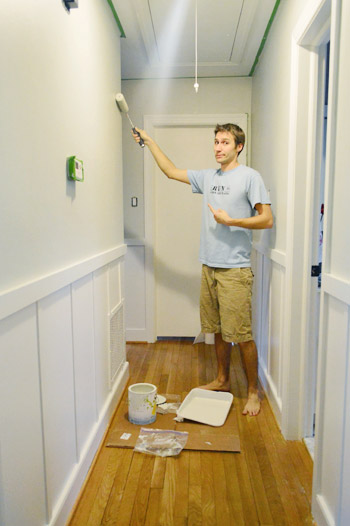
After she was done edging, I went back with the roller and (after a second coat) we had the finish line in sight.
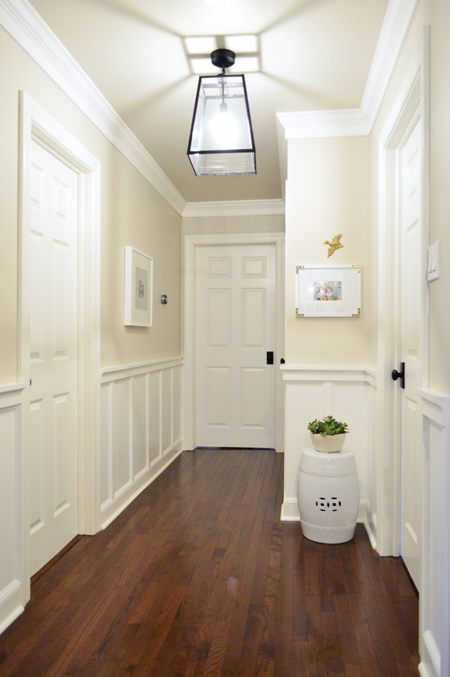
Oh, and if you couldn’t tell – we were painting the walls with Moonshine by Benjamin Moore since:
- we had some leftover from painting our dining room
- we didn’t want anything too bold/dark to close in the hallway
- it’s the color in the adjacent frame-filled hall and we wanted them to relate to each other (so things didn’t feel too choppy)
Note: we still have to paint the trim in the frame hallway the same white color as the board and batten.
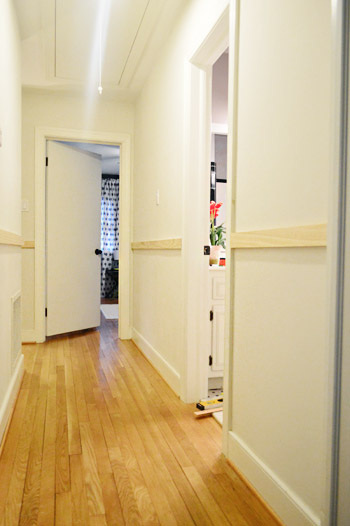
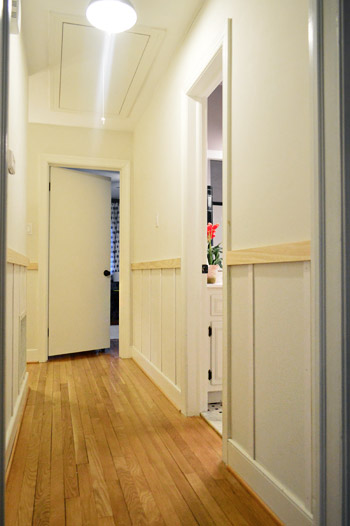
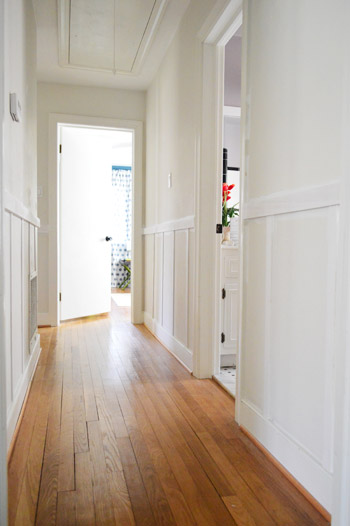
Boom. Just like that we’re ready for after pictures. So here we go!
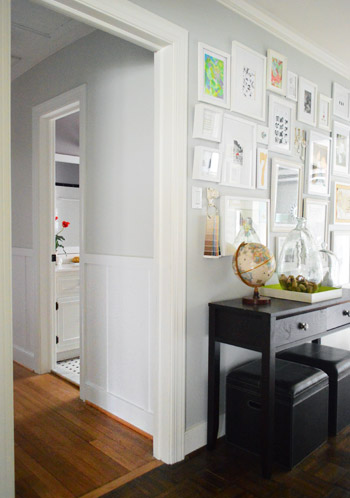
We’re in love with the result. And we’re kicking ourselves that we didn’t do it sooner. You know how you never quite realize how “blah” a space is until you do something to it and wonder why you waited so long? I mean, we walk through this hallway dozens of times a day and all we had done up to this point was hang some art in one small corner (the most hidden part of the hallway, ironically). But now that we’ve got the board and batten up we’re ready to hang some more.
Total Project Cost
Okay, so let’s break down the budget. We only spent money on three items since we had things like paint, spackle, and caulk on hand. And had we actually purchased my nail gun back at my birthday in November as planned, our total cost for the project would’ve been only $57. Crazy, right?!
- Four 12′ pieces of lattice – $32 ($0.66/foot at Home Depot)
- Two 8′ pieces and two 6ft pieces of 1 x 3″ pine – $25 (also from Home Depot)
And time-wise, our project stretched over the course of five days (six if you count the trip to Home Depot for the materials). But if we had the luxury of not having to schedule things around Clara, it probably could’ve been completed in three days (first day for construction & spackling/caulking, second day for sanding/priming/painting the board and batten, third day for painting the wall). Heck, you could probably even ditch that third day if you’re doing this project on an already painted wall.
But if you’re doing the nailing by hand it might take longer (which explains why Sherry had the urge to make out with our nail gun). Oh but if you don’t want to buy one, you can always rent one from your local home improvement store, so that’s another option.
But here we are, roughly six days later and waaaay more excited to walk down our hallway. We’re now in the midst of figuring out what to hang on the walls above the board and batten, as well as choosing what next project we can take on to satisfy the itch I’ve now got on my nail gun trigger finger (after I wrestle it away from Sherry). I smell some crown molding in our future…
UPDATE: We repeated this project in our new house, but with a twist to make it feel a little bit fancier. Check out the tutorial for our new twist on classic board & batten here.
Update – Wanna know where we got something in our house or what paint colors we used? Just click on this button:


jen says
Love it! Could you tell me the width of the lattice boards you used? Thanks!
YoungHouseLove says
They’re an inch and a half wide. Hope it helps!
xo
s
Gena says
great work. this article and your great tutorial encourage me to do the same thing in our guest room. love it–and your style.
Dawn says
Love this!! But how do you go about doing this with rounded corners rather than square corners on your wall?? I hate them but understand why contractors do them this way, just makes it difficult to paint or do cool things like this.
YoungHouseLove says
Anyone with rounded corners ever tackle this? We’re not sure- maybe try pinterest or google to see if others have ideas? Good luck!
xo
s
Vanessa says
This looks great! I would love to do this in our hallway but we have so many doors and small walls, I’m afraid it wouldn’t look right. Definitely a project for the next house! :)
andrea says
omg! I’ve wanted to do this at our house for so long, but didn’t want to go through the trouble of changing out the baseboards. Love the idea of using lattice strips…genius!
Kristi says
My husband and I are always embarking on new projects for our home. Needless we have painted the walls in our house a different color already (we painted after moving in and then I got “bored” with the colors so they changed) in the two years we have lived there. I happened to be looking on Pinterest (love the site) and found your blog. We were planning on doing something like this in our kitchen anyways but using wainscoting, so glad that I found your blog and I am happy to say you inspired us to make this our Sunday project. Much cheaper and we were able to make it look like an original piece of art. Thank you.
YoungHouseLove says
Aw thanks Kristi! So glad to help :)
xo
s
Phil says
We’re moving into a new house in a month. And this is one of the projects we want to do. We love board and batten. Although this is the first time I’ve seen someone do it without any plywood paneling. Have you done any kind of side by side to see how well your method holds up?
I come from a trades background and I’m a pretty good carpenter and can do pretty much anything DYI, but I love hitting the blogs because of all of the ideas. Why come up with it yourself if you can just do the paint by numbers someone else laid out right? Anyways I just mention this to give a background to how picky I can be. When I think board and batten or other kinds of paneling I think of a glass finish. If I do something I want it to look the same as it would in the 500k home not looking like I’m trying to fake my way through it. I don’t say this to cast any doubt, just want to be sure. Our walls are smooth but they obviously still have a very small amount of texture as any wall would. Or do you feel the high quality paint helps cover up this subtle detail? Thanks!
YoungHouseLove says
I would totally add plywood paneling behind it if you’re going to look at it within a few inches (if you get down and put your face next to the wall you might know that it’s wall and not wood paneling) but if you’re just doing an area like a hallway where you’ll walk through and not sit against the wall and stare at it I would bet money you couldn’t tell the difference! It’s one of those things you have to touch or get super close to (3″ away with your nose touching the battens) to be able to tell. Unless of course if your walls are textured, in which case you should definitely use the paneling (see Kate’s tutorial, which we’ve linked to in this post :)
xo
s
Melissa says
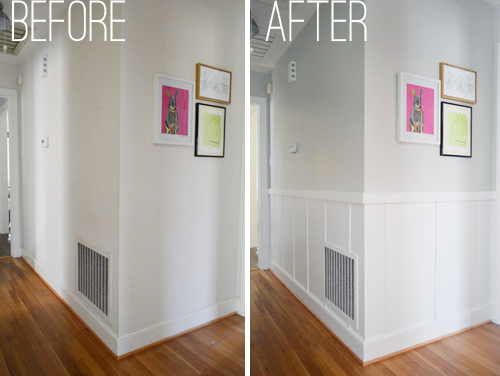
Love it! I have been on the fence about doing this in my hallway. I have a question for you though- I have an AC return vent that will be right smack in the middle of two battens (boards? The vertical boards). Would that ruin the look of it do you think, or help it blend in? The vent is white and the wall is currently a builder beige color. Thanks!!
YoungHouseLove says
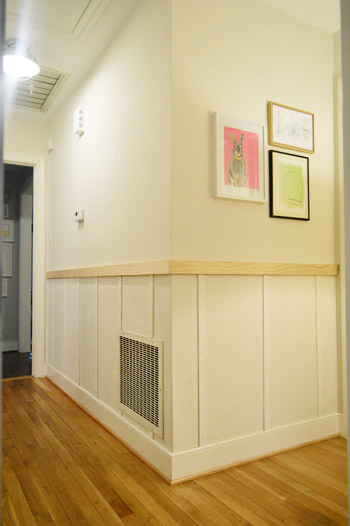
Our vent went right through the middle of two battens and in our opinion it helped it blend in (as did painting it the same color as the rest of it). So we think you should still go for it!
-John
Melissa says
Duh- totally missed that the first few times reading the post. I guess that’s a good sign since it totally blended in! Did you just use a brush to paint the vent?
YoungHouseLove says
I actually rolled over it with the roller. Ours was off-white already, so it wasn’t a big difference (aka, any missed spots deep in the cracks aren’t that visible) so if yours need some extra coverage you can certainly go in with a brush too.
-John
kelly says
I was wondering how you cut the top rail for the corners of the hallways? We are pretty novice with a saw.
thanks.
YoungHouseLove says
We didn’t even miter the corner, we just put two pieces of rail together so they met in the corner and nailed them and caulked it and it looks nice and seamless! So easy to do!
xo
s
Liz says
This is such a great post (for a great project!) I can’t wait to have my own home and come back to this post for inspiration and very helpful instructions (thank you!) For now, it will sit in my ‘future home’ Pinterest board! It looks so lovely!
YoungHouseLove says
Aw thanks Liz!
xo
s
Hayley says
Ok, I just bought the brad nailer (so glad you guys posted that one, because I have been looking for a while, but was intimidated by the air compressor part of it all). Anywho, this one is just right right size. I have been sitting outside with the dang thing for 45 minutes trying to hook it all up. I think I have it, except the gun won’t shoot a nail. Thoughts? Ideas? Did everything come with your unit except the extra nails? There isn’t some random part that I need that I don’t have, is there?
YoungHouseLove says
Ooh maybe your hose has a crack in it? Picking up a new hose is cheap and it should hopefully fix it! Also, ours came with nails in a package but not loaded inside, so make sure you loaded them. Also to fire a nail you have to have the front tip of the gun compressed against a surface for the nail to fire (so you can’t shoot one into the air, it’s a safety feature). Hope it helps!
xo
s
Hayley says
I’m an idiot…turns out, I didn’t turn the psi knob (on the right.) All is well in nailer land.
YoungHouseLove says
So glad! Whew!
xo
s
lavi says
Hi could you let me know what brand the laser level , stud finder and nail gun are where did you purchase them . thank you
YoungHouseLove says
The laser level is Black & Decker and the stud finder is Zircon – both purchased at Lowe’s. And as mentioned, the nail gun is from Sears and it is Craftsman brand.
-John
Nikki says
I just put bead board wallpaper up in our master bathroom and I’m in love with it. But this board and batten is awesome. I love the budget friendly cost of it.
Do you think it’s okay to mix wall treatments? Like board and batten in a hallway and bead board in a bathroom?
YoungHouseLove says
Oh yes, I think they layer nicely and add interest!
xo
s
Courtney says
Question: My husband and I just bought our first home and would love to install board and batten in our dining room, but the walls are paneled. Do you think it’s possible to still do this project? Would it look dumb?
YoungHouseLove says
Hmm, I think it might compete to have paneled walls above board and batten (lots of vertical lines that might not line up, etc) so perhaps you can drywall the area above and then B&B the area below.
xo
s
Elie says
Hi..what are you thoughts on the nail gun you got? Father’s day is coming up and that is something my husband has been wanting …thanks!
YoungHouseLove says
We love it! We’ve gotten very comfortable with and it makes things sooooo much faster.
-John
Elaine says
Do you have any pictures of how you ended the walls? Were the ends capped by door frames, or did you hit a corner and place an endcap?
YoungHouseLove says
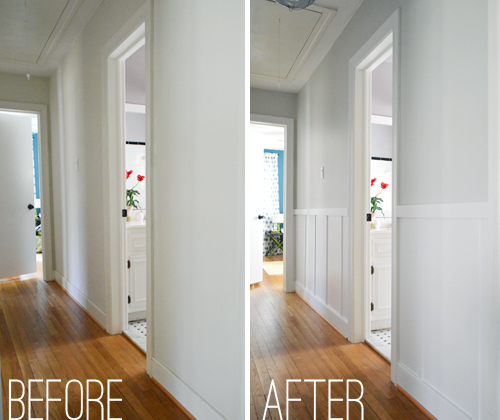
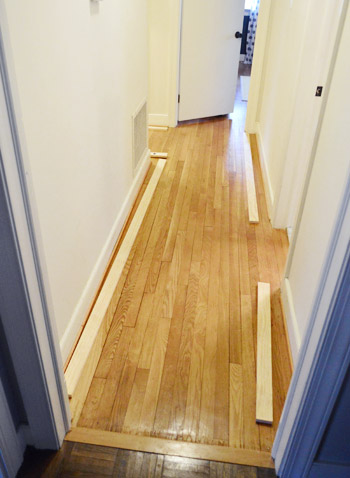
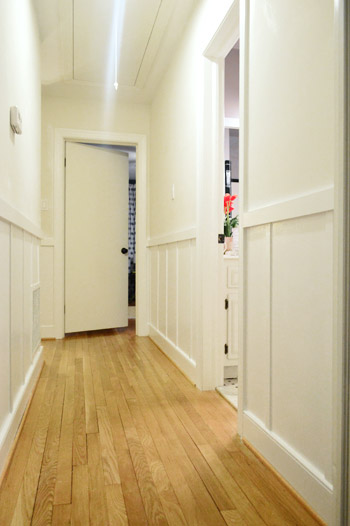
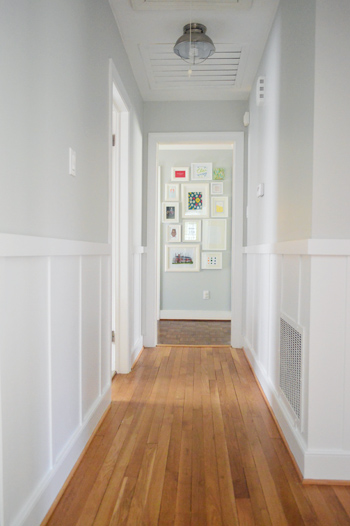
We just let the boards run into the trim around doors (so I guess you’d describe them as being capped by door frames). If you check out the second picture down (the before and after), it just bluntly ran into the door trim (it was the same depth, so once it was painted it looked nice and seamless). Hope that helps!
xo
s
Jill says
Hi Sherry & John,
Just found your blog today and love your house. I had a question about the hall project with the molding. It looks like the verticle batton is thinner than the base molding and the cap molding. Was there a reason why you went with thinner vs. say using the same thickness of the othet molding? Our base molding is pretty thick, so I’m trying to figure out the best option for us. I like what you did, but I don’t know what to do with our thick molding. Thanks!
YoungHouseLove says
Our base moldings were pretty thick too and we also discover the trim around the door from was not the same thickness all around the room (looks like some of it was shimmed to stick out further for some reason). So it sort of just came down to finding something that worked, and choosing something thin was pretty much the best option to make sure it would be thicker than any other piece of molding in the room. And ultimately we actually kind of liked the look of the thinner “battens.”
-John
Celeste says
Quick question for you, and I apologize if you’ve answered this already. How did you decide ho high to put the B&B? I’m trying to decide whether to do traditional chair-rail height or go higher.
YoungHouseLove says
We just held the top rail of wood up to see where we liked it. We opted for this height since it seemed good for hanging art above it (not too low and not too high).
xo
s
Charity says
So awesome! My husband and I are tackling our 4 bedroom walls with 5-foot-high board and batten treatment this week and this was a HUGE help. Thank you!!
YoungHouseLove says
Good luck Charity!
xo
s
megan says
Ok,question for you, we ( unfortunately) have textured walls. When looking at the tutorial for putting up boards it looks…. well, scary!!! Will skipping the step of putting up boards make it look crummy??
YoungHouseLove says
Hmm, what if you did it without boards and if it looks bad you can cut boards later and slide them into the slots? Or use thick wallpaper (they sell beadboard-looking wallpaper) for inside the boxes? It might end up being more work than just using the boards though :)
xo
s
Amy says
Looks AMAZING….can’t wait to start mine (fingers crossed) !!
Mancil says
Hey guys, I’m working on doing this same project in our new home. I picked up a piece of 1×3 for the top rail but it sticks out a good amount from the door frame. Did you guys run into the same problem? If so did you sand it down flush or just let it stick out a little? I couldn’t tell from the pictures?
Congrats on the new home and thanks for the awesome blog (this is my first post)
thanks for the help
Mancil
YoungHouseLove says
Out door frames actually stuck out the same depth, so it all matched up, but if they didn’t we would have sanded it (or ripped it down with a saw) so it was the same depth I think. Hope it helps!
xo
s
Mancil says
Thank you for the advice – looks like I better stock up on sandpaper ;o)
YoungHouseLove says
Good luck!
xo
s
Chrissy says
We just used this post as inspiration for our own hallway. It is shaped similarly but on the second floor. The entire process took about 8 hours over the course of a few days. Pretty easy. As you walk up the stairs, you see the board and batten and brings such a pop to the space. We used Bleeker Beige for the remainder of the wall. Thanks for the help!
YoungHouseLove says
Sounds so pretty! Congrats Chrissy!
xo
s
Chris says
FANTASTIC job!!! LOVE it…. Would like it in my hallway.
Tiffany says
Question…..what sheen is most commemly used on board and batten aka paneling,wainscoting etc. We just used your tutorial for our kids rooms, our room, and floor to ceiling paneling in our kitchen!!! I have to say it looks awesome, thanks to you guys…but what sheen and what did you guys use????
YoungHouseLove says
We used semi-gloss because that’s our go to for trim (it’s durable and wipe-able without being crazy glossy) but you could probably get away with something a satin too.
-John
Rebecca says
I found your website while searching simple board and batten projects. We’ve been to two Home Depots and a Lowe’s and they look at us like we’re crazy when we ask for lattice strips. Help!
YoungHouseLove says
They’re sort of in the far back of the molding aisle in Home Depot. They’re literally strips of “lattice” and labeled that way.
xo
s
shelly says
Loved to see the Zircon stud sensor — I worked for Zircon in my 20s! I’m 45 now…
Tracey says
I am moving into a new home and definitely want to do this in the living room. Not sure what to do about the wall with the HUGE front window. Skip it entirely?
YoungHouseLove says
I would continue it! Would be do pretty around the window trim!
xo
s
Jennifer says
I admire you and your husband so much! I love your blog, you actually inspired my “backyard wedding” and now I’m inspired for all my home projects on our very own “old house.” Thank you both for keeping it real!
Best regards,
Jennifer
Laura says
This is gorgeous! But please help, we have a split level home in which we would like to board and batten the wall leading up the stairs – any suggestions?!
YoungHouseLove says
I would google around (and search pinterest) for a tutorial on that! I’d imagine once you figure out the angle you want it (and the height) it would be similar to this process though! Good luck Laura!
xo
s
Becky says
Do you think this project could be done as easily on plaster walls? It’s so much more difficult to find studs. Any tips?
YoungHouseLove says
Hmm, with our plaster walls we used anchors a lot, so maybe try using screw and anchor systems to see how that goes?
xo
s
Nicole B says
Sherry & John–
Just wanted to say how grateful I am for this awesome post! We are literally in the middle of using it for our nursery for baby number 2!
We have pretty much followed all instructions to a tee, we even bought the same nail gun.. I convinced my husband that if anyone knows what kind of nail gun to buy, its you guys! I was wondering what kind of nails you used for the horizontal pieces and the lattice pieces? I know theres all different types and sizes but I figured instead of guessing I would ask, we are using the same pine boards and lattice pieces as you all.
Thanks!
YoungHouseLove says
The nail gun only takes a certain size (gauge) of nails, which I think are 16 gauge (check the box/manual to be sure) and the length we went with was an inch and three quarters for the lattice and the top piece. Hope it helps!
xo
s
Aaron says
Hello! I found this site recently, and gotta say you guys rock :) 2 quick questions… how did you decide where to put the very first batten? 16″ from the edge of the wall, or on the first stud closest to the wall? Also what about getting to the end of the wall/start of the next wall..still 16″ apart, just the distance spread across both walls?
YoungHouseLove says
Oh man, we honestly don’t remember, and we don’t live there anymore to run into the hall and check. I think maybe in our house the studs were 16″ apart, so the first one from the corner was 16″ from that crease. Meaning your first question would be correct either way (first stud = 16″). As for the end, we just tried to make it look balanced (not right next to the crease, and the same distance on the other side of the corner if that makes sense). Hope it helps!
xo
s
Kelly says
Hi guys, I know I’m late to this post, but we are in the process of gathering materials for the same project. Can I ask you if the lattice was white/pine wood as well? Or was it the prefab, lightweight lattice? Thank you!
YoungHouseLove says
Oh man, we can’t remember. I think it was pine wood?
xo
s
Kelly says
Thank you!
Melanie says
I know you published this months ago, but here’s hoping you occasionally check back — how would you go about tackling rounded drywall corners?
YoungHouseLove says
Hmm, maybe just do a rounded vertical piece that can lay in that corner as part of those vertical battens?
xo
s
Abi says
I absolutely love this project. I have been wanting to do this but the price to do it is high. So when I saw your tutorial I could only think, when do I start. THANK YOU a million, you really inspire me to do a lot of things for my family.
Q: Could you please tell me what color is the paint you use for the wall?
H A P P Y H O L I D A Y S ! !
YoungHouseLove says
Thanks Abi! That’s Moonshine by Ben Moore.
xo
s
Tyler says
Thanks so much for the tutorial and inspiration! I just finished putting this up down the hallway in my house. Your moonshine color even looks so great I’m planning on using that above the rails, too! You can’t beat Benjamin Moore paint!!
Kate says
Found this after watching Knock It Off. I have some imperfect plaster walls. Any tips? What should I use to put a backing on the wall to make it smooth? WOndering if I could do this going up the stair wall? How did you cut the lattice strips?
YoungHouseLove says
You can google “skim coating” to see how to get the walls nice and smooth. As for cutting the lattice, we just used a miter saw. Good luck!
xo
s
christa says
You have inspired me too do this in our living room. I went to the hardware store to get the lattice batten and they had no idea what I was talking about lol. Is there another name for it? I have the same dilemma in that I dint want to replace the baseboards so need something thin. Thx!!!!!
YoungHouseLove says
We only found this lattice at Home Depot, so it may be that your hardware store doesn’t carry it? At HD it’s specifically labeled “lattice.”
-John
Ty says
Love the finished board and batten. I was wondering, are your baseboards 6″?
YoungHouseLove says
I think they were shorter than that (we don’t live there anymore so we can’t measure them but I’d guess they’re 4-5″).
xo
s
Whatever1111NC says
A lot of people – especially newer builders – don’t know that shoe molding is part of the WALL MOLDING and should be PAINTED when the base molding is painted, not stained. Shoe molding is NOT part of the floor and should not be stained unless the base molding is stained. It looks weird when stained against painted base molding and has the appearance that the floor stain was slopped on the wall.
As far as the board and batten job done by the owners, fantastic!
Juanita says
Looks great!! and so inexpensive. i would love to do to our bathroom, but we have textured walls. And it looks like yours are smooth. What would you recommend for us? i would really appreciate your feedback. =)
YoungHouseLove says
We have heard from folks who have done this with textured walls, and they said they just added the trim like we did and caulked the seams and it all worked well. Hope it helps!
xo
s
WhitneyB says
I can’t wait to try this! Thanks for the tutorial.
My question is where is your hall light from? I’ve looked everywhere for something like that!
YoungHouseLove says
Thanks! That was from a local outlet called The Decorating Outlet a while back.
xo
s
Lindsey says
Loved this tutorial..you were right the video was extremely helpful!!! My question is how did you cut the boards to get the trim to fit together when you go around the edge to connect to another wall? Trying to talk myself into trying this, but have never done a project like this before!! Thanks for your help!!!
YoungHouseLove says
We cut the top boards by laying them flat on our miter saw with it set at a 45-degree angle, which allowed the two of them to butt up together nicely around the 90-degree corner. It was pretty easy! But if you don’t have a miter saw, you can just do flat cuts and have one overlap the other. It does mean you’ll have one edge exposed, meaning it might not be quite as smooth as the rest of it (but that’s probably not the worst thing in the world).
-John
Sara says
I’m having trouble finding pre primed lattice strips. Is there something else this is called? What was the width of yours? Thanks!!
YoungHouseLove says
Ours were near the fence stuff (at the far end of the trim and molding aisle of Home Depot towards the back – near dowels and quarter round).
xo
s
Kay Simmons says
Wondering if you have any tips for 1.5 x 1/4 strips that won’t be on a stud. Glue plus nail? Different nails? Doing a laundry room and two walls (most protected) of the four won’t be on stud because of spacing. Thanks!
YoungHouseLove says
I would just use glue plus nails. Should hold I think!
xo
s
Tina says
Great tutorial! Thanks!
Vanessa says
Just curious about the nail gun and if you ever had any problems with it? I wanted to purchase, but had seen some bad reviews (but there are always bad ones right?)Thanks!
YoungHouseLove says
No issues with it so far!
xo
s
Charlotte @ Ciburbanity says
Just a quick mucho grasias for a bunch of your posts that I’ve been scouring tonight! Redoing a U-G-L-Y powder room and had planned on both penny tile and board and batten and who should the wizards at google suggest by y’all! :) Thanks!
YoungHouseLove says
Aw thanks Charlotte! Good luck!
xo
s