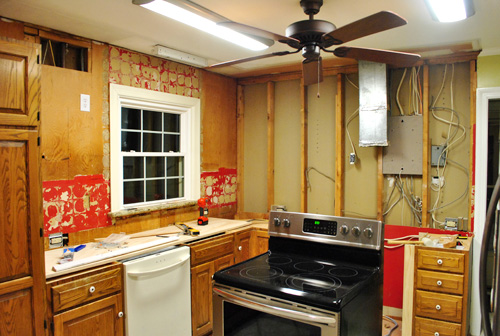
In case all of that turkey and stuffing made you forget, allow me to remind you that our kitchen was looking something this after the upper cabinets came down:
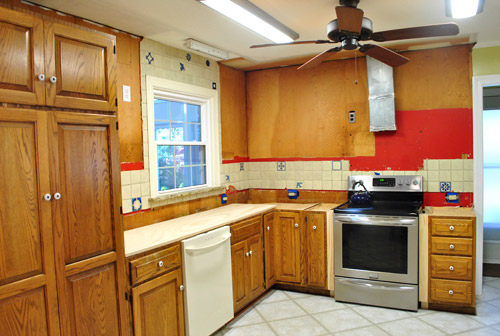
Since the clock was ticking on our new counters (in around 2 weeks we should no longer be sink-less and counter-less), we had to get the walls prepped for the new backsplash. Not that the backsplash would be going up before the counters (we’ll get a snugger fit if we install it afterwards, plus we don’t want it getting damaged during the whole counter install), but because wall prep = demo (aka: a mess) we didn’t want to worry about scratching our new counters if they were in during that step. So it was time to say adieu to the old “random blue things” backsplash:
We have a weird soft spot for this old backsplash. It’s kinda quirky, and feels very handmade. But it also feels all wrong for our idea of a dream kitchen – and the penny tile that we found had us at hello. We keep saying that the existing backsplash seems more suited to an adobe style home in the Southwest, but since we’re softies, we have an idea to keep a few of the accent tiles around for old time’s sake (more on that in a bit).
When it came to the whole removal process, it went ok. Some of it even came down in 3 or 4 (or 6!) tile chunks at a time. And all it took was a quick pry of the screwdriver.
But then again, most of it came out one-by-one… or in chipped pieces and broken chunks. Still, I can’t complain. It was maybe a 45 minute job from beginning to end? I did about 80% of it (Sherry loves demo too, but she was on Clara duty after she woke up from a wish-it-was-longer nap).
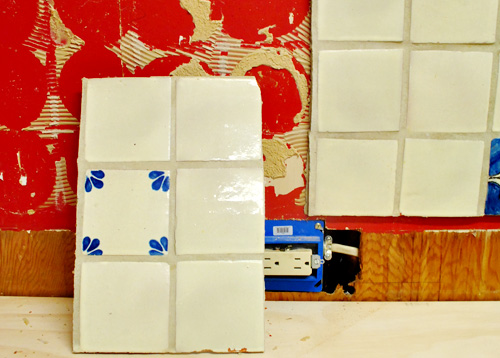
We wanted to save a bunch of the blue tiles for nostalgia’s sake, and actually came up with the idea of adding little felt feet to make them into coasters (could be fun to tell people about their past whenever we break them out), but these three were the only ones that survived in one piece:
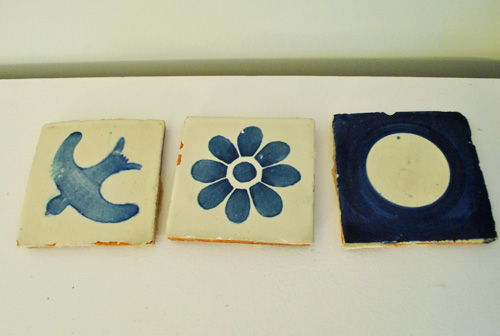
Kinda sad, but three coasters are better than none – so we’re thankful for these lucky three survivors. Still a little bummed that we couldn’t donate more whole tiles to the ReStore or give a few of the fun blue ones to friends of ours who requested ’em though. They were just so brittle (they were made from red clay) so they shattered and collapsed really easily. Our three survivors were kind of miraculous.
Oh, but to make sure that we never forget the other random blue tiles that graced our now-gone backsplash, we threw together this little tribute video. You may want to have a box of tissues handy…
Sorry. That was just us being weird. Sort of like this bow-chicka-bow-wow console video from a while back. Can’t help ourselves.
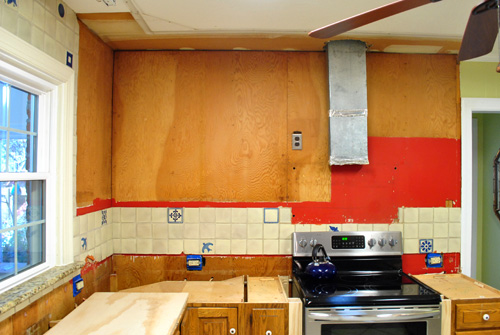
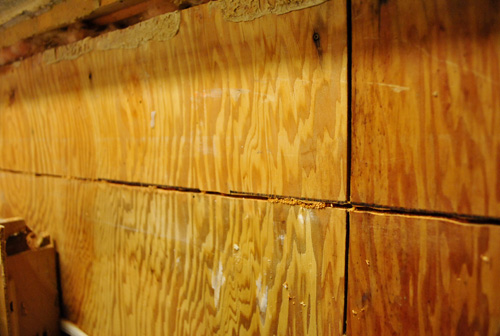
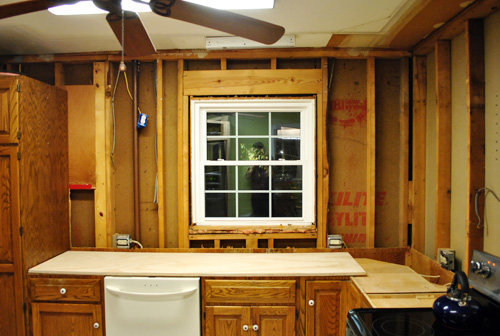
But back to the serious stuff: the rest of the kitchen demo. As you saw in the video, here’s what the room looked like sans tile. Pretty ugly and not exactly ready for the new backsplash.
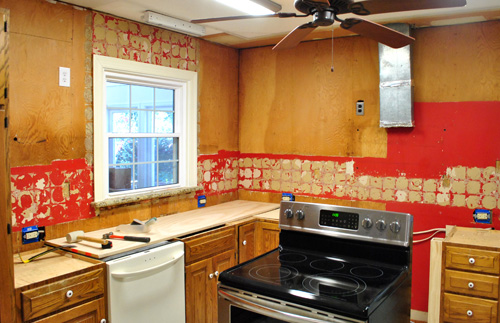
Between the plentiful bumpy leftover glue and the fact that plywood isn’t an ideal surface for holding tile in the first place (especially the weight of penny tile all the way to the ceiling along the stove wall) we resigned ourselves to the fact that we should probably demo it out and replace it with something more suitable. Sigh.
So we called The Tile Shop (they’ve pretty much been our go-to resource for tiling ever since we asked them a million questions while we gutted and retiled our bathroom a few years back) and they confirmed that we really ought to install cement board. We had a mild panic attack when we realized that the counter guys templated against the 1/4″ thick plywood walls (so if our cement board was any thicker or sat too low on the wall, our counters might not fit correctly). Thank goodness they actually sell 1/4″ cement board, so we can seamlessly sub out plywood for cement board without affecting the counters.
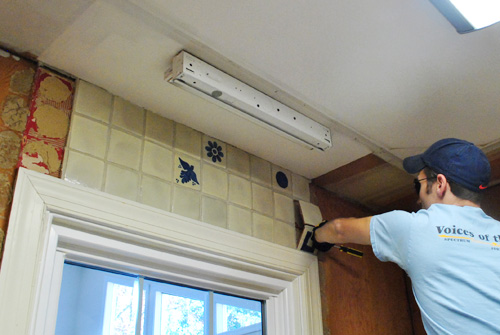
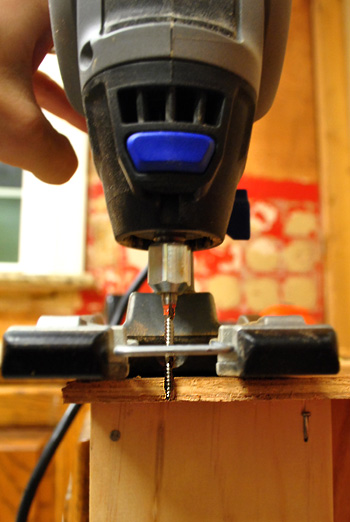
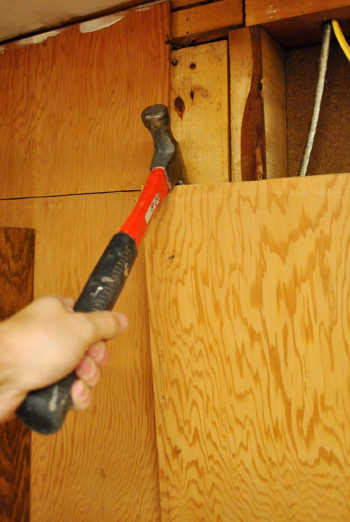
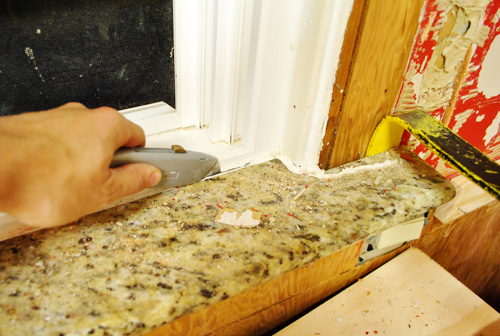
But I still had the challenge of cutting the plywood along a straight seam right above the lower cabinets, so it could be pried off the wall and replaced with cement board. I don’t really own a great tool for this, but I figured my Dremel Trio was my best shot since I could control the depth at which it cut (since I wanted to cut through the full depth of the 1/4″ plywood, but not the studs behind it) – which I’m demonstrating in the photo below:
Though had I seen the commercial that I saw the very next night for this thing I probably would’ve bought it as an early Christmas present to myself. Oh well, you know we like to use what we have.
My main struggle with the Dremel Trio is that it’s not very steady when cutting. Since it cuts using a spinning motion, it constantly wants to spin off in different directions. So I fashioned a makeshift guide by loosely nailing a piece of scrap wood into the wall. This way I could press the Dremel against it as I pushed it along the wall, keeping my cut perfectly straight:
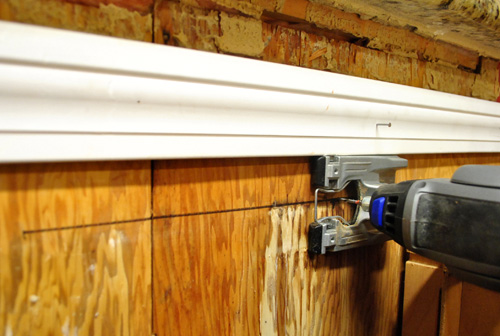
Well, straight enough. Oh and I turned off the power to the kitchen (and used an extension cord from another room to power my Dremel) even though I was only cutting the depth of the plywood – just in case there was a wire in my path. Luckily all wires were a lot deeper into the wall, so I didn’t come close to anything with my shallow cuts.
It took me a bit longer than I’d like to admit to make all of my cuts (maybe 90 minutes?) because of having to move (and double-check) my guide placement. But once I had sliced the plywood, it was easy to pry it off of the wall from there.
See? Look how fast I’m moving now. Oh wait, these photos aren’t time stamped…
I did hit one other speed bump when I realized that I needed to remove the trim from around the window (it was nailed in on top of the plywood).
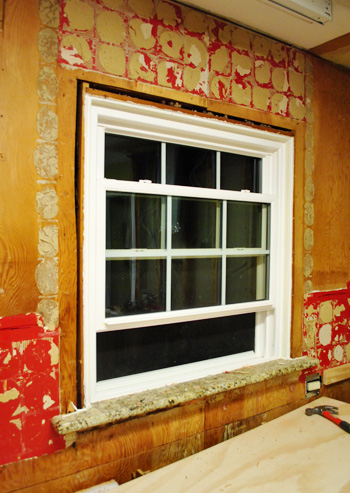
This also meant removing the last remaining piece of granite in our kitchen: the window sill. But like its granite-y brethren before it, we just had to slice its caulk seal and pry it away. Easy peasy. We’ll replace it with a regular old white wood sill like we had right above the sink in our first kitchen (white Corian would have been nice, but we’re too cheap for that, and semi-gloss paint on a wood sill holds up nicely in our experience).
Voila. So long granite. Sayonara plywood.
So there we have it: all of the demo’s officially done. And our kitchen is officially looking more disastrous than ever:
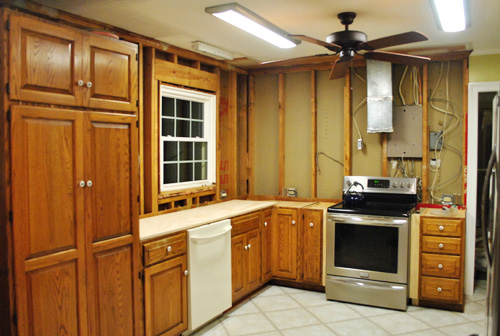
Not that where we started before demo was much to look at anyway:
Next up is the fun part. Okay, not really. Next up is hanging the new cement board walls along with some leftover paneling from the wall-opening project on either side of the window (since that wall won’t be tiled all the way to the ceiling and we want it to match the rest of the painted paneling in the room). And I’m going to be real here: this is not a process that I think we’ll particularly enjoy (at least we didn’t when my dad helped us do it in our old bathroom). But it must be done. And it also must be blogged about, so stay tuned for all the details as we go. In the meantime, I’d love to hear what you guys did around the house this weekend. Any tile stuff or demo going on? Does anyone have a fun demo story for us?

Amanda says
“all of the demo’s officially done” – are you guys planning to leave the ceiling alone? I thought there was something about changing out the lighting in the kitchen as well… or is that not included in the kitchen makeover?
YoungHouseLove says
Oh yes we have a new lighting plan to implement but that’ll mostly be getting an electrician to relocate some fixture boxes for us and then we’ll sparkle some holes and sand them down and repaint. So no sledgehammer…
xo,
s
Ariane says
No demo for me this weekend ! I’ve been busy doing different kinds of sealers in the bathroom upstairs … huge job ! first coat done !
Your kitchen is getting there, I can’t wait to see the backsplash !
Maureen @ This (Kinda) Old House says
Wow. This would make me a bit panicky. I still am amazed at how clean your house always looks even when it is torn apart. This is really exciting progress!
Seriously Sassy Mama says
I cannot wait to see the tile up!
Trina says
Wow, great progress guys! It’s really coming along.
We spent the weekend on some outside demo. We have been de-vining our side fences, only to find them barely standing up! Seems the termites have enjoyed quite a meal on us, ala our wood fences! Ugh! I think see new fences in my future!
YoungHouseLove says
Aw man, so sorry about that! Good luck with the new fences!
xo,
s
Paige says
No house demo-ing around here, but I did finally get around to making some Christmas decorations. Now we just have to put the tree up… ha ha.
http://finalclothesout.blogspot.com/2011/11/diy-mini-christmas-art.html
YoungHouseLove says
Cuuuute!
xo,
s
Rachel says
Whoa! That’s a lot of demo. At least things are only look up now!
We didn’t do any demo, but we did a few holiday projects which was fun.
Elizabeth says
LOVE the video! Haha!
No tiling around my house this weekend, but I did take down half an oak tree to get the branches off the corner of my garage and allow my beautifully blooming bougainvillea to breathe!
Tanja says
We were out of town this weekend in Seattle, my husband ran the marathon on Sunday. It was horrible weather; rain and wind. The little peanut and I hid out in the hotel room till they kicked us out.
Kudos to you on making progress on the kitchen. Can’t wait to see it completely finished.
deborah says
Well, we did not demo anything but we decided to have the anti black friday and made a mission to lighten the load of our home. With kiddos in tow (3&5) we went through every room and removed 1 box of items we no longer used or loved for donating. Our oldest (the pack rat) was upset at first until we talked about how her toys that she does not play with anymore but are still in good shape would make another little girls Christmas. Great family tradition and we opened up lots of storage in our house!!
YoungHouseLove says
Such a great idea!
xo,
s
Penny says
I love this idea!! Mind if I steal it?
Bridget says
I feel for you, we have had our spare shower down to studs for about a month because I am iffy on the concrete board! I will be checking that post for sure, and possibly tackling ours afterwards…
rosie-b says
Your cabinets look terrified.
YoungHouseLove says
Oh yes, they’re shaking in their boots. Look at those bug-out eyes. Haha.
xo,
s
ErinEvelyn says
We’ve past the demo stage (walls came down in our upstairs hallway AND stairwell, AND we’re redoing the first floor 1/2 bath). The plasterers are here today doing the 2nd coat, so we’re soaring toward the finish line, actually! Walls have to dry so WE can prime, paint, install new interior doors, flooring & trim! When will we trim the Christmas tree? I don’t know. Could be the perfect year to let the kids have their own small one and call it a day. These projects getting done WILL be our Christmas miracle! (LOVED the tile tribute, guys!)
JP says
Our tile backsplash wouldn’t pop off at all. We ended up having to smash it and pull it off in crumbly tile-cementboard chunks. It was a mess.
We also took the trim off the window when we put up the new cement board, but forgot to put it back on before the tile guys came. Now we have no trim under our window sill. It looks pretty okay, though.
YoungHouseLove says
Aw man, sorry to hear that your tile was so stubborn!!
xo,
s
Betty says
I had to break out the tissues when watching your tribute…it was so heartwarming…LOL!!
Kristen says
It’s coming along! I’m loving reading all the progress you guys are making in the kitchen!
Jill says
You guys are making such good progress! When we bought our house it had a TINY kitchen that consisted of one 7 ft-long wall of cabinetry and a sink. While we were preparing for a contractor to come in to knock down walls, we ripped up the floor and had plans to take out the entire kitchen (minus the stove and fridge).
I put an ad up for the kitchen cabinets, countertop, sink, and faucet (pre-demo) and had tons of interested people. Later that day the buyers came, actually helped us with the demo since we hadn’t had time to take everything out yet (they were actually licensed plumbers – score!), and took everything away for $400. It felt awesome – we got rid of everything, got a little cash, and the buyers got pretty new stuff to use in their own remodel at a good price. It was quite possibly the best craigslist experience EVER. :)
YoungHouseLove says
That’s awesome!!!
xo,
a
ERA says
Came across this Hue Test this morning and thought you guys might enjoy it. Maybe you’ve taken it before, maybe not but either way here ya go!
http://www.xrite.com/custom_page.aspx?PageID=77
YoungHouseLove says
Thanks! Off to check it out!
xo,
s
Jason says
Do you think you should go ahead and throw some insulation in that wall to keep the cold and especially heat from the sunroom from cooking that wall when you have the sunroom system off?
I know you are moving right along, but did you ever think about knocking out part or all of the wall to the laundry room and making the kitchen bigger? You could have your laundry in a nice pantry style cabinet and you’d have all that extra light and space? It shouldn’t be load bearing since the wall perpendicular to it was. All the cabinets could go on that outside wall.
YoungHouseLove says
Our kitchen is 25 feet long do we don’t need to make it any longer (it’s sort of bowling alley-ish already, haha). As for insulation, the sunroom is very well insulated (it was built quite recently) so here in VA interior walls don’t typically call fire tea insulation since we have a pretty mild climate.
xo,
s
Jason says
That is true, it is a nice long space. That is so weird on the original outside wall having no insulation, isn’t it half the fun the mysteries you find and wondering who did that?
YoungHouseLove says
Yes! We wonder if it was somehow removed during the addition! So odd.
xo,
s
Jesse Rader says
Since my daughter is asthmatic and allergic to dust mites and was sneezing all weekend, it was time to rip out the rug in her bedroom at the beach house. We were inspired by your corking of the kitchen but could not find anything that will go. We have wood pine beamed ceilings and the house is only 850 sq ft I did not want to overload the brown factor. We were hoping to find something nice to refinish underneath but no. So we just have exposed boarding and are thinking of painting the floor. Any pointers?
YoungHouseLove says
We had a great experience with Behr’s Porch & Floor paint when we painted our old sunroom and wood deck. Maybe check that out?
xo,
s
Kim at Yellow Brick Home says
Good gracious, I about choked on my coffee when the video turned from color to grey… SO funny. Like, really, really funny.
Abigail says
would you believe me if i said i actually think it’s looking better? there was so much visually going on between the plywood, the red paint (ekk!), and the tiles!
the only demolition we did here this weekend was demolition of piles of accumulated papers! (which, admittedly, takes the same amount of time as real demolition.) we had wanted to start priming, painting , and drilling the holes for our 36 brackets to make a much-dreamed-of wall of bookshelves but didn’t get to it. it must be the mental block of having to drill those 72 holes in our reinforced concrete walls that’s putting us off. yuck.
Jess @ Little House. Big Heart. says
No demo at the Little House, unless you count putting away all the fall decorations and putting up our Christmas!
Glad the reno is going along seamlessly!
Sandi says
How high are you taking the backsplash on the sink side?
Also, now that you’ve got your window untrimmed, now might be a good time to improve the insulation around the window. Some spray foam in a can should do it!
YoungHouseLove says
We’re going standard (18″ high) on that side (there will be some upper cabintry that will set the “guide” for it). As for insulation, the window actually looks into the insulated sunroom, so it’s not an exterior wall.
xo,
s
Rachel Tatem says
Wow! Moving along. Excited to see the finished product
Lisa A says
Thanks for this post! We, too, have gutted our kitchen and I totally forgot about the whole cement board thing! Thank you for putting that bee in my bonnet…a very welcomed bee I might add b/c now we can put up the cement board as well as our drywall and not have to rip out the drywall b/c we forgot about the cement board! Duh! You guys have helped us so much!
YoungHouseLove says
Aw so glad Lisa!
xo,
s
Kasey March says
I can’t wait to get home and watch the video again – this time with sound. Still found myself holding back giggles at my desk.
PS Also watched all the Clara videos from last week on mute. Can’t wait to actually hear her count!
Heather Grilliot says
Amazing…ok I have to know, do you ever panic in the midst of these projects? I can’t wait to see how it all turns out and in the end it always seems like it was easy as pie (or maybe you make it look that way). Love Johns safety glasses by the way!
YoungHouseLove says
Haha, we did a lot of panicking at our first house. For some reason we’re more chill now that we have certain experiences under our belt (like gutting a bathroom and hanging drywall). Sometimes something throws us for a loop (like when our old cooktop shattered when we were trying to remove it) but we just try to go slowly and take our time and remember that speed bumps happen in DIY, it’s just par for the course.
xo,
s
KathyG says
Good Job! I can see feeling nostalgic about them. Things like that always have a story. The tiles remind me a lot of the satillo tile we see a lot of out here in the southwest. Any background from prev. owner as to where/how they decided on those tiles?
I loved the look of my satillo floor tiles for many years, but eventually it becomes reality that they are actually made from dirt – I had a dirt floor! haha
YoungHouseLove says
We’re not sure if the previous owners picked them out or if they were installed before they moved in with the rest of the kitchen (in the 80s). It’s a mystery!
xo,
s
Kim says
Looks great! The only demoing I did this weekend was on the leftover pumpkin pie…
YoungHouseLove says
Bwahaha. Comment of the day!
xo,
s
Rebecca says
Sadly I think it looks better with the plywood removed than with the some plywood, some red, some tile, some trim! You are really moving along!
heating and air rock hill sc says
That looks so nice! I bet you will spend Christmas in a wonderful place, proud of all the work you have done!
Claire says
So impressed! I know that the blog is your third baby, but have you ever thought about becoming licensed contractors? Mabye Sherry could even do some interior design work?
YoungHouseLove says
We have honestly not ever entertained that idea! Haha. We love doing it for ourselves and learning as we go, but we’re definitely not expert enough to feel comfortable doing that stuff for “clients.” Blogging about our own house adventures is definitely our favorite pastime these days, but you never know where we’ll be in a decade or two!
xo,
s
Jen says
I love watching the progress! These are all the behind-the-scenes stuff that inexperienced folks (like me) would never appreciate just looking at before-and-after pics.
Kelli@becomingkelli says
Yep, I was demoing this weekend, too. I ripped up three layers of linoleum, each more hideous than the last. Thankfully we didn’t have to move the sink for the demo(since we’re just replacing floors right now), but our fridge is in the living room, right next to the stove/oven. What do you guys eat while stoveless? Or is yours still connected? I’d love to take a break from turkey sandwiches…
YoungHouseLove says
Thankfully we still have the stove and fridge and even the dishwasher hooked up. We miss our sink but it could be so much worse!
xo,
s
Katie R says
Actually, yes, we did do some demo this weekend! We’ve finally got everything lined up for our kitchen renovation so we ripped out the existing cabinets and sink and appliances. The old tile floor is being professionally removed today (and maybe the backsplash if we can sweet talk them into adding that too). We’ll have a few weeks to prep the walls for paint and the new tile backsplash, paint trim, and then install the cabinets. A quick question about the leftover tile adhesive: if you were going to keep the existing walls (ours are plaster board), how would get rid of the old glue?
YoungHouseLove says
Hmm, never tackled that. Anyone have tips for Katie?
xo,
s
Jessie SP says
How do you guys like to cut cement board? I have some unsolicited advice for you – use a wet tile saw. It eliminates the nasty dust you’ll get from lots of other cutting methods, and it’s SO easy, just like using a table saw. We came up with this brainstorm when cutting cement board for our woodstove installation. We bought a cheapie one (under $100) at HD for our various future tile projects. It works great and it’s small and easy to handle. It’s a pain to rent tools where we live, and buying it was only about the cost of two rentals.
Check it out: http://53masonstreet.blogspot.com/2011/01/woodstove-installation-part-1.html
Keep truckin’!
YoungHouseLove says
Thanks for the tip! We’ll definitely have to consider that option!
xo,
s
Meghan says
Love the coaster idea. For a fun and EASY DIY project, pick up a few 28 cent (or so) tiles from Home Depot, cut designer papers/maps/pictures to fit, and Mod Podge the pictures to tile. Cover bottom with cork or felt. My sister made these for favors for her wedding and I just made a set with maps for a friend’s wedding this past weekend. So fun and ridiculously easy.
YoungHouseLove says
Love it so much!
xo,
s
Lindsay says
I’ll take demoing a plywood wall over a plaster wall any day! Our kitchen demo was SO. DUSTY. We wore masks and glasses but I had Marie Antoinette powder hair after taking the ceiling down. Perhaps I will consider a hat next time :)
kathy says
No demo-ing this weekend, since we were at the in-laws house but when we came home I took out the old bulbs in our back porch lights and put in one green and one red on for Christmas haha
jeannette says
you are the man.
Jocelyne says
Nothing to do with kitchen demo, but thought I would let you guys know there is a Jonathan Adler sale on at 12:00EST on Gilt.com (in case you need more ceramic animals at a good price).
YoungHouseLove says
Wahoo!
xo,
s
Erin says
My dad visited so we took full advantage- he “helped” hang 2 pieces of art, cement caulk our front door threshold, build an ikea china cabinet and install an above the range microwave. I only wish he was able to visit more!
Martha says
Things look like they’re coming along! I can’t wait to see how it looks finished.
On a totally separate note, this is the first negative comment I’ve posted, but I really don’t like the embedded advertising links in the blog post. You guys do a lot of links in your text normally, and even though I’m used to how those links look, I still clicked on an advertisement. I haven’t seen it before today. Is this a new ad thing for you?
YoungHouseLove says
Hi Martha,
We actually don’t do any embedded text link ads (we say no whenever someone asks us to place them on our site) so none of the links in this post are paid placements. I’m not certain what you think was an ad in this post. Perhaps the Dremel link? That was something we included to be helpful to someone else who may tackle a project like this and want the right tool, but it’s not a paid link or even an affiliate link (those need to be clearly marked or it’s actually illegal and a blogger can get in giant trouble).
-John
Martha says
Thanks for confirming! I looked into it, and I think it was some spyware, because the bogus links disappeared after I scanned and cleaned my system.
YoungHouseLove says
Oh so glad! Whew. We have a strict policy against link ads so of anyone ever sees them, they’re either unauthorized (aka: hacked in) or it’s a spyware issue on your end. But feel free to ask or alert us to them in case it’s a hacking issue!
xo,
s
Emily says
Nice work, your get er done progress is inspiring! Love the tile to coaster idea. I did that as wedding favours. We got a custom rubber stamp made and stamped 4×4 marble tiles then sprayed them to protect and added felt feet (though those plastic sticky dots would be good too). They were a hit and I still see them in our friends homes (5+ years later)!
Heather says
No insalation? Gasp!!
YoungHouseLove says
It’s an interior wall (it looks into the insulated sunroom)!
xo,
s
Suzy says
I’m glad I read through the comments because I too was worried (hehe) about your lack of insulation! I’m from Chicago and well the first thing that comes to mind when taking down a wall is all that insulation dust or the old insulation rolls just falling all over the place.
Erin @ One Project at a Time says
Nice work! My Hubs and I said we were taking the holiday weekend off of DIY, but managed to fit in a little “Ikea Off,” each of us building the same Ikea bookshelf to see who could finish first. It was pretty hilarious, and we made a little time-lapsed video about it. http://oneprojectatatime.blogspot.com/2011/11/ikea-off.html
YoungHouseLove says
Haha, I love it!
xo,
s
Penny says
Best part of the video: the 2 birds on a collision course. I lol’d for real.
Meg@Keeping up with the Jenks says
I just noticed the Yoyo.com add in the corner. did you pick out the gifts that are shown? Or does the internet know that those are the exact three presents I just bought Isla June for Christmas??
Just wondering if we are way too on the same page!
YoungHouseLove says
Haha, it must know you! I see ads for stuff I look at on overstock a lot! Always catches me off guard and then I remember it must know me!
xo,
s