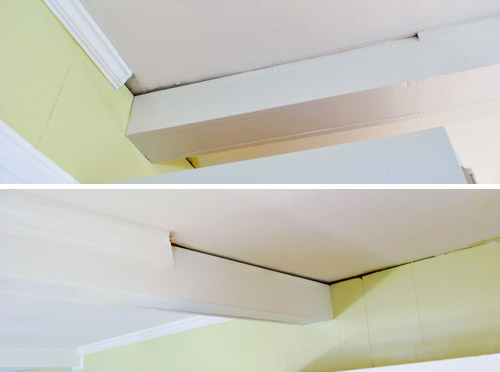
We’ve long disclaimered pictures of our kitchen with “oh, and we still need to add crown molding.” But that stops today! The unfinished edge where the wall/tile meets the ceiling…
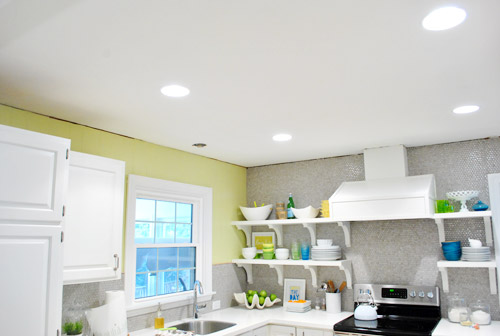
… is no more!
Let’s get a little closer…
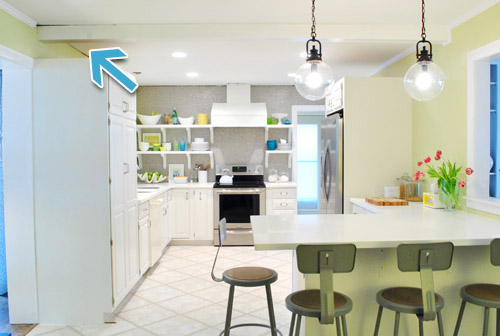
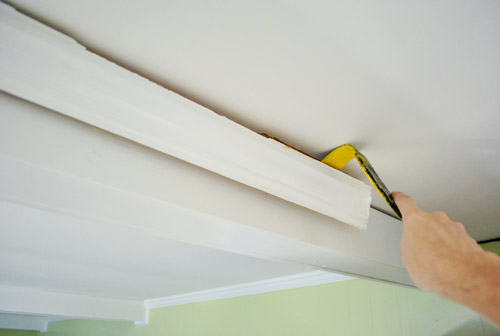
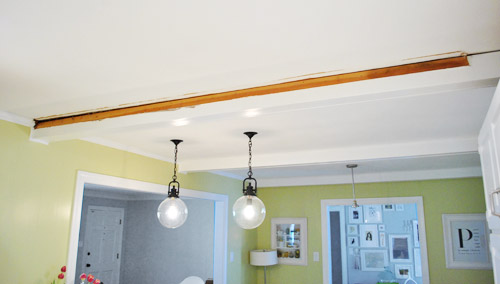
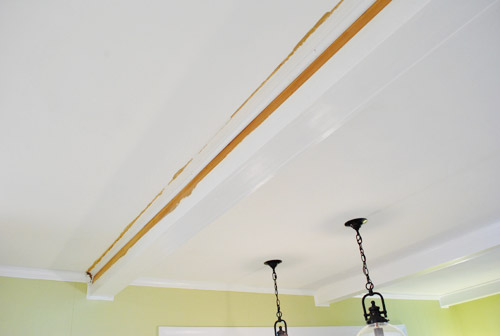
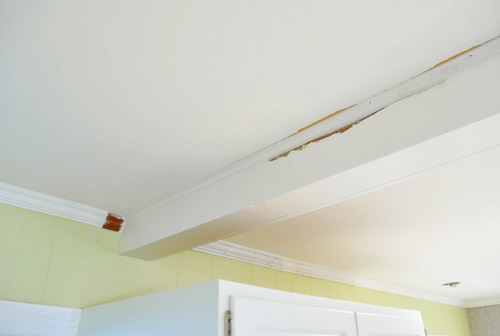
Wait, let’s rewind so I can attempt to tell you how we got there. For all of those who have been wondering about that dark line above our pantry (a few folks asked if the beam was sagging or if there was a hole) – it’s just another spot where we’ve been missing crown molding. Since there had originally been cabinets to the ceiling along that entire side of the kitchen (including one that wrapped around that beam), we’ve been stuck with a few crownless areas since we took those cabinets down in November. So they look dark and crag-y without trim to lend that finished look.
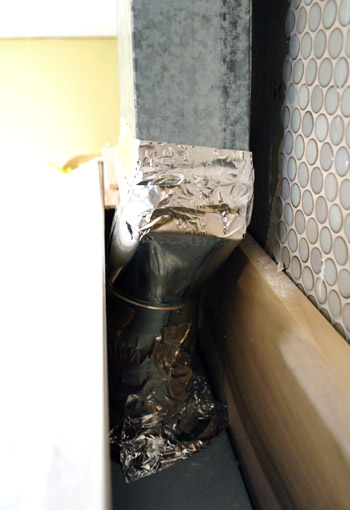
But before we could start installing crown molding, we had to make a quick fix to our hood. In a rush I had used some regular duct tape to seal up the vents on my hood. Hey, it’s called duct tape, it has to work in ducts, right? Wrong! A few smart commenters expanded my tape knowledge on my hanging post (and kept me from having some ventilation issues down the road) by reminding me that I needed to use the real metal foil tape stuff instead. So I took a moment to pry off a few pieces from my wood cover…
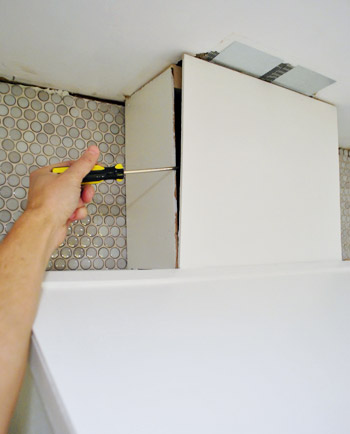
…and shimmied my hand in there enough to remove the bad duct tape and rewrap everything in the legit foil stuff.
But enough about tape. Let’s talk crown molding. This will be a bit hard to explain (and the fact that I took less-than-stellar pictures of this process won’t help me), so bear with me:
Our kitchen has three types of crown for some weird reason. There’s traditional crown around the perimeter of the room – except that it’s very very slightly smaller on the fireplace half of the room (nothing you’d ever notice with the naked eye unless you were literally holding them up next to each other, but thanks to the beams they never touch so we didn’t even detect this phenomenon until we tried to fill in a few crown-less areas and learned it was slightly different). Meanwhile, the beams just have a thin cove molding on them except for one side of one that randomly has thick crown running across it – so strange!
So our challenge was that we had to replace small bits of all three and remove the way-too-thick trim on that one mismatched beam. Because redoing the entire room from scratch would actually have been a big project and a pretty pricy undertaking since all the beams that would have to be trimmed out on each side would add up to the equivalent of about four rooms’ worth of trim.
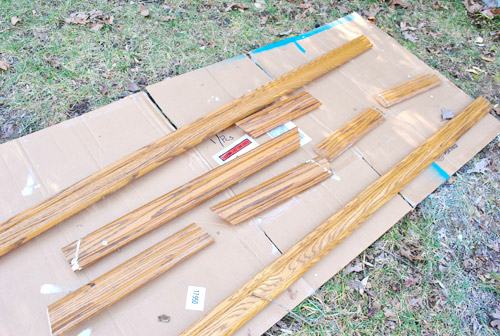
Further complicating things – none of the molding seemed to be the standard stuff you can buy at Home Depot, so we couldn’t just fill in the gaps with fresh pieces from the store. The only thing saving me from having to re-crown the entire room? I had carefully saved every single piece of crown that we took down with the cabinets.
Of course it needed some primer and paint to keep flashbacks of our old woodsy kitchen at bay (we like Zinsser Smart Prime when it comes to painting wood trim since it can bleed through and ruin your paint-job if you don’t use a stain-blocking primer first). Then we followed that with a few coats of off-the-shelf white from Behr (the one with paint + primer in it, so it gave us great coverage with stain-blocking primer underneath it). Why did we use that paint? It was what we used for the rest of the trim in the kitchen back when we painted the paneling. It’s a really nice crisp white color that layers in nicely with our white Corian couners.

Now for the bad news: I was short a few pieces. Wop wop. My leftovers of this large sized crown weren’t enough to fill the gaps around that side of the room. Then I had a flash of brilliance (or used ordinary common sense that any human being would possess) and realized that the odd mismatched beam with the thick trim on one side was the right size for the job. So I could steal it from there and replace it with store-bought smaller trim (which exactly matched the stuff on the other beams- or was at least really close). Then the whole room would have trim that actually appears to make sense and I wouldn’t be short on trim to finish the job. Talk about lucky breaks. That weird mis-matched beam actually saved us from having to re-crown the entire kitchen.
So the good news was that I had another big, long piece of crown to use to fill in all the spots that needed filling in. And the bad news was that the kitchen was actually looking a lot uglier at this point:
Now this is where my photos start to get terrible. I don’t know where my head was (actually I do – I was in a post-book photo shoot fog). So forgive me that this isn’t really a “how to install crown molding” post and more of “here are fleeting snippets of how we did it and some pics of the finished product.” Maybe next time I’ll be a better documentarian (we’ve always wanted to put crown in Clara’s room along with the other two bedrooms on that side of the house, so we promise to take better photos and actually share a step by step rundown when we do). And in the meantime, here are links to some of the tutorials that I learned from (since this was my first time and all). I read the ones here, here, here and here.
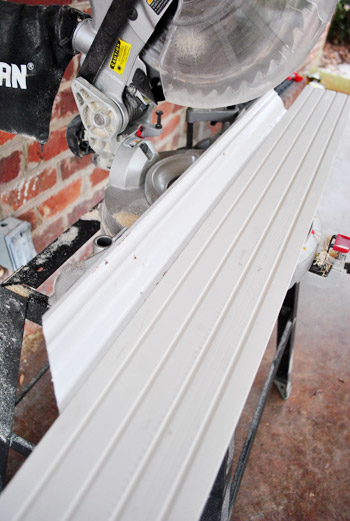
Cutting was interesting, to say the least. You have to cut crown at the same angle that it will sit against the ceiling – i.e. not laying flat. One of the tutorials suggested temporarily gluing a piece of guide wood to your saw table to help hold the piece of molding at the angle. I took a picture of myself starting to try this, but it never really worked for me (I didn’t want to use heavy duty glue and ruin my saw, and the lighter duty stuff I had wouldn’t cure thanks to the cold temps).
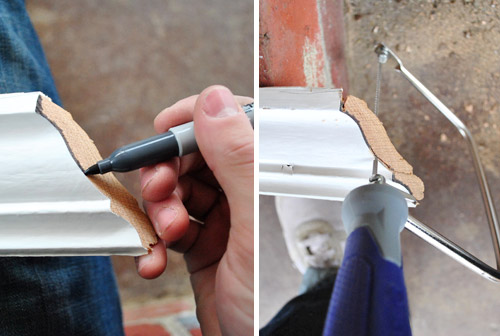
And even once I figured out how to make those cuts (just by holding things by hand), I still wasn’t done cutting. I still had to use a coping saw to get rid of some extra overhang that would prevent my corners from sitting flush. See that going on below? All of the tutorials suggested marking the edge with a darker marker to help ensure that I was cutting as close to the edge as possible. I guess it helped.
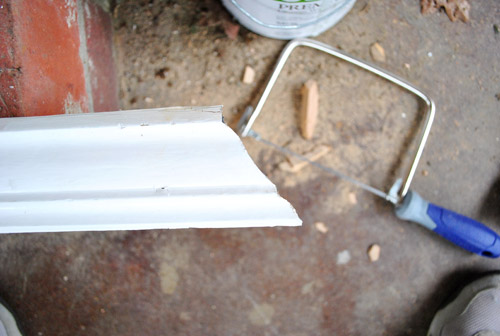
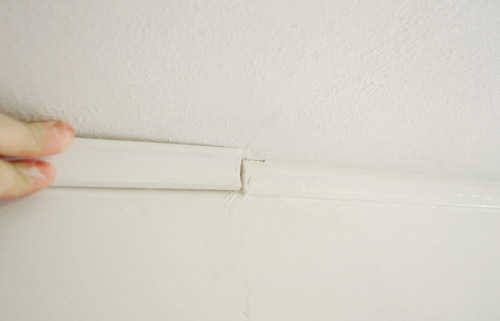
Being my first time, things went okay – but I’ll admit my cuts weren’t perfect. Nor was my ceiling perfectly flat (oh the joys of an older home). But everything was sufficient enough that a little caulk and paint ended up finishing it off really well. Whew. So here are my first few pieces in place (without caulk and paint yet, obviously).


Despite having primed and painted all of the pieces, the general banging around that happened during the cutting / coping / hammering process got them fairly beat up.

No biggie, I knew we’d have to break out the paint anyways for nail holes and more obvious spots (like where we would be replacing the big crown on that one beam with smaller cove molding).
Speaking of cove molding, remember how I was missing just a small section on the other side of that beam? Well, I had hoped the new stuff that I got from the store would match… but I wasn’t so lucky. Turns out our existing stuff wasn’t a standard size. So that one whole of the beam ended up needing to be replaced with something slightly larger. Thankfully since each side of the beam runs into thicker crown around the perimeter (and doesn’t meet other beam trim on the other side) the difference isn’t detectible at all (it’s one of those you-can’t-tell-unless-they’re-next-to-each-other-things). So although it might sound annoying to replace one side of a beam for a small missing piece of not-standard cove trim, it was muuuuch better to replace the side of one beam instead of six sides of beams and ten perimeter pieces between each beam and around the rest of the room. In short: it could have been much much worse.
And I did get lucky when it came to the small section of missing crown on that side (remember how it’s slightly smaller than the rest of the crown in the room?). In a last ditch effort to keep from having to replace all of the crown on this half of the room, I found a single piece of matching molding in a trash bucket in the basement. I was never so happy to see old orange-y trim in my life.
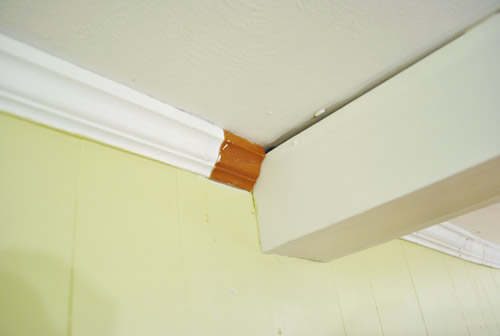
So here are those pieces installed and caulked over. The shot below sort of demonstrates how the thinner trim along the beams meets the thicker trim around the room, so I hope that makes sense now. And yes, this is the only picture that I ended up snagging of the whole caulking and painting process that Sherry and I tackled over the course of a few hours. Basically we just used white paintable Dap caulk and a caulk gun to run some beads wherever we need to fill things in, smoothed them with our finger, waited for it to dry, and painted it to keep it all looking seamless.
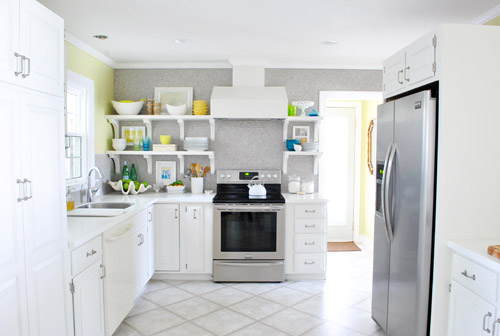
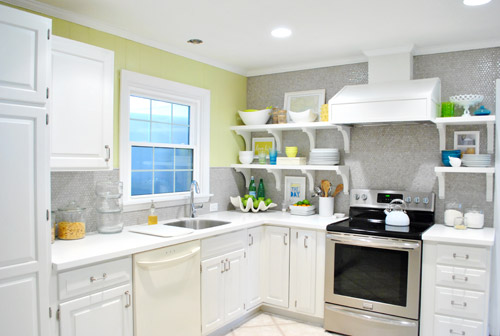
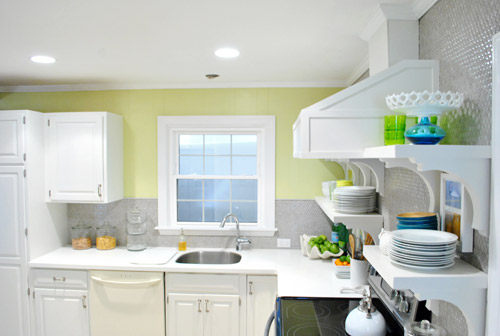
So let’s just fast forward to some afters, shall we?
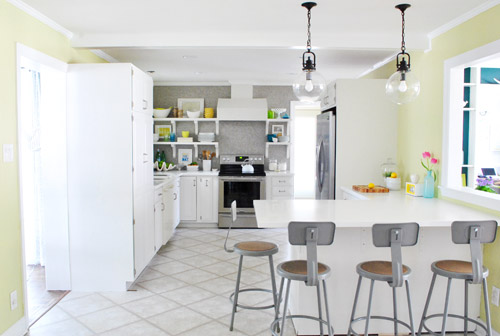
It’s a small change, but it makes a pretty noticeable difference in our opinion. Minus the empty fixture hole in the ceiling above the sink (and mismatched dishwasher) you could almost be tricked into thinking this was a finished room now. Although the real game-changer will definitely be those cork floors – which we’re more anxious than ever to get in there so we can call this kitchen done-zo. Slowly but surely.
Oh yeah, and since everything came off the shelves when the trim went up, of course it didn’t all go back up in the same way. In other words: Sherry had a grand ol’ time playing around with a few things – like adding two more frames, eliminating some stuff that we realized we weren’t using very often, and just playing around because it’s her idea of a good time). As for a few of the frames that are actually hung, we used 3M removable picture hanging strips (which meant no holes in our tile and an easy-to-remove-whenever-we-want result).
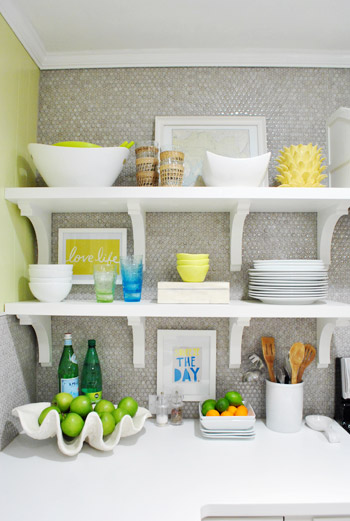
Oh and since some of you requested a photo of the window to see the slice of “breathing room” on each side that finally makes it looked balanced, here it is. Once we have a nice gleaming pendant light hanging down in front of the window it should be pretty darn charming. It’s a nice little airy spot since the wall of shelves is a pretty big focal point, so not filling up every square inch of every other wall feels like the way to go for us. We’re also toying with something on the window (roman shade or blind) so we’ll have to keep you posted.

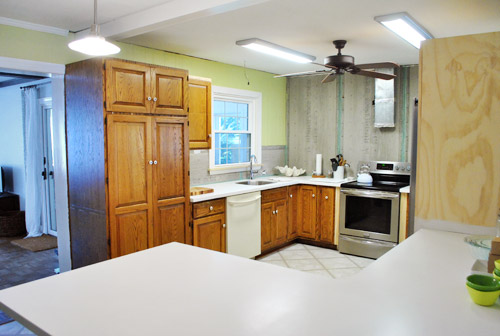
We’re thankful that it’s a far cry from the crazy off-centered deal that we had going on for a while before the tile and shelves went up to restore the balance:
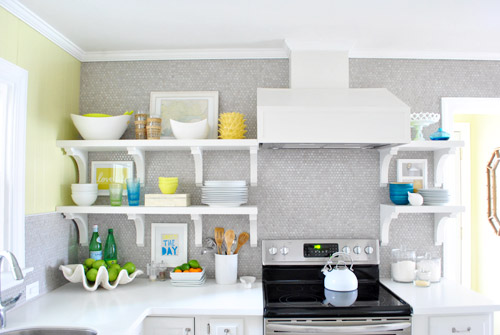
Here’s another shot from a similar angle where you can see more of the crown.
And another:
So that’s where we are. Next up: finding/hanging a pendant over the sink, finishing the peninsula with some decorative wood molding, installing the dishwasher, and finally adding those cork floors so we can call this 3.5 month marathon done! Oh yes, and doing something to the side of the pantry and possibly altering the stools is at the very end of the list (not sure how the cork will change things so we don’t want to jump the gun on either of those things).
What did you guys do this weekend? Any trim hunting/cutting/hanging? Or open-shelf tweaking? Or metal-foil-tape using?

Kathy S says
Oddly enough, I’m putting in crown molding in a few places in my new-old home too! I’m wondering how many times you had to caulk your laps and corner joints — mine is a few times so far, and I can still see the lap joints when I get close enough. Yours look great! Or was the camera just not close enough? :)
YoungHouseLove says
I think two rounds of caulk followed by paint did the trick :)
xo,
s
Jerry says
Fabulous work! I need to get crown moulding done in my place as well. This is my next DIY project. If you got time, you can have a look at my blog on home tips – http://mouldmen.com/