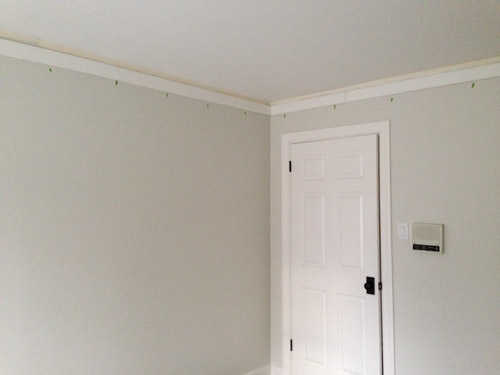
We hoped to have all of the nursery’s extra chunky crown molding painted, cut, hung, caulked, and touched up by the end of the weekend, and we just made it by the skin of our teeth (where did that gross expression come from anyway?).
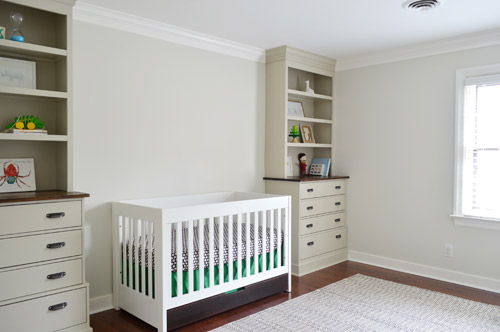
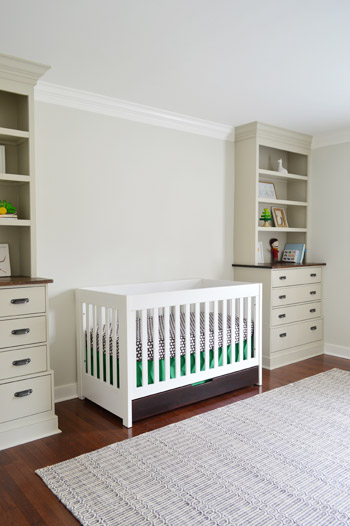
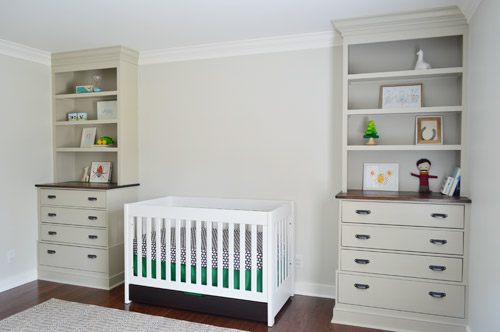
Crown is always one of the those “it’ll be nice” things on a to-do list, and then whenever we add it we’re blown away by how much of a difference it makes. Even the most basic and boxy rooms suddenly look taller and just generally upgraded in a surprisingly significant way. Which we always appreciate since a lot of the rooms in our homes have been devoid of amazing architecture (no extra high ceilings, arched doorways, cool columns, etc). So between the addition of our little corner built-ins, and the new extra chunky crown, this 11 x 13.5′ rectangle of a room is really coming along.
You know, after eight months of looking like this.
Don’t get me wrong – we still have a long way to go (there are three completely unaddressed walls, and not nearly enough color/fun/personality yet), but this chunky crown molding is a pretty glorious sight. It erased all of those unfinished cracks and crevices and made the room feel so much more polished in a few short days.
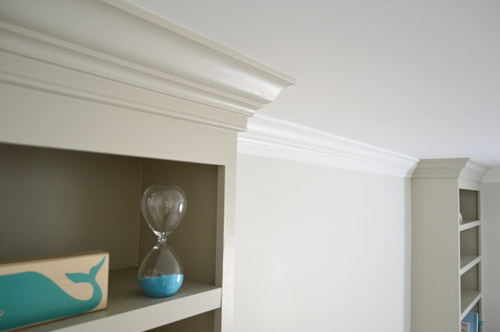
As for how we installed it, we followed the same method that we tried out in Clara’s room, which is to use 3 1/4″ baseboard as the first “layer” – and run that around the room first. We used a spacer to drop it an inch and a half down from the ceiling for more of a chunky look, a level to make sure it stayed straight, and we marked our studs with painters tape so we knew just where to fire the nail gun into the wall to hold them up.
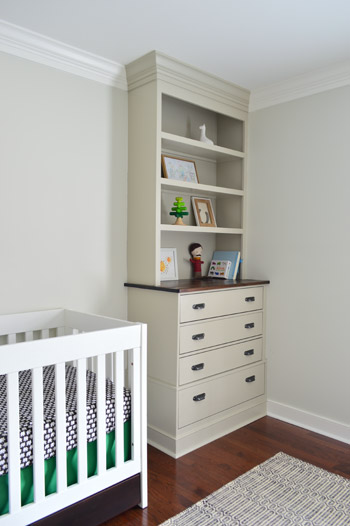
The second “layer” involved hanging actual crown molding (we got nice beefy 4 5/8″ stuff from Home Depot) right over the baseboard, for that extra chunky look. You can see how the left piece has been “crowned” and on the right there’s just baseboard waiting for us to hang crown over it to complete the look. This is how all the crown on the first floor of our house was done, along with the stuff in our master bedroom, so we wanted to keep any new crown that we added looking cohesive.
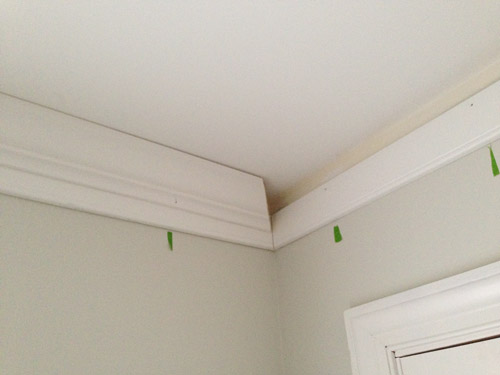
We went with pre-primed baseboard and crown to save ourselves a step, so we just had to lay it out on the floor with a drop cloth and paint it before we hung it. We prefer that to painting it in place because it’s a lot faster, and then we only need touch-ups after hanging it and caulking it. It was funny to paint just a tiny bit of it with the built-in color, and the rest of it white, but we’re really happy with how it all turned out.
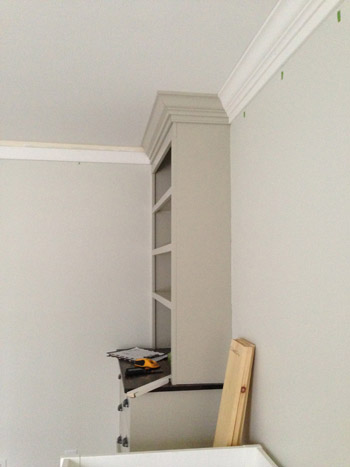
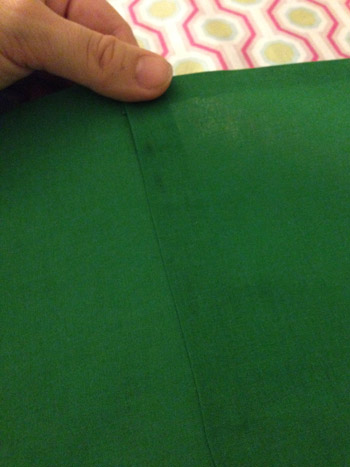
Here’s the crown between the built-ins after it was hung but before we caulked it or did any paint touch ups. See the slightly imperfect wavers of the ceiling above it? Those are nice and finished looking when you squeeze a line of caulk up along that crevice and just drag your finger across it to force it into those small gaps. And if you wipe it fast enough (we apply it about a foot at a time) you can usually get it off the pre-painted ceiling and crown so it’s just in those cracks and there’s no need to touch up the ceiling or crown again for the most part, which is nice.
After some final paint touch ups (mostly along the nail marks that we filled with caulk), and removing all of those tape marks for the studs, it gets a lot better looking. Like so:
For anyone looking for additional details and photos of this chunkier crown effect using baseboards + molding, you can click here to read about how we installed it in Clara’s room. The cost of hers rung in at $137, and that’s a significantly larger room, so although we can’t find the receipt for this latest trip to Home Depot, we’re guessing it was around $115 to do the nursery. And you’ll want to add a tube or two of caulk and a can of paint to the project cost if you don’t have those on hand already.
I also finally got to dive into the crib bedding arena, which you all know I’ve been excited about thanks to John’s revelation that I wander around the house impersonating Golum and whispering “CRIIIB SKIRT.” Here’s a close up of the sweet little organic crib sheet that I found on sale from Pottery Barn for $9.99 (I think we paid something like $25+ for organic crib sheets before Clara was born, so I’m psyched to see that these have become a lot easier to find & more affordable in the last four years).

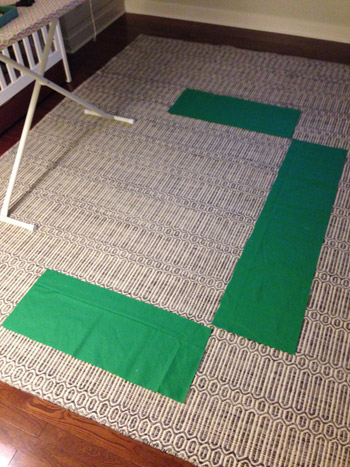
The green rectangle behind that parade of adorable elephants is just 1.5 yards of fabric that I grabbed from JoAnn during one of their 50% off sales. So the grand total for the 1.5 yards of fabric that I needed to make the crib skirt was a wallet-busing $3.73. You know I did The Mom Victory Dance at the checkout, right? For those not in the know, that involves all sorts of ridiculous movements like high fiving your embarrassed husband and waving your hands around like you’ve won the lottery when in fact you have just saved something like $3.50.

Once at home, I laid out my fabric and cut out three pieces (two sides and a front) which will make up the crib skirt. To get the measurements of those three pieces, I just measured the crib skirt area’s height and width in that section, and then added 3″ to each measurement (to account for 1.5″ hems on each side). So for example, if the measured height for the side panel of the crib was 10 inches, I added three more to make it 13 inches. And if the measured length of that side panel was 28 inches, I added another three inches to make it 31.
Oh and it would be a nice moment for me to mention that if you’re using any fabric with a pattern on it, make sure your three panels all go in the same direction and have the pattern level or centered (so you don’t end up with wonky stripes or something from cutting things in the wrong direction). You might need more yardage for certain patterns or longer crib skirts.
I debated sewing these panels together or just using Heat N’ Bond hem tape, but since the crib skirt that I made for Clara was with Heat N’ Bond, and it held up really well, I figured that was a good choice again – especially since this is more of a tucked away element in the room (for example, I sewed Clara a quilt, but I used hem tape for her crib skirt, since it’s less of a hands-on item).
As far as what materials you’ll need if you’re attempting to make a crib skirt using this method, you’re all set with fabric, hem tape, scissors, and an iron. Oh and some velcro tabs, but we’ll get to that in a minute. First you just need to use hem tape on all four backsides of each of your three panels to hem them for a nice finished look in the front.
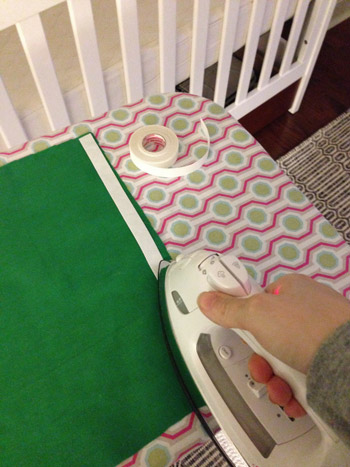
It’s really easy stuff to use, just iron it on, peel off the backing, fold the fabric over, and iron it again to make a hem. The fabric panel on the left of this picture was hemmed on all sides, and the panel on the right was also hemmed all the way around, and then I laid one more strip of hem tape down the side (along the back edge) so that I could join these two panels by ironing it on, peeling the backing, moving the second panel over the first one to overlap them, and then ironing that edge so they were fused together.
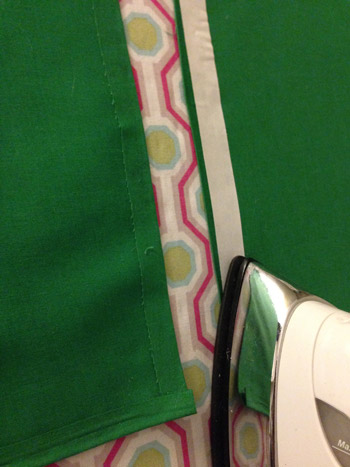
Once you turn it over, you’re left with a nice clean seam in the front of the fabric. And that seam will fall on a corner of our crib (behind one of the legs) so it won’t be seen.
I joined the middle panel to the two end panels this way on both sides and then it was ready to be attached to the crib. I used small velcro tabs around the metal frame of the crib to hold our skirt in place (you can get them at JoAnn or Michael’s which is also where they sell Heat N’ Bond).
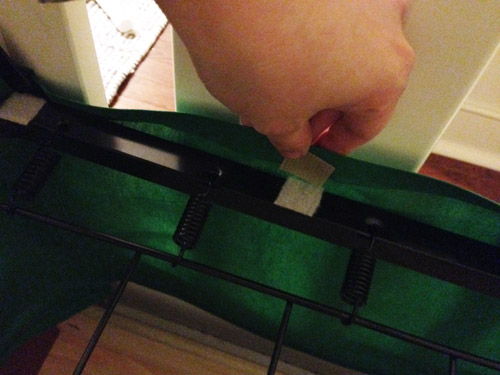
Velcro is a nice option because it makes it easy to remove and wash it if you ever need to (hem tape is washable if you follow the directions and avoid high heat).
Our crib mattress will be lowered once the little guy is more mobile, so we won’t always need this skirt to bridge the gap between the bottom of the mattress and the drawer, but it’s such a fun little addition. Especially for $3.73.
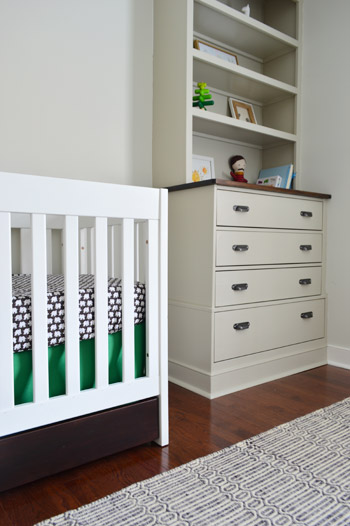
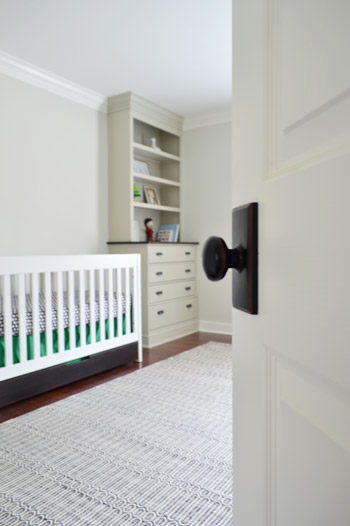
We also used two coats of satin PolyShades gel stain (in Tudor) to make the bottom drawer of the crib a little darker, since it was looking kind of reddish-orange in comparison to the floors and the wood dresser-tops. We thought a hit of darker color would be nice to ground our light-colored crib, and it would also tie into things like the dark hardware on the built-ins, the chocolate elephant crib sheet, and even the oil-rubbed bronze doorknob that leads to his room.
We sealed the PolyShades with two satin coats of Safecoat Acrylacq, which is an awesome non-toxic sealer that keeps things from off-gasing, since Polyshades is low-VOC but not no-VOC.
It’s probably obvious that I just tossed like eight things on the built-in bookcases so they weren’t painfully bare, but I literally gave them four minutes of my time, so I can’t wait to gather some baskets and frames and books and toys and other fun nursery items to fill them in for real. (Shout out to the lone giraffe on the top right shelf). I think they’ll end up being super functional and a nice way to add a lot more fun/color/personality to the room, so I can’t wait to get cracking.
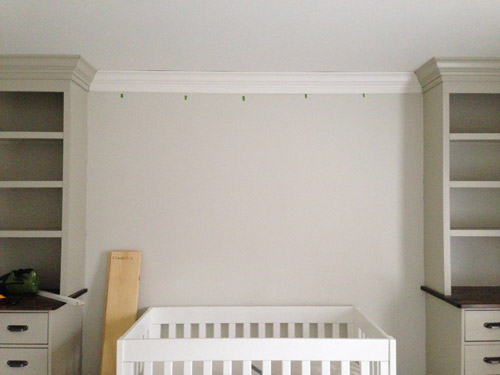
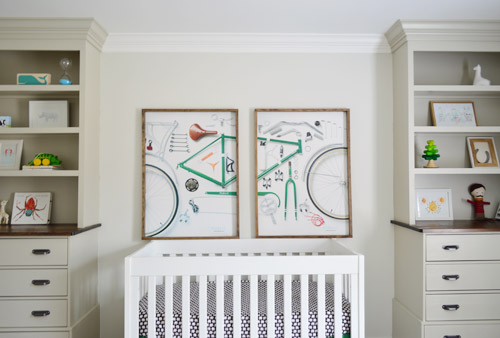
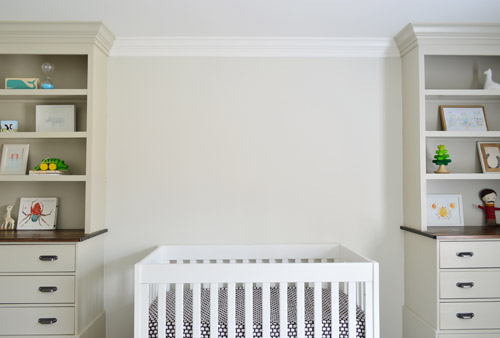
For the space above the crib, we’ve been debating everything from large scale art to some sort of accent like a slatted wall or a giant mobile. We even tried leaning the bike prints up there just to see what they’d look like, but we think they’re better suited for the opposite wall since they look a little busy with the built-ins.
So we’re planning to fill those built-ins “for real” and then see where we end up with that wall. I think we’re leaning towards a really fun large scale mobile – maybe like this but with hits of bold green, black, and white? And maybe another animal instead of birds (Burgers? Or whales since he’s The Barnacle?)…
What did you guys work on this weekend? Do you have any mostly-empty bookcases that you’re ready to go nuts on? Or some bare walls that are begging for some action?
Psst- To see our nursery progress from the very beginning, here’s the planning and rug-buying post, the dresser-sourcing post, the wall and ceiling painting rundown, the first half of built-in building, and the second half of the built-in project.

KiKi B says
I’d say definitely go for the mobile, I thought it as soon as I saw the space and I was so excited to see it as a ‘maybe’ for your plans. The room looks a-may-zing, it’s an incredible transformation from the beginning. I can’t wait to see what you have planned.
All the best to you all (and the littlest one!) x
YoungHouseLove says
Thanks so much Kiki!
xo
s
Rachel K says
Wow, this is just amazing. I absolutely love how the built-ins turned out with the crown molding and what an awesome score for the crib sheet.
I made a crib skirt for my bed by purchasing curtain panels from home goods, cutting strategically so the hemmed parts hit the floor and safety pinning them to an unused sheet I had lying around. You were the inspiration for this because at the same time we used the fabric to upholster our headboard with quilt batting. It was about a $65 update to our bedroom instead of purching a brand new bed, we are so proud of it, lol.
YoungHouseLove says
So smart! I love that Rachel!
xo
s
Natalie says
Do you ever have trouble with the caulk shrinking or cracking? A few months after we finished caulking all of our molding, it’s showing gaps again.
YoungHouseLove says
The key to that shrinkage is to use the best caulk (we love Dap window and door caulk that’s white and paintable) and to do it on a very cold day if you can (things shrink in the cold, so if you can caulk when they’re as separated as possible, they hopefully will never shrink more than that).
xo
s
Natalie says
Thanks! It’s certainly been plenty cold this winter…guess we’ll try to caulk the gaps on the next snow day!!
YoungHouseLove says
Good luck!
xo
s
Jill says
Looks great! Have you considered a giant abacus for above the crib?? Geeky, I know. But they look so chunky & cool!
http://www.anythingpretty.com/2011/04/i-think-this-is-my-best-idea-ever.html?m=1
YoungHouseLove says
Someone else mentioned that too! Such a fun idea!
xo
s
Paige says
We are also expecting soon (March 23) and have looked forward to a fun mobile in a fun spot. Our chicklet has two big (7yo and 11yo) artsy big sisters, and the girls get to make the mobile. They have been brewing lots of ideas … many of them are very simple. Maybe you could have Clara help you make the mobile, or she could choose a motif.
We are considering cutting stars or circles from bright felt, making tiny pompoms, ornaments or balls, and felting small objects, simple embroidery or possibly origami. They thought of birds, circus animals, seals with balls on their noses (?!!), raindrops and sunshine and clouds, etc. Clara could easily help you with paper (cutting it or using a punch), small stitches on felt, or braiding yarn.
One that could work great for you guys could be leaves — in all shades of green — maybe even from a branch. There is a lot that could bring to that space, to that baby, and to your memory-making :)
YoungHouseLove says
So sweet! Love all of those ideas. Thanks for sharing Paige!
xo
s
Sarah @ Sarah's Daybook says
Those look awesome! I think that a large scale modern clock that is securely fastened would look super cute and modern above the crib!
Also, Saturday was soooo amazing. I loved meeting you both. You two are super sweet! And the fact that you re-gramed my picture might have been the highlight of my life. Oh! And I was too starstruck to ask if you’re going to Bethany this year. I have a house up there as well and would totally love running in to you again!
Sarah
http://www.sarahsdaybook.blogspot.com
p.s.: Hope you put the gift card to good use! :)
YoungHouseLove says
You’re so sweet Sarah! We LOVED meeting you on Saturday and I went straight to Starbucks afterwards to satisfy my prego-craving for a hot chocolate. You’re amazing and we raised our little paper cups in your honor! As for Bethany, we think we’ll go this year and hope we get good weather. I need some beachiness in my life! Haha!
xo
s
Shunta says
NEVER NEVER NEVER cease to amaze me with what you can do in a room. Love it!!!!!
YoungHouseLove says
Aw thanks Shunta!
xo
s
Katie H says
I love it! You are inspiring me to get my butt in gear for our own nursery…although I just hit 20 weeks today and we have our gender “half time” show on Wednesday! So excited!!
But, question. How many crib sheets did you use for Clara? Just one? Or did you have a few spares? I see that registry checklists often suggest up to 4, but I don’t know if that is just because Babies R Us wants you to buy a bunch :)
Thanks!!! I can’t wait to see the rest of the nursery!
YoungHouseLove says
We had two and that was great for us. We just always kept the second one clean and it seemed to be cool for the entire 3+ years that she slept in her crib (she LOVED her crib a lot longer than most kiddos, haha).
xo
s
Eva says
I’m very sorry I have to say this, but I don’t like it at all. Sorry.
Kate says
Complete inspiration! I love how there is an air of sophistication to his space. So many nurseries go over the top ‘baby’ and they grow out of them so quickly. You have one lucky little prince on your hands! I’m taking mental notes for the day I get to design a nursery :)
Anna // Gone Banannas says
I am completely in awe of you guys! And totally inspired :) Those faux built-ins are absolutely stunning and I am really enjoying watching this room come together! YOU GO GLEN COCO!
YoungHouseLove says
Haha, thanks Anna!
xo
s
Erin says
Such a great space! You guys did a fabulous job on those built ins and moldings. Love the color on the built ins especially.
Green is such a great color choice too! I was browsing land of nod’s website the other day and they had a few green things that made me think of you guys, especially this…
http://www.landofnod.com/green-dragon-throw-pillow/s146328
I have this canvas print and it’s pretty cute too (and probably easy to make!)
http://www.fawnandforest.com/avalisa-moose.html
Sorry if the links are a no no.
YoungHouseLove says
Really cute! Oh man Clara would love that dragon pillow too! Haha!
xo
s
mp says
I’m glad to see y’all are making sure Baby Boy Petersik won’t be arachnophobic (like me … that spider drawing gave me the shivers!)
YoungHouseLove says
Haha! You know how much Clara loves bugs, so we’re hoping this little guy follows suit.
xo
s
Dominique Paolini says
Oh my gosh, guys! I haven’t been here for a couple of weeks. The nursery is looking AMAZING!
YoungHouseLove says
Thanks so much Dominique!
xo
s
Helena Dias says
Looking amazing. Can’t wait to see the finished room.
danielle says
Those are beautiful! Wow!
Gretchen says
I ‘ve been reading your blog for a while and think you are the cutest little family. Congratulations on your new son. Everything you do to your house is so tasteful and on a budget. I’ve renovated two houses and a condo and built a house. So I’m pooped. Your blog gives me my rehab fix without the work or dealing with contractors.
If you do a Mobile above the crib. Do something Big. Fill in the blank space. Another thought would be to hang flags (maybe when Baby Boy P is older. String three rows zig zagged across the space.
Wishing you all the best with the arrival of your son.
YoungHouseLove says
That’s an awesome suggestion! Thanks so much Gretchen!
xo
s
Patsy Ledbetter says
The nursery looks great! I wish I had half your energy. It was awesome seeing you guys in person yesterday at the home show. You we’re the highlight of the show! Thanks for the tip of the thrift shops. My daughter and I will have to check it out. She just had a new baby boy 3 weeks ago and she is still working on little Noah’s room :).
Btw, every time we see Clara on FB! my grand daughter, Sofia says “that’s Clara, she’s my friend”. So cute!
YoungHouseLove says
That’s so sweet Patsy! Thanks so much for coming out. We had so much fun with you guys!
xo
s
Erin says
I actually think that the bicycle prints would work on that wall, but there isn’t enough contrast. If the wall between the built-ins were a darker color (like navy! – love navy walls!), I think the prints would pop more and not look so cluttered.
The built-in’s and crown look awesome! :)
YoungHouseLove says
Aw thanks Erin! That’s a fun idea too!
xo
s
Brandi says
Glory! It looks amazing! The moulding makes a huge difference in the nursery! So amazed by your talents.
YoungHouseLove says
Aw thanks Brandi!
xo
s
Nicole says
LOVE IT! Just beautiful!!!! You guys are awesome!
Jamie says
Beautiful! I love the progress so far in this room and the whole house!
YoungHouseLove says
Thanks so much Jamie!
xo
s
Emmy A says
I made a similar crib skirt for my son’s crib that also had a drawer. I planned on removing it as we lowered the crib, but it ended up being the perfect length and just hanging in front of the drawer, so I left it. It was actually really nice to prevent him (and his sister) from being tempted to open the drawer and take everything out. I liked having the pop of color even after we lowered the crib and it easily flips up to open the drawer.
YoungHouseLove says
That’s a fun idea too! Thanks for sharing, Emmy!
xo
s
Angela says
I arrived home from work on Friday to my husband (and 7 year old twin helpers) working on my surprise Valentines gift – replacing our kitchen sink and faucet. Too many details to list here but you know the story – what began as a four hour project (max) ended up to be an entire weekend event. Kitchen isn’t put back together yet but the end result looks fantastic!
YoungHouseLove says
Oh man, that’s so sweet! I’m glad it ended up looking fantastic, and can totally relate to something you think will be fast ending up being a marathon project!
xo
s
Jacqui says
Looks fantastic! I grew up in South Africa and now live in Australia, and in both countries its always standard to have crown molding (called a cornice) in residential homes!
When you mentioned the mobile above the crib (we call it a cot) I immediately thought of this hot air balloon mobile I saw on Pinterest recently: http://www.pinterest.com/pin/218917231861015775/ :)
YoungHouseLove says
So sweet! Thanks for sharing the link!
xo
s
Kori says
This was a really great post! Lots of information. A little something for everyone. :)
The nursery is looking awesome so far. I’m impressed!
YoungHouseLove says
Thanks Kori!
xo
s
Kati says
For the area above the crib and between the shelves: How about these Hanging Wire Airplanes? http://www.potterybarnkids.com/products/wire-hanging-airplanes/?pkey=caccessories-sale&
Or maybe these wooden airplanes: http://www.potterybarnkids.com/products/wood-hanging-biplane/?cm_src=AutoSchRel.
There’s a photo of them hanging over a white crib between two sets of shelves. Or maybe you could make your own DIY planes to hang! Just passing along some thoughts…. Love your blog!
YoungHouseLove says
Such fun links! Thanks for sharing!
xo
s
el plegatin says
Que ideal! me encantan las respisas y la terminación.
Cheyenne Protz says
I spent my weekend painting my kitchen cabinets thanks to your tutorial! We are working on our first house and your blog has been an amazing help! Next is a glass tile backsplash! I am LOVING those built-ins… I think that might have to be the next item on our to-do-dream list!
YoungHouseLove says
Aw thanks Cheyenne! And congrats on all of your progress. Sounds exciting- and a glass tile backsplash will be gorgeous!
xo
s
Judy says
I plan to make a bed skirt for trundle bed using your method. Please help by explaining how if you bonded the sections together they could accommodate crib bed leg. I was thinking I’d have to have 3 pieces so skirt would hang around leg. Love your posts. Thank you.
YoungHouseLove says
It’s just one long strip of fabric if you can picture that. It goes around the perimeter of the crib around the inside, so if you look at the pictures of the velcro from above, it hopefully will show how it’s just tacked around the metal base frame all the way around (the leg is in front of it, so it just gets velcroed behind it).
xo
s
Shannon [Our Home Notebook] says
I love how his room is coming together! Those built ins are gorgeous and the crown really finished off the space. Love, love, love what you’ve done with it.
Carmen says
This update looks amazing!
Jennifer says
Feel free to ignore this suggestion, but I can’t help myself. ;) How would you feel about wainscoting/batten board 3/4 of the way up the wall behind the crib to connect the two bookcases?
YoungHouseLove says
That would be really pretty! We had been debating some sort of slatted wall threatment between those (it’s a bullet on our earlier nursery to-do lists) but worried with the lines of the bookcase shelves, more lines on the wall might be too busy. Will have to see what we think once we fill those bookshelves up :)
xo
s
Monica F says
Wish this post would have come a few weeks earlier. I just bought the bedding for our little guy and it was $115!!! That is just for a houndstooth sheet, polka dot crib skirt and a tiny lil blanket! I would have saved so much using your crib skirt “cheat”. Genius!
The room looks great! We are doing a Route 66 theme for our little guy due May 1. Here is the mood board I made: http://www.smalltownmojo.co/the-mother-road-a-route-66-nursery/
YoungHouseLove says
Such a charming room idea! Good luck with your little one!
xo
s
Andrea says
I laughed when you talked about the mom dance to save three bucks. Our local Caribou Coffee does a trivia question and if you get it right, you get 10 cents off your drink. You should have seen my face when I got it right! My boyfriend was like, “you know it’s TEN CENTS.” I told the story of my brilliance and money saving skills like 10 more times that day. (Also: Bamboo is the fastest growing plant on Earth.)
YoungHouseLove says
THAT’s HILARIOUS!
xo
s
Christina says
Where did you get your crib, Sherry? Is that a drawer on the bottom of it? I love it! I’m pregnant with my first and loving the inspiration from your progress decorating the baby room :) Thank you!!
YoungHouseLove says
Aw thanks Christina! Here’s that post for ya: https://www.younghouselove.com/2010/02/nursery-progress-crib-notes/
xo,
s
Kristin Corbin says
Looks awesome! Love the colors! =)
Sarah H says
Sherry, have you ever seen this Teal Blue Wooden Whale tissue holder on Etsy? I’ve had it pinned for years, but immediately thought of it after reading this post. It would be perfect for the Barnacle’s room!
https://www.etsy.com/listing/70698005/whale-tissue-holder-cyan-ships-february?ref=listing-shop-header-0
YoungHouseLove says
ADORABLE!
xo
s
Madeleine says
Really cute nursery! :) I just bought some inexpensive pillows for my own bedroom that match your colour scheme:
http://www.bouclair.com/products/Home-Accents-4/Cushions-15/Emerald-Collection-Cushion-p15692/?pstart=1
YoungHouseLove says
Love that!
xo
s
Jenny says
I was just browsing pinterest for some ideas for myself and came across this pin. I was thinking about doing something like this with my kids and it occurred to me that the perfect thing for your wall over the crib would be something that Clara helps to make. I’m sure someone else already suggested it, but that would be so meaningful and if she’s anything like my three-year-old, she would got nuts over the idea of making art for her baby brother. I think I’ll be heading off to Michaels now…
YoungHouseLove says
Aw man, there’s no link or pin attached. Would love to see it!
xo
s
Julie says
I loooove those built ins and the crown molding! It looks amazing! :)
Karen Frederick says
Love love love I’m paying close attention so does Clara room and the baby’s room have the same size crown. I ready to start my project too.
YoungHouseLove says
Yes, we made it extra chunky in each room using the same method :)
xo
s
Joanna says
So I have a quirky thing about mobiles… Babies look UP at them, so 3-D shapes or at least some that face down toward baby is a good thing! I loved Clara’s because it was interesting from all directions:) (I apologize if this has already been addressed in previous comments- viewing 500+ comments on iPhone= not fun!). As always, love your work & thanks for sharing!
YoungHouseLove says
Thanks Joanna!
xo
s
tiffany says
congrats, boys are the sweetest. Their like your little boyfriend, I love it. I just had my second boy, he’s 12weeks and we have just started putting a room together for him. I love the built-ins, so I wanted to show my hubby, his eye of course went straight to the bike/parts poster, he wants them…..do you rememeber where you bought those or were they a random find never to be found again;)
YoungHouseLove says
They were a display at The Gap that we asked about (they sweetly gave them to us after they were done displaying them, and John made the frames since they were just posters).
xo
s
Angie says
The built ins are absolutely beautiful! I’m wondering, do you have any problems with the Alex paintable caulk? We used that for the crown moulding in our house, and now the caulk is starting to shrink from the heat (I think?). It’s too noticeable! It would be such a pain to have to do it again, but I think that’s what we’re going to have to do.
YoungHouseLove says
Hmm, I’m not sure we’ve ever used Alex. We like Dap paintable door & window caulk (white and pantable is the key). Also caulking when it’s really cold is best since most things expand in the summer and contract when it’s cold, so caulking then gives you the best chance to guard against shrinking later.
xo
s
Emily @ Life on Food says
We painted the large formal living room two weekends ago and now just need to do some of the trim by the ceiling. I kind of just want to add molding so I don’t have to paint. This post was perfect timing.
karen says
hi you guys have ms so excited to start using my kreg crown pro but right away i ran into a problem when i went to make the cut on my 10′ miter saw the blade guard wont allow me to make the cut im pretty sure i have the kreg set at the proper angle. im so ready to get started any suggestions?
YoungHouseLove says
I ran into that issue when I was trying to cut some of the bigger crown too. It was not something I was anticipating! I was able to manually pull my blade guard up (i.e. swing it out of the way) just a bit so that I could start my cut and then once my blade was an inch or two into the wood I could release it so it’d do its job of protecting me from the blade. If your blade guard doesn’t move easily, you may have to swap out your crown for a smaller version (or upgrade your saw). Sorry to hear you’re having the same trouble!
-John
Rachael says
Wow – I love your website and the nursery is coming on great, what a lucky Barnacle :)
A mobile would be lovely – we have the most beautiful Djeco one for our daughter (http://www.tickety-boo.co.uk/acatalog/An_Unusual_Night_Mobile_by_Djeco.html#a2685) – not sure if you can get them in the states but if you can they really are amazing. This one has glow in the dark stars and sheep, what’s not to love?! Evie has had hers from birth and is now nearly 3 and we all still love it!
Oooh, I feel broody just thinking about doing up a nursery again! :)
YoungHouseLove says
Aw thanks Rachael!
xo
s
Sandy says
I could totally see this in the barnacle’s room!!! Painted a pretty color of course… http://www.landofnod.com/new-lighting/new/thar-she-glows-whale-table-lamp/s682073
YoungHouseLove says
LOVE it!
xo
s
Michelle says
I found this wallpaper and Immediately thought of your nursery design. Would be great between the built-ins or even the back wall of the built-ins. http://www.fermlivingshop.com/collections/kids-wallpaper/products/animal-farm-wallpaper
YoungHouseLove says
LOVE that so much!
xo
s