Digging is right up there with the Kardashians for me. As in, I’m getting tired of it (What? I’m a guy – we don’t like those shows). I knew there’d be a lot of it involved in DIYing our patio (digging, not Kardashians), but I think I got a false sense of confidence after all of that liriope came up relatively easily last week.
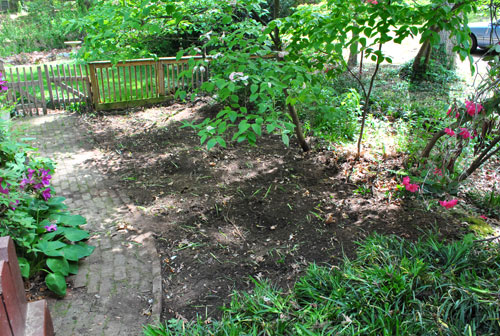
Next up was removing the brick path which, based on the looseness of some bricks on the edge, I said to Sherry “shouldn’t be that bad.” At least I can pinpoint the very moment I jinxed myself. Do you hear that? It’s the sound of the universe laughing at me.
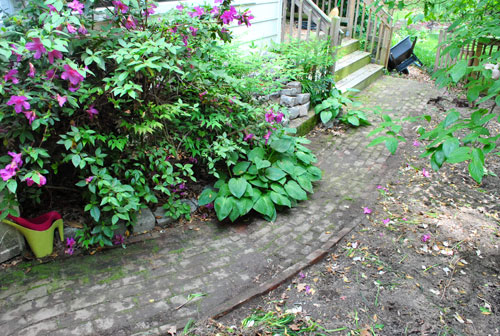
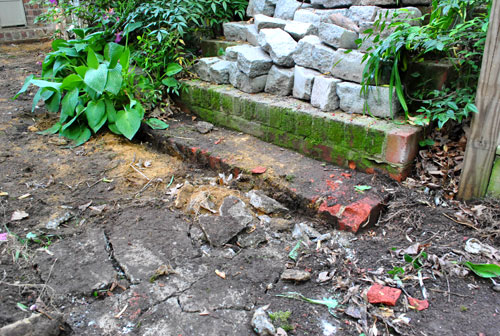
As Sherry mentioned yesterday, it came up pretty easily at first because the first half of them were just laid in sand. So I only had to find the edge of a brick with my shovel, give it a little pry and rows of brick would come loose at once… further luring me into that dangerous “this’ll be easy” mentality.
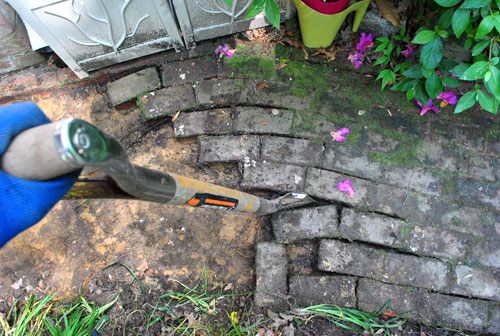
Then I hit a roadblock. And by hit I literally mean hit. And by roadblock I mean concrete. Suddenly I discovered that the second half of the bricks were set in some sort of mortar. It wasn’t that bad at first. It just took a couple of good whacks with my sledgehammer to get the bricks loose, but from there it was just as simple as prying them out with my shovel again.
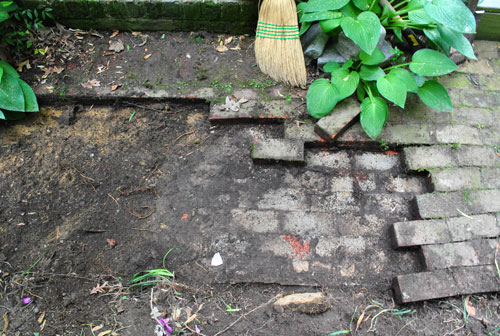
By the time I had removed all of the bricks – aka prying them all loose, knocking some with the sledgehammer and carrying them away by hand (to the carport, where I neatly stacked them for use in a later project) I was pretty darn exhausted. And I still had about ten feet of concrete that had to come out. In the words of the always hilarious Liz Lemon: nards.
With my energy gone, so was most of my confidence. I whined to Sherry that I’d probably need to rent the demolition hammer that helped me bust out the floor of our old bathroom (which Sherry then relayed to Katie B who she was jabbering with on the phone with while attempting to cut fabric in the hopes of making a birthday quilt for the sleeping bean). But knowing that driving to and spending money at the Home Depot Rental Center wasn’t necessarily the easier solution, I mustered enough strength to give the concrete a few good whacks with the ol’ sledgehammer.
Miraculously, it shattered.
With that moment of good luck came another burst of energy, so I kept smashing away at it, making good progress for a while.
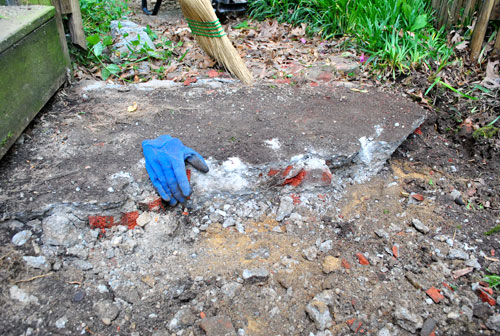
Then I started to notice that the concrete was getting thicker and thicker as I went. They must have used it to level out a much more dramatically sloped area beneath it. What had started off as easily-breakable inch-thick concrete was now about 6″ thick. Hence the creepy blue glove photo that Sherry shared yesterday:
As I later confessed to Sherry, to psych myself up / amuse myself I started to sling insults at the concrete as I swung away. I’m not very good at smack talk, so it quickly turned to weird geeky chants like “By the hammer of Thor!” (clearly I’ve been watching too many Thor commercials lately). Off in the distance I thought I caught a squirrel laughing at me. Glad to entertain the woodland creatures, I pressed on with my chanting and swinging. Either way it worked, and by the end of the day all of the concrete was out. Sherry snort-laughed at the insanity of my method, but hey, whatever works.
Okay, technically it was “out” but not removed. I saved the hauling of the shattered debris for the next day (right now it’s hidden in the back corner of our property behind some trees, although we might haul it to the dump a little later on – you know, when I have more energy).
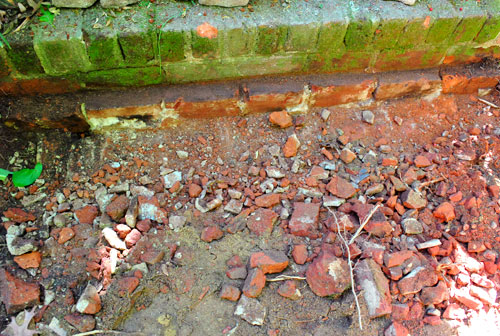
Sadly my sledgehammer slinging days were not over. The bottom step of that pesky old unusable brick staircase (next to the wooden steps that are now used) was about two inches too high so it too had to be busted up so as not to interfere with the perimeter of our paver patio. I’ll spare you the gritty details on this one, but let’s just say that my second less-exhausted day of sledgehammering meant that old brick looked like pebbles by the time I was done. That’s right, Thor worked it out:
With my proverbial slate officially clean (read: no more liriope and bricks), we could now more formally start laying the foundation for the patio. I’m following the instructions from this series of Lowe’s videos about recommended patio installation btw (along with the advice of some local experts who lay paver patios both commercially and residentially, who agreed with every step from the video), so this clip covers most of what was ahead of me (unfortunately, it involved more digging).
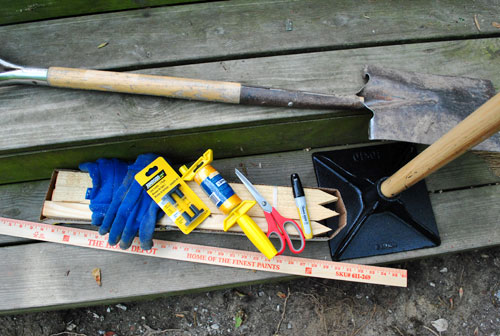
The next steps would require about $40 worth of new supplies, like wood stakes, line levels, nylon mason string and a hand tamper – along with some already owned items like gloves, a yard stick/ruler, scissors, a marker, and a shovel.
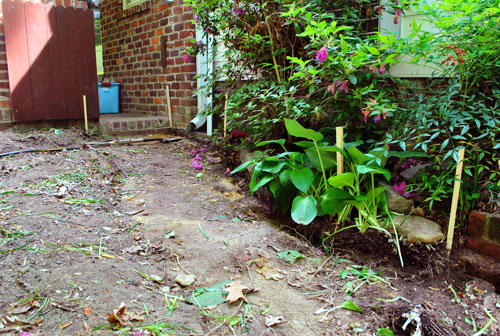
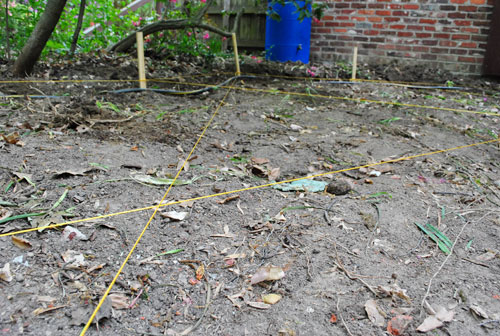
Fortunately I got a respite from all of my digging since the next task was staking out the patio area so I’d know how deep to dig in all areas. We had already marked the boundaries with our hose when it came to the desired perimeter (straight on most sides but gently curved on that back perimeter like our old patio was in our first house). So I drove in some wood stakes at key corners and turns (I learned I should drive them in deeply since I’d soon find myself digging out a lot of the dirt around them).
Next came marking things off with string. The key objective being to mark where the top of your pavers should eventually sit while making sure things are level. Well, actually making sure things slope gradually away from the house (to stave off any water-collecting-around-the-foundation-issues). So just as the video showed, I used my line level to tie the string between two stakes (and ensure that it was 100% level).
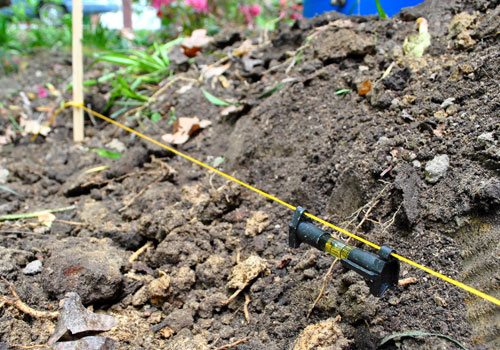
Then based on how far apart the stakes were (these were 6 feet) I marked off where I should lower my string to in order to meet the general rule mentioned in the video (that a patio should slope down one inch for every four feet). To save on string slash effort, I just moved my strings rather than tying on a second one.

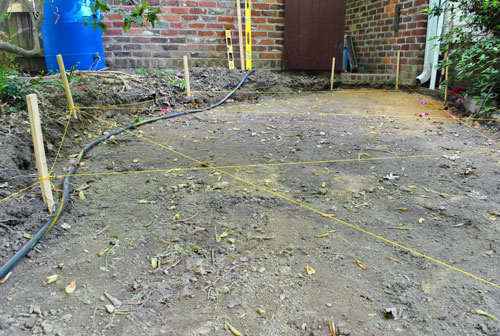
The whole string process took longer than I expected. The video fooled me into thinking it was a cinch because they were doing a square patio on a flat surface. I was doing a gently curved patio on an already sloped surface. Plus, I had pre-existing features that I had to line up with three of the four sides: the carport at the top, the deck stairs on the side and the fence at the bottom. And the area already sloped towards the house, so I was fighting the pre-existing terrain to create something that would later slope away from it.
But eventually I got all of my strings tied, my slopes going away from the house, and everything lined up the way it needed to be.
The video didn’t mention tying strings anywhere but the perimeter, but having seen Nicole’s DIY patio photos I opted to do some across the patio area too. This not only helped me check the diagonal slope as well as the perimeter slope, but also would give me some reference points across the middle while I was digging. After all, what good is a patio that’s perfect on the edges but bulges or sinks in the middle?
Oh, and if you don’t have a line level – you can always enlist a helpful chihuahua to double-check the slope of your lines.

Okay, clearly Burger isn’t smart enough to actually help with this project (besides peeing near my work area and licking my muddy face). He’s just trying to crush a bug with his neck in that photo. I recommend the line level (a two-pack was like $3) even though it’s far less amusing than a crazy bug-hunting chihuahua.
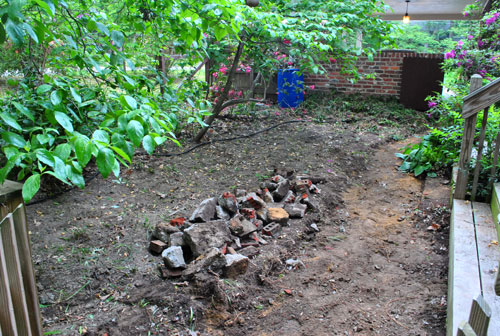
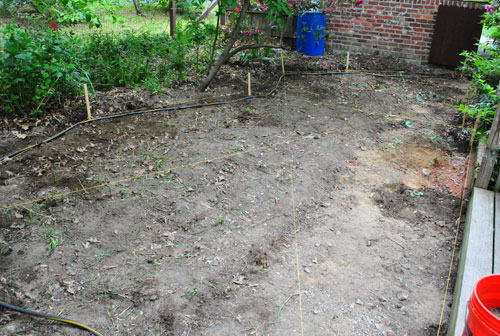
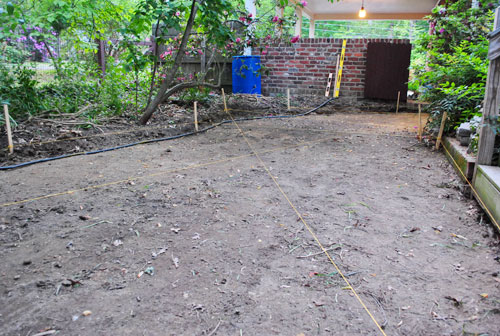
I have no “during” photos of the next part because it was basically a bunch of digging, measuring, digging, hauling dirt, digging, rubbing my aching back, digging, sitting down for water breaks, digging, begging for Sherry to bring me an insane number of granola bars for “fuel”, digging, barely working up the nerve to get up again, digging, checking things with a level, digging, cutting out roots, and yes – more digging. It took me one and half days (about six hours in total) to get the whole area nearly seven inches lower than my nylon strings (6 3/8″ to be exact, which leaves room for 3″ of gravel, 1″ of sand, and 2 3/8″ of paver to make everything nice and flush again). By the end, it looked like this (there’s kind of an archeological dig site vibe going on, right?):
Oh, and when I was done digging I went over the whole thing one last time with a level to make sure I still had the right slope going on across the whole thing. After that, a vigorous round of tamping with the hand tamper ensued (yes, the word vigorous is the best I can do at making it sound like fun). It was not. I fully realize that renting a plate compactor would be the less laborious route, but frankly I’ve heard mixed reviews about how easy it is to use and I knew it would require removing all of my middle guide strings (which I consult so frequently that I’d never want to be without them for fear of a huge sunken spot in the middle of the patio that will collect water and debris for decades to come). Plus, what’s a little more manual labor at this point? My back didn’t exactly agree but after a few hours of serious tamping (and just one blister) the dirt was compacted within a centimeter of its life. And can I just tell you that it’s nice to put that step behind me?
My apologies if this post sounds a tad whiny. Just trying to keep it real as my lady likes to say. Fake Chipper John says: it was lots of good old fashioned sweaty fun. Keeping It Real John says: holy crap that was waaaay more exhausing than I expected, and it took waaaay longer than I thought it would. But it’s done and I’m psyched to have lived to tell the tale. Now we just have an insane amount of gravel and sand to layer into that leveled and tamped hole followed by some pavers. Although I’m sure I’m oversimlifying that step too. Haha. But to prove that I still have my sense of humor intact, I wanted to share the warning that came on the new wheelbarrow tire that I had to buy (our old one got punctured last year somehow at the old house).
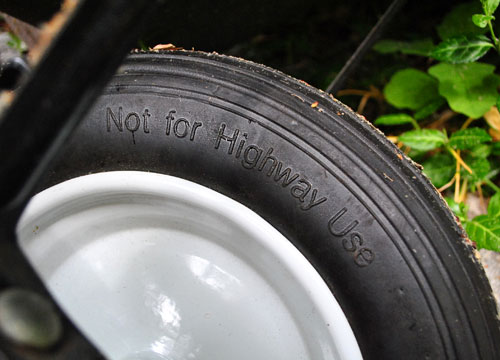
So if anyone had plans to take their wheelbarrow for a spin down I-95, you might want to work on a plan B.
And might I suggest that plan B involves helping me haul and level all of the gravel and sand that got delivered yesterday morning? Doesn’t hurt to ask, right? Oh well, I guess it’s time to put on my tough guy pants (my Thor pants?) and get back to work. More details soon…

Andrea says
Can you tell me more about what you did with the roots (tree?) you encountered? Did you just dig them out?
YoungHouseLove says
Yup, dug them out and cut them out. Lots of muttering went on during that step.
xo,
s
Lindsey says
I’m wondering…after you got everything smoothed out and exactly 6 3/8″ below the string, didn’t all of the tamping mess with your perfectly level dirt and push it down more than 6 3/8″ below the string?
Anyway, this is awesome and I am in awe of your fearlessness and persistence. Can’t wait to see the outcome!
YoungHouseLove says
Surprisingly it didn’t (probably because we were dealing with clay which was really densely packed anyway) so in some areas John had to build it up a bit when it was a little low but overall it wasn’t too bad. Except that the actual physical act of tamping was pretty hard work. Glad that’s over.
xo,
s
caitlin says
found it! one of these things, though instead of filled with water they are just solid steel. probably impossible to get to your house without a truck: http://www.amazon.com/Steel-Pull-Behind-Lawn-Roller/dp/B00169YEVK
YoungHouseLove says
Gotcha! Wow that looks serious.
xo,
s
Cayce says
That picture of Burger cracks me up. My dog does the same thing with earthworms… we like to say she’s putting on her worm perfume :)
Alicia says
John, you are hilarious. Your copywriting skills are still exuberant! :) By the way, this post is NOT whiny. I can’t begin to imagine how difficult the whole process really was.
I’m super excited to see the new patio!
Lisa in Seattle says
Well, there go my plans to pimp my barrow. I was going to add some spinners and thumping bass. They see me rollin… they hatin…
You are doing a great service here by being realistic about how hard the work is. It’s easy to get caught up in a fantasy about wanting to be a great DIY-er, creating beautiful spaces with the strength of our manly thews, but the reality is that we can’t all do it. And it’s better to know that now rather than find out too late!
Megan says
I think this makes you even since Sherry had to paint the ceiling beams :)
Looks great!
YoungHouseLove says
I know right! I get dirty too sometimes!
xo,
s
karen says
john…please rent a tamper…for the sake of your back.
john are you doing this all by yourself? I wish i could help you.
you guys are doing great! it will be so rewarding!
Adam says
I can completely understand how much work that must have been. Speaking of looking like an archeological dig, did you stumble across any finds? My last outdoor project unearthed several coins (only from the 1950’s, so nothing too unusual) and 2 arrowheads.
YoungHouseLove says
Nothing! But we did find arrowheads on the side of the house and framed them in our hallway frame gallery.
xo,
s
Elizabeth says
Since you mentioned your “Thor pants”…if you need a few minutes break and want a laugh, go check out this hashtag on Twitter…
#replaceawordinastarwarslinewithpants
HI-LAR-IOUS!
And HAPPY STAR WARS DAY! May the 4th be with you. ;-)
P.S. I have brick pathways all around my house and two large patios in the back yard and now I realize why they are so uneven…the previous owner clearly didn’t follow these steps…and I am not sure I am up to redoing the entire project…where are the Yardcrashers when I need them?!!
YoungHouseLove says
Hilarious. We’re dying over here.
xo,
s
AmberGale says
holy crap.
John, you are a rock star. Rock. Star.
When it’s all done, you’ll have to tell us how this compares to redoing the guest bath in the last house :) I feel like it could be a close one…
Major kudos to you for DIYing this!
Allison says
The blood, sweat, and Thor chanting will pay off when have a beautiful patio to enjoy.
Love those Lowe’s videos. Just used one to lay some laminate floor in our kitchen. I think we watched it at least 4 times and would quote it throughout the project. “But the video said…”
Kay says
I am convienced you must live 36 hour days! You got so much done in just two short days! Great job!
Paula/adhocmom says
Please know that I am in South Orange, NJ cursing on your behalf. Our new yard is a total mess. . big patches of mud where the tractor sat when it dug out that oil tank! Um, so we’re like focused on GROWING GRASS and can barely handle that! So hats off to you. . . I’m so intimidated by our lawn. I’ve never had one before can you believe it?
Amy @ larryspearslive.com says
Great post! Gets me motivated to do some yard work! (Whew, good thing it’s raining so I can just read and plan today!)
skye says
sorry for being ignorant, but who is liz lemon??
that looks like a lot of really hard sweaty work but for me yardwork is the most rewarding sometimes! Chipper Skye says “Wow! Great work Thor! You deserve a cold lemonade and a massage!” Keeping it Real Skye says “Wow my back hurts just looking at it and no way am I going to be able to finish this!”
I know it will look awesome when yall are done! :)
YoungHouseLove says
She’s from 30 Rock. Hilarious.
xo,
s
heather says
“Hey, nerds! Who’s got two thumbs, speaks limited French, and hasn’t cried once today? [pointing thumbs at self] This moi.”
OH Lemonisms.
YoungHouseLove says
So good I’m crying.
xo,
s
Erin C. says
Next time rent a gas powered tamper. It is totally worth it. We discovered this while laying a flagstone patio last summer. After all that digging/dirt leveling you deserve a break.
Christine B says
My hubby and I are also digging. . . our driveway. Its miserable. We are building a retaining wall in efforts to prep for the asphalt driveway we hope to have once this project is done. I feel so bad for the hubs having to dig through rock and roots I have offered to help and sincerely regret it! Good Luck! Hope your digging goes more smoothly then ours.
Amz says
I demand Thor pants pictures!!! (…please?)
Great work John, totally saving this page for future reference.
Anna says
I’m sure this question has been asked before … but does Burger REALLY hunt bugs? And crushes them with his neck? I’ve read about him several times in past posts about his bug hunting habits but I’m not sure if you’re kidding or if he’s really a bona fide bug hunter! I have five dogs of my own and I’ve never seen any of them so much as look twice if a beetle or fly buzzes around … I’m just soooo curious … because it sounds so strange. :)
YoungHouseLove says
Yes. With a vengeance. It’s his favorite pastime.
xo,
s
Elizabeth says
My mother’s dachshund used to do the same thing, right down to the rolling over and crushing them with his neck.
Robin @ our semi organic life says
another random comment: we have a few of those levels on a string that my husband gets from the hospital where he works. When his patients get ventriculostomies they use those levels (for what I don’t know) – then throw them away. A few may have somehow have found their way into our home. Who knew they’d be a official medical instrument AND handy DIY tools?!
Shawna says
You are one step closer to being done! WAHOO! The hard part is over. Right??
Also love all your plants. They remind me of a jungle or something.
Joy says
Right up there with just about way to much hard work. Looking forward to seeing the next steps.
– Joy
Donna Huebsch says
Oh. my. gosh…I cannot quit laughing over the “Not For Highway Use” warning on the wheelbarrow tire! Thanks – after a two-root-canal-three-crown trip to the dentist this morning, I needed a good laugh!
Krystal says
Dang, my new wheelbarrow only told me not to exceed speeds of 45 mph. I’ve therefore concluded that they implied “not for highway use” but that it is perfectly acceptable for city roads, which average 40 mph and are totally within in my wheelbarrow’s speed capabilities.
YoungHouseLove says
Hahahahaha. So true.
xo,
s
Jordan@the2seasons says
Way to go John and we feel all of your sore muscles right now. We worked liked crazy this last weekend installing a patio and still have a couple more cuts and sand to finish up. My husband decided to do a curved pattern and a herringbone pattern which made things a little more complication. We just keep picturing the finished result. Good thing is I didn’t have to go to the gym on the days we were working away on the patio!
KCatGU says
This week being a blogger is literally back breaking work, here I thought you all had it so easy (just kidding)
carolyn says
Thank you for posting your step by step! I see a new and improved patio in my future (you know, one that DRAINS!).
KathyL says
haha, my dad’s wheelbarrow says “stolen from Tom Mizer” because thats what he puts on the bottom of all his things. The first time you borrow it, and flip the stuff out, you about die laughing when you read that.
YoungHouseLove says
Hilarious! I now want to label everything we own “stolen from Thor and Sherry Petersik.”
xo,
s
Jacqueline says
This is fantastic! Ha!
Chaucea says
Goodneth! After all of that back-breaking work, John must have been really… thor. *gigglesnork* ;-D
Emily says
OMG you are DAD!!!! Clearly you are the only one that got that full on stubborn, must do it myself gene. We would be patio-less if I had to do any of that. Wait we are patio-less. See what I mean? :-) Can’t wait to party on it next weekend!
YoungHouseLove says
Aw thanks Em! Can’t wait to celebrate next weekend. Hopefully on the new patio (completion and weather permitting).
xo,
s
Paula M. says
You guys are so awe-inspiring! The amount of labor and planning and persistence involved in some of these projects is really impressive!
Sometimes I wonder why I’m such a fraidy-cat about some DIY overhauls, but I think your past advice to folks about starting small and building up confidence as you go makes a lot of sense.
Also, man, aren’t you glad you’re doing all this while you’re young and strong and agile and can bounce back from a day of sledge-hammering?
On another note, I can’t help but wonder if some husbands would like to *block* their wives from accessing this site, along with a lot of HGTV shows? — I can just imagine women all over America going to their husbands, and saying, “Honey, LOOK! You CAN build the patio yourself. See how John is doing it?” LOL … In fact, I think I see at least one such post, above.
Don’t get me wrong — this is all my quirky, long-winded way of saying: “Wowzer! Another hugely impressive undertaking!”
p.s. the photo of Burger doing an ersatz limbo is so cute! On a similar note, I can count on my 2 cats to “supervise” and “help out” when I do work around my condo. (“Is the paint on this cabinet really dry? We’ll test it for you!”)
Wendy says
That’s a lot of work! Way to go, John! Also, totally unrelated, but Sherry, have you seen this: http://www.pier1.com/Catalog/HomeAccentsD%C3%A9cor/Pier1ToGoProductDetails/tabid/979/CategoryId/136/ProductId/4773/Default.aspx
YoungHouseLove says
Cute!
xo,
s
Erika says
Ha! I thought Burger was doing his best impression of Catherine Zeta Jones circa Entrapment (remember the string/laser thing?)
Nice work John! Can’t wait to see your awesome handywork when it’s all finished.
YoungHouseLove says
OH NO YOU D’INT! That’s my favorite obscure reference ever. In college me and my best friend would do impersonations of all that bending and stretching and slinking down the hallway. Hilarious. Now I have to call her and laugh about it all over.
xo,
s
Cindy @ The Flipping Couple says
Oh man. I feel your pain. We poured our own garage slab two years ago, so there was EXCESSIVE digging, tamping, measuring, re-tamping and class 5 shuffling. And more tamping.
But it’s worth it in the end!! So worth it. Can’t wait to see the next step.
Laura says
Thanks, John…I’ve been singing “Whoomp! There it is…” all day long since I read your post this morning. :)
Laura says
More like “stuck-in-my-head-making-me-a-little-nuts” singing, not actual singing. Stuck a lot faster than “I’m So Excited” from yesterday.
Anne At Large says
This is one huge job! When I did the patio at my old place I had a friend come just to help wheel gravel in – he trucked it back in the wheelbarrow while I leveled it and it was still three hours just for that part of the project!
But just FYI, I rented a compactor and was SO GLAD! It saved me a huge amount of time, and we have a local rental place (not Home Depot or Lowe’s) that is shut on the weekends, so you can rent something for a discounted rate if you rent it late Friday afternoon and bring it back first thing Monday a.m. I know you don’t need it now but I tell ya, sometimes it’s nice to have a little mechanical assistance. Although with Thor on your side, you’re already ahead of the game.
jeannette says
you are the man.
Nevin says
This brings back memories for me! My husband laid a brick patio/sidewalk at our first house where he had to dig out many inches of clay. He only worked on it during the weekends, so…. it took it about 6 months to get it all dug out and prepped like you have done. My hat is off to you!
At this house, we opted to hire someone to put in a patio and walkway. This project was way to BIG for us! May you all enjoy it like we have!
Erica says
John I feel your pain! My husband and I diyed our own paver patio last July. We had no idea that digging, leveling, tamping, measuring, and adding gravel and sand was so time consuming. We thought we would never be able to lay our pavers. We worked for a week everyday after work to dig out all our dirt just to get it level. Then it took us 3 days to finally add the gravel, sand, pavers, and finally polymeric sand.
On a happy note…It was all totally worth it! We love our patio space and would do all the work again! Enjoy your space….you will be proud you did it all yourself!
xo,
Erica
Jaclyn says
Just wondering….could you even move a single muscle the next day? I’m thinking even Thor would be groaning in the morning….
YoungHouseLove says
Thor was surprisingly ok in the morning. My spry guy.
xo,
s
Emily says
This is a huge project, no doubt. My husband has built patios in the past for a living (he did ours as well) and it is super hard, back-breaking work if you are going to do it right (like you are)…that’s why it costs a lot if you don’t DIY! So you aren’t whiny at all, you are truthful! Be happy you are getting it done in the spring, before the heat! You will love it later!
Carrie says
I loved reading this post. I really want to redo our patio and this is a huge help in knowing what lies ahead of us. And, as always, I find myself smiling at the silly jokes and nerd humor. Best DIY blog ever, nerd humor AND DIY tales in one place!!! :)That’s my idea of a good time!
Morgan G says
Yeah, that’s a nasty surprise and one which we encountered when removing some nearly a ton of concrete from our yard. And, when I say “we” I mean my husband and my dad. But I felt their pain. Really I did.
As far as the Kardashians are concerned, I don’t see my husband and my dad tiring of them. :)
Shelby Lou says
That last photo is hilarious. Wanna race a wheelbarrow on the freeway with me? Goodness gracious. You two are a million times braver than me. Maybe when I have my own house I will attempt a project, but this is nuts! You guys do so well though!
Kim says
Go John!!! I admire you both so much for taking these projects on and not giving up when it gets a little hard. I was thinking how good you’ll feel when it’s all done and you’re having the Bean’s party and saying to yourself – ‘Darn, I did this!’ You guys are amazing and I love your blog. It’s given us great ideas and it’s my treat during the day!
Joy Franks says
I’m in awe of you!! Not many would have the tenacity and stamina to do all of that back-breaking work. Impressive!!
Jessie says
Wow, it looks so good already. I can’t wait to see the finished product. I know this is a kind of odd question, but do you guys ever get tired of taking pictures of your projects? I’ve always wondered, but this project made me wonder even more. I think if I were tackling a back breaking project like this, the last thing I would want to do is stop and take pictures. It would mess up my momentum and I’d probably want to quit, lol. Do you ever feel that way sometimes?
YoungHouseLove says
I think snapping pics is just ingrained as part of the home improvement process by now (we’ve been blogging about our DIY adventures for 3.5 years now, so it’s almost second nature). When it comes to photos we’re usually more annoyed when we’re lazy and don’t take the time to snap them, because later when we’re explaining something in a post about the project, a photo can be worth a thousand words – so it’s not a short cut to skip them (because it means a lot more wordy explanations without ’em).
xo,
s
Ashley says
Kudos to you…from someone who embarked on a similar project (a 600 sq. ft. paver patio on a “gently sloped” lot which took 2 summers and approximately 80 tons of paver base), I can understand every step you went through. Enjoy your great new space!