Ok, so we recently had some work done. Nope, not calf implants, but you’re close…
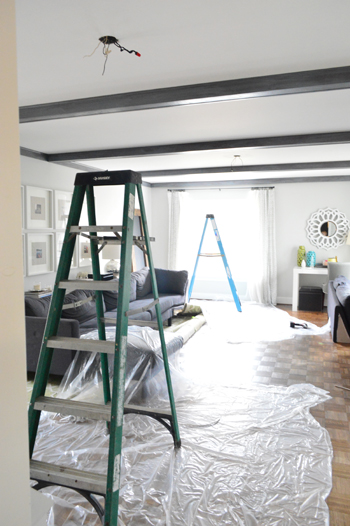
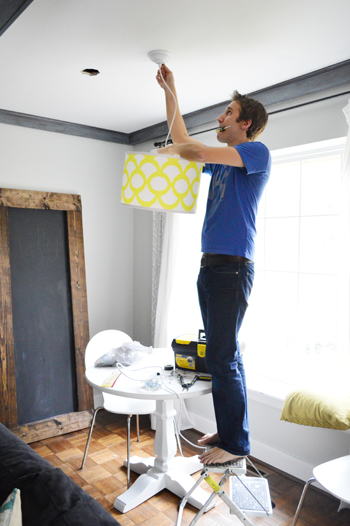
How about can implants? Also known as recessed lighting. And we went for a pendant injection while we were at it (when in Rome…). Actually the wide shot shows more of the chaos that ensued just to get the room ready for its close up (we removed half of Karl The Sectional and pushed him across the room along with rolling back the rug and covering the floor with drop clothes under each work area).
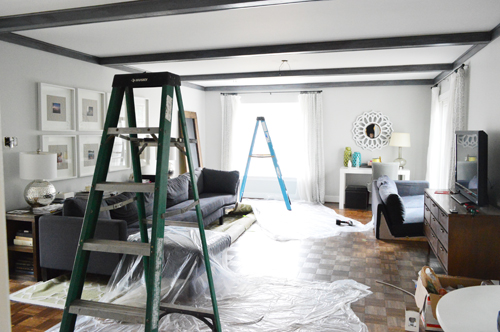
Can you believe we’re well into year three of living here and we’ve never had overhead lights in the living room (except for one small light that used to hang off-center in the corner). And while we love lamps for ambiance, overhead lights can be helpful to flip on when more illumination is necessary (like for finding that rogue doll shoe that Clara needs rightthissecond!). Basically there’s a reason that Candice Olson champions the whole light-layering thing (some recessed lights + a pendant + a few table lamps or floor lamps seems to be her sweet spot, sometimes with a sconce or two tossed in there for good measure).
And since we used to have two large fans overhead – without lights mind you, just big hulking brown fans that we never used (this part of the house is cooler and has lots of sliders to open for a breeze) – we had two fixture boxes in the ceiling to tap into for the recessed lights.

And magically, with the scroll of a mouse they’re done. And they’re glorious.
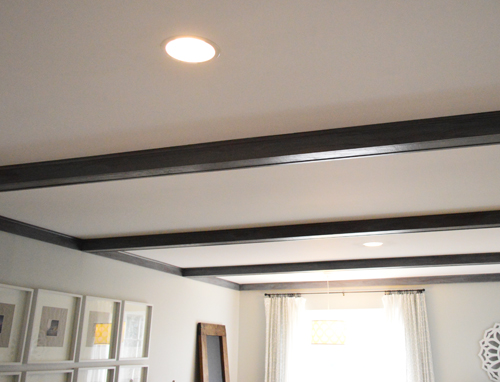
We thought about branching off from them and adding a ton more (four? six? eight?) but decided that since there were just those two fixture boxes that existed, we’d live with two for now before swiss-cheesing the ceiling and buying more materials. But knowing that we can always add more now that these babies are wired up is nice.
When it came to making sure those recessed light conversions were done safely, we hired our favorite local electrician (his name is Sean, and he runs S.J. Ryan Electric, who we mentioned during our kitchen reno here).

The cords up in the attic above the living room were a little too scary (not up to code at all) for us to deal with on our own, and the peace of mind of relying on an expert for things that can burn your house down is always nice. But like most DIYers, we were excited to tackle whatever was within our skill set (because we’re cheap like that). Which meant that we were happy to instal the pendant light over the table by the window, just as soon as Sean’s guys got the fixture box centered (it used to be about a foot too far to the left so the old pendant made the window look really wonky).
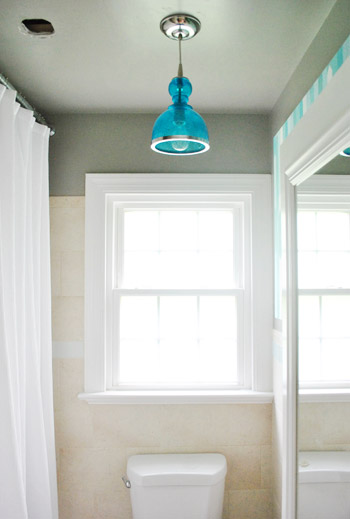
Sometimes we can move fixture boxes ourselves, like we did in our bathroom here…
… but in this case there wasn’t any slack in the wire for us to move it ourselves, and there were lots of other wires going to the box that confused us, so we had them get things up to code and move them over while they were at it.
It’s a lot like how we hired a contractor to help us open up the wall between the kitchen and the dining room and then did all the drywall/trim/finishing ourselves to save some loot. In this case we grabbed the ol’ baton and did the pendant installation and patched the ceiling hole. Since most electricians charge hourly, the more you do yourself, the more you can save.
Oh and you can also save money by prepping the room before anyone shows up. For this little adventure we:
- moved the sofa
- rolled back the rug
- put down drop cloths
- marked the ceiling for where we wanted things to go
That last bullet is a biggie. Measuring to be sure the pendant would be centered and then marking an x on the ceiling saved us time since we didn’t have to debate the pendant placement while the electrician was here (any long chats while the electrician’s around = cash-money out the door, since they’re on his time).
And after they left, we:
- hung the pendant light
- patched that hole in the ceiling near the back window
- caught our breath
- put the room back together
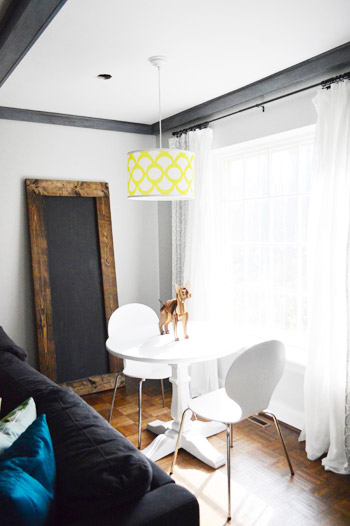
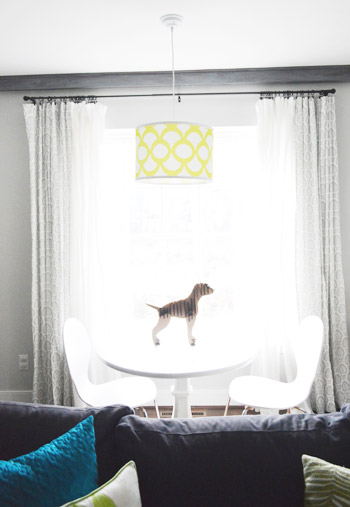
And then it looked like this…
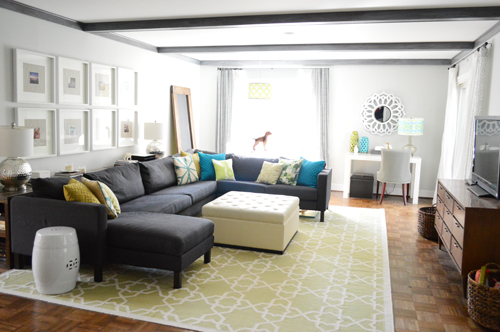
Of course the giant window makes our pretty pendant a lot more invisible than he is in person (he’s crisp and easy to see in real life), but going from zero overhead lights to two recessed lights and a pendant over the table is such an awesome change. There’s a reason all those people say “good lighting is a room changer.”
When it comes to the whole hole patching shebang, we have a few tips for you…
Hole patching tip numero uno: We use these little hole-patching mesh things from Home Depot along with Crackshot Spackle by Dap (applied with a spackle knife) for a nice quick cover-up.
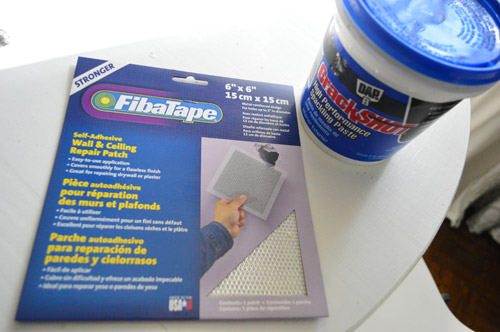
Hole patching tip numero dos: Don’t stop at one spackle session, I always try to do 2-3 thin applications so I catch all the little imperfections that I might miss the first time (you can sand between each spackling sesh or just keep building it up and then sand when you’re sure you have all the low points filled). Note: you can see most of this process on video here if that helps.
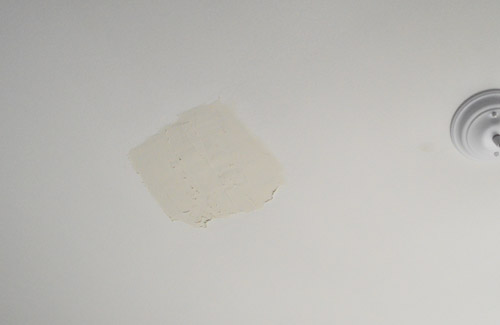
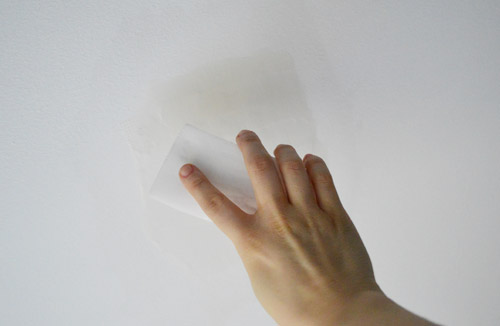
Hole patching tip numero tres: I heard that Magic Erasers were pretty handy if you didn’t want to stir up as much dust as sanding would, so after my spackle dried I gave it a try. And I gotta say, it rocked. Some gentle buffing back and forth against the dry spackle with my only-slightly-wet Magic Eraser filed down the high points and made a lot less of a mess, but I think the key to my success may have been that I don’t mound my spackle (I just try to keep it flush while covering the low points, so minimal sanding is necessary).
Hole patching tip numero quatro: When it’s time to paint over your smoothed out spackle, be sure it’s completely smooth (drywall or spackle imperfections aren’t covered by paint, they’re emphasized by it). You also want to feather the paint out about 12″ beyond the spackled area, just so it’s not an obvious blob of paint on the ceiling (two thin and even coats with long feathery brush strokes works for me).
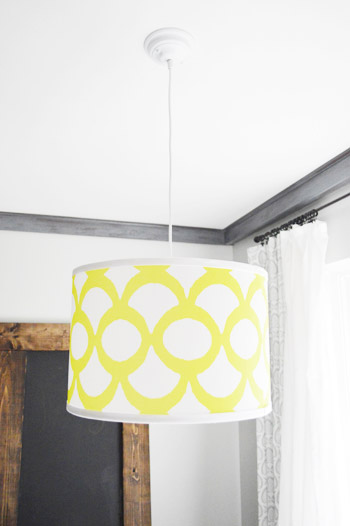
As for the pendant that we chose, you might remember it from our little lighting collection (we mentioned that we purchased three things in that old post- two of which we still had to hang). It was awesome to finally get it this baby up – especially since it’s now perfectly centered over the table and in front of the window.
I love that the wire and canopy are a crisp white color. I almost looks like it’s floating like a big ol’ sun in the sky.
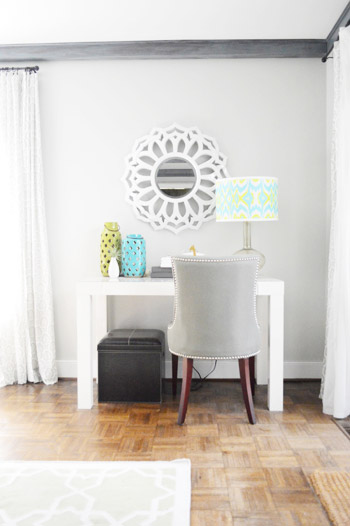
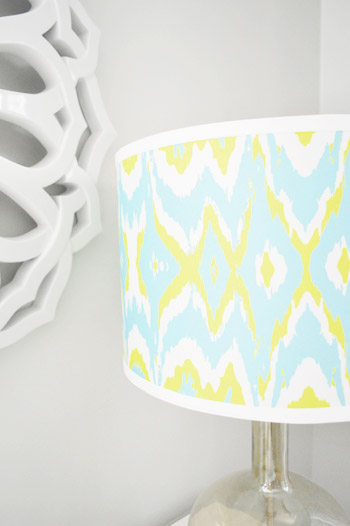
And as for the third thing that we bought from our collection, that colorful shade found a home on our little stationery desk. Which is also known as Burger’s treat desk since those are its two functions.
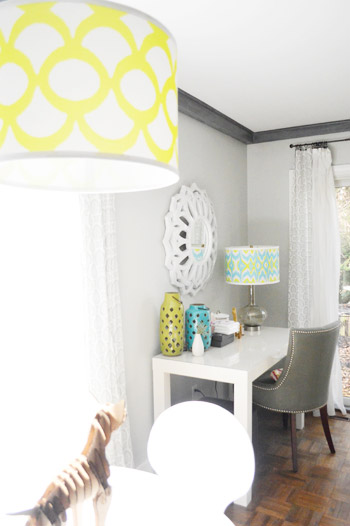
It adds more of the colors that you see in the green and blue lanterns on the desk, and the shapes in the shade seem to tie into the shapes in the mirror and the cutouts on the lanterns. It’s a nice counterpart to the neutral choices around it, like the walls, the desk, the chair, the ottoman, and the curtains.
We hosted a little lamp shade fashion show with him. We tried it out on a few other lights, including the floor lamp in the sunroom (which was also cute) but decided to enjoy him in the living room for now. Who knows where he’ll end up though…
Close up in 3… 2… 1. Boom.
As for the cost, this lighting upgrade was $72 in materials (for the two can lights, the trim for those, some wiring and junction boxes to fix a few bad connections in the attic, etc) and around $200 for all of the labor. We usually tell people it’s about $100 to get an overhead light added, so we thought that converting two of them to recessed lights and moving a fixture box so it’s centered (while straightening out some tangled fire-hazard wiring up in the attic) for $200 was a great price. Heck, when we look back at this before picture from 2010…
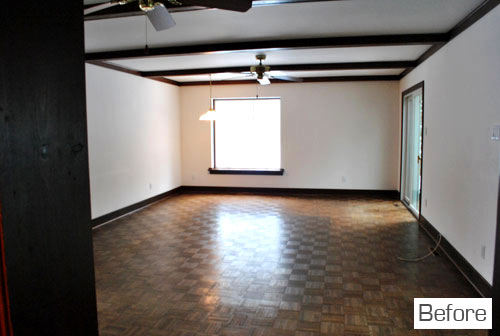
… it’s amazing how far this room has come.
The only sad thing is that we sat on the sofa this weekend and said “why did we wait so many years to do this?!” Isn’t that always how it goes? Oh well, at least now we can enjoy it. And say pun-tastic things like “I see the light!” every time we walk into the room. Heck yeah that happens.
What are you guys up to with lighting/ceilings/holes/pendants? Do you take the hire-out-some-but-do-what-I-can approach? I think we saved around 100 bucks patching that hole and hanging the pendant ourselves. Sing it with me: “everyday I’m shuffling spackling…”

jeannette says
fifty thousand points for the kaching!!!! between the pendant shade and the LR rug.
one hundred thousand points for spelling “stationery” correctly. because i’m a spelling perv.
http://youtu.be/14jlfuwHqr4
YoungHouseLove says
Haha, thanks Jeannette! I’d like to redeem my points for some ceramic animals :)
xo
s
caroline says
hahaha I love the barefeet on the ladder!!!! too cute!!!! ;)
Jill says
Hi guys! I’ve been following your blog for over a year, but have never left a comment/question- so hello! Thanks for all your awesome content :) I was wondering if you have ever shared the source for Karl the Sectional. It is such a great piece and since my hubby and I are currently in the market for a new sectional, I am curious to hear where it’s from. Thank you in advance!! Love the new lighting!
YoungHouseLove says
Hi Jill, it’s the Karlstad sectional from Ikea. You read all about how we settle don him here: https://www.younghouselove.com/2011/01/sectional-hunting/
-John
KathyG says
I just got a huge popup, Scorecard Research. You guys don’t allow those, right?
YoungHouseLove says
Argh, nope. Please let us know what the URL links to (and grab a screen grab if you can). We don’t see them on our end, so sometimes they’re regional (and having the url info and a screen grab is the best way to block them for good :)
xo
s
Chelsea says
Aw! It always puts a smile on my face to see my cardboard Burger show up in your pictures! Thank you for keeping him and making him your #5 in your family :)
YoungHouseLove says
Of course, he’s the man!
xo
s
Jennifer says
What type of can lights did you put in? Halogen? What size? Lately I have seen a lot of different ones. I always used to think can lights looked dated but then I realized it depended on the size, the type of insert, etc.
YoungHouseLove says
They just installed them with halogen ones, but we’d love to upgrade to LED since we hear such amazing things about them!
xo
s
Kathleen says
I painted my kitchen ceiling and replaced the outdated halogen light fixture with a swanky new one! You can check it out on my blog Easily Distracted by Shiny Things
YoungHouseLove says
Love it!
xo
s
Ginny @ Goofy Monkeys says
The lights look great! We do most stuff ourselves here, but there are things we have hired out. Most plumbing is done by a plumber and we had a furnace guy do our furnace/AC. We also hired out the installation of our hardwood floors. There are a variety of reasons why we hire out vs. diy, but mostly it’s the question of can we afford to hire it out and do we have time to do it ourselves.
Kati H says
So where does it turn on? Did the electrician do that, too? Looks gorgeous!
YoungHouseLove says
There was already a switch on the wall for the old fans, so we had them wired to be the same switch for the can lights. We’ve also had them add a new switch (in our dining room) and it was only $100 to get the entire light thing done in there (new switch + new junction box over the table where it never was before). Hope it helps!
xo
s
N Shirley says
I am still trying to get over the amazement that putting ball fringe on the toy cradle gendered more comments than the nice lighting redo in the living room! It looks great- and I am sure it makes it more comfortable and cozy feeling as well as being useful. Nice transformation!
YoungHouseLove says
Haha, you never know what’ll be a hit when it comes to posts! So we just share it all. Keeps it nice and easy that way :)
xo
s
Paul says
I love the lights that you added! Everything looks so great!
If you don’t mind me asking, where did you get that area rug? It really looks great!
YoungHouseLove says
Thanks Paul! It’s from Joss & Main a while back (such a great price for something so big).
xo
s
Yvonne P. says
Looks great, guys! Where is the little cardboard dog from? I have to have one :)
YoungHouseLove says
Isn’t he amazing?! A reader actually made him for us at one of our signings. We’re in love!! It’s all from cardboard that was cut and interlocked to make an actual-sized Burger!
xo
s
Sarah says
Hi guys!
I have a question about Karl. I want a Karl of my own, but we have to make a six hour drive to get him. I’ve read your reviews, but I have two questions. 1. Are you loungers? Like, does Clara watch TV while drinking OJ on Karl? Or do you guys watch Friends marathons while snacking on chips and salsa? Is it super lounge-able? Is my husband gonna sit on the floor model and say, “it’s not comfy” and I’m gonna be all “wah-wah-wah”…let down!
2. Also, is it deep enough to sit comfortable with a throw pillow behind you? I’m always tossing pillows on the floor before we sit down. Kind of frustrating!
Thanks for the input! So happy for you guys and all of your success!
Sarah Royal
YoungHouseLove says
Oh yes, we lounge like champs. Clara is sipping a drinkable yogurt right next to me on the couch right now. And it’s totally comfy. I’ve heard that some folks think it’s firm in the showroom (ours felt awesome and sold us right away) but you don’t want something too squishy (we think that’s more uncomfortable over a few hours of use since you get all sore from bending like that, haha) so as people who have sat on this sofa for hours on end with the flu, it’s totally comfy. As for the depth, we put pillows behind us a lot (I tend to sit on the chaise seat though, so that’s super deep, and John sprawls out on the other corner, so he can stretch his legs out totally). Hope it helps!
xo
s
Lauren says
I cannot agree with you more about the lights making such a difference. We’ve put simple recessed ceiling lights in almost every room of our house. Most recently, we tackled our angled ceiling in our family room. It was a little trickier than a flat ceiling, so we hired an electrician . . . who fortunately was skinny and could squeeze into the small space between the ceiling and the roof:) Immediately after the lights were in, I started noticing how filthy my carpets were! Nothing a little rug cleaning couldn’t help, but it just showed how much I was missing by having dim lighting!
YoungHouseLove says
Haha, no way! I love that he could squeeze in there for ya!
xo
s
Lauren {L'amour chez nous} says
So clean and pretty! Layered lighting really does make a difference. Love your line of lamps in the room too!
Abby @ Just a Girl and Her Blog says
What a beautiful transformation! The lights bring so much to the room and highlight your gorgeous design choices! I might have to steal the blue/yellow-green color combo for a space in my house–LOVE it!
~Abby =)
YoungHouseLove says
Aw thanks Abby!
xo
s
kate C. says
You mentioned you didn’t use the fans in here and they didn’t have lights so they were rather worthless for that. I was curious though if you’d ever consider ceiling fans with lights in any of the rooms of your house or if you’re just sort of against them from a design/asthetic perspective. We love them in our location (midwest) because often it’s not hot enough to waste energy on the a/c in the summer especially if you have air moving with a ceiling fan. But we don’t have them in our house, and I’m having trouble deciding if they’d look good or what type would actually look good and ‘modern’ – I don’t want my house to look like it’s stuck in the 80s (is that when most were installed??) but I also miss having the air flow!
Any chance you guys want to do a special ceiling fan/light post on nice, stylish ones (especially ones that would look great in a 1968 ranch with sloped ceilings and beams :) OR on why you aren’t a fan (ha!) and why you think they don’t make a room look good?
YoungHouseLove says
Oh yes, we kept ceiling fans with lights in two rooms in our first house (the den and the sunroom) where they were super functional. We also have a ceiling fan in the sunroom here which works really nicely – we just lived with the living room fans for around a year and never used them so to us it was worth switching them out for something less hulking/bulky. So you can check out our Current House Tour page and our First House Tour page for three rooms with fans :). Hope that helps!
xo
s
Gaelle says
It’s amazing… I go through your pictures and I go “Oh no, now that’s just too much bold geometric pattern!” And then I do a double take… and although the rug and the pendent shade are bold, the whole room still looks awesome… You guys are so borderline pattern crazy it makes you amazing. Amaz… :D
YoungHouseLove says
Haha, thanks Gaelle! We owe it all to Clara! She pairs so many fun colors and patterns and somehow it works (and it’s super cute, haha!) so it makes us want to give it a go too :)
xo
s
Katherine says
I have been reading this blog now for 2 years, and I’ve never been disappointed! My whole family is hooked now. Anyways, my mom was reading through a magazine the other day (I can’t remember which one, sorry!), and there was an ad for your new lighting line! I’ve never been so excited by an advertisement! Congrats and best wishes on continuing your work! Oh, and I may be starting a personal fan club for Clara. Cutest girl ever!
YoungHouseLove says
Ahhhh, that’s so exciting! I haven’t seen that yet but you comment gave me goosebumps. Eeks!
xo
s
Lara says
Such a great transformation! And you’ve given me so much more confidence to install recessed lighting in my own home!! Kitchen & living room – watch out!
Alison says
Night shot, pretty, pretty please.
YoungHouseLove says
Will do!
xo
s
Susan says
So jealous of the canned lights! We have vaulted ceilings in our kitchen and living room and so far, every electrician has balked at adding recessed lighting in the rooms. The upgrade is just another bullet point on our wishlist for now!
Emily says
Ooooh, fancy. I have to say I wasn’t so into recessed lighting when I first started to play around with home decor/DIY, but it has since grown on me and I’m a HUGE fan and would one day hope to have it in my “forever” home. And that yellow pendant is fab. You guys are seriously such a great source of inspiration!
YoungHouseLove says
Aw thanks so much Emily!
xo
s
Rebecca says
Yes! Yes! Yes! We have new lights too. Yours are sooo colourful and pretty. Here are ours:
http://make-it-funky.blogspot.com.au/2013/02/dining-room-progress.html
Femme Ménage says
Great work! I don’t know if you used a filter between the before and after photo, but you have more light in the room. It’s so fresh right now.
Xo
Alison says
Amazing job! You should be proud.
Alison@soiledrotten.blogspot.com
Kellie says
I love your lamp shades/lights – do you stock them in Australia? :)
YoungHouseLove says
If you call Shades Of Light, they offer international shipping and can give you rates over the phone. Hope it helps!
xo
s
Brittany aka Pretty Handy Girl says
Ahhh, there is nothing better for raising your ceiling height than can lights! (Well other than raising the ceiling.) I just subcontracted an electrician to run the wiring for our lights (because I pulled a permit and wanted to make sure it was to code.) But he let me put in the cans and I’ll be adding my own lights when the time comes. http://www.prettyhandygirl.com/2013/02/how-to-install-recessed-lights.html
Today I’ll be mudding, so thanks for the magic eraser trick!!!
YoungHouseLove says
Good luck Brittany!
xo
s
Sharon says
Our living room also had no overhead lights and it’s a fairly large room. I kept adding floor and table lamps til it looked like a lighting store. A couple of summers ago we had a house fire that started in our attic and thankfully the damage was kept to the upstairs floor thanks to the quick action of our local fire department. However, that put us into unplanned renovation mode and since the upstairs was tore apart and we could access our ceiling we added three rows of recessed lighting to our living room. Three different switches and on dimmers…WOW what a difference. Out of every bad situation comes something good.
Sharon says
btw, we loved it so much that when we recently did a whole kitchen reno we added recessed lighting over the peninsula. Pretty lighting fixtures are great in some places and some places just call for recessed lighting. Your blog made me light obsessed when shopping for the lighting for our new kitchen. We are in Canada so some things were just more difficult. Ended up with finding the perfect unique lights at West Elm and Overstock.com which ships to Canada at reasonable rates.
YoungHouseLove says
Sounds awesome!
xo,
s
YoungHouseLove says
That’s amazing Sharon! So sorry about the fire but so glad something great came out of it.
xo
s
Natalie says
I’m not sure I understand the floor plan. Can you explain the huge ouch and no chairs? Or the table and chairs behind the couch and the desk next to the table and chairs? Just curious about the effectiveness of the unusual floorplan.
YoungHouseLove says
It’s a giant room (25 x 20′ or so) so it’s practically a gymnasium, so in order to make it feel cozy we just decided to go with a large sectional instead of cluttering it up with lots of floating chairs everywhere (we lounge on sofas more than chairs since we’re informal, haha!). The desk is near the slider (which is perfect for holding Burger’s treats for when he goes in and out – and also holds all of our stationery and acts as a bill-paying desk) while the table is back near the window (we love eating there on a nice day while we soak up the sun – and sometimes even when a movie is on TV, haha!). With such a giant room I’m sure there are a million other ways to play it, so this is just what works for our family :)
xo
s
leanne says
Crack Shot.
That should be for plumbers! Ha!
YoungHouseLove says
Haha! We make crack jokes pretty much every time we use it…
xo
s
Marianne says
We are about to hire somebody to have some work done on our electricity (waiting for the bid). Our house is from 1957 and when you remove the lamps upstairs there is a tube with 2 wires and a nail to hold the lamp. I won’t have anybody but a pro work on the electricity. We’ve learned that lesson last year, when a ten year old job done by a handyman almost blew up in our face (or should I say fuse(box)).
YoungHouseLove says
Eeks!
xo
s
Nicole says
Where did you get the replica of Burger? Is it cardboard? I have a chihuahua mix rescue that could be Burger’s sister! ;)
YoungHouseLove says
That was actually made by a reader at a signing (from cardboard!). Isn’t it awesome!
xo
s
Tara says
Those new shades from your collection add just the right mix of color and pattern to the room. I have liked all of the changes you’ve made over the last 3 years but this was the first time I thought this room looked finally finished and pulled together. Of course I’m sure the recessed lighting is great for practical living but I love to see your choices on how to add pops of color to basically neutral spaces. It’s easy to say but not so easy to do!
YoungHouseLove says
Aw thanks Tara!
xo
s
Gabbi @ Retro Ranch Reno says
Adding lighting was such a major improvement to our home! There were MAYBE 2 cans in our house before we came along…now everything is lit up and lovely. I really adore the choices you guys made in your space…it looks awesome!
Meleah says
That made such a difference. It looks awesome!!!
Yvonne says
Where did you get that beautiful rug, and the coordinating blue and green jars/vases on your Parsons desk? :) I’m always hesitant to splurge on a huge rug, but it looks like it’s really pulling together your room.
YoungHouseLove says
The rug is from Joss & Main a while back and the lanterns on the desk are from HomeGoods (I’ve seen them at Marshall’s too)! Hope it helps!
xo
s
Chris says
It looks great! Love your blog – you always seem to post on projects that we are in the process of planning :) I’m wondering what size/type of can you guys chose? Did your electrician supply them or did you buy the kits yourselves?
YoungHouseLove says
We just used white standard can lights (they sell them at Home Depot and Lowe’s) – we like the white trim kit (not stainless) so they blend right in.
xo
s
Angela M says
We’re actually in the pendant situation now. I wanna change out the ugly builder brass chandelier in the dining room for a drum shade but my husband does think it will give off enough light since we’d be going from 3 bulbs to 1. Argh! I think he’s right but there has to be a waaay! #DIYerproblems
Lisa says
Love the new look and lights! Fabulous! I broke one of my bedside table lamps, so we ran to Home Goods to buy two new ones and WOW! What a difference new lighting makes. (The old ones were only 10 inches tall with a tiny lampshade – garage sale purchase. The new ones are gorgeous 15 inches tall with beautiful white shades with white polka dots. Totally fits the space so much better).
I would love to see an added picture to this post of the room photographed at night when the lights really shine. Just an idea!
YoungHouseLove says
Oh yes, we’d love to update you guys with some night pics :)
xo
s
Christina says
Man, I wish I’d read this post a couple days ago. I am no stranger to patching drywall holes, but I got so lazy with my latest venture. I’m doing some updates in my bathroom including painting and a new towel bar, and my old towel bar left several ugly holes and protruding screw anchors which I hastily decided to just cover up with drywall compound. (The new bar is longer and therefore can’t cover or reuse all the holes.) I sanded it, but not nearly enough. And painted it. And it looks pretty much like crap. Haha. I’m just hoping I can make things better somehow. More sanding, probably some more compound to better feather it out, and obviously more paint. I just want this project to be done! Haha.
YoungHouseLove says
Oh man, good luck Christina!
xo
s
sarah says
I have a lightbulb question: Are you using bulbs that lean yellow, or the ones that lean more blue. We recently had an electrician install several new can lights and he recommended we remove all the “yellow” lighting from the house, and replace them with the blue ones. Supposedly the blue mimics natural light, but I am really struggling getting used to it.
Just wondering what you guys have done?
Love EVERYTHING you do. You both have the golden touch.
YoungHouseLove says
We prefer “warm white” bulbs, so they’re not the blue daylight ones (those are a little too cool for our tastes – at least the ones we tried a few years ago were) but it’s really all personal preference!
xo
s