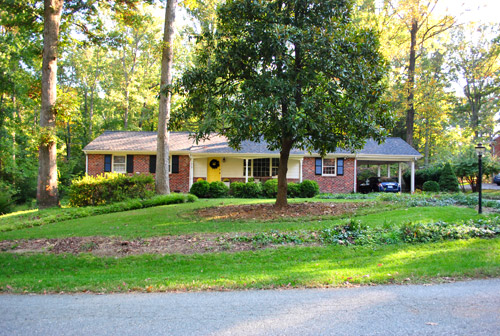
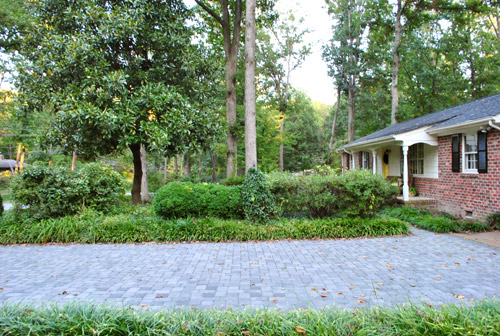
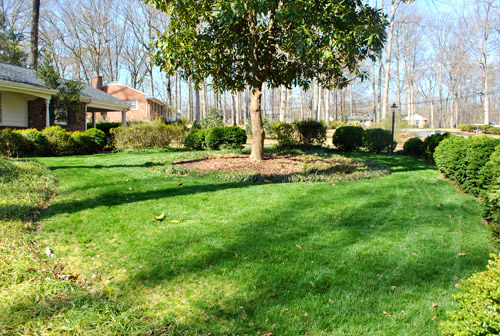
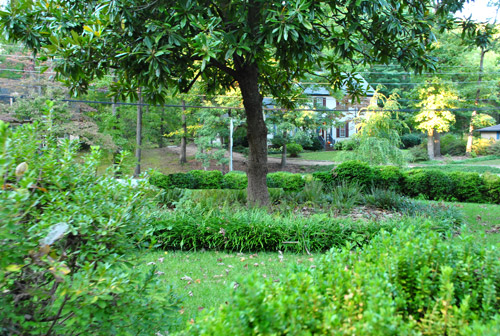
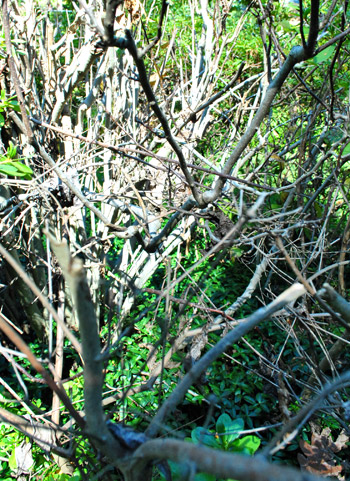
We did it! Over the course of two nice long Clara naps (and with a little help from a friend) we managed to open up our front yard in what we like to call “Phase Two Of Ten Million” when it comes to slowly transforming our front yard. Why so many phases? Well it started out looking like this:

Much like our first house’s yard, we figure it’ll take a few years of tweaks to get it where we want it, so this phase was just about clearing things out for a you-can-actually-see-the-house-now effect (Phase One was limbing up the magnolia). In short: we dug up/transplanted/removed a ton of bushes (with the help of a friend of ours who took home some boxwoods in exchange for helping us get a bunch of them up). This post is full of photos, so I’ll let them do the talking. Without further ado, here are the before and afters (we tried to take photos from the same angle for comparison). First there’s the AFTER to the before above (don’t mind the black feather wreath out there on the door for Halloween):
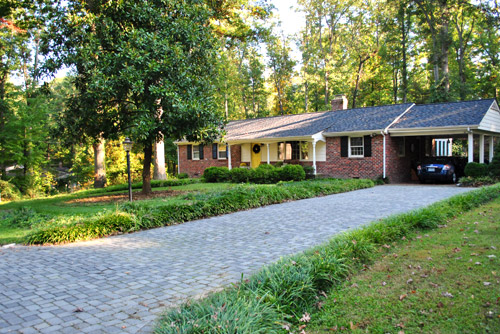
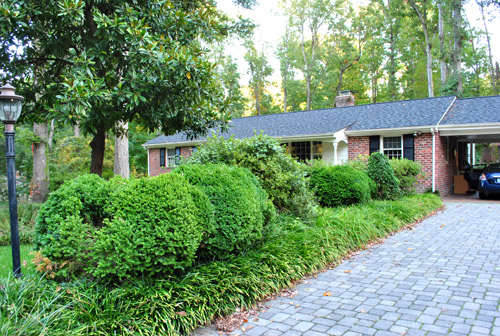
Here’s another BEFORE for ya from the driveway:
And another AFTER from the same angle (a little further away):
Another BEFORE:
And the AFTER:

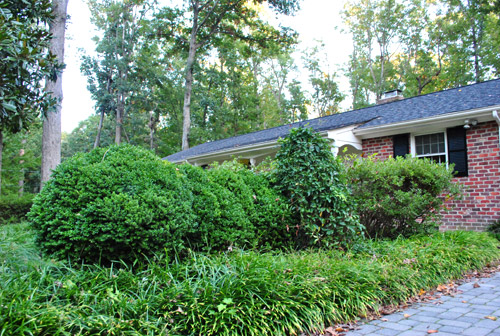
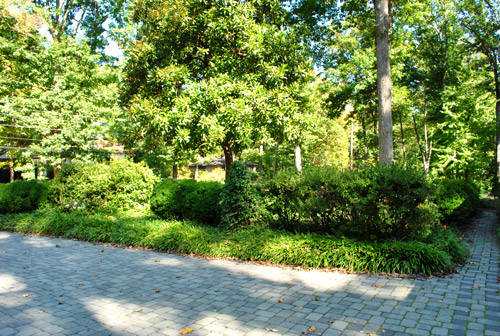
Here’s a side-angle BEFORE:
And an AFTER from the same POV:
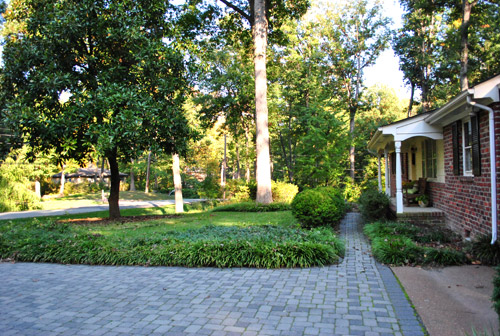
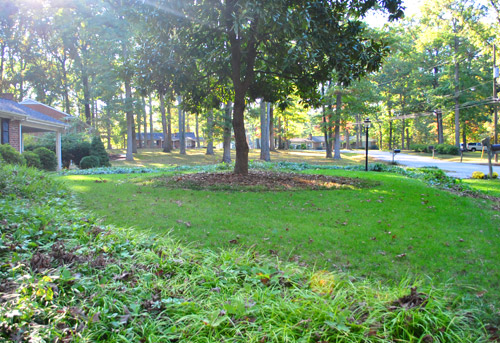
Another BEFORE facing more towards the street:
And the accompanying AFTER:
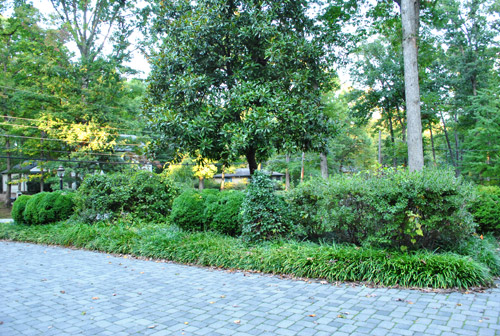
Here’s a BEFORE from the other side (the bushes used to completely stop the eye so our yard felt way smaller):
And here’s the AFTER from the same angle:
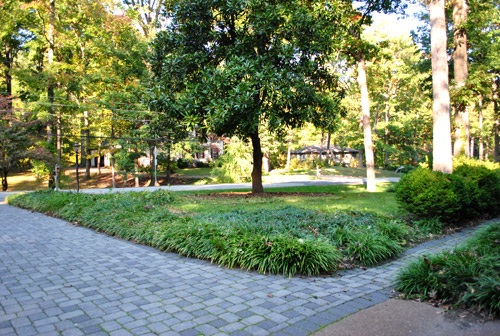
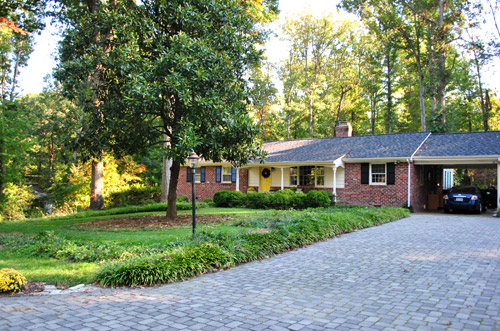
Yet another BEFORE:
And another AFTER:
Here’s how it looked from the front porch BEFORE:
And AFTER:

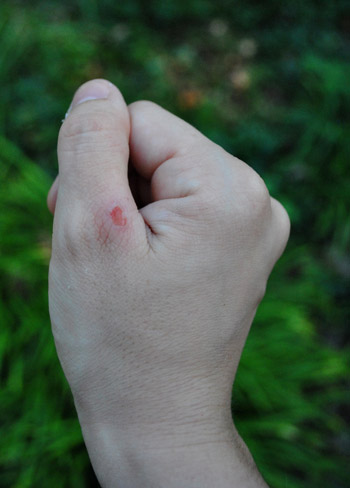
The only drawback? I got me a blister. So in that aspect it was exactly like Phase One (seen here). Totally worth it though. No pain, no gain.
As for where we put the bushes that we transplanted, we just dug them up…
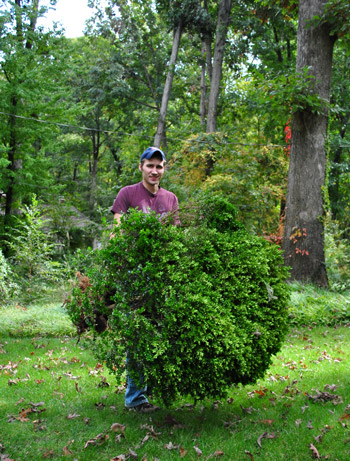
… and planted them in the naturalized parts of our side and back yard (and our friend who helped us dig made off with the rest of the healthy ones). Sadly some of the bushes were dead…
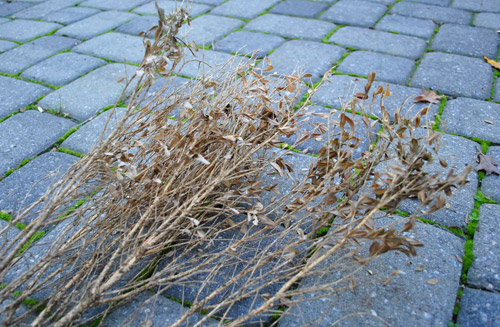
… so those just got removed with a sawzall (aka this reciprocating saw by Skill). Which was probably more fun to use than it should have been (it was actually our first time sawzalling, so we took turns and grinned like fools the whole time). And you know we loved the fact that this big curb appeal makeover was f-r-e-e (well, I guess it cost us a few boxwoods in return for some helpful friend labor, but it was foliage well spent).
As for our future lawn plans, we’re definitely just getting started out there – so there are a lot more phases on the over-the-next-few-years agenda. We’ve got plans to:
- dig out some ivy/monkey grass
- lay down some grass seed in certain areas
- layer in some low maintenance native (and less vinyl fence-like) plantings to soften things up around certain areas of the perimeter
- landscape around the front of the house (there are hardly any plants on either side of the porch – so it’s just sort of a mud pit in those areas)
- do a million other things that are slipping my mind at the moment (one big one: convert the carport to a garage)
So this step was just about clearing things out to make way for some less house-obscuring choices and opening things up to let the eye travel a bit further in certain places. Feels nice to let the house breathe a little. And the neighbors have all been saying such sweet things about the change. Whew! Has anyone else been up to a few exterior tweaks? Do you do them during baby naps with the monitor outside on full blast so you can run in at a moment’s notice? Do you hold your breath until the neighbors approve? We totally do.
Psst- We’re over on BabyCenter talking about a Halloween surprise that we discovered on Sunday night. Let’s just say Clara’s in love. Here’s the story.

jaime says
Hey! Your yard looks great…as for the magnolia…dont cut it down, they are beautiful and sort of good luck in our family haha…my dad had the same problem with the trees in his back yard and (I wish I had a picture) he built circular, raised flat stone beds around the base about a foot high…and planted shade plants such as hostas (sp?).they are beautiful, full green plants that actually double in size so you have to separate them every so often…so they sort of give you more plant over the years…but they looked great and took care of his grass growing frustrations..and they give the yard this great texture and organized feel…and his trees still bloom and look great so they are smothered if you worried about that.
jaime says
*aren’t smothered. Geez. Haha. But also, he built them pretty wide to balance out the branch width…probably around three or four feet from trunk of tree to rock wall. We live in GA so it’s tough sometimes to get grass to grow naturally under a heavy shade tree…darn climate.
YoungHouseLove says
Oh yes, we love hostas! Another great idea!
xo,
s
Sam @ The Junk House says
There’s actually a house back there! And your yard looks way bigger now! Definitely foliage well spent!
We’re starting to do some exterior work now that Phoenix isn’t 1000 degrees anymore. Over the weekend we put up a new gate. Our old one was a hunk of junk and we were scared our puppy would get out.
http://thejunkhouse.blogspot.com/2011/10/above-my-skill-level.html
YoungHouseLove says
Wow- that looks awesome!
xo,
s
Samantha says
I know everyone else said it, but it looks so GOOD! Great job!
maribel says
Love your yard it’s so green…I have a question regarding window treatments. I have three rooms that face my street. (living room and two bedrooms). How would you deal with this when wanting different curtains for each room…with out looking like a quilt from the outside…
YoungHouseLove says
I never really pay attention to it. Haha. Weird answer, right? We have patterned curtains in Clara’s room and in the living room (super bright, both of them) but from the back – and also because we hang them high and wide, so they don’t overlap the window a ton) they look neutral enough from the curb somehow.
xo,
s
Gretchen says
I’ve always heard that digging up established boxwoods like those (and mine) can be a huge pain b/c they can regrow if you leave any roots underground. Also because of the clay soil around my area (I’m near Roanoke, not far from you). Do you have that tough soil too? You didn’t throw your backs out or anything? I know you said it took two Clara naptimes… which sounds surprisingly quick! :)
I have wanted to get rid of our boxwoods ever since we moved in 4 1/2 years ago. I love them if they’re in a hedge, but these were just plopped separately in random places just in front of our house. I so want to get rid of them and create a real garden! I’ve tried to plant things around them, but the garden just doesn’t flow well. Hmmmm…
YoungHouseLove says
It was tough! Don’t get us wrong. But it was possible! You can do it! We do have some pretty firm soil (although we didn’t hit much clay) so we just took our time and did what we could!
xo,
s
Michelle Kersey says
Wow. Awesomeness. :)
Sandy says
Can you believe what a huge difference that makes?!!!! That is just amazing! I love transformations like that. It makes the hard work so satisfying.
Amanda @ Serenity Now says
Nice “After” shots! Those bushes had a playpen kind of look to them…like they’d maybe fence Clara in or something. Now it looks like she’ll have plenty of room to run and play.
Katherine Victoria says
Amazing.
You’ve actually inspired me to rake my lawn this weekend – which is a big deal for me!
Rosalyn J says
Hi *wavin*….”AWESOME JOB”, it looks amazing!
Meg says
Wow what a difference! Way to go!
Brittney Colyer says
BRAVO yall! Seriously, that’s a crazy large amount of work but it for sure paid off. I think the pay off from the front porch alone was worth it. Man. Curb appeal just shot through the roof! Congrats and happy Tuesday!
maribel says
Now that I think about it one window is shaded by a tree so it’s not too visible the others have beige blinds that blend in from the curb…so if i do the high and wide thing i will be good…I drove by a house the other day that had wood blinds
on all the front windows and it just looked to matchy matchy to me…
Britney says
What wonderful improvements you’ve done to your yard!!! The yard looks so much bigger.
CAMEO ME!
I’d basically love a cameo from any of the stars of True Blood ;) Those boys are smokin hot!
Elizabeth says
Wow! That is a very dramatic before and after! It looks so much better!
Kacey @ Refreshed Decor says
What a gorgeous after! Seriously, so wide open, green and beautiful. Great job!
Angie K says
Wow, that looks so much better! When I looked at the first picture I thought “wow, that tree grew back SO fast!” I then felt a little sheepish when I kept reading. Of course it didn’t grow that fast.
I should just stop having conversations in my own head :)
I have a handful of bushes in front of my townhouse I want to remove. I’m going to put in a little porch instead. Nothing fancy…just a place I can sit and watch the kiddos play in the front yard…
Gabbi says
i absolutely love it! it takes me back to when we removed all the overgrown plants in our yard. its the best feeling to see your house and get rid of all the obstructions! good job!
Julie W says
It looks absolutely beautiful now. Bush hedges never look right unless they are constantly pruned which my lazy butt will never do. I like the monkey grass around the driveway now. The before view from the front porch makes me want to go grab my safari hat and sit and wait to see what wildlife will pass by. No offense to you or the previous owners I just think it looks kind of cool like that.
Becky says
I’m not a fan of ‘bush fences’ either! Your before and afters are amazing…your yard is so much more open!! Looks fantastic. Isn’t it amazing what a little landscaping/cleaning up can do?! Such instant gratification. Makes me miss my yard.
http://www.preparingforpeanut.com
Teresa says
WOW!!! That makes a huge difference in your front yard… so do you find yourself sneaking to teh front windows to peak out at it every now and again?? lol
YoungHouseLove says
Haha- yes! I even make John drive right by the house when we’re going home so I can see the whole thing (then we back up and pull into the driveway).
xo,
s
KLL says
I keep reading the title of this post as “Bush fence Beyonce.” I blame you for making Beyonce something my subconscious automatically settles upon.
YoungHouseLove says
Bwahahahhaah, hilarious.
xo,
s
Kerstin says
Me too! And I searched the whole post for a chicken :-)
YoungHouseLove says
Hysterical!
xo,
s
Melody says
I’m usually one for a lot of landscaping because it provides privacy, but I love what you’ve done. It looks so much better… very clean looking! I might have to consider trimming things back a bit next year!
Sabrina says
Love it! I need someone to help me dig up all my bushes in the front! I was told I needed a tree company to dig them up. That’s what she said, by the way for headline, from the hubs lol
YoungHouseLove says
Haha- what about posting a free-if-you-dig them ad on craigslist so folks come over and do the labor for you in return for free bushes?
xo,
s
Sabrina says
I did that! No one wanted them lol They are half dead. They are right up against our house and the half that is closer to the house is dead. Also everyone around here has them. I saw 6 free bushes listed. We looked behind them and no one bothered to paint the house there or reside. We have old siding and paint color from the 60’s back there. Totally need to reno. Next year though. We are “those people”, we only work on the inside of the house.
Susan says
Sherry, I’m a Master Gardener and landscape designer and even so, I can’t believe the difference all that hard work made! You and John have great structural visualization and vision. I’m not sure that can be learned. Anyway, your yard looks fabulous.
YoungHouseLove says
Aw thanks so much Susan! That’s so sweet.
xo,
s
Charlene @ Sweetchic says
Holy smokes, you guys never cease to amaze me!!
dee says
Looks wonderful!!!! So much hard work. Love how you take before and after photos from the same angle. So many before and after shots do not do that and it is hard to compare. Thanks!
statia says
I LOVE a clean fresh front yard. It looks great, and I HATE those blisters. I have painting blisters right now. Bleh!
Sherry from BC says
That really spruces up your yard. A lot of work I am sure but wow what a difference.
Kati L says
Wow – what an amazing transformation! I love that you can see that happy yellow door from the road now – it makes your house look even more inviting!
Jasmine says
Oh my gosh. I am so inspired by this post… I think it just goes to show you that as so many visual things in life—often all you need to do is edit… not necessarily add or elaborate: just take something away to make something else shine. As a photographer, this is a principle I try to live by, but this is such a great example of this in other applications. Lovely!
Ali says
Huge!! It looks great. We’re in the process of getting rid of some eyesores in our front yard, like a giant flagpole, some haggard-looking hedges, and some dying trees. I’m excited about how much it will open up the look!
Bobbie Brown says
Wow! All THIS in only two Clara naps?! You guys rock! And the end result looks incredible!!!!
Trina says
Looks GREAT you guys!! Amazing what a little hard work will do, it looks completely different (in a good way)!
We just bought a new home 3 weeks ago & had a little…ok, A LOT, of brush to clear out. Previous owners had a love for everything viney, and we SO did not! Now we can actually SEE our house & we love it! The only problem we ran into was the vines actually left little “footprints” bedhind so now our house looks polka dotted!! We are looking into the cost of having it sanded & repainted or re-stucco’d. What a project!!
Terri says
What a great transformation! Do you guys have any advice for digging up boxwoods? I have several old ones that need to go, but they don’t budge when I try to dig them up. Also, thank you for the great tip on free labor. My boxwoods will hopefully be in someone elses yard by the winter.
One more thing…where do you go for your yard inspiration?
Thanks!
YoungHouseLove says
Our tip is to jump on the shovel to get in there. Haha. That helps us sink into the dense soil. We also just put our heads down and dig! It’s hard work but so worth it! As for our yard inspiration, we just take photos of homes with landscaping that we love (even on vacation) and also pin stuff on Pinterest that inspires us!
xo,
s
Heidi P. says
Wow! That totally opened up the yard! I can’t believe how much you were able to do during two nap times! Im-press-ivo.
Lisa A says
SO much better. I believe you increased your property values a bit there.
mp says
Love how it opens up everything!
AmandaonMaui says
Oh yeah, that looks 100x better than before. It also makes your house and gorgeous driveway the stars of the show. :)
Jaimie says
We need to redo the landscaping in our yard. After this most recent Texas drought, we need some serious xeriscaping. Even our monkey grass is 50% dead at this point, and I am not looking forward to ripping it all out in the next few months. The previous owners went a little crazy with it; it is everywhere.
Elizabeth says
It looks amazing. And I was thinking that the neighbors must love it just before I read they are giving you compliments. :)
Jenna says
Wow the difference is incredible!!! I’ve been dying to remove some over grown bushes from our yard, but haven’t gotten my hubby completely on board yet. Maybe I’ll show him this post… So inspiring!
Lisa says
Your neighbors must have been shocked! Looks awesome! I owned a home with a boxwood hedge and know they are high maintenance. My neighbors had one too and let it grow 12 ft tall or more, then sculpted it into arches. It was fun!
Recently my husband and I took out some 25 year old creeping jasmine that was creepy from a lack of pruning. It was fun having neighbors go by and tell us how much better the yard looked!
Lauren says
Wow! You guys did a great job clearing the bushes! I can’t believe it only took you a couple of nap times, haha Keep up the good work : )
Leah - Bogue Living says
Wow, big difference! I wouldn’t have even thought about that kind of outdoor declutter, but it works as well in the great outdoors as inside to make space.
Jen @ The Decor Scene says
Love it!!! Looks soooo much better. Really opens things up. Great job. Love that you reused the live ones. Nice to be green. ;)
Ann says
Oh my gosh! It looks like a different house entirely!
Allison says
My husband and I cut down a dead tree in our front yard this weekend. I was so nervous that it would fall on our mailbox, but our youtube video instructions worked out perfectly.
We want to move some crepe myrtle bushes from the backyard to the front, but I’m worried that we’re running out of time this fall. How long before a frost do you allow so your bushes survive?
Also, how far from the base of your plants did you start digging, and how large were your transplant holes? (I have no clue how to do this, and I don’t want to damage the roots.)
Thanks, and, wow(!) what an improvement to your front yard!
YoungHouseLove says
The base of a boxwood is only about 5″ wide (they’re very small and stick-y on the bottom) so we probably dug about 8″ wider than that all around? As for our transplant holes, we just dug them deeper and wider than the root ball and filled them with some soil/compost. Hope it helps!
xo,
s
Alison says
Wow!!! I think this might be one of my favorite makeovers of yours yet! Talk about crub appeal!!!! Great work!
georgia says
Such a transformation!!! Well done on the hardwork.