Hold onto your miniature hats, it’s time for the fun part of painting and personalizing the dollhouse!
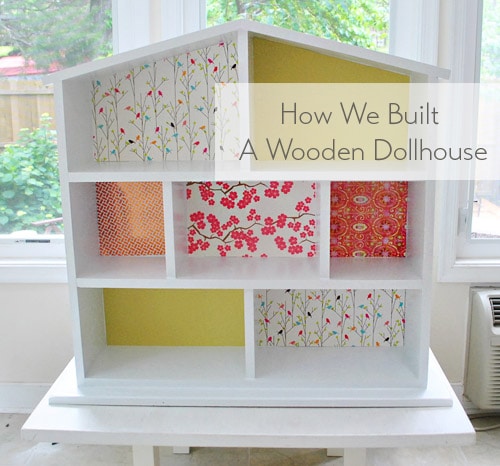
Our last post was full of the building process, which you can see by (clicking here) – so let’s move on to how we finished everything off.
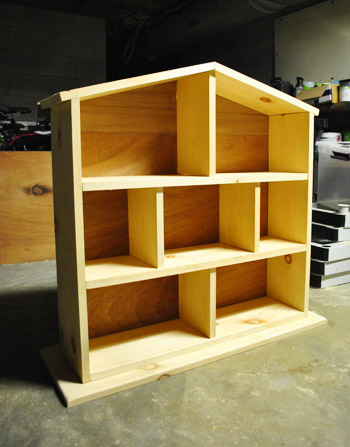
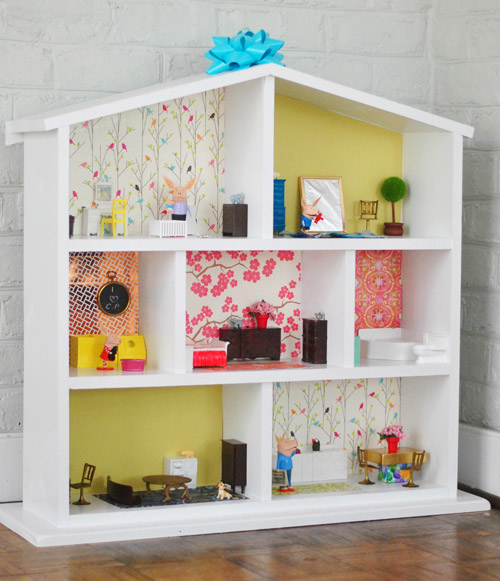
After it was all assembled, it was time to schlep our 31″ x 31″ creation up into the sunroom for some priming and painting. Just like our office cabinets, kitchen cabinets, and the play kitchen we made for Clara, I used a coat of Zinsser Smart Prime (it’s no-VOC but amazingly good for blocking bleed through when you’re painting raw or stained wood) followed by two coats of Bejamin Moore’s low-VOC Advance paint (really durable and awesomely self-leveling). I went with Decorators White since we had it leftover from painting the office cabinets and the play kitchen, so this step didn’t cost us anything. Here’s our little house when it was primed but not yet painted:
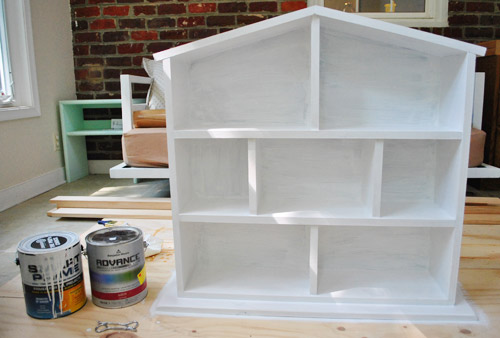
And here’s my first coat of paint going on (I used a brush for some of the hard to roll places and a small foam roller for the more expansive roll-able places – like the sides, roof, and back).

Then I gave it about 30 hours to cure up before it was…
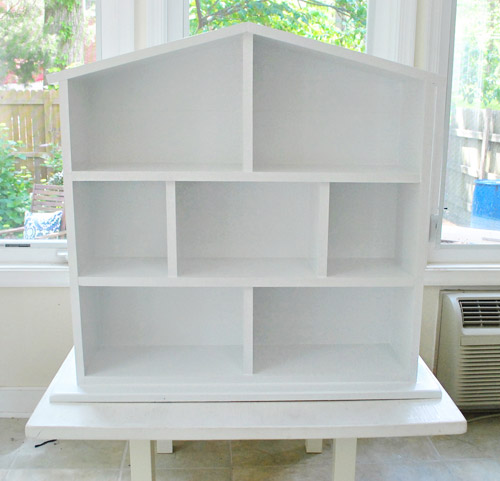
… wallpaper time!
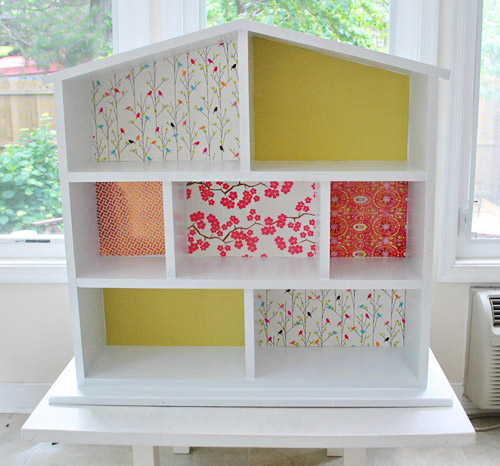
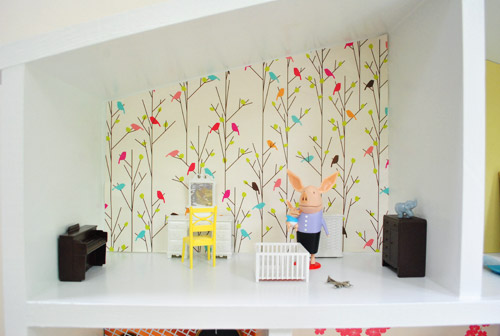
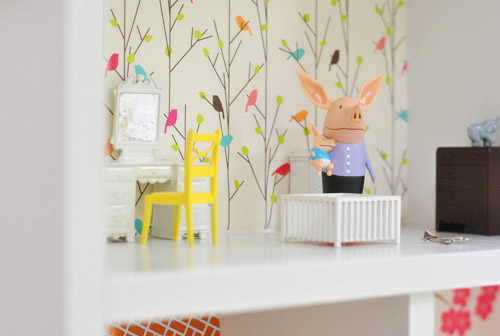
I actually used the following things that I already had in the house (I just ransacked my craft bin/gift wrap closet) to wallpaper the dollhouse:
- Top left: Gift wrap sheets picked up from a local place called Mongrel a few months back
- Top right: Decorative paper from Michael’s leftover from some other project
- Middle left: A roll of leftover decorative tape from Michael’s (I just taped four strips of it to a piece of card stock)
- Middle middle: More gift wrap from Mongrel (this one’s actually from a few years back)
- Middle right: More decorative paper from Michael’s
- Bottom left: Even more decorative paper from Michael’s (I have a nice pile of leftover paper under the bed)
- Bottom right: More gift wrap from Mongrel
As for how I did it, I cut templates for the back wall of each room using regular old printer paper (taping a few sheets together if it was bigger than one sheet and trimming things until it was a nice snug fit). Then I just used that paper template to cut out the right sized piece of gift wrap or decorative paper. I used double sided tape to affix them to the back wall of the dollhouse, and then brushed a thin coat of matte Mod Podge over each of them – just to give them some protection from being scratched or ripped (except for the room with the decorative tape, which was already shiny).
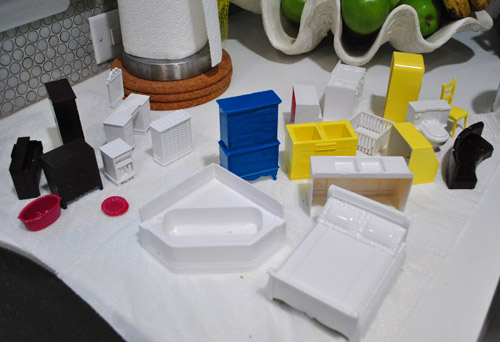
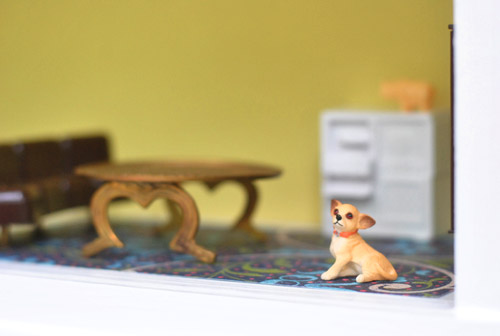
As for furniture, I bought a big “mixed lot” of old dollhouse furniture (most of it from the 50s/60s) from eBay for $30 including shipping. Oh and for those wondering about scale, it’s 1/2″ scale. This is what it looked like after it came and I soaked everything in hot soapy water to remove years of grime.
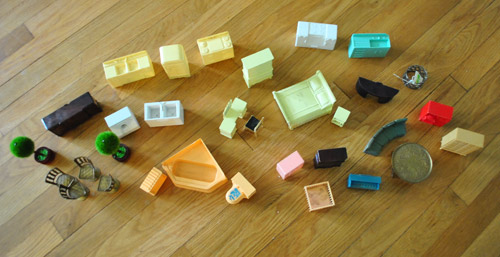
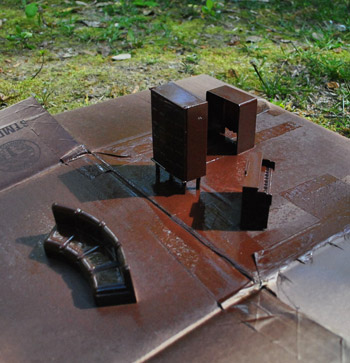
But since those colors weren’t exactly what we were going for, I turned to my good friend spray paint. We knew spray primer and spray paint was the best way to permanently update the furniture (no-VOC paint would most likely scratch off within one or two play-sessions – and we really want this to be a durable and long-lasting gift) but we didn’t want the dollhouse to smell all fumey like spray paint, so I actually ordered this furniture in February and sprayed it all in March so it could be left in the sealed off sunroom (and brought outside on sunny days) to off-gas for a nice long time. Thankfully there’s nothing stinky about it after all that curing time, and it actually looks pretty convincingly done – as if that’s the color the manufacturer sprayed on it a few decades back. Speaking of color, some of them got leftover dark brown spray paint (with built-in primer by Rustoleum) for the whole “wood look.”
But most of them got white primer + paint as a base (Rustoleum Universal in Satin White) …
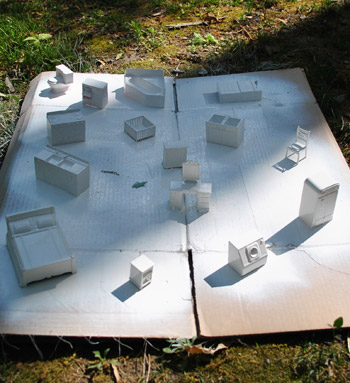
And then some of them got a shot of bright color on top of that primer + paint base, just for fun (thanks to leftover cans of random colors). Who doesn’t love a yellow washer or fridge? They’re Sun Yellow by Rustoleum, and the turquoise dresser in the background is Lagoon by Rustoleum.
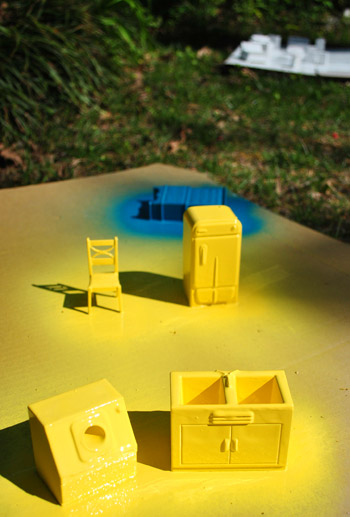
They sat around in the sunroom after their March paint job so long that they actually got dusty by May. Haha. So here they are after a little rinse-down in the sink.
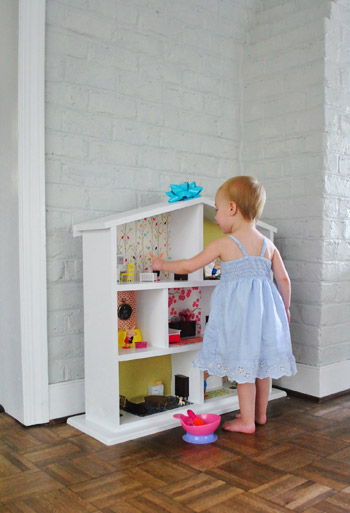
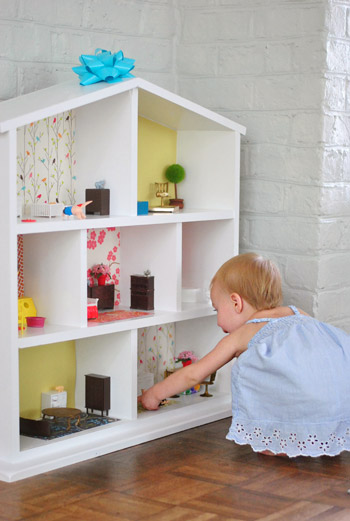
I couldn’t wait to finally get things into the house…
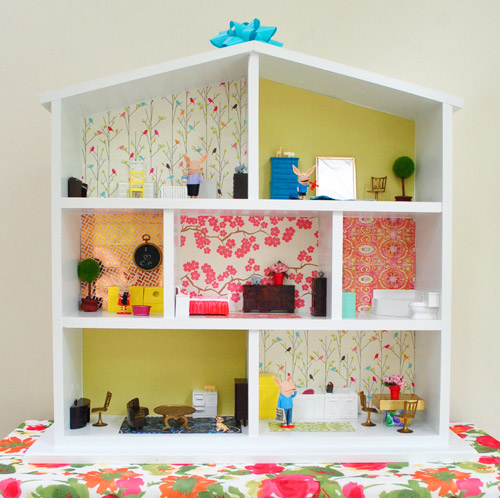
I didn’t put much thought into what went where since I figure Clara will be moving things around, and we’ll probably add some more items (like some much-needed wall art – maybe by laminating photos that we’ll print).
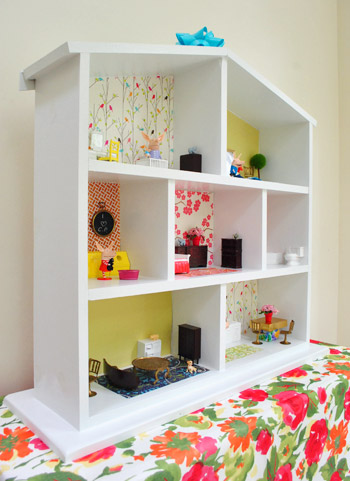
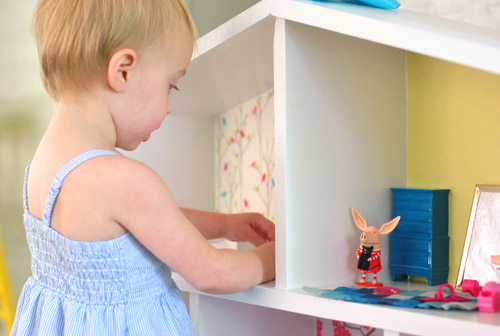
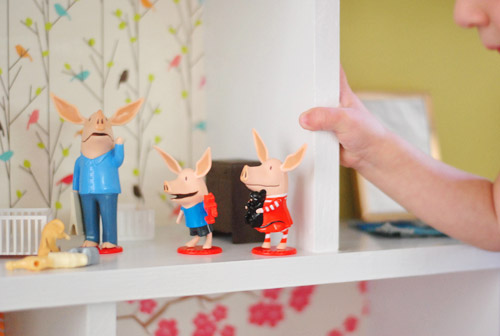
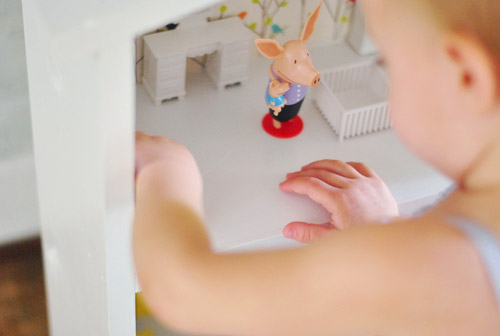
Oh yes, but what about dollhouse people? We couldn’t find many that we liked (they either had ceramic faces that we worried Clara would shatter or were a bit too big for the scale of our furniture, or were just kind of scary looking) – although I later learned about these, which are pretty darn cute… so we went with Olivia’s family.
Clara loves Olivia, and when I saw a family set at Toys R Us that looked perfectly scaled for our house, we scooped them up. They’re bendy plastic so they seem pretty indestructible and Clara has so much fun putting them in different rooms (ex: “Olivia’s daddy is taking a nap” and “Olivia’s mommy is in the crib – so silly”).
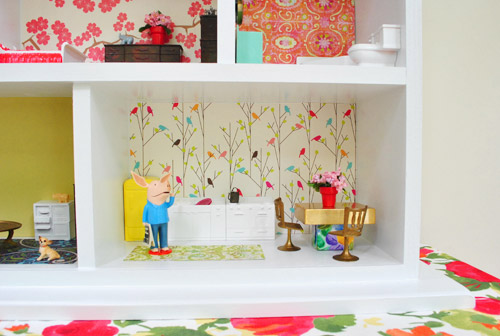
Although everything changes each time Clara rearranges things, the room above is sort of a nursery with a crib, a vanity with a happy yellow chair (and tin foil that I added to make the mirror look more like a mirror), a baby piano (Clara loves playing one at Grammy and Tom Tom’s house) and a dresser. There’s even a little airplane “toy” for the nursery, that I found at Michael’s (it’s really a charm for a necklace, but the scale is right so I went with it). But more on how we’re keeping the super tiny things in the dollhouse Clara-safe in a second.
Speaking of scale, as John mentioned yesterday, we opted for an 8″ room height on the first two floors and a sloped attic that’d go from 6″ to about 10.” This was all a bit big for the scale of our eBay furniture, but we wanted to err on the side of giving Clara plenty of room to move around rather than being sticklers for scale – and who doesn’t love a room with extra high ceilings anyway?
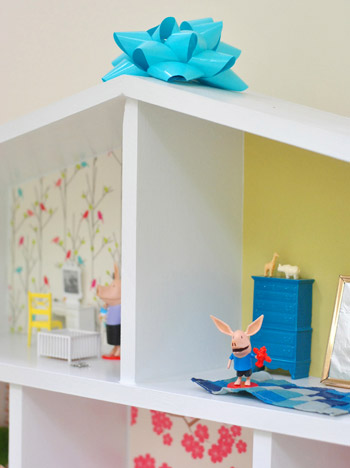
The room below is sort of a playroom/ extra bedroom without a bed (remember this whole thing is still evolving, haha) so it’s mostly filled with random furniture, a fabric rug that came with the dollhouse lot, a small frame that I found at a thrift store for a nickel with the glass removed and a piece of tinfoil in there to make it resemble a leaning mirror, and a small potted topiary that I found at Michael’s from the wedding aisle (it’s actually a place card holder).
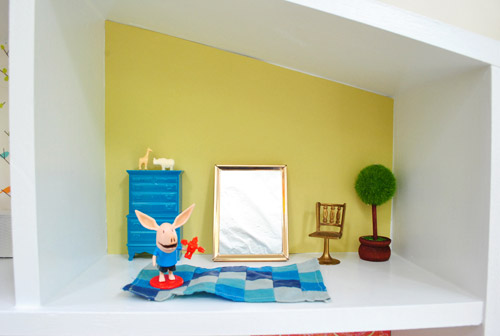
Oh and see those “ceramic animals” on top of the blue dresser above? They’re just plastic beads I found at Michael’s. I thought it was cute to add some animal friends to Clara’s dollhouse, and although Clara’s past the putting-things-in-her-mouth stage, a few smaller accessories like these and the previously mentioned toy airplane get put away in a box that only comes out when we’re playing together (so if she’s playing alone they’re not in there for her – just in case she gets any crazy ideas…).
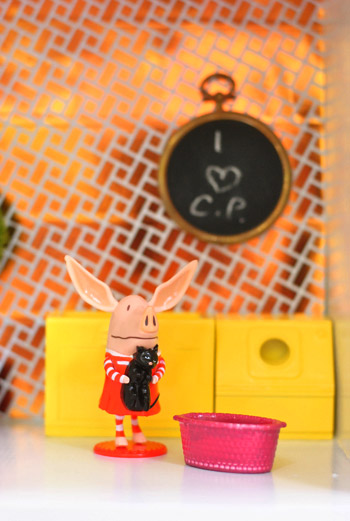
The laundry room might be my favorite room. The metallic tape I used for the wallpaper doesn’t photograph as great as it looks in real life, but in person it’s kind of swanky and geometric. I loved spraying the utility sink and the washer bright yellow and adding that cute pink basket on the floor. And see that black thing hanging on the wall? It’s a thrift store find for 10 cents (it was some sort of plastic frame ornament or something) but I used leftover chalk board paint to make it into a hanging chalkboard by just painting the plastic disk inside the frame and hanging it up.
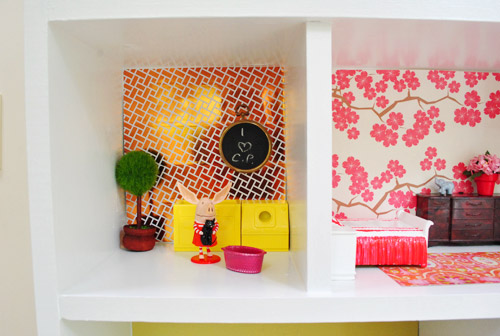
I love that we can change the message whenever Clara asks me to write something new (it actually says “Moooo!” right now at her request).
The next room is the bedroom, complete with a paper rug (I thought laminating it would make it last longer, but Clara has yet to pick it up and crush it so we’ll have to see if I get around to it). I’d also love to make fabric rugs from old scraps from her monthly pics someday, so I’ll keep you posted.
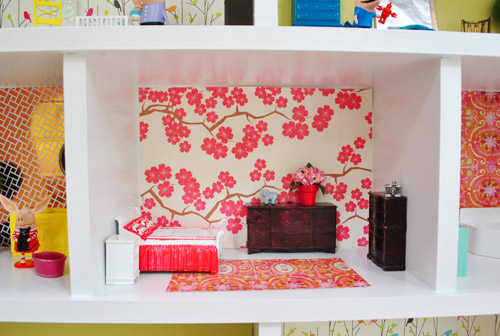
Oh and see the tiny metal camera on the dresser and the small flower pot on the other dresser above? Those are little doodads I found for a few bucks at Michael’s (the camera is a charm for a necklace actually – it’s another one of those things I tuck away when Clara is playing by herself since it’s so small). They also sell tiny flowerpots and fake flowers so I made that little potted plant and painted the terra cotta pot with the same pink nail polish that I used to make chevron pillows and a matching pink duvet skirt on the bed.
Here’s the bathroom with a mint green sink, and the other one of those plastic thrift store frame ornaments. Instead of making this one another chalkboard, I just put some tin foil behind the plastic pane and made it into a mirror for over the sink.
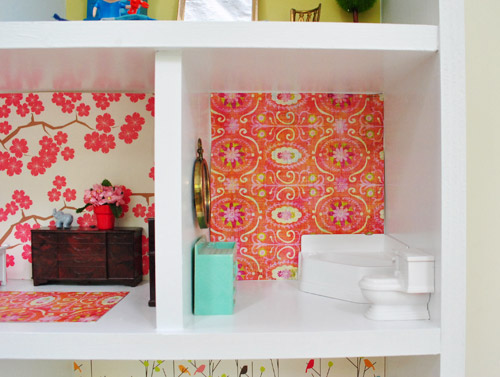
Oh and Clara was sad the potty didn’t open at first, but then was very excited when I taught her we could flush it by making a swissssssshhhhhhh noise with our mouth. Now Olivia and her family hang out in the bathroom a lot.
The living room is in dire need of some art on that blank wall, but it does have a funny little retro record player/TV cabinet (the white thing) with a “ceramic” rhino on top of it, so that tickles me.
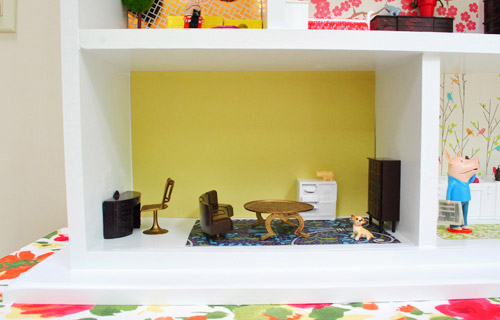
My favorite guy in there is the tiny Burger I found on eBay. You bet I paid $3 plus $3 shipping to have him represented in the house. Haha. Clara was pretty psyched to see him. She calls him “Baby Burger.” It’s very sweet.
Next to the living room is the kitchen, with an oven/stove and a sink (complete with tiny dishes in it, which also go away when Clara plays alone because they’re pretty small) and a happy yellow refrigerator. I also made the table with the top of a little wooden box I had lying around and used a small paper gift box as the base. Another homemade flowerpot + faux flower combo went on top along with chairs from the eBay lot of furniture. Oh and that’s another paper rug I just quickly made and might get laminated for protection (or it’ll get replaced with a fabric one I’ll make down the line).
After loading in all the furniture, it was time to top it with a bow…
… and carry it out of hiding and into the living room for Clara to discover after her nap.
She ran right in as if it had always been there and picked stuff up and got right down to the business of playing.
It was so cute to watch her little brain work out that things were too small for herself, but perfectly sized for Olivia and her family. The little family of pigs was definitely her favorite part at first and slowly she picked up on things like baskets and chairs and the crib, bed, and toilet- which became fun to work into Olivia and her family’s routine.
We love that nothing is too precious to worry about because we really wanted it to be something she could go to town on without fearing that delicate things could be broken.
Thankfully since the furnishings are all plastic or metal, they should hold up to Hurricane Clara. Oh yes, and the fact that Olivia is holding a kitty = Clara’s favorite part (other than discovering Baby Burger). The girl loves her animals!
So it’s safe to say that she likes it. Whew. The next morning it was the first thing she talked about as we got her our of her crib. And we might like it a little more than adults should too (not that we played with it after she went to bed, ok maybe we did just a little).
As for the budget breakdown, here ya go:
- Wood: $35 (we did get to reuse a scrap piece we had for the back to keep costs down)
- Nails and wood glue: $0, already owned (but they might run you $5 if you don’t have them)
- Primer & paint: $0, leftover from painting other things like cabinets & the play kitchen ($70 would get you a gallon of each that would probably last for a ton of furniture painting projects like ours have – even big ones like cabinet painting)
- Dollhouse furniture: $30 (including shipping) bought as one “lot” on eBay
- Michael’s doodads: $5 (small flower pots, faux flowers, beads, camera and airplane charm, etc)
- Baby Burger: $6 (including shipping) on eBay
- Olivia’s family: $10, Toys R Us
- TOTAL: $86
Thanks to having lots of those odds and ends on hand (primer & paint, decorative paper and gift wrap, Mod Podge, and even a piece of scrap wood for the back of the dollhouse) we were able to come in almost $15 under our $100 goal. Actually $86 is lower than all of the used wood dollhouses that we found on Craigslist. Which I think means that momma should get $15 to spend on future upgrades and furnishings, right? Haha. Can’t wait to see how this thing evolves as Clara grows!
Have you guys used things like gift wrap and decorative tape as wallpaper? Any other plastic-beads-turned-ceramic-animals out there? We heard so many awesome ideas in yesterday’s post, from carpet samples or even wood/tile on the floor to using tongue depressors to make shingles. Love it all.
Psst- Check out Part 1 of this project here.

Sharee A. says
Just checking, on my way out the door to work and, haven’t read any comments or your responses. Having said that…..SUPER CUTE doll house but, one big concern. Some of the pieces are really small and may be a chocking hazard. I assume the spray paint was “kid-friendly”. Please be really careful with those small pieces. Have a great day…I’m OUT!
YoungHouseLove says
Oh yes, if you check out the post I mention the small pieces get tucked away when Clara plays alone. They come out when I’m on the floor playing with her since she’s past the stage of putting things in her mouth- but you can’t be too careful!
xo,
s
Dlichten says
This takes me back! I loved my dollhouse growing up. I swear it is why I am decor obsessed today. The plastic insert inside of soda caps make great plates, toothpaste caps are convincing flower pots and most wallpaper places will give you old sample books.
YoungHouseLove says
Love those tips Dlichten!
xo,
s
SherL says
Clara’s doll house brought tears, doll-size tears, to my eyes. What a gift of love you have given to your adorable daughter!
YoungHouseLove says
Aw thanks SherL. So sweet!
xo,
s
Cassie says
Beautiful! What a lucky girl Clara is to have such amazing parents.
When I was about her age my mom repurposed a dog house she found at the dump by putting in a “floor” and some “walls;” she hinged the roof so one side opened up to reveal the attic. My favorite part was the use of scraps of wallpaper from our house she used on the walls. 30 years later she renovated it for my 4 and 6 year old nieces and gave it to them for Christmas last year. They LOVED it!
When I was a bit older she converted a 3 shelf bookcase into a Barbie house by adding walls with holes cut out for doorways. We loved that just as much!
Happy Birthday Clara!
YoungHouseLove says
So smart to convert that! I love it!
xo,
s
Lindsey says
This is so great for a little girl! I am currently putting together my own dollhouse that I was given as a child. I found it still boxed up when I came home from college… never put together. :) I also use scrapbook paper for my dollhouse walls and ceilings. You can look in home magazines for rug advertisements. They put great pics in of rugs from a top view that you can cut out and use as dollhouse rugs. There are so many cheap/repurposing type things that you can do with dollhouses! They are so much fun and I am sure Clara will enjoy it for years to come!
Anje says
And…when Clara is bigger she can use the doll house as a book shelf and a place to tuck all her trinkets and treasures! That’s what our Lily has done with hers.
YoungHouseLove says
So cute!!
xo
s
Ursula says
I love the doll house! You might want to look into playmobile. It can be a little pricey but looks very realistic and I think it would be a good size for the house and the rest of the furniture. I loved playing with playmobile when I was a kid.
YoungHouseLove says
Thanks Ursula!
xo,
s
Ann says
You guys are among the most awesome people i know. Love love love it! Would you mind if i copy it for my 2 girls? They are going to be in heaven!! :). Thank you so much for sharing!
YoungHouseLove says
Aw, you’re sweet – of course!! We’d love to see pics- hope they love it!
xo,
s
Rachel says
Great job on the doll house! I have one my grandfather built for me about 20 years ago that I will cherish forever. I’m sure Clara will do the same :) Its perfect, and Clara seems to love it! I have to tell you guys, Clara’s speech is amazing.. I worked with kids 2 to 2 1/2 for about 8 years and her vocabulary.. wow, extensive! It’s pretty rare to see a just-turned-two year old that speaks that clearly! Bravo Sherry and John!
YoungHouseLove says
Aw thanks Rachel! She’s our little chatterbug (just like her chatty mom, haha).
xo,
s
Crystal says
What a wonderful gift for Clara! It turned out awesome. You Petersiks are so inspiring! You could use paint chips as artwork for the walls or use them as a “canvas” for Clara (or you) to create art for Olivia’s family! :)
YoungHouseLove says
Haha, I love that idea!!!
xo,
s
Elisa says
I want your dollhouse. I KNOW you’ve enjoy it just as much as Clara does.
I used to work at a preschool. Everytime the manager bought a new toy for the kids, she would let the TEACHERS go in one at a time to get the chance to play with it first!
Something about tiny little furniture that is just so fun, regardless of how old you are.
Andrea says
Ohhh… love it – great job!! My Dad made me a dollhouse 40+ years ago and I still have it. The outside has been re-painted, but the inside is the same — some of the rooms are rocking the 70’s wallpaper that was in our real house at the time (yes, the scale is way off…)
One thing I want my Dad to do next time he visits is sign the back or bottom – I wish he had signed and dated it when he built it (but I’m guessing he was just relieved to have it done!)
Jen C says
OH MY GOSH this make me want a little girl!!! SO CUTE! I bet she will love her house for years to come!
Anna says
I love, love, love the dollhouse and how personal it is. I have two boys (18 mos and 8 mos) and can’t figure out a cool gift I could make for them. Any suggestions from your creative brains?
YoungHouseLove says
I would totally make a house! Guys like moving furniture around too, right? Haha. And you could get little action figures like GI Joe or Batman/Superman if he’s into that! You also could make a little work bench thing (on pinterest we’ve seen some really cute tool centers where kids can hammer with wooden tools like a little mini workshop. So cute!
xo,
s
Maricris of Zensible Mama says
Wow this is truly a labor of love! I’ve been looking for a doll house for my daughter and this is such an inspiration. I always admire people who can whip up a wonderful creation out of their own hands! You rock!
carrie wohlt says
way too cute! Love It..always love reading your blog, it’s a daily read for me :)
silly eagle books says
wow–this is beautiful! I love all the special touches–and the spray painted furniture turned out so well! My 5 year old and I made a cardboard dollhouse together last fall–it was such a fun project. Seeing yours makes me want to try one out in wood–thanks for sharing. :)
Here’s a link to ours if you want to take a peek:
http://www.sillyeaglebooks.com/2011/12/cardboard-box-dollhouse-reveal-im-giant.html
YoungHouseLove says
So cool! I love the cheetah holding the TV up! Haha. So much fun!
xo,
s
katalina says
so much love in that home made house!
reminds me of the cmas where 5 adults were putting together a dollhouse and all the furniture the night before cmas till very late in the morning. The recipient, my niece exclaimed — santa did a good job putting this together.
of course I got in trouble when I would move things around…cat on top of the frig etc…
the worse was when my sister had to take it apart to mail back to their house!
secret santa video footage of dollhouse assembly is in a vault somewhere.
Marilyn says
I love the dollhouse and your creativity!!! Great Job! My closest similar adventure was buying extra crib sheets, cutting the to line the insides of another pair of curtains for my sons room. I bought rufflely yellow curtains, and cut-up teddy bear sheets to line over the top of the center of the curtains. Used a TON of stich witchery back in the day……come to think about it I also used contact paper a few years back for a cheap kitchen cabinet redo. I recently updated the cabinets with wallpaper and chef border cutouts. When I get really ambitious I will actually paint the cabinets…..or think about replacing them. 1970’s has to go at sometime.
Monique says
Amazing! I was obsessed with wooden dollhouses with realistic furniture as a little girl. I grew up and now have all boys, so I didn’t get to pass that love on. lol
I love the attention to detail and how inexpensive this project is. So special!
Leah says
I love this!! This is the cutest thing ever, I love how it turned out. So sweet.
Laurel_Park says
Oh my goodness…Clara Bell is getting so big, she looks adorable..
Candy from Candied Fabrics says
OMG – this is so super awesome! Clara is going to love this for years! ANd someday her kids will love it too! BRAVO!
Natalie says
That is the cutest dollhouse I’ve ever seen! And I am completely smitten with the “Olivia’s family” dolls! My Kindergarteners can’t get enough of her books, so I’m sure Clara will have a blast playing with them for years to come! :)
LARY @ Inspiration Nook says
I finally saw the dollhouse! What an AWESOME job! I hope my first born is a baby girl so I can make her one. haha
The details on each room are incredible. Love the wallpaper. I also love the fact that the furniture is all retro! I used to have a dollhouse that belong to my mom. It was super special to me. Until my little brother discovered it…and destroyed it all.
Chris Wilson says
This is the best kind of dollhouse, so sweet and you can customize it!! Love it! The baby Burger was a great find! You guys rock!
Kimbercrafts says
Awesome job you guys!!! I love all of the creative details like the chalkboard and the “ceramic” animals. My all time favorite Christmas gift was a dollhouse my dad built for me when I was 7. I would love to build something like this for my own daughter someday!
Patricia says
ohmygoodness! The doll house is perfect, but I’m more excited about the furniture! I received a large, Marx tin dollhouse for Christmas when I was 5. It came with all the furniture, colored themed for each room; the same furniture that you found! You’ve inspired me to piece it back together and search for the furniture on ebay. Thanks!
(PS We are now the second owners of a home built in 1955. Not much was done in here over the years! So, my bathroom sink upstairs matches the one from my dollhouse, with the towel racks attached to the sides!)
Bianca C. says
My grandpa built a bookcase just like that, I should make it into a doll house one dy for a future bean haha, and if your thinking of reinventing that dollhouse, mak it into a bookcase/toys etc!
jja says
Awsome work!!!
Rhissanna says
This is just glorious! What a wonderful thing and Clara is a very sweet and lucky girl. I can see you had fun, too. Heck, why do it if it’s not fun? The dolls’ house is nice and big, too, so if she grows out of it, it could be used as a fancy book shelf or storage for pretties and knick knacks.
Martha Bowen says
My husband and I loved the dollhouse idea. He and a team of men from our church create ramps for wheelchair bound people in our community. He noticed that a lot of wood plank ends were being trashed, so he asked for them. When we saw the pictures on your blog, we knew instantly that those scrap pieces would be the PERFECT fit for a dollhouse for a granddaughter of ours. He worked four days and decorated it with leftover scraps of wallpaper from our house and paint from our house, so the whole thing has the “BOWEN” decor. I would love to send you our pictures of Nola enjoying her “down to the business of playing” with you.
YoungHouseLove says
So awesome that your husband was able to repurpose those scraps! We’d love to see some pics – maybe post them on our Facebook page? Thanks!
-John
Carissa says
We are DIY’ing’ a dollhouse for our daughter’s 2nd bday (she turns 2 in August and it’s always great to see what you do for Clara so I can steal, I mean borrow, your ideas!) If we used the same scale as you, would the polly pocket dolls (just under 4″) be too big??
YoungHouseLove says
I think those would be perfect! They’re about the size of Olivia’s fam I think. Haha.
xo,
s
Martha says
If Olivia doesn’t work out the Calico Critters families might, they are sometimes called Sylvanian families. My two year old LOVES to play with them at our local toy store, this post has me seriously inspired for a third birthday present for him :) I’ve spent the morning looking at plastic dollhouse furniture on ebay….haha. The dolls are so freaking cute!
YoungHouseLove says
Thanks! Those sound so cute!
xo,
s
Jennifer millis says
This is fantastic! You’ve got me itching to do a new project now. Back in jan i made the kitchen you guys built for Clara, for my daughter who at the time was still in my belly. That thing was too adorable and my son has played with it a ton, so i know my daughter will love it when she’s old enough, but now i want to make her a doll house too! With a 2 1/2yr old and new born it will be more challenging :/. Love ya’lls creativity and obviously Clara does too!
YoungHouseLove says
That’s so sweet! I love that you made it for her even when she was still “cooking” – haha.
xo,
s
Kristen says
Hi! We are making this for our daughter’s 3rd birthday next week. I’m at the part of “papering” the rooms and I’m finding it quite challenging. I made the mistake of thinking I could use scrapbook paper instead of wrapping paper… so when I applied the mod podge (which I’ve never used before), it made ripples and soaked the whole paper! It was a wet, saggy mess! :-/ BAD IDEA! I’ll now be heading back to Michael’s tomorrow to get the right stuff! But other than that slight problem with me following directions it’s been so easy to do! Thanks so much!
YoungHouseLove says
Aw, good luck! Sometimes it’s easiest to use double stick tape on the back of the paper and just mod podge the front. Sometimes it looks rippled but it straightens out when it dries.
xo,
s
Michaela says
Nothing like being 4 months late to comment but now I want to rush out and get a bunch of stuff to hoard until my now 4 month old is big enough to have a doll house. I don’t know if you have a Craft Warehouse in Richmond but if you do they have a $1 section with little 1″x1″ canvases that would be perfect wall art that she could paint and hang up in there.
YoungHouseLove says
Ooh that sounds awesome! I love that idea!
xo
s
Karen says
We made something similiar for my daughter’s barbie dolls. She had all of this furniture that was always all around the house so we made a doll house for her to put it in.
There was a kitchen, living room, 2 bedrooms, bathroom and a an attic playroom and she got to help decorate it. She loved it !!! Many years of fun !!
As your daughter grows, you can change the family and size of furniture.
Michelle says
Hi Guys, I absolutely love this dollhouse . And my husband is going to attempt to make something similar to this . I was wondering about two things I know it’s 31′ inches tall and Clara seems to be perfect for it . My daughter will be 2 soon ( this is a birthday gift) do you think this is a good height or should we make it a little taller? My other question scale of furniture . Looking on ebay/etsy everything looks normal size so it’s hard to tell what will work for furniture . Do you think the 1/2 scale is a good size for this dollhouse? And if you have any other helpful tips I’m all ears . Before we attempt this project . Thanks so much!! Love your blog and your adorable family !!
Michelle
YoungHouseLove says
Oh yes, so far it’s working out great with 1/2 scale furniture and being 31″ tall. Hope it helps! Good luck with it!
xo
s
Naomi says
My sister and I love your blog. I guess she must have been inspired by your beautiful doll house that you made for Clara. I just ohhed and ahhheed at it and thought that I would like to do the same thing for our little girl when she turns two or three. My sister just surprised us with this http://www.growingupsavvy.com/?p=557 beautiful doll bed and linens and I wanted to share.
YoungHouseLove says
So sweet!!!
xo,
s
Melissa says
Let me start out by saying this blog is so cool!!! After eyeing this post for 4EVA my dad and I built one for my sister and her kids, the only problem, we can’t find any furniture, do you have any tips on were to get some? (we looked online and it is either really old and crappy or expensive)
Debra says
Amazing doll house. I used some flocked hot pink wrapping paper to line the walls of Barbies bedroom and it seem to be holding out ok.
Cara D says
I love the dollhouse. Does Clara still play with it? I am planning to make one for my daughter for her 2nd birthday and I am trying to decide if I should make it for small doll size like Clara’s or if she would use it longer if I made it for Barbie sized dolls. I really like the Olivia dolls you have.
YoungHouseLove says
Oh yes she still loves it!
xo,
s
Nicole says
Clara’s doll house trees are topiary place card holders by Kate Aspen! This is the best re-purpose we’ve seen!
http://www.kateaspen.com/topiary-photo-holderplace-card-holder-set_E9.html
Amanda Castro says
Such a sweet project! I was perusing Pinterest for DIY kid toys and one of your pictures popped up! I said hey that’s Clara! Love reading your site and seeing all of the beautiful things you create! Keep up the amazing work!
Danielle says
What did you use to hang the chalkboard frames on the walls?
YoungHouseLove says
Just a loop of tape!
xo
s
Brunie Astor says
Oh so beautiful. I will also be doing a doll house. Will follow your great ideas. You answered so many of my questions.
Mary Beth says
Just a quick question… How did you attach the little mirror & chalkboard to the walls?
Mary Beth says
Oh nevermind- just saw the answer in a previous comment! Adorable dollhouse!
Céc says
Love love love. I have done a house for my little boy thanks to your blog.