Update: You can check out Part 2 of this project right here.
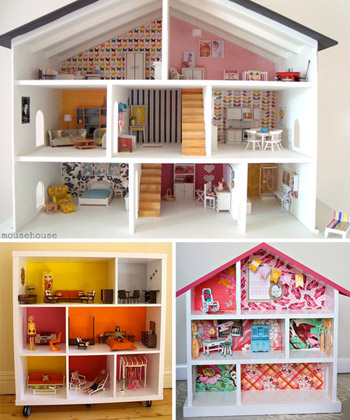
But let’s start at the beginning. When Sherry and I started talking about building a dollhouse for Clara, I was afraid. I know, I know – scared of a dollhouse? Get your laughs out. But that ominous word conjured up these elaborate images of perfectly crafted, to-scale replicas of Victorian mansions that seemed waaaaay beyond my skill / patience level. But once Sherry showed me some of her inspiration pictures on Pinterest (from Mousehouse, Natty Michelle and Under The Sycamore) my cold sweats dried up and I actually got a little excited. Yes, excited about a dollhouse. Now get those laughs out.
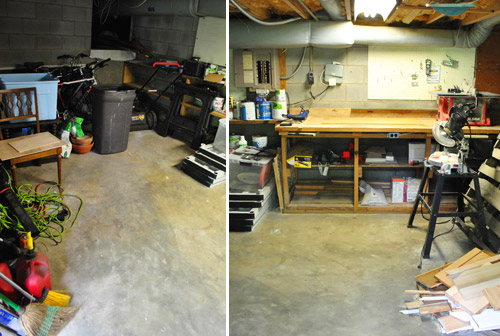
More accurately, those cold sweats turned into regular sweats since starting this project required a bit of basement cleaning first. Remember this mess?

I didn’t get rid of much of anything yet, but I did give it the ol’ “quick tidy” so I’d at least have a clean workspace to get a-dollhousing in. Here’s the “not-after-but-not-as-bad-as-the-before” result:
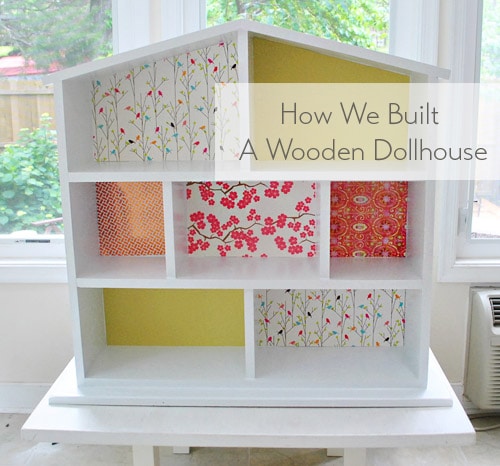
After giving myself a brief pat on the back for that, I moved on to dollhouse planning and material buying. Sherry loved the idea of priming/painting/decorating the dollhouse, so she called those parts of the task while leaving the entire design up to me except for very casually suggested a three-story house with seven rooms. After some thought I landed on something most similar to the Under The Sycamore’s version show above, except with a different room arrangement.
We decided on 1 x 8″ basic white wood as our building material. It was cheap and light, but sturdy and wide enough to make for easy play. We also opted for an 8″ room height on the first two floors and a sloped attic that’d go from 6″ to about 10.” So the finished dollhouse measures around 30″ tall and 30″ wide. Those 8 inches of room height with a sloped attic ceiling were a bit big for the scale of furniture that Sherry had found on eBay (more on that in her Part 2 post) but we wanted to err on the side of giving Clara plenty of room to move around rather than being sticklers for scale – and who doesn’t love a room with extra high ceilings?
My total for all of my building materials (just wood since I already had nails) was about $35 and I started off by cutting everything except the roof pieces to size, creating a box that was roughly 30″ wide and 24″ tall. I also cut the walls for my first two floors (not shown) to 8″ tall and used my table saw to shave a bit off the side so they were slightly narrower than the floors.
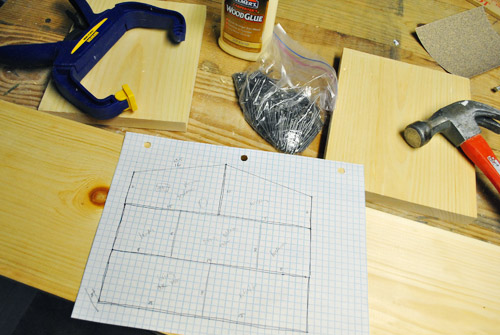
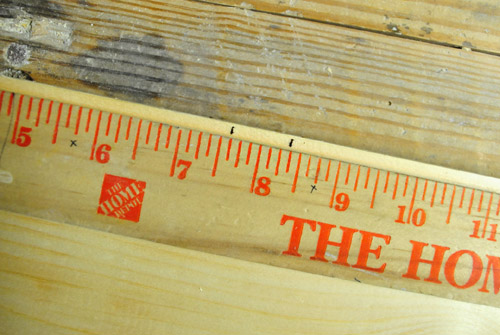
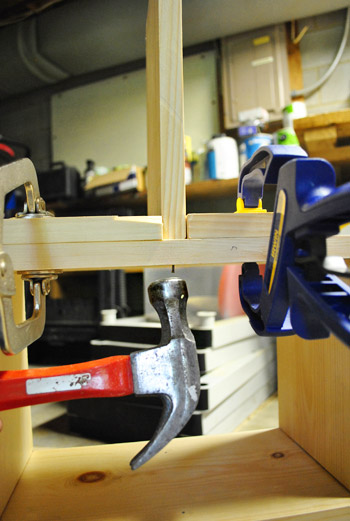
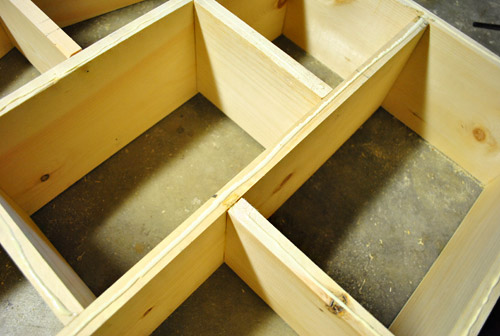
I wanted to affix the walls to the bottom and middle floors first, so I measured and marked where I wanted each divider to go. The two marks on the wood below represent each side of the wall board so I knew exactly where I wanted it to sit.
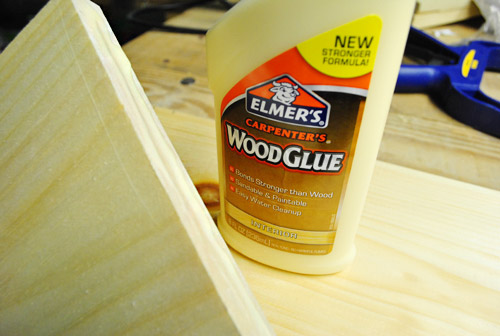
I’m usually a screw guy (that sounds weird, I realize) but I didn’t want Clara’s dollhouse to be riddled with screw holes and potentially split boards. So I opted instead to use a combination of wood glue and nails. I know lots of people swear by wood glue, but I just find it messy, time consuming and harder to reverse. But I put our differences aside and squeezed a line of it on each wall before putting in place. It actually worked really well.
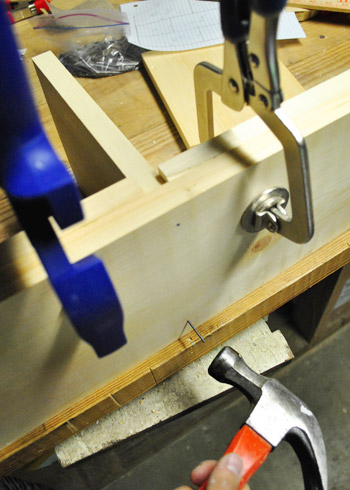
I clamped two scrap pieces of wood (those two pieces of wood under the clamps weren’t part of the dollhouse, they were just pinching the perpendicular piece of wood to hold it up). This method helped keep things steady for a couple of minutes while the glue got a grip.
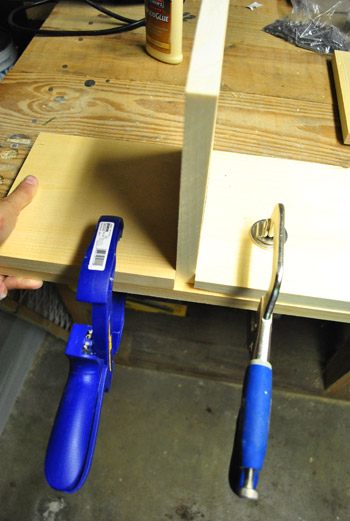
And since I’m impatient, I carefully tipped the whole thing over so I could drive a couple of nails into the wall board from the bottom. Now it’s hopefully more clear that the perpendicular piece of wood is the wall and the piece of wood on the bottom is the floor of the dollhouse (those two pieces of wood clamped above the base are just there to steady the wall I added while the glue dried and I banged in those nails).
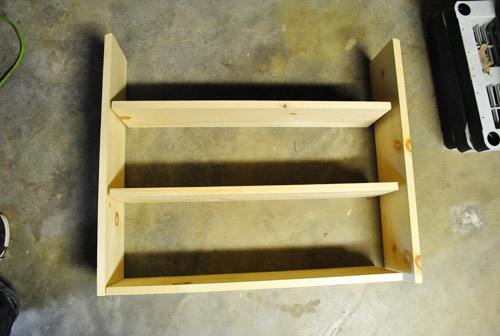
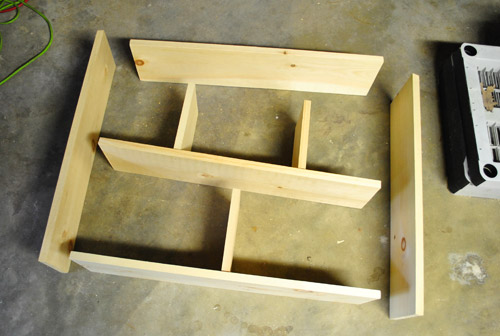
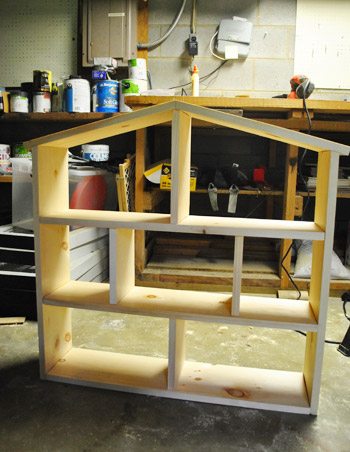
So here’s what I was left with after putting up walls for the first two floors. I hadn’t tackled the third floor wall yet since I wanted to wait to finish the sloped roof to make sure my cut was accurate to a real roof, not my roughly sketched one. Oh and the first and second floors weren’t attached (hence them looking skewed in the pic below) – they were just both placed on the floor in a rough little layout of sorts.
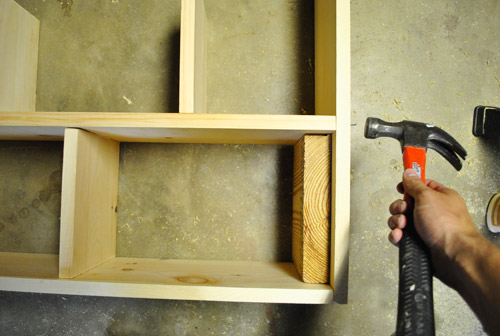
Next I used the glue and nails method to affix the two sides, using another scrap board to help keep my corners at 90-degree angles. I also glued and nailed all of the walls into the floors above them.
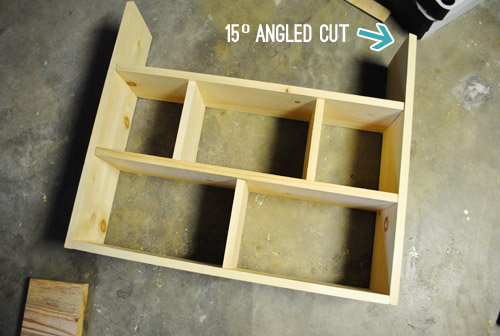
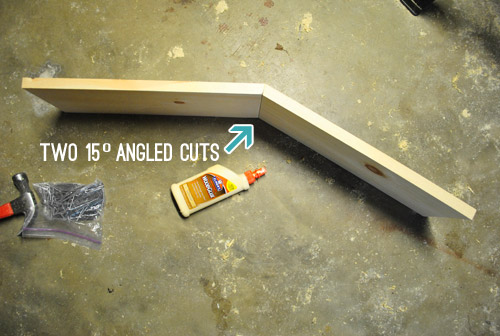
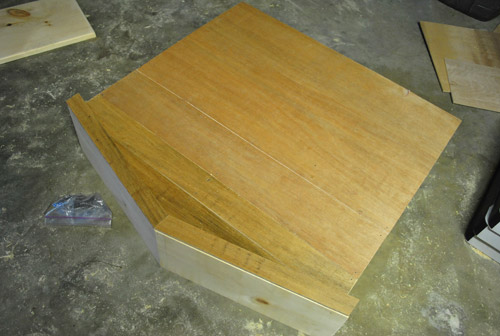
One thing I didn’t point out earlier is that when I cut my side boards to length I actually did a slightly angled cut on the tops using my miter saw. The 15-degree choice was kind of an arbitrary “this looks like a nice shallow angle” decision, which I hoped would help my sloped roof rest evenly on the side boards.
I tried drawing some complex diagram of angles to figure out exactly how I needed to cut the peak of my roof, but I quickly realized how rough my 9th grade geometry was. So I figured I’d start with two 15-degree cuts butted up against each other and go from there. Luckily it worked out perfectly and I could scoff at Euclid as I glued the two pieces together.
Once my roof had dried enough I sat it in place to help measure the height of the center wall that would support it. Once that was cut (using two cuts of the miter saw to create a close-enough point at the tip) I glued and nailed it into place like the others.
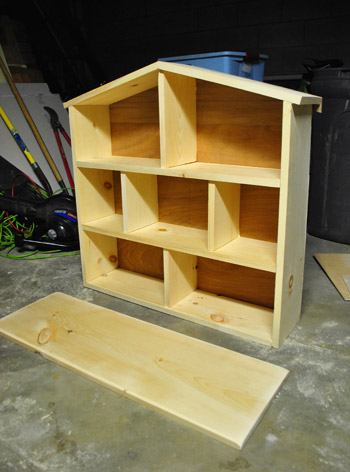
With the roof also secured in place, this collection of boxes actually started to resemble a residence suitable for dolls.
But I still had to add a back side, which can be filed under the “two birds with one stone” column because I was able to take some thin plywood from my messy scrap pile (bird one) to make the back panel (bird two). I didn’t have a piece tall enough for the whole thing, but I was able to cut this one big piece so that the seam would be hidden behind the third floor board.
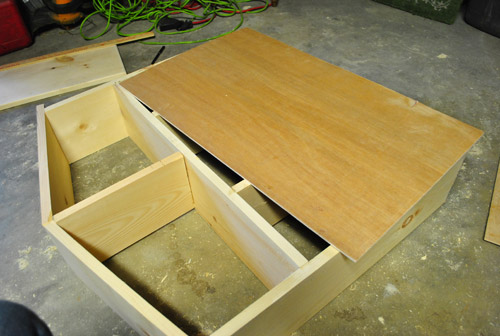
As for attaching it, you can probably guess the words about I’m about to type since I used the same method… I applied glue to the backside of the dollhouse frame, put the plywood down, and nailed it into place.
For the rest of the top I had to assemble a few scrap strips, which did create some seams. But we were already planning to caulk some other corners so it wasn’t a big deal to have a few other places to patch up before priming and painting it all to get a nice seamless end result.
Here’s the whole house after it was constructed. The last thing we wanted to do was affix the whole thing to a larger base to give it more stability. So this is a piece of 1 x 12″ that I cut to size and sanded so it had nice rounded edges.
A few more squirts of glue and swings of the hammer later, the construction phase of the d-o-l-l house (as we were calling it at this point to keep the secret from Little Miss Hears A Lot) was c-o-m-p-l-e-t-e.
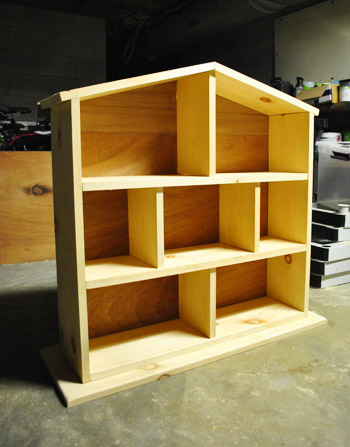
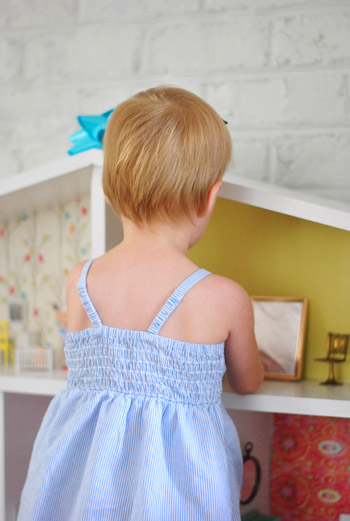
It was actually surprisingly straightforward and took me about three hours in total (after about an hour of basement clearing out before I got down to business). And not that I’m gonna get all Victorian mansion on it, but it has given me the confidence to try to add some details like doors and windows (decorative, not functional) on the so-far blank backside at some point. But since all of this happened just a few days before Clara’s birthday, that’ll have to wait since the first priority was to get it all painted, decorated, and gifted by this past Monday (which was the bean’s big oh-two).
So Sherry will be back tomorrow with a giant breakdown of what she likes to call “the fun part.” You know, the priming, painting, furniture-ing, and decorating (there were too many pics/descriptions to squeeze it all into this post, but she’s working on it right now and can’t wait to share). Hilariously enough, I thought the fun part was building it, so I guess we’re a good pair. And in case you’re wondering, Clara is obsessed. As is Sherry. Even I want to play with it sometimes.
So it went over really well. And we all know that a happy wife/kiddo = a happy hubby. So… score! Has anyone else out there built a dollhouse? Or some other fun kid thing? Or been obsessed with hunting down eBay dollhouse furniture like the wife? Let’s chat… about dollhouses. Haha. Oh yeah, I’m man enough to say that.
Update: You can check out Part 2 of this project right here.
Update #2: We finally created this Shop Our House page to help you hunt down any furniture/accessories that you see in our house, along with all of our paint colors.

Sarah says
What a fun project, I love your wall paper choices. I would have loved that as a little girl. Heck I would still love that now! If you feel like adding some new furniture pieces you can whip up a cute and cheap pedestal table :) http://sarahsutin.com/aflutter/mini-monday-pedestal-table/
YoungHouseLove says
So cute!!!
xo
s
Kelly Harris says
I got my dad to make a similar house for my daughter 10 years ago. Dad made it so Barbie and family can live there. He made 2 of the houses then hinged them with a piano hinge and put it all on castors. It’s a 3 bedroom one bath with a family room and attic storage. Every kid who has played here loves it.
Judith says
I just love your directions. I have wanted to build my grandaughters a dollhouse like this and after readin your blog I think i may just give it a try! I really hink i can do it like you have and it is sooo cute!!
Shirley says
My husband and I are going to build this for our daughter for christmas. I was reading through the plans and could not find how long the roof sections were. I know to cut the top of the side support at a 15 degree angle and also to cut the two roof sections at 15 degree angels. Last but not least, how tall is the middle support for the roof section. Thanks so much, I cant wait to get this going!!
YoungHouseLove says
The middle support is about 11″ high and each part of the roof is 17″ in length. Hope it helps!
xo
s
Todd says
Thanks! To our horror we discovered yesterday that the second hand doll house that was to be one of our 3 year old’s Christmas presents had mold everywhere. We planned on cleaning it up and painting it but this was way too much. After looking at a few web sites I found your blog and within 24 hours had built one that looks pretty much like yours. I sketched all the triangles and broke out the trig and still messed up the angle where they meet at the top (more than once). Thankfully a little caulk made it somewhat acceptable. My wife is painting it right now.
Eternally grateful in New Hampshire!,
Merry Christmas!
Patsy says
My hubby has had me drawing floor plans, individual room plans, and the electrical outlets for my massive, electrified dollhouse he is preparing to build. The sheets of plywood were bought yesterday, and he will study the plans and begin an exact size drawing of it before he starts building. The house will be 3 stories-36″ tall, 48″ long plus a 12″ add on at either end. One will be the kitchen, the other will be an oval solarium or green house. It will be 24″ deep. Front and back will open up. He will build, wire, and give decorating opinions on the furnishings, decor, etc. I will paint, paper, make the drapes, quilt the quilts and do the needlepoint. It will be my dream Tara, but I am of course going to take liberties with it as the designer.
YoungHouseLove says
Haha that’s awesome! Good luck!
xo,
s
Daniela Leones says
Amei a casinha que fez para sua linda bebê! Parabéns pelo trabalho e por compartilhar… eu já estou fazendo o orçamento para fazer uma para minha filha brincar com as Barbies.
Obrigada =D
Judi says
Awwwwww! What a great daddy you are!
heather pifer says
So glad I found this! When I mentioned to my husband that I wanted to build a doll house for our 5 month old he said that she is too young. So I said ok our 8 year old is into pirates right now so i changed the layout and made a three story pirate ship complete with crows nest, sails, ladders and sword art on the walls. Thanks so much for inspiring me! Is there any way i can send you a picture of it?
YoungHouseLove says
Aw, we’d love to see it! You can post it on our Facebook wall or upload it to a free site like flickr and link to it in the comments :)
xo
s
Caroline says
Can you tell me where you found your wood? We’re tackling the same project for our twin daughters. Thanks!
YoungHouseLove says
Home Depot originally I think (some of it was scrap I believe).
xo
s
Erin says
This is adorable and my husband and I are attempting it for this year’s Christmas gift!
Question: How long was each section of the roof?
Thanks!
YoungHouseLove says
Each of the two roof panes are 7 3/4″ by 16 3/4″ – good luck, Erin!
xo
s
Daniel Krantz says
Dollhouse looks great. Would love to build one for my 5 1/2 year old granddaughter. Are the plans available, and if not can you tell me the dimensions (length, width, height, footprint)? Thank you
YoungHouseLove says
That info’s all in the comments for ya if you scroll back (ours are highlighted so hopefully it jumps out at you).
xo
s