Update: You can check out Part 2 of this project right here.
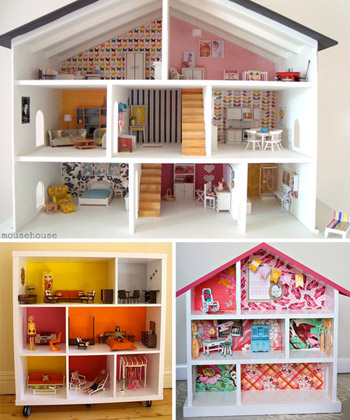
But let’s start at the beginning. When Sherry and I started talking about building a dollhouse for Clara, I was afraid. I know, I know – scared of a dollhouse? Get your laughs out. But that ominous word conjured up these elaborate images of perfectly crafted, to-scale replicas of Victorian mansions that seemed waaaaay beyond my skill / patience level. But once Sherry showed me some of her inspiration pictures on Pinterest (from Mousehouse, Natty Michelle and Under The Sycamore) my cold sweats dried up and I actually got a little excited. Yes, excited about a dollhouse. Now get those laughs out.
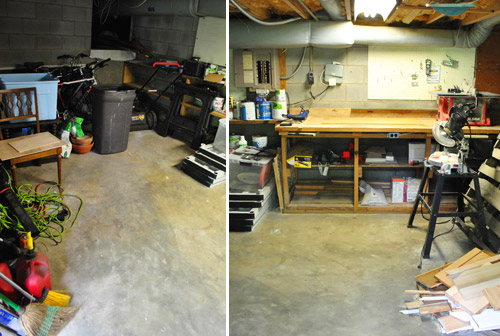
More accurately, those cold sweats turned into regular sweats since starting this project required a bit of basement cleaning first. Remember this mess?

I didn’t get rid of much of anything yet, but I did give it the ol’ “quick tidy” so I’d at least have a clean workspace to get a-dollhousing in. Here’s the “not-after-but-not-as-bad-as-the-before” result:
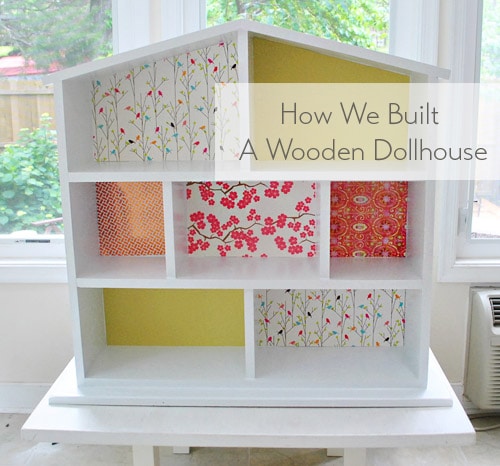
After giving myself a brief pat on the back for that, I moved on to dollhouse planning and material buying. Sherry loved the idea of priming/painting/decorating the dollhouse, so she called those parts of the task while leaving the entire design up to me except for very casually suggested a three-story house with seven rooms. After some thought I landed on something most similar to the Under The Sycamore’s version show above, except with a different room arrangement.
We decided on 1 x 8″ basic white wood as our building material. It was cheap and light, but sturdy and wide enough to make for easy play. We also opted for an 8″ room height on the first two floors and a sloped attic that’d go from 6″ to about 10.” So the finished dollhouse measures around 30″ tall and 30″ wide. Those 8 inches of room height with a sloped attic ceiling were a bit big for the scale of furniture that Sherry had found on eBay (more on that in her Part 2 post) but we wanted to err on the side of giving Clara plenty of room to move around rather than being sticklers for scale – and who doesn’t love a room with extra high ceilings?
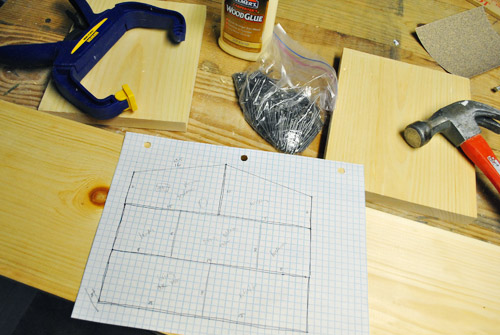
My total for all of my building materials (just wood since I already had nails) was about $35 and I started off by cutting everything except the roof pieces to size, creating a box that was roughly 30″ wide and 24″ tall. I also cut the walls for my first two floors (not shown) to 8″ tall and used my table saw to shave a bit off the side so they were slightly narrower than the floors.
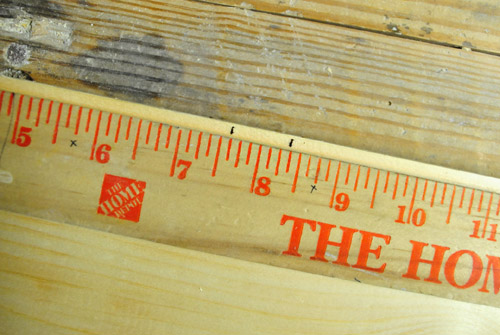
I wanted to affix the walls to the bottom and middle floors first, so I measured and marked where I wanted each divider to go. The two marks on the wood below represent each side of the wall board so I knew exactly where I wanted it to sit.
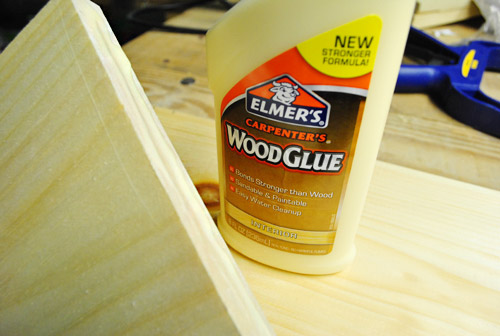
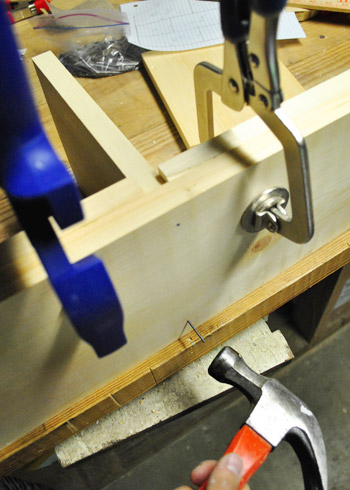
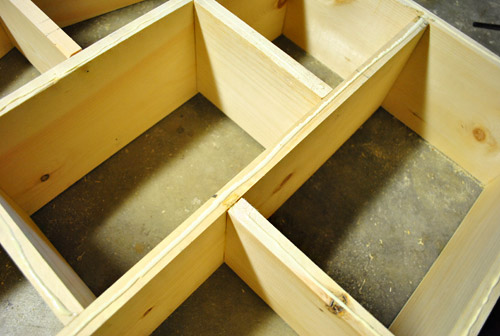
I’m usually a screw guy (that sounds weird, I realize) but I didn’t want Clara’s dollhouse to be riddled with screw holes and potentially split boards. So I opted instead to use a combination of wood glue and nails. I know lots of people swear by wood glue, but I just find it messy, time consuming and harder to reverse. But I put our differences aside and squeezed a line of it on each wall before putting in place. It actually worked really well.
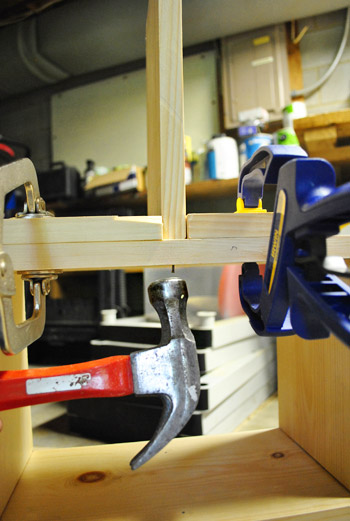
I clamped two scrap pieces of wood (those two pieces of wood under the clamps weren’t part of the dollhouse, they were just pinching the perpendicular piece of wood to hold it up). This method helped keep things steady for a couple of minutes while the glue got a grip.
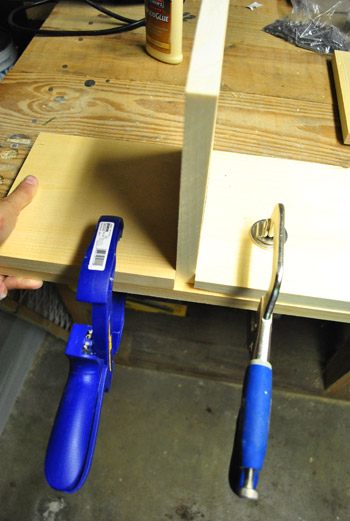
And since I’m impatient, I carefully tipped the whole thing over so I could drive a couple of nails into the wall board from the bottom. Now it’s hopefully more clear that the perpendicular piece of wood is the wall and the piece of wood on the bottom is the floor of the dollhouse (those two pieces of wood clamped above the base are just there to steady the wall I added while the glue dried and I banged in those nails).
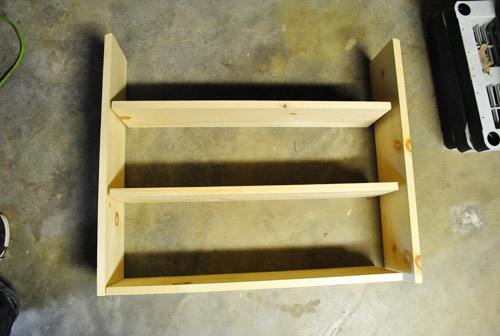
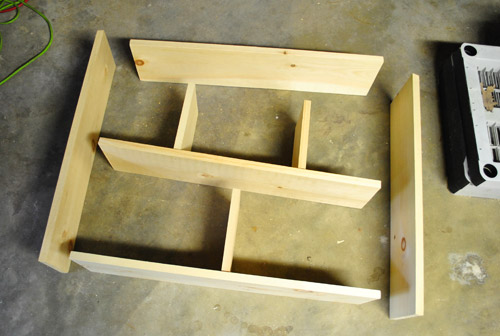
So here’s what I was left with after putting up walls for the first two floors. I hadn’t tackled the third floor wall yet since I wanted to wait to finish the sloped roof to make sure my cut was accurate to a real roof, not my roughly sketched one. Oh and the first and second floors weren’t attached (hence them looking skewed in the pic below) – they were just both placed on the floor in a rough little layout of sorts.
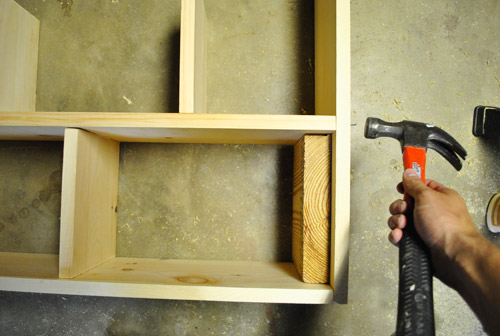
Next I used the glue and nails method to affix the two sides, using another scrap board to help keep my corners at 90-degree angles. I also glued and nailed all of the walls into the floors above them.
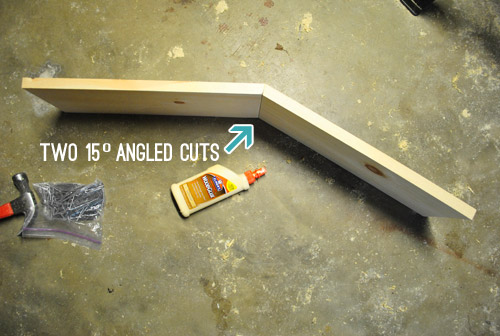
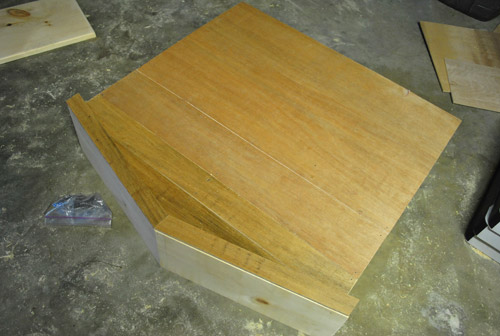
One thing I didn’t point out earlier is that when I cut my side boards to length I actually did a slightly angled cut on the tops using my miter saw. The 15-degree choice was kind of an arbitrary “this looks like a nice shallow angle” decision, which I hoped would help my sloped roof rest evenly on the side boards.
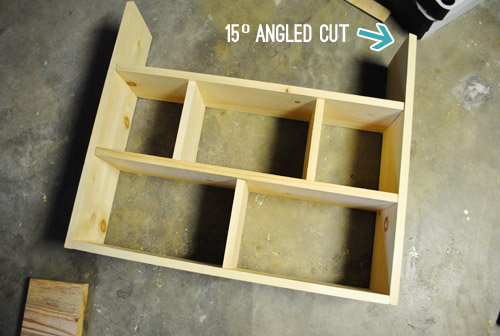
I tried drawing some complex diagram of angles to figure out exactly how I needed to cut the peak of my roof, but I quickly realized how rough my 9th grade geometry was. So I figured I’d start with two 15-degree cuts butted up against each other and go from there. Luckily it worked out perfectly and I could scoff at Euclid as I glued the two pieces together.
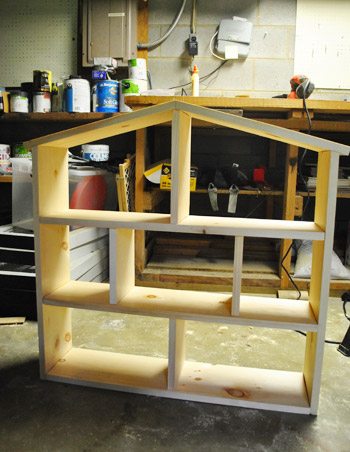
Once my roof had dried enough I sat it in place to help measure the height of the center wall that would support it. Once that was cut (using two cuts of the miter saw to create a close-enough point at the tip) I glued and nailed it into place like the others.
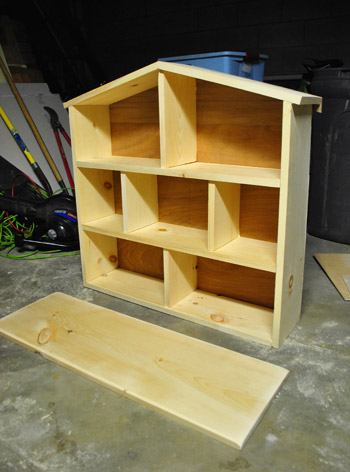
With the roof also secured in place, this collection of boxes actually started to resemble a residence suitable for dolls.
But I still had to add a back side, which can be filed under the “two birds with one stone” column because I was able to take some thin plywood from my messy scrap pile (bird one) to make the back panel (bird two). I didn’t have a piece tall enough for the whole thing, but I was able to cut this one big piece so that the seam would be hidden behind the third floor board.
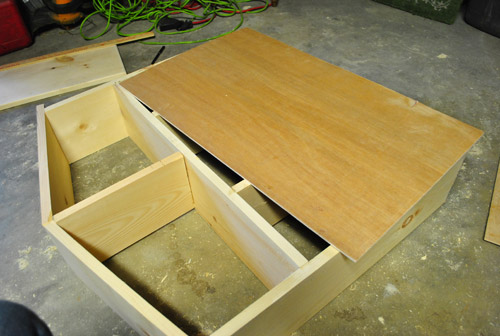
As for attaching it, you can probably guess the words about I’m about to type since I used the same method… I applied glue to the backside of the dollhouse frame, put the plywood down, and nailed it into place.
For the rest of the top I had to assemble a few scrap strips, which did create some seams. But we were already planning to caulk some other corners so it wasn’t a big deal to have a few other places to patch up before priming and painting it all to get a nice seamless end result.
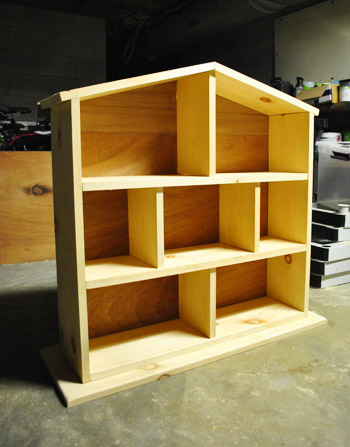
Here’s the whole house after it was constructed. The last thing we wanted to do was affix the whole thing to a larger base to give it more stability. So this is a piece of 1 x 12″ that I cut to size and sanded so it had nice rounded edges.
A few more squirts of glue and swings of the hammer later, the construction phase of the d-o-l-l house (as we were calling it at this point to keep the secret from Little Miss Hears A Lot) was c-o-m-p-l-e-t-e.
It was actually surprisingly straightforward and took me about three hours in total (after about an hour of basement clearing out before I got down to business). And not that I’m gonna get all Victorian mansion on it, but it has given me the confidence to try to add some details like doors and windows (decorative, not functional) on the so-far blank backside at some point. But since all of this happened just a few days before Clara’s birthday, that’ll have to wait since the first priority was to get it all painted, decorated, and gifted by this past Monday (which was the bean’s big oh-two).
So Sherry will be back tomorrow with a giant breakdown of what she likes to call “the fun part.” You know, the priming, painting, furniture-ing, and decorating (there were too many pics/descriptions to squeeze it all into this post, but she’s working on it right now and can’t wait to share). Hilariously enough, I thought the fun part was building it, so I guess we’re a good pair. And in case you’re wondering, Clara is obsessed. As is Sherry. Even I want to play with it sometimes.
So it went over really well. And we all know that a happy wife/kiddo = a happy hubby. So… score! Has anyone else out there built a dollhouse? Or some other fun kid thing? Or been obsessed with hunting down eBay dollhouse furniture like the wife? Let’s chat… about dollhouses. Haha. Oh yeah, I’m man enough to say that.
Update: You can check out Part 2 of this project right here.
Update #2: We finally created this Shop Our House page to help you hunt down any furniture/accessories that you see in our house, along with all of our paint colors.

Tara G. says
I had one of these built for my daughter. I bought a Melissa and Doug royal family and this set that she enjoys: http://www.amazon.com/Melissa-Doug-Princess-Castle-Furniture/dp/B001ENH3WU/ref=pd_sim_t_1
YoungHouseLove says
So cute!!
xo
s
Allison B says
I like the title of this post..it makes me think of Zoolander…”what is this, a house for ants?!” tehe.
YoungHouseLove says
Hahahah, best line ever.
xo,
s
Marie Parker says
we had a dollhouse for a long time for our little girls and then when they got too old for it, we turned it into a bookshelf for the playroom. the kids’ books look so cute in their little “rooms”. so just an fyi for when she’s outgrown dolls, keep it and use it for books. :)
YoungHouseLove says
So smart!
xo
s
Carla says
That’s super adorable. I really love the size and depth. Just perfect!!
YoungHouseLove says
Aw thanks Carla!
xo,
s
Sally C. says
Love it! It’s so fun, isn’t it?
We built my daughter a dollhouse out of a couple of Re-store drawers for Christmas this year. My favorite part was creating framed “art” for the walls that she can rearrange (using velcro dots) to her heart’s content. I even used our own family photos! You can see it at http://mscaspers.net/ohbladi/?p=1755.
Also, Ava uses Playmobils in her dollhouse. Parts might be too teeny for Clara yet, but there are a ton of fun options for the future!
YoungHouseLove says
SO sweet! Love how you can rearrange the dots!
xo,
s
Amanda says
My grandparents built me a dollhouse when I was younger. My grandpa did all the woodwork, including building the furniture and my grandmother did all the wallpapering, flooring and textiles. She even sewed the curtains and bedsheets! I still have it to this day.
YoungHouseLove says
That’s amazing!
xo
s
Ginny says
One of the great things about a toy like this is that you can pass it down for generations. I have a dollhouse very similar to this one that my grandpa made my mom…and it’s still in great condition for me to pass down to a daughter someday! That makes it all the more special. :) It’s great that your whole family is enjoying it!
Heather says
I need the deets on part 2! I took my break at 3 at work in hopes it would be ready to read!
YoungHouseLove says
So sorry Heather, I’m working on that for first thing tomorrow morning! It has a bunch of photos and steps, but I’m getting there!
xo,
s
Megan says
Hi from NZ, thank you for sharing my dollshouse on your blog-can’t wait to see the finished photo’s of your one!
YoungHouseLove says
Aw thanks for being so inspiring Megan!
xoxo,
s
Leyre says
I was SO excited to see you guys were working on this – my daughter turns three next month and I want to build her a dollhouse. It seemed like maybe too daunting a task but then I saw your post and today I saw that you used the same exact floor plan/room layout that I wanted to use (I saw that same picture at the top of your post on Pinterest and thought it looked perfect!). One question – it’s obvious that it’s quite big since it looks like Clara is nearly as tall as the house itself, and that’s cool because I get the idea of her having plenty of space to reach in there and play/move stuff around. I’ve been obsessing over my plans trying to make them so that the furniture I intend to use (playmobil sets) doesn’t look TINY inside of it – do you feel like it looks weird to have really small dollhouse furniture in such a big scale house? Or maybe I’m just getting waaaaay too wrapped up in the details and the kids don’t care? Either way I love what you’ve done and can’t wait to see the full reveal tomorrow – thanks for giving me the boost of confidence I needed to make me think this would actually be possible!!
Erin @ His & Hers says
My parents bought a dollhouse for me a few years ago because I have always LOVED them. I worked on it for a little while and then we bought a real house and the dollhouse sorta got put away. Someday I WILL work on it again.
Leyre says
Eep! I just totally went back and read the part where it says you’re going to answer questions about scaling in tomorrow’s post. Sorry, I blew right past the text the first time because I was so excited to see the whole project ;) Feel free to ignore my comment and I will very patiently wait for tomorrow’s post to go up :)
YoungHouseLove says
No worries! We can’t wait to share the goods!
xo,
s
Sara says
To John and Sherry, I’m 28 and still want to play with the doll house my grandparents made me. As Clara grows and gets the DIY bug, she’ll put up her own wall paper and flooring and maybe sew some dresses for the people or animals in my case. A dollhouse is something that will stick with her forever! And as she gets older, the furniture gets to be more fun! I found most of my pieces at fairs, homemade and ornate!
Erika says
John you are such a good guy/dad! And, I can’t wait to see that finished interior!
With a little girl on the way, I have already started fantasizing about the dollhouse I will be making in her future. Last summer I made a cardboard box castle/playhouse/hiding spot for Liam.
http://www.kitschdesigns.com/post/Making-And-Crafts–Cardboard-Box-Castle.aspx#comment
It still lives in the corner of his bedroom and he sits in there with his books and stuffed animals. I find him “reading” to them all the time.
Kids are so funny!
YoungHouseLove says
So cool! I love it!
xo,
s
karine says
So jealous I’ve only got boys !! would have loved to have a girl to play with such a lovely doll house !!
Ann says
I was recently at hobby lobby and they have “fairy” doors that glue onto a wall or tree trunk. If the doll house is going flush against a wall, this would be an easy way to have a door that is non-working but very pretty. There were several unfinished styles. Can’t wait for tomorrow!
Sharon says
Hi there!
This is totally unrelated to dollhouses, but as I was Googling “painting cement” your photo showed up…http://cementboardss.com/paint-cement/
Just though I’d send that on in case, ya know, having your photo on some random cement painting site isn’t your cup of tea. But it did remind me that you have several cement painting posts that I will check out!
Oh, and I sincerely appreciate your blog for ideas and a smile every day. Keep up the great work!
Sharon
YoungHouseLove says
Thanks Sharon! Off to check it out!
xo,
s
georgia says
So amazing!!! you make it look so easy too… i wonder what you will make next… maybe a claimbing frame or a tree house? :D
YoungHouseLove says
Other folks have mentioned a tree house- that would be pretty fun!
xo,
s
Katrina says
This is so sweet! I’m excited to see how it looks! I always get so excited when my kiddos get cute toys :) and I always want to play too, lol
Georgia says
Well done you! I am impressed. I had a dolls house built by my dad which got lost along the way some where. For my daughter’s first birthday I bought her a doll’s house…after 3 boys I wanted one really badly. Just a wooden one with some cute wooden furniture. For months after we gave it to her, all 4 of them would be pushing each other aside to play with it. She still loves it 11 years later and says she never wants to get rid of it.
Maureen says
What a cute dollhouse! My grandpa made me one similar when I was 6 years old and we still have it. It had wallpaper and carpeting (very 70s!) so we are going to renovate it for our little ones. I’m inspired by this post to get moving on it!!
Steffanie says
What kind of dolls fit in a house that size? Can’t tell for sure, but looks too small for barbies…?
YoungHouseLove says
We’ll chat about scale in tomorrow’s post! It’s definitely a little too small for Barbies, but many dollhouses are this size since a lot of the furniture is 1/2″ scale (like we built ours) – so they sell dolls meant for this size along with furniture and other dollhouse accessories.
xo,
s
Lindsey says
I was feeling nostalgic for my childhood dollhouse one night (tragically, it passed on due to some water damage) when I decided that I should just make a new one. I got a kit from Hobby Lobby, and since I’m a total sucker for anything scary or Halloween-y, I decided to make it a haunted dollhouse! It’s got coffins, spiders, gargoyles, and a skeleton in a rocking chair on the front porch. I love it. Who says dollhouses are only for kids?
YoungHouseLove says
Haha- I love it!!
xo
s
Linda says
Have you seen the Thorne Rooms at the Art Institute? http://www.artic.edu/aic/collections/thorne
I can just see Clara’s house being the YHL version of evolving style and decoration.
YoungHouseLove says
Sooo cool!
xo
s
Simon R. says
My wife is a big fan of yours, and we have done several projects around the house (most notably, taking pictures of our son every week and photoshopping his white onesie just like you are doing with Clara) specifically because she read about your experiences. We recently bought a digital SLR and are having a blast figuring it out, but we can’t seem to get the same level of color and clarity as your photos. The pictures you post seem so vivid and colorful, and I’m wondering if you could provide some information about how you achieve this. I know you have a Nikon D3000, but are there special settings you have tweaked? Or are there certain adjustments you like to do in iPhoto or Photoshop? Anything you could provide would be greatly appreciated! Thank you!
YoungHouseLove says
We always shoot in A mode with the flash off, so that helps. Then we manually adjust the exposure. Oh and we white balance before we take shots too, so the colors are more accurate. We mainly just use Photoshop to crop and straighten things if they’re crooked. Haha. Hope it helps!
xo,
s
Annie says
Have y’all seen this incredible AND incredibly crafty/budget-friendly/DIY “binder” dollhouse from Kendra @ Southern Disposition? She is a friend of a friend and did an amazing job with this very “stow-able” Barbie doll-house. Less cutting/measuring/chopping wood, but a very satisfying result nonetheless. :)
http://southerndisposition.blogspot.com/2011/12/diy-three-ring-binder-barbie-dollhouse.html
YoungHouseLove says
So cute!!! I love it!
xo,
s
Laura says
Okay, I gotta share. My dad made this for my 2 year old this past christmas. We bought the fairy furniture pre-made, and I had an etsy seller make the red bin to hold her dollhouse pieces when she’s not playing with it. Also, we got more furniture than will fit in the house, so it’s good to have a soft container to put the fragile furniture in.
https://picasaweb.google.com/114915128453941593169/Dollhouse
YoungHouseLove says
Aw, I’d love to see it! The link isn’t working for me!
xo,
s
Laura says
Oops! I’m new to this stuff! Try this:
https://picasaweb.google.com/114915128453941593169/Dollhouse?authuser=0&authkey=Gv1sRgCKj12LfrxszzxAE&feat=directlink
YoungHouseLove says
Adorable!!!
xo,
s
Brittney Saffell says
How adorable! What a good daddy!! My dad built one of those crazy Victorian dollhouses for me when I was little. LOVED IT. It took him a million hours to do, but I am now 23, married, still have the doll house, and plan on giving it to my daughter one day :)
AshleyAnn says
How fun to see my niece’s dollhouse here today! Your version looks so great. I’m looking forward to tomorrow’s post with the details of the ‘interior’!
Nicole says
Can’t wait to see the detail shots! I spotted the same Snow & Graham bird paper in the top left… I used it for the nursery in Eleanor’s dollhouse in the top right. And Eleanor LOVES hers — I’m sure Clara does too.
YoungHouseLove says
No WAY!!! I can’t believe we used the same gift wrap. So funny! Eleanor’s dollhouse is the most special thing I’ve ever seen. So glad she loves it!
xo,
s
Kelly says
I can’t wait to see more! It looks great so far!
I have a vivid memory of helping my father build “bunk Beds” for my Cabbage Patch dolls when I was a kid. Ecept instead of 2 high, we opted to make one bed 5 tiers tall. I loved the idea that all 5 dolls could sleep in one “bed”. And my father loved that when I outgrew the dolls, he inherited a small set of shelves for the garage. LOL!
Laura says
Oh, and on a totally random topic, I just ordered the most adorable bedding for my daughter’s big girl bed she’s getting for her 3rd birthday in June and it made me think of my favorite bloggers because of John’s fondness of bike art:
http://www.rhbabyandchild.com/catalog/product/product.jsp?type=sale&productId=rhbc_prod361053
YoungHouseLove says
SO cute!!
xo,
s
John@RemodelingBIBLE says
I did a similar project for my daughters a couple of years back. I used a combination of pine and oak and added a few details to make it look as realistic as possible. Clara is very lucky to have you as parents. Keep up the good work.
Catherine says
Yeah!!! We were given a little dolls house last week and it’s sitting in the garage waiting for me to do something. Can’t wait to see the next post!
Bobbie says
I am so excited for today’s part 2 post! Clara is such a lucky little girl!
Selena says
You did a great job building her dollhouse, John. Clara is a very lucky little girl to have you and Sherry for her parents. Looking forward to Sherry’s part!
Caitlin says
Awesome project! I am so impressed and can’t wait to see the “fun part” later today… I would be all about decorating the inside of a dollhouse!!
Jackie says
I love that you did this!
I still remember my dad building my dollhouse in 1980. It’s a yellow Victorian. I remodeled it twice; once in the current 1980’s style and once as a colonial house (I believe my love of decorating was born in this house!). He sat in our garage with the radio on, working away. News of President Reagan being shot was pouring in as he measured, cut, glued, and painted. His love covered every inch of that house! We still have it.
My dad passed away in October. The memory of him building that dollhouse is among my favorites.
I hope your daughter will love and treasure this special present for years to come! What a special gift. :)
YoungHouseLove says
Oh Jackie, I’m so sorry for your loss. It’s so sweet that you have that dollhouse memory!
xo,
s
cara says
I can’t wait to see it! After seeing your play kitchen I decided to build one for my little girl’s 2nd birthday (she is only 6 months). Now I want to build a dollhouse for her 2 year old Christmas. Thanks for all the ideas and thank goodness for unfinished basements! I’m upholstering her a rocking chair and knitting her a puff ottoman and mini afghan right now. So many projects!
YoungHouseLove says
Aw, good luck with everything Cara!
xo,
s
kate says
One of my fondest memories of my grandmother – who is now passed away – involves dollhouses. She had a kick ass “miniature” store in the town where she lived…an entire store devoted to dollhouse furniture and what not! Every time I’d come visit we’d go to the store and she’d let me pick out something new for my dollhouse. To this day I have a weird obsession with things that are miniature, even though I don’t have a dollhouse anymore. I need to hurry up and have a daughter so I can feed my secret obsession with miniature things haha!
YoungHouseLove says
What a sweet memory- she sounds like she was an amazing woman!
xo,
s
Julie says
PART 2! PART 2! PART 2!
I swear your blog is like DIY porn … I love to look at it and can’t get enough of it but never have the chutzpah to do it myself. (BTW, I’m kidding about watching or being in porn, unless that’s your thing and all).
YoungHouseLove says
Haha- it’s up! It’s up! It’s up!
xo,
s
Jennifer says
I cannot wait to see what it looks like after it has been painted and decorated! One of my favorite childhood memories was playing with my doll house – Clara must love it too!
Meg says
Two things – You’re basement looks great!!!
And I love this and hope I can give one to a kid someday. When we were moving my parents out of the home I grew up in this past winter we found the box of a dollhouse kit I got for my 1st or 2nd birthday… but never put together, sad.
thedistilledreview says
Soo cute!! My grandmother gave me a doll house when I was a little girl. She did the whole house by crochet though. It was nuts!
Jessie says
not doll house related (yet) …. but is that workbench something John put together himself??? If so, where can i find the details to that blog entry?
Thanks!!!
now i will continue reading For Dolls Part I ( I had to get that question out. I am a bit ADD-ish)
YoungHouseLove says
Hmm, do you mean the wood thing in the basement? That came with out house. So sorry not to have a tutorial, but maybe try anawhite.com?
xo,
s
Mel says
I’m dying! Sherry, I can’t WAIT to see your post! You have got me planning to build a doll house for my little girl (by the way her nickname is the “Bean” or “Beannie”. Good luck with everything!
YoungHouseLove says
Aw thanks Mel! It’s actually up! If you click over to the main blog it’s the post right under this afternoon’s reader redesign!
xo,
s
Kayla Havumaki says
John, I call shenanigans on your “non-geometry”! You either measured the angle with some sort of protractor or you used trig ratios. I just worked it out (using the inverse tangent) and the angle where the outer corner meets the roof would be approximately 14.9 degrees! There’s no way you guessed that, man. Just fess up to your own math skills! :)
-A highschool Geometry teacher (can you tell?)
YoungHouseLove says
Haha, I just guessed 15 since that was the random angle that I cut the side edges of the wood where the roof will rest on the side walls of the house. So somehow I wondered if the same angle at the top would work – and thankfully it did! Haha.
-John
Betsy says
OOOOOO. MMMMMMM. GGGGGG. We are totally on the same wavelength! I love you guys!!!!!
1) YESTERDAY – GARAGE: Just cleaned out the workspace in the garage – complete with the label maker – because it was RIDICULOUS – found tons of duplicate tools, etc. Wish I took before/after pics!
2) THIS MORNING – DOLLHOUSE: Just started putting together scraps of leftover melamine covered wood (leftover from a shelving project)to piece together a very rudimentary doll house for my 5 yr old! Also just hit up target for some tissue boxes & contact paper for some fun furniture making crafts!
So, after all that I do have a
“Dollhouse construction question”:
I was thinking of buying and using a Kreg jig (mini) for the joints on the dollhouse. How come you opted glue and nails instead? I thought that the Kreg would make it easier? I am wrong? (I never heard of a Kreg jig before I read your blog!)
Thanks!!
YoungHouseLove says
Hi Betsy,
The Kreg probably would’ve made the dollhouse a lot sturdier, faster (instead it kinda didn’t feel solid until the roof and back were attached – plus the glue had to dry). But I opted not to use it because I didn’t want to have to go back and fill in a bunch of holes with wood putty. Most of my Kreg projects I just place the holes somewhere that will be hidden in the final product, but I didn’t have that luxury in this project. But I still love my Kreg!
-John
Melissa V. says
That is so awesome that you built a dollhouse for your daughter! At age 27 I still have a doll-sized bed that my grandfather made for me, and it’s one of the most meaningful things that I own. Every little girl should have a man who makes things for her. You guys are great parents. :-)
Sally says
Awesome thoughtful gift y’all! My dad made me a dollhouse out of scrap wood when I was a kid, and my mom and I made furniture out of little boxes (e.g. jewelry boxes), spools, fabric, and other scraps. Good memories!