You know that part in a movie where the dorky girl rips off her glasses and throws on some makeup and suddenly she’s a bombshell? Well, our deck has already tossed its spectacles aside (i.e. we stripped off the old finish) and now it’s time for some lipstick (i.e. stain). We’re not exactly aiming for bombshell status here, but we’d settle for – I dunno – sexy librarian? I think I’m getting lost in my own analogy.
The gist is that with our deck boards cleaned, we could finally apply a new protective finish. After some discussion, we decided to use a semi-transparent stain. Both of us prefer that look over something completely solid, but we didn’t want to go as light as the toner that we used on our last deck since we thought a deeper brown tone would look nice with this brick facade. We also wanted to loosely match the previous deck finish since we didn’t strip areas that were in decent shape, like the smaller vertical rails or the lattice around the outside. And we decided to stick with Olympic Maximum Stain + Sealant because we’d had a good experience with it on our last deck (we chose it for that project last year after many folks recommended it to us). Plus, they had a color called “Russet” that looked to be a pretty spot-on match to our existing color (we brought home their color booklet and held it up against the deck railing to pick the best match).
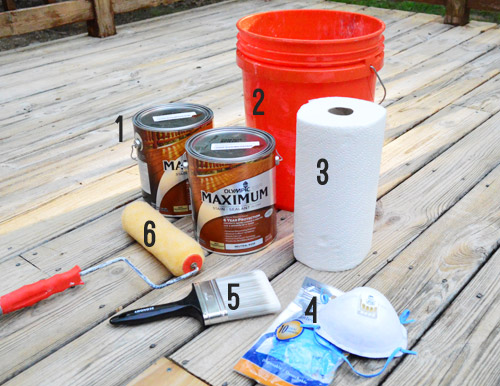
Here are the supplies we gathered for the task:
- Olympic Maximum Semi-Transparent Stain – we ended up needing 4 gallons for our behemoth 676 square foot deck, totaling $148
- Bucket – to pour stain into for easy roller dipping
- Paper Towels – since stain be messy, y’all
- Gloves & Mask – since stain be messy and stinky
- Wide Brush – for back-brushing (more on that later) and to get smaller areas like railings
- High-Nap Roller on A Pole – we chose a 3/4″ nap
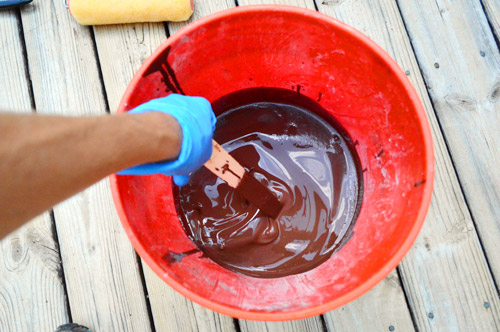
The bucket is also useful when your job takes more than one gallon because you can help eliminate color inconsistencies. Just like with paint, combining all of your tinted materials at the start of a job means you won’t be surprised by a noticeable color change if one gallon is a slightly different hue than the one before it. We mixed two gallons at first and then added each subsequent gallon as our bucket level got low. I half expected Augustus Gloop to surface for air when I stirred it, but no such luck.
I’ll admit I was a little nervous about having trusted the stain swatch to match the old finish. We could’ve gotten a small test pot of stain to be sure before going all in on multiple gallons but Sherry was feeling confident. But we did decide to start in a low-risk area – the railing hidden on the far side of sunroom – just to be sure. Once again the lady-wife wowed me with her luck, and it matched the un-stripped-already-mocha railings perfectly. We stripped the top and the wider railing slats, so those have been re-stained in this shot, but the skinny ones are the old color. Can’t even tell the difference, huh?
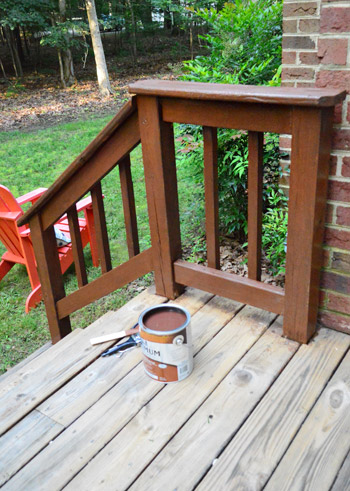
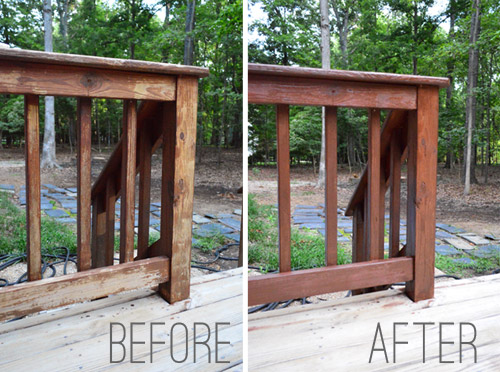
Here’s another railing that we tackled next – and this time I remembered to take a before picture of it. I had attempted to strip this railing but it didn’t come off as well as I had hoped. But the coat of stain did a great job of covering up my spotting strip-job. Once it fully dried (it’s still wet here) it had absorbed and looked even better. Almost like new.
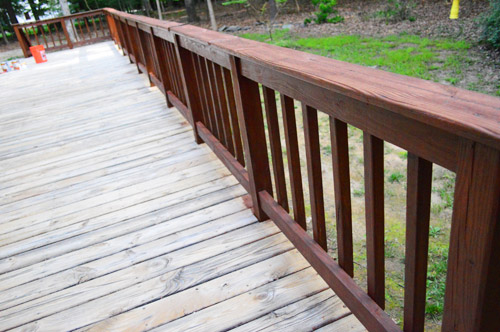
Since we had started our little test-run on the railings, we decided to go ahead and finish those first. It also made sense because we could work while standing on the deck, rather than having to wait for it to dry. It was tedious work, but with both of us plugging away at it (Clara was with my parents) we knocked all of the railings – both the outside, inside, and tops – in about two hours.
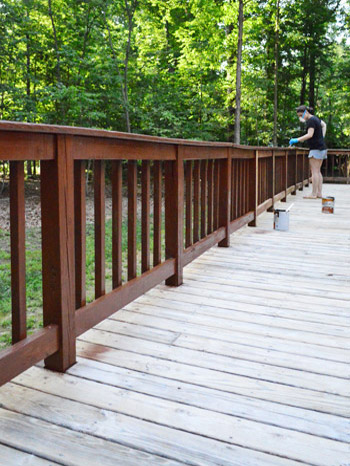
We would’ve kept going but (1) it was 10am and Sherry had to put up the morning post and (2) the sun was starting to creep over the trees. This is another product they advise against using in direct sunlight because it dries too fast and can create visible lines where a freshly stained area meets an already-started-to-dry area. Since the sun was only going to get more direct for the next few hours, we knew moving on to the floorboards would have to wait. But at least the railings were starting to look sexier. Let’s just say she’s almost all that at this point.
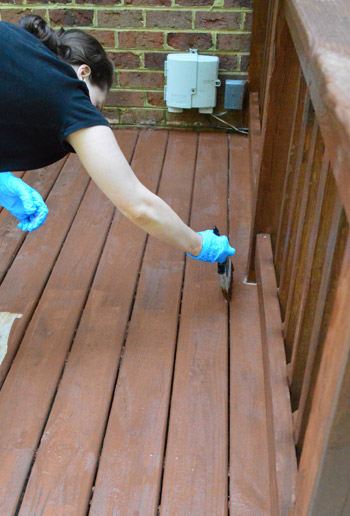
Around 4:30 the sun dropped down enough on the other side of the house that the light had finally crept off the deck floor. Clara was back home and napping, so we had anywhere from 30 to 90 minutes to tackle as much as we could as a two-person team before she woke up and threatened to slip and slide through our work zone. Because we were working fast we didn’t pick up the camera much, but the basic process involved me dipping my roller and liberally applying stain to a small area. I didn’t want to go too big at any time because we’d need to be able to reach any wet stain for the next step…

…which was back-brushing. If you remember from our last staining job, going back over the wet areas with a brush helps to even out any puddles (which could cause darker stain spots) and also works the stain into the wood better. Since we were working with older more weathered wood it was also an important step to make sure we got coverage in any small cracks. Plus, the roller didn’t do a good job of getting those between-the-board creases, so Sherry did each of those by hand along with back-brushing the top of each board that I rolled.
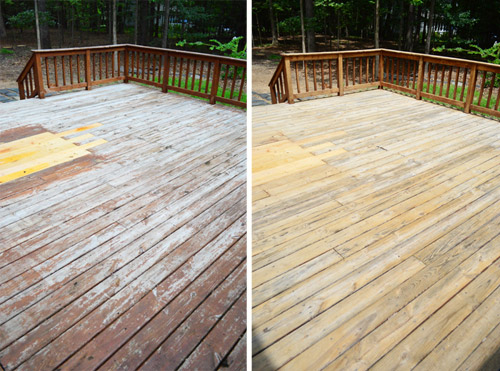
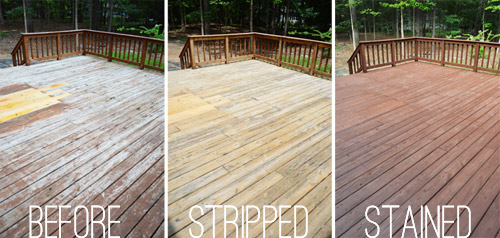
With over 650 square feet of deck to do, it was not a fast job. We got almost halfway done before Clara woke up and, rather than leave the deck half stained (and risk a big overlap line wherever we had left off) I continued on my own until the rest of the deck was done. Which conveniently was also about when it was too dark to see what I was doing anymore (so it was about a four hour job with two people for the majority of the time and me flying solo in the end). Here’s a full side-by-side of our process, which really shows how much better it looks. I’d say we achieved sexy librarian.
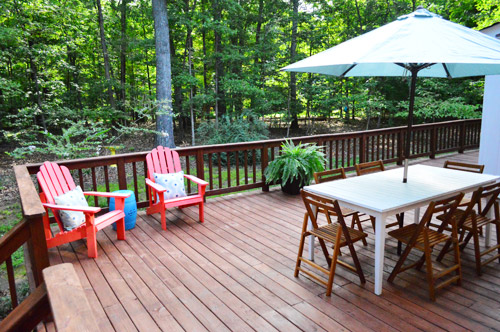
When we brought our furniture back out we were happy to see that the table could be placed right on the spot where the patched boards meet the old ones, so it’s not noticeable at all. The only problem? It’s looking like a larger deck calls for some more furniture.
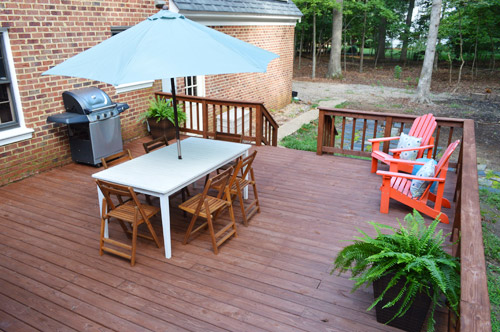
A few planters from Target along with a clearanced umbrella from Home Depot are making it feel a little less sparse in the meantime…
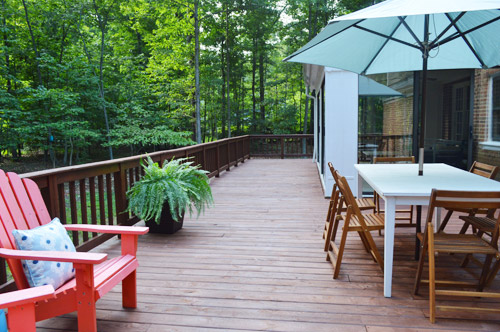
… but we think some craigslist and end-of-season sale-hunting is in our future. Especially since the entire other end of the deck is completely bare.
But that, my friends, is a mission for another day. For now we’re just happy to be done spraying, scrubbing, rinsing, rolling, and brushing this baby, which leaves us more time for playing, relaxing and eating on it instead. And I gotta say, as good as painting the walls of a room can feel, refreshing a 676 square foot deck feels even better. Especially when this used to be the view:
You should see us out there wolf whistling at it. You can also read how we later added custom gates to our deck to keep the dog from getting out!

linda says
Deck looks great! Ever consider using the dining room chairs which were originally meant for outdoor use on this deck? The size of the porch would support their visual weight. There are lots of great outdoor tables out there that would pair beautifully with them!
YoungHouseLove says
I thought about that for a second but we really like our white table (it seats 6-8 people and we think it looks nice with the new stain color, etc) and I’m not sure if they’d work with it. But you never know, we might give them a go and love them!
xo
s
KathyG says
What an amazing transformation! Love it. And HA, same thought here about the dining room chairs. But prob. because I have something similar on my deck, I just keep seeing them on yours. Gorgeous! Enjoy it!
Gina says
Awesome job! Are you going to put another sealer on i t? It looks pretty dry.. I know how tough and long of a process it is staining a huge deck, we just did ours. So not raggin’ on you AT ALL, just curious.
YoungHouseLove says
Aw, thanks Gina! Almost all stain now comes with a sealer right in it (ours did) so it’s all sealed and it makes it a nice easy one-step process. Water beads up on that baby now. In fact before we took the after pics in this post this morning we were out there with a towel wiping up the morning dew that was still sitting on it (it was an eaaarly photoshoot, haha!).
xo
s
Jobee says
Are you going to put something under your grill to prevent stains on the deck? I was just wondering whether it’s a good idea or overkill if the deck has a good finish on it.
YoungHouseLove says
Never thought about that! We haven’t used it yet since we re-stained. Does anyone else have a suggestion for protecting it with something? Do you use a tray or something?
xo
s
Kaci says
We used a silicone mat under ours. It was waterproof, so no risk of rot or rust plus it didn’t get ruined if anything from the grill fell on it since silicone is heat resistant and easy to wipe clean. I suppose a cute rubber mat would work as well. We were gifted the silicone one so it was an easy choice!
YoungHouseLove says
Really smart!
xo
s
John says
I’m seeing ads at the end of the comments, is this a problem on my end?
YoungHouseLove says
Hmm, what does it look like? Sometimes ads hack in (ex: pop ups) and we have to sleuth them down to get them off. For the past few years we’ve had one google ad down there at the bottom of comments though (it’s just a box, and the ad rotates to be something home-related, or so it should be). Is it that or something crazy (more than one ad = no bueno). Thanks for the heads up, John!
xo,
s
Cindy B. says
Stripping and decks and sexy rails! Oh my, where is this blog going? :) haha just kidding! It looks great! You two did a great job!
Mandy says
Wow! Love the before and afters! I was wondering how the brown stain color would work, but it looks FABO! Thanks for sharing. :)
Kimberly says
And a sexy librarian that deck is.
lindsay emmett says
The befores and afters are awesome. that should be an ad. for the stain manufacturer! This is kind of random but, I wonder if the former owners are reading / following your blog.
And right now, are they thinking, “wow, look at all the wonderful changes and upgrades these two are making!”
Or, “what the heck are they doing? we LOVED that wallpaper !?”
Ha ha ha
I think there was a show like this, bringing back former owners.
Could make for an interesting post. OR let the past be the past?
YoungHouseLove says
We’d love to know if they’re reading! For our first and second house the previous owners read along and it was so much fun! We haven’t heard that the old owners of this house read though, although our buyers agent told their sellers agent about the blog. Should be fun to see if we hear from anyone!
xo
s
Samantha says
AMAZING JOB GUYS!! Looks brand new :)
Manda Wolf says
That is gorgeous! You guys did a great job. I still need to stain the two decks we built over memorial day.
Julie says
Nice job! You all should feel really accomplished! I’m envisioning rocking chairs out there along that long, narrow unfurnished area.
Vonda says
It looks amazing!
Brenda says
Wow, what a difference from the before pics! You’ve definitely got a swanky deck now.
Shannon [Our Home Notebook] says
It looks so good! It’s amazing what a fresh coat of stain can do. Enjoy your new deck!
Heidi says
Did you just apply new stain over the old, non-stripped railings? I’m curious if I need to strip my deck or if I can just apply a new coat over what’s already on there. It’s not very peeled, just looking like it needs a recoat.
YoungHouseLove says
We stripped everything except for the skinny little middle rails (we did the thick ones and the rail on top) and then we didn’t really touch the little ones that we didn’t strip since they were in great shape and matched already. So I’m not sure if re-staining with semi-transparent over stain that’s already there is recommended. I’d worry that you might not get great adhesion. Maybe read the can and be sure to follow any necessary first steps for the type of stain/deck that you have?
xo
s
Shell says
Random question: does the deck smell? We had an issue with a funky smelling deck after we stripped it.
YoungHouseLove says
There was only a smell while stripping (which dissipated after John rinsed it) and a slight odor while we stained (which went away when it was dry). I wonder if stripping yours released a smell that was embedded in the wood – perhaps the old stain/sealer had held it in, but once you opened things up when stripping it came out?
xo
s
Elaine - visual meringue says
Looks fantastic guys! Awesome job :) I bet that one feels great to check off the ‘ol list!
Megaroonie says
wow guys, it really looks great. I was so excited to see the update in my feedly this morning :) I like that you are taking a more traditional approach to this house with little pops of color. classic never goes out of style :)
amy says
The deck looks amazing! We recently bought a house with a desk that has that deck over stuff which isn’t bad but gets really hot on your feet. I’m wondering now if i can strip it off and stain like you guys. I perfer to see the wood grain.
Should you guys have powerwashed the brick first before staining? In the picture of sherry backbrushing the brick looks greenish. Id be afraid of powerwashing over the nice new stained deck.
YoungHouseLove says
It does look green in that picture! I noticed that too. The only thing I can think of is that it was just the camera reflecting the green trees on it in a weird way since we already power washed it. There’s even a video of John doing that area in this post! So funny.
xo
s
Tara says
Maybe I missed it but what stripper did you use. We have a similar deck situation.
Thanks!
YoungHouseLove says
So sorry Tara, that info is in the previous post for you! I think we also linked to it at the top of this one :)
xo
s
Helen says
Oh man! You are living the dream. :) What I wouldn’t give to have a nice big back porch someday. Congratulations on the hard work, it really paid off and that stain looks great!
Necole@seriouslysassymama says
I love decks. Backyard living is the best.
Mary | Lemon Grove Blog says
Daaaanggg. Now that’s a before and after. Perfect for enjoying the last days of summer!
Kaci says
It looks amazing! We just moved out of our rental home that had a wonderful porch out back:( we are really going to miss that outdoor space now that we are back into an apartment! Someday huh? Haha maybe someday when we aren’t fresh outta school and plagued with school loan debt? For now I’ll live vicariously through y’all and your beautiful deck! So be sure to share lots of pics on Instagram for me and my fellow deck-less!
YoungHouseLove says
Aw thanks Kaci! Will do!
xo
s
Karen says
Dude, not only is the dorky-chick a bombshell, but she’s been elevated to super model status!!! That deck is stuh-ning!
Jessica D. says
I’m secretly sad that you didn’t do the Behr Deckover since I am in the exact same boat as you – not enough reviews to make a decision!! Our deck is in horrible shape. It has never been stained or sealed so the wood is cracked and rather splintery. We are leaning toward the Deckover solution to help smooth out all that roughness, but I still want better reviews to convince me! I love the way your deck turned out with the stain, though! It looks awesome! Have you thought about painting those wooden chairs yellow to bring back the happiness of the old chairs even though they didn’t work out here?
YoungHouseLove says
Didn’t even think of that! Could be fun!
xo
s
Deidre says
That moment when you realize your favorite home bloggers’ deck is bigger than your and Hubs’s first SF apartment…
YoungHouseLove says
Hahahahaha! We had that too! Our NYC studios were all smaller. At one point I had a 400 square foot box without room for a chair!
xo
s
Coralie says
Looks great! I am curious how Sherry painted in between the cracks without stepping on the new paint…did she wait or was it a constant back and forth process of rolling a little then painting in the cracks a little?
(long time reader! first time poster!)
YoungHouseLove says
Yes, the latter! In fact in that pic you can see a sliver of un-stained area where I was standing. We just worked our way around in small sections that way.
xo
s
Cadie says
What an amazing transformation! Loved the Augustus Gloop reference, too! Ya’ll are too funny.
Debbie says
Beautiful result…but my back hurts just reading about the work involved! Hope you guys were able to walk the next day!
Megan says
I see some chaise lounges in your future maybe……..Deck looks great!
Steph Nelson says
I wasn’t expecting it to look as good as it does! Makes me want to do my much smaller front porch. I’ll have to wait until it is cooler. Florida is walk out and start sweating immediately right now. (was Destin like that?) Your foyer paint job motivated me to lighten up the paint in my main living space, so for the next week I am going from a grellow similar to your old house, to some very light taupe, tan and off white! Inside jobs for the month of August. Tell John I am using his simple bike pic frames for a large wall picture of the USA.
Thanks for all the tips guys! :)
YoungHouseLove says
Destin was hot but not too bad since there was a nice breeze on the beach. I miss it!
xo
s
Paige says
A joggling board would be perfect for that long empty space at the end of your deck! They are so fun! I would google around for some prices (you can also DIY your own), but if you’ve never seen one they look like this: http://www.google.com/imgres?imgurl=http://finewoodworking.assets.tauntonnet.com/assets/uploads/posts/46972/Joggling_Board_Green.png&imgrefurl=http://www.finewoodworking.com/item/46972/drawing-a-joggling-board&h=715&w=1200&sz=1069&tbnid=bL7eBB3IFeC7kM:&tbnh=72&tbnw=120&zoom=1&usg=__OuSqIiTjtSaFli14ppGZrsPZJns=&docid=aQNdppEnYVDF0M&sa=X&ei=gakLUs3wK-mwyQHL6YC4AQ&ved=0CEMQ9QEwBA&dur=1407
YoungHouseLove says
Never seen one! Thanks for the link Paige!
xo
s
mollie says
sexy, sexy deck! sending lots of good end-of-summer vibes that you find a nice outdoor rug on clearance, as that would look bomb.com under your table!
oh Holland says
Looks fantastic!
Your deck is so big, 80% of my whole house could fit on it. You should run a zipline down its length!
YoungHouseLove says
Haha! I think Clara would squeal with delight!
xo
s
Kasia says
Love it! What kind of furniture layout are you thinking for that strip next to the sun room? It seems like a tricky place to add furniture, especially with your long term plan to make the sun room more of an outdoor room (at least that’s what I think your long term plan is- I maybe am remembering incorrectly). I think I’d make it a kid play space, but I’m excited to see what you guys will do.
Christine says
Hi guys – oh my goodness – what a transformation! Quick paint question I think you said you typically mix multiple cans of paint in a bucket when painting to make sure there aren’t color variations. Do you do that on your interior walls, too? We are doing a whole house (interior) paint ourselves…scaffolding for the atrium and all…but it will involved gallons (and gallons) of paint. I’m wondering if we need to mix them first and then pour them back into their original cans? Seems like a really messy job, but I definitely don’t want color variations. What do you guys usually do?
YoungHouseLove says
We have never used multiple buckets in a house that way, but it definitely coudldn’t hurt! You can also save money by buying a 5 gallon bucket that’s pre-mixed if you need that much!
xo,
s
Koliti says
The sexy librarian in me would like a hammock for two, a hunky man servant with umbrella drinks (you have John, so just let me dream…), and of course some juicy summer literature. Yes, that would all fit nicely in that space.
Heather says
Looks great! Please post a pic in the fall with leaves all over it!
Katie says
So if your deck is a behemoth needing 4 gallons, what would my deck be?
We used 16 gallons when we stained it last summer. It goes all around our 1800 sq ft house, then there is an upper balcony, upper and lower decks off the back, a long boardwalk to the woods and a deck on the side of the house.
It took 4 days and three people working flat out to get it done. And that doesn’t include the power washing (we opted for it because – well – huge deck and we had two power washers we could borrow).
YoungHouseLove says
HOLY COW! I think that’s the biggest deck I’ve ever heard of! It sounds like a huge job!
xo
s
Angie says
Your deck looks lovely! And how lucky for you that the color matches so wonderfully! :D
Rachel says
Oh Petersiks, I SO hope you’re out there today enjoying that sexy librarian deck of yours! I’m jelly! Today seems like the perfect day to enjoy it. Excuse me while I hang my head in envy… over my keyboard.. at my desk… inside… all day
YoungHouseLove says
We’re about to run to Home Depot, so we do get to be outside for a hot second- although not on the deck! Haha! I’ll soak up some sun for you in the HD parking lot!
xo
s
Heather @ Forsythia + Oak says
It looks fantastic! I think the darker deck looks great against the trees.
Connie Randall says
I always love the final before/after picture. Worth a thousand words. Shows your true vision come to life. And I ask again – when does your tv show start?…
YoungHouseLove says
Aw thanks Connie! We’re not really TV folks – I mean we watch it like crazy but we’d much rather hide behind our computers than be on it :)
xo
s
Amy says
Sure is proof that a day of DIY can make a huge (and cost saving) difference! Virtual high five!
Kate S. says
This couldn’t be more timely – we have practically the same deck in the same exact condition, and coming from the desert we had no idea what to do, so thankful we have these posts to look to!
Jenn says
Hi John and Sherry,
We’re thinking of re-doing our deck so your posts are so timely and helpful. Question on the back brushing, you said that you have to go and back brush while it’s still wet – so do you step on the part of the deck that’s still wet as well? Otherwise how do you get to the part that needs back brushing? Thanks so much.
YoungHouseLove says
You just work around in small parts (ex: just roll 4′ of four boards so you can still reach them while standing on unstained boards and then backbrush those and as a unit move over and do four more boards while standing on unstained wood, etc). Just like if you were painting a floor and you’d paint yourself out of a room, just sort of stain yourself from the far side of the deck right off the end of it and down the stairs so you’re never standing in it :)
xo
s
sarah b says
Just curious – for the railing top and wider rails, any tips for stripping those? did you use the same stripper (ha, ha!) as on the deck? i assume you didn’t use that huge brush on those small areas, or maybe you did? anyway, just a couple pointers would be helpful.
fortunately the floor of my deck is a composite trex-type thing, but the railing is wood and needs to be stained/sealed before the pacific NW rains start in a month or so.
YoungHouseLove says
Oh yes, we used the same stripped but just used a small foam roller for those parts. It started breaking down after a while (it was wearing down the foam to roll it vigorously on a wooden surface) but we tried to work fast and got the tops done that way. I think a wide brush (like the one I used for back-brushing) would work too. Hope it helps!
xo
s
jenna lou says
wow. You guys are serious rock stars. The deck looks amazing…. all that hard work paid off!
Kristin @ Little Corbin Hill says
Looks awesome!