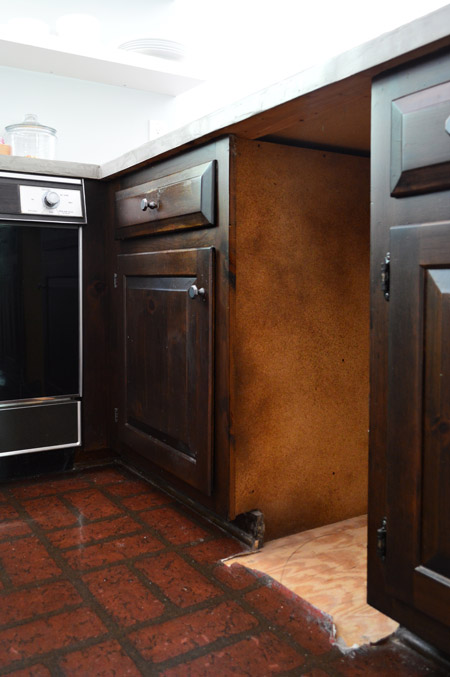
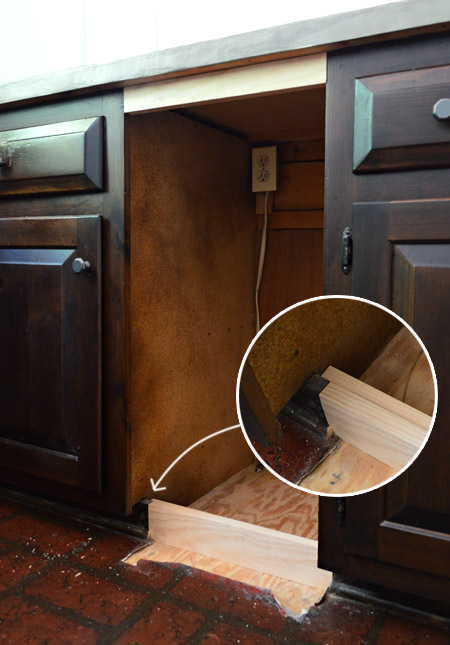
Remember how we had a trash compactor in our kitchen? Remember how we removed it waaaaay back in March? Well, we have officially filled the void with some slide out baskets.
Only took us three months.
Not that the hole it left wasn’t super attractive and crazy functional. I mean, if incorporating a “great Clara hiding spot” into our kitchen was the goal (and I put that in quotes because Clara’s hiding spots are frequently preceded by “I’m going to go hide in the [insert one of four usual locations here]”). So yeah, it’s time this hole worked a little harder.
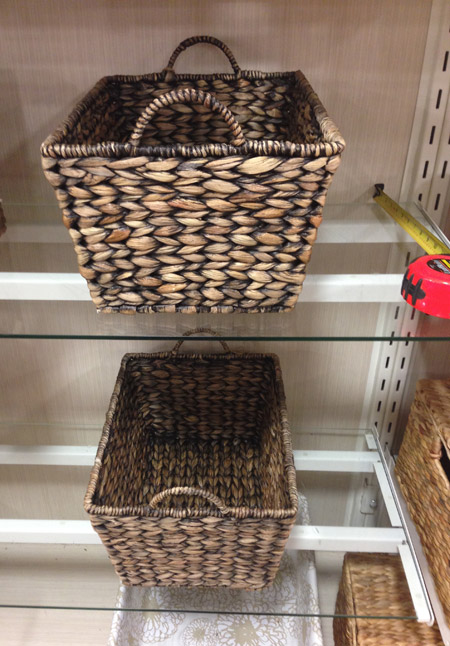
We debated a few options – like putting a trash or recycling bin there (but this cabinet hack is already working nicely for us) or adding some open shelves (like we did in our master bath). Ultimately we decided to attempt some sliding basket storage, kind of like what we’ve admired here and here. It would help us get our dishcloths, cloth napkins, and paper napkins out of the various spots they’re housed throughout the kitchen and into one distinct spot, and it would satisfy our curiosity as to whether it’s a feature we’d appreciate in our eventual kitchen remodel (you know we love to use Phase 1 projects as a do-we-even-like-this test before committing long-term).
So with a few key measurements in hand, Sherry hit up HomeGoods and found these two perfectly-sized and nicely-colored winners. And she almost left our tape measure there. Close call, guys.
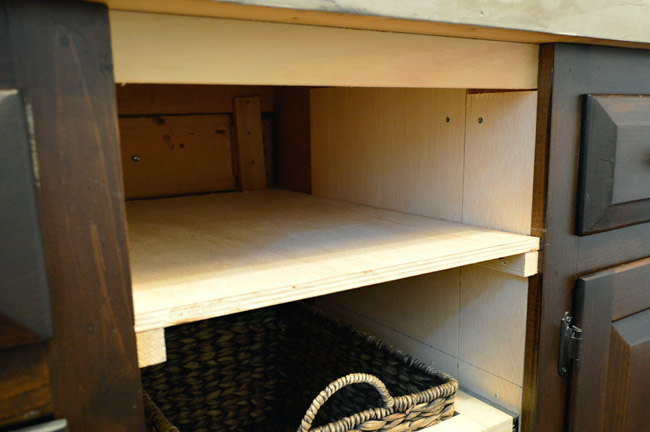
Before we could put those baskets to use, there was work to be done. I started by filling in two basic areas to make the hole look more cabinet-y thanks to a board across the top and the toe-kick. I attached both by screwing a brace piece into the back of the existing cabinet lip, then nailing the face pieces in.
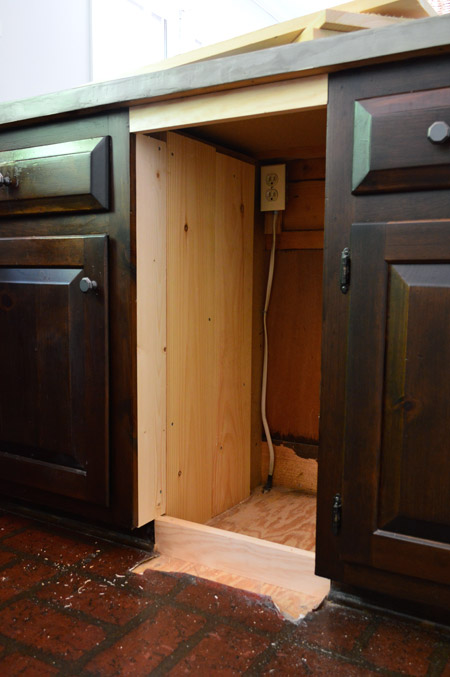
Next I had to build out the sides of the cabinet to make them flush with the outer lip, that way the drawer slides could attach inside without being obstructed when we tried to slide them out. I did this by screwing in a few pieces of scrap wood that I cut to fit. Actually, up to this point in the project I was able to pull everything from my scrap pile. Am I the only one who feels a special kind of victory when this happens?
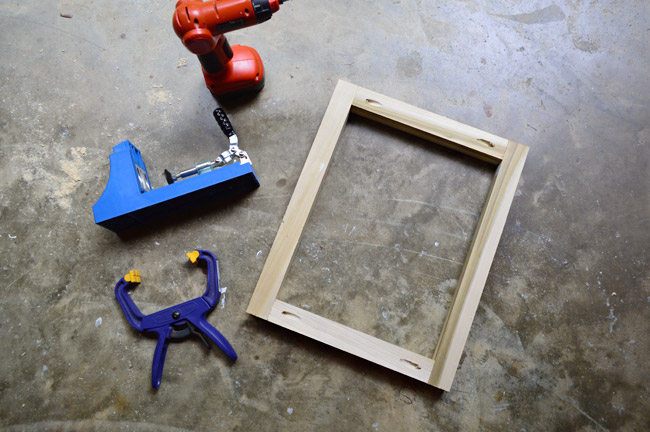
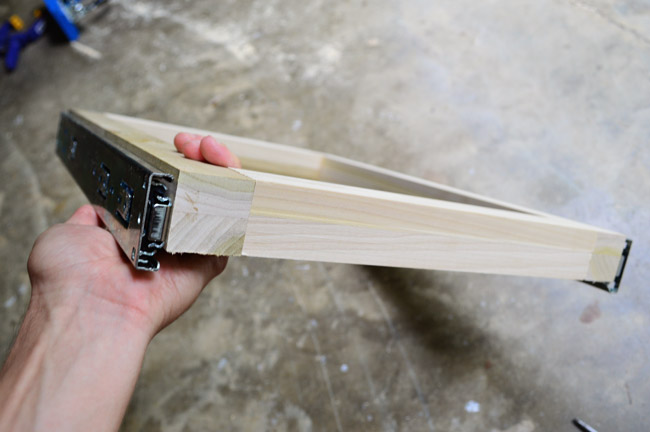
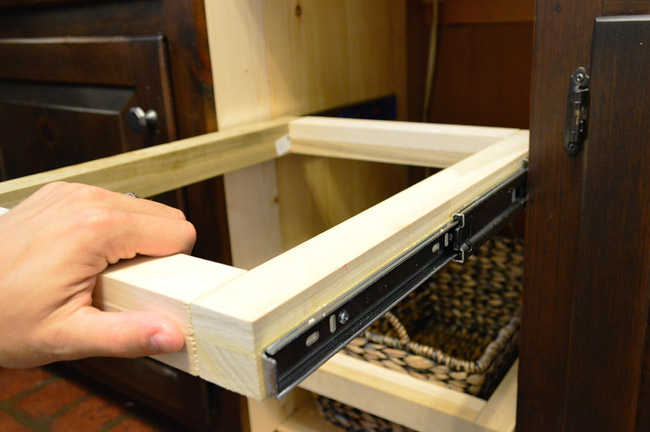
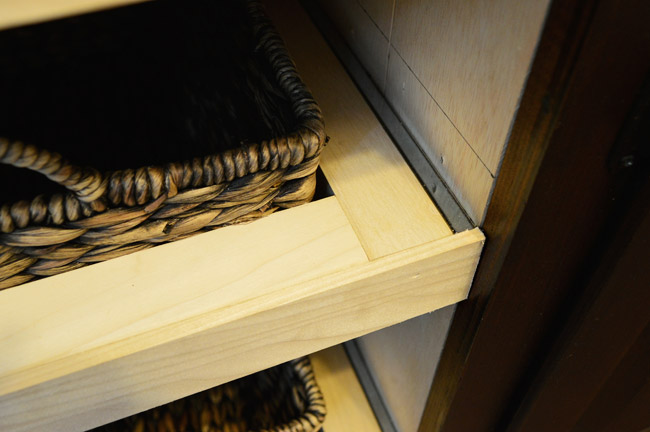
With the cabinet hole built out, it was time to create my drawers. Simply put, I used my Kreg Jig to create a frame that the tapered basket could then slide into. I built them out of 1.5″ square dowels from Lowe’s. That was a pretty precise thickness that I needed, so my scrap pile couldn’t help me here. Sad face emoji.
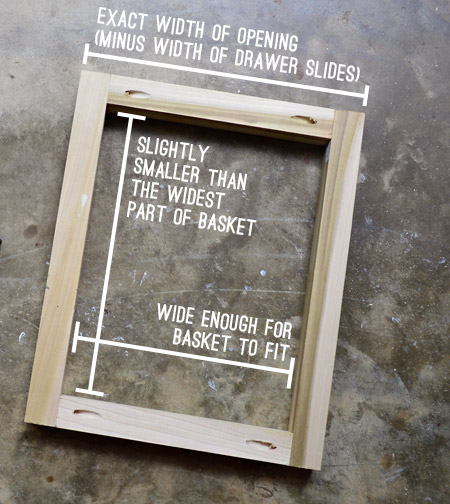
This was probably the most complicated part of the project to figure out. There was lots to take into account to make sure that the frame:
- was sized so that the basket fit snugly into the opening without falling completely through
- fit perfectly into the cabinet hole, while accounting for the width of the drawer slides
- was thick enough for the drawer slide to attach to securely
There was lots of triple-checking myself. Since my exact measurements would only work if you have exactly the same opening and exactly the same baskets, just use the descriptors below to create your own frame that should fit whatever specifications you’re working with.
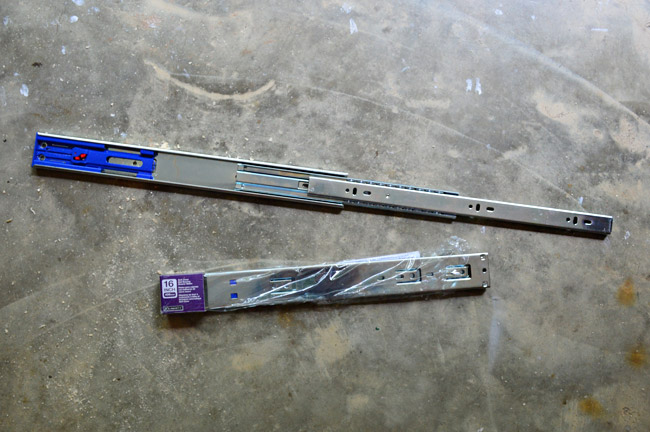
The drawer slides we selected were these ball-bearing ones from Home Depot. They’re a little pricier than your basic wheeled slide ($15 vs. $5), but I thought the full-extension would come in handy – and who doesn’t love a soft close?
Per the instructions, I detached the drawer rail part and screwed it into each side of my two frames. I found it helpful to mark the holes with pen, drill pilot holes, and then come back with the screw to ensure careful placement.
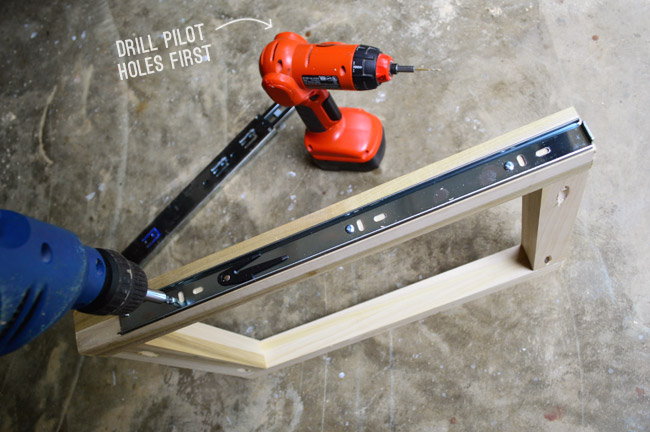
I attached them along the bottom edge of my drawer frame. It not only made keeping them straight/level easier, but also meant when we reattached the rest of the slide (which was thicker) it didn’t stick up above the frame. #thinkingahead
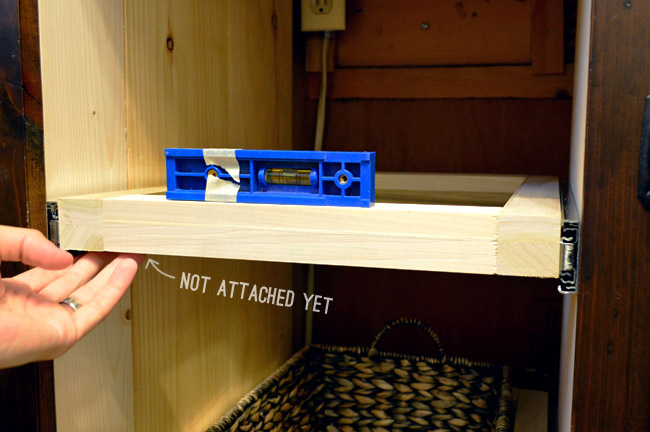
Back inside, I held up my frame in the cabinet hole to mark its placement. Then I detached the cabinet rail part of the slide, held it in place, marked my hole, drilled pilot holes, and screwed the first one in place. This was possible with two hands, but easier with four, so I recommend recruiting your lovely burp cloth sporting spouse (or a friend, neighbor, relative, but probably not your dog) if you can. You can see below that we already had the bottom drawer done and in place.
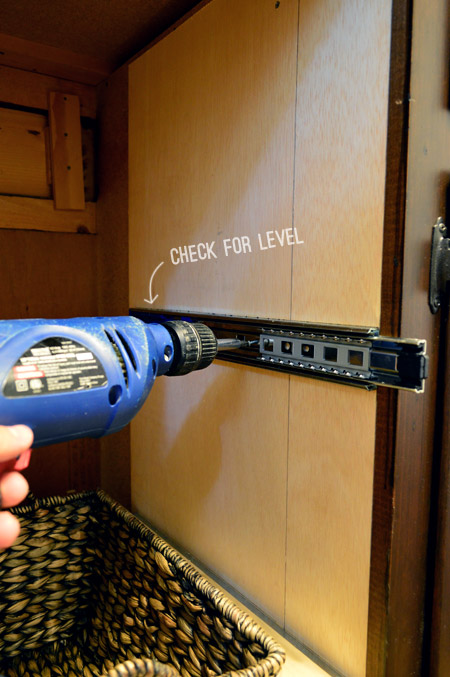
Before screwing the second one in, I temporary reassembled everything so we could check that it was level first. Not only would this ensure that it looked straight, but it helps the drawers slide more smoothly.
With the second side screwed in, I reattached the drawer, held my breath and checked that everything worked. Insert sigh of relief here.
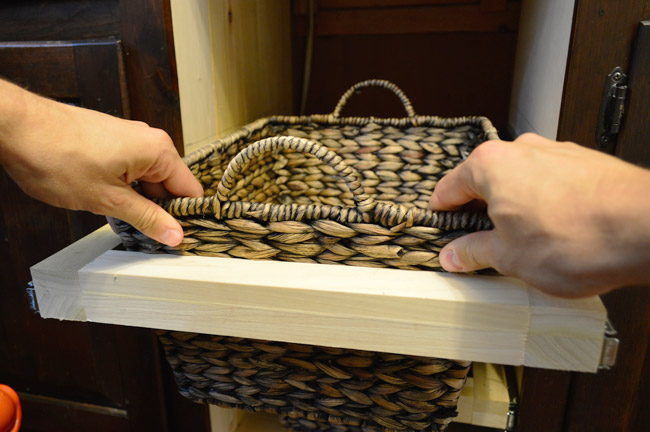
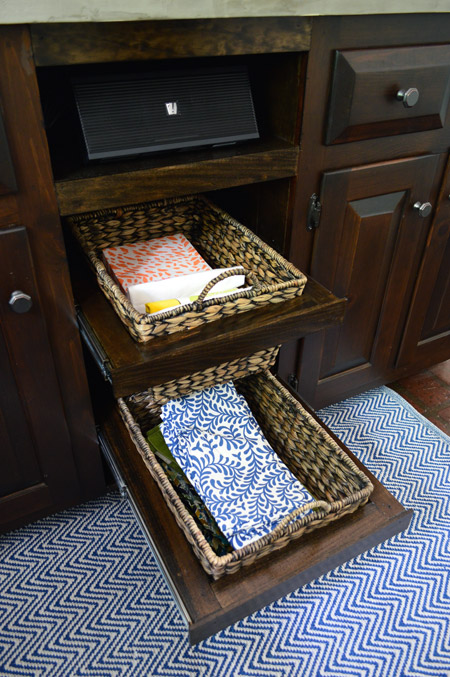
The next step was to place the basket into the frame. They sat in there nicely, but I shoved them down a bit to keep things snug.
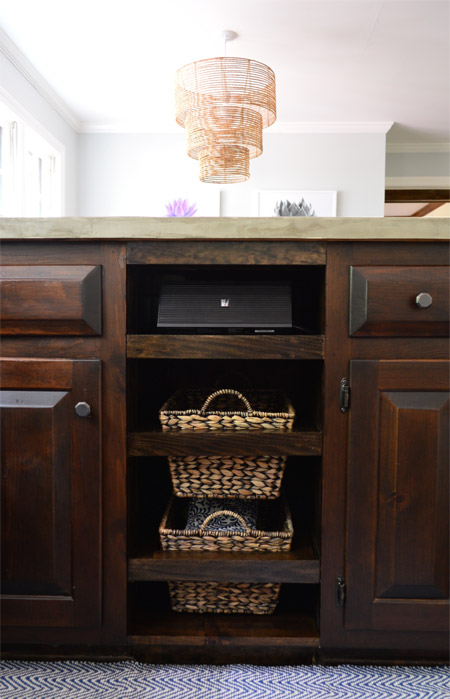
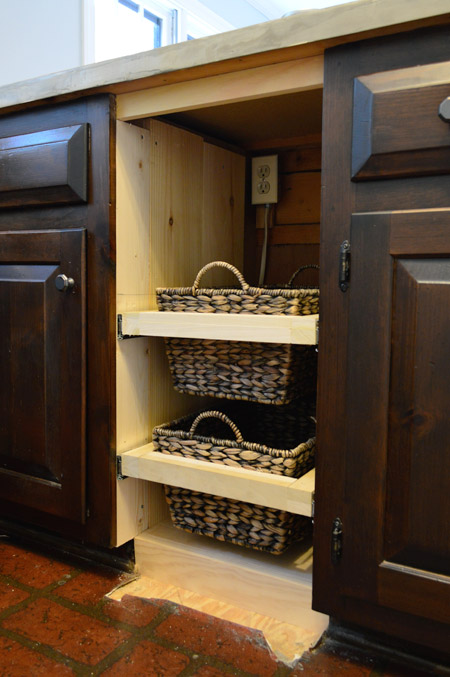
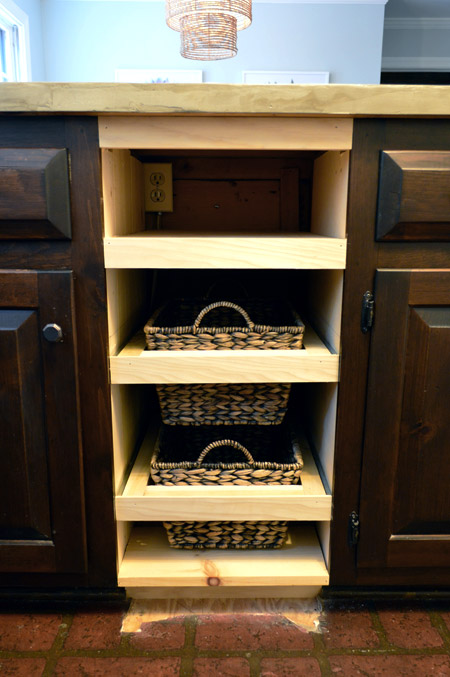
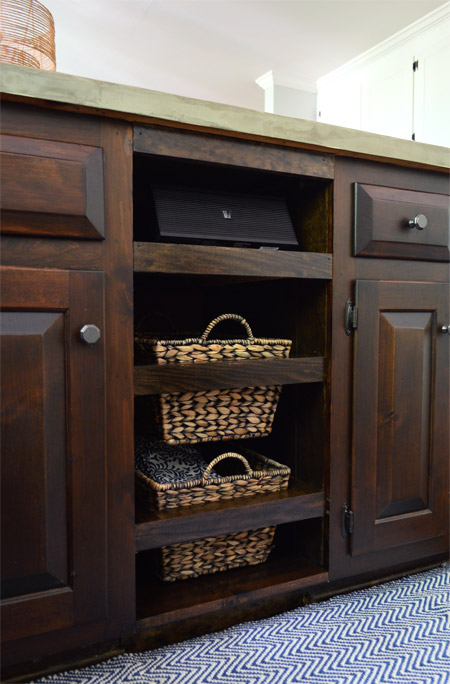
Here are the two basket drawers installed (after we decided after the fact to shift the top one down a couple of inches). We contemplated doing a third, but HomeGoods only had two baskets, and we thought we’d take advantage of the fact that there’s already a working outlet back there (the trash compactor was plugged in, not hard-wired).
Taking advantage actually just meant adding a simple shelf (built from scrap wood!). Sherry suggested that we use it as a phone charging spot, but I saw it as an excuse to buy the Bluetooth speaker that I’ve been trying to justify buying for a while now. Our kitchen radio reception is really spotty at this house, and having my phone tethered to an auxiliary cable has meant that it has gone largely unused since we moved in.
One last finishing piece was to add a few thin boards to the front of each drawer (and the shelf) to give the fronts a clean and consistent look. Plus, it hid the drawer slides even more.
Here’s everything built. Now it was just a matter of staining everything to match. Well, match-ish.
We stained our existing cabinets with PolyShades in their Tudor color, so I wish it was as simple as just repeating that process. But obviously the raw wood finish here is pretty different from the medium brown-red stain that the other cabinets already had going on. So first Sherry darkened the new pieces with a coat of Dark Walnut stain that we had on hand.
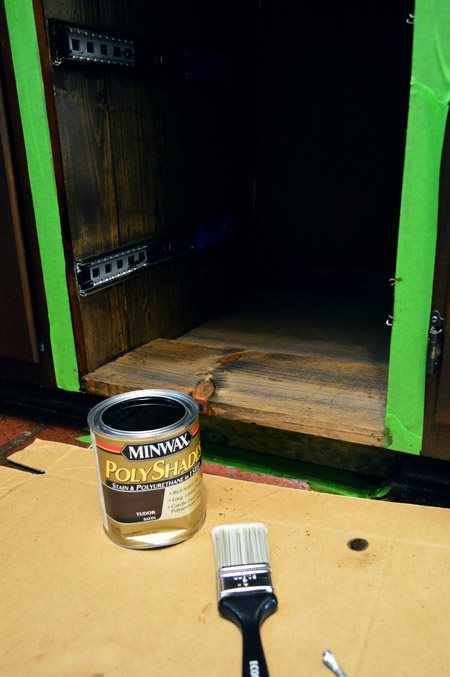
After that dried she started in with the PolyShades coats. It ended up taking three coats of it to get a similar tone to the surrounding cabinets. It’s not a perfect match (the cabinets are a little redder) but its close enough for us.
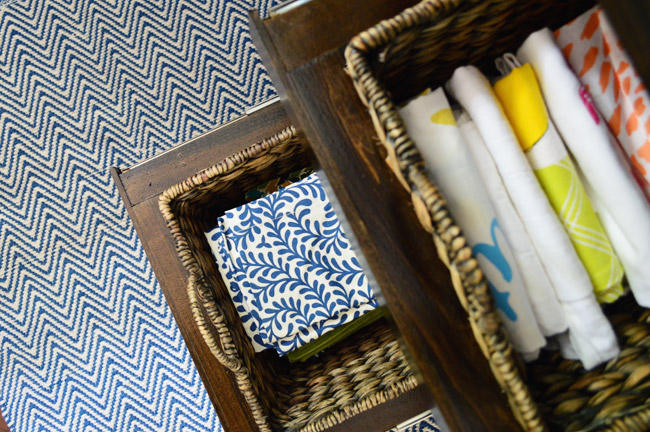
Oh, and you can see that Sherry found a $12 HomeGoods runner to help cover the fact that the laminate floor under there wasn’t looking so hot. Not that the scratched up faux brick is looking very hot anywhere in here.
As planned, the baskets got filled with dishtowels & paper napkins (top basket) and cloth napkins (bottom basket).
Oh, and the bluetooth speaker that we ended up buying is this one from Target. It’s plugged in/charging below and can be has been easily removed for use around the house (so far mostly out back on the deck).
Sherry suggested I include a video of a drawer in action, specifically to demonstrate the soft-close function. Sure I could have uploaded a three second video and called it good, but I just couldn’t resist some music and some slow-mo action.
It’s almost as titillating as our console video from back in the day.
Not sure there’s much to say after those. I’m sorry? You’re welcome? But so far we’re digging the sliding baskets.
What projects have you guys been tackling lately? Kitchen stuff? Building? Painting? Outdoor updates? With these done we simultaneously want to deal with the kitchen floors rightthissecond and ignore them for a few more months.

Sarah @ Sarah's Daybook says
I am freaking obsessed with those white and blue napkins!
Random, but when is book #2 supposed to come out?
Sarah
http://www.sarahdsdaybook.wordpress.com
YoungHouseLove says
Thanks Sarah! We’re aiming for fall/winter of next year. Books take forever to make!
xo
s
Sarah @ Sarah's Daybook says
I will make sure that I am the first to pre-order, haha. Probably won’t be hard because I refreshed this page for about 10 minutes until you posted this :)
I am so strange. Excuse me.
Sarah
http://www.sarahsdaybook.wordpress.com
YoungHouseLove says
Ha! Thanks Sarah!
xo
s
Mary Beth says
I’ve actually been wanting to do something like this in our kitchen except for onions and potatoes and stuff.
It looks good!
MB
http://www.hystericallyeverafter.com
Olivia says
Good idea!
Jenn says
Ah! I was thinking the same thing! This would be great for dry produce.
Treana @ House of Bennetts says
I already made 100 napkins for my wedding, but this post makes me want to buy all of my favorite fabrics and Go. To. Town. :)
http://houseofbennetts.com/2014/05/08/vintage-napkins/
And then buy adorable baskets to store them in.
YoungHouseLove says
Love that project!
xo
s
Anne @ Planting Sequoias says
Great solution for now! I love the idea of keeping fruits/veggies in there too, but that would certainly get a bit messier than napkins and towels.
We’ve been working on some outdoor updates–painting shutters and the front door, specifically! We’re now working up the courage to tackle the trim on our house’s exterior. Eeep.
Lisa | Winter Heights says
Haha, that video. All I can say is thank you. Love the look, too. :)
sarina says
I have been pimping out my chicken pen.. I stained the pen to match the chicken house. I also fabricated a little picket fence and made a stand/roost for their waterer.
Also installed the fence charger this weekend and finished attaching the wire to the gate posts in the horse pasture:)
Mary | Lemon Grove Blog says
What a perfect use of space! We have some baskets just like this that we use for our potatoes and onions. I love how it turned out!
Megan says
I think you should have painted the shelves something fun vs trying to match the stain… still looks great though and very smart, per usual. Curious to know, is your complete remodel on the same timeline or have you moved it up? I love the experimenting and affordability of phase 1 stuff, but I would think with you wanting to streamline projects a bit more after Teddy’s arrival… you must be itching to make some permanent progress in there?!?!?
YoungHouseLove says
Thanks Megan! We definitely were itching to fill that hole in, and instead of just adding shelves we thought this was a way for us to test-drive a concept before committing to leaving a cabinet out in our real gut-job for this purpose (totally could be a regrettable mistake if we don’t like these). Of course we’d love an all new kitchen, but when we get to tackle that gut-job depends on what appliances, cabinetry, flooring, and counters we end up wanting (might take us longer to save for things depending how pricy they are – and we have a whole wall to knock out during that phase). We knew those weren’t happening anytime soon, and we had a hole to fill.
-John
Megan says
Thanks for your response, John! Totally forgot about knocking down a wall… that definitely elevates a remodel (and budget) pretty quick. I really admire your patience on these larger projects and your persistance with the smaller ones along the way.
YoungHouseLove says
Thanks Megan!
-John
Sarah says
Do you like the speaker? Is the sound quality good? I have been trying to justify getting one for around the house/on the back deck for a while now too… I’ve sort of had enough of the “phone in the drinking glass” speaker system…
YoungHouseLove says
We have been happy with it so far. It works outside even with the air conditioner on.
-John
olivia says
That’s such a great temporary solution! Love it.
Are you planning to do a day in he life post? It would be interesting to see how different your days are now that you’ve scaled back a bit.
YoungHouseLove says
That would be fun!
xo
s
Laura @ Rather Square says
Really clever. And I like that you kept the space kind of open – it breaks up all the door-covered cabinets surrounding it. This is a great Phase 1 update – seems really budget-friendly and functional!
We’ve been slowly doing our own “Phase 1” bathroom project. Keeping updates as inexpensive as possible and doing as much DIY as possible. So far, we’re liking the results!
http://www.rathersquare.com/2014/06/budget-bathroom-update-four-fixes-for-under-twenty-dollars/
YoungHouseLove says
Love it!
xo
s
Ally says
Such a creative solution. Awesome DIY storage! It looks amazing to me. Love the baskets. I’m already thinking about unused portions of my kitchen cabinets where I could add in something like this.
marianne says
Ya’ll are flippin genious! That looks amazing!
Stephanie says
Those videos are hysterical!
olivia says
Love them, and the video is hilarious! I am about to paint my pantry door “irish moss” now. Thanks for the inspiration!
Kara says
Oh hey we have a sound kick and LOVE it. We debated getting a Bose Wave, but my husband found a good review of the sound kick online and it’s been perfect for us. Neat to see it in your kitchen!
YoungHouseLove says
That’s so good to hear! We have been using ours a ton!
-John
Clodia says
It looks beautiful! It makes the segments around it look so modern.
Random aside – how often do you use your cloth napkins, and for what? Growing up, my parents had a set that they’d use when we sat down at the fancy dinner table, but we used paper napkins the rest of the time. Now I just use paper, but I hate the waste. But cloth napkins seem like they’d be a fair bit of effort. How do you use the cloth vs the paper napkins, and how does it affect cleanup and laundry?
YoungHouseLove says
We use them a lot! They’re really not too much to keep up with since we’re washing dishcloths regularly anyway. Some meals they get a workout, but it’s nothing the washing machine can’t solve.
xo
s
Leah says
Clodia, we exclusively use cloth napkins at home. It’s just me and my husband, and we don’t mind interchanging, so we’ll use them multiple times before washing. I have a few different styles, so I make sure to bring out different ones for guests.
Another blogger I love (Miser Mom) also does cloth napkins. She’s got a few kids, so they each have their own special napkin ring. They also reuse the napkins until they need washing.
I recommend having some dark napkins for those spaghetti dinners and whatnot. We find that we like our pretty, light colored ones but gravitate toward these grey and red ones my SIL made for us. I love using the cloth napkins all the time, saving money, and not throwing away so much. I never buy paper napkins (I’ve got perhaps 20 cloth ones I’ve been gifted, so I have enough for gatherings). We also use cleaning rags, so I go through maybe a roll or two of paper towels per year.
Catherine says
Clodia, our family uses cloth napkins every day. We have a bunch of cotton ones and a set of personalized napkin rings (a family DIY project/gift) so we can reuse the napkins for a few meals and then toss them in the laundry. I just wash them with the towels–it’s no extra work at all.
Vicky says
We use cloth napkins everyday as well. My sister-in-law gave us a few sets of solid colored napkins with my family’s first names embroidered on them. Not sure what the material is anymore, but it is super washable and stain resistant. We’ve used them for several years now and just toss them in with other kitchen/dish towel laundry when needed.
Sarah at simplysocialblog.com says
Dying over the use of “push it” for your slow-close drawers video. You guys crack me up! P.S. they look great!
Rachel says
I love everything you do, but I gotta say, I cannot believe you all didn’t gut the whole kitchen as soon as you moved in. Kudos for the patience.
Michelle | Birds of Berwick says
HA HA HA!!
Isabel says
Very smart solution and looks really great too. We did something similar with a hole in the kitchen that use to house the washer (it was a pretty bad spot for it but I dream of an upstairs washer and dryer like yours). Turned out two of the cabinets we took down were the perfect fit for that spot so we re-engineered them to fit the microwave up top with smaller cabinet space below. Not easy and re-sizing those doors was HARD, but such a better use of space.
YoungHouseLove says
That sounds really smart.
-John
Michelle | Birds of Berwick says
HA HA HA!! Thanks for that!
Lisa E says
Love it! Great idea. I’ve been doing office/craftroom updates. Repainted so it didn’t feel like such a cave; bought fun fabric for pops of color, which my friend made into roman shades; hubby built a bench to put in front of the window and now I’m doing the finishing on it. This sewing novice will attempt to sew my first box cushion cover from Centsational Girl’s easy looking tutorial which will be joined by colorful pillows which covers I already sewed. It was my first attempt and they came out great!
YoungHouseLove says
That sounds awesome!
-John
Samantha says
Love it! Great idea! Both videos crack me up! Thanks for the smile!
Emma says
Wow! That’s pretty bad @ss!
Annie says
WOW! This might be my favorite project you guys have EVER done! I know that sounds silly, but really, the difference between leaving the hole in the wall until phase 2 (probably what me and hubby would have done…hee hee!) and finding some perfectly fitted baskets and *making* the drawer frames is why you guys are famous and we’re not! That’s ingenuity! Keep turning your diamond in the rough house into a treasure trove for your fans to feast our eyes on!!!
xoxoxoxo,
Annie
YoungHouseLove says
Thanks so much Annie! You’re too kind.
-John
Amy says
Haha, love the part about Clara’s “hiding spots!” My daughter (who is Clara’s age) loves to play hide and seek as well but when she’s hiding and I call out “Where are you?” she yells back “I’m hiding in the closet!” :)
YoungHouseLove says
So funny!
-John
Shannon says
Getting ready to redo a bathroom. Drywall has me scared, but looking forward to the other parts of that project! Mom gave me your book for Christmas, so that is always close by!!
YoungHouseLove says
Thanks Shannon! Good luck with your bathroom. Drywall is always our least favorite part too.
-John
Anele @ Success Along the Weigh says
That looks so cute with those baskets! I thought for sure you guys would put a little compactor sized wine fridge there like this one (http://www.homedepot.com/p/Whynter-18-Bottle-Built-In-Wine-Refrigerator-Stainless-Steel-BWR-18SD/202575534?cm_sp=BazVoice-_-RLP-_-202575534-_-x) You know, you could pull out a juice box for Clara or a bottle and ask Teddy if the vintage is pleasing, etc. But your solution is cute and much more affordable. ;)
We got a smaller speaker like that and we’ve become adults. We’ll eat on the lanai and turn on our speaker listening to smooth jazz. The Mr laughed and said “did your 17 year old self ever envision this when we first started dating?” I said “actually yes. Check one off the adult bucket list.” Who knew all it took was a speaker and Pandora. HA!
Kati says
Stop. You’re killing me. I read all of the YHL posts and then go through the comments to find yours. I think we should be friends in real life.
BamaCarol says
Thank you for this! I have a spot that I’ve been wanting to do something like this in and now I have the instructions and guide to get it done. I worked on something to store my cloth napkins in this weekend as well. Just an old/antique dresser that I refinished to use in the sun room for napkin and napkin ring storage since we eat out there. Great minds and all!
Paula says
Love the new are in the kitchen, it’s a great solution to that gapping hole. Just curious: Did you guys consider getting Sonos? It’s it a super up and coming system that’s supposedly way more reliable then bluetooth. And you can expand, so eventually you can place boxes everywhere (it just needs a power outlet) and group them into groups to play music throughout the house.
We have it, and absolutely love it!
YoungHouseLove says
I keep hearing amazing things about it! Will have to look into it.
-John
mary says
Nice! Can you pull them out from the basket handles or no? If not, I think I’d add some cute handles to the wood, maybe.
YoungHouseLove says
Yes, that’s what I use. You can either grab the basket handles or the corner of the basket like John does in the video. The handles are wired and fixed in place (strong, and not floppy) so we think they should hold up well. Will keep you posted!
xo
s
Anne says
Hahahaha! How did I miss the console video back in the day?! As for the drawers, what a great fix! They look great. Way to go on the soft slides. But the real win is John editing the photo so the “Pow!” from one of the ladies (Salt? Pepa? I don’t know) coincides with a close. I laughed out loud.
Katy @ The Non-Consumer Advocate says
Okay, that video made me laugh out loud!
Real good.
Great job, and no, you are not the only one who gets inordinately excited from using up supplies for new projects.
haverwench says
“Push it good!” Hahahaha!
And no, of COURSE you are not “the only one who feels a special kind of victory” at being able to put together a whole project from the scrap pile. My husband has made me birthday presents from scrap wood on multiple occasions (frames for some vintage tiles, a stemware rack to display some pretty glasses) and I love them all the more because he made them out of leftover bits that would just have gone to waste.
Our current project in the kitchen: refinishing cabinet doors that have gotten a bit mucky over the years and ORB’ing all the handles. We’ve only done one set of doors so far, but it looks promising.
liz says
Really great use of space!
Thanks for the tutorial and awesome pics, as usual!
And I love the blue and white napkins, too!!!
Carrie says
I bought my husband the Bose small wireless blue-tooth speaker for father’s day – and it spends an amazing amount of time in the kitchen – wise move – you’re both going to love having music to rock out to! Also, love the runner. I recently bought a couple of runners for our hall but they keep slipping and sliding all over the place. At first I blamed the cats and kids…there’s got to be a way to keep them from moving. What would you suggest? How are you keeping your runner from running away from you? I tried to put a small slip pad underneath. But nadda. It’s still a problem.
YoungHouseLove says
Rug tape is pretty awesome (we discovered it while doing the showhouse for the runner in the tiled laundry room) so I’d give that a try. They sell it at places like Home Depot and Target I think.
-John
Jill says
Good job guys. That looks great.
BTW-that pic of little Teddy in the egg chair from the last post…sooo cute! He looks so soft and smushy. I sort of want to cuddle with him. Hope that’s not weird!
Jill
YoungHouseLove says
Not weird at all! I do that like it’s my job these days (bonus: it sort of is). He’s a cuddly little guy!
xo
s
Elizabeth says
I was NOT expecting that song…almost spit my coffee out!
Hilarious.
Crystal says
Wow, love it! You guys truly have the best ideas! Can’t help but notice your countertops as I’m about to do mine, just a few more things to finish in our new kitchen first. Please tell me your still happy with your choice and that yours isn’t scratching, peeling, sticking to the bottom of small appliances etc. I spent our whole (small) kitchen budget on new cabinets and tearing out walls so as of now ardex is my only option.
YoungHouseLove says
Sherry’s working on an update post about that among other items in the house. We know you guys like hearing (and seeing) how things hold up over time!
-John
Clare M says
DYING over the videos. Thanks for that!
Susan in Colorado says
What a great idea on that space!!
Back to why I am really posting.. the dramatic video (the 2nd one..)… I was SO disappointed that Barry White didn’t start singing. That’s all. :)
Push it YHL!! Just push it.. :)
YoungHouseLove says
Ha! I made that video back before YouTube let you use popular songs/artists (with a credit). Barry would have been perfect.
-John
Meg says
Fab addition, and very creative use of space! I just don’t have that sort of analytical/creative mind for home projects… but I’m working on cultivating it. :)
We spent most of the weekend at our new house — we move in this week! — working on re-caulking the seals around the windows in our master bedroom, using a razor to remove errant paint from where we got a little too wily with the new color, etc. We also bought hardwood floor for the upstairs and our carpet guy is due to arrive Wednesday to take our home from “construction zone” to “may possibly be habitable.” I can’t wait!
Pat S says
Pretty cool. Do you have a run down on how you made that console?
YoungHouseLove says
We built that console over the course of a few weeks and a number of posts, but here’s the final one with the links back to the others for you: https://www.younghouselove.com/2011/04/at-long-last-a-completed-console/
-John
Melanie says
Haha those videos were just the crack-up I needed this morning. I don’t know how I missed the original “sultry” video, but those were funny!
Jess says
Teddy is going to l-o-v-e pulling those napkins out and throwing them all over the floor!
Liz says
I love that you guys added function to an area where I probably would have just crammed my trash can. Great way to test drive an idea before phase 2! Those baskets should be pretty handy after phase 1 too.
This makes me itchy for the big renovation. Could you please just press the “TV instant gratification button” and make your expensive remodel done by the end of the hour? Thanks. ;)
YoungHouseLove says
That would be nice!
-John
Lindsay @ The Newlywed Notebook says
This is genius!! We recently remodeled the kitchen in our new house, and are debating taking out a cabinet to install a dishwasher (super weird our house doesn’t have one, since it was built in the 90’s…maybe the previous owners liked manual labor or something). But our issue with doing that has always been that we will be left with a weird space and no ideas what to do with it. Something like this would be PERFECT!! Thanks so much for sharing! Can’t wait to show the hubby when he gets home :)
YoungHouseLove says
So glad! Our first house didn’t have a dishwasher until we added one during the reno. It was SO NICE to finally have one!
xo
s
Instants de Louise says
Ha ! Ha ! I love Clara’s way of playing “hide ans seek”.
As we’re remodeling our kitchen right now, with doorless cabinet right now, I totally relate to that situation as our own daughter loves hiding there !
Tracy Carson says
Please picture this: Me casually reading blogs over my morning coffee at 7:45 in the morning with my 7 and 5 year old playing legos quietly around me. What a nice start to week during the summer break. A video? I think to myself. That’s fun, I’ll take a look…and suddenly our quiet early morning was jolted to life with the lyrics, “PUSH IT, PUSH IT REAAAALLL GOOD!” While the accompanying video was certainly G-rated, the lyrics and intense base made me laugh out loud and feel suddenly naughty with my morning blog reading!
YoungHouseLove says
Haha! I love that mental picture!
xo
s